Leaderboard




Popular Content
Showing content with the highest reputation on 04/20/2018 in all areas
-
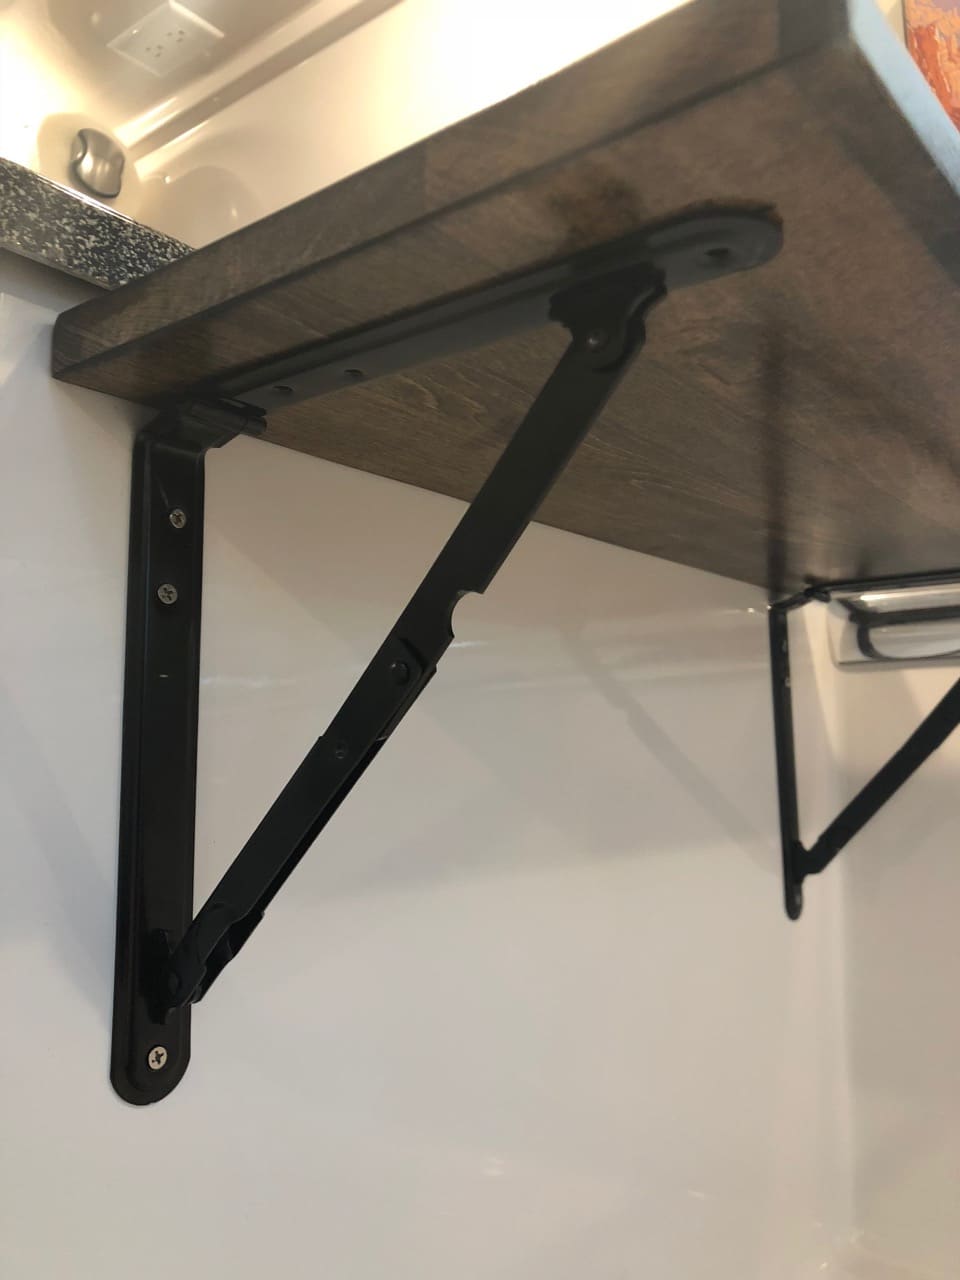
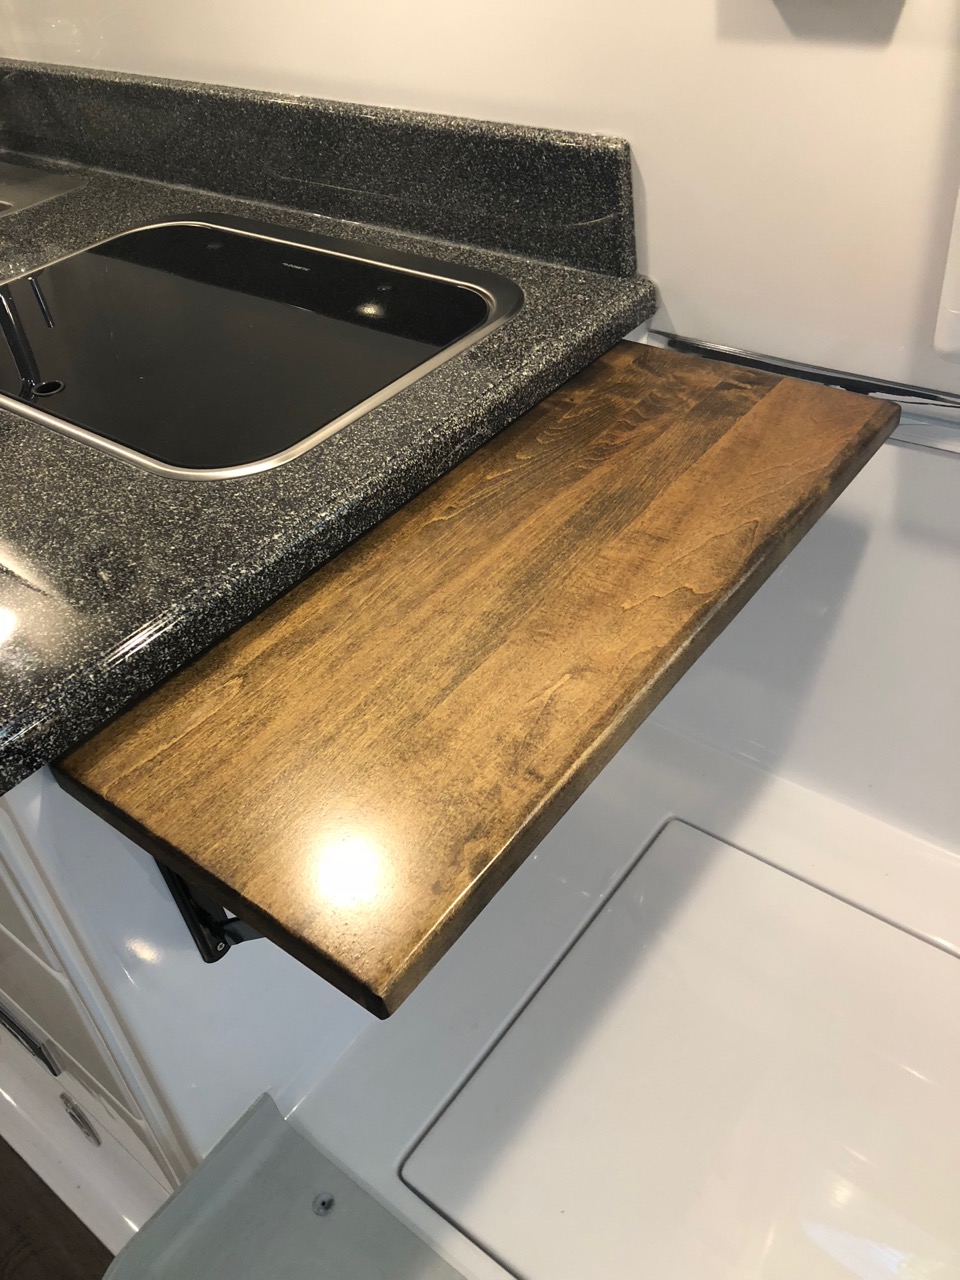
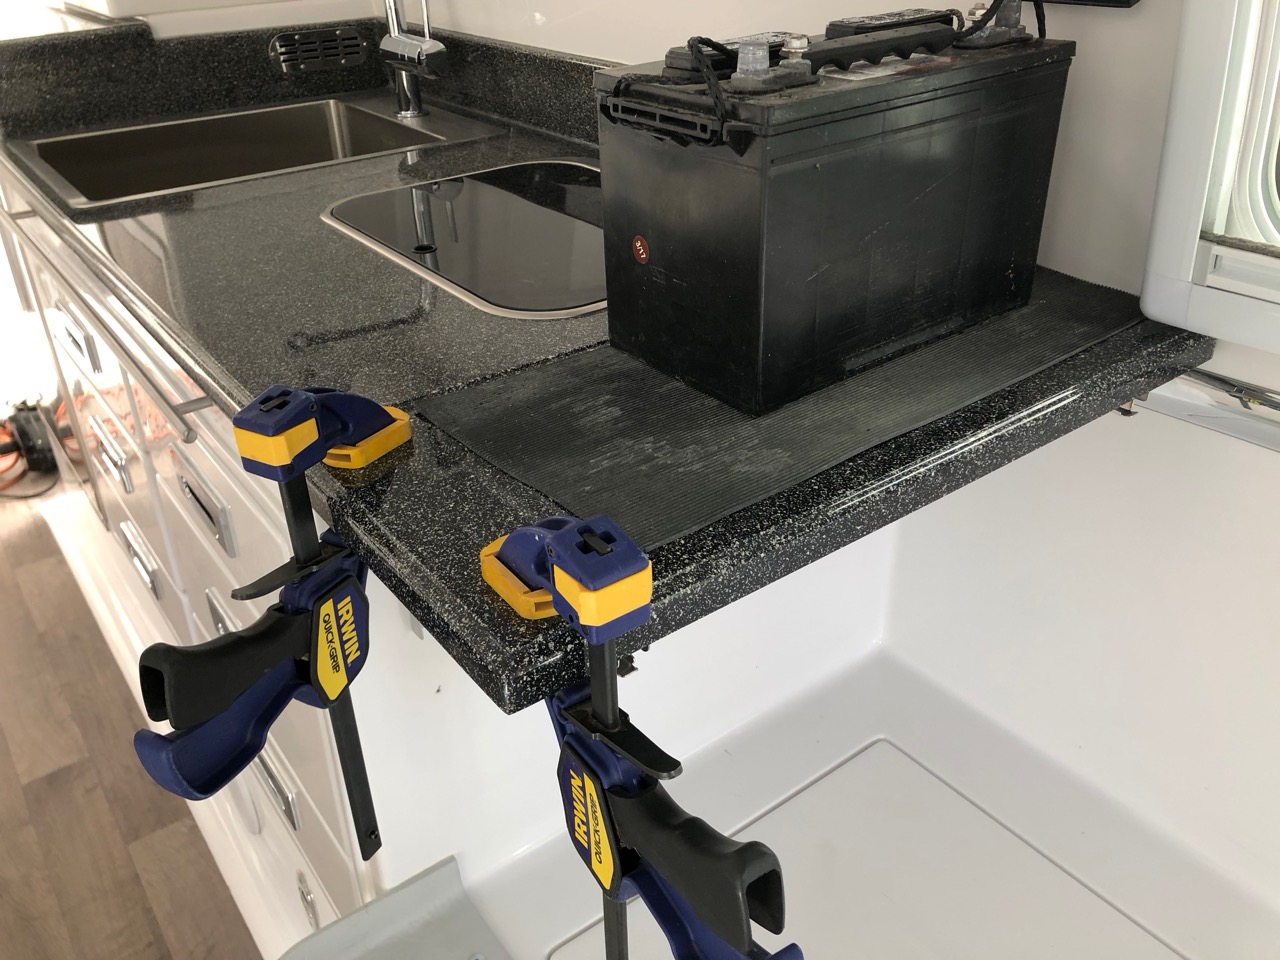
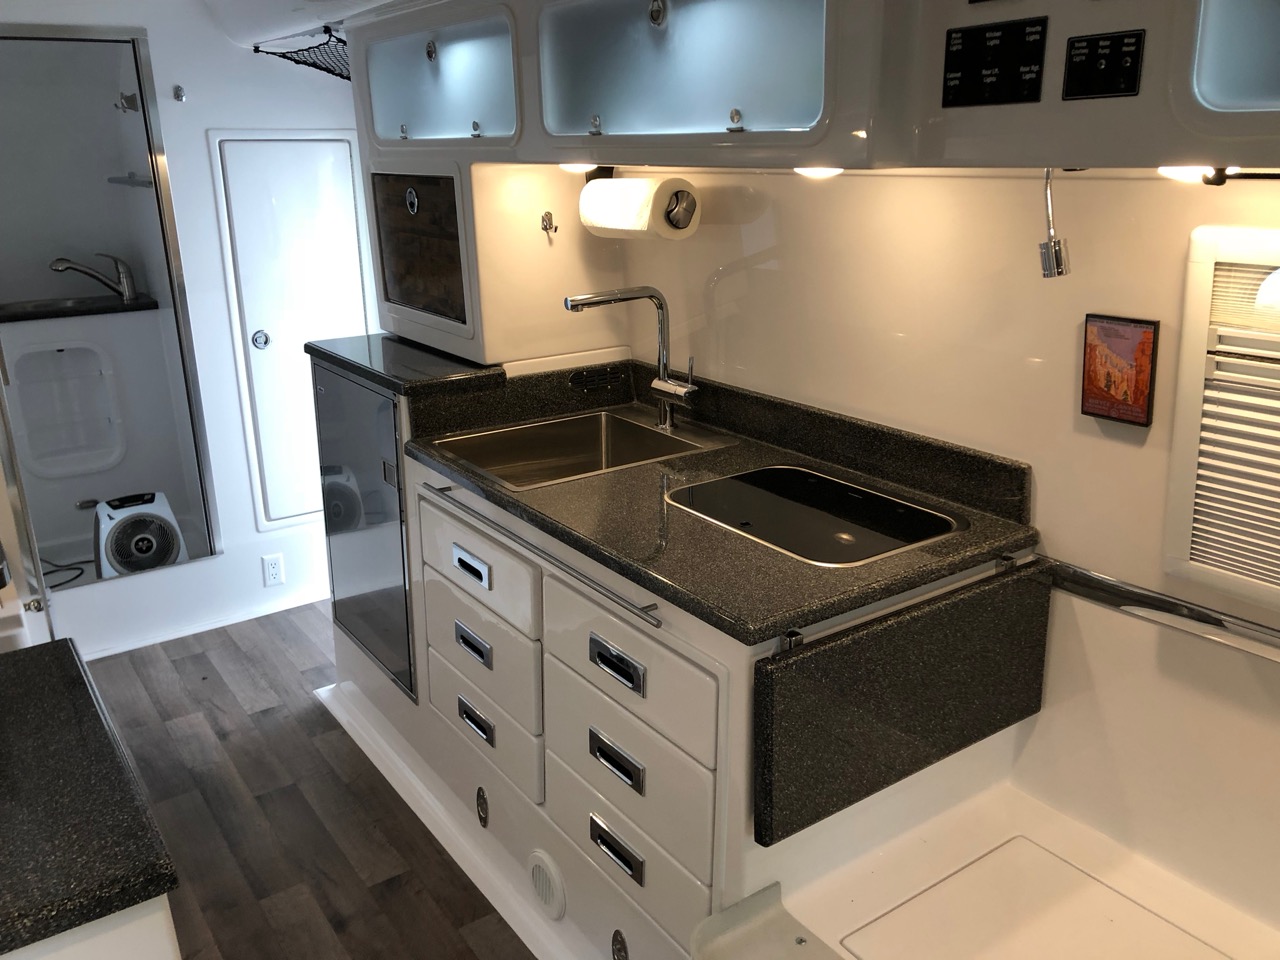
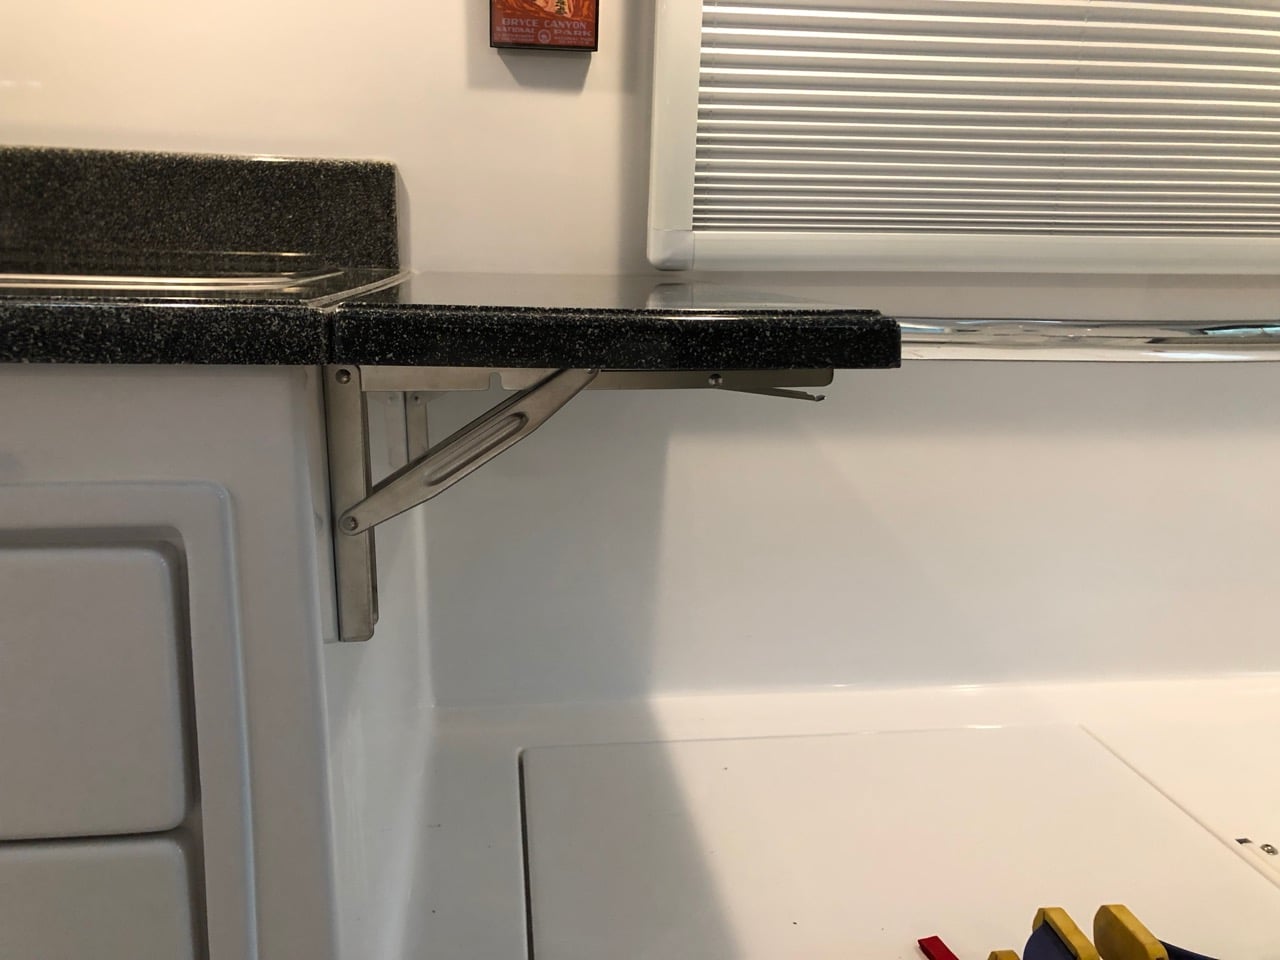
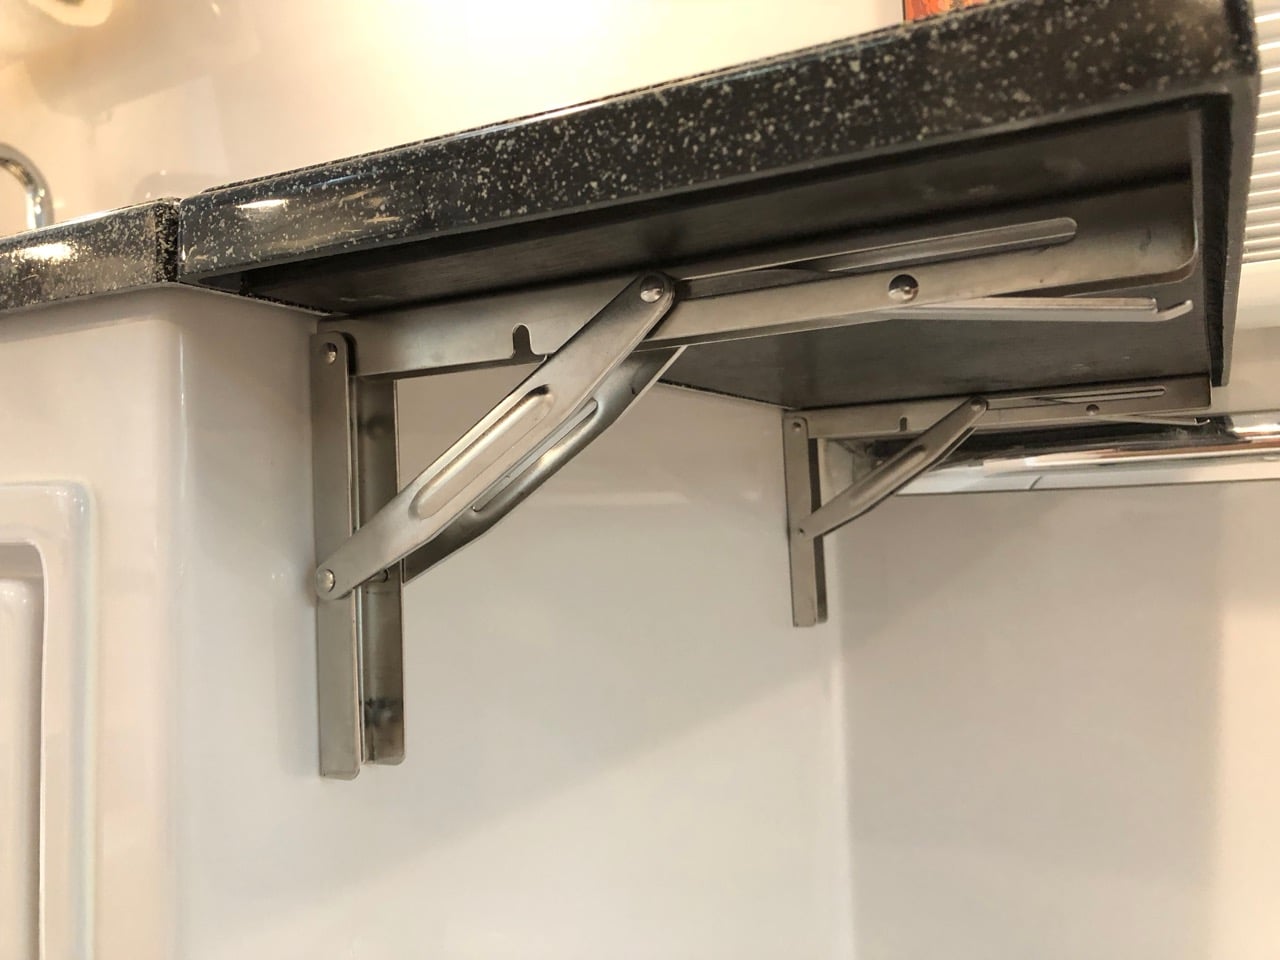
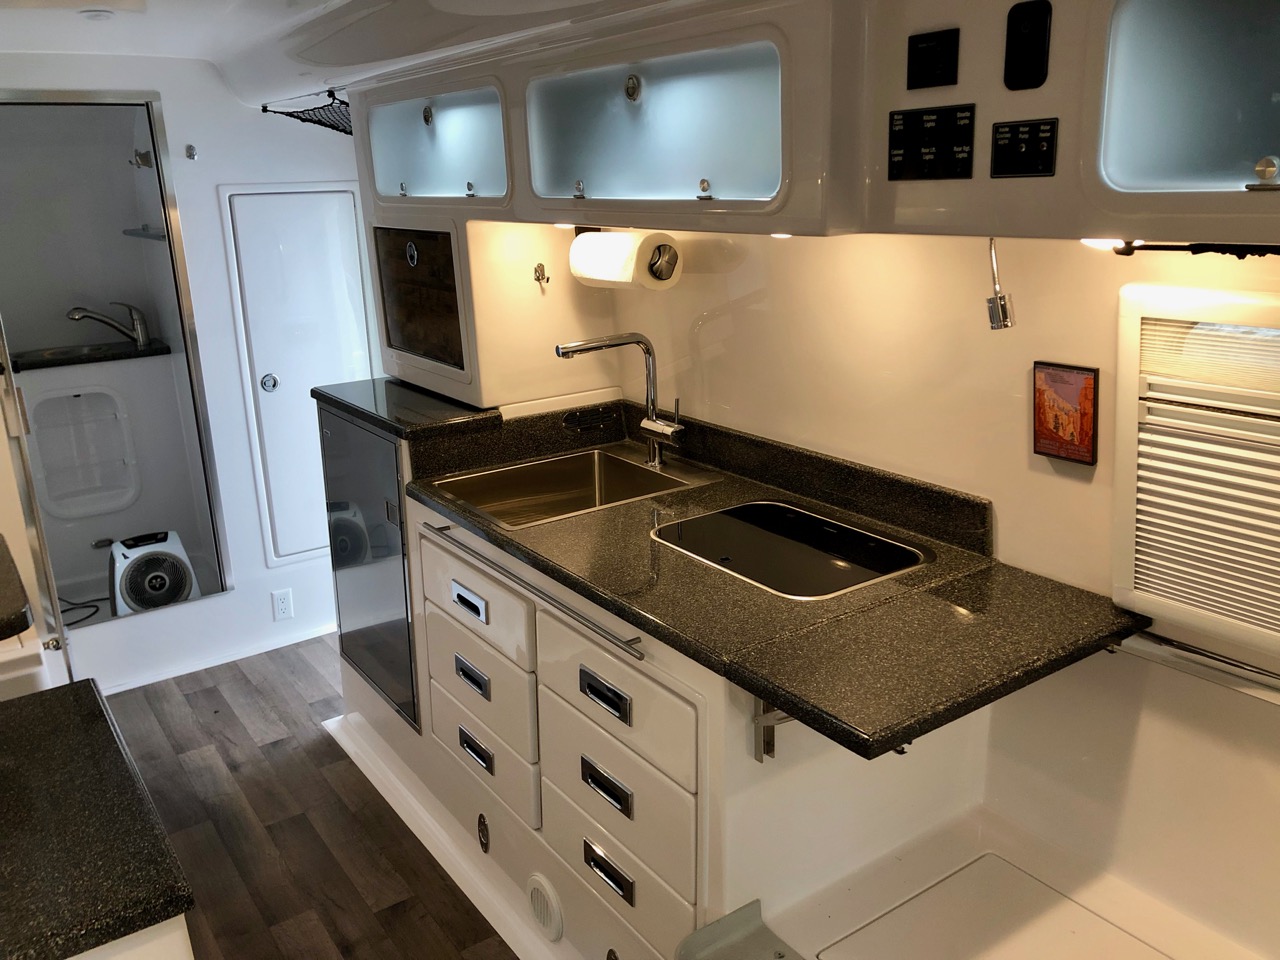
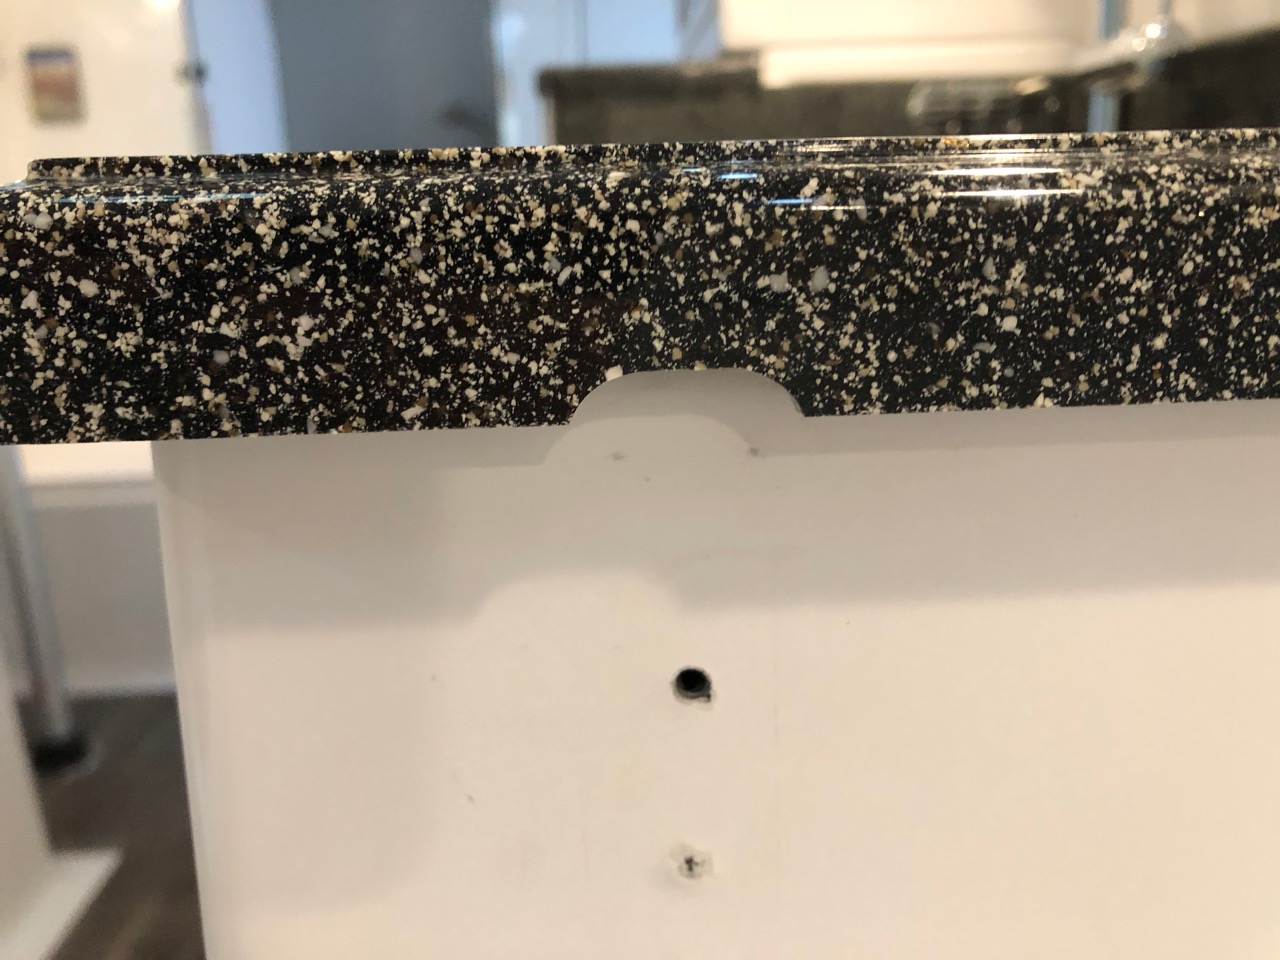
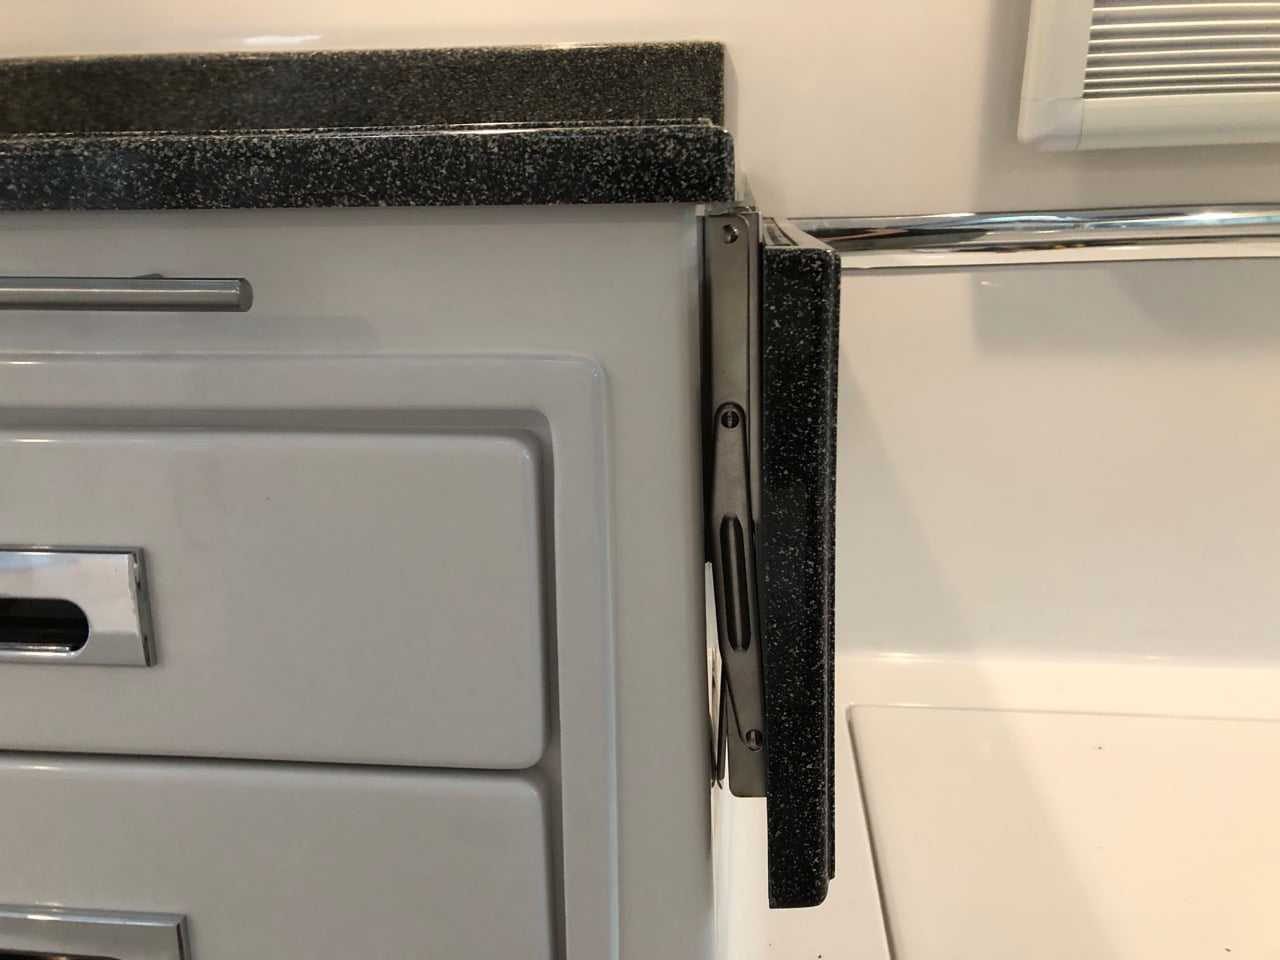
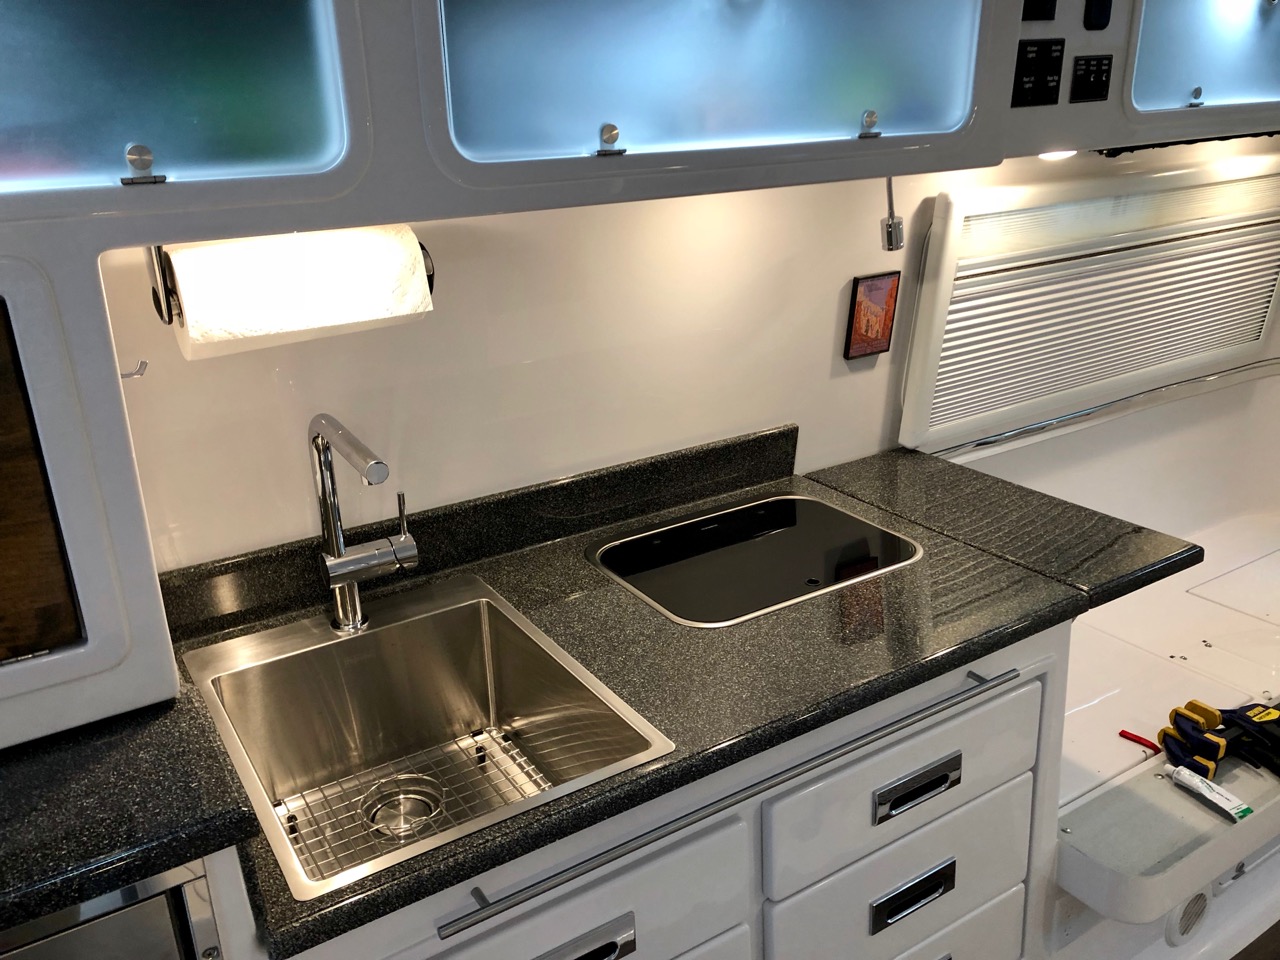
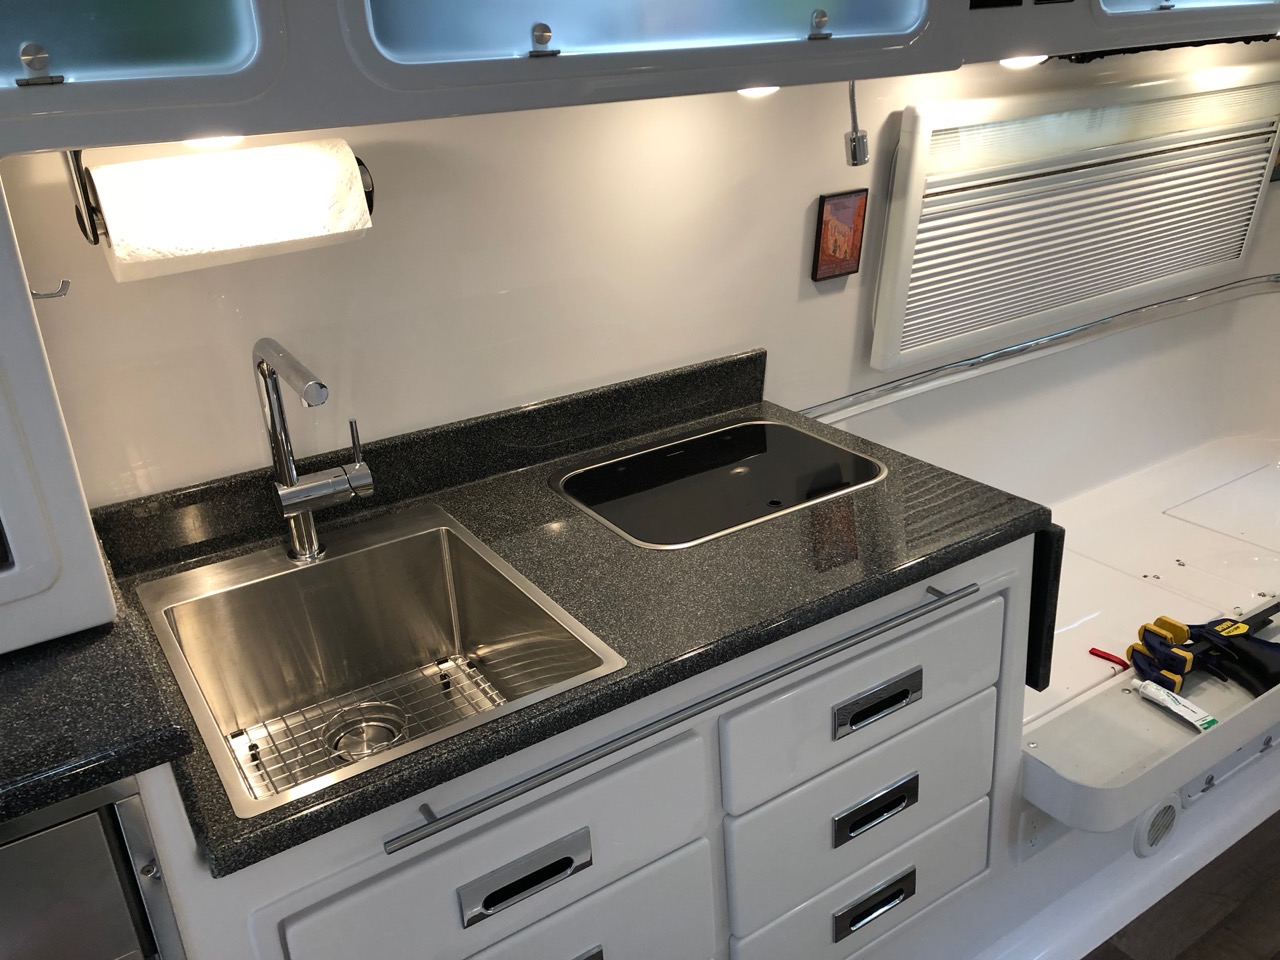
One of the things I asked Oliver to do for me was to install a 12" counter extension to the right of the cooktop that could be folded down when not in use. I figured we could use the extra counter space, plus I wanted a buffer between the cooktop and beds for splatter. This is what they came up with - This was perfectly fine and exactly what I was expecting, and we've really enjoyed using it. The only thing I didn't really like was that the hardware was finicky and just didn't work well. And the top ended up about 9" rather than 12", so it was a little small. And we had asked if they could make a piece of fiber granite to match, but they'd have to make a new mould for it so that wasn't going to happen. It also would have been nice if the extension were flush to the counter. So maybe a lot of problems. But we were happy with it nonetheless. But one day when I was running some wires through the pantry, I had removed the countertop beneath for access and just naturally set it down on top of the counter extension. Well, it fit perfectly; and thus, a new project was added to the list. I asked Oliver if they would sell me an extra top and picked it up when I got my trailer out of service a few weeks ago. I believe they charged $150 for it. Since I was redoing the top, I figured I'd search for better hardware as well. I found several options, but the ones that stood out were these from Amarine. They're super heavy duty and stainless steel. They work much better than what we had, and look nicer to boot. The only problem was that they were about a half inch too long for the countertop, so they'd have to be cut to size. But worth the trouble, so I ground the ends off a half inch. If you don't want to go through that trouble, my second choice was these, which are small enough to fit without modification. I cut a ½" piece of plywood that I could screw into to use as the base for the top. A ½" sheet will sit flush to the lip of the counter, which is what I wanted, but to make the countertop flush to the existing counter, it meant the hinges had to be high enough that I had to grind out a small notch for each hinge to clear. No big deal - btw, a Dremel with a small sanding cylinder works really well on the fiberglass, and leaves a smooth edge and no chipping whatsoever. Wear a mask. Here are the notches - The brackets are easy, just mark the holes, drill, and screw. I used ¾" #10 stainless on the bottom legs and ¼" #8's on the top. And 3M 4200 along each leg and on each screw going into the fiberglass to prevent it from backing out over time. Since none of the surfaces in the trailer are perfectly 90°, I needed to shim something to make the counter level. I considered grinding down the latch that holds the brackets at 90°, but that would have been difficult and if I ground off too much, I'd have to buy another bracket. Instead, I decided to shim between the plywood and fiber granite and then glue the top to the plywood with more 3M 4200, which I'm using so much that I've started referring to it around the house now as Snowball Glue. It's only about ⅛" max to shim - I used some stainless washers that I had lying about and just glued them down in each of the corners. I found that the top was a bit warped, so I had to weigh it down while the glue set - See, I knew lead acid batteries still had a use. I let it sit overnight and in the morning, I had what's in the photo above. Cool. BTW, if you want to do this and have mattresses, then you'll want to check their thickness to make sure the extension will clear when folded. Measure down 12" from the bottom lip of the counter. If your mattress is below that, you're good. If you have cushions, then no problem, but you'll need to move one of the back ones out of the way when raising or lowering the top. More pics -
 4 points
 -
Due to the propane enclosure and the main trailer body being separate I could easily see the relative movement between the two. When the trailer stopped, I could see some flexing. I would expect to see a little but, what I saw was way too much so I looked under the tongue area.2 points
-
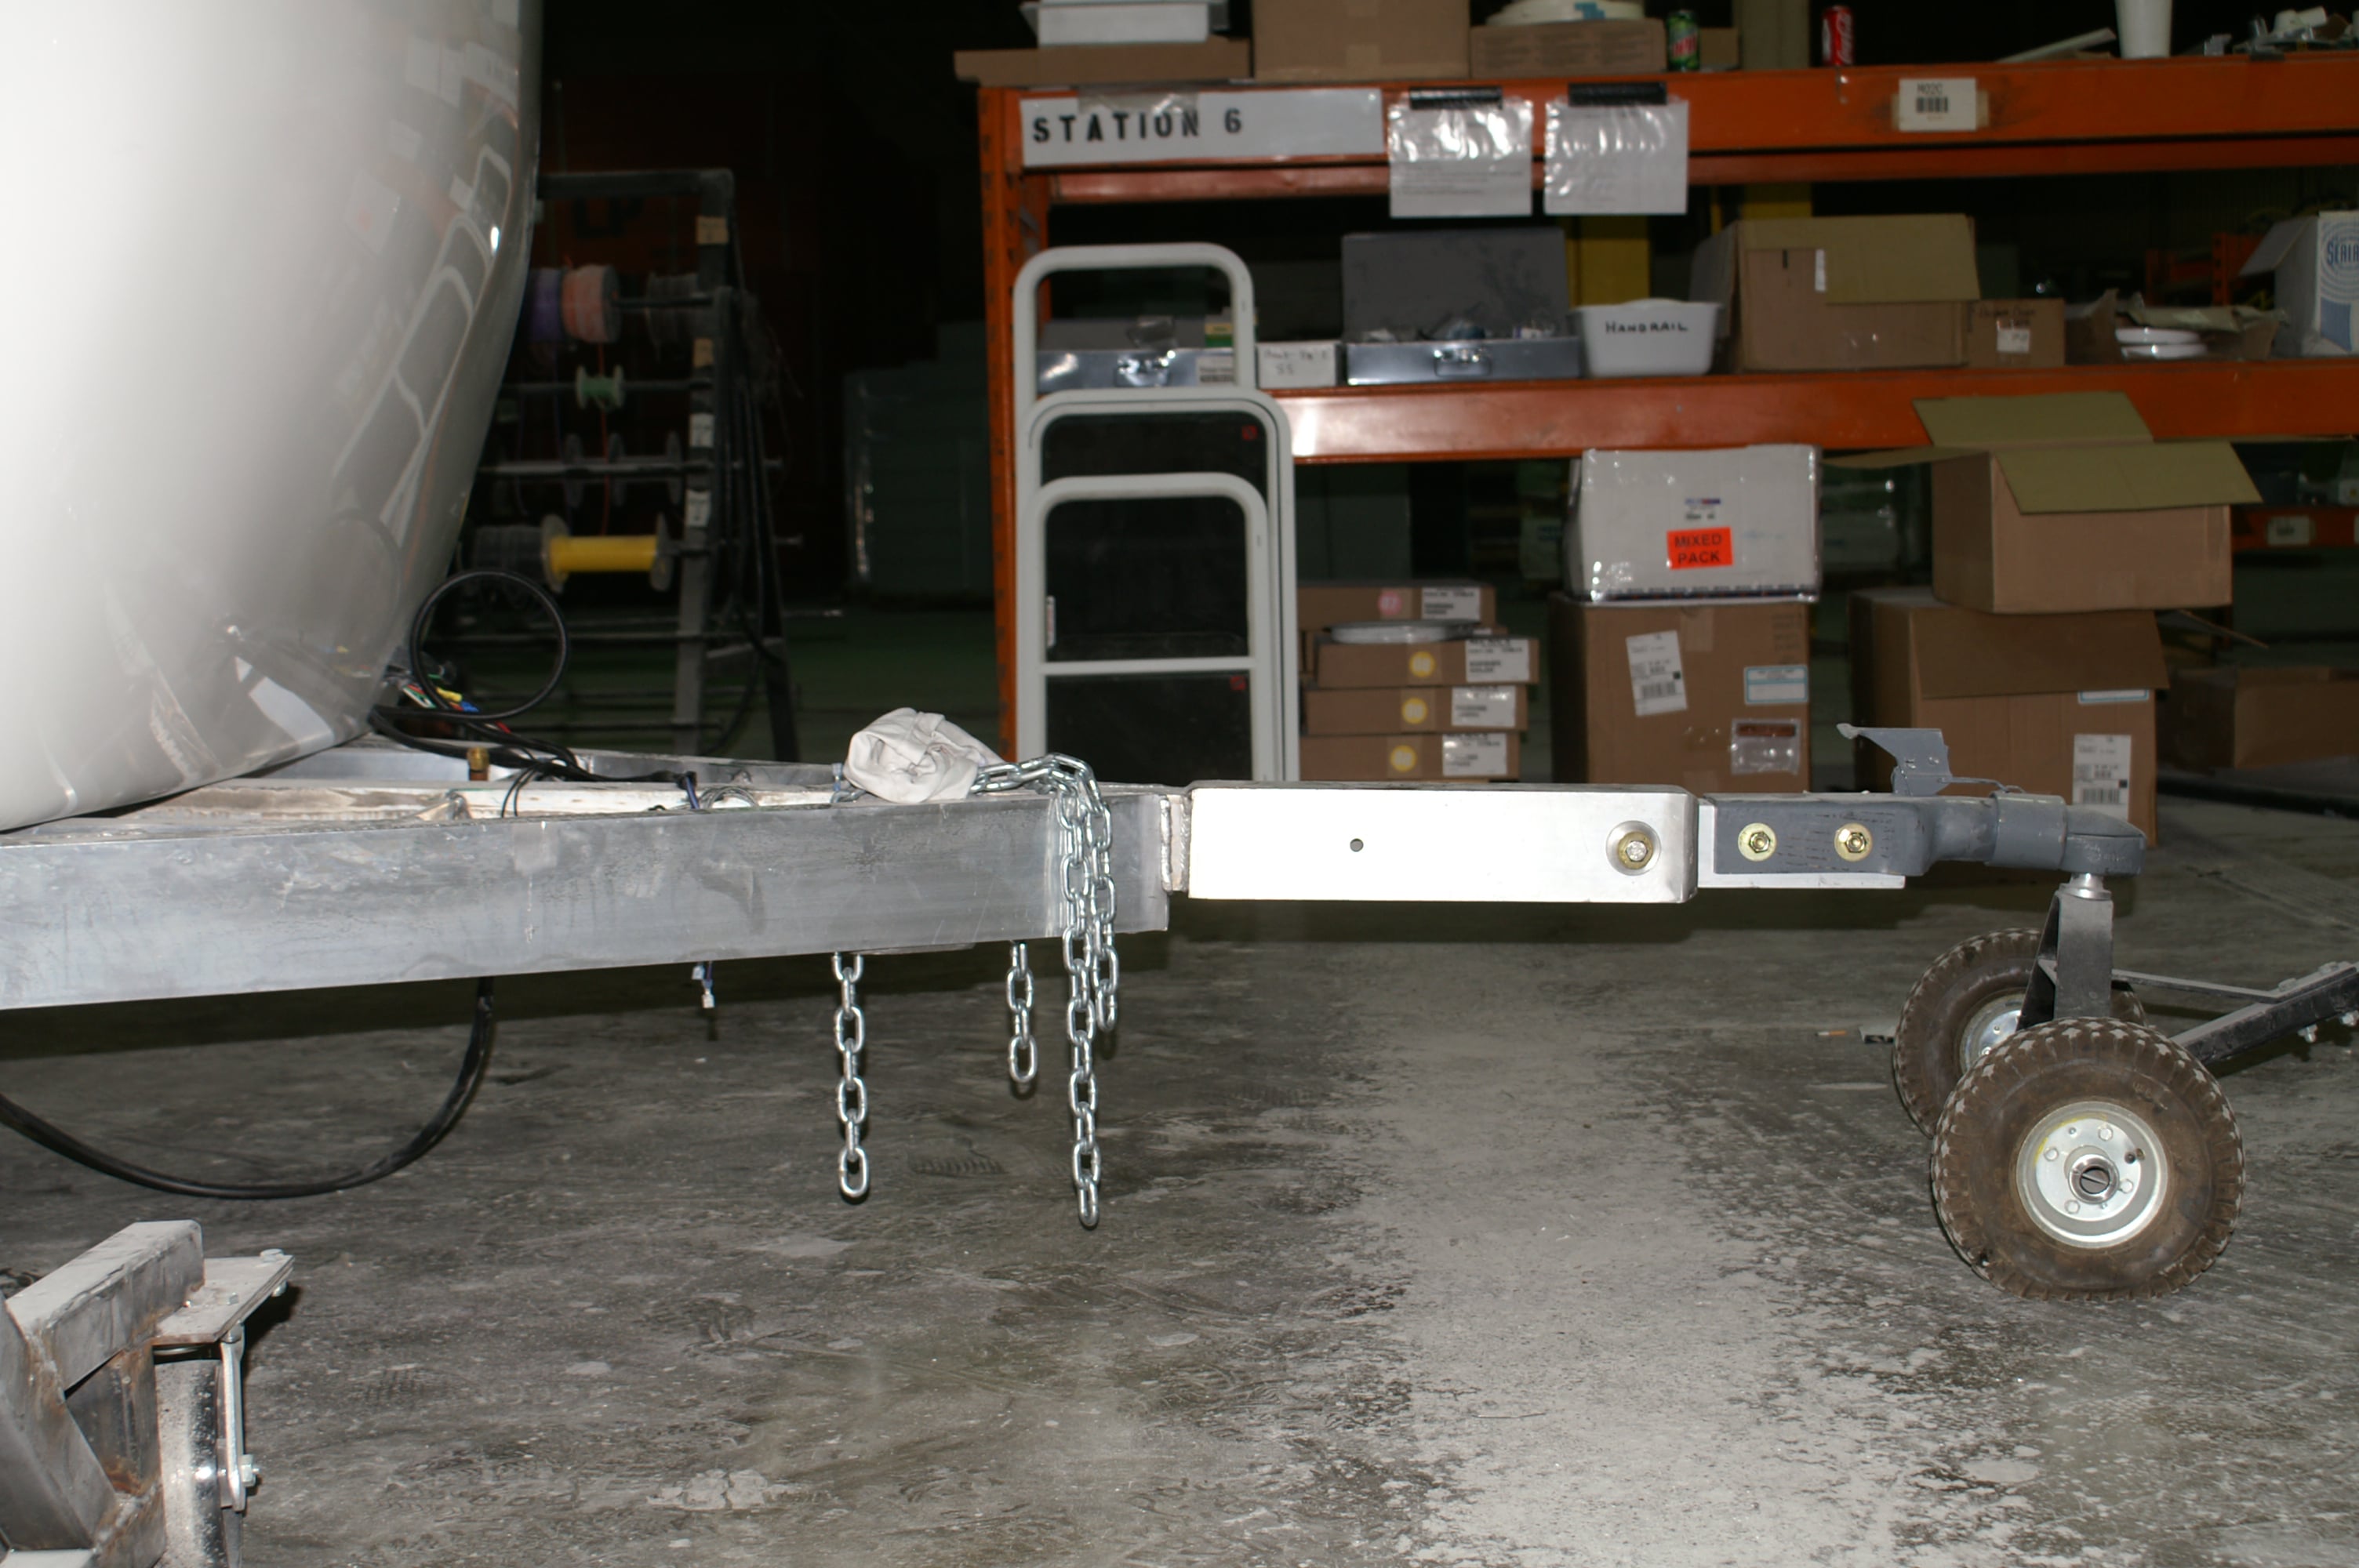
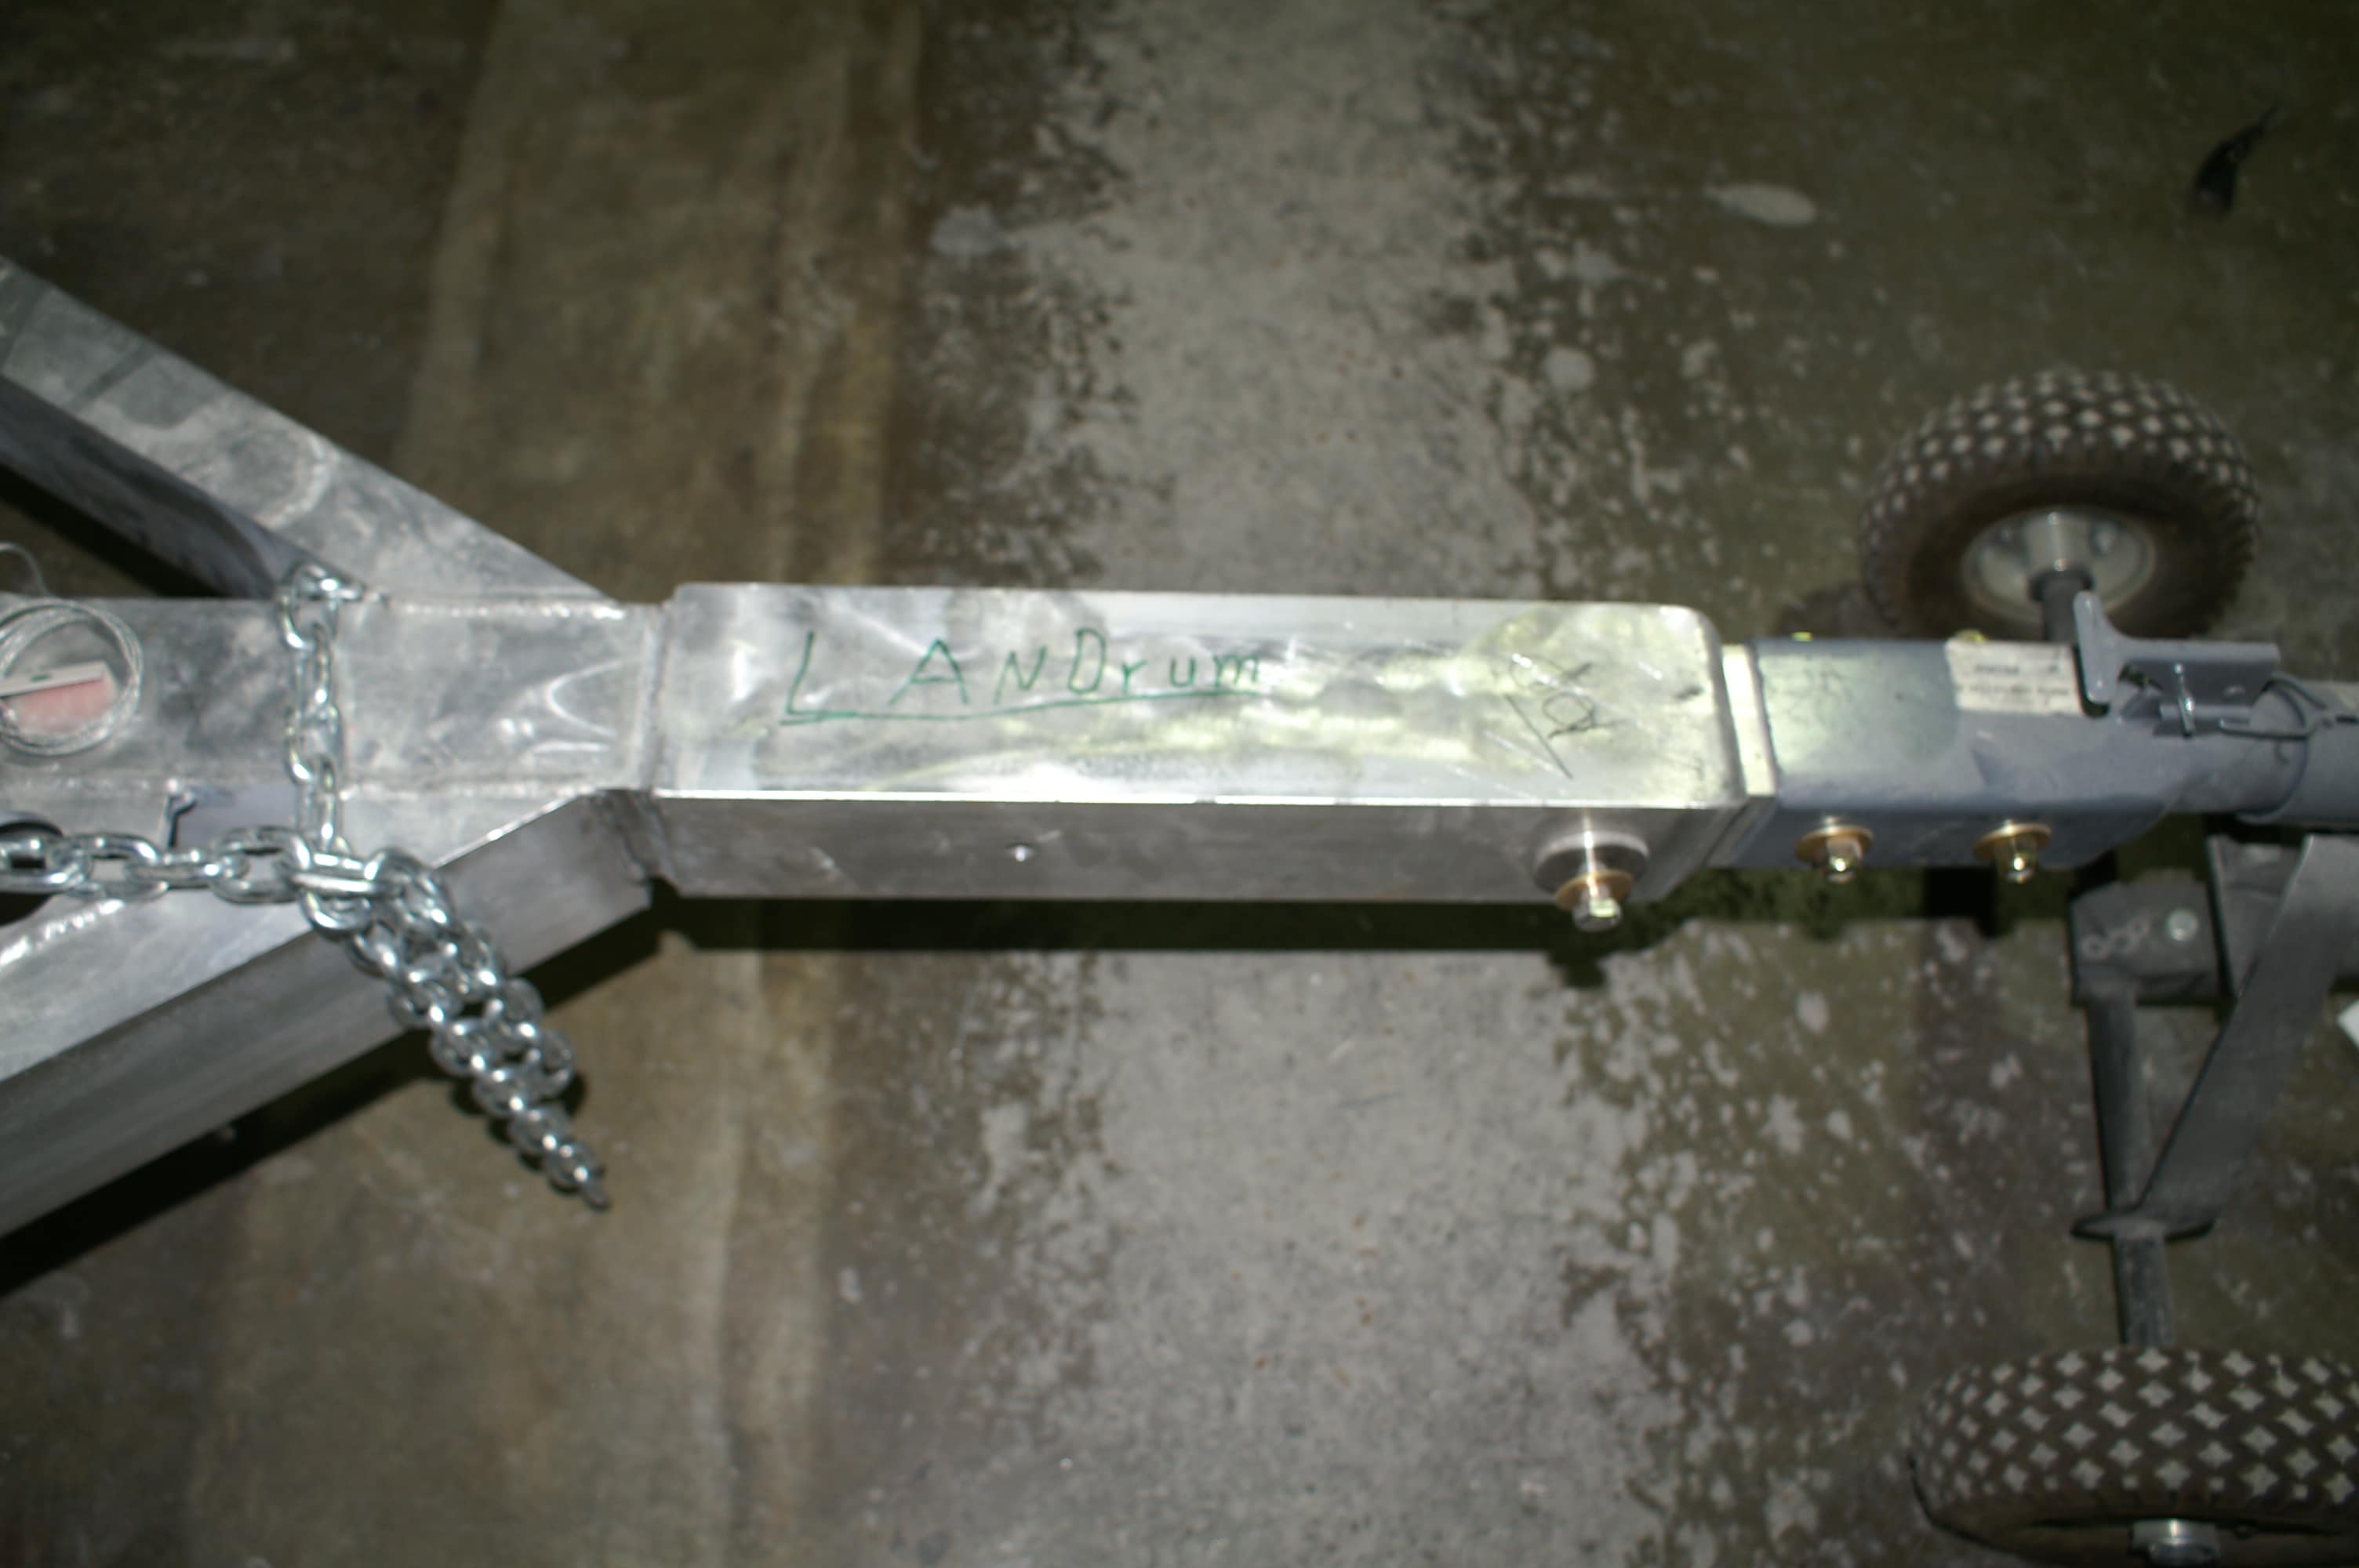
A big thank you to Steve and Tali for the detailed explanation. Sounds like the failure is about what I expected. As I posted earlier, I saw and immediately recognized Outlaw when I went to pick my own trailer up from service. The steel braces were pretty obvious so naturally I had to inspect. I wasn't going to post about it on my own, for the reasons above and because I thought it was Steve and Tali's business to bring it up if they wanted. But once the photo was posted, I figured the cat was out of the bag, and so I asked. Having seen the damage in person, I'm in full agreement with Steve and Tali on the cause and the no call for alarm. It was clear to me that the problem was unique to their trailer, or perhaps to the first batch of early trailers, if they have similar frames. Being able to stand there and see both frames side by side, you immediately recognize that they're two different animals. Steve mentioned the longer tongue, but also the aluminum tubing is sized differently and the joints lack the same gusseting that our frames have. And the steel subframe is larger as well. Even the welds were different. With a longer beam (tongue) you get more deflection for a given load, and more deflection means more stress on the beam over time which, especially in aluminum, can lead to eventual metal fatigue and failure. But that's only if you exceed the limits of the material. DeHaviland Comets would break apart in mid air, but we still fly around in aluminum framed jets because they learned how do design out the weaknesses. I think the current frame is far more robust than the original and I'm personally not worried that mine's going to snap anytime soon, if ever. I didn't post the photo that was removed, but I did take a bunch for myself, simply because the repair job was so excellently done that I wanted photos to be able to show a repairman, should anything similar ever happen to us. Which I don't expect to happen. However, I am glad that this did become public, because it is potentially a catastrophic failure, and unlikely as it may be, I think people should add a frame check to their list of annual, or pre-trip maintenance checks. In the unlikely even that this should happen, you want to catch it early. I guess there's no way of knowing how quickly those cracks propagated through the frame, but since there was no evidence of any bending, like you'd see if it happened suddenly, I suspect it took some time. Had it been detected earlier, perhaps some less comprehensive repair could have been done. Anyway, you guys all know by now that if I have a problem with Oliver or the quality of any part of their trailers, that I am immediately here voicing my concern. This obviously was a big failure, but it didn't make me concerned. My take aways were this: 1) Inspect the bottom of the A-Frame at least once a year and probably before every major trip to check for possible cracks. They'll start at the bottom and work their way up, and would probably be located near one of the welded joints. 2) Think twice about placing a really heavy load permanently on the tongue. This is subjective, but I personally don't know if that's a good spot for heavy generators, water, fuel, etc. It may be perfectly fine, but that's my take. Especially if you also have the larger propane tanks. 3) Be wary of any modifications that would require drilling into the frame in that area. 4) in the very unlikely case that your frame does develop a crack, Oliver will take care of you.2 points
-
We were told no on a couple of simple request too. After seeing some crazy mods going on when we took the factory tour and talking about them with Brent I fully understand why they stopped. They were holding up the line big time and had to do something. The Oliver is a great trailer the way it is offered and with the options list they offer it is over the top. Escape also used to do almost any request you could think of and stopped just before we ordered ours for the same reason. They cannot be expected to hold up the line for custom requests that will affect production so for now they have stopped all custom work to concentrate on quality which was fine with me. I was able to get the bath mirror lowered 6" for my wife. :-)1 point
-
The modifications they did for our camper were completed during the build if we requested them and they were approved before the trailer was too far down the production line. A few things the service department did because I requested them too late. I found that totally understandable. I am sorry to hear the answer is mostly “no” now. I too love your logo!1 point
-
That’s a go for us, two for zip line Saturday @1pm. Thanks for organizing this thing!1 point
-
Between your fancy new sink and your counter extension, I am having a case of serious kitchen envy! Thanks for sharing.1 point
-
Certainly I feel your pain. When one reads the story about the Outlaw Oliver and the "custom" work that was done there (and elsewhere) and compares that to what appears to be the current situation, I'm sure that it can be a bit frustrating. Even what appear to be fairly simple requests are met with the same response - "no". However, it seems to me that this looks like a case of "be careful of what you ask for". We, as a group, clamored for better quality and subjected the Company to a fair amount of abuse/criticism (justified or not) over these types of issues. Then, when the Company decides to concentrate on quality by limiting the number of deviations from the norm (custom work), once again we find ourselves in the position of not liking the result. Hopefully, one day, the Company will once again find itself in a position where they can accept custom work. I believe that I have a better, more comfortable and enjoyable camper because of the suggestions of the owners that came before me. But, in the final analysis, I'd rather have a quality unit that I can then modify and or customize later than a lesser built unit with a bunch of bells and whistles. Bill p.s. cool logo!1 point
-
Goodness! Kudos to MountainOliver for saving Steve & Tali's glass. I'm curious, what did he see happening that caused him to check under the trailer?1 point
-
When I first got my Oliver I would have liked to put up a paper towel holder like the one I have at home, that has tension that makes it easy to rip off a single sheet one handed. But at that time I was afraid of drilling into the fiberglass. For a paper towel holder I got a simple white plastic unit and attached it with double stick tape. But the one at home is much better. Then, one of my projects this winter was to relocate the TV using the excellent strategy outlined by Mike and Carol. Not only drilling thru fiberglass, but a hole saw! So now I may put up a new paper towel holder. Rather than the SimpleHuman model recommended by Overland and John Davies, I will get the Kamenstein model that I have at home that I like so much. Both models have great reviews, and both have a tension system to allow you to rip off a single sheet with one hand. However, the SimpleHuman model is $26, while the Kamenstein model is $15.1 point
-
The paper towel holder is this one. We really like it - it has a spring that keeps the roll from unrolling while traveling, which also gives it just enough tension to make it easy to rip of a sheet one handed. The nets I'll need to take some photos of and post about. It's a simple mod that has really helped out day to day organization. We have them over the front door, over the beds, etc. I'll see if I can take some photos and maybe put them into the Snowball thread later today.1 point
-
This is nonsense. There are five active moderators, all owners just like you. There is no censorship going on except in extreme cases (remember bugbite?). None of us are zealous. If there is a questionable post or photo we consult with each other. I have had photos disappear from my own posts - my Television move thread had a number of photos disappear. Let’s not point fingers with no facts. Mike1 point
-
Steve, I am also glad to hear that everything will work out for you on this. While I understand and agree with your belief and faith in the Oliver company and people, I am saddened to see that someone felt it was necessary to remove the photo that had accompanied someone else's post. I understand the desire to defend and almost protect those that we close to, but doing so almost makes such an action look like a cover-up where there is someone to hide. All one needs to do is read the post about Goodyear tires on this very forum. The A frame area on an Oliver has two angle sections and the straight sections, the center of which is the tongue, which runs from the coupler to the main body frame, the other two straight sections are welded into the middleish area of the angle pieces. Judging by the single photo, that had been posted here, that appears to where your failure occurred, the outer steel plates were centered over this section and backer plates were used to completely encase the "V" junction where the straights are welded in. The reinforcements were done exceptionally well, after seeing some of your other creations for your trailer, I imagine your were very closely involved the actual creation of it. You'll notice that I seem to have payed pretty close attention to what could be gleaned from that one photo, before it was removed (I admit, I recognized what it represented and what would happen and saved a full resolution copy as soon as I saw it, for reference) for good reason. We purchased our 2015 used in the spring of 2016, never having owned a trailer before, I was all over it, around the same timeframe Buzzy purchased his trailer and was posting all his photos and videos, one of his photos caught my eye as being quite different than what I remembered from it trailer so I went out to compare, somewhere between hull 069 (ours) and Buzzy's trailer, the Oliver company decided that the welds on the earlier model must have been inadequate, the method on our trailer had been direct welds of the straight section to the angle, on Buzzy's trailer they had started to place corner braces into the angles and fully welded then in to strengthen the joints. When I crawled under the trailer and checked the differences, I noticed that the street side weld on the angle joint had in fact actually started to crack, while it had my attention I was not overly concerned, in my planned trip cross country I was already scheduled to stop at the factory, for a fiberglass repair. I mentioned the difference to them when I got there and they welded in after-the-fact bracing to match what was now being done. This can be seen in my XO photo mentioned in the off-road recovery post. While I understand your thinking, that with your trailer differences, that might be the cause, I would tend to disagree, what appear to be the failure point do not line up with either an extended tongue or what extra weight might cause, it is the center of a long section where everything is mainly supported by those long sections. While I do not normally subscribe to the the-sky-is-falling mentality, I do believe that Oliver should contact all known owners, that have trailers built before the reinforcements, to alert them to check the areas mentioned proactively, before someone, who doesn't have six pairs of eyes watching their trailer being maneuvered, has a catastrophic failure that would be a lot worse representation of company. Hopefully, this post survives too.1 point
-
We should have it back in a few more days. We WILL be at the rally WITH the Outlaw Oliver. I am looking forward to seeing all our old friends and meeting lots of new ones. This event will turn out to be the best one yet. Thanks! Steve1 point
-
I am getting back into the swing of things after dealing with some family issues of late. I think that there may be some confusion on what may be going on with our trailer. Please notice that my first (and, at that time, only) post in this thread was made back on 08/28/2013! So, just to bring everybody up to speed, that Outlaw Oliver was our Hull # 026 and one of the original ones built back in 2008. We were selling it in anticipation of getting our current Outlaw Oliver (Hull # 050) in early 2014. Thanks, Overland for your comment about Storm, we do miss him. Reacher, on the other hand, is now almost 5 years old and weighs nearly 100 pounds. And don't worry, the extra 18 inches is still there, the nomenclature just changed. As to what is currently happening to Hull # 050, a little history is in order so please bear with me.... After building 49 trailers between late 2007 and early 2009, the production line at Oliver Travel Trailers was shut down due to the down turn in the economy. These 49 units included 46 of the seventeen (now 18.5) foot trailers and 3 of the larger twenty two (now 23.5) foot trailers. All during this hiatus, Oliver kept saying that there would be future trailers built. And although it took almost five years, true to their word, I got a call on 03/03/2013 from then sales manager Robert Partee. He asked me if I would like to own one of their “big” trailers. At that point in time, we felt we had outgrown our smaller Elite (traveling with two adults and three dogs) and were actually considering selling the Oliver and getting (horrors) some other brand. After speaking with Robert for less than 5 minutes I stated, “I’ll take the first one you build.” and then quickly enquired as to when I might expect delivery. As it turned out it would be over a year. For anyone who does not know, this trailer is one of the first three that were in production at the same time during late 2013 and early 2014. It became the first of the Elite II’s that was sold to a customer. During the build I was at the factory at least every other week “overseeing” the work being done on our unit. During these visits I made several requests for non-standard accessories, most of which Oliver graciously agreed to. The biggest (and in retrospect, the least wise) request that I made was for the frame to be constructed with a longer than standard tongue to accommodate the generator basket that I planned to mount there. Twenty three inches was added and the Outlaw Oliver II became the first and only unit with an “extended, extendable” tongue. Fast forward to 2018. We had been on our annual winter pilgrimage to Quartzsite, AZ accompanied by mountainoliver and hardrock. On the return trip we were stopped at the Walmart in Winslow, AZ for the night and positioning our trailers with their butts into the wind in anticipation of 40-50 mph gusts that were predicted for the night. While jockeying mine into position, mountainoliver noticed something he didn’t like and when I stopped, quickly scooted up under our trailer. Coming out he grimly stated that “we have a problem.” The “problem” turned out to be cracks in both outboard A-frame members that were causing the trailer to flex at that point. The only thing holding the body of the trailer to the truck was the tongue. Progression of events since that point: I immediately called Scott Oliver and then Jim Oliver for advice. Jim Oliver drove from Lake Havasu City spending a night with us to see the damage and assist in any way. A plan of action was made that included temporary repairs locally and replacement with a new frame at the factory. We found a metal fabricator in Winslow that agreed to make the temporary repairs so we could safely get the trailer back to Hohenwald. Three days later we are on I-40 headed East. Two weeks later, after unloading at home (who carries that much stuff) we take the trailer to Hohenwald and leave it. A new frame and sub frame are built to the new standard. I go to the factory to observe the body switch. The entire trailer and old frame is lifted and placed on multiple jacks under the frame. The old running gear (Axles, Wheels and Tires) is removed from the old frame and installed on the new frame. Support blocks are placed under the body of the trailer which has been completely unattached from the frame. The old frame is lowered away from the body and rolled out. The new frame is rolled under the body and lifted into place and attached. So what happened to cause all this? Our best guess is that my longer tongue with its additional weight (200 lbs worth of generator and basket) bouncing up and down during about 50,000 miles of travel simply had too much leverage and caused additional stress at the failure points on the frame. I want everyone to understand that Oliver has handled this matter in an exemplary fashion. Although this is the normal standard to which they always hold themselves, I could not have asked for greater service. The whole team has been wonderful. This trailer will truly be better than the day it rolled off the assembly line. I understand everyone’s curiosity and I appreciate everyone’s concern but please be aware that no other trailer Oliver has ever built has a front end set up like mine. As this is obviously a unique event, there is no cause for concern with your units.
1 point
-
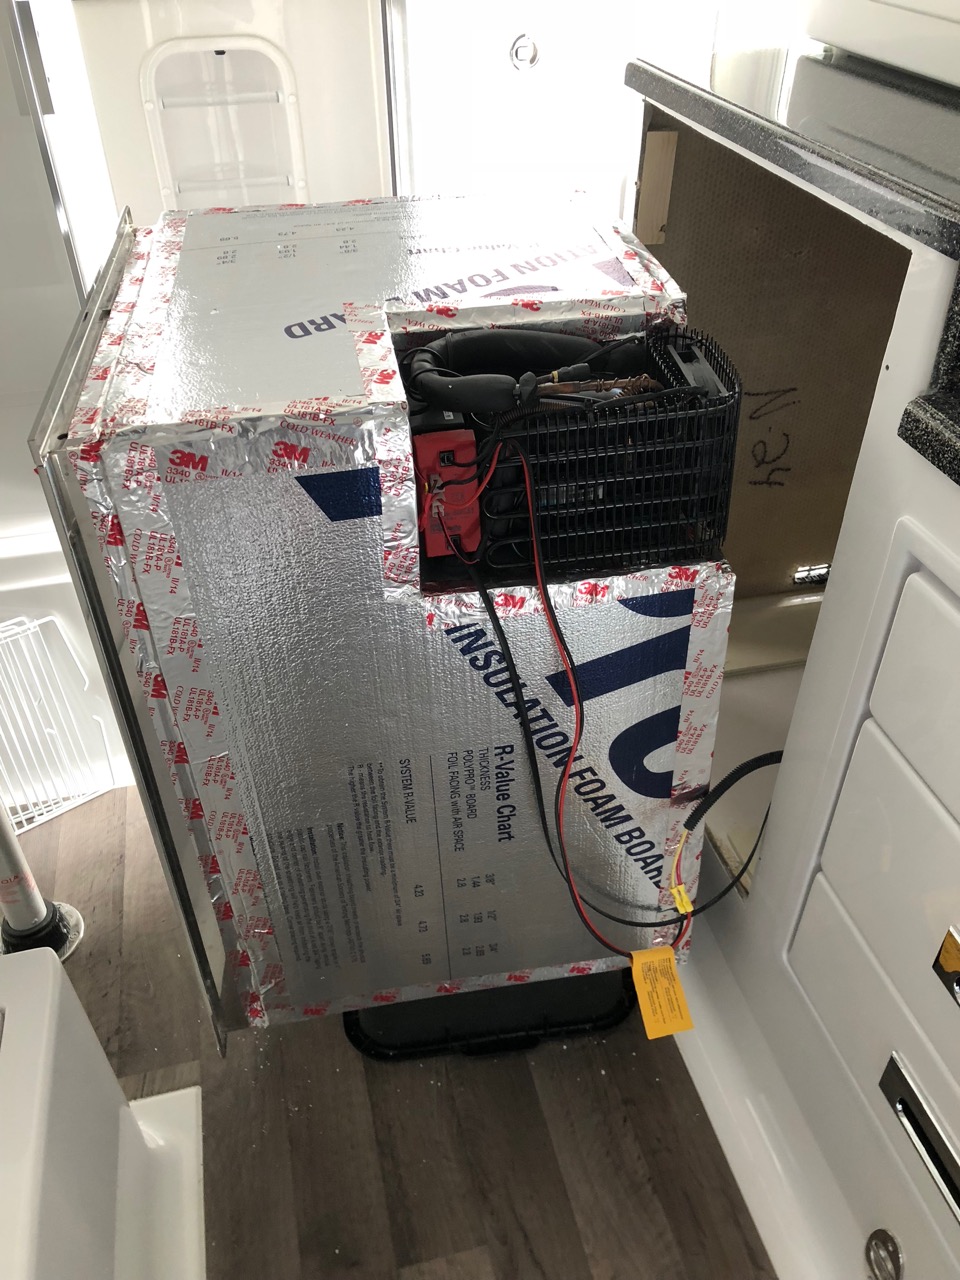
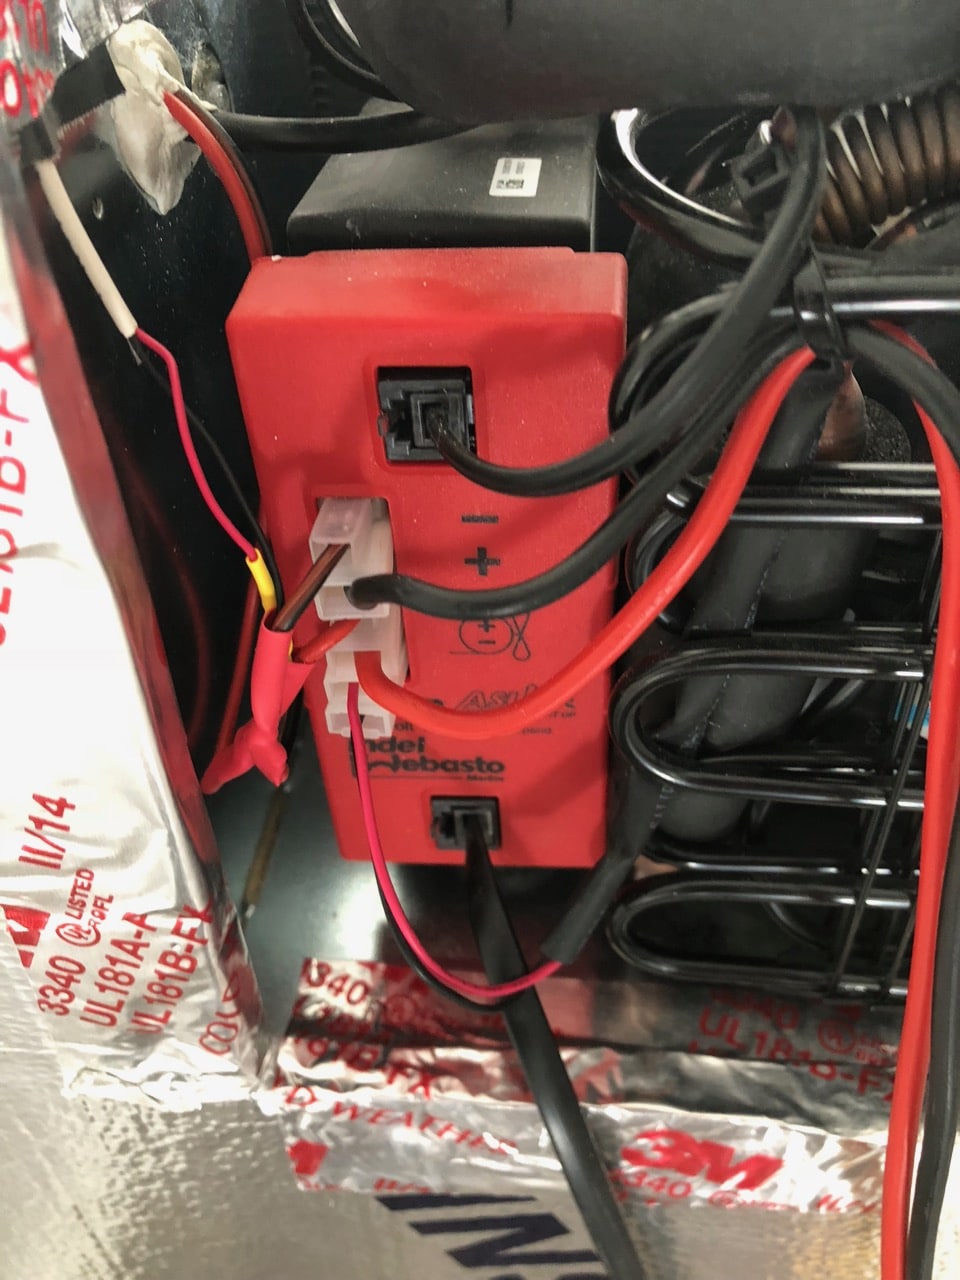
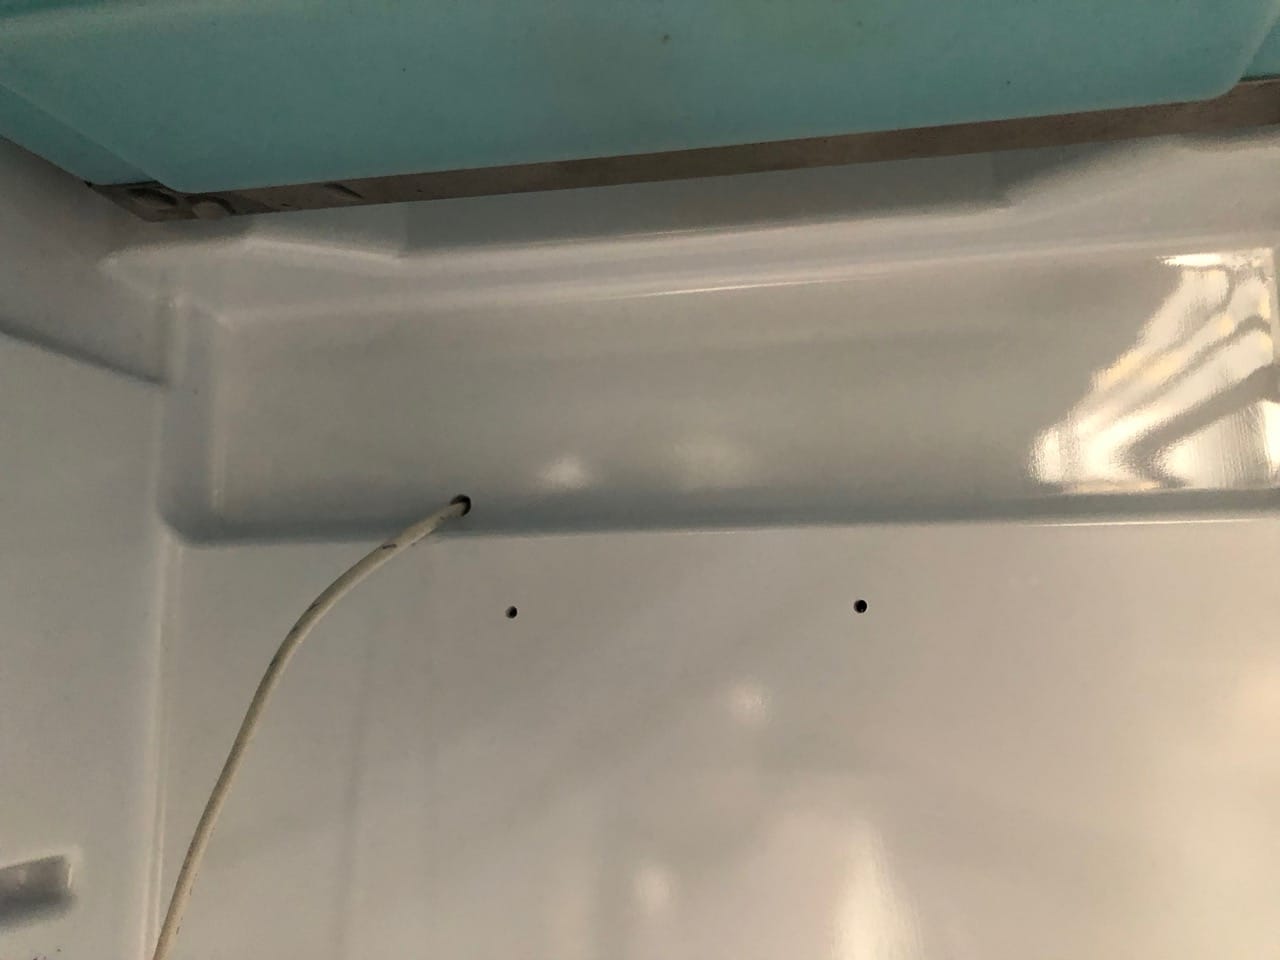
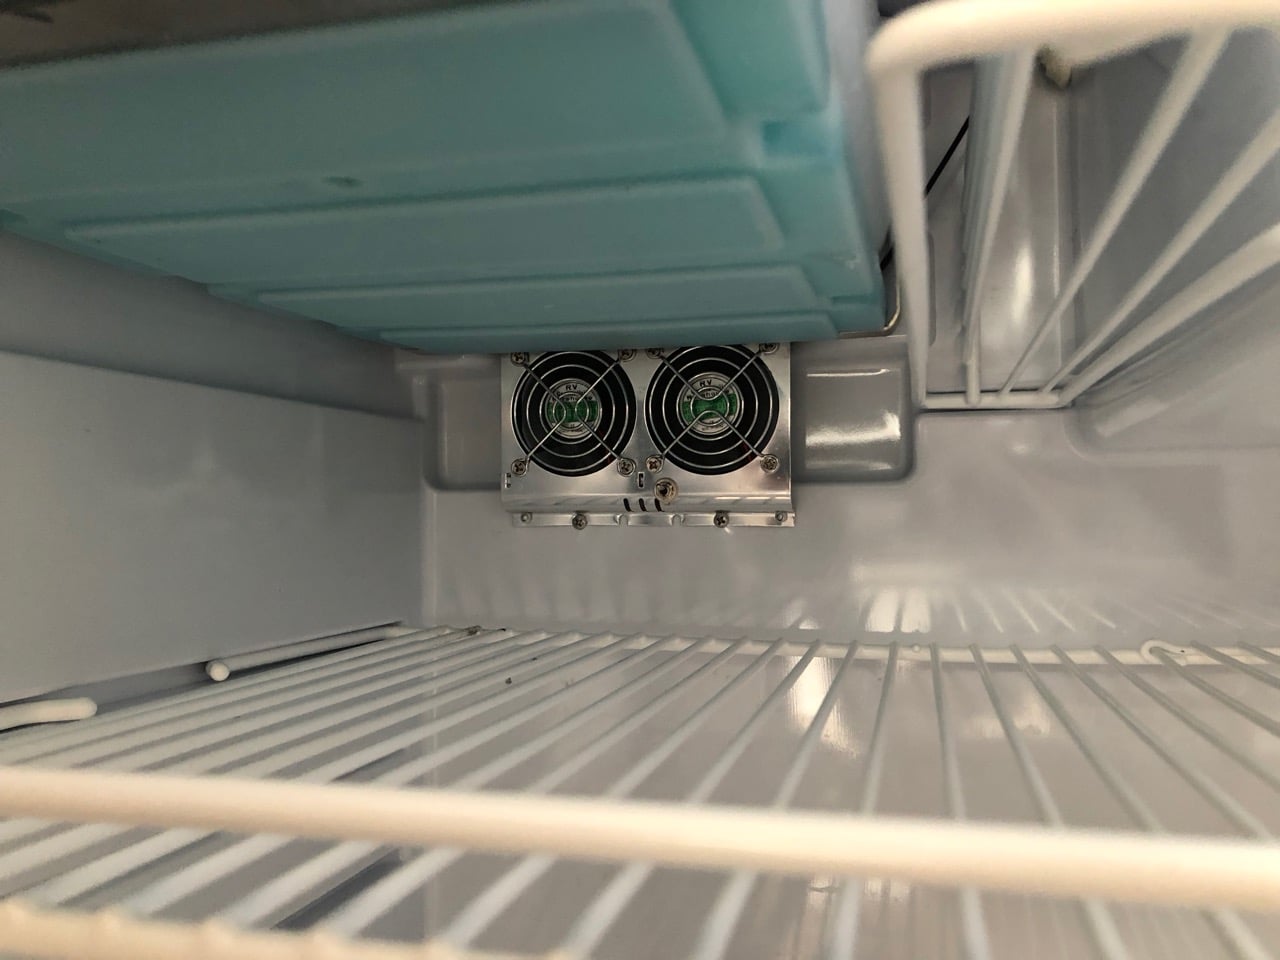
I posted a while back that we were having trouble with cold spots inside our Isotherm fridge. Basically, stuff under the freezer on both shelves would freeze more often than not. So I decided to add a fan just under the freezer to circulate the air. We'll see how it does. This is the fan I got - seemed much nicer than anything else I could find. It has two fans and connects directly to the 12v supply. You can keep the wiring in the fridge and connect to the light, if you have one, or if you don't, or don't want wires cluttering up your fridge you can do as I did and drill through to connect directly to the DC supplying the fridge. I drilled straight through the back behind the fan, ran the wire and caulked both sides. I tapped in to the DC fan supply on the side by the compressor. I had to flip the fans around in the housing since the fan kit is designed to blow into the fins on a dometic fridge. The fan has an on/of switch and seems to draw about 0.1 amp. You can hear it pretty well when you have the door open, but is completely inaudible with it closed. The fan isn't super strong but you can feel the air coming off of it even at the front of the fridge. I decided while I had the fridge out to add a layer of insulation all around. 1" in the back and ⅜" on the top and sides, which is all that would clear the cutout in the fiberglass. It was a tight squeeze even at that. I also spotted a couple fins on the coil that were touching the top of the fridge, which were probably what was causing an occasional buzzing, so I bent those back and generally made sure everything was rattle free. Drilling for the DC power - This is the ASU module on the side of the fridge where I tapped in to the DC. The wire with the white insulation sticking out is to the fan. The yellow bit is an inline fuse that comes with the fan. Not particularly convenient if it ever blows. All wrapped up in insulation. Cut the bejeezus out of my finger on that aluminum tape - And the finished product. I was fortunate that there is that little scallop in the fridge liner right where I wanted to put the fan. Otherwise I'd have had to block it out for airflow. Two screws hold the bottom, and the top is fixed with my favorite 3M 4200 since I didn't have access for screws. A little 4200 on the screws as always to hold them tight -
1 point
-
I was already making a shopping list.1 point
-
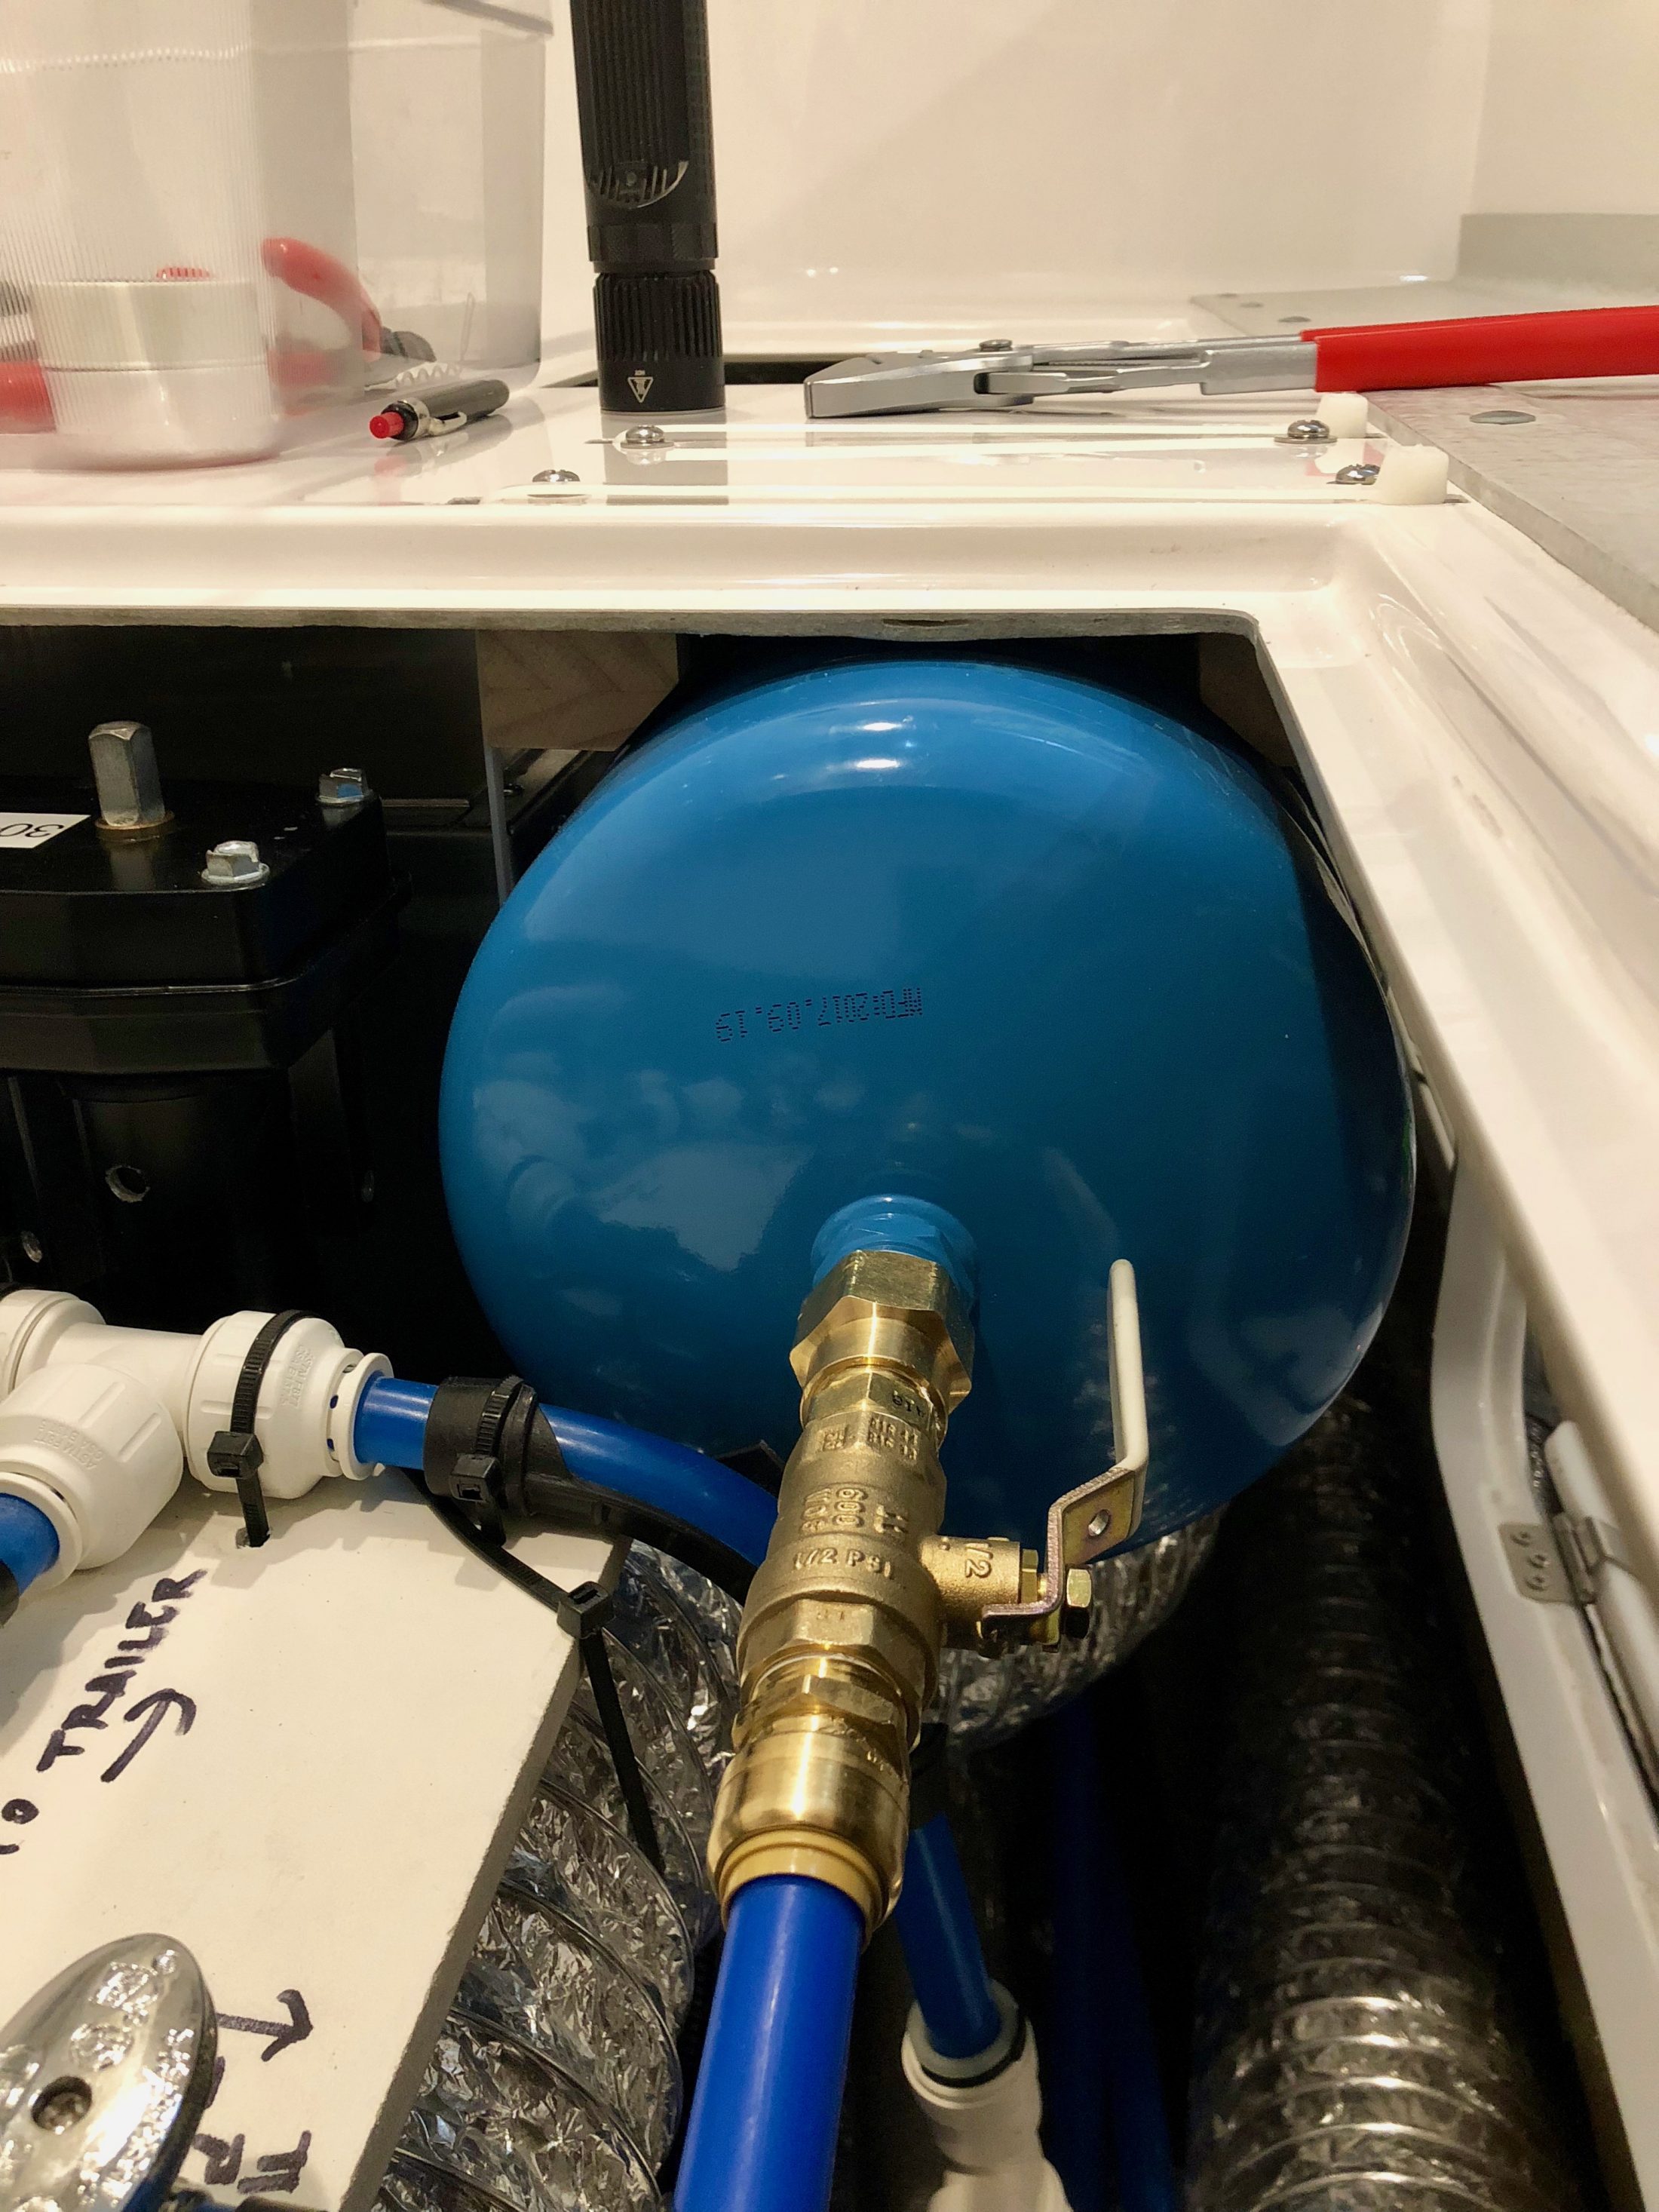
Pressure tank install... This is the Flotec FP7105 that one or two others have added, sitting under the curbside bed, kind of half in front of the water heater. It's a 2 gallon recharged tank. I placed it here because I wanted to add a valve to isolate the tank when traveling, winterizing, etc. Oliver gave me an access hatch for the water valves, and this sits just inside the hatch. It's nice because I can just reach in and feel for the valve and not have to crawl around on the floor looking for it. I just didn't want to travel with the water system pressurized in case there were a leak. This way I can just shut the valve and open a faucet and all the pressure is released. then when we get to camp, I can turn on the pump and open the valve and it doesn't have to fill the tank back up. I glued and screwed two blocks to the fiberglass to keep the tank from shifting, and then ran two heavy zip ties through to hold it in place. I put some rubber mat on the blocks and cut a block to keep the zip ties in place. It feels really solid. It was a pain to get it in there and work around it, but now that it's in place, accessing around it really isn't too bad. While I was in there, I did my zip tie tie-ing and fiberglass dust dusting. And learned my PEX skills, which is a necessity. Also, I bought a nice collection of PEX fittings and some tubing for repairs. The only thing I don't have is a crimper, which is darned expensive and bulky, but there are a few connections here and there which seem to require one. Mo pics...
1 point








-
Recent Achievements
-