Leaderboard


Popular Content
Showing content with the highest reputation on 01/29/2024 in Posts
-
So, everyone's camping style is slightly different depending upon their needs, wants, and desires - that's been discussed here regularly and it's a good thing, IMO, to recognize that we all have different ways to "roll." Right? Regarding the shore power cable... It's rare that we use the cable (or the Honda GENSET, for that matter) anymore. They both live in the bowels of our TV. We're happy with just letting the 540Watts of solar modules ramp up the BBs... We rarely find ourselves in a "pay for hookups" campsite, unless it's necessary for a particular route to get to a boon docking site. But hey, if it's WOXOF out there, we'll definitely dig out and use the cable/GENSET to top off the bank, if needed. Both items are considered backups at this point. One is none, 2 is one. HA! Cheers!7 points
-
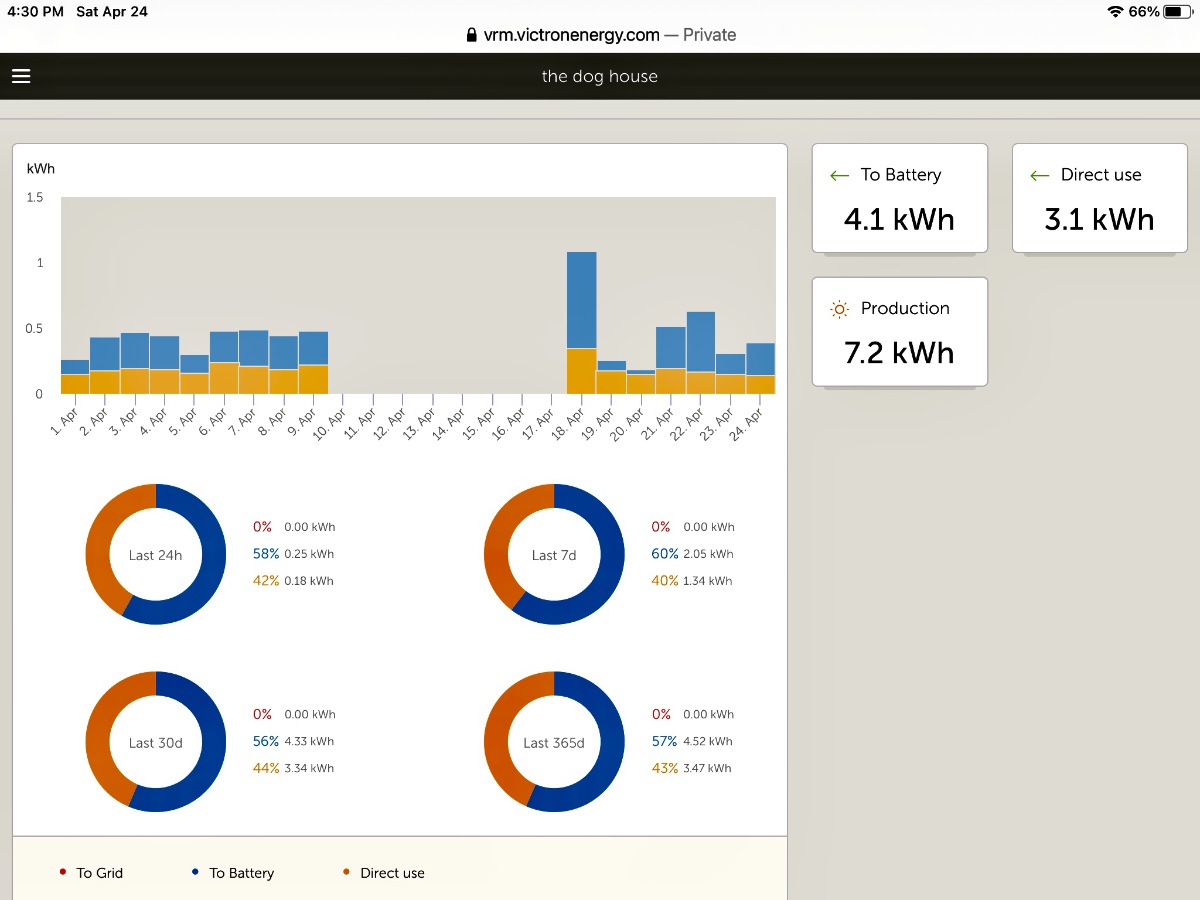
We use these values (screenshot from our maintenance and trip log):
 6 points
 -
Right on, brother. We've come a long way from starting with a '78 VW "Westie" which had a single lead-acid battery and shore power provided by a standard 20A extension cord - no GENSET. Progressed to a 12' pop-up tent trailer/lead-acid/but after adding a Honda 1000 we thought we were in RV Heaven (kick myself every time I think about selling that Eu-1000i)! Two highly modified AS's and a Casita later, we landed in our Casa Blanca, now with an Eu-2000i. We configured the AS's with two AGMs and 250W worth of solar modules - but not enough energy to boon dock for extended periods without firing up the Honda. After just completed a solid 2-week trip to AZ, neither the OTT power cable or the Honda saw the light of day. Granted, mild WX conditions contributed to that. But it's a wonderful feeling not relying on someone else's power. Our thoughts are now (in terms of upgrades), is much like @mossemi explains... wait until the Xantrax 2000 dies and move into a Victron Multi 3000 inverter/charger. At that point, we'd be able to run the Dometic AC unit off the Battle Borns for a few hours. Looking forward to integrating a Victron inverter/charger with our Cerbo S GX unit. Then there's always a Nomadic 12vDC AC unit on the horizon.... HA! Cheers!4 points
-
This is just for fun. 😁 I was travelling on Highway 59 north of Center, TX, when I came across this sight: Sorry for the grainy image. I was driving and took a quick picture. From a distance it looked like a new little fiberglass trailer. Turns out, it was just cars covered with a white vinyl cover. Now I'm just looking for fiberglass stuff on wheels.
4 points
-
Looks like you’ve invented a new travel game. We used to predict and then count the number of Airstreams seen, but now we can count glass eggs and car haulers.😇3 points
-
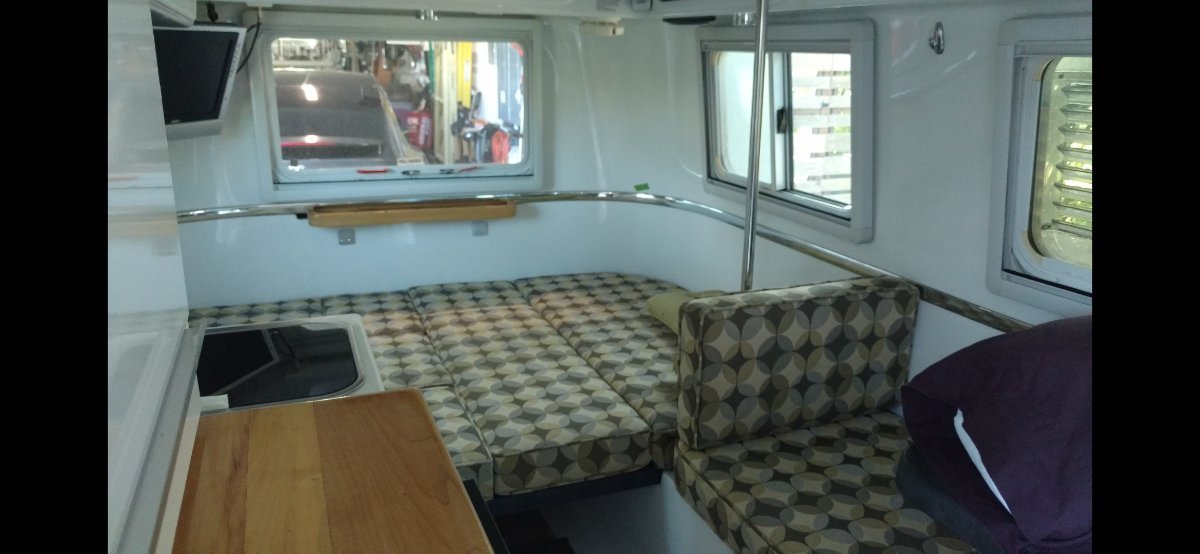
For those of you who've never seen the inside of a first gen Elite, here's a photo of the infamous "stripper pole." It's quite helpful as a handhold if you're the person sleeping next to the hull, climbing over your sleeping spouse, to get to the lav in the middle of the night. We had many jokes about it, back in the day. (Apologies for the thread drift, @Ronbrink)
3 points
-
Fiberglass RV Rally Quartzite Arizona now has a Facebook page https://www.facebook.com/groups/domerockfiberglassrv Happy Trails2 points
-
@thompsonkd: Go back further (on the Oliver side) into the wire loom - you'll see that there's a single red wire (+12vDC)... You'll need to connect that red wire to the RV Safe detector - suggest adding an "on/off" switch since you'll be in there anyway...2 points
-
No problem - consider it done! Bill2 points
-
I don't have issue with anyone's particular camping style, as long as it doesn't bother others (referring to loud, obnoxious and bright during the night people). Personally, I love being outdoors most of the time. However, I'm not a big fan of heat and humidity and I sweat a lot during the summer. A/C is a must in the southern latitudes, especially at night because I don't particularly sleep well on wet sheets. If I could chase mild climates during the year, I would, leaning more towards colder regions. In Spring, Fall and southern Winters, I will gladly park my rear in a free location and just use the batteries. This is the ideal situation. The Oliver is the first camper I have ever had that contained batteries with enough capacity to boondock effectively. The option I chose when I bought the trailer was 390 ah and 400 watts solar. I believe that if I don't use the A/C, watch TV all night long or run the microwave/convection oven, I will likely never run out of power. Of course, if the weather doesn't cooperate, and the solar panels don't get the optimal amount of sunlight, I will either have to cut back on power output or break out the Cummins generator. Most of the time, I would consider this the backup plan. For this reason, the power cable isn't all that important to me. I suppose I would change my mind if I owned an Airstream with one battery mounted on the front. Those things are dependent on external power sources unless someone refitted them with a much larger battery bank and solar. This is also one of the other reasons I went with Oliver over the Airstream. I don't want to be dependent upon someone else's power.2 points
-
OMG: We love JB Weld!!!2 points
-
Yep - this was my first thought too. However, only the Elite I's had what was known as the "stripper pole". Bill2 points
-
Got our Ruuvi tags yesterday and had time to set them up today. I did buy the $20/ea eBay item listed above. Got 4 for $100, taxed and shipped. Some good and bad with these. Good news they are real Ruuvi, but according to the setup instructions in the app, these are an older model (two internal buttons vs. one). Now the 1/2 price makes sense since this eBay seller likely buys out old stock. Though now that I have everything working, I'm glad to have saved $100! They open easy with a small screwdriver to get them started, then use your hands. It is not a plastic snap-fit, there is actually an O-ring seal and light press fit. Pull the plastic off the CR2477 battery and you'll see an LED light blink. Download the Ruuvi Station app and follow instructions. It was quite intuitive. It might take the app a minute to see the device. If you have the older model, you have to update the firmware immediately, otherwise the Bluetooth will not connect. Overall, about a half hour and I was up and running. I believe with the update, there shouldn't be much difference from the new model. They read temp, humidity, barometric pressure and motion. Given the motion sensor, thinking of putting one of these at the base of our hot tub for packrat hunting! 🤣 I do not have the Victron Cerbo at this time as @mossemiillustrated above, but upon such upgrade, I can integrate these. The Bluetooth is strong enough. I had two in my living room, walked out to our parked Oliver (~70 ft line-of-sight) and put one in the trunk area by the rear incoming water lines and just placed another on the counter for now (this one is behind our Tuff Shed). As I was doing this, the app was reading all 4 sensors continuously. I named all four to show location, but also keeping the sensor ID# for reference. I will tape them in place later, with a very small piece of 3M VHB. The one sitting on the counter will be taped right beside the thermostat, so I can tell actual temp, not just set temp. The third one will go in the fridge and I'm thinking the 4th under the front dinette opening down low near the back tank which is furthest from the furnace. The one named Black is currently outdoors on a stone wall attached to our house. That is why it is a few degrees warmer and less relative humidity than the two placed in the Oliver. The one named Fridge is sitting on the far/cold side of our LR. They seem quite accurate. We've had rain lately, hence the humidity. The temps seem right on too, and the movements make sense since the one I setup first has the most and they count down in descending order. Wow! What a very nice mod for the money.
2 points
-
I just searched for them and they are available at Amazon and they are also available on eBay at a much better price. Search for "SOUTHCO C3-805" Mossey1 point
-
I did this mod in 2019 and Oliver used the same latches a little differently than I did with their version. The latches I used, had a 5 pound pull. The initial latches I tried had an 8 pound pull which was too much. Mossemi1 point
-
Jason, I think the problem with covering them is, when you’re driving down the road these scuppers also cause a venturi effect, which actually draws air/moisture out from between the Hulls.1 point
-
We have a pretty big problem with winter condensation with humidity often in the high 80s and 90s. We usually do not get below freezing much (except for last week). We crack the bathroom fan open, and turn on the Maxair to it's lowest setting. We also keep the heater around 68 during the day and 60 at night. We do end up wiping the inside window a couple of times a day.1 point
-
.... mmmm ... stripper pole option? ... was that offered at one time? (sorry, couldn't resist - apologies if anyone's offended)1 point
-
I've split my replies concerning the above quote into a new thread since it really didn't fit with the topic of this thread. It can now be found HERE. There are a number or reviews, pictures and details about this Oliver by its original owner located in various places in his blog posts from 2016 through 2017. Enjoy! Bill1 point
-
THAT's interesting! Never saw one of those in an Oliver either in or out of the factory. Bill1 point
-
@Overland These are great organization ideas! We were wondering though, what kind of glue did you use to affix the stainless steel piece to your pantry door? Thanks!1 point
-
With your longer hose, you'll need to position the shower head where you want it, I purchased this item, not for dishes, but first for showers: JONKEAN Chrome Handheld Shower Head Holder with 2 Hanger Hooks, Strong Adhesive Shower Head Holder, Adjustable Shower Wand Holder Wall Mount, Bathroom Waterproof Shower Handle Holder No Drill Need - Amazon.com The white plastic shower wand holder slides up and off of a clear flat mount, so when towing or not using it comes off and fits nicely in the shower opening. It's available as a 2-pack, so the second mount can be positioned elsewhere, like attached to camping stations as shown above. I will put my 2nd mount lower to rinse feet, our dog, maybe a large grill pan, though we wash most dishes inside. The second item is a suction cup version which should work well on polished fiberglass: OUO Suction Cup Shower Head Holder Handheld Showerhead Bracket Adjustable Shower Holder, Removable Handheld Showerhead & Wall Mounted Suction Bracket - Amazon.com
1 point
-
Excellent rundown, thanks Mike! You did mention previously about needing "a new SeeLevel display and a modified comm cable" but I didn't get it fully until now. With your helpful information, I just bought 4 Ruuvi tags! I went with the eBay listing sited above at $20/ea, $100 total taxed and shipped. Wrote the seller back to say if they were not legit Ruuvi, which he promised, he'd be paying for the return shipping label along with a refund! Elsewhere they're $40 each. I'm thinking one on the rear wall in the basement by the incoming water lines, one in the fridge, one in the cabin on the wall right next to the thermostat (are these thermostats capable of displaying actual temp vs. set temp?) and a 4th extra placement TBD. I now have the Mopeka Pro's on my shopping list for the propane tanks. They have a neat kit that includes 2 sensors and 2 plastic insulating rings for the tanks: Amazon.com : Mopeka Pro Check Universal Bundle - 2 Pro Universal Sensors and 2 Tank Halos - Wireless Propane Tank Gauge Sensor - BBQ and RV Must Have Accessories Monitors Outside Propane Tank Levels in your Camper : Patio, Lawn & Garden Thanks again! I did not know the right direction for temp and tank sensors and learning here these products integrate with the Victron Cerbo GX will future-proof my purchases. For now, I'll download Ruuvi and Mopeka Bluetooth apps to read these sensors.1 point
-
Mopeka only monitors the propane tanks. They are magnetic and stick to the bottom of the propane tanks. RuuviTags are from Finland and that is where I got mine. They have been around long enough to be sold on the web. Check out the web site and compare packaging and photos. The black one with mounting ears is the 3 in 1 and is weatherproof. That’s the one I have in the propane box. My others are all white and the have silicone holders much like Apple Air Tags you find on Amazon. Mossey1 point
-
Thanks for the kind words. Sorry, I don’t document my projects very well. The MOP's I’ve written have always been from my point of view and I have a difficult time writing them so everybody can follow my thoughts. A little history of how I got to this point. My Xantrex 2000 ProWatt inverter failed in my second year of ownership and I wasn’t confident enough to start buying Victron gear and putting in a Multi Plus instead of another Xantrex. When one of my Trojan 105's failed, I moved to 2 Battle Borns and added a BMV 712. The Smart Shunt was not available and I never have really used the 712 display, it’s always been mounted in the below the seating/sleeping area’s. So I used an old cellular phone and Bluetooth to communicate with the 712. I also have tested the Bluetooth by moving the 712 display high and low and RF always propagate's better with elevation. Moving on, I used a Raspberry Pi micro computer and display running Victron software. That was a $400 experiment that just wetted my appetite for more Victron gear. Because I was already running Victron software, I was aware of Victron's plans to integrate SeeLevel, Mopeka and Ruuvi sensors and decided to upgrade to a Cerbo GX with a 7 inch display. The Ruuvi tags were the easiest add and the Mopeka was pretty simple as well. The SeeLevel required a new display and a modified Comm cable. Some place along this journey I also added a Victron MPPT 150/45 SC and two 90 watt solar panels and a third Battle Born. I'm never satisfied with the mods I do, so things are in a state of flux most of the time. And I failed planning one 0 one. Enough about my limitations! There is a Ruuvi sensor in the fridge, on the kitchen counter, tie wrapped to the SS jack post and the fourth is in the Propane box for outside temp readings. I am adding some locations for information on items you mentioned. Victron's community forum is a great place for answers and don’t forget the Air forums. There are some very smart people there with Victron gear.
1 point
-
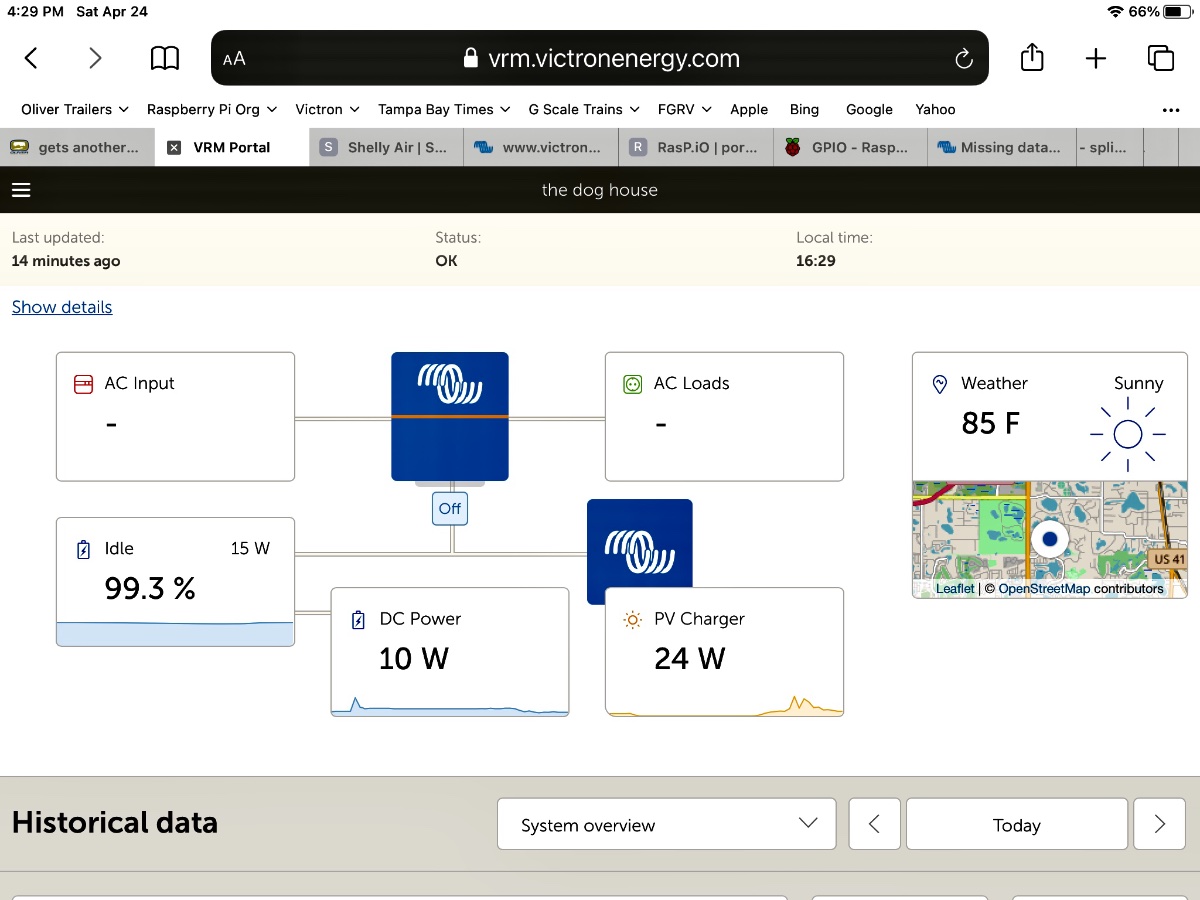
Mossey, this is so cool! I'm assuming the 2nd pic is your computer screen (or smartphone) connected by Wi-Fi and VRM. Besides battery and charge data, looks like you have your GX device integrated to temp sensors placed in the cabin, fridge and other locations (I would place one on the incoming water lines by the rear wall in the trunk). Also, you tapped into your tank level panel or the sensor wires to read resistance for % full. Please confirm my assumptions. Thank you. This also confirms @Ronbrink does not need a Bluetooth dongle with the Cerbo GX. If you have a Mod post on your installation, I sure want to study it. Also, please let know what temp sensors to purchase that can be read the VRM as you have shown here. Very nice!1 point
-
@RonbrinkJust adding some pictures to @jd1923 comments. The first picture is from the Smart Shunt Manual and the second is of my installation via the Victron Remote Management or VRM over WiFi. Mossey
1 point
-
Linda, Have a great time and post up a few photos! Enjoy the adventure! Safe Travels! Patriot🇺🇸1 point
-
Thanks to all of you! We decided that the campground we were headed to would be too cold and snowy for a couple of days of fun. It was at 9000' so we found a place that is about 5500' and will be warmer. It is only 8.5 miles from our house.. hardly a shake down. But if we forgot something (or the weather is icky) we can go home! We are not afraid of cold weather or snow we have almost always used it in winter condition..though sometimes on the way to warmer places. We will probably be replacing the tires if we go on a longer trip. Linda1 point
-
Unfortunately tires "age" not only from the outside where you can see things like tread separation and sidewall cracking, but, they also age from the inside. The inside is a bit more insidious in that you simply can't see it! Heat causes the cords and rubber to slowly give way and all tires are subject to heat over their lifetimes. I'm sure that there are reasons why the generally accepted guidelines of 5 to 7 years for the aging out of tires has become the norm. For the money involved, I'm not willing to take the chance on arguing about something that I can't see and I'm not an expert on. Bill1 point
-
I have been running cooper AT3 LXT tires many years. First on my Tundra and now on my F250. They have been great all-around off/on road tires in all conditions but only mediocre running in snow (although the reviews seem to like them more than I do for snow driving) . The only negative is they tend to throw rocks. Regardless of these shortcomings, they are the best tires I have used for towing on/off road. In my quest for new trailer tires, I'm considering the Cooper HT3's. This tire is the all-season highway tread 10ply. Does anyone have experience running the HT3's on a trailer? https://coopertire.com/en-us/find-tires/all-tires/discoverer-ht31 point
-
Cooper AT3’s on trailer and truck:
1 point
-
I have run Michelin's on all my rolling stock for 52 years. Never had a problem. As such, I consider my experience to their products to consistently be top notch. As such, my comments were pretty explicit. None the less, eventually my Ollie Michelins will require replacement based upon their condition, not some arbitrary age opinion. Sadly, as indicated on other posts, I understand that they no longer make LT or ST tires for our OE2 16" rims. Are there any brands that offer such quality tires as Michelin, that wear out before they age out, and fit our rims? GJ1 point
-
We ordered our trailer in Sept ‘15 for delivery in December/January sometime. We put off our delivery until May so I was told our chassis and other parts were put aside until early ‘16 when work on it resumed. So, parts of our trailer were pre-2016, including tires. I believe that is why we got the BF Goodrich. Mike1 point
-
There's an old saying in the motorcycle world - "tires are cheap insurance".1 point
-
Here is an electronic version of your Olivers owners manual if you need to reference it. https://olivertraveltrailers.com/oliver-university/ Patriot🇺🇸1 point
-
Hi Linda, good to have you back. Good advice in the above posts. Let us know how it goes. Mike1 point
-
Linda, Good for you that you can try and get back out camping with your Oliver. Along with the above recommendations and since your Oliver has been sitting so long please don’t overlook checking your spare tire pressure. Make sure your tires are not old and out of date. Welcome Back! Patriot🇺🇸1 point
-
Thank you so much. We will be better prepared with this for the whole trip! This is a great group. Happy to be back here. Linda1 point
-
FYI: I've attached a MSWord file that's a fairly comprehensive checklist which was written by an Oliver owner (can't recall his name, though). But anyhow, it may be a good baseline for you.... Good luck with your trip this weekend - send pix! Safe travels! Oliver Checklist-2.docx1 point
-
Bill, I edited the pictures to clear things up. It is actually a closet flange with a short 3" pipe glued on and the bottom is filed down to ease insertion. Mossey1 point
-
It has been my experience that a fat wallet leads to low back problems, so my advice is to get 2 wallets and share the pain. And it does help with elevating back pain.😉 Mossey1 point
-
I was able to reuse the Zamp CC hole to mount the display/RPi with industrial Velcro. The wall thickness blocks two of the four USB ports and I would probably separate the display and RPi which would allow access all four USB ports. I have taken a peak at the tank sensor issue and there is some mention of the SeeLevel sensors on the the Victron support pages, but the Venus software is provided by Victron free of charge and it is open source they do not provide much development on non Victron products. If SeeLevel tank sensors are supported, it seems like it will be done by the Victron community. I seem to remember some talk about an interface between the Victron and SeeLevel sensors, but I am not positive. I will work on a parts list of the products I used instead of what I bought. I'm not very good at planning so I generally bump my head a lot as I work through issues. So I purchased some items I didn’t use and some items that I would have needed with a CCGX or Cerbo GX installation, like VE.Direct to USB Interfaces.1 point
-
I initially used the touchscreen for system setup. And I have made changes through the VRM remote console, but the touchscreen is much easier to use. Mossey1 point
-
This looks even "cooler" in person!1 point
-
It all looks very similar. So you’re using VRM for control? If so, then I think you have the same control as a CCGX. Basically duplicates all the same menus. Very cool.1 point
-
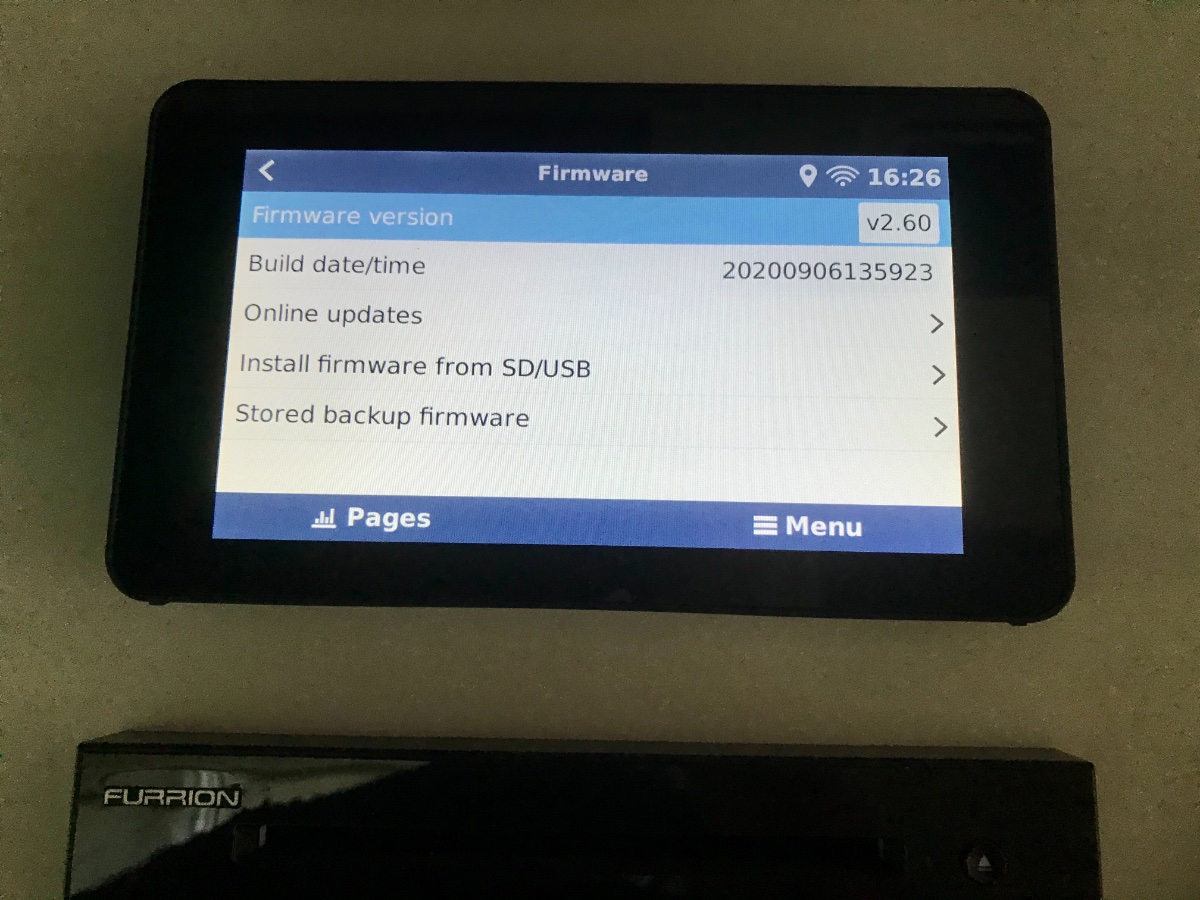
I believe I can do anything that the standard CCGX or the Cerbo GX and GX Touch can do. Since I have never had a chance to play with a CCGX, I’m not really sure. And I only have a MPPT CC and a BMV, so I can only see the DC side of things. You tell me if it looks like any functionality is missing. The missing data is while out camping as I don’t have any connectivity without WiFi and my storage solution didn’t work, so it’s back to the drawing board. Mossey
1 point
-
You da man - but I warned ya 😝1 point
-
Nope! That is a Raspberry Pi Foundation 7" display with a Raspberry Pi 3B+ single board computer running the 2.60 version of Victron's Venus open source software. Mossey
1 point
-
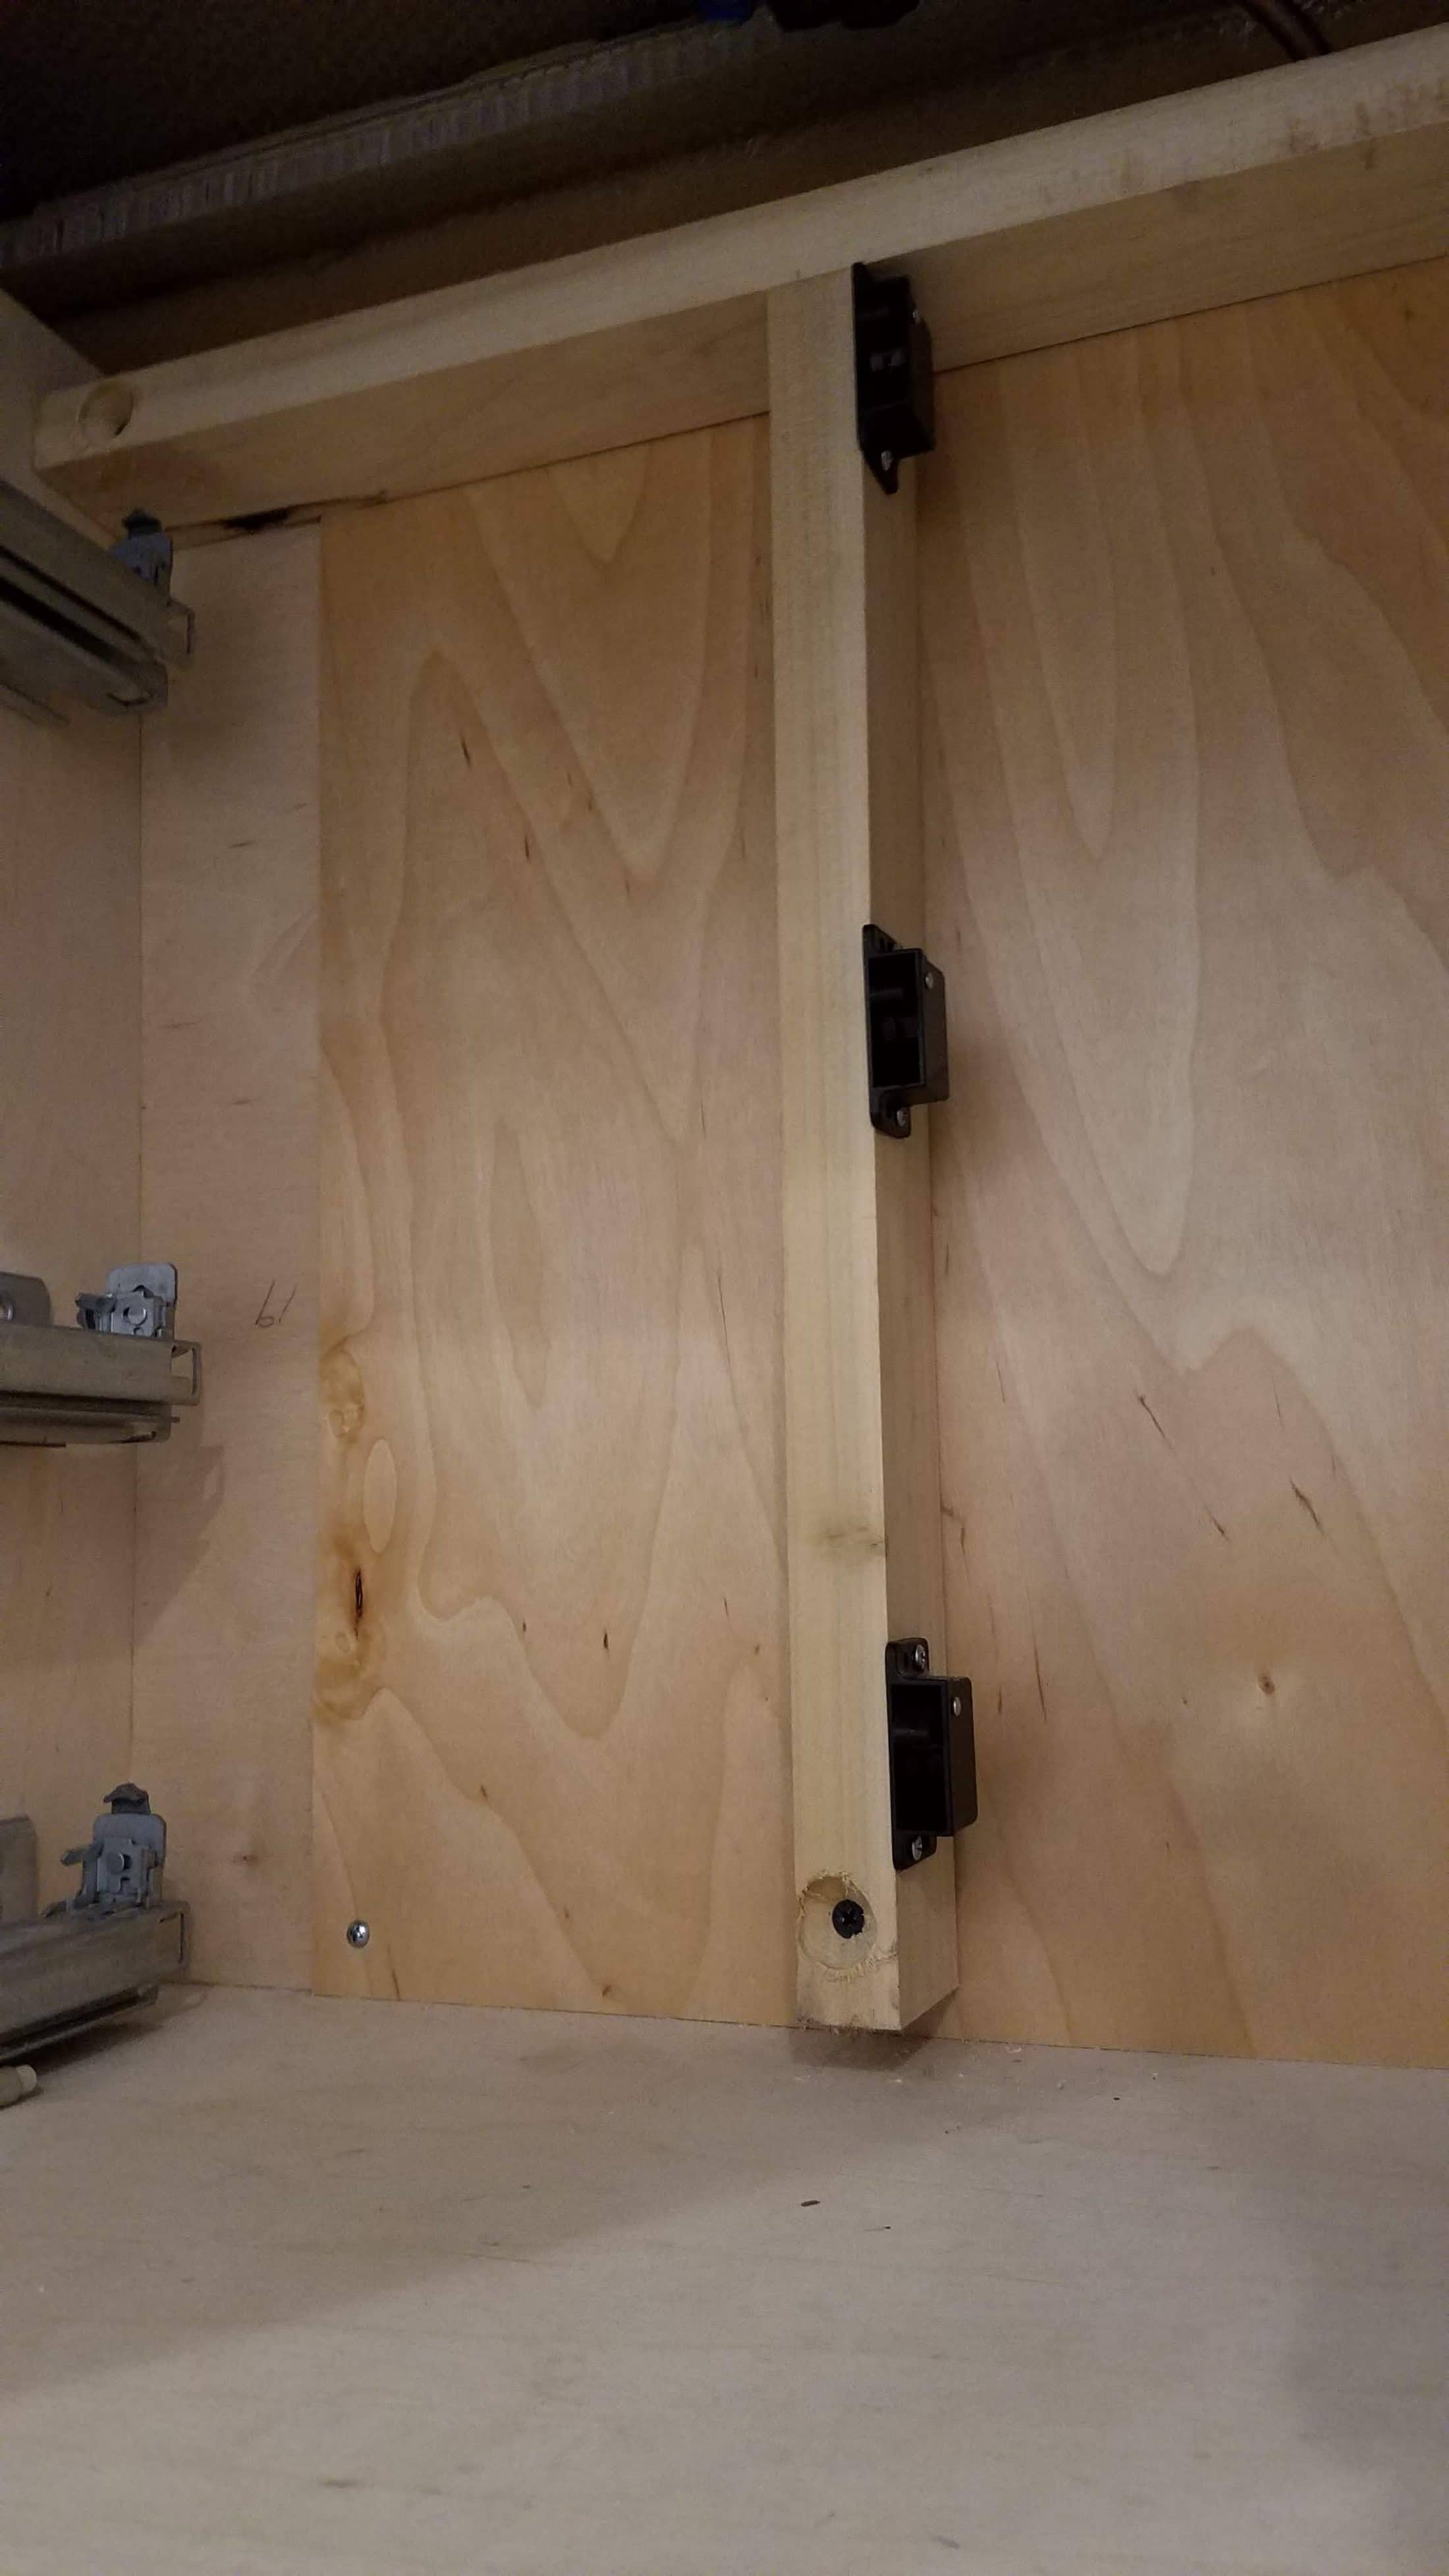
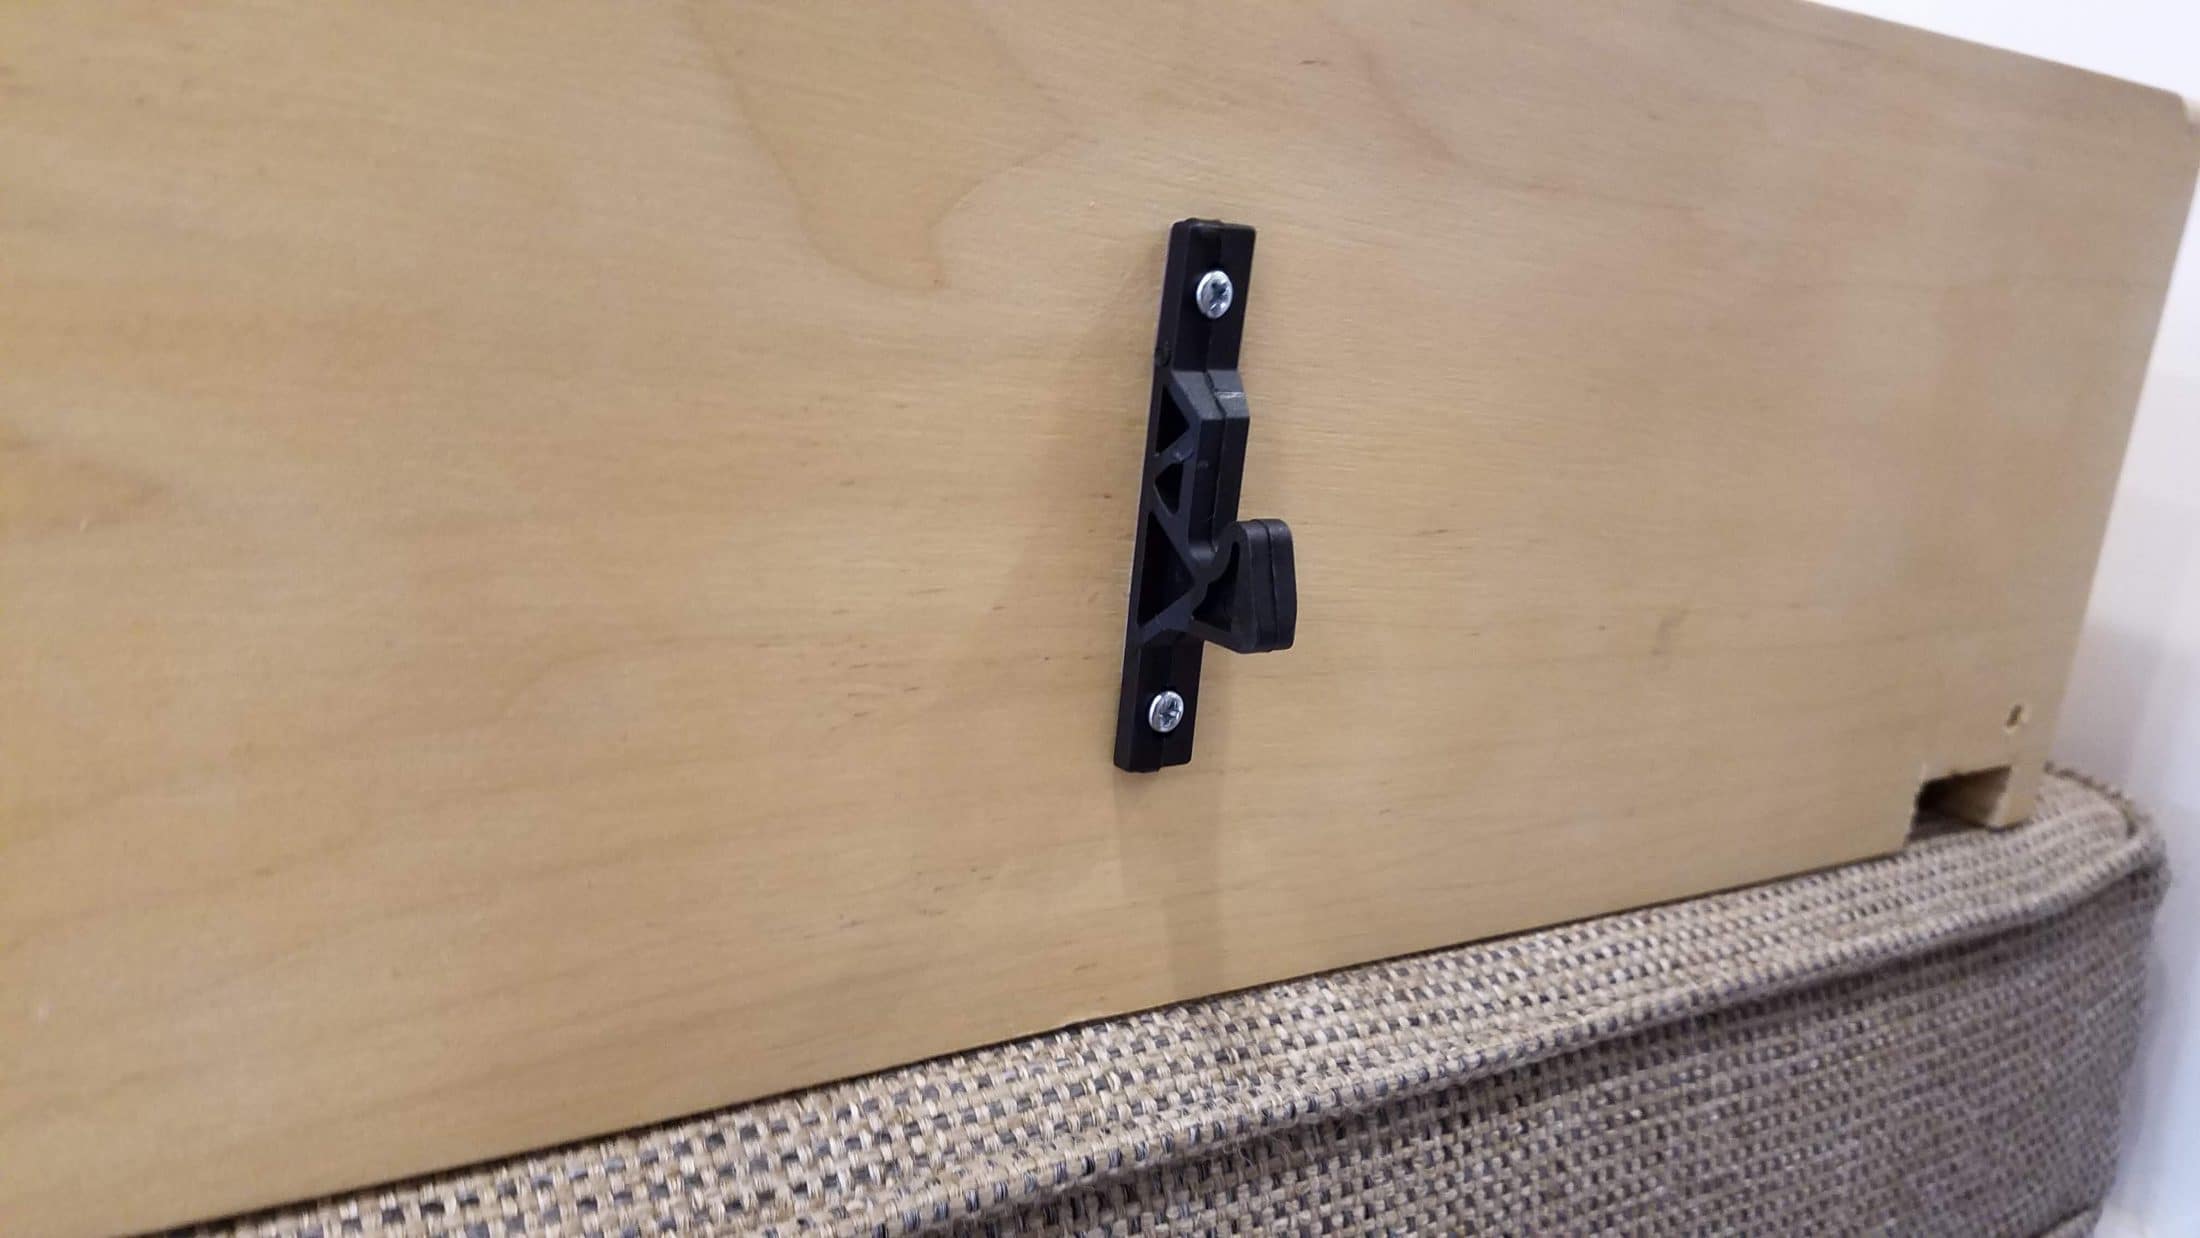
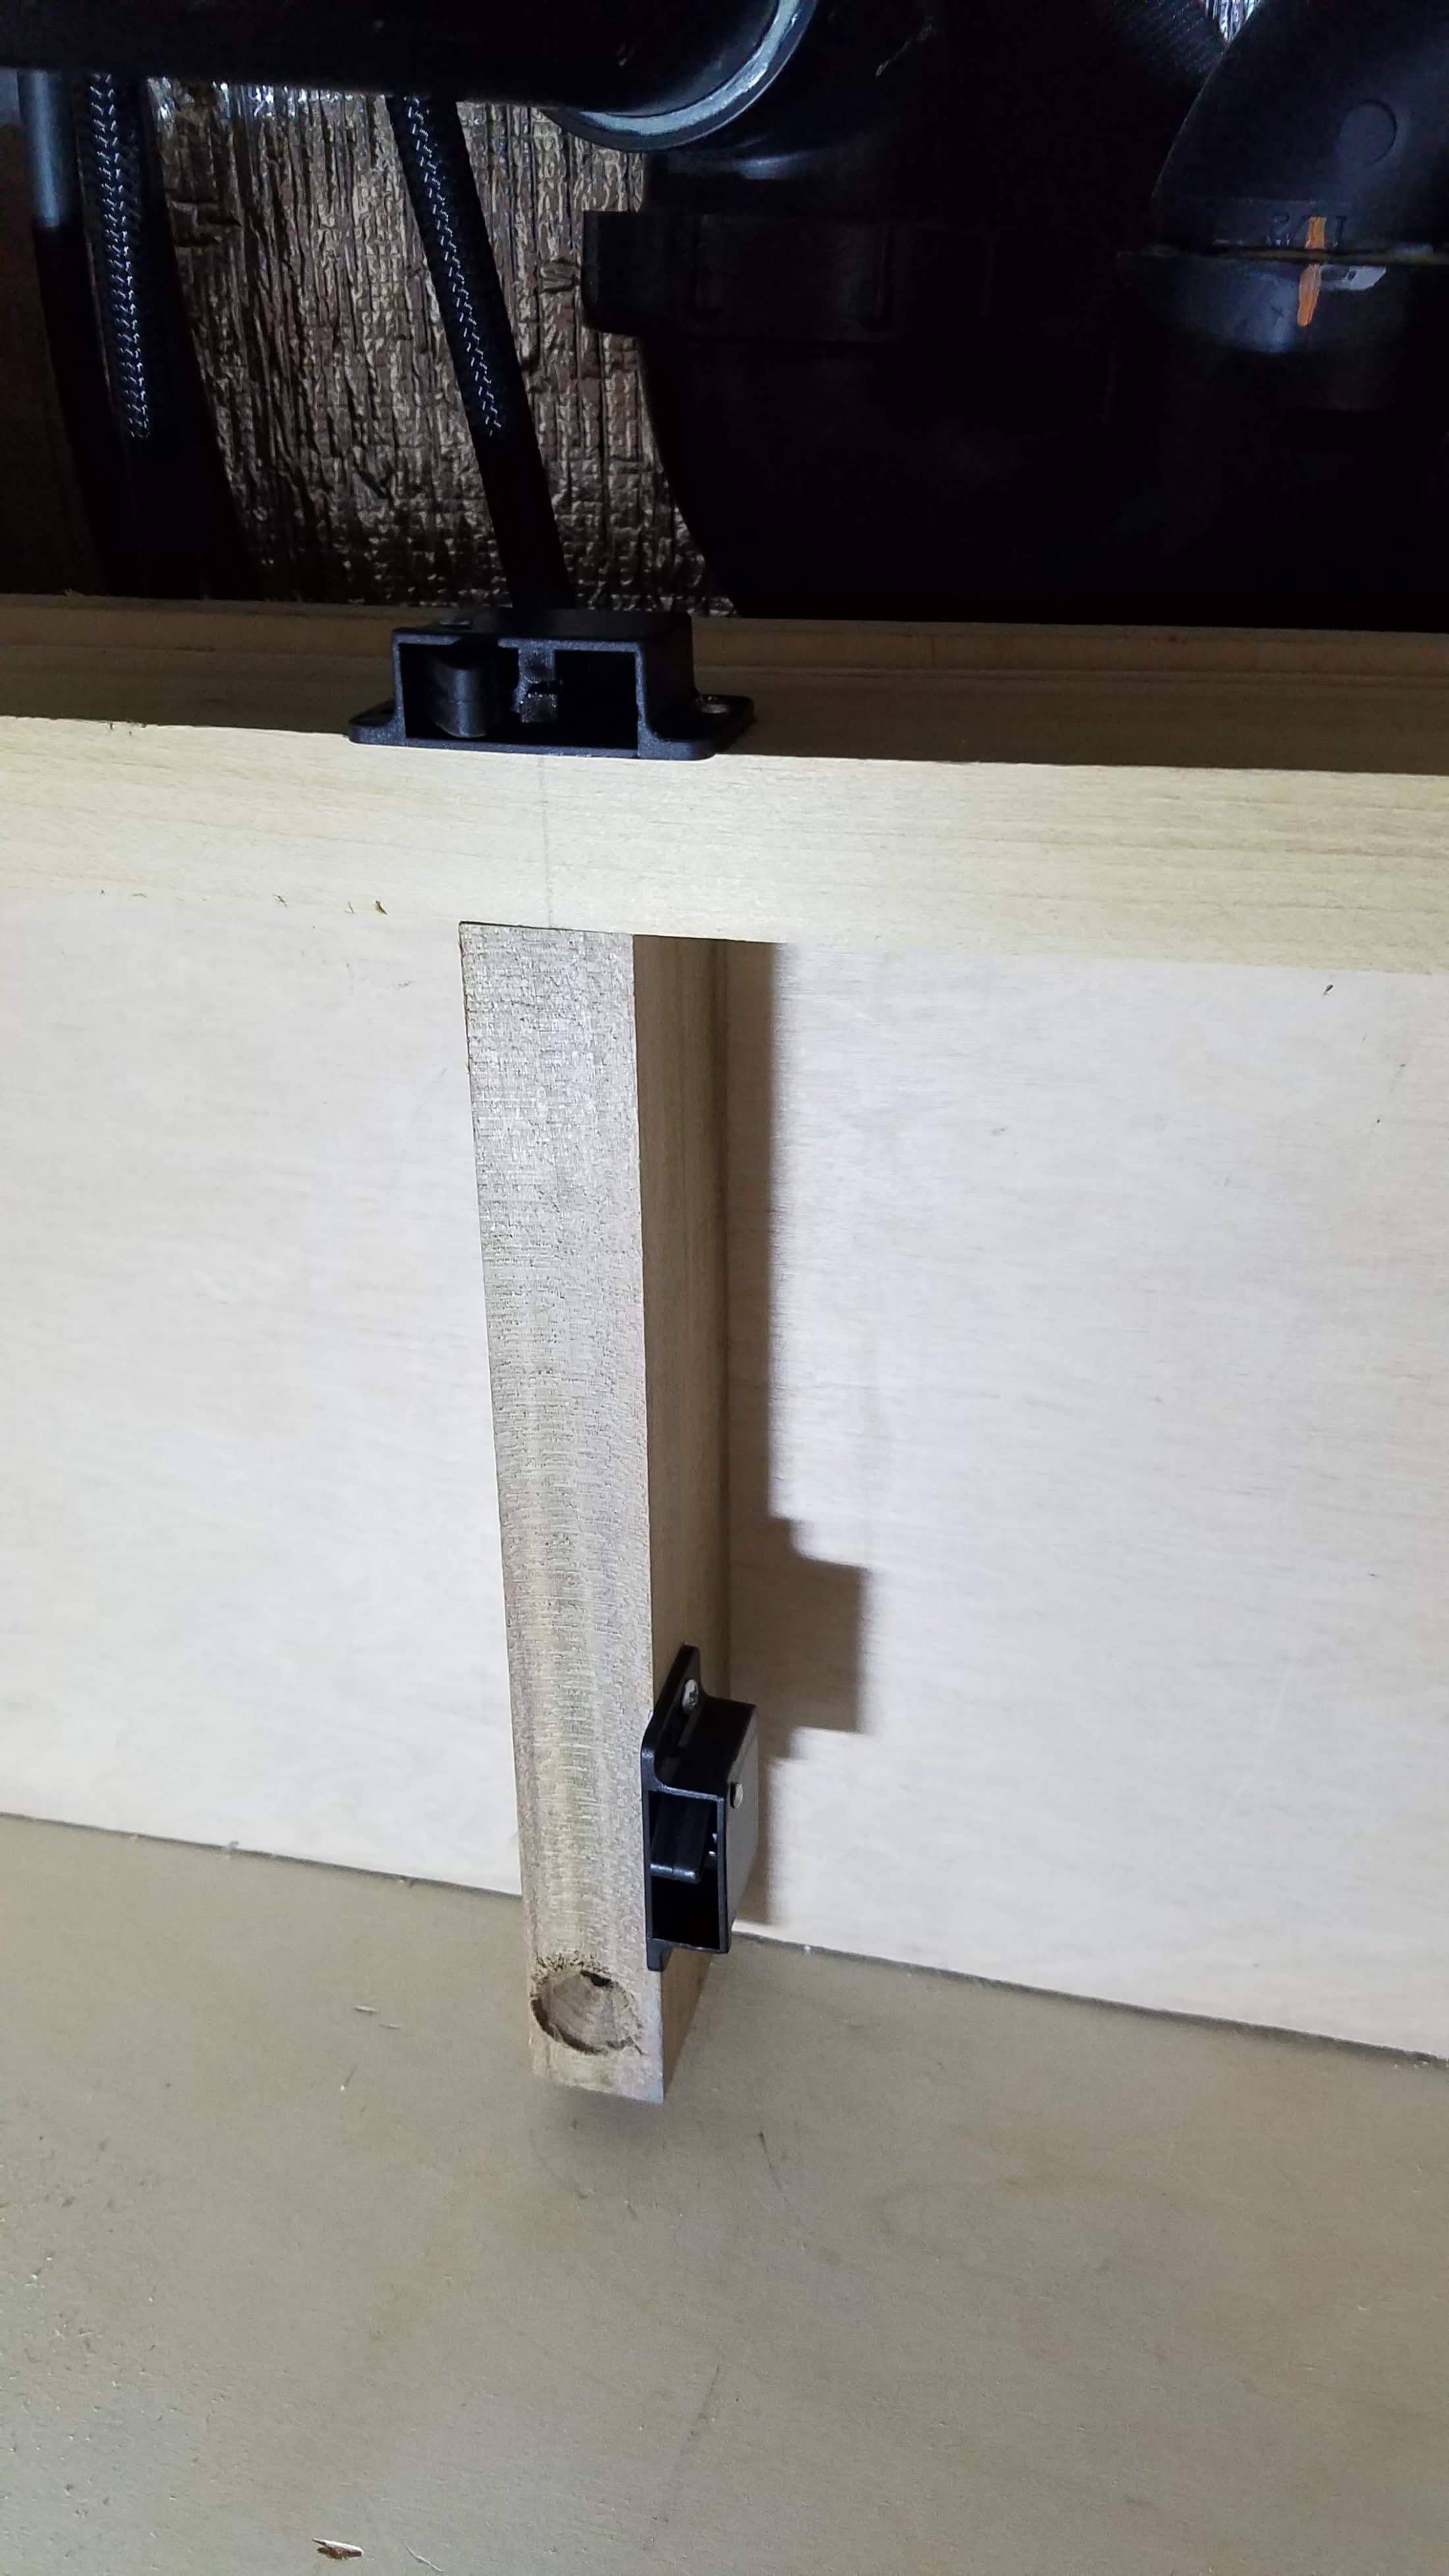
Drawer Locks There have been quite a few postings about galley drawers opening during travel. I am constantly amazed at the ingenuity and craftsmanship of my fellow forum members. My first drawer management version consisted of small Harbor Freight suction cups and 1/2” PVC pipe. It was a simple fix and worked well, but then I followed topgun2's recommendation to clean the inside of the dog house with the Norton's Duragloss recipe. The inside was clean, shiny and so slick, I couldn’t get the suction cups to stay in place any longer. So we once again had the unexpected open drawer experience during our rally trip this year and the hunt was on for a new solution. This was the product I chose and we will test it on our next trip with fingers crossed. And this is how I mounted them to the cabinet supports and drawers. Edit: The drawer locks worked very well on our last 2900 mile trip. Edit: The link above to Amazon actually takes you to the 8 lb. version of the latch. I used the 5 lb. version and corrected the Amazon link. Mike
1 point


-
Recent Achievements
-


")


