Leaderboard


Popular Content
Showing content with the highest reputation on 12/01/2024 in Posts
-
I usually don't. I'm thinking about turning in an hour or so.2 points
-
Oliver has used at least two different colors of gelcoat through the years. The current models are a much brighter white that the older ones.2 points
-
Fiberglass work by Oliver or a marine shop that does fiberglass repairs.2 points
-
I keep a very inexpensive yoga mat rolled up in the front bin for work under the trailer and for Anderson hitch chain adjustments. Since those almost always occur in gravel sites it keeps me from starting the day looking like I crawled through chalk and mud on the way to the truck. 🤣1 point
-
Had a repeat of our Thanksgiving turkey dinner last night! Chris stretched out the left-over gravy just a bit and our dinner was just as good again. It tasted really good this year, yum! 🤣 Hope everybody had a great weekend!1 point
-
That's why I saved the dinette seat backs that measure 24x15 and 4" thick! 🤣1 point
-
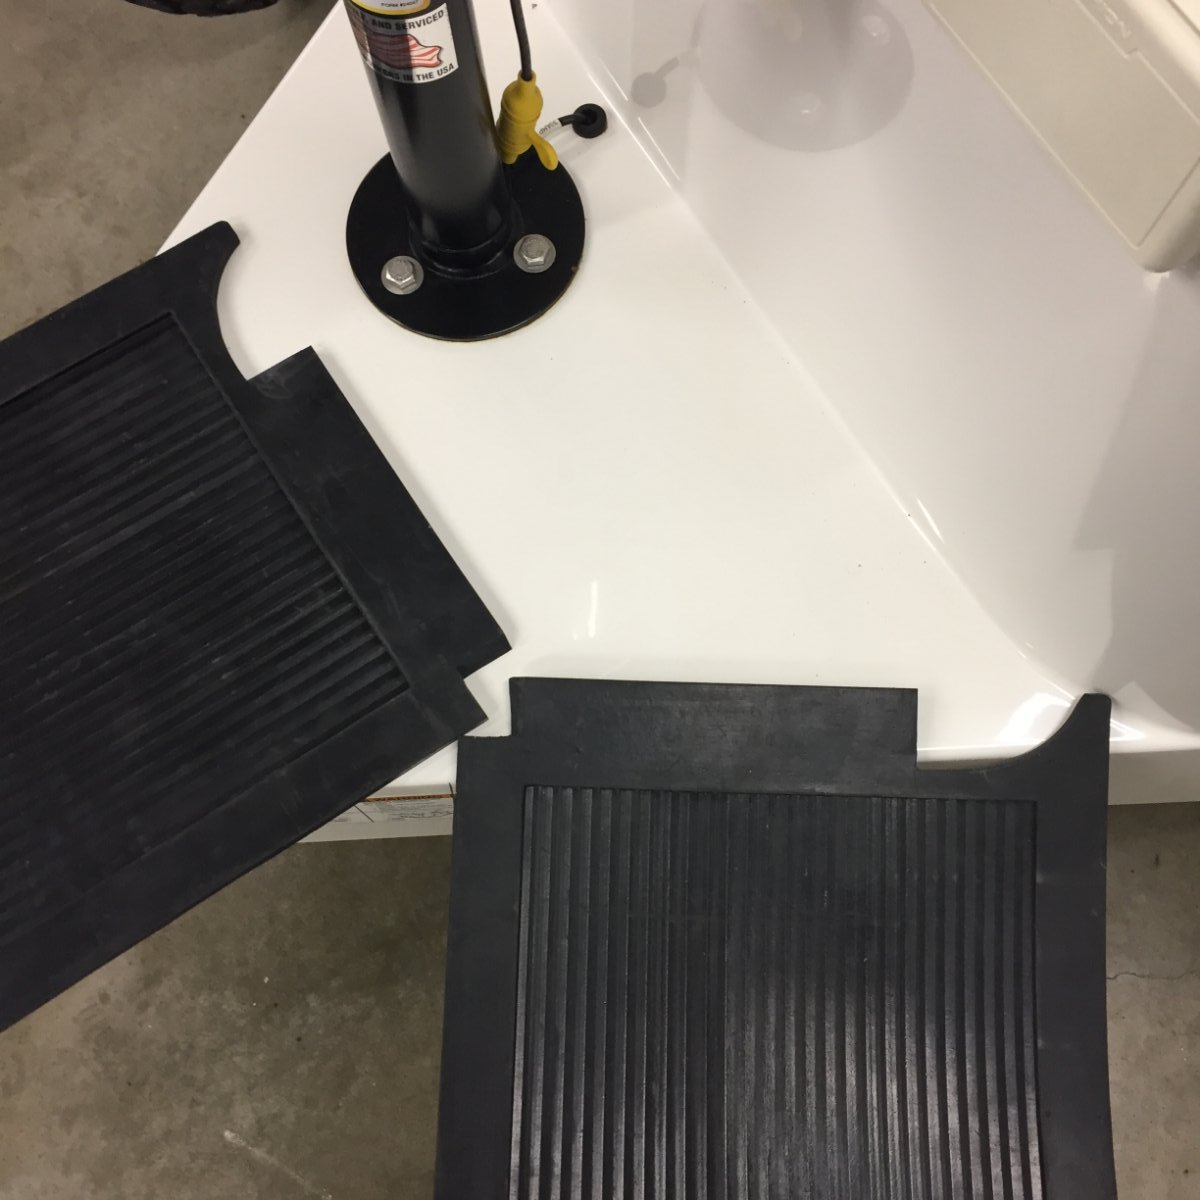
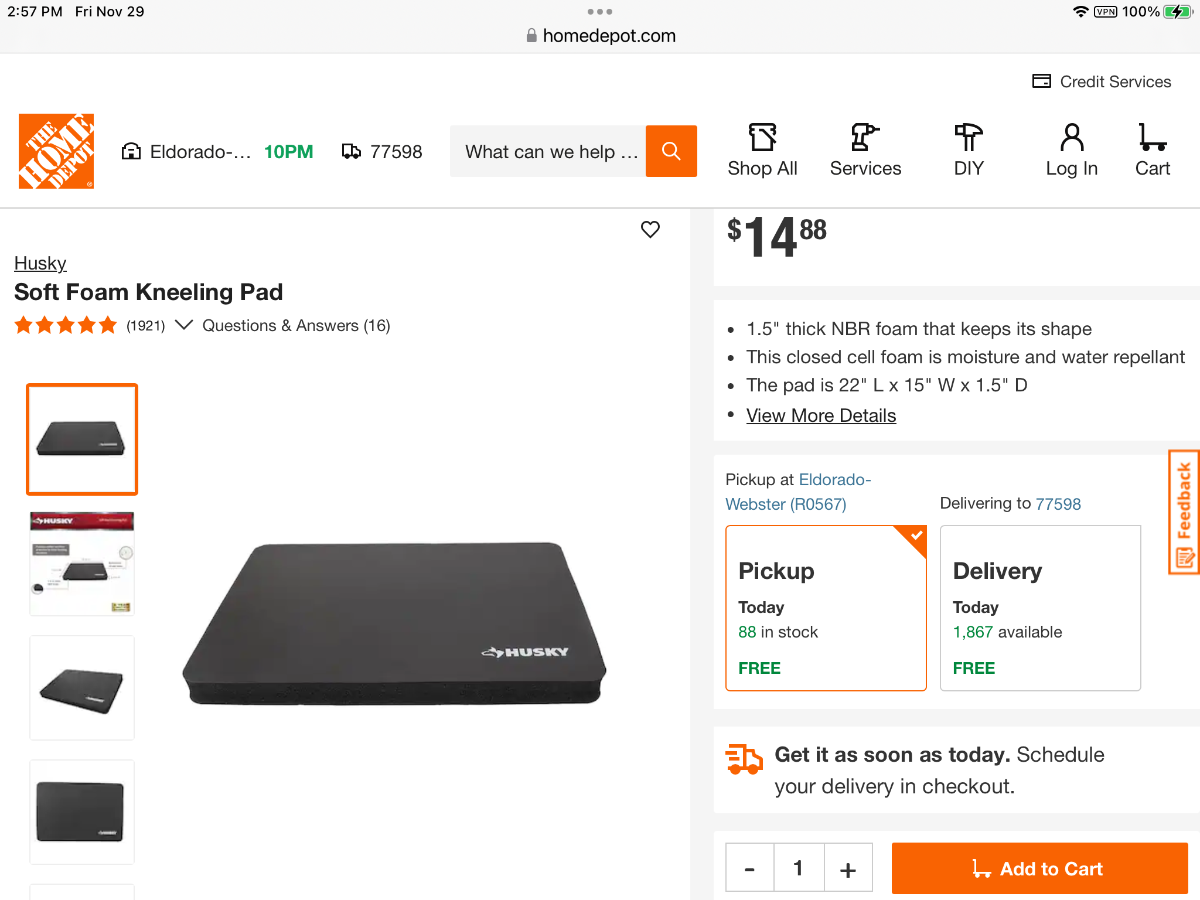
In comparison, the featured Harbour Freight kneeling pad measures 11” x 18” whereas the more expensive Home Depot pad measures 15” x 22”; both equal in thickness. I like having more upper body and hip real estate when laying down inside or crawling under the Oliver, eases the shoulder, back, hip and knee pains a’commin’!1 point
-
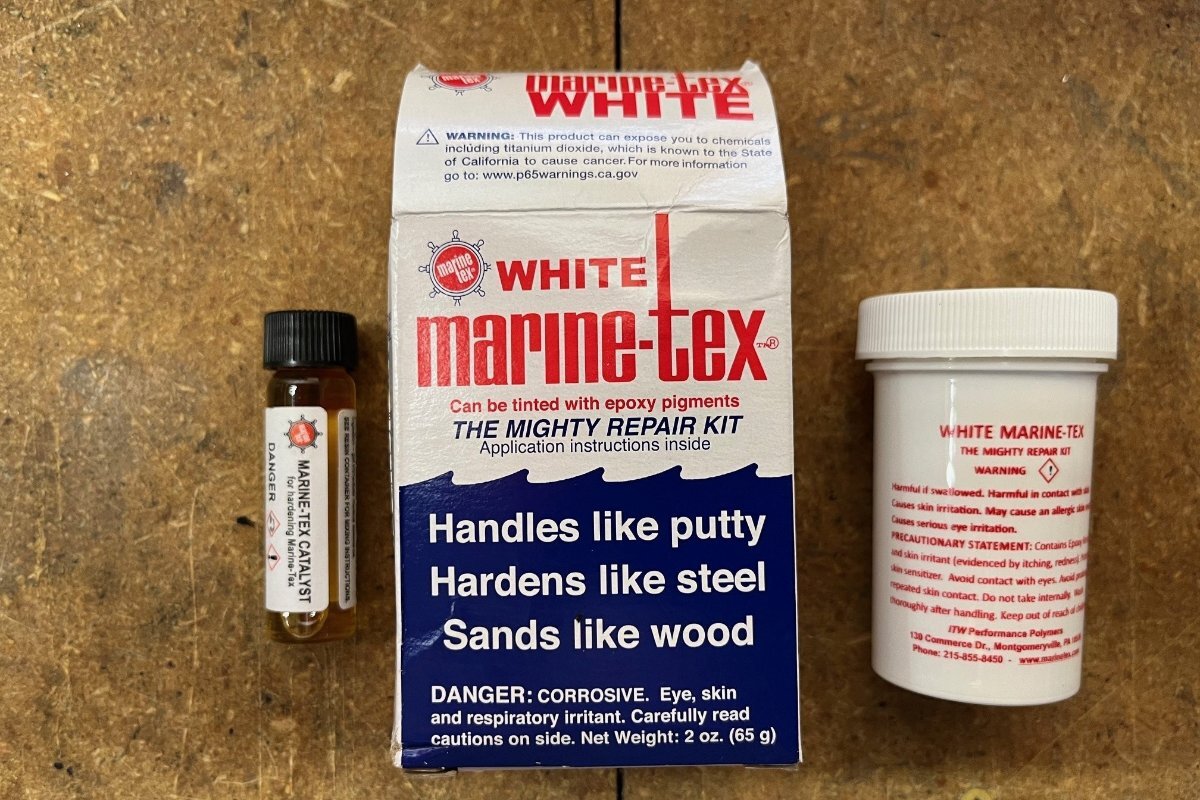
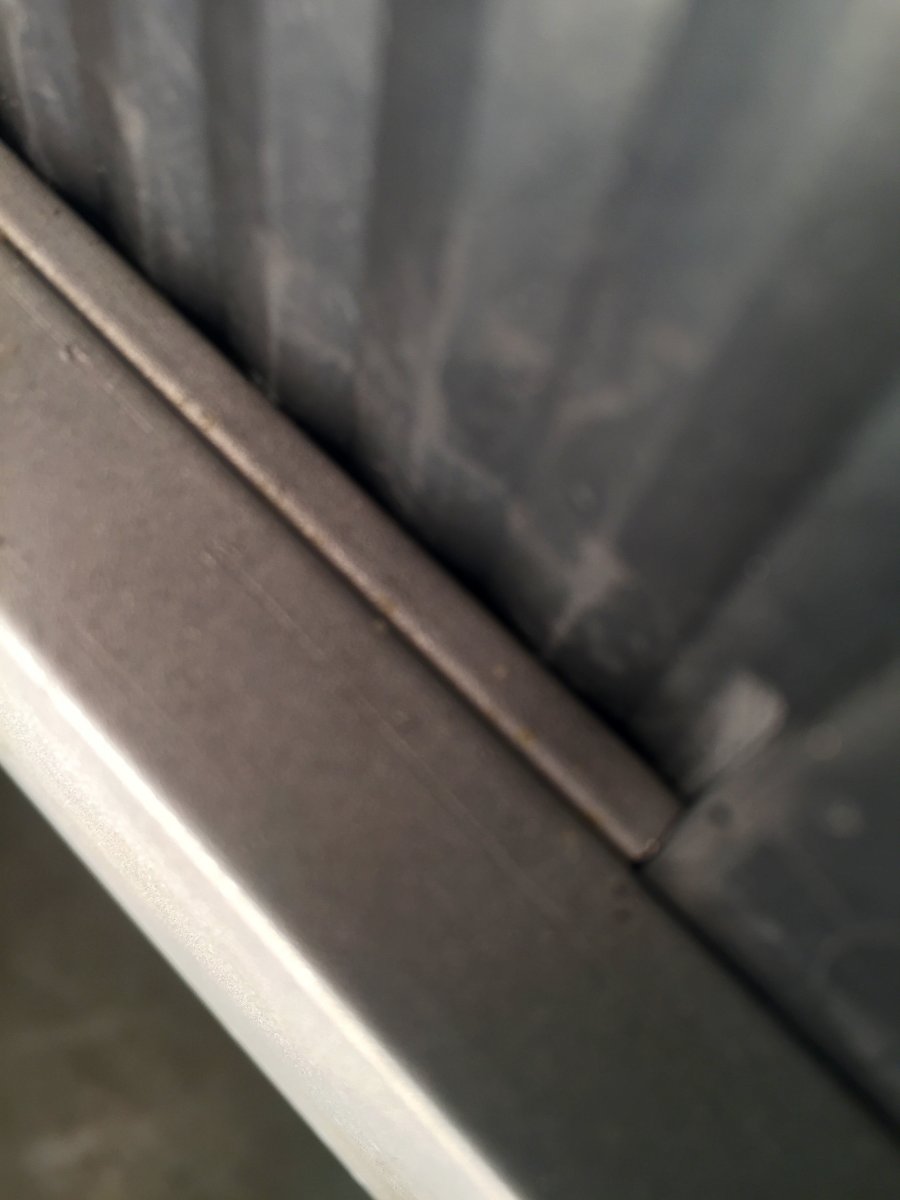
Thanks, John. I did patch these holes when I filled some screw holes on the body. Like Bill wrote, it is tedious with the sanding, and I only got it so good, trying to sand the fill without dulling the area around it. I used this product that was pretty good, color just a tad brighter than our old hull.
 1 point
 -
Fiberglass repair is really not very difficult to do as long as you don't mind filling - sanding, filling - sanding, repeat (plenty of YouTube vids and info available over at the FiberglassRV.com forum). The biggest issue is getting the gel coat color to match. The folks at Oliver should be able to tell you exactly what color you have and even (perhaps) send you a small amount of it. I know that they spray it on for any of the small repairs that I've seen them do. Good luck! Bill1 point
-
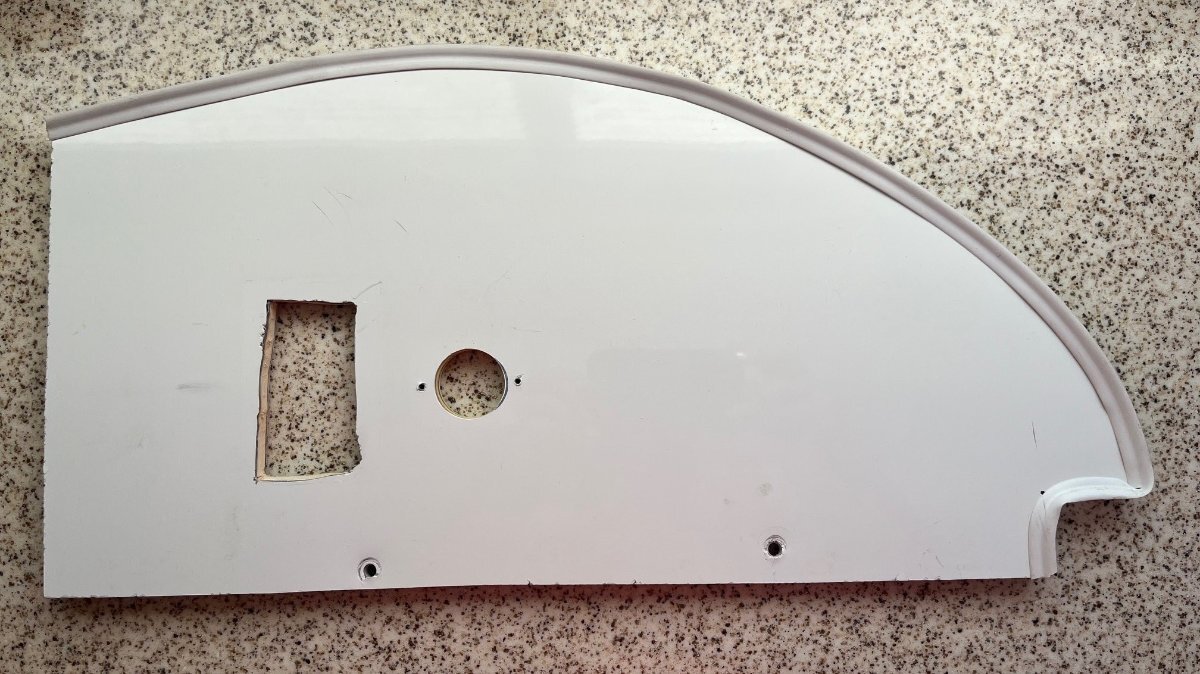
I reworked all the "Attic" wiring while adding this antenna. Check out the first picture. It's not funny! The Oliver family should not employ anybody who cannot cut a square rectangular opening! They also used a 1 1/4" hole saw for the 12V outlet that requires a 1 1/8" opening. And look at how the two screw holes at the bottom of the panel are lined up. I used the original hole for the new Winegard antenna controller and drilled a new hole to install the dual USB port. The simple power strip and an HDMI switch (choose between TV tuner or Blu-ray player) are both mounted with VHB tape. Our WHITE and amazing Samsung 32" high-rez monitor, its screen only 1/2" thick, has no internal TV tuner. I added a remote digital HDTV tuner. You cannot see this in the install since it is behind the panel. It's powered by USB and HDMI is the output. Simple, inexpensive and works well: https://a.co/d/7YBYzxw Check out all the wires in the bottom RH corner of the second picture. The TV tuner, the TV power supply and all extra cabling is behind the panel. The Winegard controller has cable inputs and output behind the panel too. The cable TV input you see in front is extra if needed. I should have taken a picture behind the panel.
1 point
-
2024 was an amazing year for us. We sold our home in Loxahatchee, FL, moved to our condo in Jacksonville Beach, and recently completed our new mountain home in Dahlonega, GA. My new shop is up and making sawdust. We cannot be happier. My 2025 catalog has new products and many more pictures from Oliver Trailer owners who have had me craft upgrades. You can download the 2025 PDF catalog here: http://bit.ly/3v0qiqU Onward and Happy Camping, Foy Sperring
1 point
-
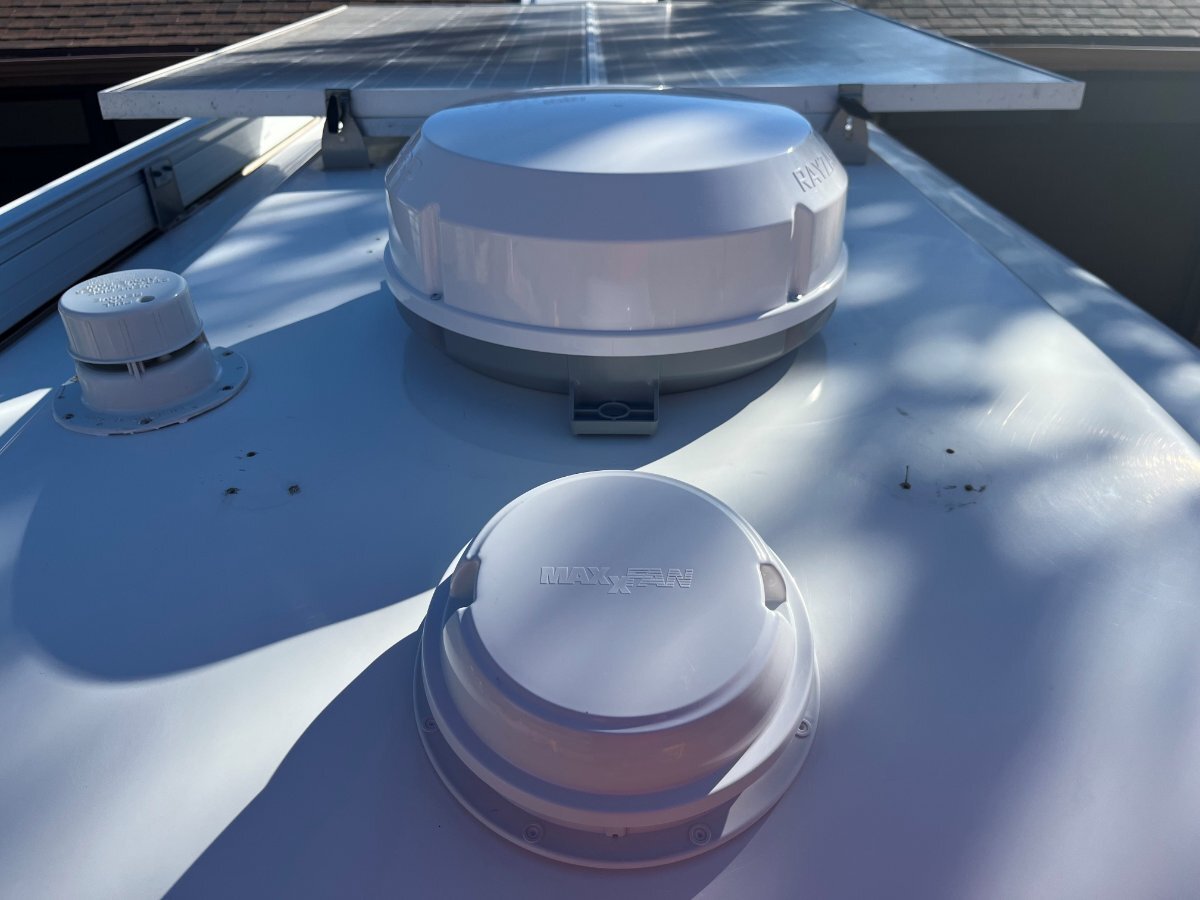
UPDATE on our A/V system installation - Back in June 2023 when we purchased our Oliver, I thought the Winegard Dish Sat setup was a nice option to have. We got a Wally receiver and used it on one spring trip to Utah. We soon realized the monthly cost of the Dish Network, even paying a month at a time, was too much money for the value. I would prefer an antenna to view occasional local broadcast TV when traveling without monthly service fees. I just removed the Winegard satellite dish. I wished OTT had never installed this system for all the related repair work, though I will reuse the same coax feed for a new antenna. After some antenna research, I went with the Winegard Rayzar Automatic Antenna RZ-8500. It has the advantage of being self-adjusting, automatically turning the antenna for the strongest signals. These are expensive at over $400. Months ago, after looking on-and-off, I found a new unit from a private eBay Seller for $250 shipped! Living in Prescott AZ, broadcast HDTV is bounced off Mingus Mountain (think Jerome AZ) to the north of us, from Phoenix 100 miles to our south. Also, our Oliver is now parked behind our garage blocking line-of-sight to the repeater. However, the Rayzar antenna still found 13 frequencies, with subchannels connecting to 30 stations. This antenna works very well. I did not want a directional antenna that would need manual adjustments. It may appear that I’m removing one eyesore for another, but the new antenna is much smaller. The Dish Sat was a monster at 13” tall with 20” diameter. The Rayzar is half the height at 6 ½” and 15” round (notice screw holes from old unit in the picture). It is far less noticeable on the Oliver roof, just 2” taller than the solar panels and hardly noticeable from ground level. In the picture nothing is mounted, until all the fiberglass work is completed. The new antenna will be held tight with 3M 4950 VHB tape, no screws!
1 point
-
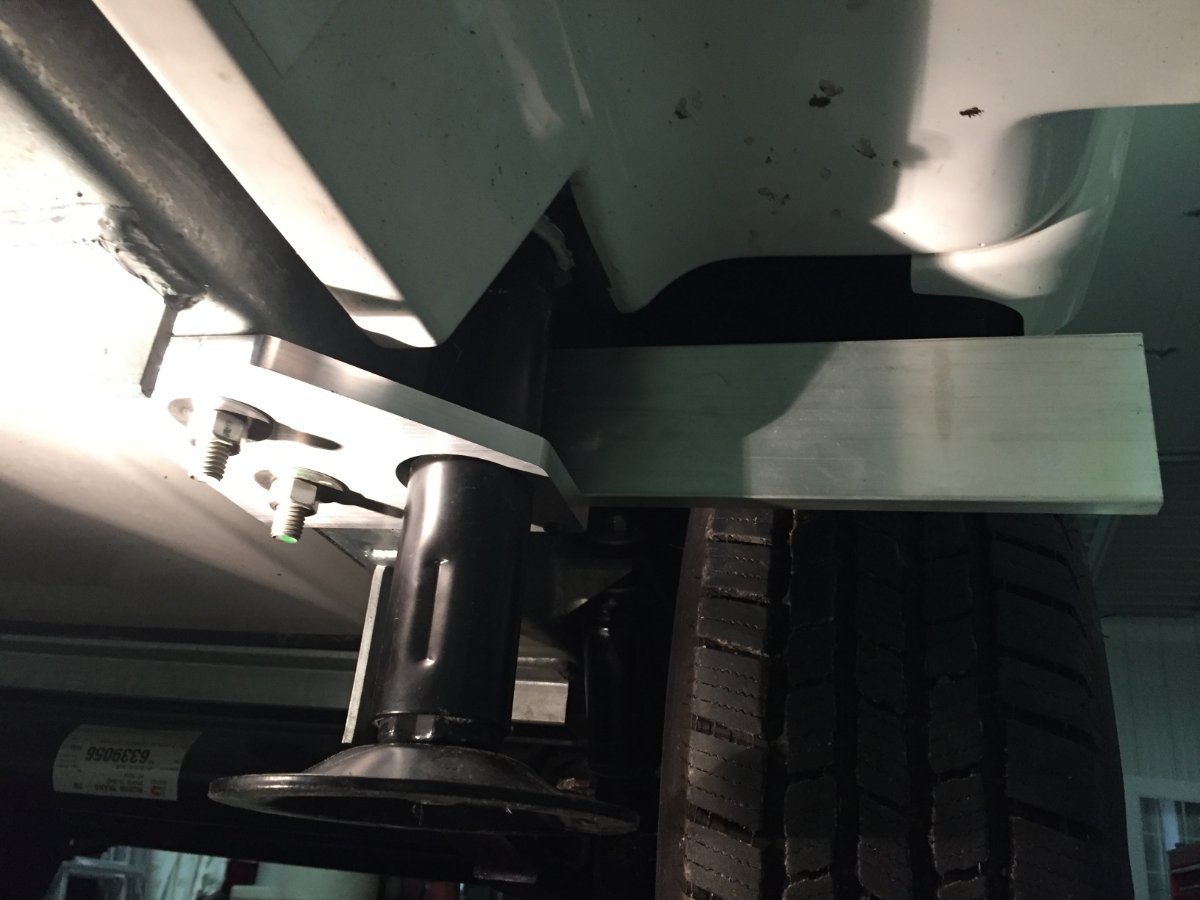
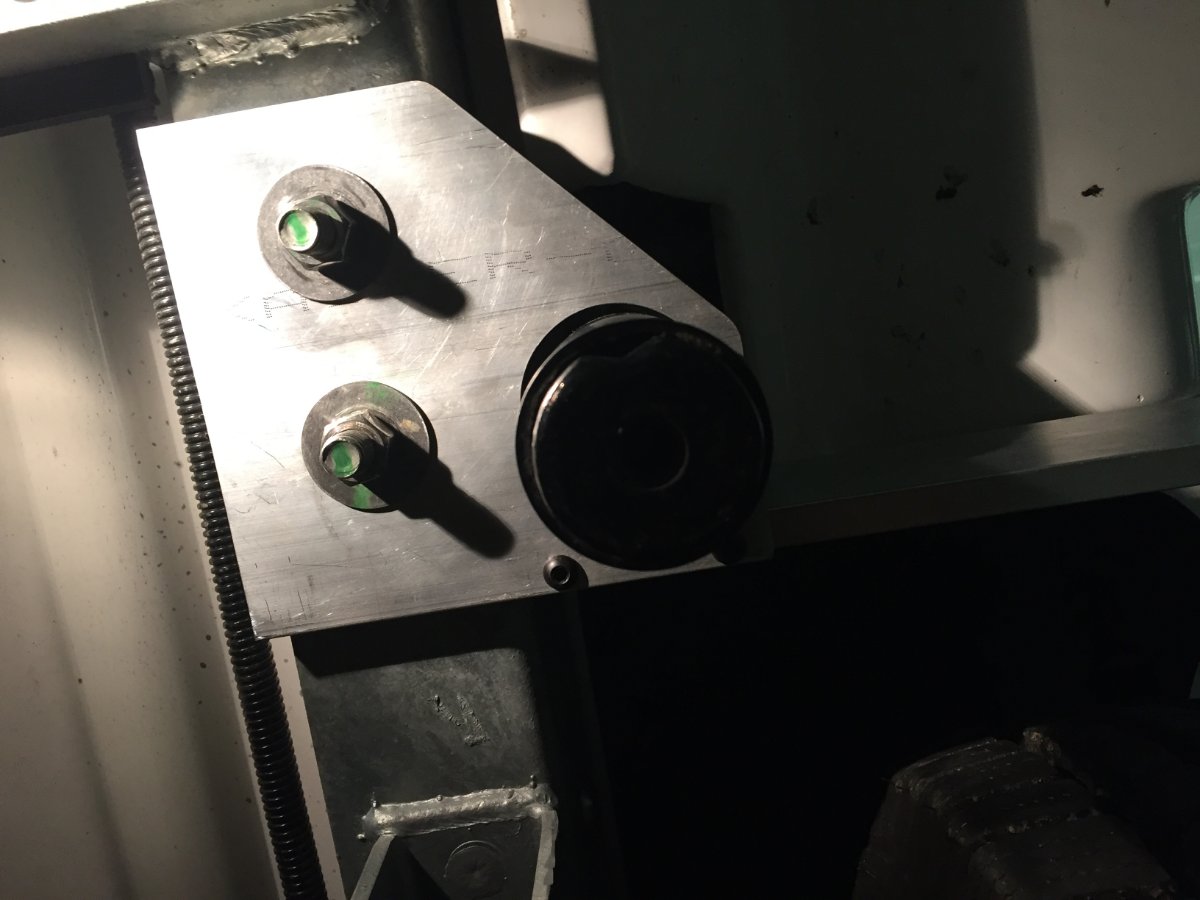
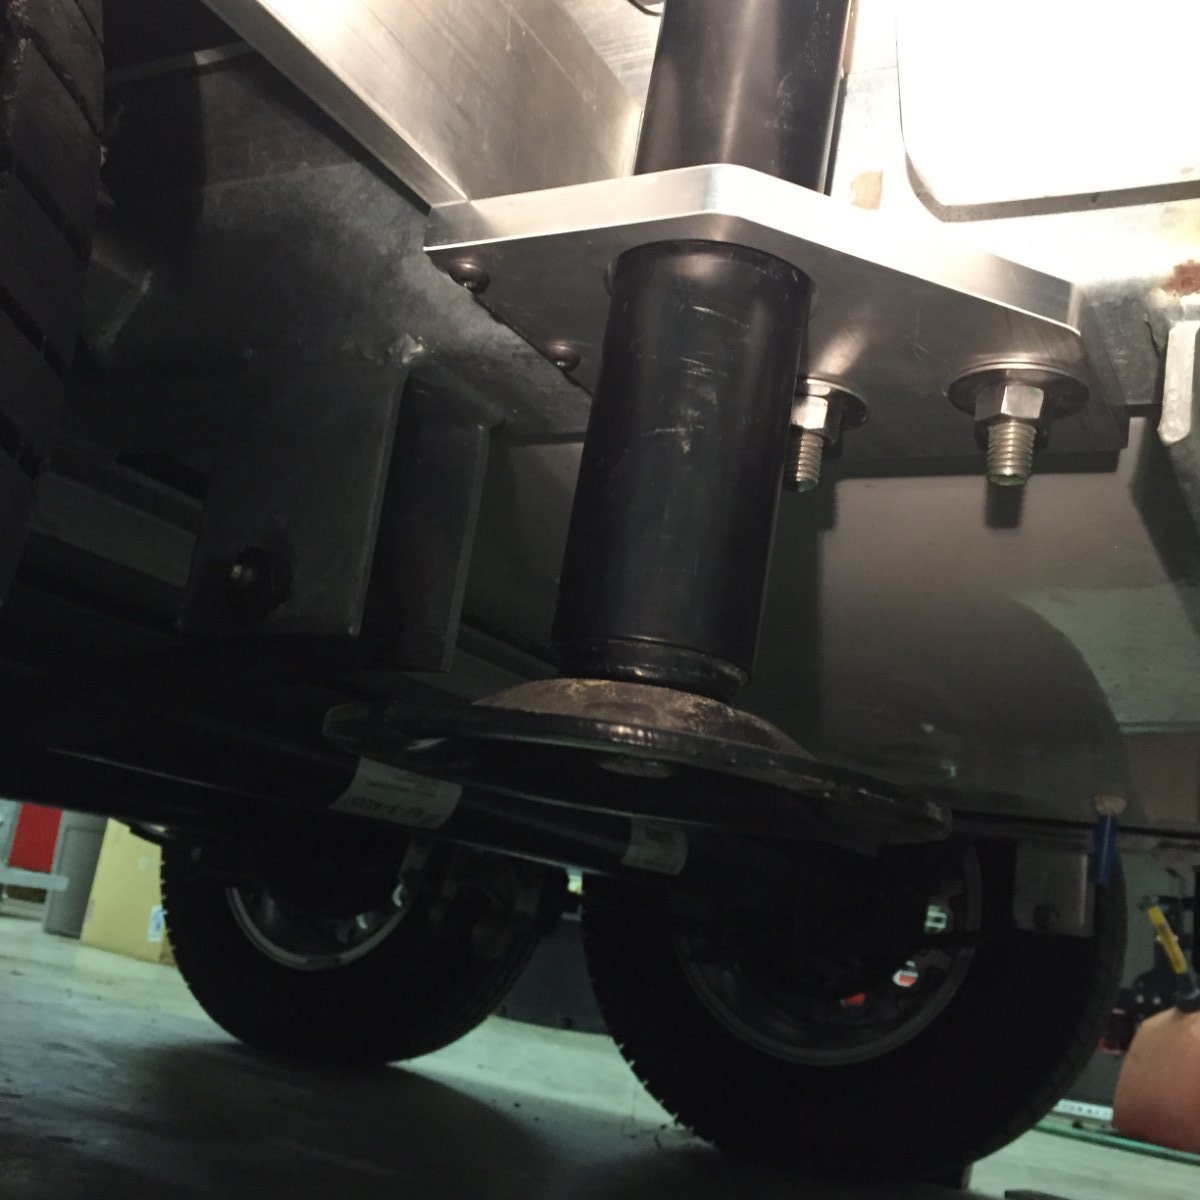
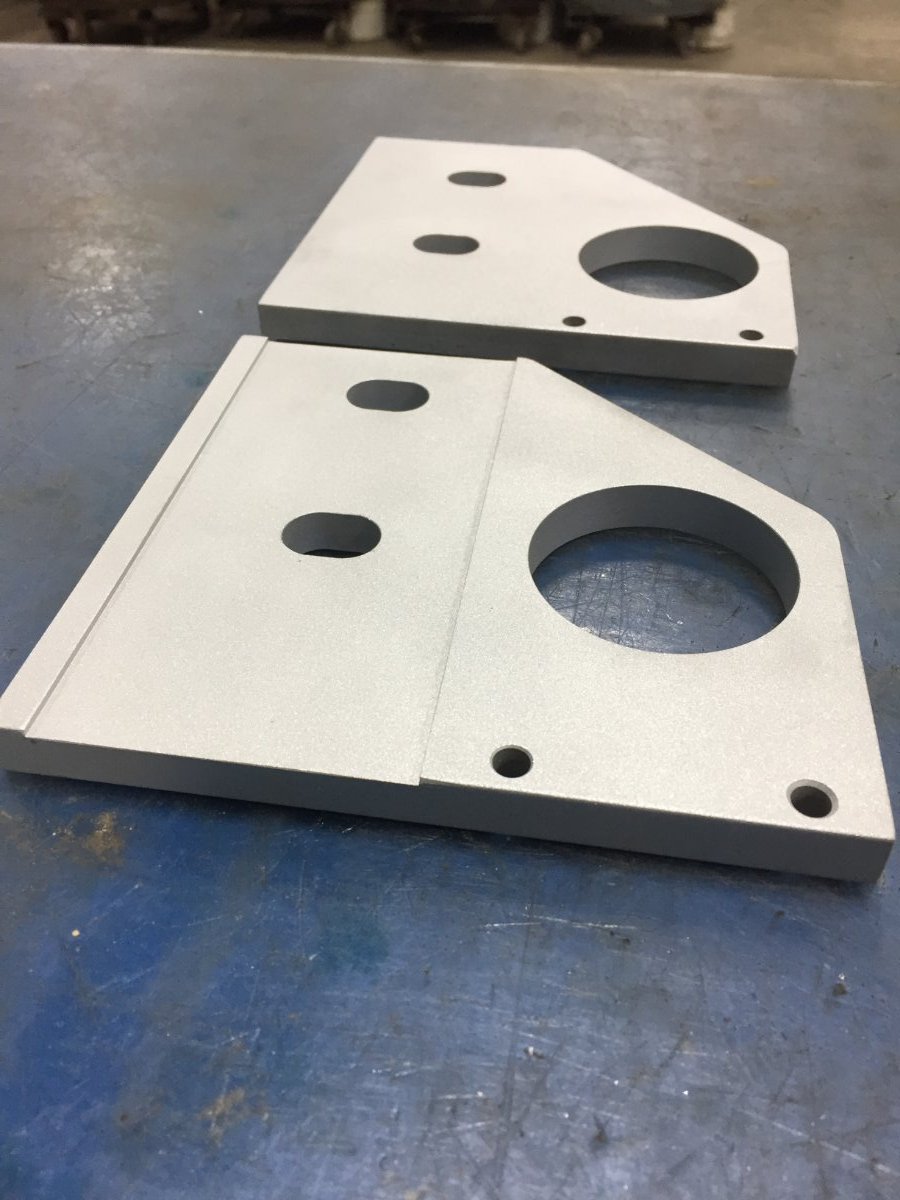
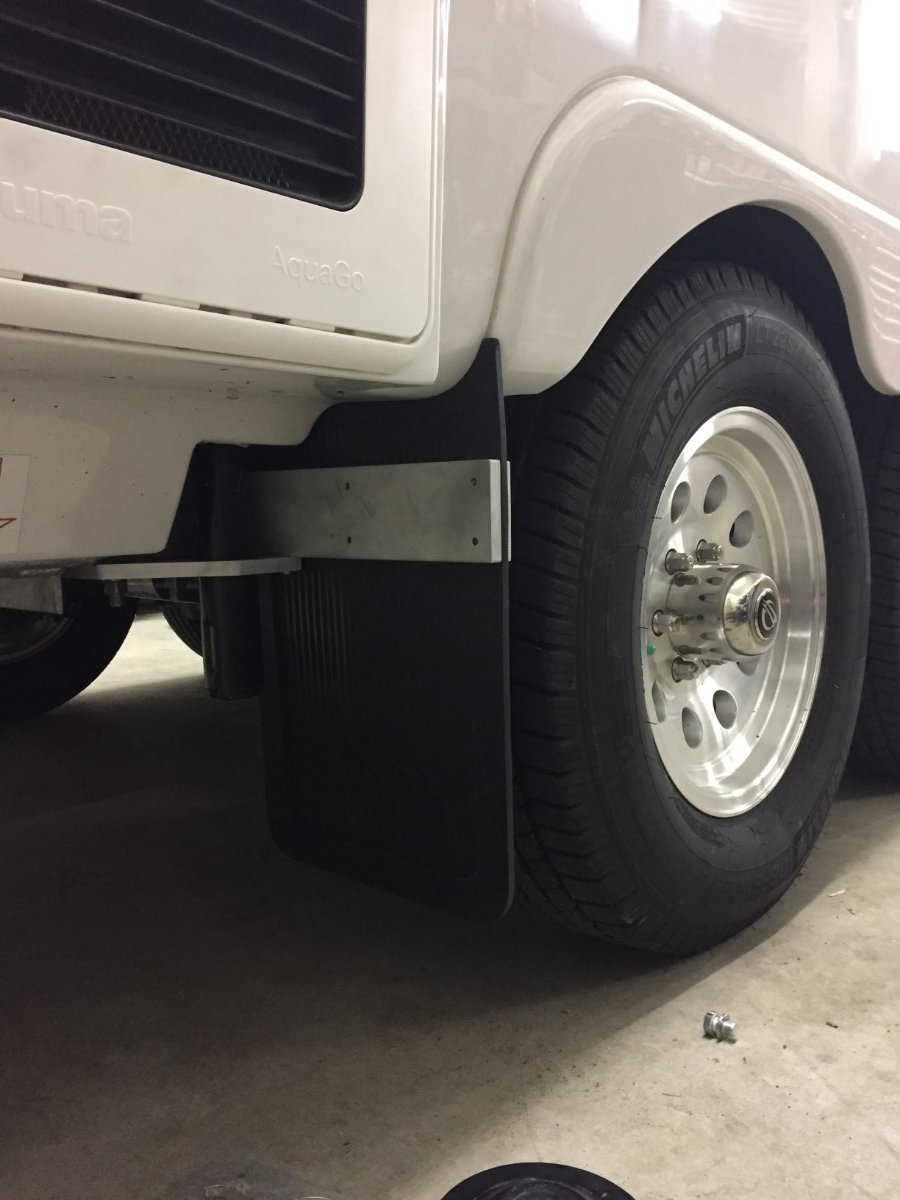
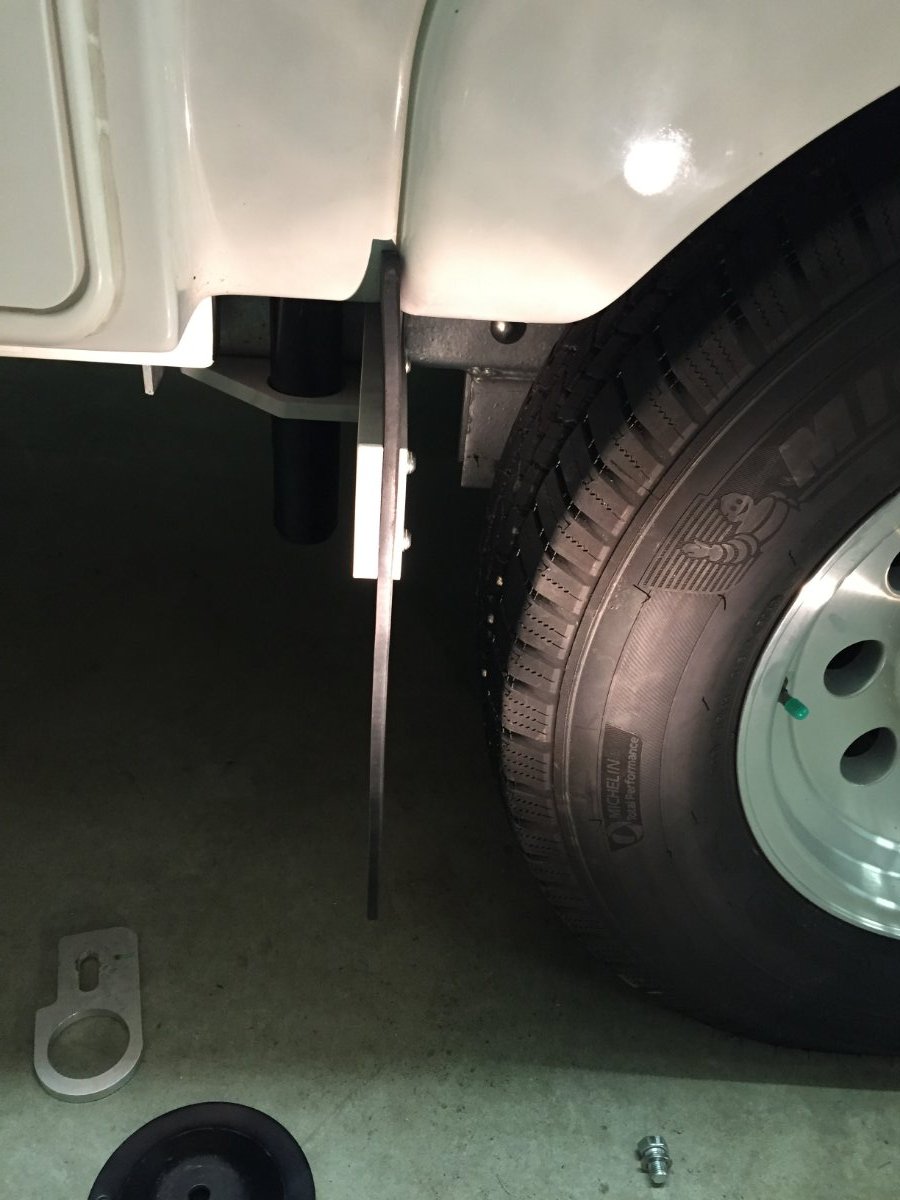
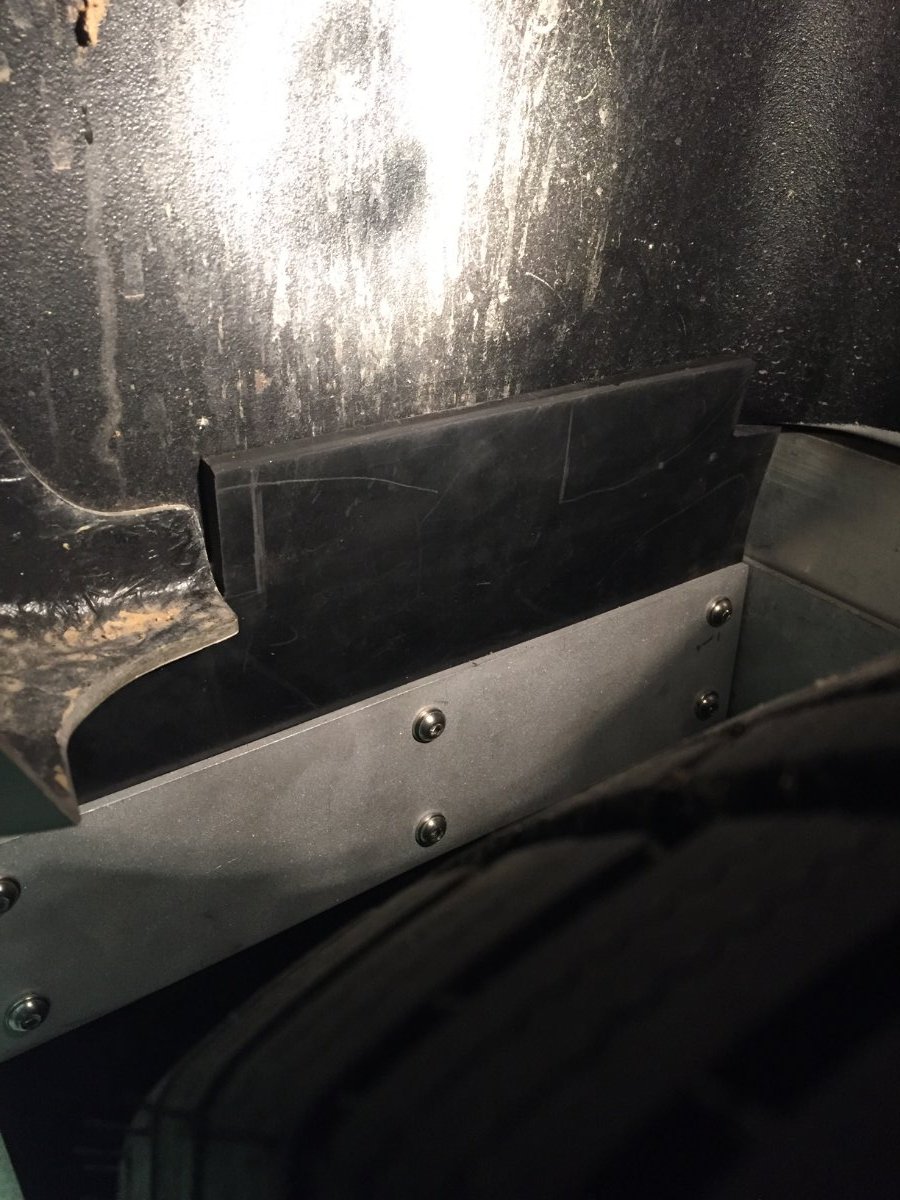
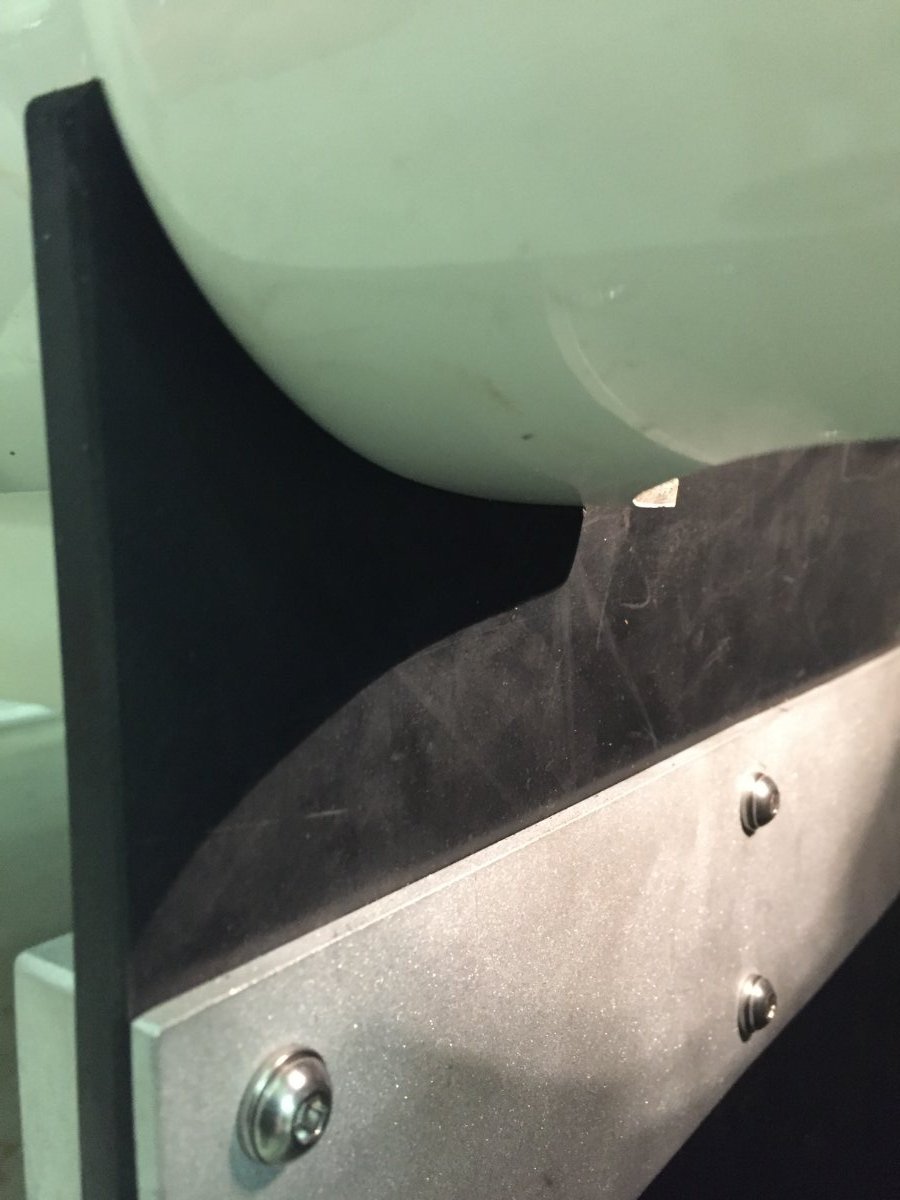
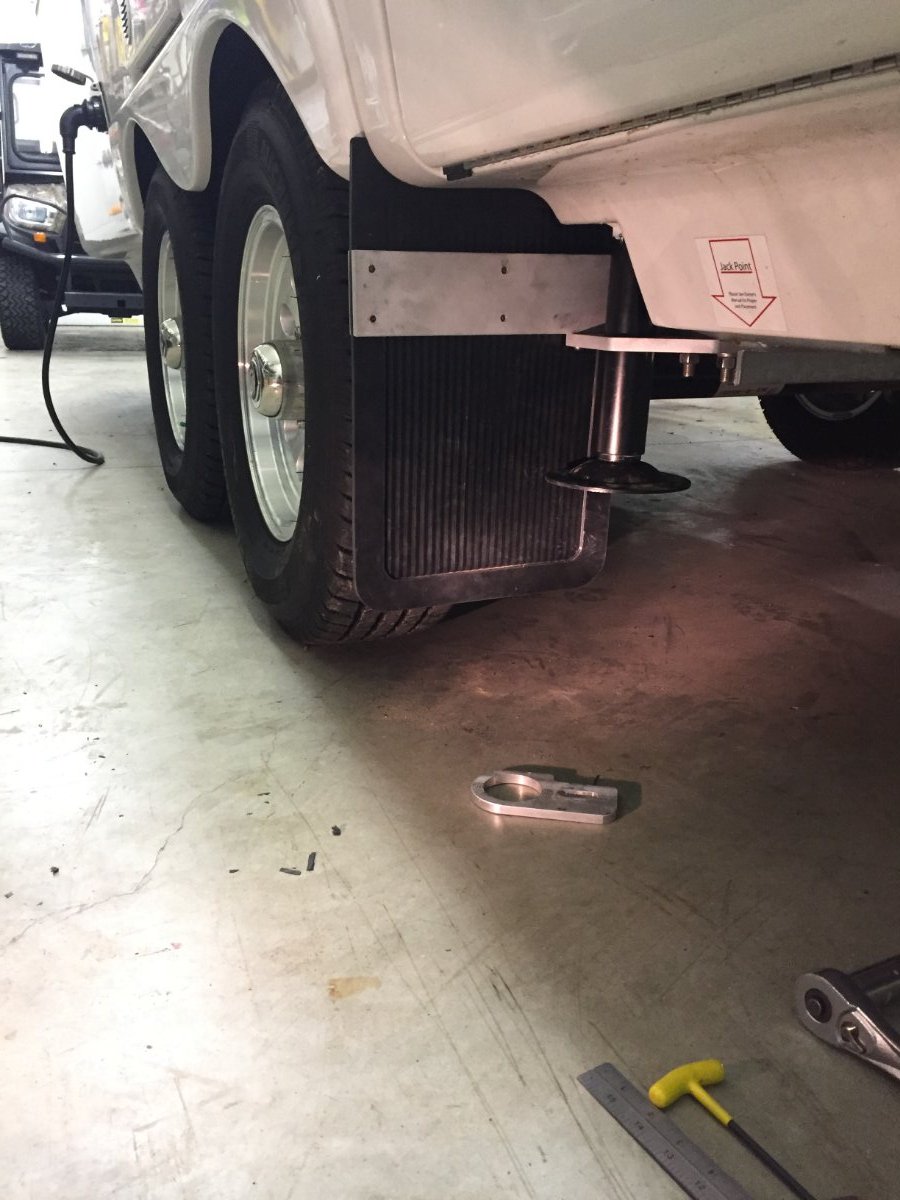
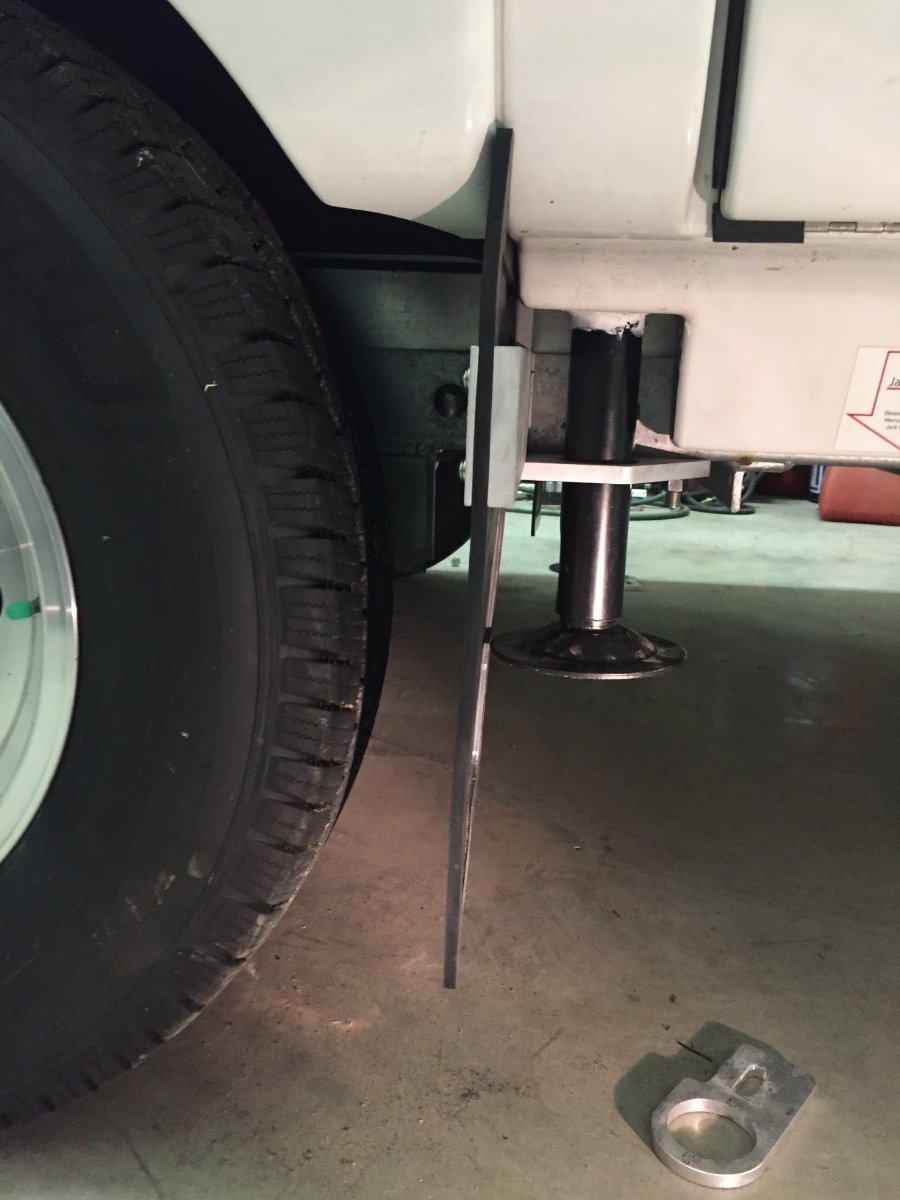
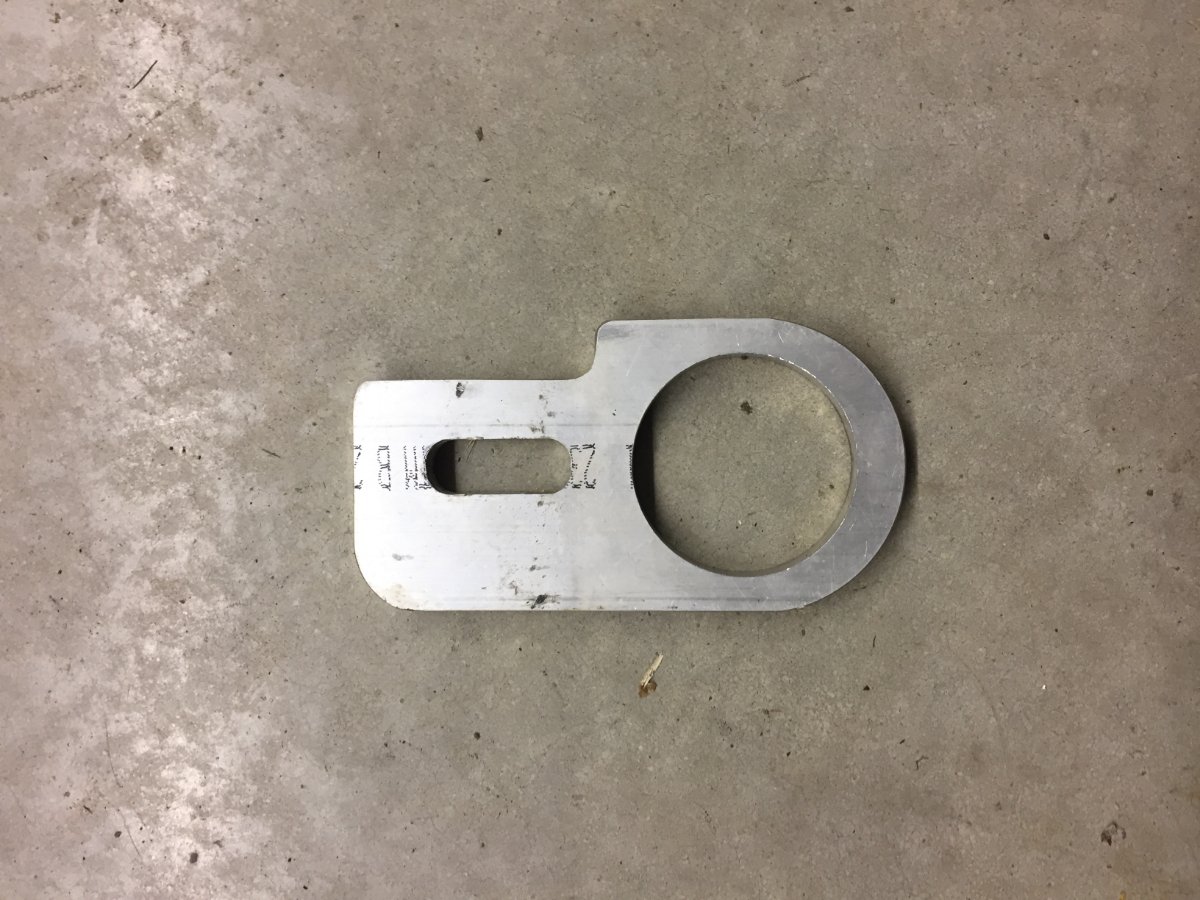
Sharing my modification to bring mudflaps closer to protect everything beyond the wheel well.
1 point
-
I carry a pad in the Oliver for any kneeling or laying on my side or back; stows against the nightstand between the twin bed rails and floor perfectly. Mostly for inside use, but outside on occasion, as necessary.
1 point
-
Airstream trailers use a much thicker 'plastic' on the door interior. Probably the ONLY 'plastic kind' of material being used. I do not know the composition, but it is not Aluminum or metal. OK? It is a 2019 as is my 2019 Oliver Elite II. They purchase the plastic from... someone, somewhere. Possibly the same company that makes this 'plastic', or whatever it is... for Oliver. Plastic: PET, POM, PBT, PA... and the list goes on. This door 'material' is thin on the Oliver. After a time span... it has become brittle. Some may say it is used to save WEIGHT to the Trailer. Yeah... right. My wife saw this thread earlier today, which got my attention. Anyone who has worked with Fiber Glass... like some of us did with 1960's Corvettes when they were... cheap... whoa... the smell is something I never forgot. Once 'cured'... no smell. Older automobiles can have parts or components that shrink. Acetate Dice and earlier Nitrate Casino Dice... also have a problem. Nitrates shrink, distort and decompose exposed to air over decades. Acetate Casino Dice... will keep their sharp edges and probably last a hundred or more years. This issue with the very thin interior door 'material' is a problem. I find cracks in my Oliver door. I suspect everyone will have hair line cracks. Some will get those that shrink, but fold and curl up on vertical shrinkage. If you have the horizontal hair line cracks... you are one LUCKY owner. The curling I saw next the door window, may be the same material, but cut to size differently. The material is inexpensive, compared to the LABOR to remove and replace. Makes my nasal hairs... tickle. 😞 Sorry for taking your time... I did OSHA inspections in my youth... and... heard lots of excuses and finger pointing, as well.1 point
-
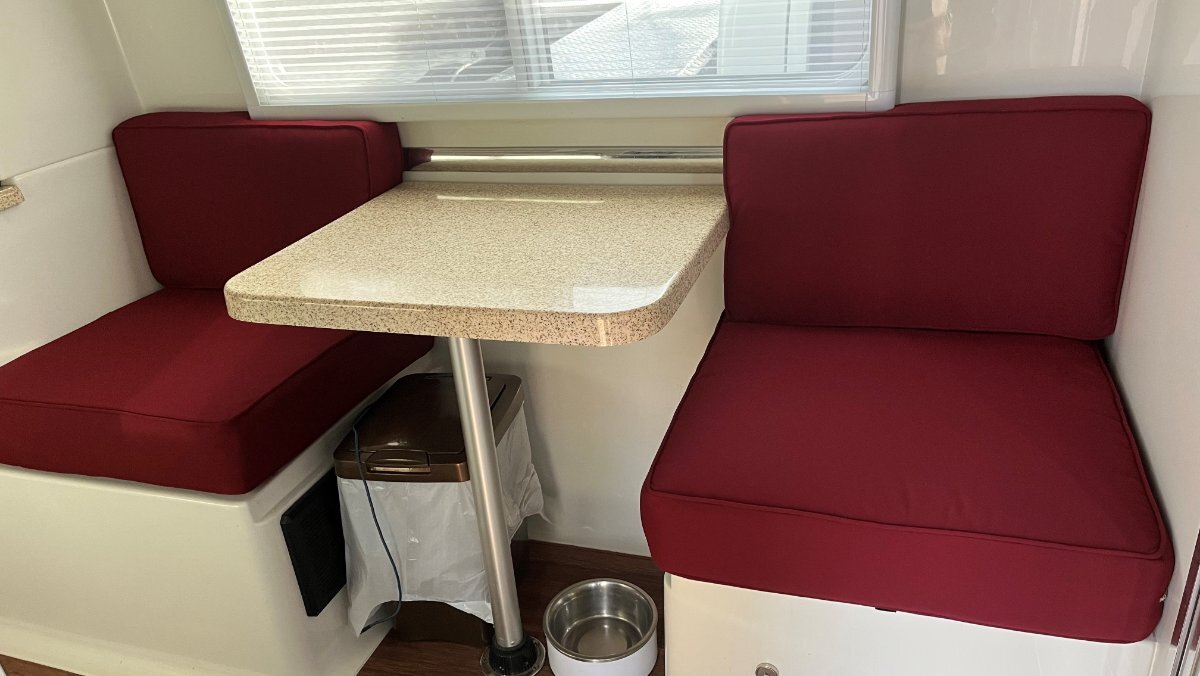
They put us on their November calendar. After running our trip, every time I sat on the old cushions, I thought it would be a shame to merely reupholster with new cloth yet keep the 9-year-old foam. When we dropped them off, I asked about new foam. He said the quality of foam for seating they carry is far superior to what we showed them in the old cushions. We went with 24x25" bottoms with 5" new foam (1" taller) and with the batting and fabric, the cushions are closer to 6" tall. We had 2" clearance under the window frames with the old cushions. The new ones just fill the opening and stay nicely. Went with the original sized 4" foam for the seat backs. All new foam, batting, fabric, zippers with newly corded edges. Chris loves the color given her Red, White and Blue Oliver theme! We spent just under $500 out the door. Which for me was better than the $350 for upholstery only. Soon, she will look as good as she tows or provides inverter power!
1 point
-
Neighbors next door to us recently put their house up for sale and the Agent obviously used AI to spruce up their recently flooded home and property for the MLS pics. I guess the AI never saw an Oliver before.. 😂
1 point
-
Might something like THIS work for keeping that door closed? Bill p.s. "invention is the mother of necessity" and I really like your work.1 point
-
My temporary fix is working well enough and may tweak a bit for a more permanent solution, since parts are not readily available.
1 point
-
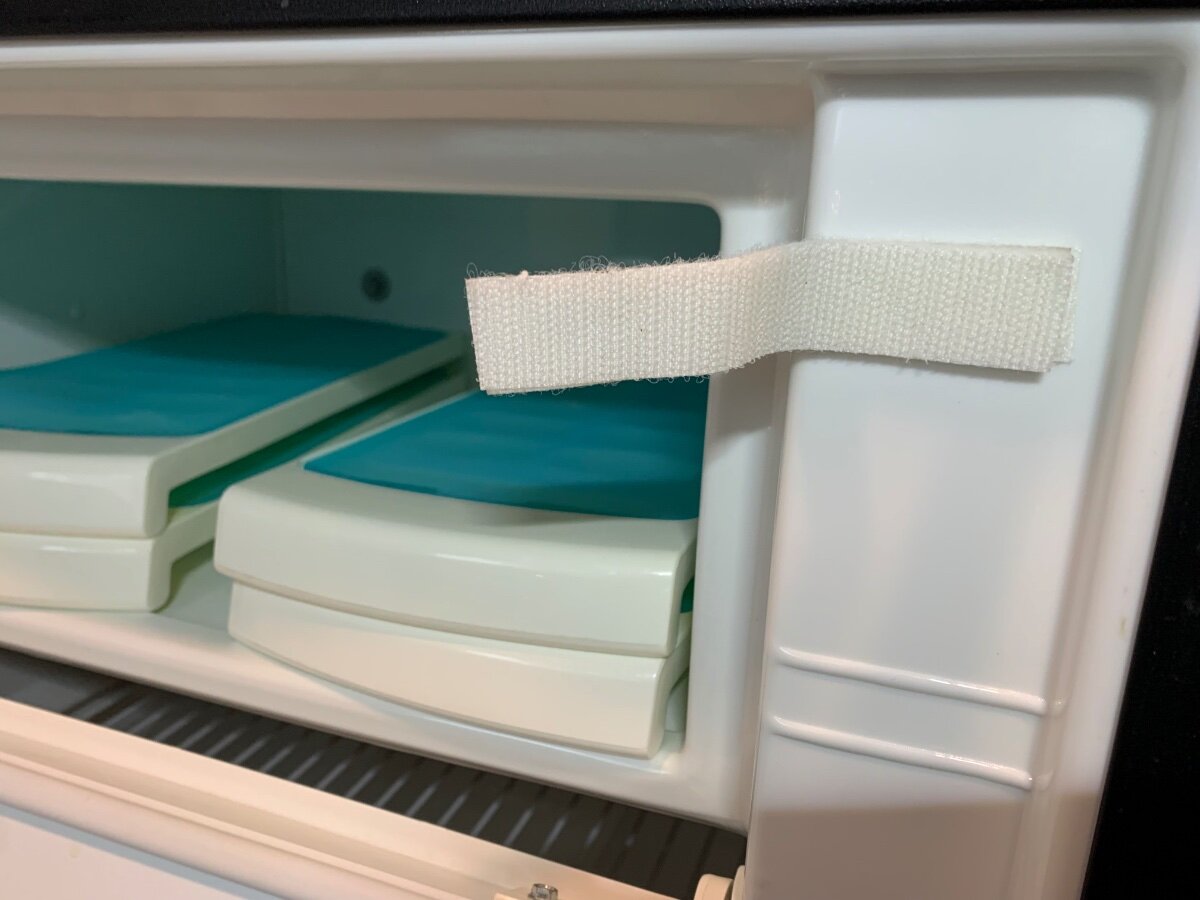
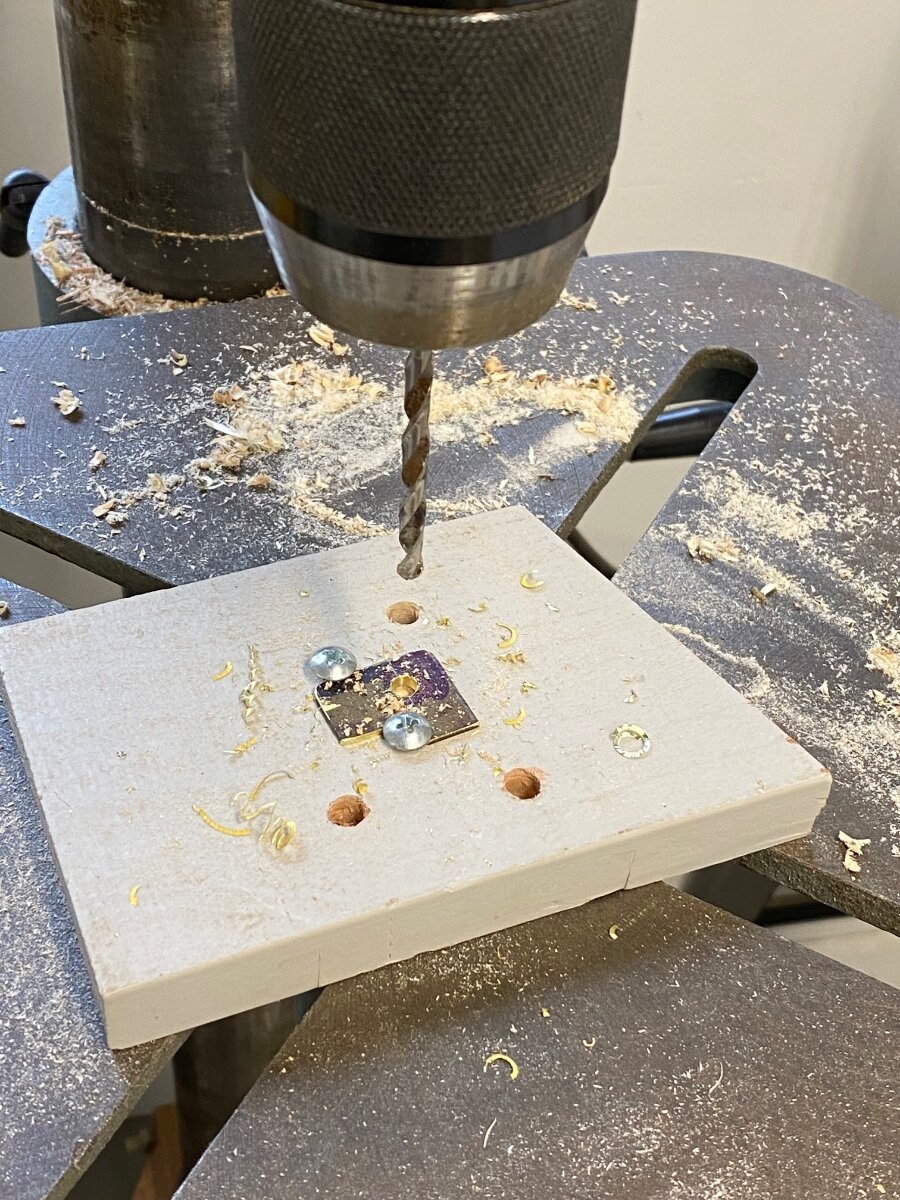
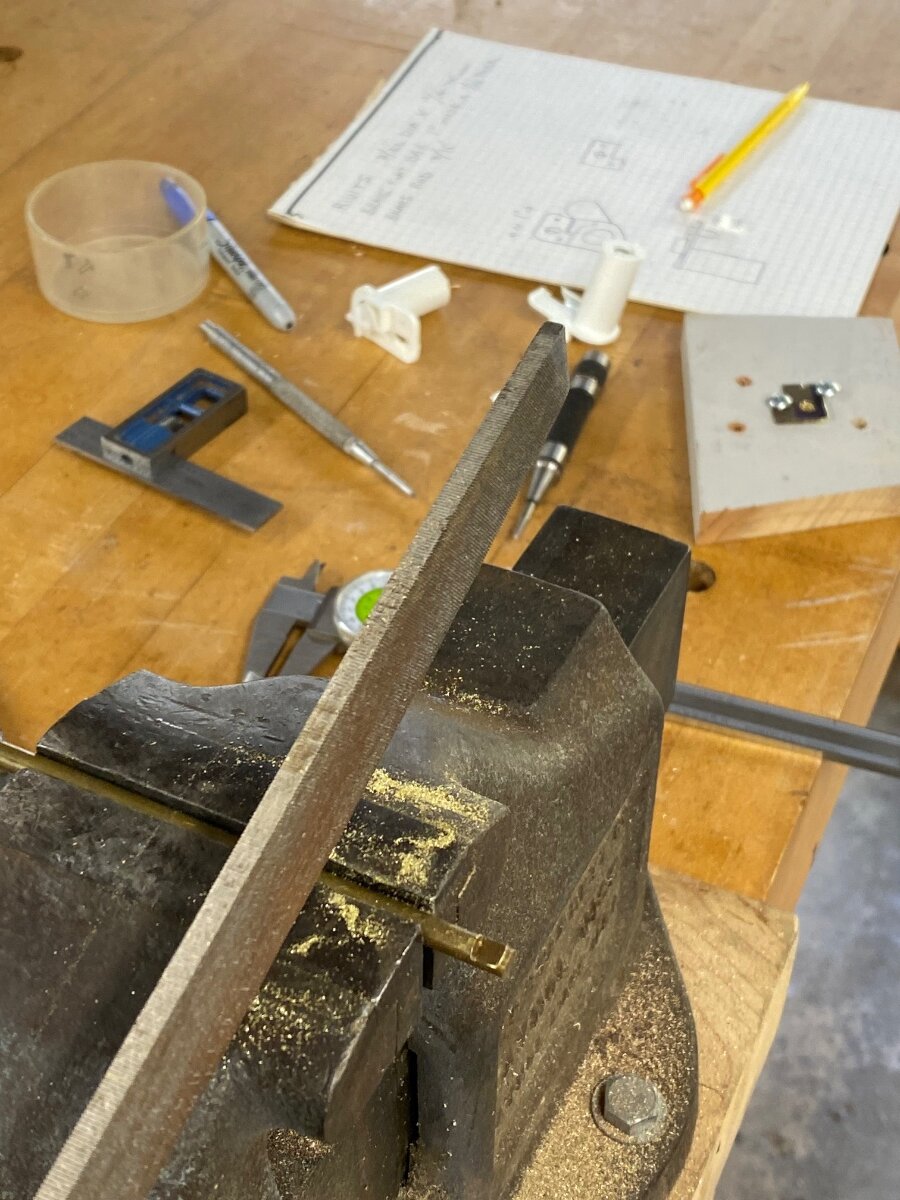
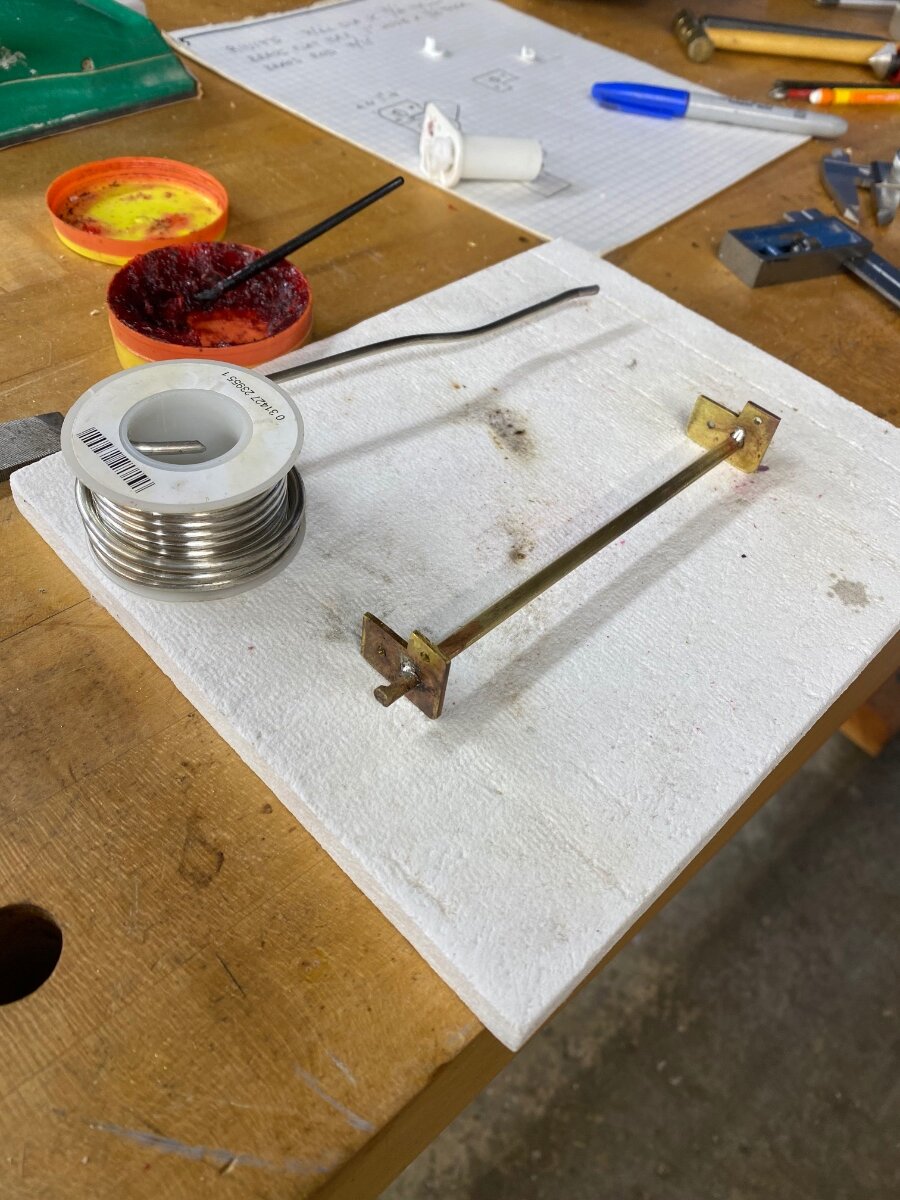
Oh boy, another one bites the dust! Those little notched pins for the freezer door hinge broke off on ours too, and now the door won’t stay closed or seal. I searched the net for new parts and nobody had the left spring holder assembly. But while searching, this post popped up and I found out Im not alone! Apparently Norcold is out of business and these parts are no longer available. So short of replacing the whole fridge, I figured out a way to repair them. I cut out pieces from 1” x 1/16” brass bar to “sister” onto the broken spring holder assemblies. Holes were drilled for a 3/16” brass pin and 1/16” rivets. I filed notch’s on the brass rod to match the original pins and soldered them into place with plumbers flux and solder. I trimmed the excess, and filed it flat. The new brass piece was riveted onto the hinge with 1/16” diameter x 1/4” flat head brass rivets. Fortunately I had all the brass and rivets in my stash, but most hardware stores carry this stuff. It was a little tricky to install the hinges with enough spring preload, probably because the repaired hinges were stiffer and wider than the originals. Here’s what worked for me: Put the repaired right spring holder assembly in it’s final position on the fridge wall. Remove the right door mount clip from the door. Install the left spring holder assembly onto the door mount clip so it has spring pre-load. Mount left side door with spring holder/clip assembly onto fridge while maintaining spring pre-load. While holding door in place, use left door clip to wind some pre-load and screw it on the door. Hope this saves someone a new fridge! Cheers, Geoff
1 point
-
Ah, yes, the Oliver Motorhome. They never sold well, possibly due to the lack of a windshield. You don't see them very often.1 point


.thumb.jpg.e34bf01ef7f7d5e99ad31856d45afbeb.jpg)


-
Recent Achievements
-


")


")


")


