Leaderboard


Popular Content
Showing content with the highest reputation on 12/12/2025 in Posts
-
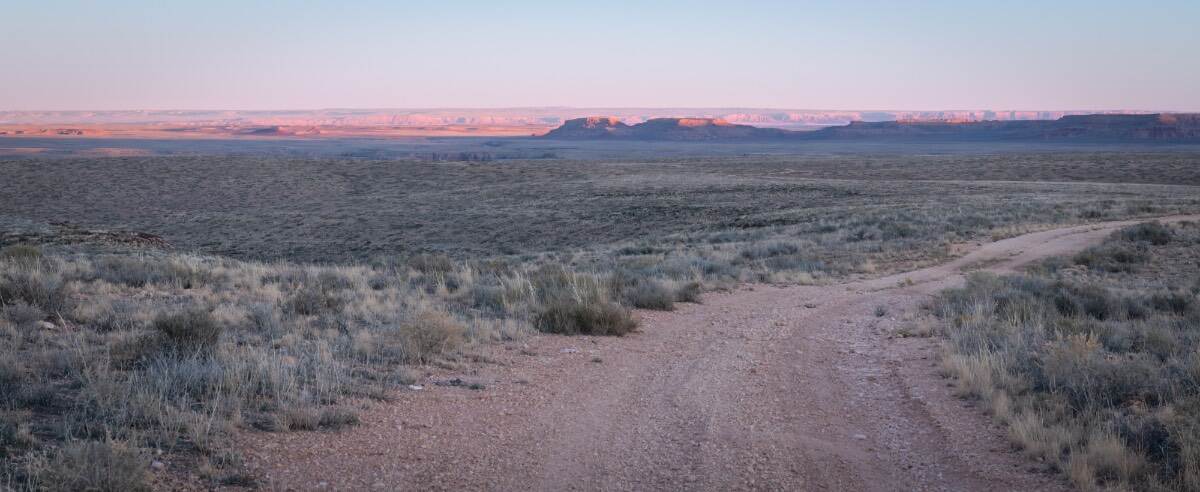
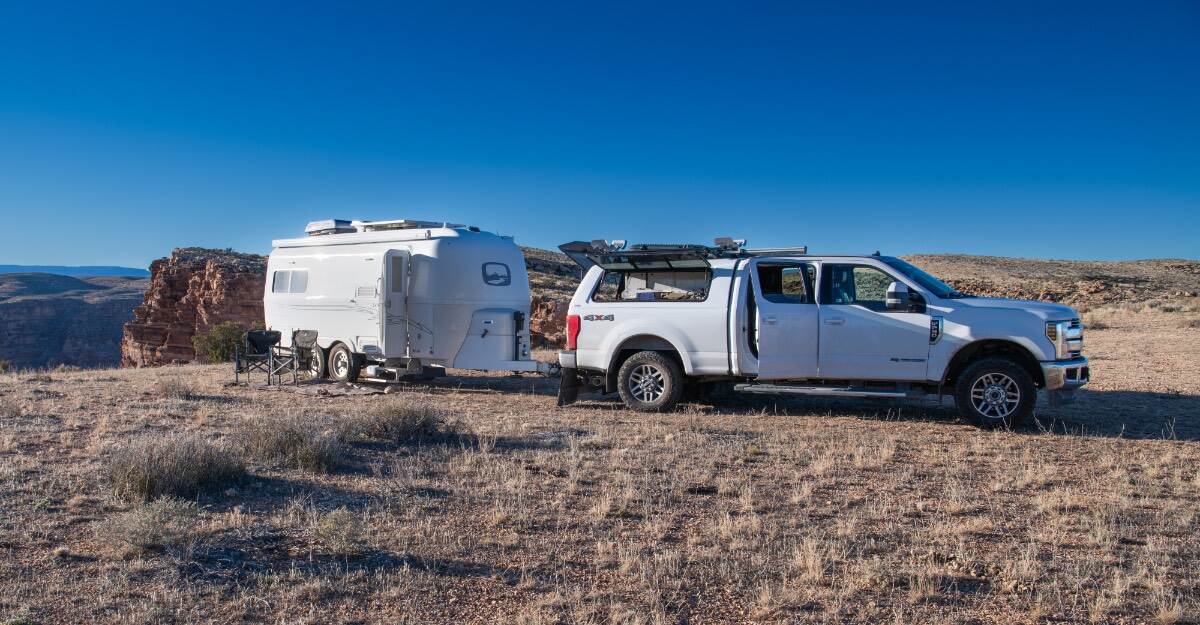
Stopped to get permits to camp on the Navajo area called Coal Mine Canyon for tonight. The roads into the area were closed so the people at Navajo parks in Cameron suggested the Little Colorado River Canyon. We were told it's a great place and only 12 miles off AZ highway 89. Our first clue we are about to have more than we bargained for should have been the Navajo road #6134 did not have a sign marking the cross road on AZ hy 89. Fast forward: 2 hours and 20 miles on bad gravel / some light 4x4ing due to steepness we arrive at the spectacular overlook of the very remote canyon. Maybe 1500-2000 ft deep with blue water winding between the walls. There is no doubt we are alone. It's an amazing place but we would not have chosen the 20 miles at 10 mph trip. Another real adventure in the books. Looking back (east) 20 miles towards AZ hy 89. We asked for a remote and quiet place. BE CARFUL WHAT YOU ASK FOR.. Camped at the edge of he Little Colorado River Canyon overlook. note the big rock behind the trailer is the canyon wall This is the big rock / canyon wall in the above image behind the tailer looking down into the canyon.
 5 points
 -
With all of this good info @jd1923 and the other thread on greasing the head, I decided since the Oli is down for 3 months before we take her back out, I would Pull the jack apart and grease everything in the head, tubes and drive screw. A few thing I learned/did. 1. The helical drive gear on the Curb side motor had a small amount of wear, the other two were not visible. I think that I hit the top more often since it is hard to see across the trailer specially with the mud flaps added. 2. The 3 set screws holding the head to the shaft had red thread lock. Used a heat gun to help loosened them. 3. The 2 carriage bolts holding the Rear jacks to the bracket where Stainless steel with a two way lock nut (two dimples on nut). They used so much force to putting on the nut on that it gulled the thread inside. It took 80-100 ft/pounds to get the nuts completely off and was a rear bear. I got one off by my self, but it was tough holding the carriage hold in while trying to remove the nut. I ended up getting help with the others from my son. The last nut was so hard just to hold it in, when we got the nut far enough off we used a 1/2 open end wrench on the square of the carriage head. 4. The chalk on the outside of the trailer adhered to the jack , but not the trailer. when the carriage bolts were remove, the jacks just dropped down down about 1/4" and then I just lifted it back up through the whole. I luckily didn't find any signs of water inside the trailer. 5. The three 1/4" Socket head cap screws holding the outside tube to inner assembly had Gray thread lock, they were tight to remove but doable without heat. 6. The drive screws came out easily with two 1/2" dowels. 7. The grease between the tubes was clean on the top, and dirty on bottom. All of the grease was getting hard. 8. All of the drive screws had some grease on them, two had bare minimum, and one had slightly more. The front jack had a little more grease than the rears. 9 The rear jacks I remove the motor and left it in the trailer. So I could clean and partially grease the assembly on the work bench. then finished greasing during assembly in the trailer with redline CV2 . 10. I remove the whole front (tongue) jack as a unit and did the cleaning a greasing on the work bench. The front jack was little more time consuming to clean since the power wire run up into the bottom of the case and then wires run up through the top of the case. I removed the switches and light from the plastic case top and got it out of the way so I had more room to clean and grease the case halves. 11. I did re-grease in between the tubes, just because they did at the factory. I know it may make more work for me latter. 12. I really liked butyl tape idea for sealing the tube back in the trailer . I put a little more on the tube than @jd1923 and formed a slope on the bottom side. When the tube was inserted the butyl went all the way through the hole in the trailer. I work the butyl from the top making sure it was pressed tightly to the and in the hole. I did not caulk the bottom, I used butyl added a little more to the bottom to completely seal the bottom with 3/8 per side. I am not sure how well the butyl will continue to seal on the outside, but it couldn't be any worse than the caulking job that was done at the factory. 13. I did replace the original Carriage bolts with steel, Nylock lock nut, and lock washer. 14. I used an enamel pen marker making a mark 1-1/2" from the bottom of the inside tubes for a stopping point. Instead of allowing the foot to come too far up. I started with the Rear curb side jack (12hours), then the Front jack (7hours), lastly the Rear street side jack (5 hours). I also called Baker and receive 3 gaskets for free. before starting the project. I need one for the front. the other came off easily. I also use liberal amounts of redline CV2 grease on everything. Thanks for listening4 points
-
@jd1923 I’ve now added my year and hull info on my forum signature. I’m new here and didn’t realize how to actually accomplish this but I figured it out. Hope this helps. Thanks for pointing this out. I vet my eBay sellers carefully for a few reasons - many sellers are simply drop shipping from Amazon and have no inventory in stock. Personally, I prefer not to buy from Amazon. On eBay, I look for actual businesses that have high feedback numbers, high feedback ratings and inventory that is consistent with their business model. I also look at their location to make sure the item is located in the US. I’ve waited weeks for items for arrive from overseas. In this particular instance, Leet Auto has a high number of feedbacks (9850), a high feedback rating (98.8%), 193 items in stock and they’re mostly Gorilla lug nuts. This narrow business model and inventory could be a red flag. They might be drop shipping, hard to tell without asking the seller that question, which I have done I do see a very high level of expertise on this forum and I will go with your recommendation to go with Summit Racing or eTrailer. I agree with @Geronimo John about safety equipment from China and it’s very difficult to find anything made in the USA. Generally, I have had very good luck buying from reputable businesses on eBay. One recent exception was a Propane/CO monitor that I purchased from RecPro. They passed all of my screening criteria but still sent me an outdated sensor which I returned and promptly received credit. I will check out this item and others on Summit Racing and eTrailer Thank you for your help, I appreciate it Jamie3 points
-
Well, I removed and reconnected all the battery cables, then did the power draw down to reserve cutoff. Then I charged it back up to 100 percent. They are all showing the same state of charge now. Lithionics rep did call me and told me of the need to periodically discharge and charge to full in order to help the batteries keep their balance. He also said to charge with shore power to 100 percent before leaving on any trip as this helps the batteries maintain their equilibrium. Thanks for all the help!3 points
-
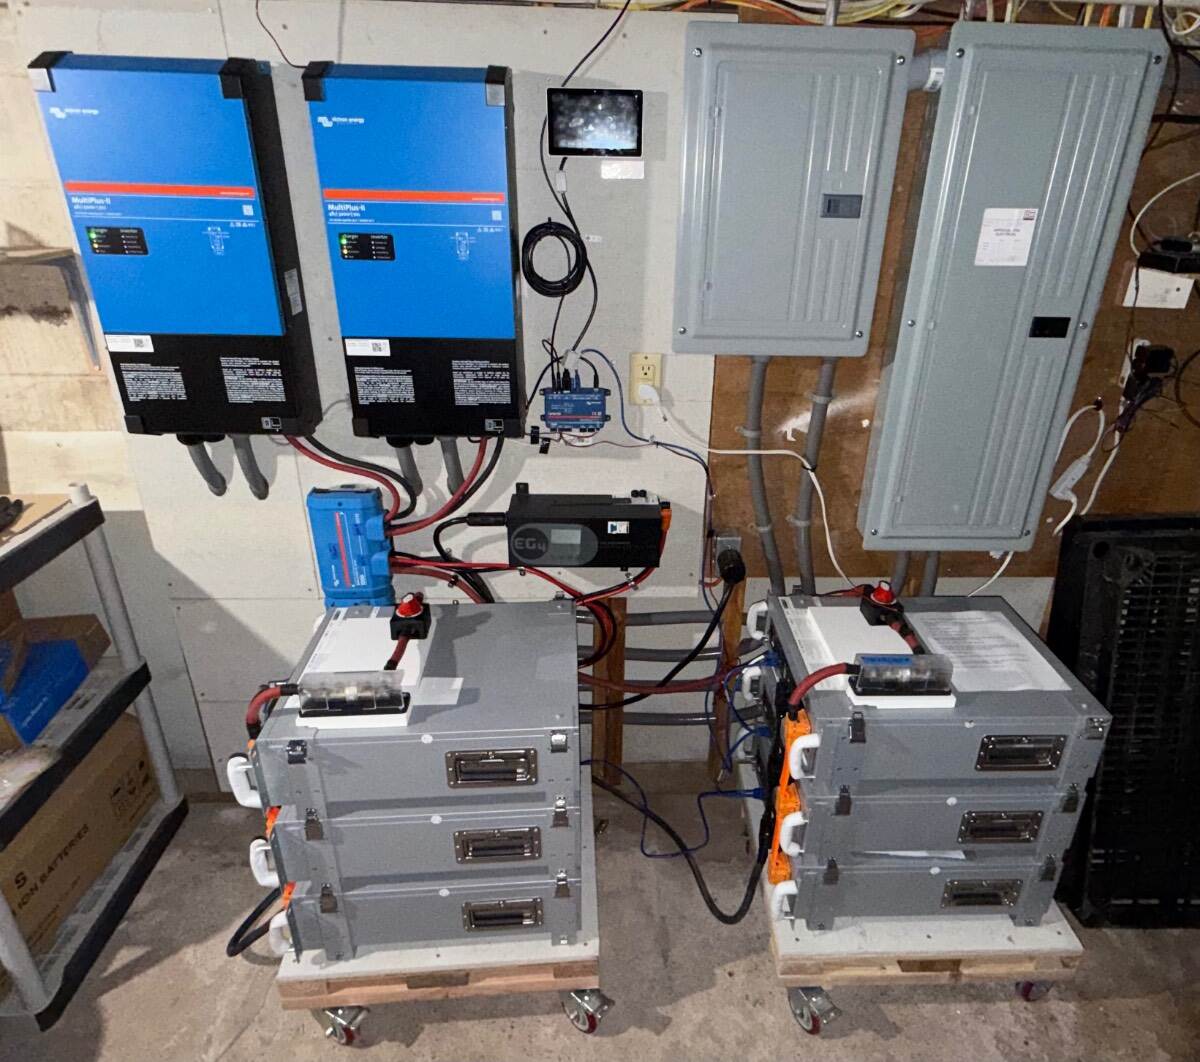
I do this with my home backup system ( pic below ). Temp sensor(s) on positive battery bank cable close to T-class fuse. It is interesting to watch it rise when pumping 6 kW+ into bank. Like you, I am now considering adding Cerbo GX to trailer ( 2xBB ) or, maybe a meat thermometer w/remote 😀
2 points
-
Yet another reason you got that Ollie! 😀2 points
-
Goosenecks State Park, UT, not to far from Moab. Camped on the rim for $10/night. High above the San Juan River. You get an option, campground or along the rim. No brainer.
2 points
-
My first rule with technology is keep things simple and go with defaults in configuration! That being said, Ron and some others, I believe it was @Treasure Coast Vault who first installed the Pioneer Inverter A/C, and both have positive results with this thermostat/power on/off control product. I'm working on a Turbro Inverter A/C install. My plan again is to go with installing this product by defaults without additional complication. I have already installed a simple Honeywell heat-only thermostat, it works well. I do not believe I would need this product since humidity is not generally a concern in the Southwest. Love the input though! Thank you @Ronbrink!2 points
-
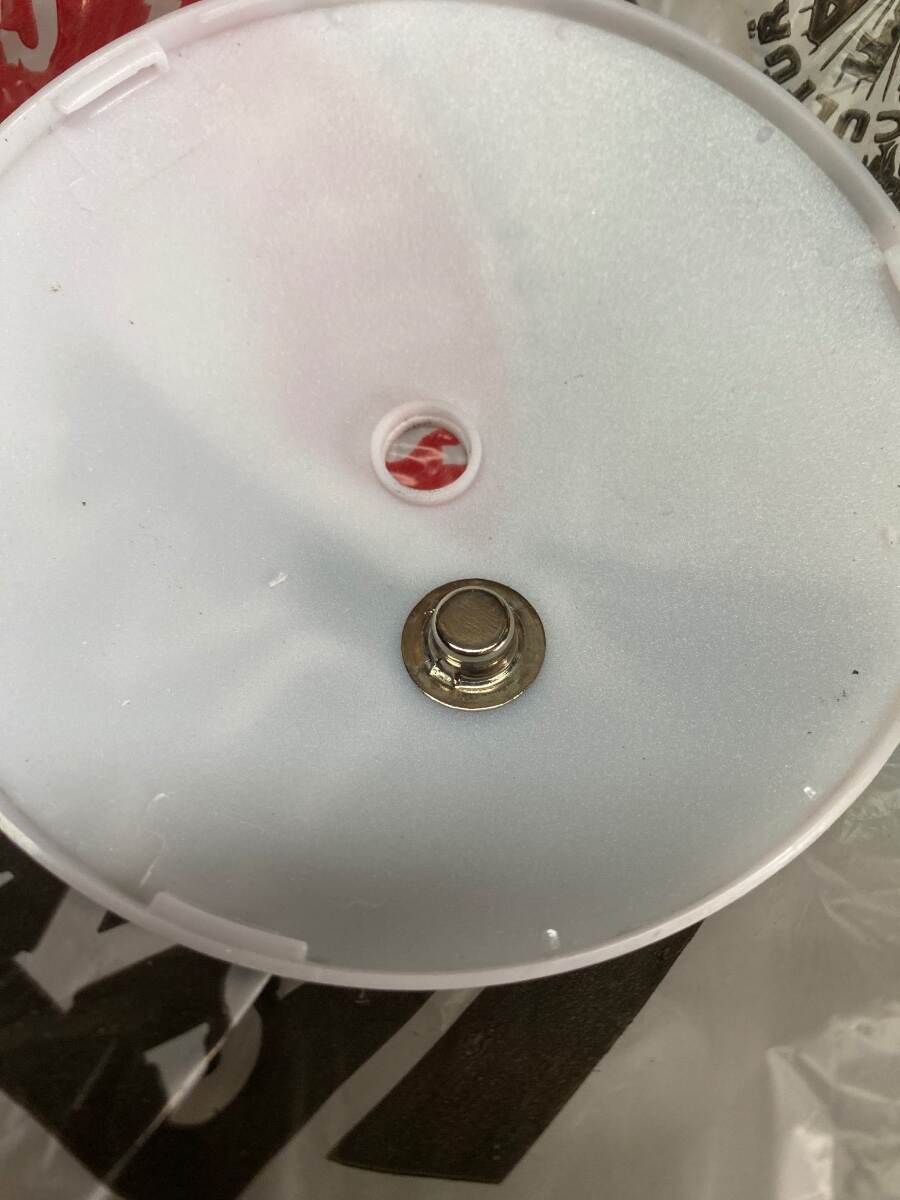
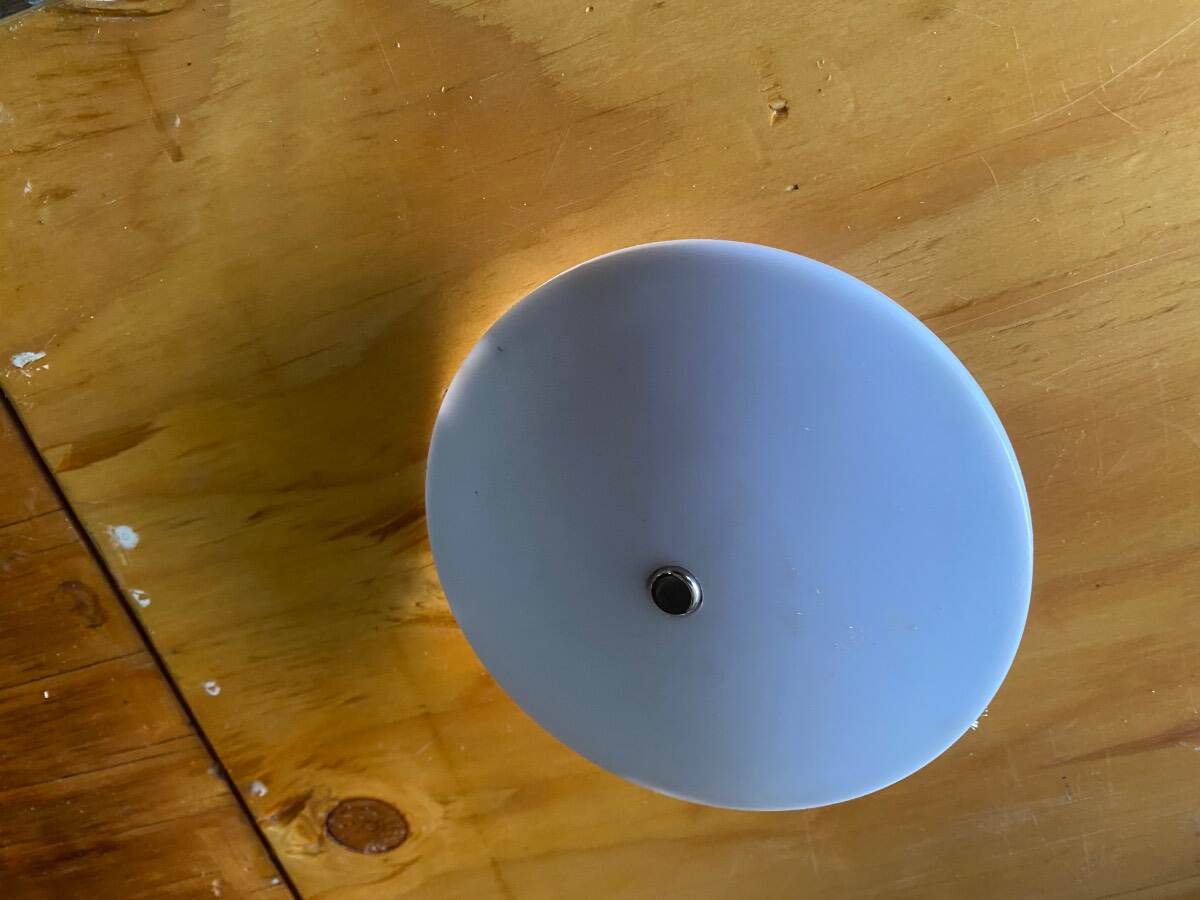
I got an Idea on how to fix the original lights that were failing. First, I had 3 lights that went from randomly failing to one out of 10 times trying to turn it on the light my come on. I played with the ones over the kitchen counter for 6 months trying to get them working better. When the 3 light started failing I decided to upgrade to the 7" and 3" white and blue lights for the touch lights. As I was taking things apart I noticed that I could turn the light on/off every time by just touching the spring. I also found that I could get within about .050 of an inch (just less than 1/16 of an inch) of the spring the light would turn On/Off every time. After I finished installing the all of the new lights, I thought I would try something. I took the light that was failing the most, and drilled a 3/8 hole in the center of the cover. I put the cover back on the light and it looks ugly. I thought If I could find a piece of metal button I could make it look nicer. Then I remembered I had a couple of 5/16 push on axle nuts/caps. The axle cap fit perfect in my hole and I put the cap back on. The cover looks like it was manufactured like this. I hooked the light up to 12V and tested it. It works great. Just like the light did with me touching the spring. Not pushing required, just get real close or light touch on the axle cap. This is a cheap and quick way to possible getting your lights functioning again. You might try to use a 3/8 press on nut cap. And drill the hole to 7/16 so the spring would set inside the axle nut instead of on the flange of the cap. Although you might not have enough spring pressure to have the spring tightly touching the nut. BTW, I do like the new lights. The 7" cool white (5000K) model is almost as bright as the originals, the 3 inch ones are dimmer. We chose to use the 3" one over the beds and kitchen table.
2 points
-
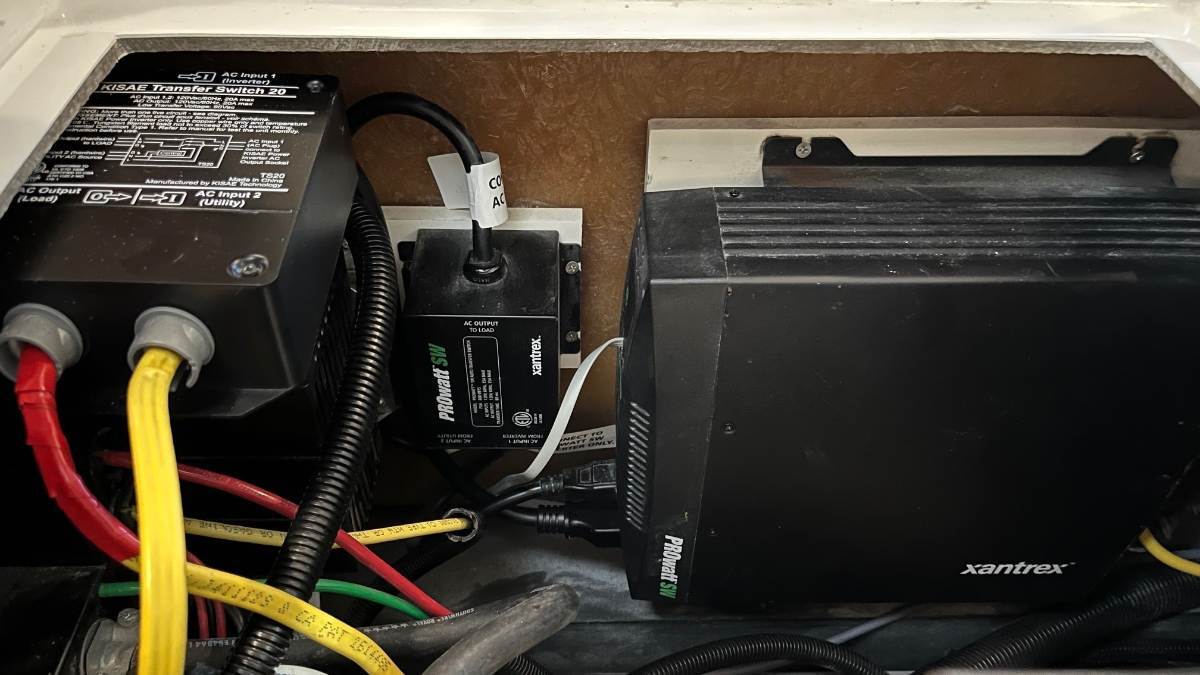
Yes, your conclusion makes sense! Perhaps one more try will work... 😎 A 15 or 20A ATS can be used with an inverter when the inverter does not have a built-in ATS. It is used to switch between shore power and inverted power for a 15 or 20A circuit. Our Victron has a built-in ATS but the 2KW Xantrex inverter OTT originally installed did not (see pic, ATS in middle). An external 15A ATS was added to switch all circuits except A/C to use shore power when present or inverted power when not. Some Oliver owners added the 20 KISEA ATS to add switching for the A/C circuit. The picture below shows the KISEA I installed for literally a few days before I decided on the Victron upgrade. Both ATS in the picture would switch between shore or inverted power. The KISEA for the A/C circuit and the OTT installed Xantrex ATS to switch the other circuits (microwave, outlets, etc.). These are NOT the main 30A ATS which is as follows: The main ATS installed in most RVs is the PD5100 a 30A ATS. These must be/always are 30A, used mainly to switch between shore power and generator. On the Oliver it switches between the side and front 120VAC 30A Furrion shore power inlets.
2 points
-
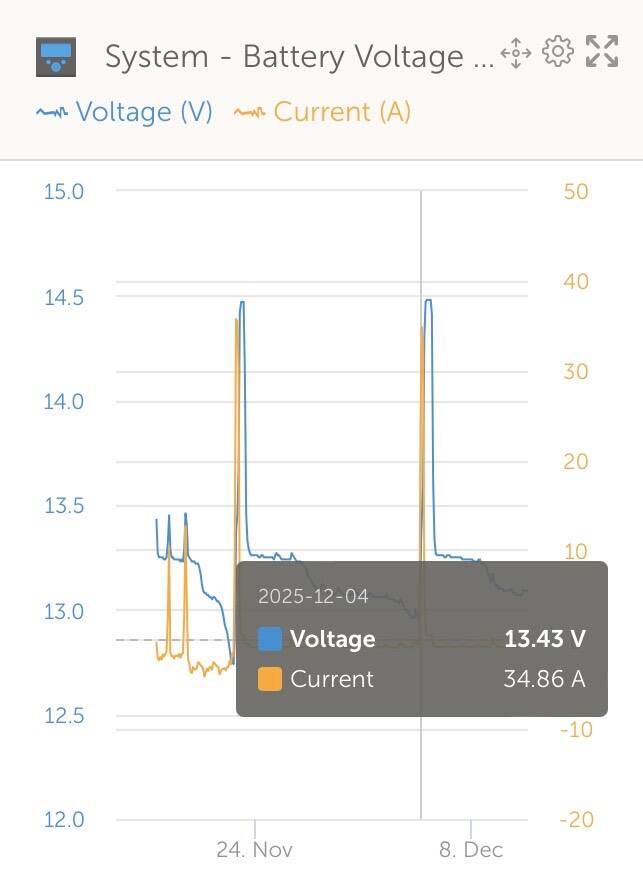
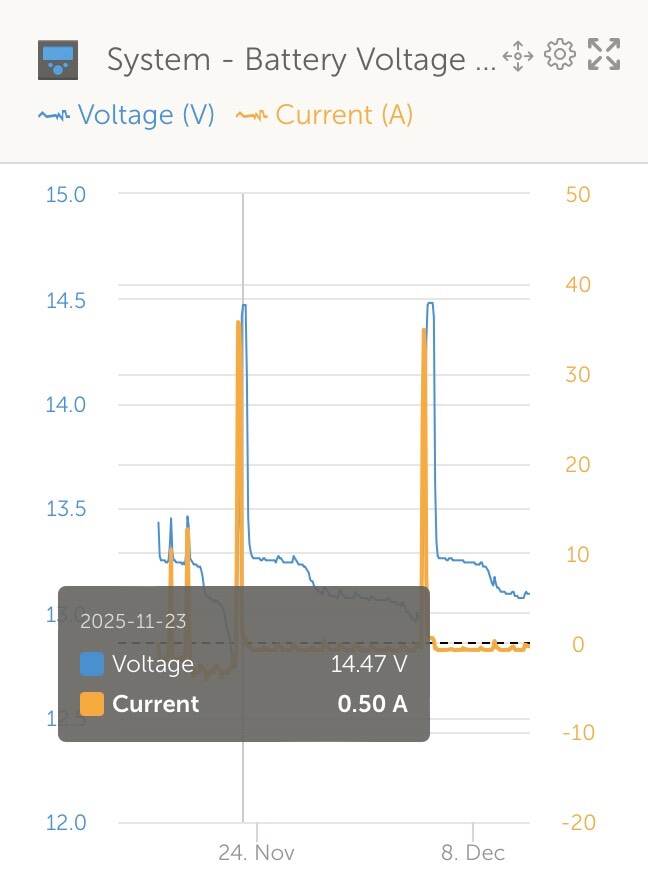
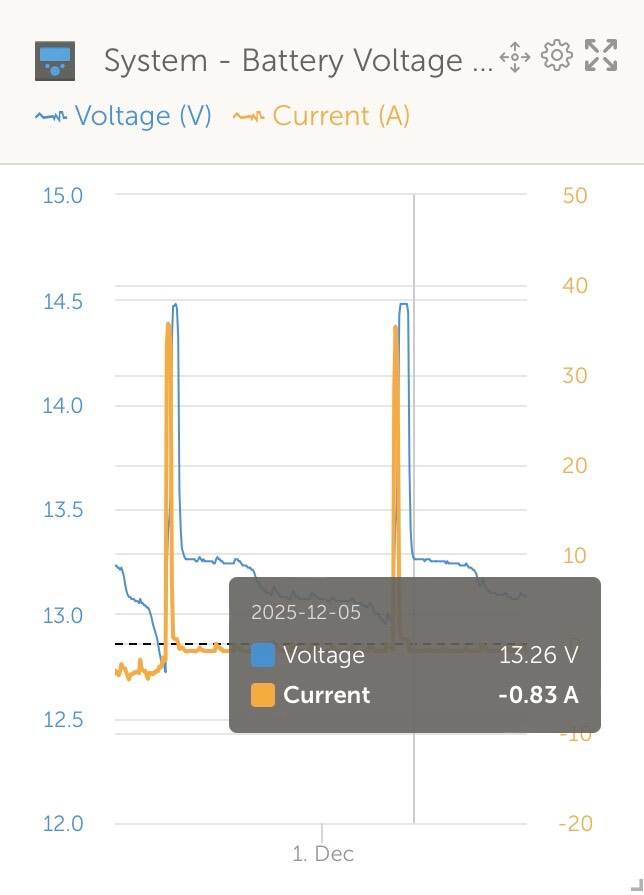
I manually turn of the PD4045-CSV breaker @ the PD Power Center when charging is complete. Batteries charging @ 34.86 Amps Batteries completely charged, but still charging @ 0.50 Amps Battery charger turned off @ breaker and showing batteries discharging @ -0.83 A Mossey
2 points
-
Nor I and furthermore, I honestly believe the Cielo to be much smarter than me when it comes to air conditioners!2 points
-
Wow! We were there in early October during the Shutdown. The only thing closed was the Visitor Center. We camped at Trailer Park in the park, run by a contracted vendor, so no issues. The views were spectacular. Thanks for sharing.2 points
-
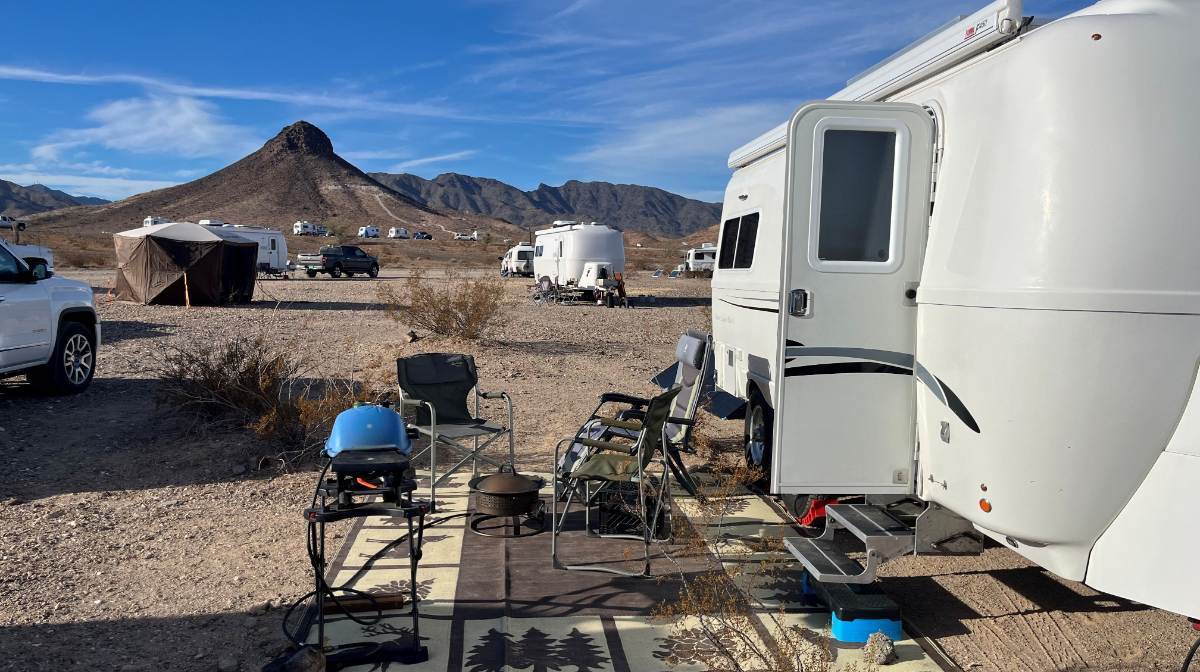
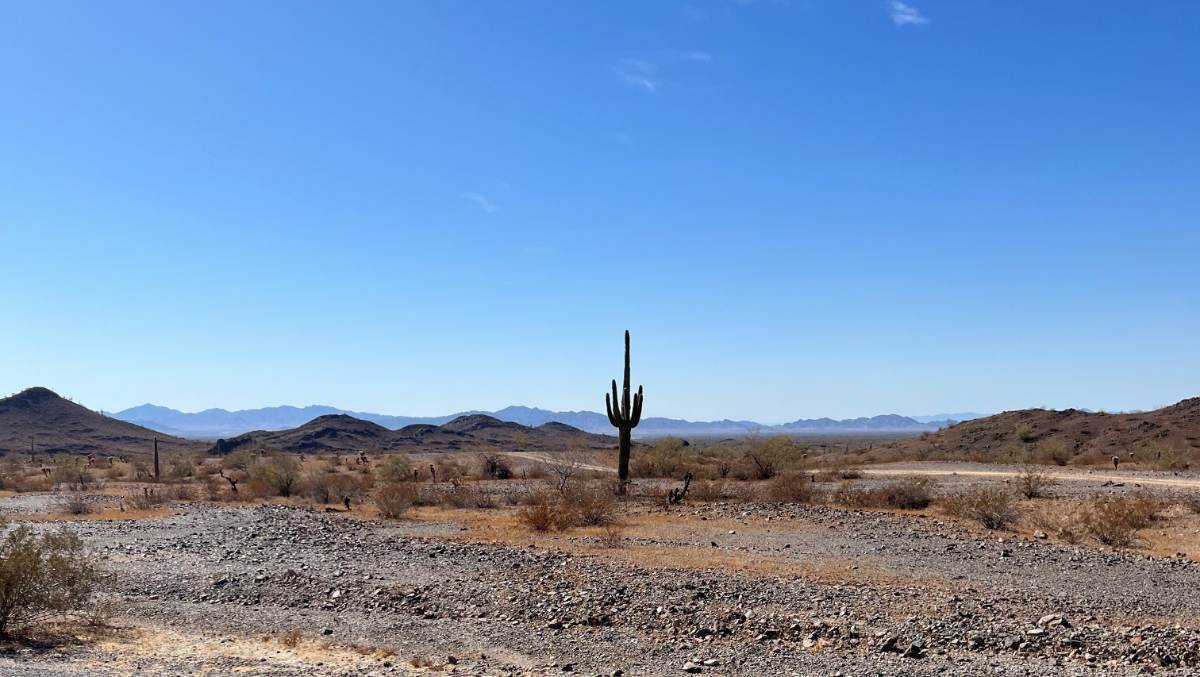
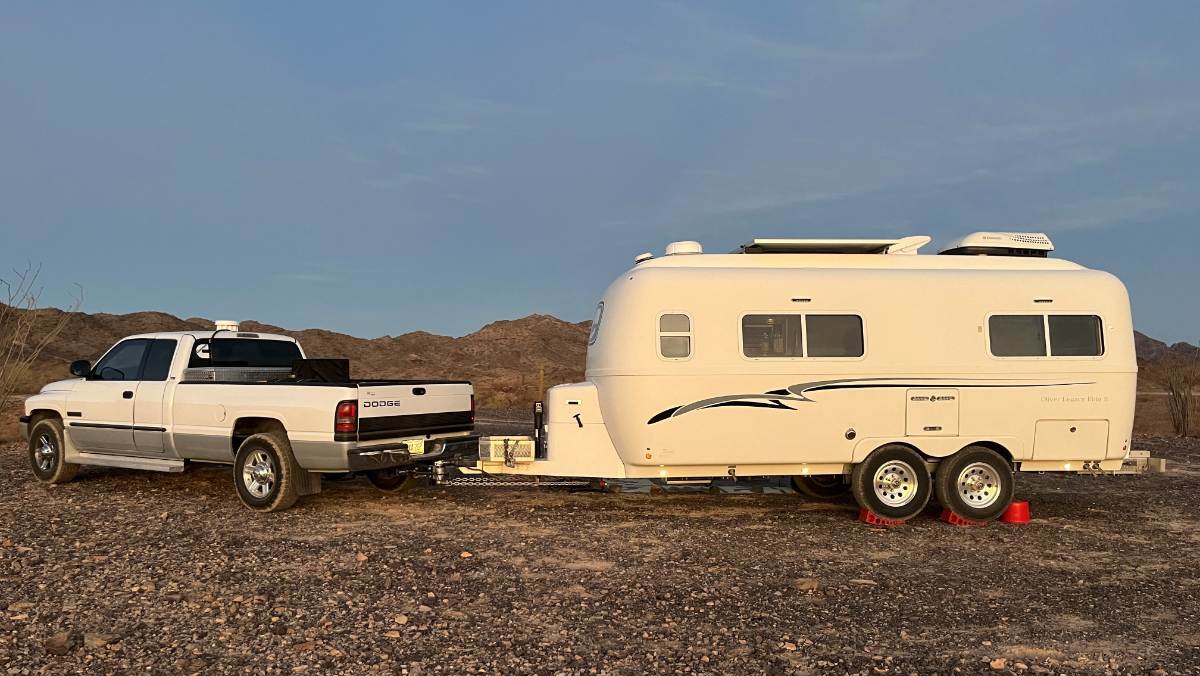
Who's going and when? The Q Big Tent runs Jan 17-25. The Fiberglass RV Gathering will run from February 6-9. I have time off work second half of Jan through first week of Feb and we'd like to visit for a few days when other Oliver Owners are there. Love to meet old friends and new! We weren't so much for Dome Rock (pic1) last year except for meeting Oliver owners! It's a bit crowded with the constant whine of nearby I-10 (and too many little Casitas)! Later we stayed several miles up Plomosa Rd NE of town. It was quiet up on the ridge with great views (pics 2-3). Hope to meet y'all there! 😎
1 point
-
Oops, I stand corrected again! I assumed the listings were in alphabetical order, but there it is….Turbro! I’m even more hopeful now that things can be worked out.1 point
-
John, your pics of the spot you stayed there on the ridge do not do that view any justice, you found a winner there with unbelievable views, will definitely see you there next year….2026/2027!1 point
-
If only there was a Transporter to get there quickly! Only 2800 miles one-way Prescott AZ to New Harbor ME! One day we should head that way...1 point
-
It will be interesting to see if your temp sensor is as far off as mine was. I've had the unit shut off at 70-71 cabin temp because the internal thermistor was reading 64 which is as low as the unit allows you to set it. Usually don't need to go much lower than that anyway, but sometimes I do just to remove excess humidity. To fix this I added a resistor in parallel to the thermistor to trick it into reading a hair lower than actual cabin temp and seems to be working great now. Need it to warm up some and get the Breez Max working to finish testing and adjusting before giving a final opinion on this unit.1 point
-
Going to finish my Turbro install soon. I have next week off. I hadn't planned on adding the Cielo thermostat, unless after a season of use it is deemed necessary in our use case. Humidity is rarely an issue in our travels. Also, @BigTexas nicely wrote-up a concern that was in the back of my mind...1 point
-
@CRM - I have since learned there is a QUIETSIDE Turbo air conditioner to which Cielo is referencing in their compatibility link and thus, I stand corrected. You were correct in your questioning, Turbro is not in the Cielo database. Hopefully the tech support you contacted can provide a viable alternative in programming a new template for the Turbro. Good luck with that endeavor!1 point
-
Well, spent about an hour on the phone with tech support and they weren't able to get any of their remote settings to work with my Turbro. They ended up having me send them each remote command through the WIFI connected Breez Max and now will use that info to try and program a new template for the Turbro. They said they should have it done by Tues. Pretty strange since @Treasure Coast Vaultdidn't seem to have any trouble setting his Breez Max up with the seemingly identical Pioneer unit. Told tech support this info and it didn't seem to help any... Maybe not so identical after all? Why didn't I let @jd1923try setting his up first?1 point
-
I did find the "Turbro" brand on the website, but as you can see in the pic the only remote they show is much different than the one I have (mine on the right). Sent them all the info they requested and just waiting for them to get back to me.
1 point
-
Here is a response from an electrical engineer on Will's second video, the response video on BB's legal letter.
1 point
-
Another thought, try to find out if the Turbro remote listed by Cielo is compatible with your Turbro inverter a/c model.1 point
-
The views never get old. Gooseneck State Park, we camped along the rim. The views were amazing, the sunset spectacular.1 point
-
Might want to wait on that. Installed my Breez Max today and couldn't get it to work correctly using the auto detect for the remote, nor by trying to manually enter the Turbro info. It's shows the Turbro brand in the manual setup, but only one model remote and it isn't the one I have. Got it to to turn the Turbro on but it would turn the built in LED's on and off when it was trying to change the temp. Going to contact support in the am and I'll let you know how it goes.1 point
-
If they are truly Gorilla brand or McGard (another good brand I've used) then they're good. What @Geronimo John is referring to is that there are a lot of China made knock-offs on eBay (Amazon too for that matter). Instead buy from Summit Racing or eTrailer or another reliable and authorized reseller. This eBay seller has Feedback number at 9850 and 99.8% rating, likely their parts are good, but who knows. @Jamie Peghiny I believe the lug nuts you found is the correct size and shape but cannot be certain w/o a forum signature with your hull#, etc.1 point
-
When I saw Will's "Sparking" demo, in my mind's eye it turned from a safety one time feature into a serious "Oh Ship" issue. If an owner has BB's, I highly recommend getting a thermal temperature gun for checking the 4/0 system. It is also very useful for checking Ollie's brakes... especially if in the mountains. GJ1 point
-
Excellent rebuttal in the second video. I'm not an electrical engineer, but I can't see how this can be a "safety feature" like BB claims. Loose connections on high amperage devices create heat, heat causes cell failure and potential thermal runaway in lithium batteries.1 point
-
DIY Solar Power by Will Prowse has been around for many years. His take it apart and inspect approach is well received. Basically a common sense approach to looking at problems. He in my opinion is not the definative expert in the detailed design elements. But he is able to communicate well and calls issues as he sees them. I know of no other technician with his experience in taking apart and then making common sense reviews of hundreds of different batteries. So, is he raising the red flat on Battleborns before at least calling Dragon Fly for comment? Yea sort of I think. Was his post raising a flag that all BB owners need and should be aware of? Yep. GJ1 point
-
My main concern regarding damaging the system would be if somehow the Ceilo inadvertently bypassed the compressor delay (not allowing high side pressures to normalize before restarting). But it's only providing commands via IR signals. It doesn't have the ability to cut power to the system like opening a circuit breaker and then turning it back on, which could defeat the compressor delay. I think an analogy may be similar to a computer. Power off the computer and it starts a shut down process protecting your data and the system. Pull the plug and you may loose everything. The Ceilo is just giving commands via IR to the motherboard. But the motherboard retains all the manufacturers protection protocols. But I'm no expert. I just watch a lot of YouTube air conditioning videos.1 point
-
When I watched the video I was dumb founded. The comments are unreal. People have been bringing this to Battleborn 's attention and their response to the owners has been, " you must have damaged the batteries, your issue, not Battleborn 's. Wow.1 point
-
Just called BattleBorn and left a message for technical support. Had a BattleBorn battery in Ollie for years without issues. I have had such good performance out of BattleBorn batteries, just purchased two more 100AH batteries during the Black Friday sales event. Will see what they say and post.1 point
-
Mather campground Gand Canyon NP An amazing week to be in Grand Canyon N P. The main water supply is shut down for repairs and the whole Park is almost empty. That would be Hotels, campgrounds, parking lots and South rim drive. The park is a ghost town. We are among the few dry camping in Mather Campground (only campground open). Might be 20 campers tonight. No traffic, no lines, no people. This might be a once in lifetime event to have the greater Grand Canyon N P uncrowded and as our personal playground. Doesn't get better than this.
1 point
-
JD and Jason, Vortex must be applied with special equipment by an experienced shop. I got my inspiration from Bugeyed Driver. Vortex is similar to Line-X spray on pick-up bed liner in texture and feel (a firm rubber like finish) I chose Vortex because it is applied at a much lower temperture than Line-X (best not to heat fiberglass too much) and can be painted with automotive paint to match your hull. Bugeyed Driver estimates it increased his tongue weight by 40lbs. The coating is substantial and tough. We have been on the road five 5 week since the application and are pleased to date.. I feel Vortex is a very good solution to protect your trailer nose. Bugeyed Driver has years of experiences with his Vortex..1 point
-
Not on the older hulls! Chris owns #110 and ours is #113. OTT installed a 2KW Xantrex inverter in our Oliver (inverter only, no charger). The PD charger installed in the power panel was the only charger (hence Chris’ recent upgrade to the PD charger with the LiFePO4 switch)!
1 point
-
That State of Charge (SOC) differential is not a sign of damage to the battery. Our three Lithionics batteries also discharge at somewhat different rates. As advised by Roger above, periodic battery balancing is recommended by Lithionics. This is done by discharging down to Reserve Voltage Cutoff (RVC) (until they automatically turn off), then back to full charge. I have found that complete balancing after recharge sometimes takes 1-2 days on shore power before all 3 batteries show 100%. To discharge our batteries in the winter I run a space heater using the inverter (as I can't set the AC low enough in December in Idaho to get it to run). The inverter will shut down 120V power when battery voltage drops to the point preset at the factory. To get down to RVC, I then turn on a bunch of 12V loads, including all the lights and the refrigerator set to DC mode, for another couple of hours until the lights go out because the batteries have turned themselves off. I can then reconnect shore power to charge the batteries back up to 100% SOC. This process balances all three batteries. In my experience, the next time I use battery power, discharge rates among the three batteries are much more even, but never precisely the same. That is o.k., per Lithionics.1 point
-
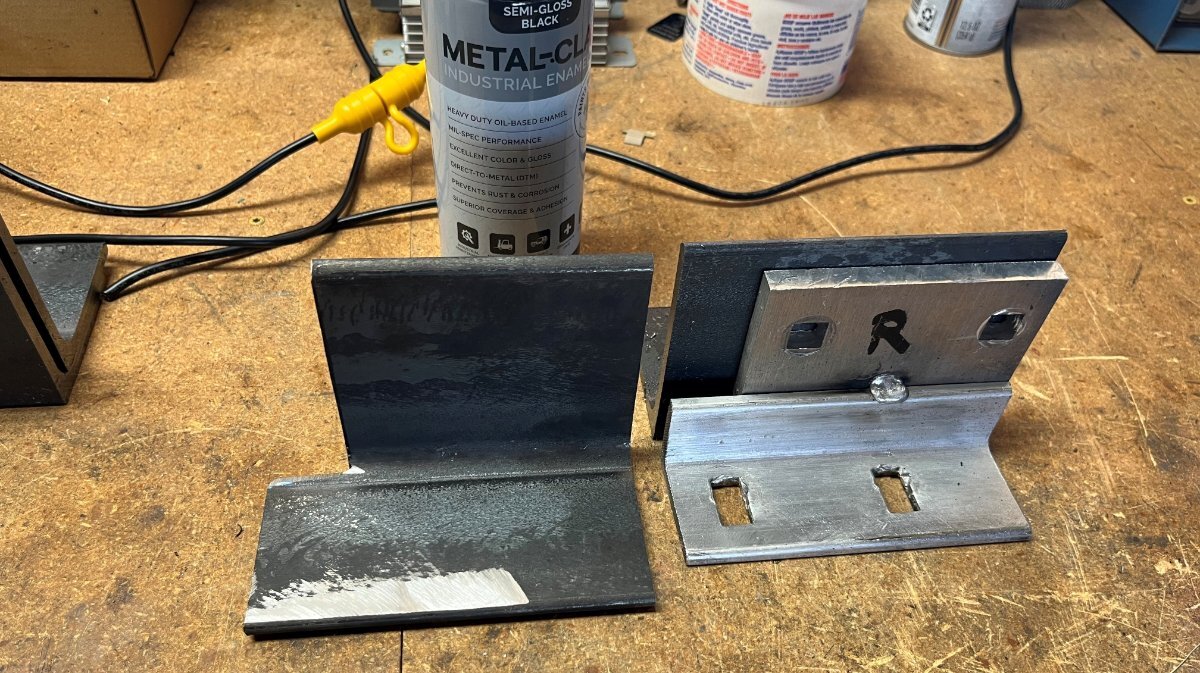
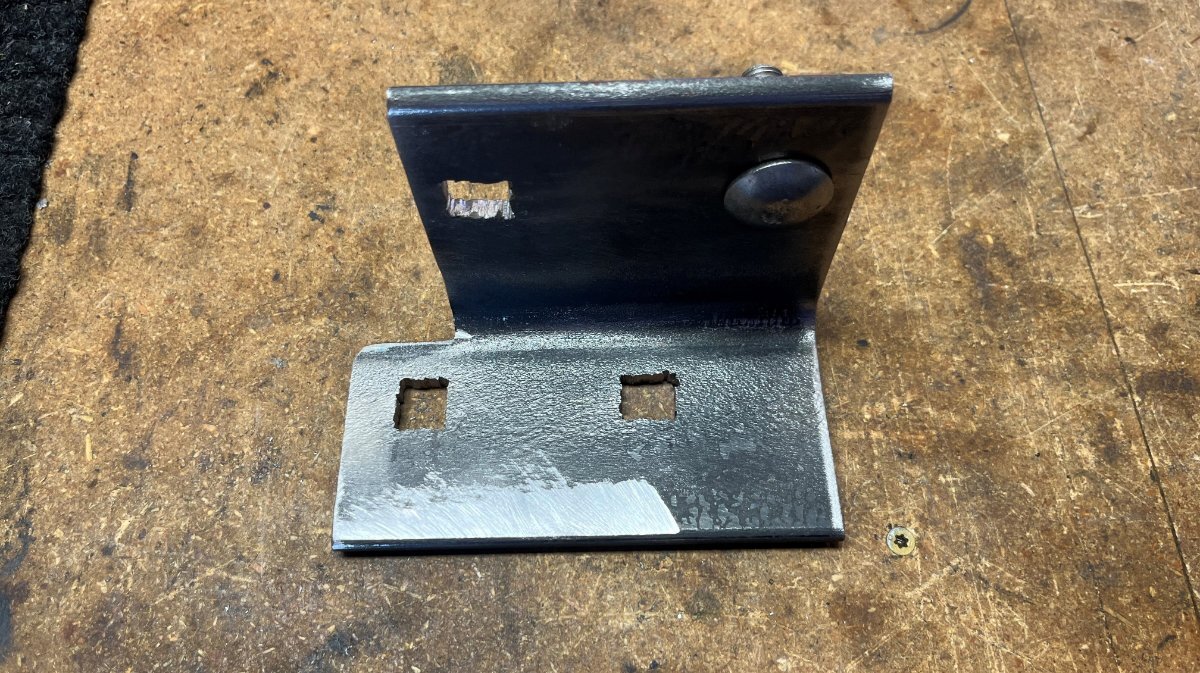
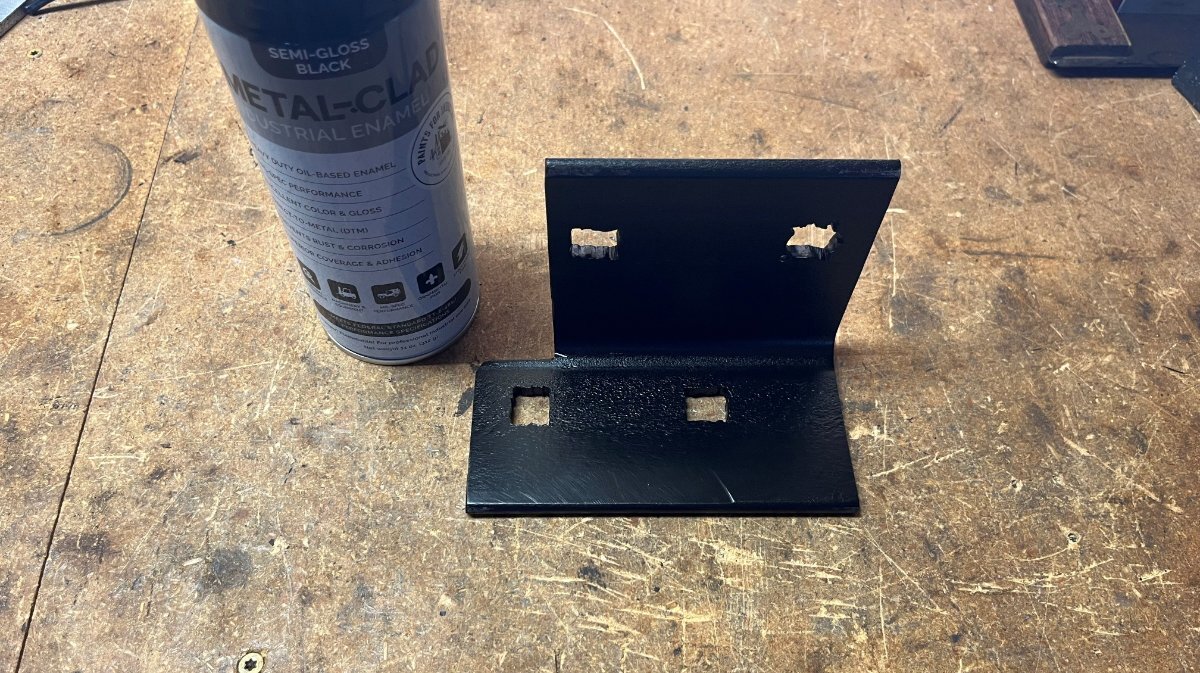
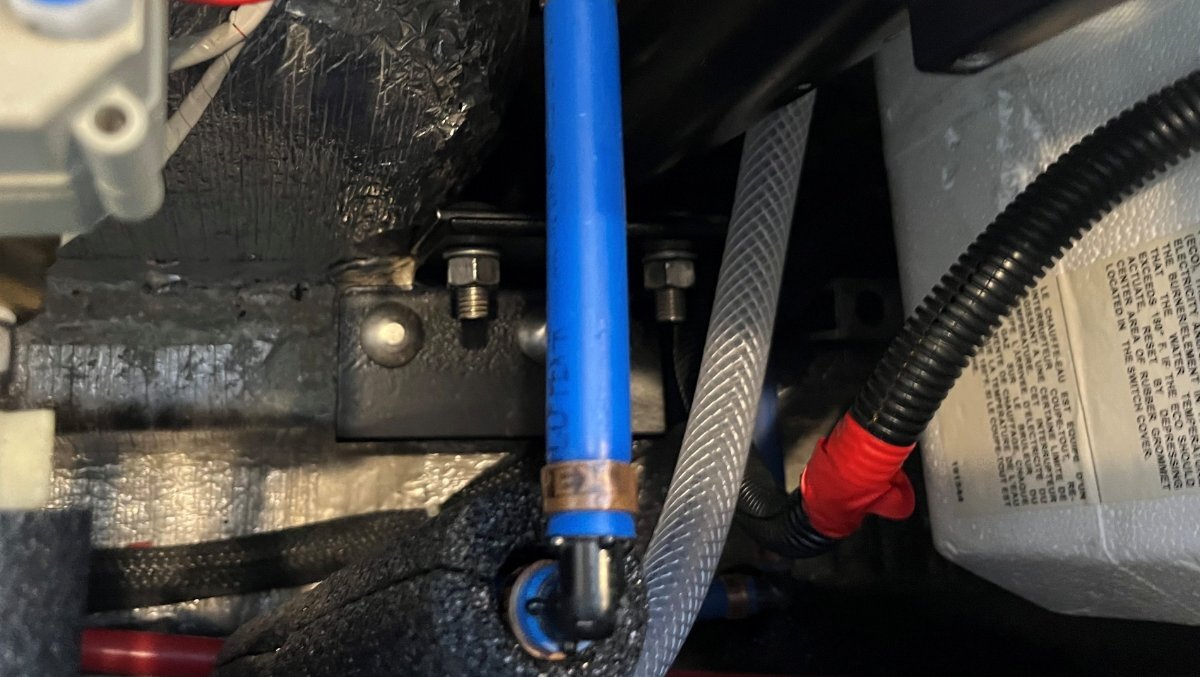
I could have had the aluminum brackets re-welded, but then I thought of a way I could fix this myself if I had the right 1/4" steel angle iron. OTT uses two pieces fitted together since they're easier to fit in place during installation. One piece would require the holes to be drilled in precise locations. Getting 4 squared offset holes to align exactly is no easy feat! 🤣 Solid steel must be stronger than 2 pieces of aluminum welded together. I went to Prescott Steel & Welding and they had the steel I needed and also referred me to a good welder that also works with aluminum. For $15 They cut me two 3x4" angle iron 5 1/2" long and another $10 for this Direct-to-Metal paint which is amazing! One coat, covers in seconds, no drips. Wish I knew of this paint in all my years of auto restoration! Must have taken me 2 1/2 hours total to fab this bracket. Being L-shaped there is no way to trace the original part, so measure and measure again and hope for the best! I drilled the 1/2" holes and cut the corners with a jigsaw. My first hole was not so clean, thinking I could drill 1/8" holes in the 4 corners (it didn't work). I purchased two brackets, but after I realized the other side had full welds, I just made one saving the 2 hours it would have taken me to make a second bracket. Both sides are done and tested. I still have the wheels up in the air on the side with the new bracket! 🤣 If the weld had not failed this rebuild project would have been done last Friday when Barker delivered the new heads. Beds are in and Chris is making the beds! We'll leave to Colorado by the weekend, a few days later than plan, but all the better! 😎
1 point


.thumb.jpg.e34bf01ef7f7d5e99ad31856d45afbeb.jpg)


-
Recent Achievements
-


")


")


")

