mossemi
-
Posts
1,805 -
Joined
-
Last visited
-
Days Won
43
Everything posted by mossemi
-
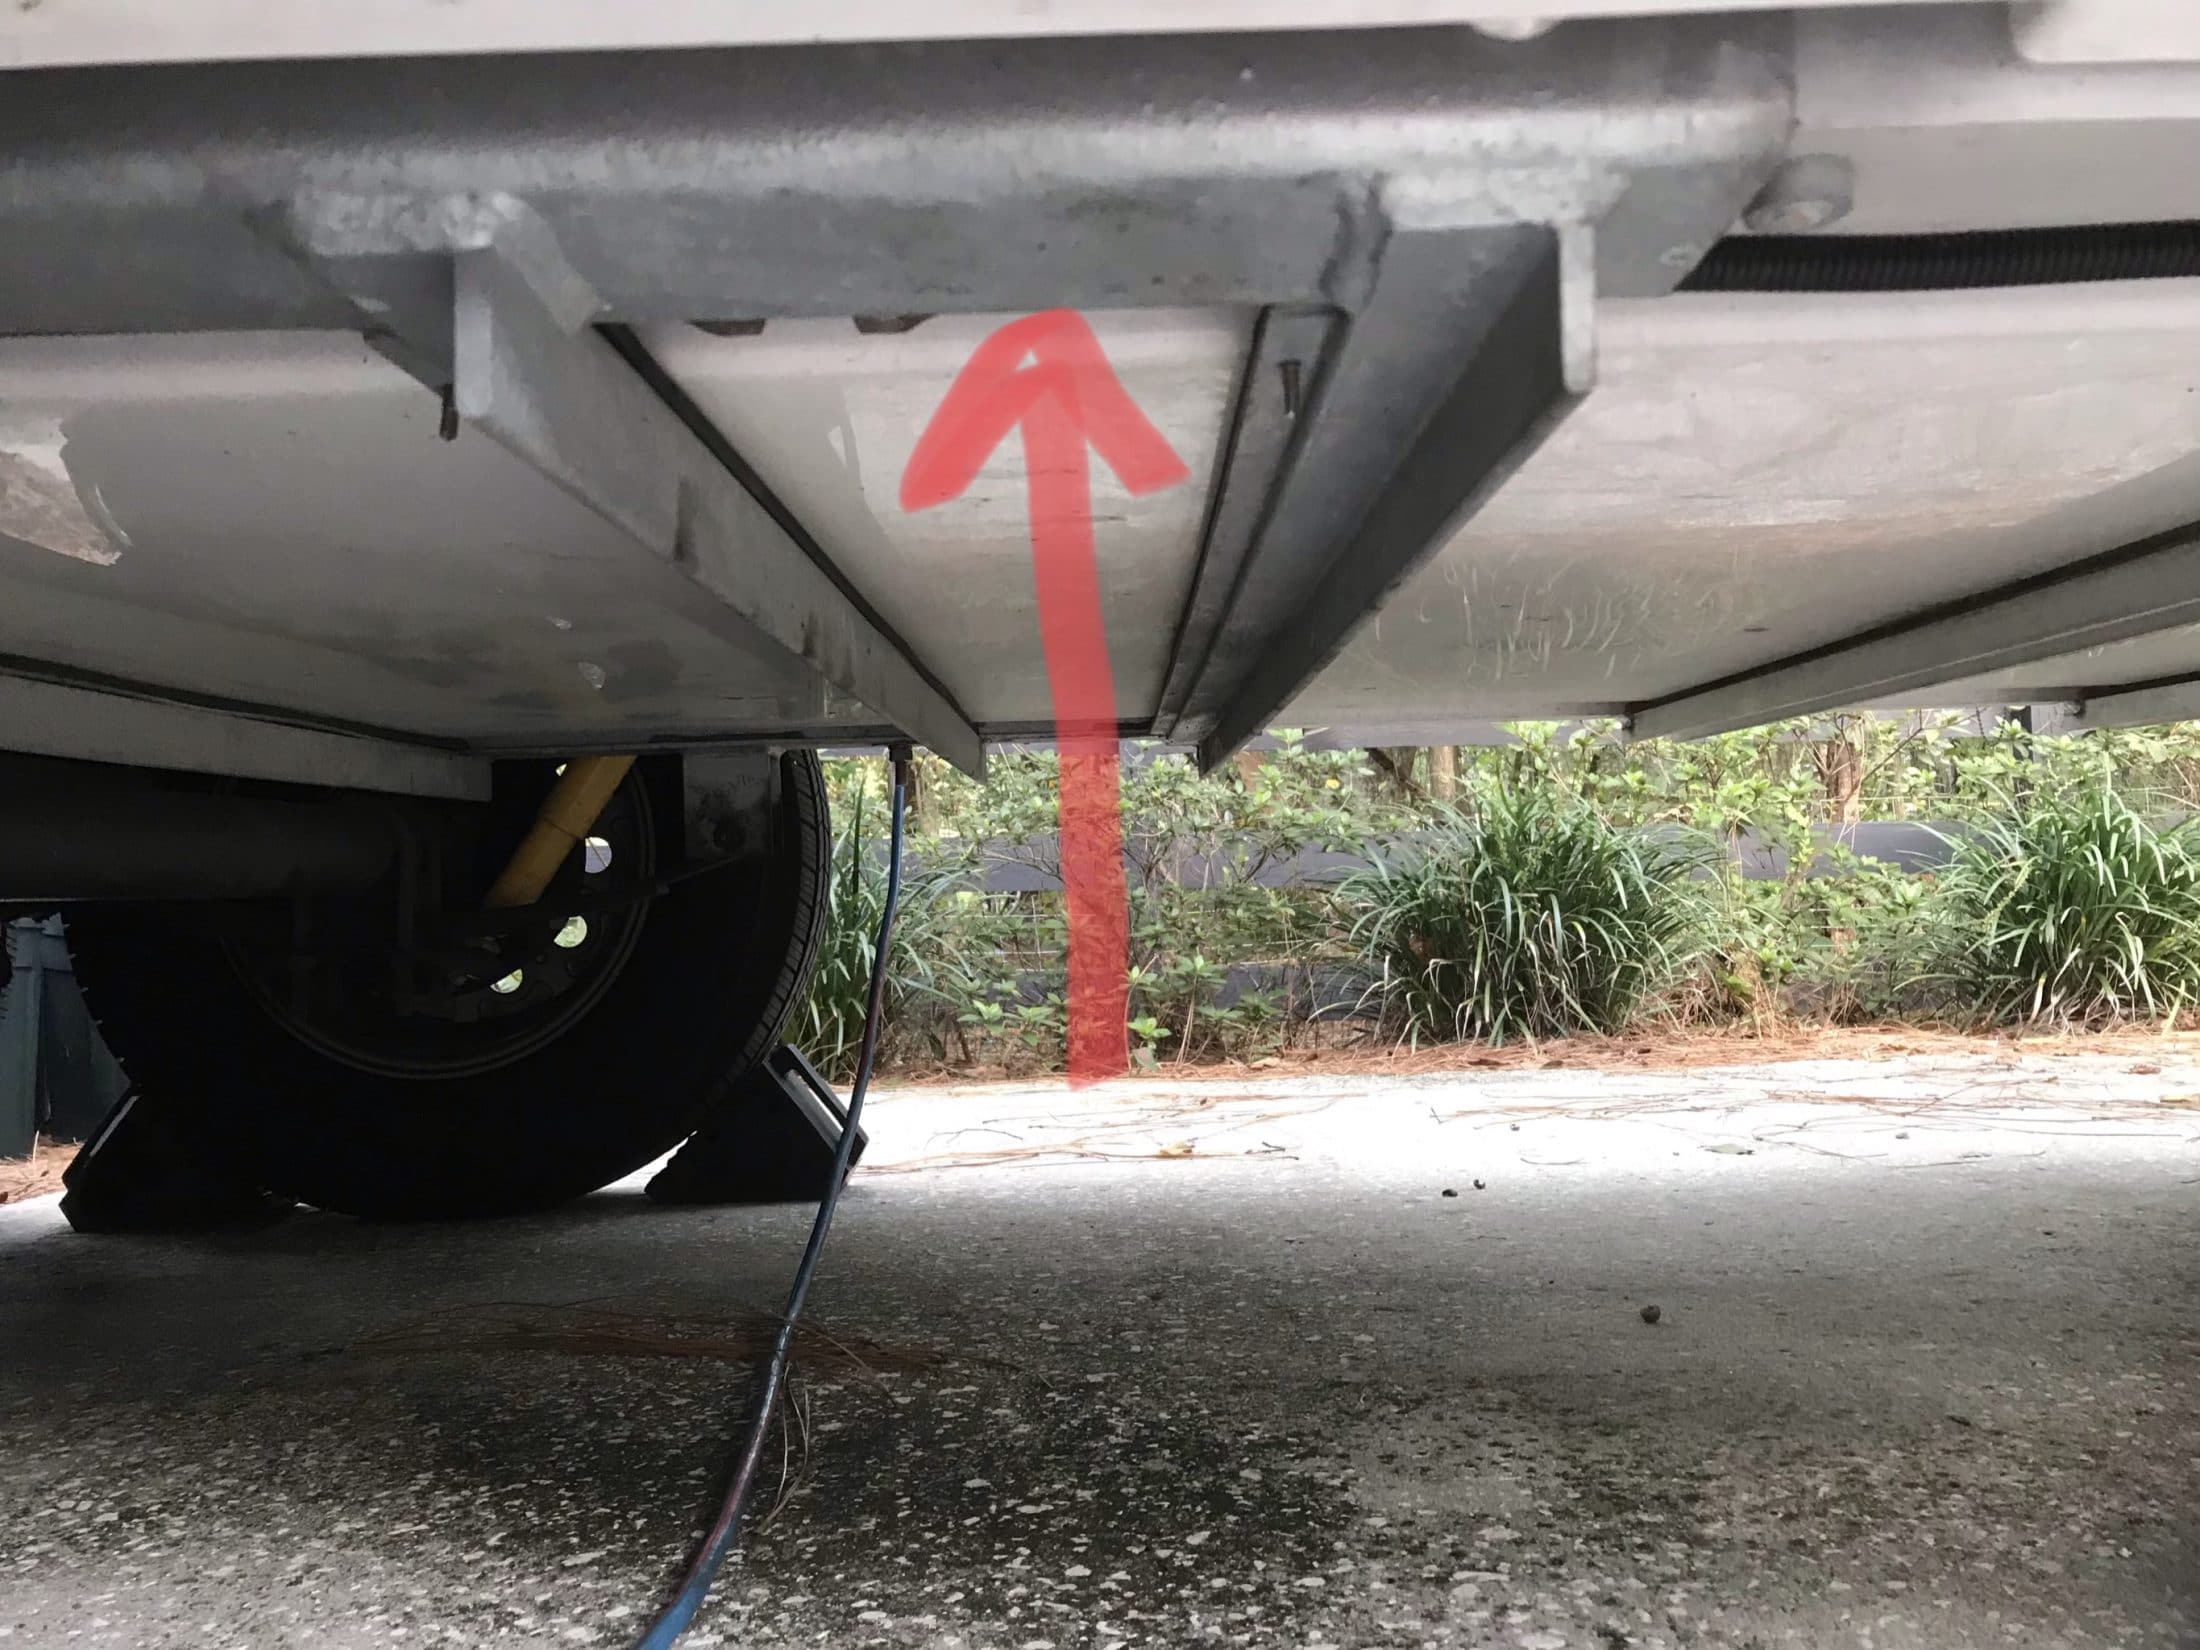
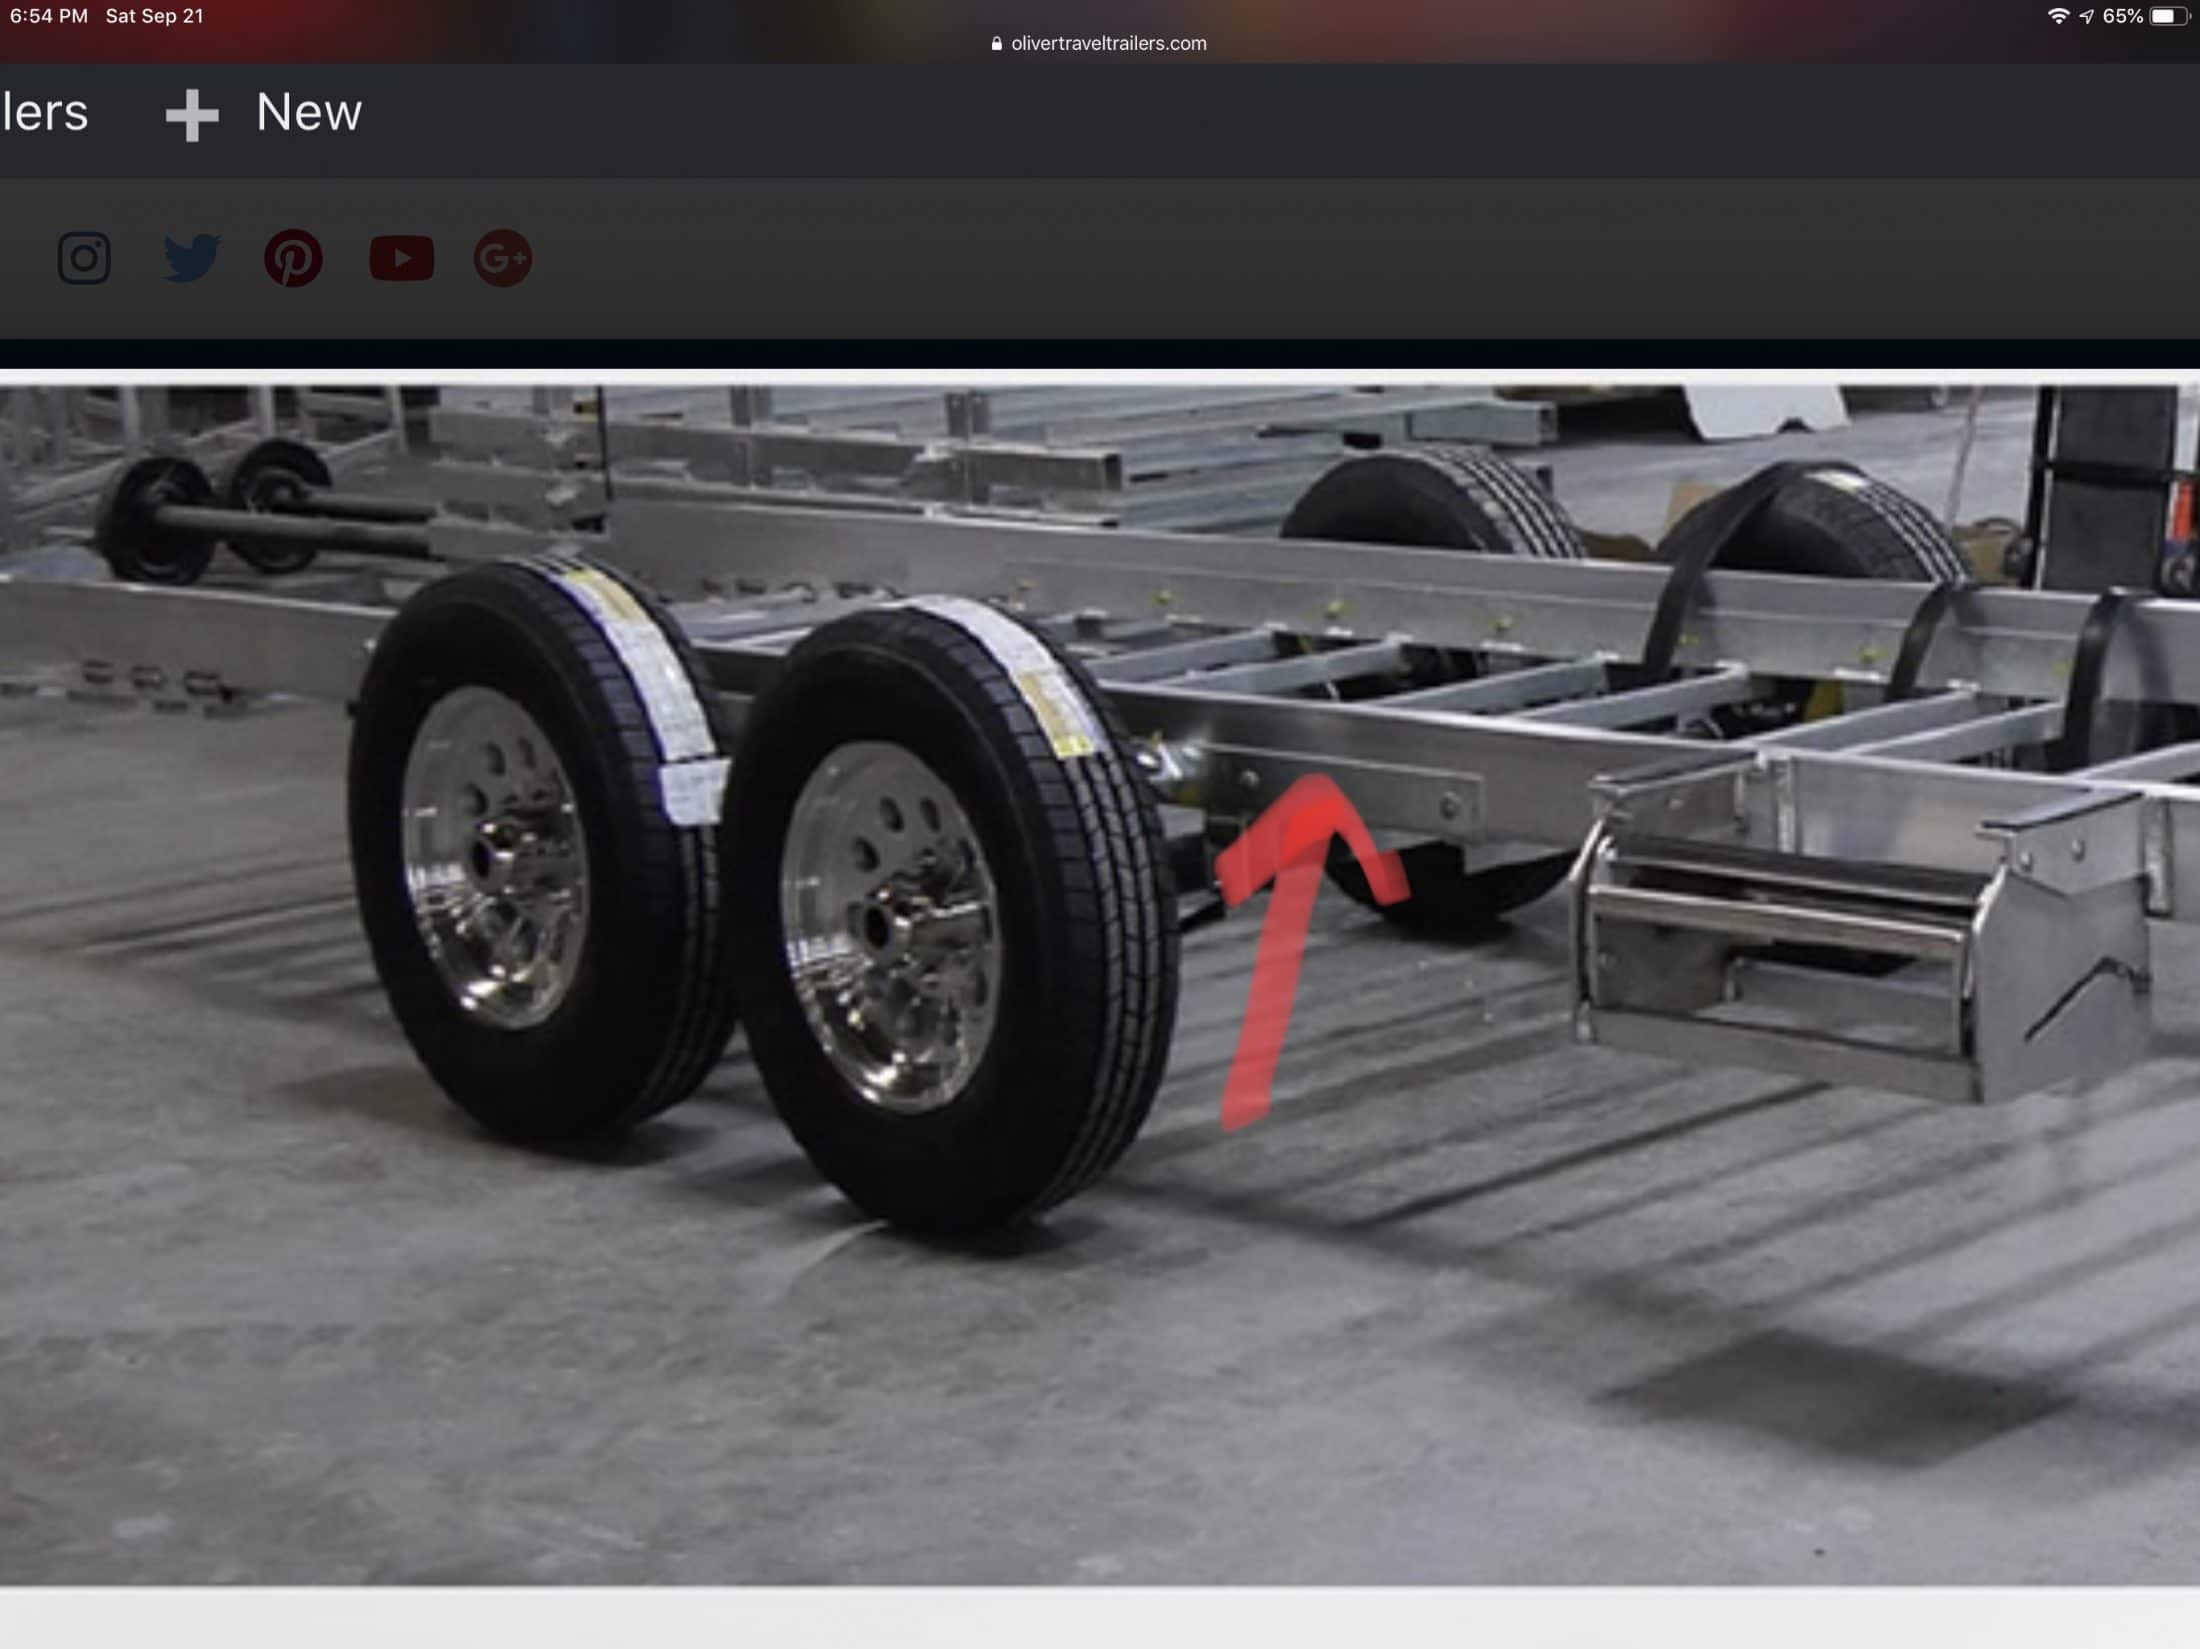
This is a picture of my 2017 EII. The outside aluminum frame member in bolted to a galvanized steel channel. You want to place your jack under the steel channel, never under the aluminum. The have been some pictures of the 2019 or 2020 trailers and they have a sticker pointing to the jack points, but I can’t find them now. EDIT: The picture of the jack point stickers is in the September 2019 newsletter.

-
Do you have a problem with all switches and all lights? Are you plugged into AC or running on batteries? Mike
-
I have driven the Going to the Sun Road a half a dozen times and since Krunch doesn’t usually drive while on vacation, I have never really gotten to enjoy the scenery. So a couple of years back, we stayed in some cabins in St. Mary on Hwy 89 and the Red Buses were parked across the street each night and the drivers would wash them at the end of the day. After a couple of days of watching the bus wash, we decided to take a bus ride and it was the best GTTSR drive ever. I was Mister Prairie Dog, popping up and taking pictures or a look through the binoculars. I really enjoyed it and of course Krunch said it was ok, as she had seen it all on the previous 6 drives. Mike
-
Although Krunch and I did not know Jim or his family personally, everything we have ever heard was extremely positive. And in my experience, nothing I say will really make a difference at this time. But I will still say that we are very sorry for your loss and know that you all are in our prayers. With God, all things are possible, Mike and Krunch
-

Launch of Hull #517 - The Scent Free Ollie!
mossemi replied to ScentFreeInSC's topic in Delivery Day Photos
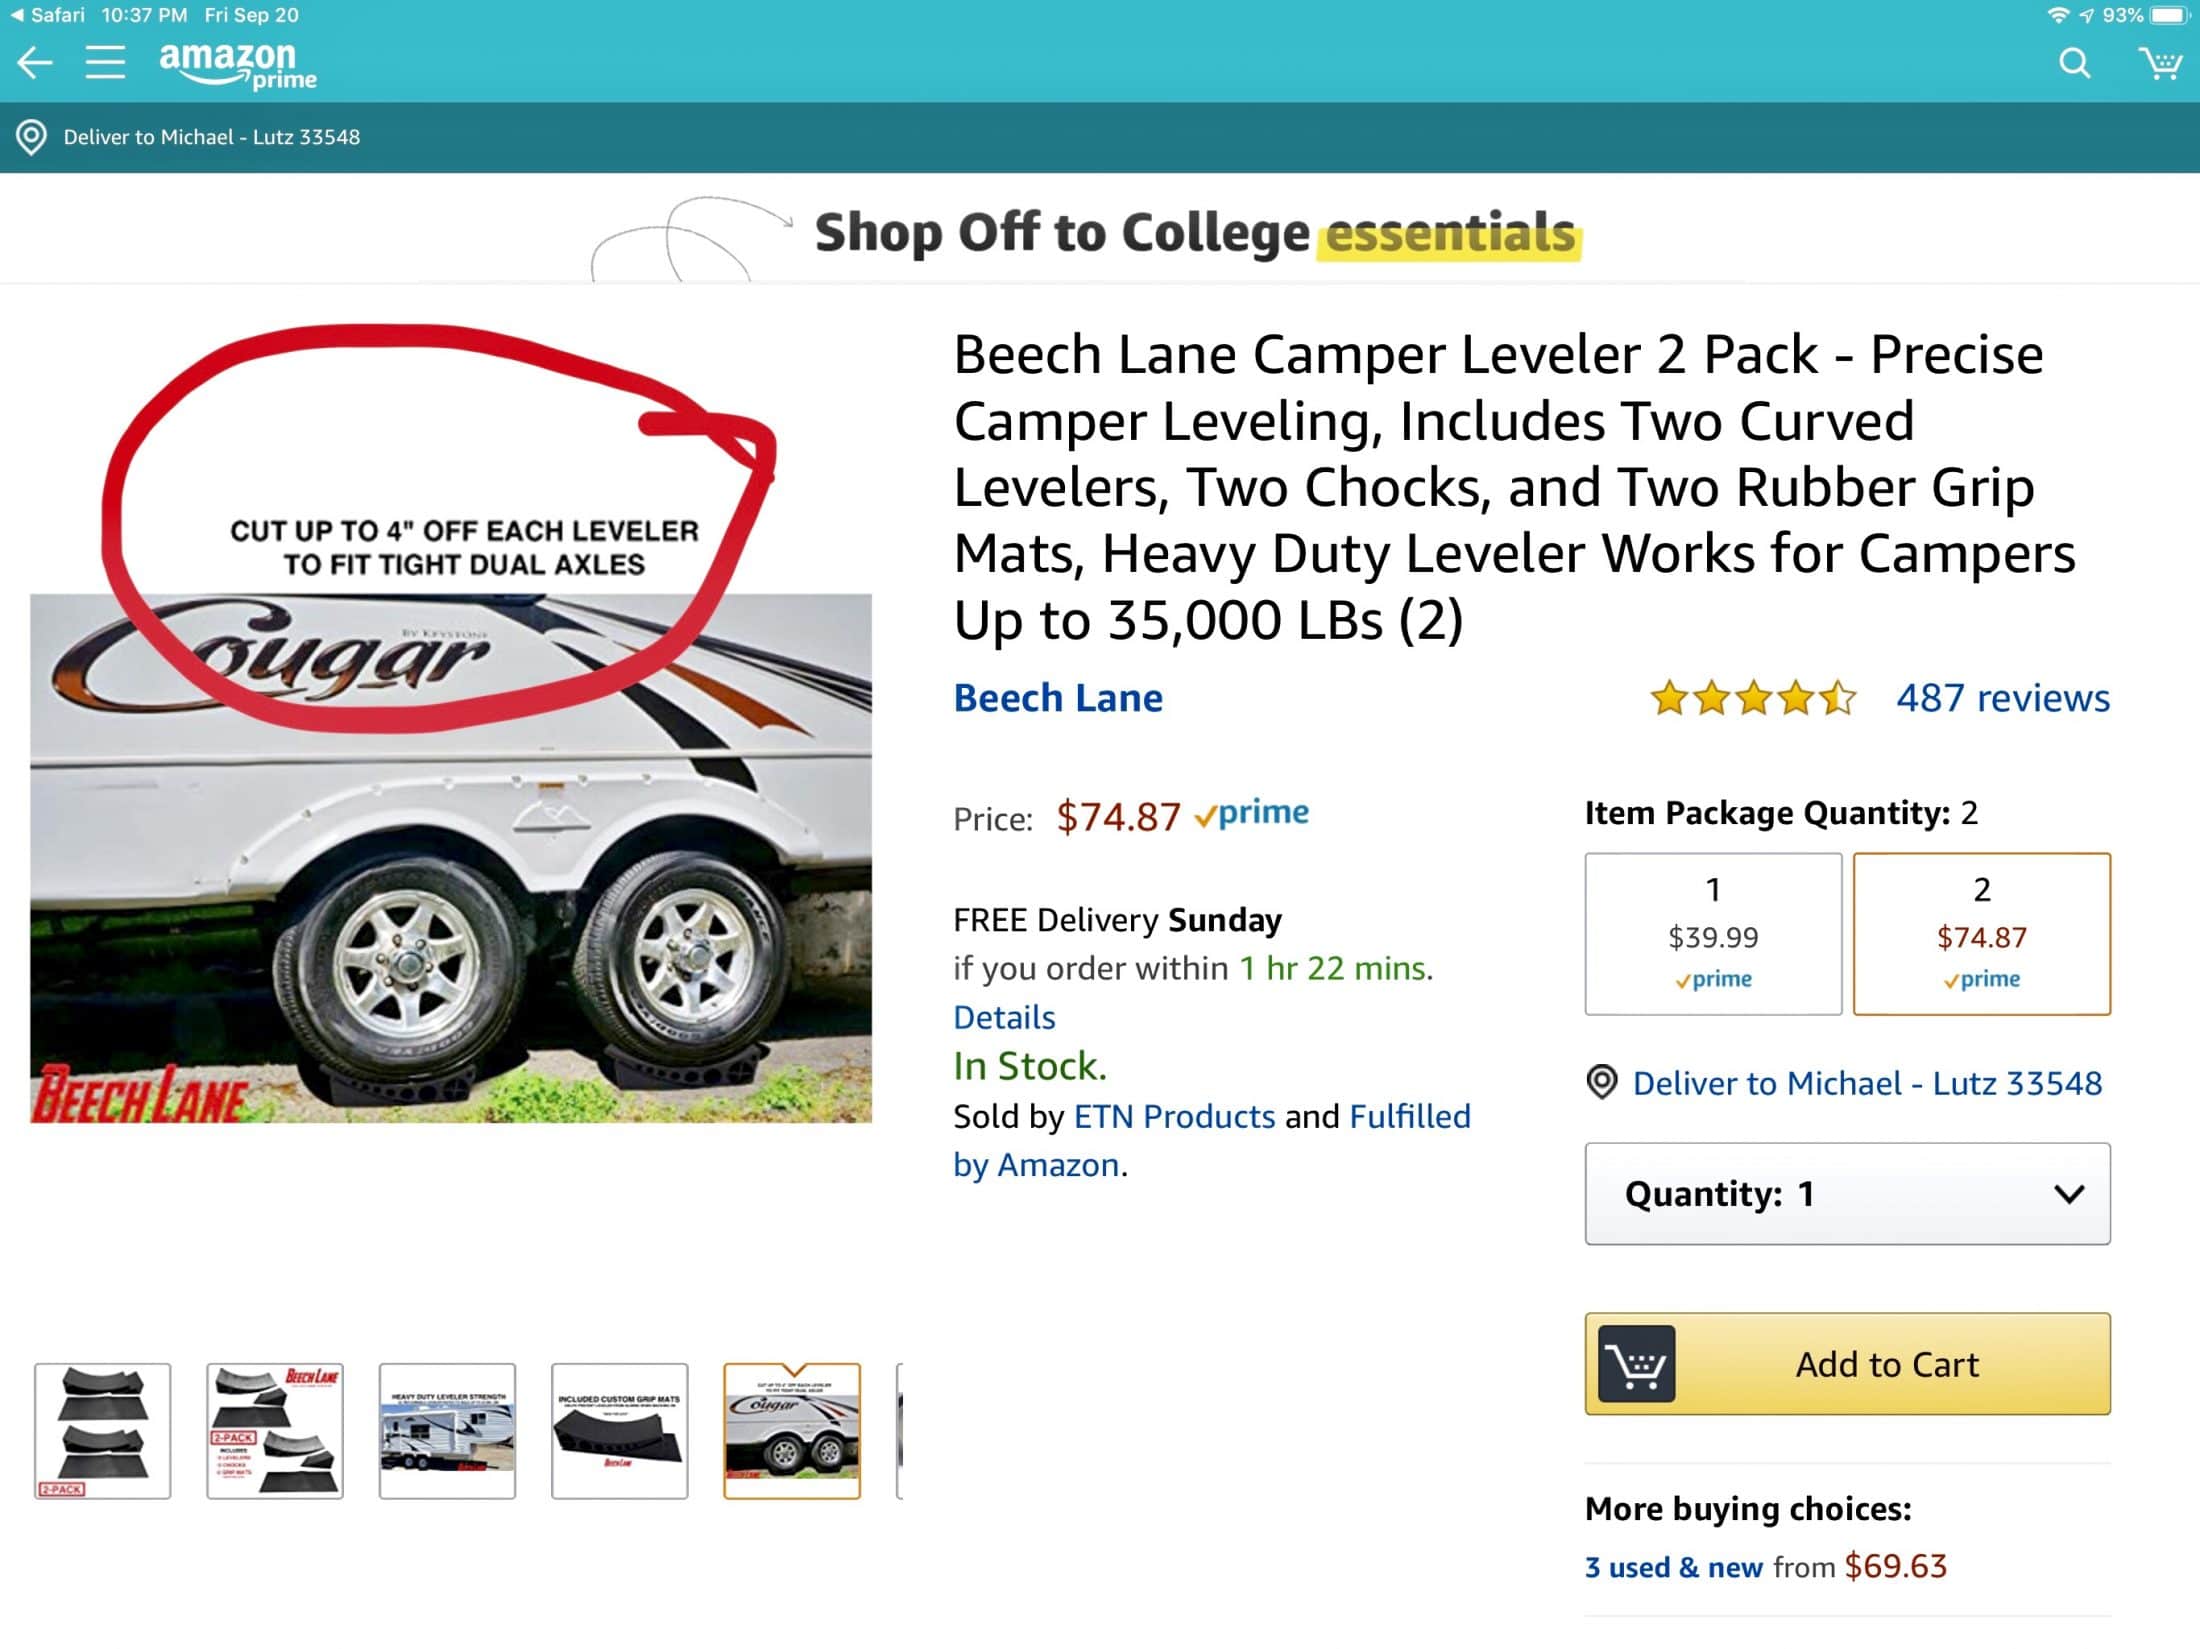
Looks like the Beech Lane levelers also suggest cutting them shorter if necessary. Mike
-
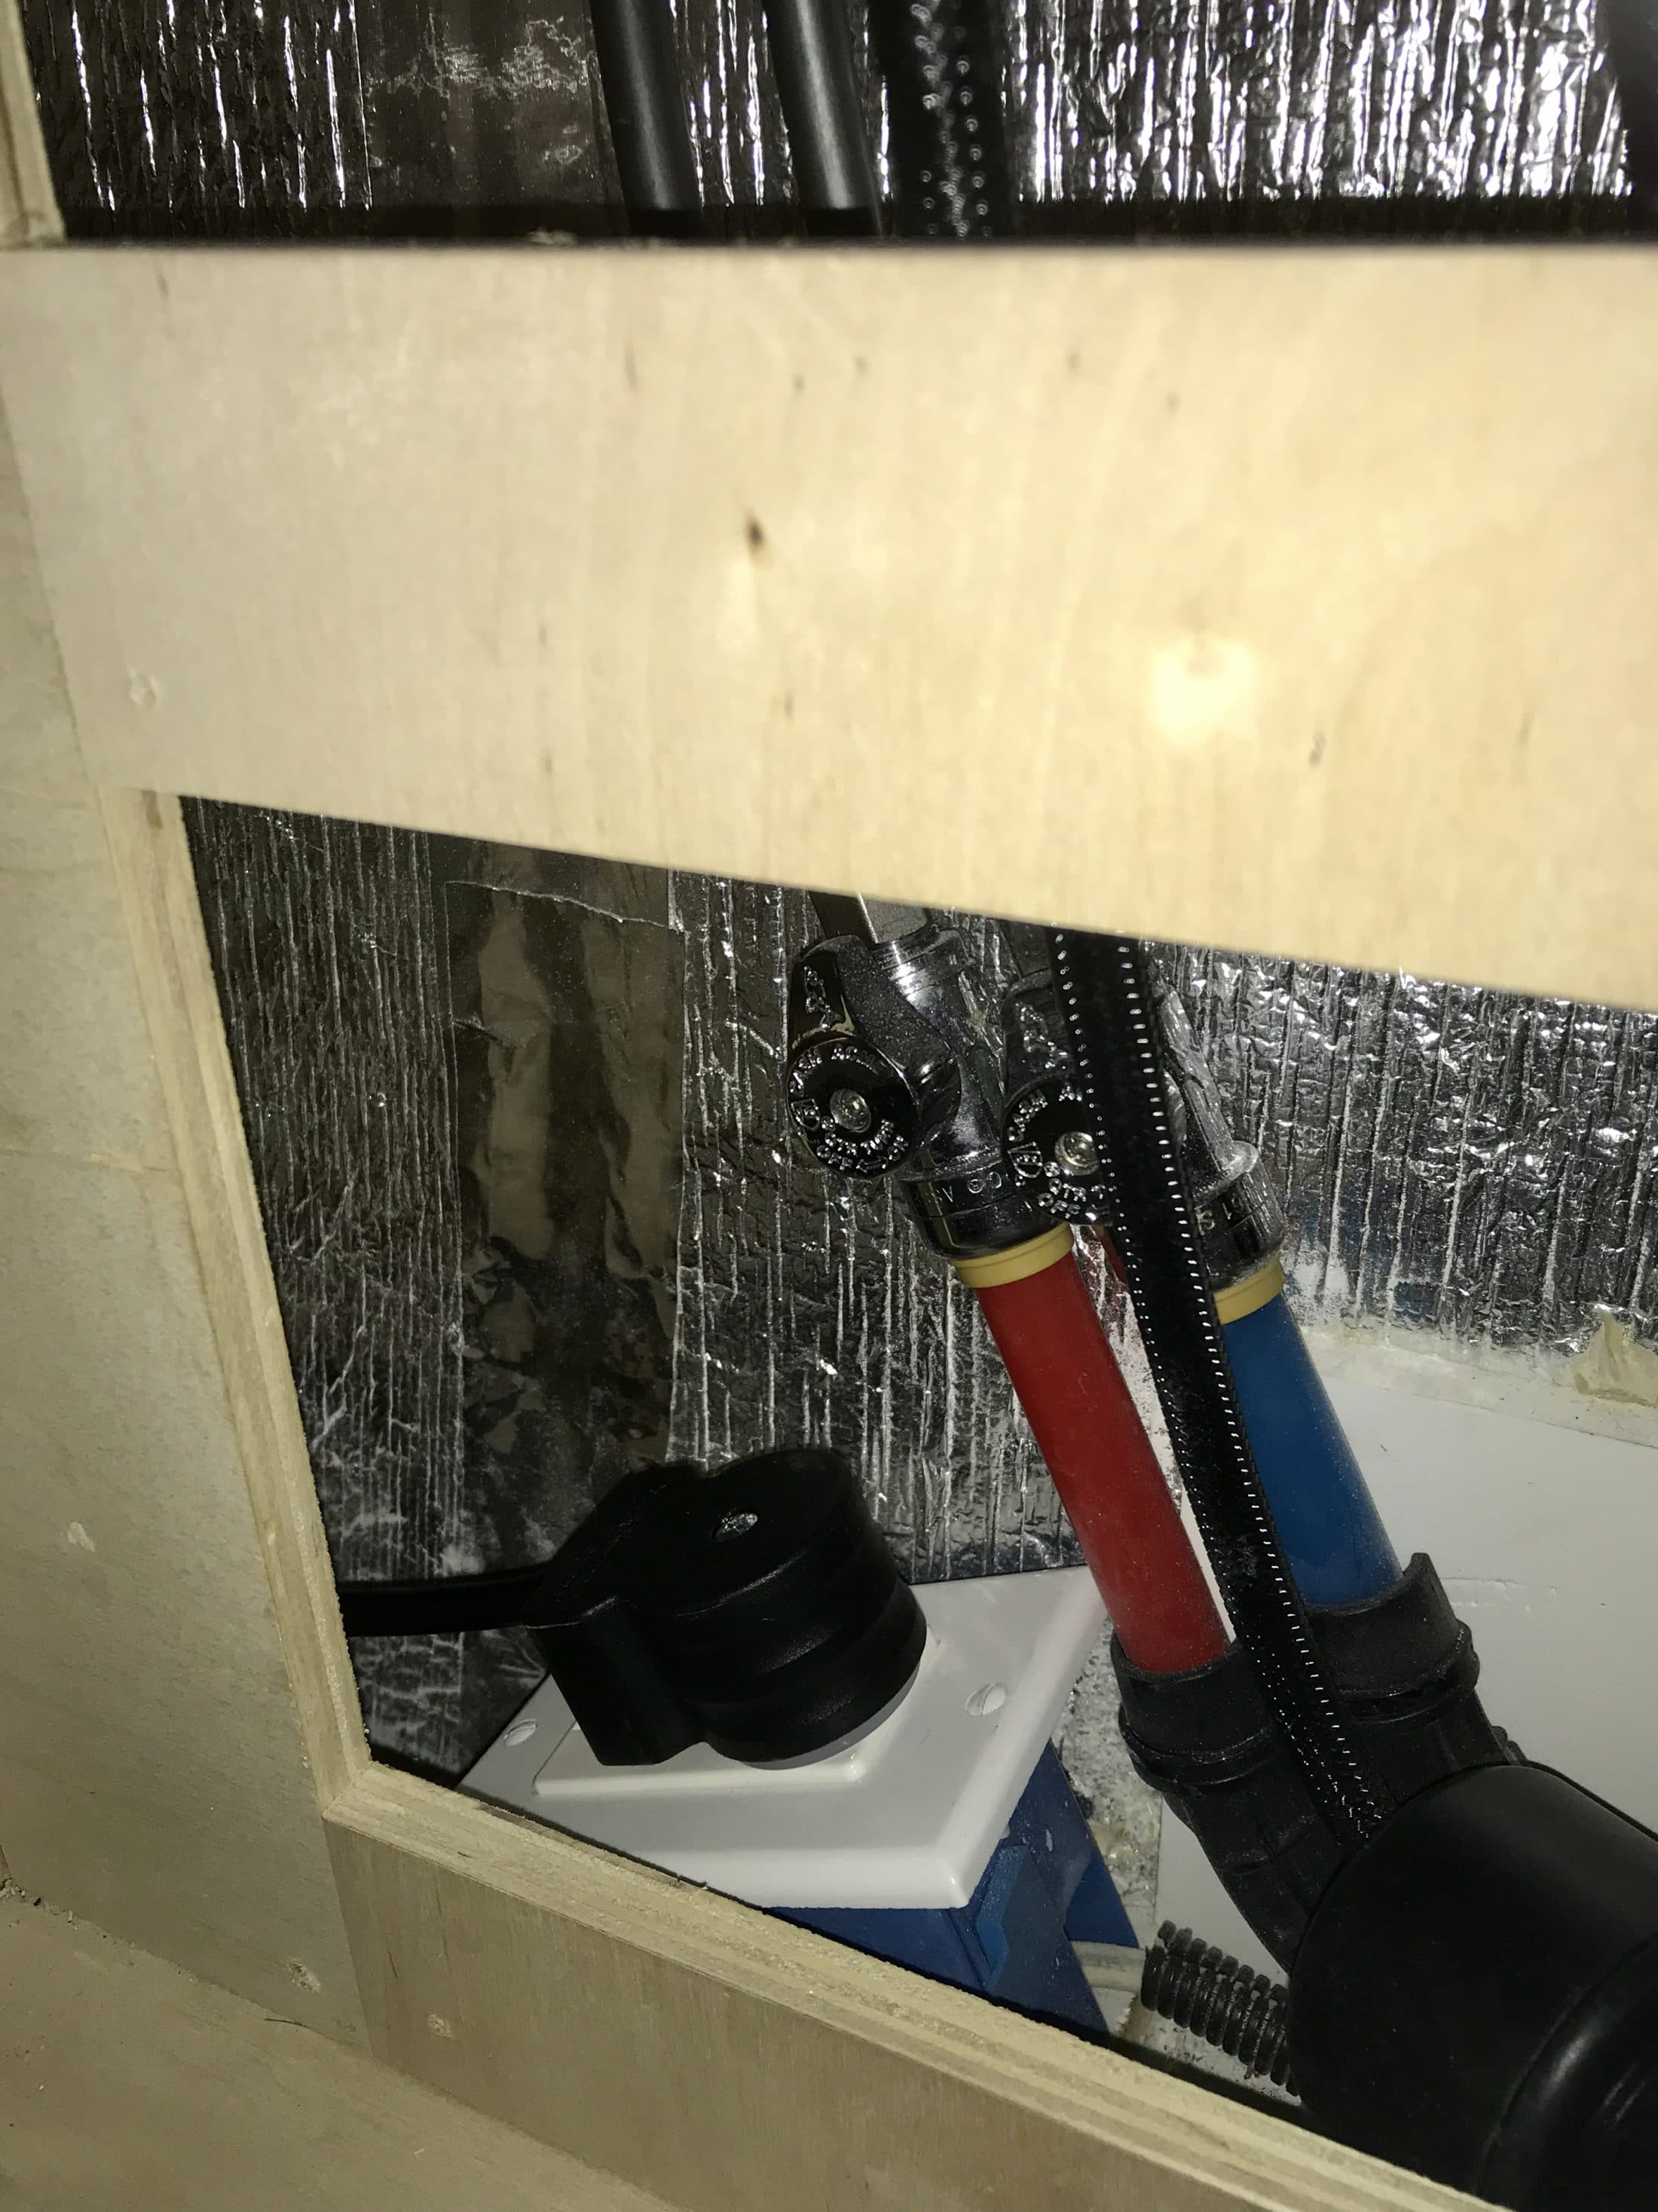
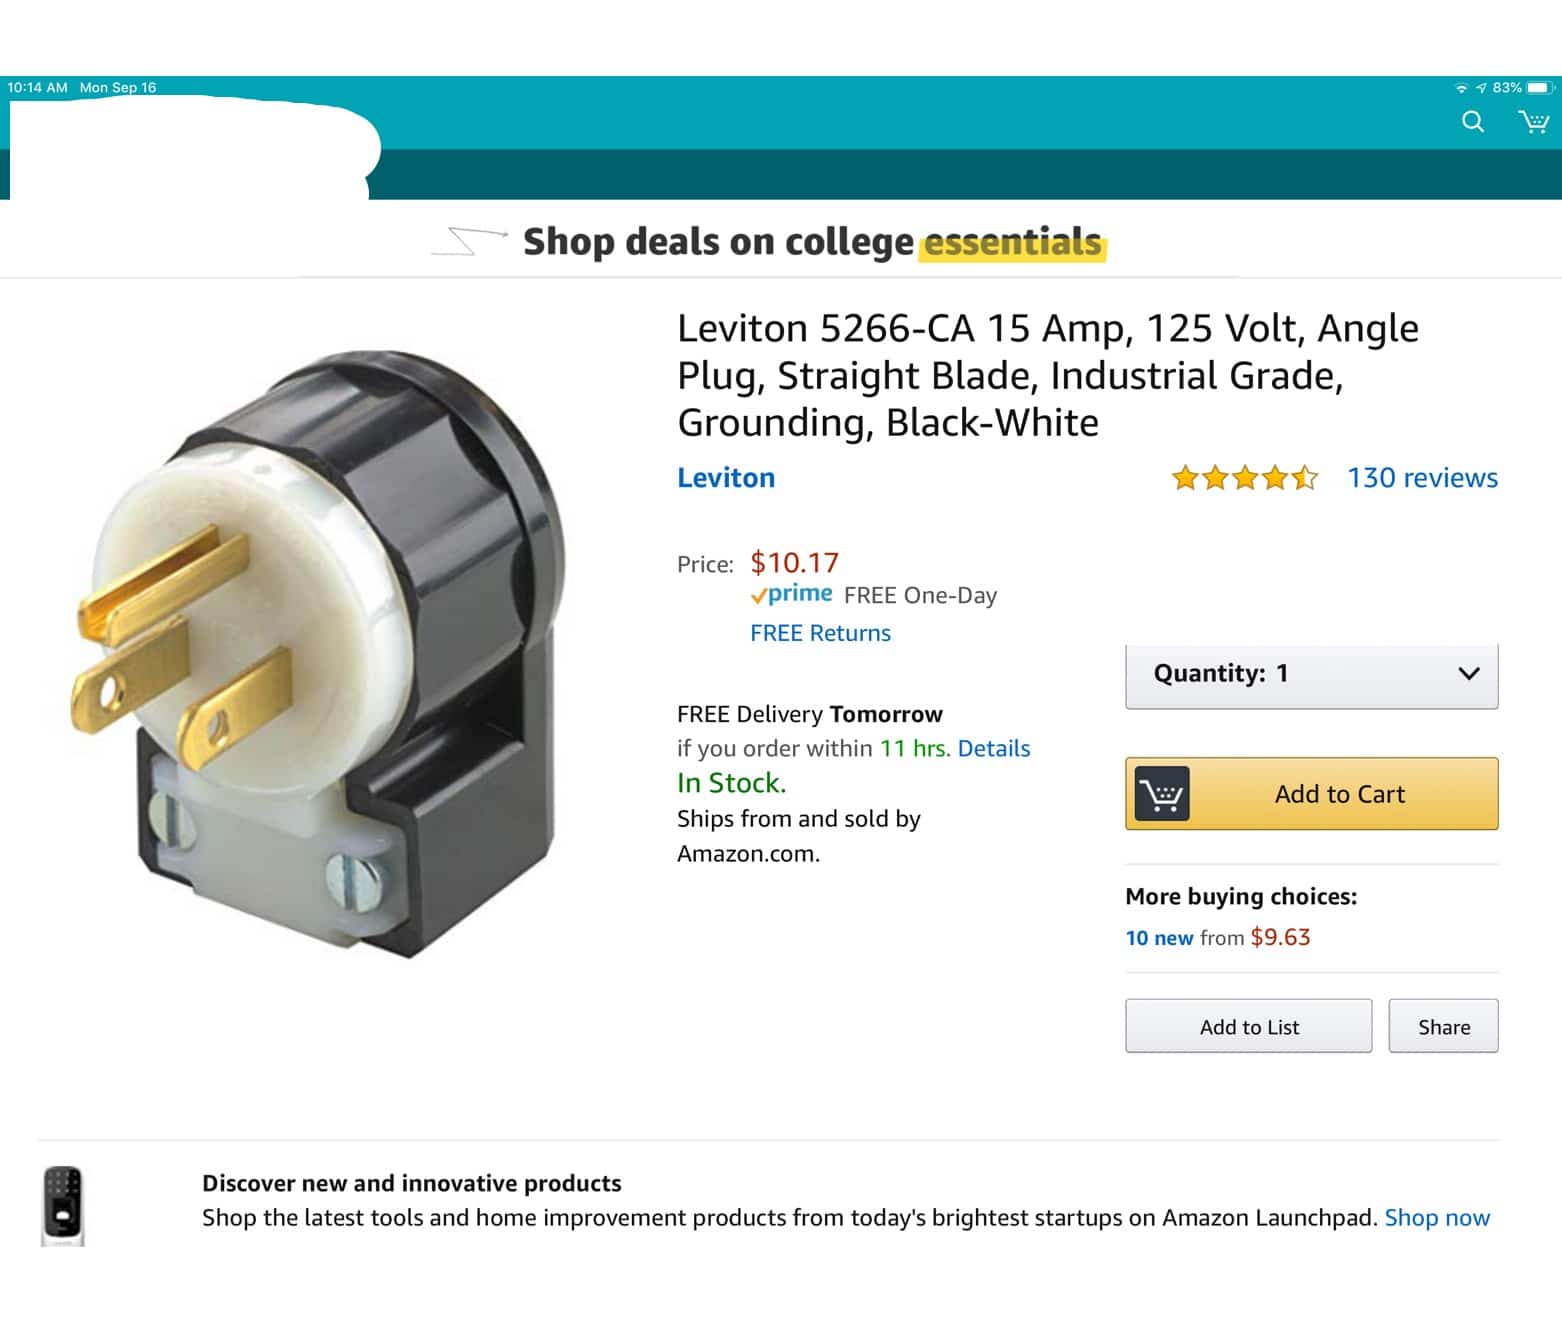
I could have, but I didn’t have one in my parts bin! So I just replaced the plug. The following the pictures tell the story. This picture is the bottom of one of the drawers I removed and shows the latches that allow removal. This picture is the rear drawer support. 3 screws hold it in place. And it is upside down in this picture. This picture is of the kitchen faucet access panel and it is mounted with 4 screws. The existing plug. And the replacement plug. And hopefully the new plug will not become unplugged while traveling to the next campsite. Mike
-
I was updating my campground log and realized I mispoke concerning electric service at Dunewoods campground. There is no electric service there. Sorry about the incorrect information. I did check with Indiana Dunes State Park and their website states that they have 20 amp service. Mike
-
Thanks David for the report. It sounds like you had a great time. And it looks like you got a new oven for ?. Mike
-
Congratulations on your new Ollie. Your retirement date looks familiar, it was my official date as well, although they did pay me a little longer just to go away. There must be someplace to camp in the White or Green Mountains before next spring. But then again I know it’s different up north. In Florida, we don’t start thinking about spring until after Easter so we don’t confuse it with fall?. Mike
-
I would guess that has happened before, based on Paul and Sherry's and Bill and Martha's response. Which gave me another project for the honey do list. Since I would rather fix problems at home rather than while camping, I am going to replace the offending plug with a 90° plug. That should allow me to secure the plug and wire, possible with a tie wrap. Thanks for the problem to solve, it more fun than chess, for me. Mike
-
I noticed the new wheels on the E2 in the cover photo in the newest newsletter. The star pattern looks good. Mike
-
Funny you should ask! I’m still catching up on missed forum activity, so I just saw your question about the Indiana Dunes NP. It used to be Indiana Dunes National Lakeshore until becoming a NP in February of this year. It surrounds Indiana Dunes State Park which has different fees and rules. We stopped at the Dunes on our way back from a family reunion in Illinois. We stayed 2 nights in the Dunewood campground. It is an older campground, the showers and restrooms were nice and clean as was the campground. EDIT: Sorry, my bad! There is no electric at Dunewood Campground. Electric only With dump station and central water as most cold weather campgrounds are. I thought the parking pads were on the small side, but each camp site had a large picnic table and fire ring area. The campground is very shady with lots of new growth trees. The bugs were not bad for a shady camp site. The park is rather unique in that it is more urban and industrial. The dunes were impressive unless you compare them to White Sands or the Great Sand Dunes NP's. The beaches are gravel with mostly round stones. We arrived Labor Day afternoon and the State Park was a zoo. We checked in the campsite and chilled. Rain in the morning sent most of the tent campers away and the crowds were much smaller everywhere we went on Tuesday. Access into the park was easy as we came in from the west on I-80 and left on Hwy 20 and then back on l-80 to Elkhart and the museum. Do check it out if you are in the area, it’s worth the visit and at $25 for 2 nights with the NP pass, it’s a bargain. Mike
-
We just visited Indiana Dunes National Park, just off I-80, 50 miles west of Chicago. It’s not in the class of Yellowstone but it’s a NP that’s close to I-80 and it’s worth a stop for the night or just to stretch your legs with a walk on the beach. Edit: There is no electric at Dunewood campground. My apologies. Mike The Dunewoods campground is electric only with central water and a dump station. The shower rooms are clean as are the restrooms. Depending on traffic, Starved Rock State Park is about 3 hours from the Dunes or 100 miles west of Chicago and also just of off I-80. The campground is not quite as clean as Dunewoods, but not bad. Lots of hiking available at Starved Rock. And I forgot the RV/MH Hall of Fame in Elkhart, IN. It can be done in a couple of hours and has some interesting campers from the 30's and up. Happy camping, Mike
-
I would suggest you first determine what type of camping you are going to do. Will it it be in formal campgrounds with electric, water and sewer or state and national parks that might just have electric? Or will it be Boondocking on BLM land? The reason I suggest thinking about it this way, is that we cook a little differently in each campground type. Now you need to determine menus that will work for your diet and camping style. For instance, I don’t like to cook breakfast on travel days. Cereal or a bagel allows us to break camp faster and get on the road. And if we have multiple travel days back to back, I’ll grill multiple chicken pieces, pork chops or hamburgers that can be heated up quickly in the microwave. I’m not looking for Michelin meals while camping, so we keep it simple. We very rarely cook inside as most everything is cooked outside on the gas grill and others OTTO's cook over a fire pit or charcoal grill. I do carry a cast iron Dutch Oven sometimes for group meals, but it is heavier than I like for most trips. Also grilling mats will protect you cookware from grills that are sometimes rusty or greasy. And the are easy to clean. Now I that You have an idea of how an you are going to camp and cook, you should have an idea of what you might need. After 44 years of marriage, we have too much stuff, so we moved some of it to the trailer and went camping. Then we started a list of what we needed, what we wanted and what we had to have. And even though we do that every camping trip, we still take too much, but we’re getting lighter all the time. Thrift stores and garage sales are a great source of lightly used cooking items that you do not mind abusing. Look for light weight items when possible no matter where find them. And don’t forget aluminum foil and pans. The pans are light and reusable if you chose. And square items store better than round, so look for them. Happy camping, Mike
-
Thank you Sherry! They did have a couple of mirrors in white at the BB&B at Citrus Park a month ago. Mike
-
While technically not cubbies, I did find these little silicone pockets extremely handy on our recent family reunion trip. They stayed in place for 14 days, nearly 3000 miles, 1 COE, 1 NP, 7 SP campgrounds and held a variety of odds and ends. They weren’t cheap at $10 a piece on close out at Bed Bath & Beyond, so I bought one and went home to try it out. I liked it so much that I went back and bought the other 5. So we have 4 white ones in the cabin area and 2 grey ones in the bath. And then I stumbled across a different brand at Kohl’s that holds a beer can and we used it for a bottle of water in the bath to rinse after brushing our teeth. Mike
-
Thanks for clarifying the WAN feature. It is definitely a piece of Enterprise equipment that requires a high level tech savvy and an IT department for support. I can say with confidence that it cannot boost any WiFi or cellular received signal without an amplifier in front of the antenna ports. The boost you are referring to with WIFi is the result of a better antenna located on the roof not any type of amplification. Using a rubber duck WiFi antenna inside and the outside roof top would give you the best coverage both inside and outside. As far as the cellular goes, moving one antenna 10 to 20 feet up on a mast would be detrimental to the MiMo capabilities. You would be better off with a MiMo antenna on the mast. And don’t worry about 5g, it won’t be anywhere near where you like to camp anytime soon. If they put 5g equipment on the telephone pole outside my house, it would cover about 6 houses. 5g will be deployed at stadiums and around apartment building where there are high concentrations of users. Although KOA's might be a target area. Mike
-
So 2 antennas support LTE, 2 support WiFi and the 5th supports GPS. That makes sense. I may be wrong, it’s happened before, but I don’t think the WiFi portion is capable of receiving a WiFi signal from another access point, I think it is an access point. I know you said you don’t use it that way, but have you ever tried to connect to another WiFi signal? All of that really doesn’t matter if you aren’t going to use it to connect to, let’s say a Starbucks WiFi while picking up an espresso. I think the LTE modem is the ISP and supplies the internet connection and the WiFi is a wireless router allowing multiple devices to connect to the www. I can’t see the WiFi antenna connections in your picture, I assume they are hidden by the net bookcase and transmit/receive the WiFi signal outside. If you put 1 of the rubber antennas on the router inside, it would be on the good side of the reflectix and improve the WiFi inside the Ollie. Cobra1169 could confirm the details if he was around. Mike
-
I line up the ball with the coupler when I am hitching up and back up to the point where the coupler would drop onto the ball if I lower the trailer. If I cannot connect the whale tail or the shackles at that point, I raise the coupler enough for me to backup a couple more inches and try again. Generally, if the ball is under the sliding collar with the coupler open, there is enough slack to connect. If my wife is helping, she stops me before I back into my TV, which wouldn’t be cool. If I am by myself, I place a piece of wood on my bumper to protect the TV. When you raise the coupler while connected to the ball, you are effectively reducing the distance between the whale tail and the chain mounting point on the trailer, resulting in the chains having more slack and allowing an easier connection. Doing it without connecting to the ball has the same effect. I would suggest you try it while hitching up, you might be surprised. Mike
-
The idea behind connecting multiple antennas is diversity. One of the antennas nearly always receives a better signal than the other, so you combine the signal from both antennas, thus improving the received signal. Any newer 4G phone has multiple receive and transmit antennas. That is called MiMo or multiple in/multiple out. Horizontal diversity is much better than vertical diversity because the higher antenna would nearly always receive a stronger signal. That would eliminate the benefit of the second antenna as far as diversity is concerned. So if your 5 way antenna supports WiFi and 4G cellular, what else does it support and how many coax connections does it have?
-
I think television coax and antennas are rated at 75 OHM and wireless coax and antennas are rated at 50 OHM. If you connect a 50 OHM device to a 75 OHM device or coax, you would create an impedance mismatch which would cause signal loss. Since the idea is to boost a weak wireless signal, you would want all components balanced for the best signal improvement. That being said, the short coax length would be a benefit and possibly not create enough impedance loss to be a problem, but it is a consideration. I don’t think it would be too difficult to replace the television coax with wireless coax. I’m not sure if your Cradlepoint is a WiFi receiver or not, it depends on the model, but I assume it is based on the 5 way antenna. The big signal boost you get with your equipment is the roof mount antenna. If I was going to spend the money to add a wireless booster or router, I would install a wireless antenna and coax cable which I think you did from your description. Although an antenna on JD's flag pole would be an interesting test. Mike
-
I can understand the coupler pulling up the ball and cone a little bit if the locking collar was not released and you were actually lifting the TV with the trailer while trying to create slack in the chains while unhooking. I don’t understand how that could happen while hooking up unless you have actually connected the the coupler and ball and are again lifting the TV with the trailer to create slack in the chains. There is a good video on YouTube showing how to connect a shackle to the Whale Tail plate if one of the chains is long enough to connect and the other is too short. It allows the trailer to pull the Whale Tail straight enough to allow the short chain to be connected. The method best for me is as follows: 1. Chock the wheels on both sides of the trailer 2. Unlatch the coupler 3. Use the front jack to raise the coupler off of the ball and if the chains are still too tight, keep raising the coupler enough to allow the TV to be backed up a couple of inches. 4. The chains should now have enough slack for easy removal of the Whale Tail or the shackles. 5. Level the trailer as you normally do. If you use this procedure to hook up, be sure to leave the chocks in place and raise the rear jacks before lifting the trailer on the front jack. Good luck, Mike
-
We used both dogs?. Oh well! And the only place I can find a replacement is at eTrailer, although I haven’t talked to OTT about it either. Mike
-
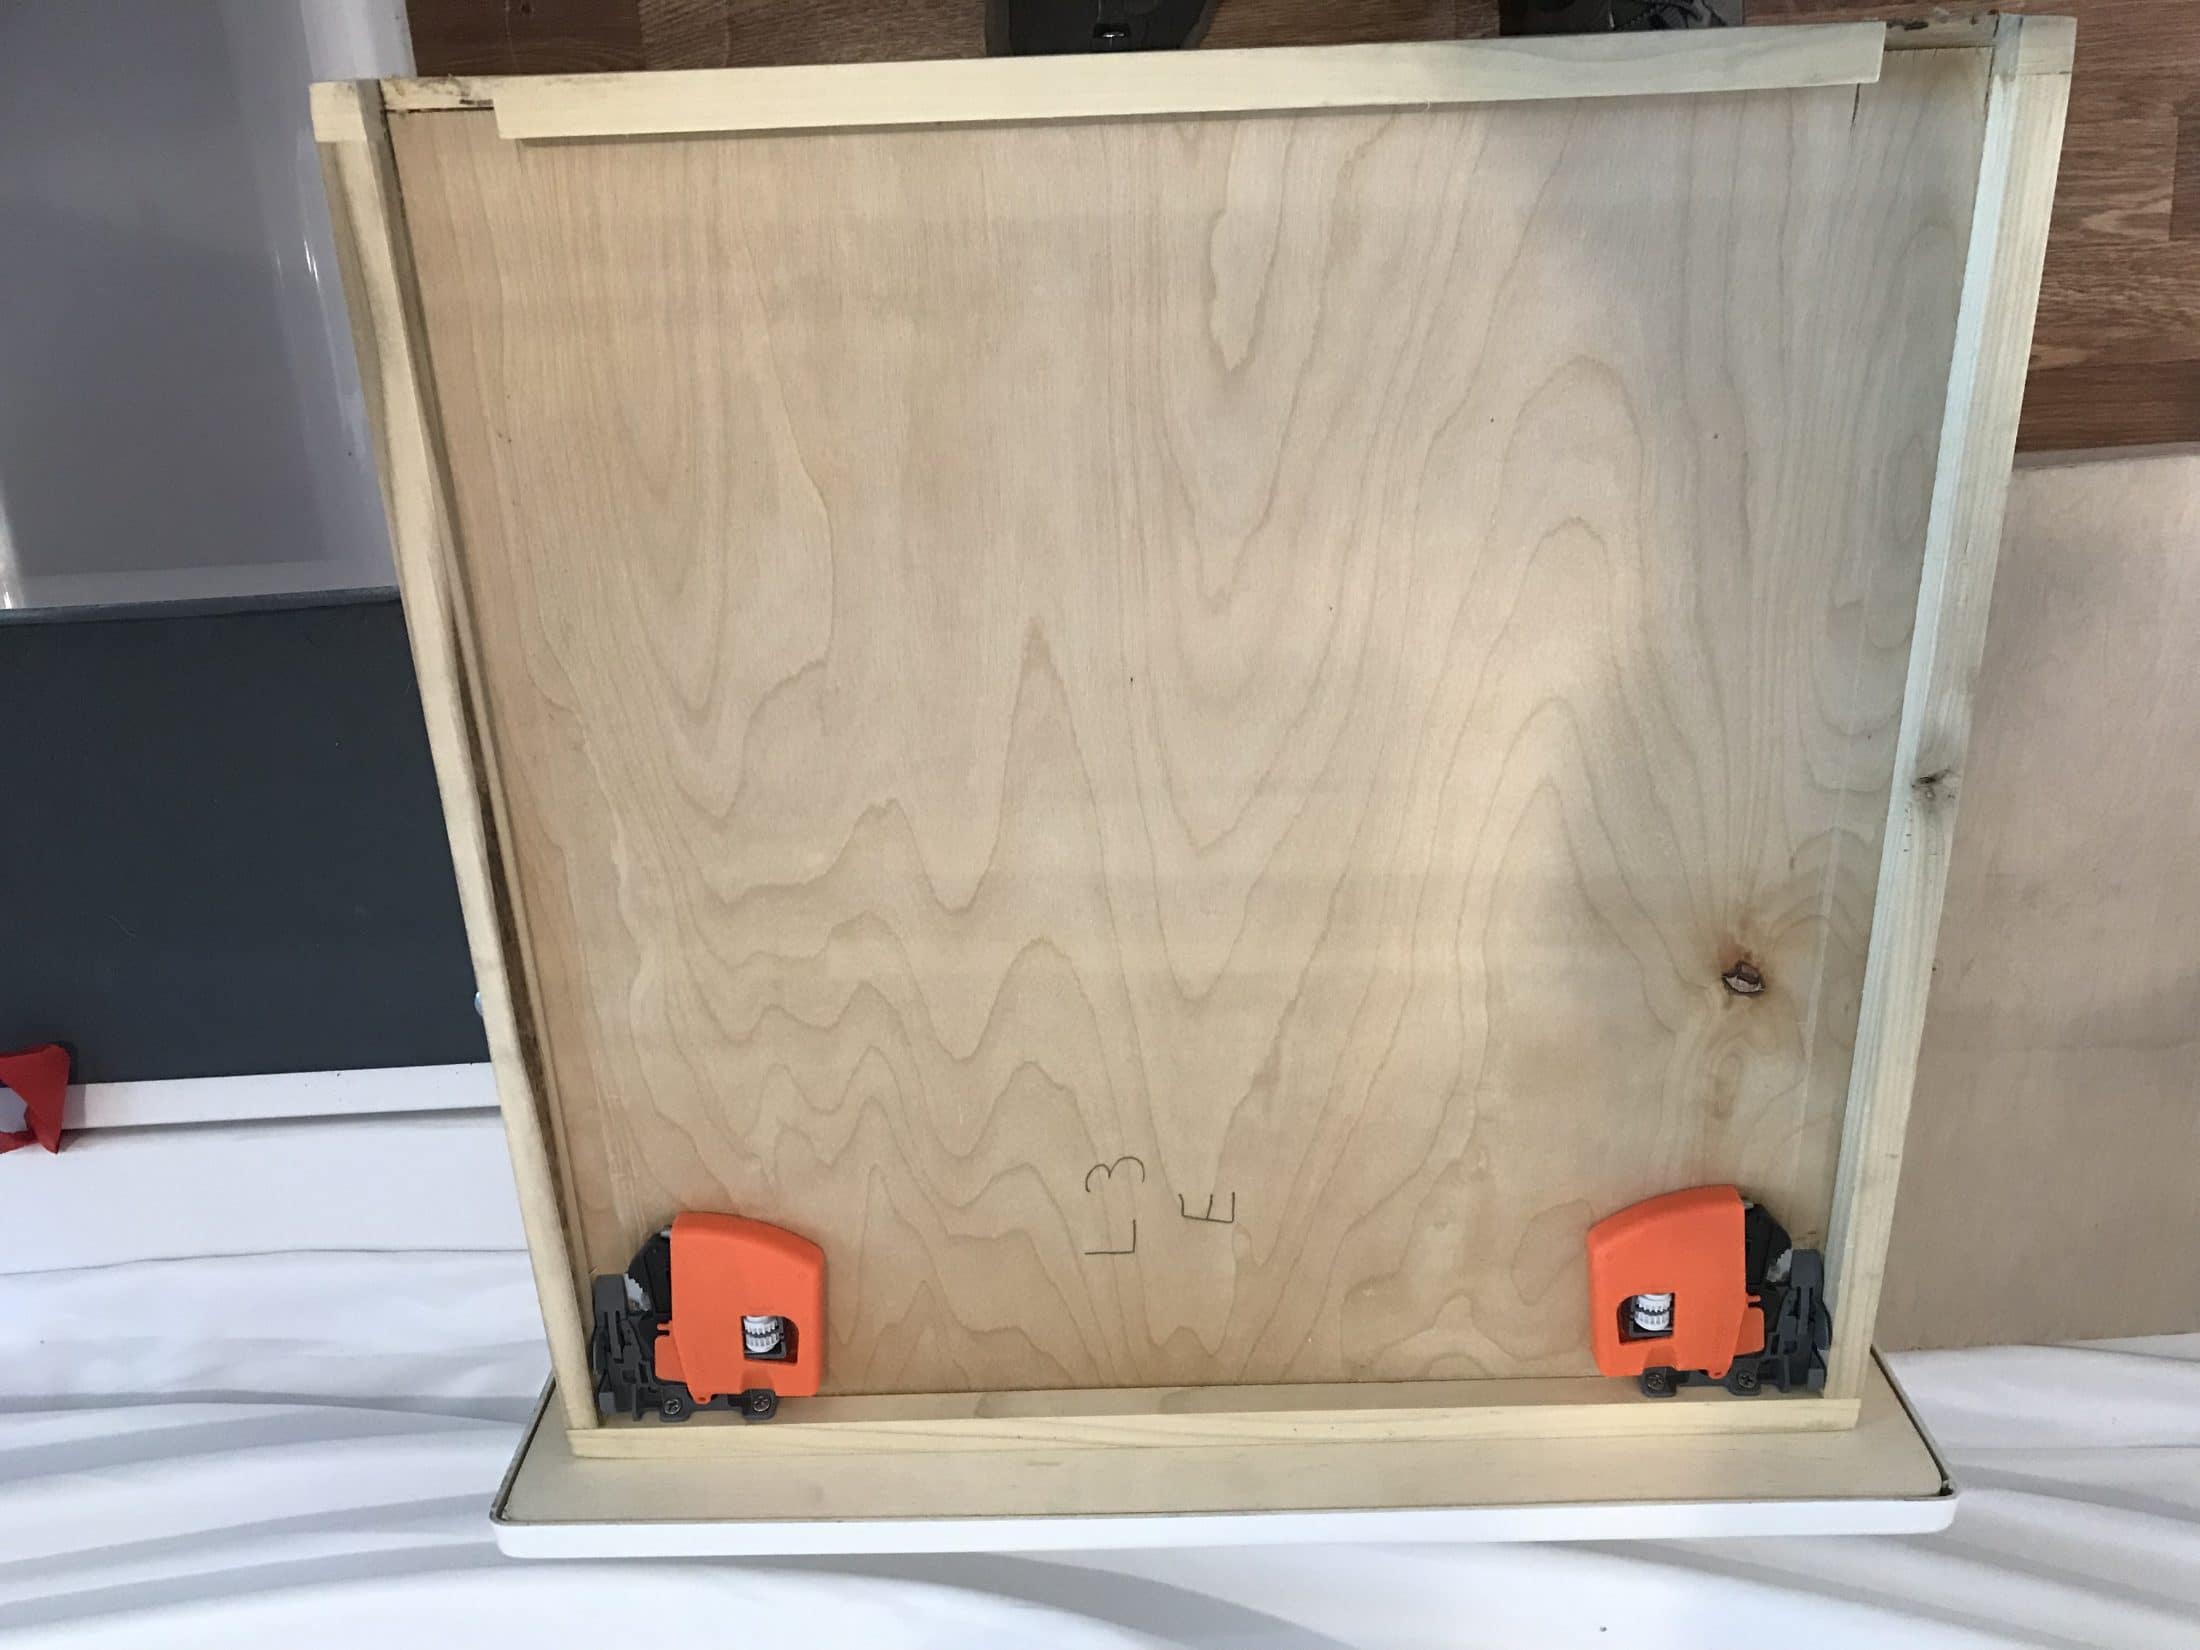
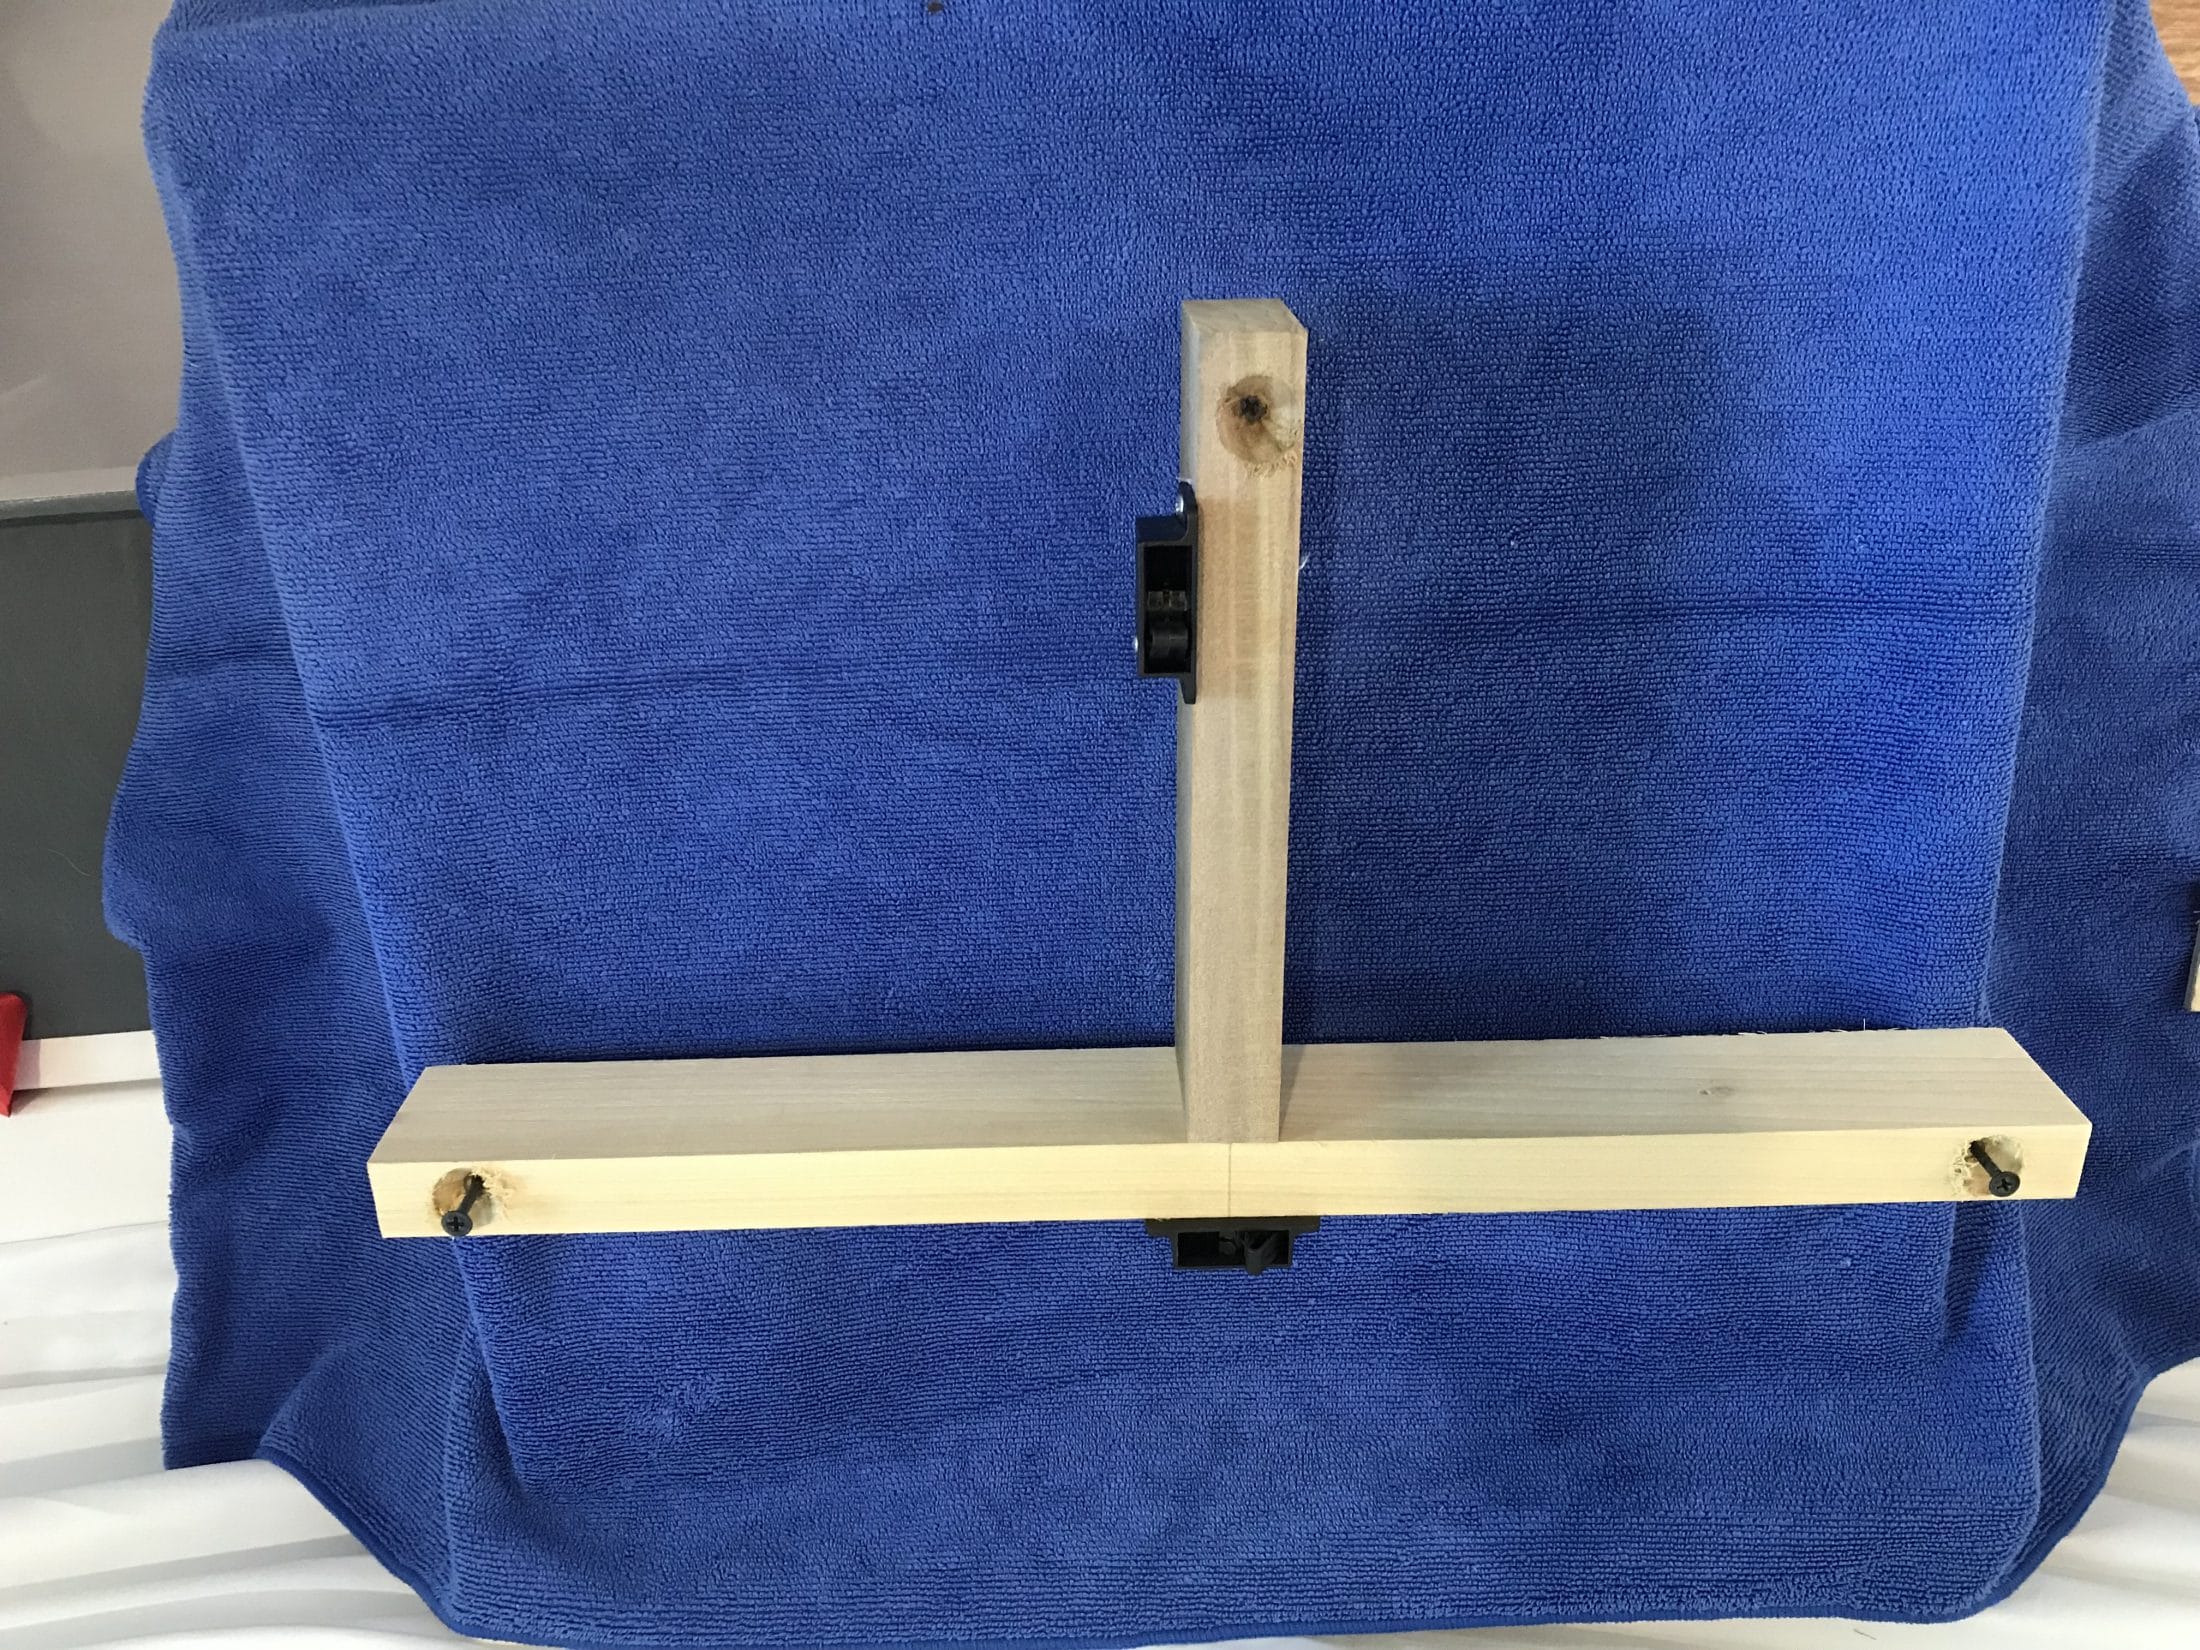
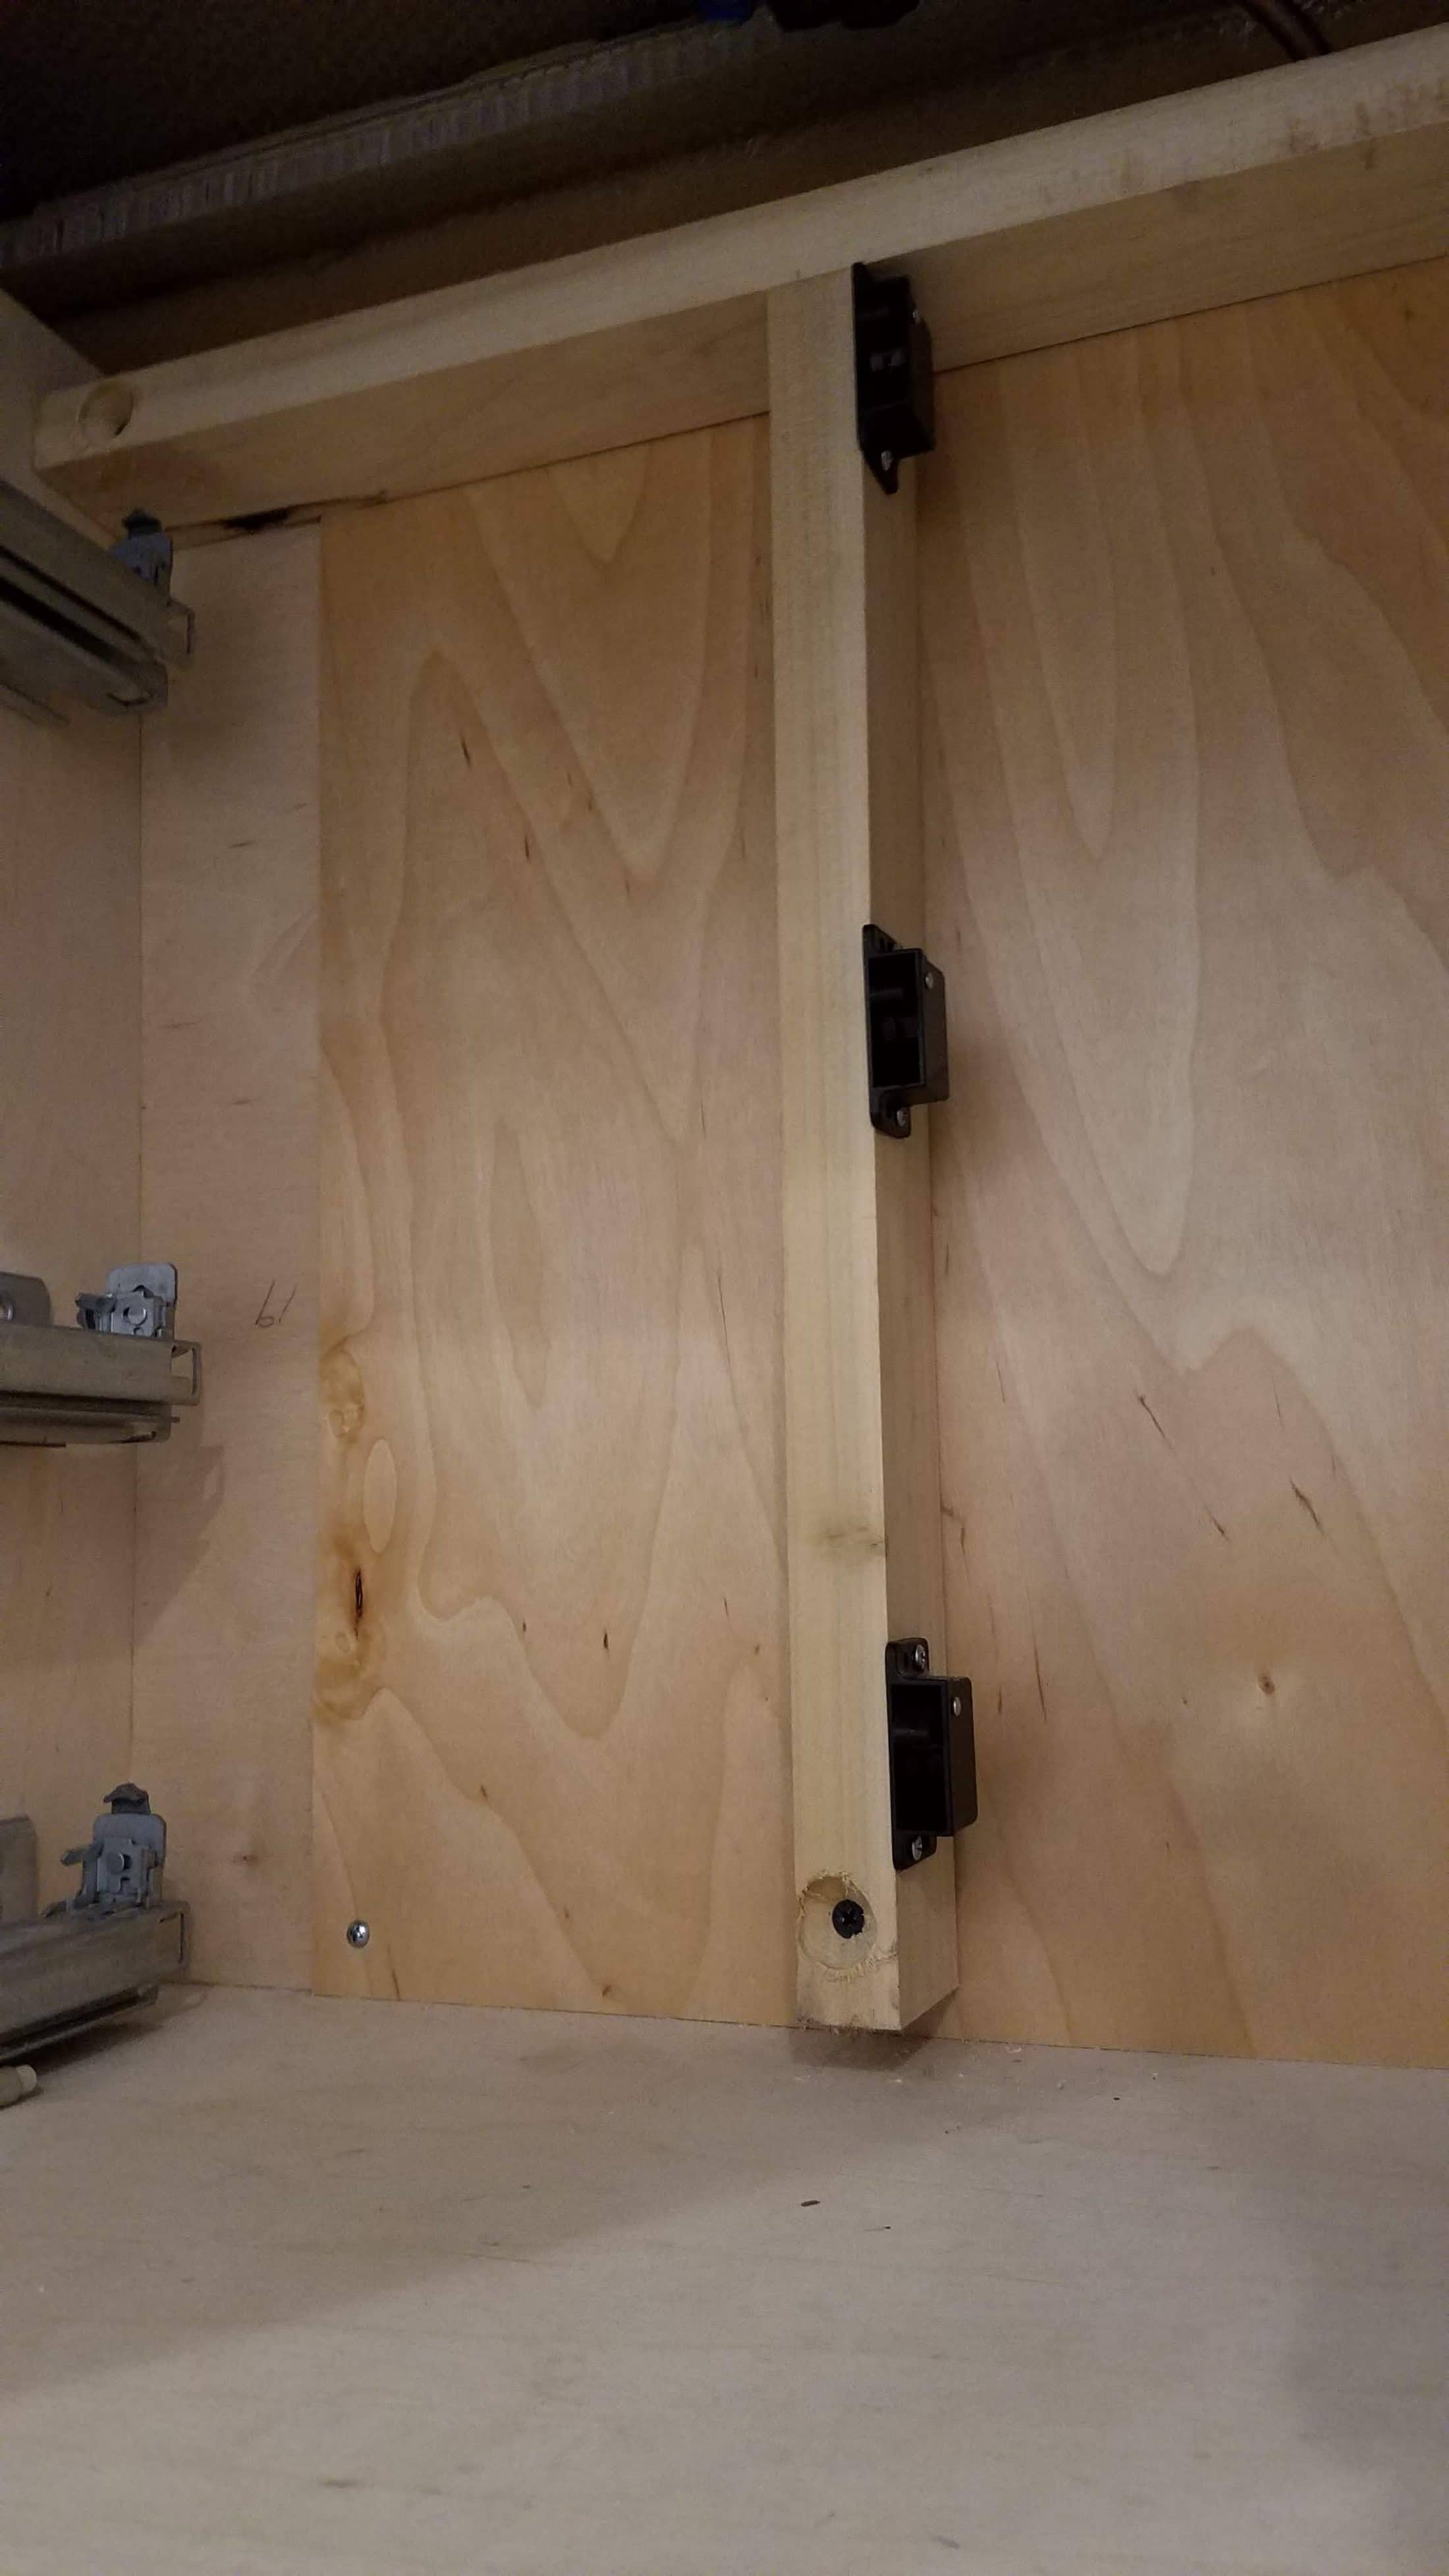
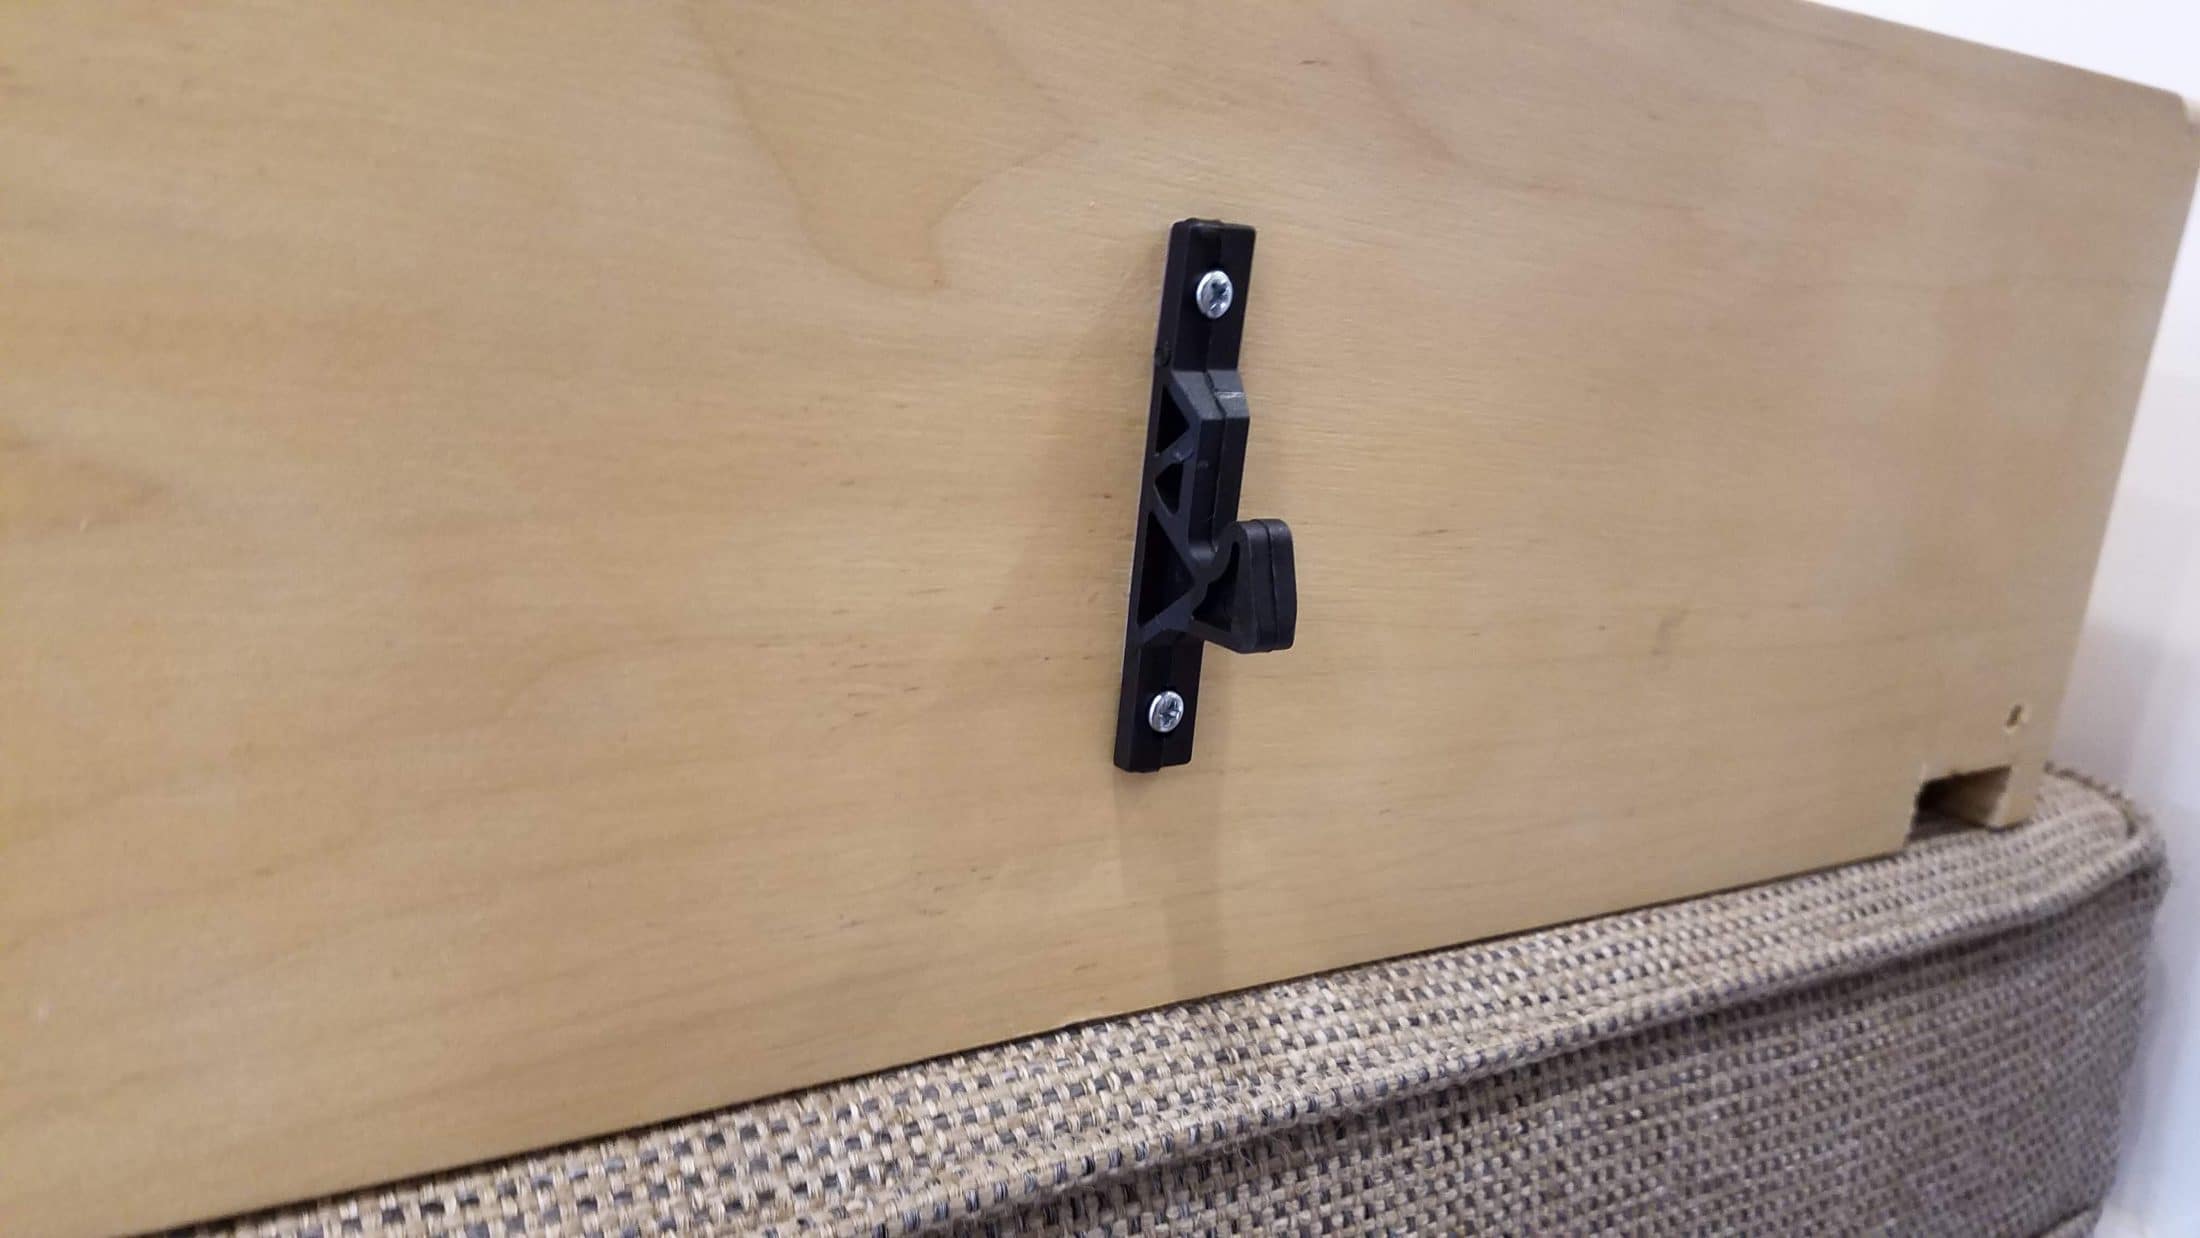
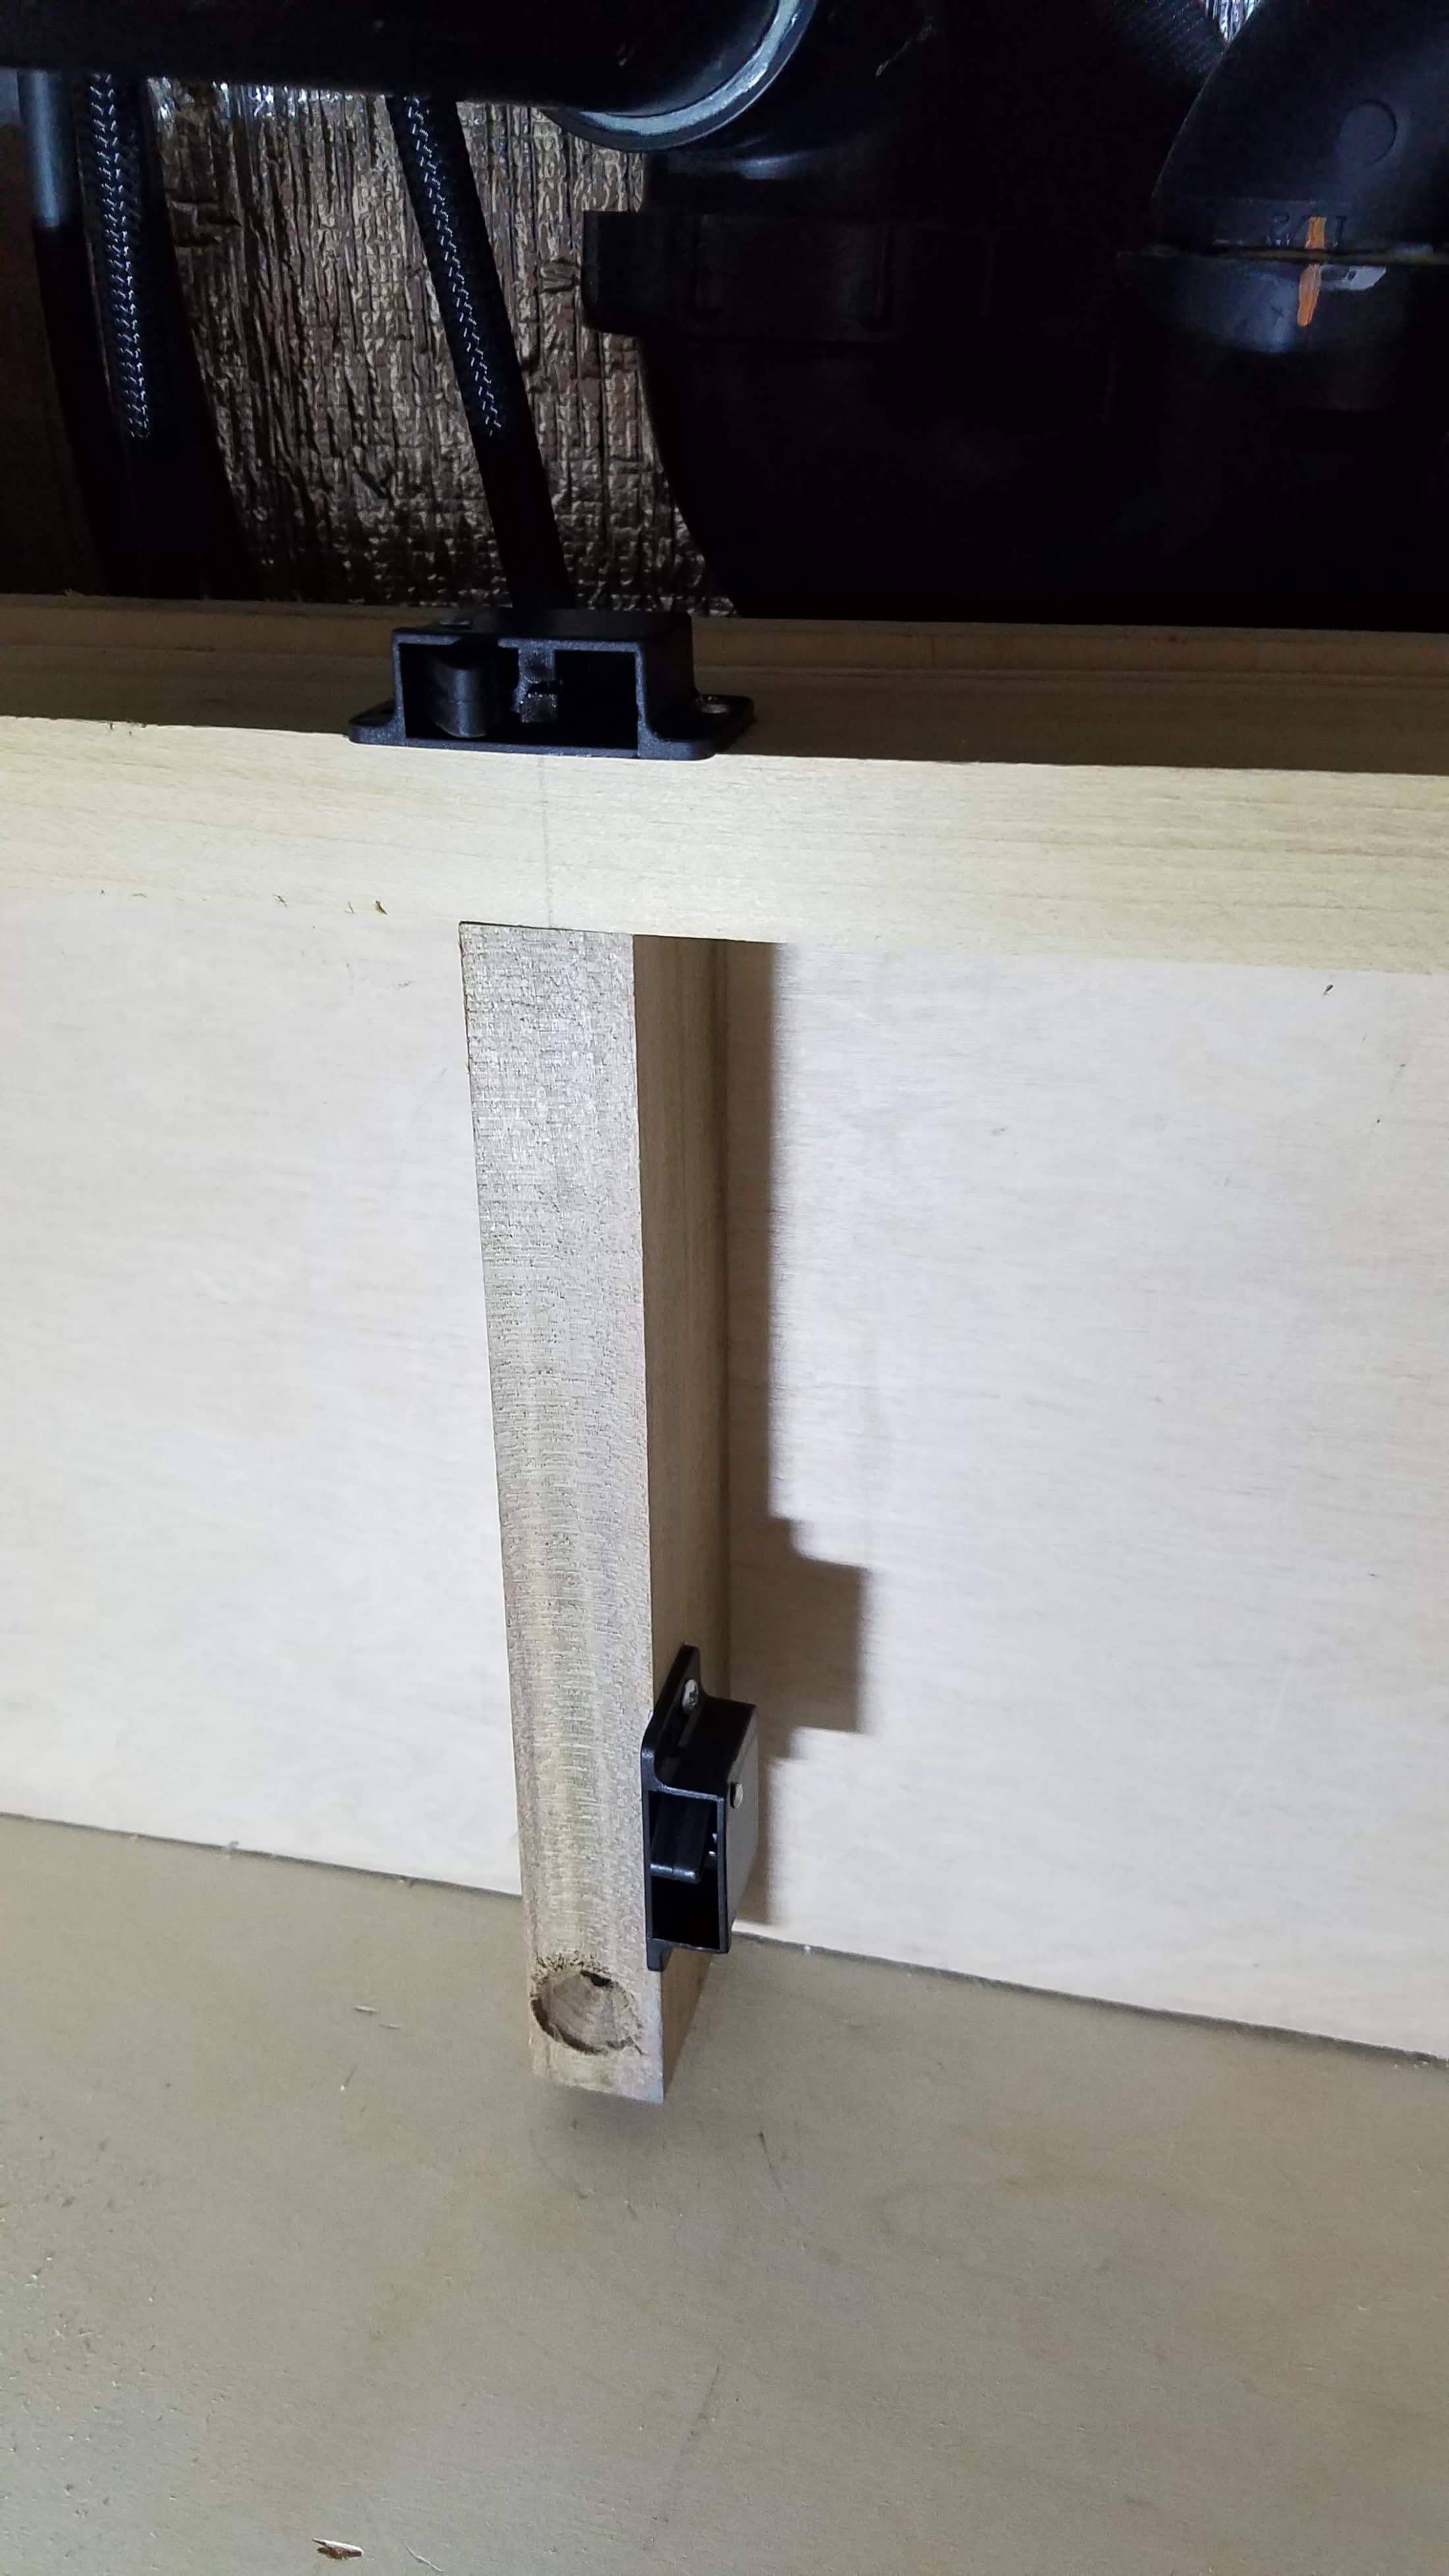
Drawer Locks There have been quite a few postings about galley drawers opening during travel. I am constantly amazed at the ingenuity and craftsmanship of my fellow forum members. My first drawer management version consisted of small Harbor Freight suction cups and 1/2” PVC pipe. It was a simple fix and worked well, but then I followed topgun2's recommendation to clean the inside of the dog house with the Norton's Duragloss recipe. The inside was clean, shiny and so slick, I couldn’t get the suction cups to stay in place any longer. So we once again had the unexpected open drawer experience during our rally trip this year and the hunt was on for a new solution. This was the product I chose and we will test it on our next trip with fingers crossed. And this is how I mounted them to the cabinet supports and drawers. Edit: The drawer locks worked very well on our last 2900 mile trip. Edit: The link above to Amazon actually takes you to the 8 lb. version of the latch. I used the 5 lb. version and corrected the Amazon link. Mike