
Geronimo John
-
Posts
2,398 -
Joined
-
Last visited
-
Days Won
68
Everything posted by Geronimo John
-

Honda EU2200i storage/transport in truck bed…
Geronimo John replied to Frank C's topic in Mechanical & Technical Tips
I like your heat gun idea better than the Rubbermaid box or tire tube mod. My goal is to keep the dust out of the generator so minimal dust entry points is a good idea. It would also hide the precious cargo from not nice eyes looking to finance their habits. Wonder what the fume ignition hazard is in the box or in our enclosed beds? GJ -
For grins I checked out the Allison's AB Lifestyles Sheets. Pretty cool beans that they have our cot beds specifically designed for OTT! For sure appear to be well made and custom made for just us! Then I saw the price of those sheet sets.... OUCH! For now anyway, it's "Back to Walmart". GJ

-
Honda EU2200i storage/transport in truck bed…
Geronimo John replied to Frank C's topic in Mechanical & Technical Tips
Solution Optimization: Cut out part of the rib for the handle as you suggested. Then pop rivet in rubber tire tube to make a flexible roof over the handle area to keep dust out. It could have a slit for fume venting or made separate as you suggested above. GJ -
Having containers such as yours in the pantry is UBER important. And pretty sweet too! This past summer our pantry shelving collapsed when we were in Canada. The white plastic clips that hold up the shelves failed and the wires on the rack also failed. The loose wires locked up the latch and it took destructive drilling of the latch to get the pantry open. Those latches are are quite expensive. Having containers spreads the load, keeps broken containers from being a REAL mess, and greatly reduces the propensity for the contents from successfully playing bumper cars on the shelves. Did I mention that one of the caultities of our event was a 1.75L bottle of Jack D? Tragedy of the highest order! If you have the white plastic shelf holders, please replace them with metal ones. While you are at it, I suggest adding 100% more of them too. Trust me we had a MESS. Thank you for the clear plastic suggestion! GJ PS: OTT Service is very aware of my terrible loss (1.75L) and the fix.
-
I double sided print two copies. One copy I highlight the text "Inside Trailer Copy". the other one I highlight Outside Trailer Copy. My "Cinc House" copy stays in the kitchen drawer. The outside copy in my truck. She does hers, and I do mine. The highlight trick has eliminated any question as to which copy is missing. 🙂 The check list has evolved each year and lets us fully prepare for departure each and every time. I have attached it as a .docx so you can tailor it to your needs. Enjoy, GJ CHECKLIST 2023 OE2 Pre-Departure Check Lists (25 NOV 2022 Version).docx
-
Sent you a PM. I'll be down near Splashway in mid July. Geronimo John
-
Re-read your post. I think Paul answered it better. There may be some adjustment in the hinges, but first make sure your Ollie is dead level as Paul suggested, then loosen the hinges and see if you can take up some slack to level the bathroom door to the OTT Frame. GJ
-
Paul raises a good question. IS your reassembled mirror frame not square, or is the installed mirror and frame not aligning with the OTT door opening? I'm addressing the former, and Paul I think is addressing the latter. GJ
-
A Thread for OTT Owners of "New-to-Them" Ollivers...
Geronimo John replied to MAX Burner's topic in General Discussion
Our 2023 Summer voyage is 1 JULY to October. Quite a bit shorter than our 2022 15,000 mile Houston to Alaska tour. Just heading up to Oklahoma and then SLC and King Mountain near Arco ID. Just about 6,000 miles or so. -
If the replacement mirror was square, then the only way the assembled frame would not be square is if the adhesive mounted frame was installed not square or it has come loose, likely on the hinge side. This could happen if the assembly was hung before the adhesive fully set. The weight of the door could separate it at the top allowing such a sag. If this were the case, likely the top of the hinge trim would be separated from the top trim. GJ
-
A Thread for OTT Owners of "New-to-Them" Ollivers...
Geronimo John replied to MAX Burner's topic in General Discussion
As the nominator of SeaDog to this question, I suggest you provide them a ten-year free subscription to the OTT Owner's Forum. GJ -
Parking on Slopes or Hills
Geronimo John replied to Wayfinder's topic in Mechanical & Technical Tips
Wayfinder: I like your chock set between the wheels. I typically put them outside of the axle sets. Yea, a tomato/tomatto discussion. Your way though would require me to bend over just once to place both of them. YEA With a "tag line" between them, it would allow me to easily allow carry two sets of two in one hand. That saves travel time box to wheels and back for a second run to the other side. YEA X2 Thanks for the picture! GJ
-
Parking on Slopes or Hills
Geronimo John replied to Wayfinder's topic in Mechanical & Technical Tips
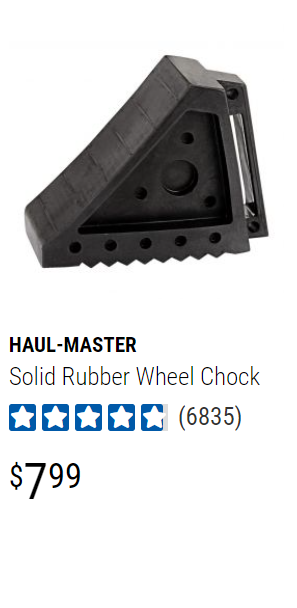
Your AFA chocks are nice. $50 for four. I like the design and think the price is reasonable due to the extra material and forming costs it would entail. We carry in the front box of Ollie: Four of the below Harbor Freights (at $32 for four) A milk crate box of blocking 2 1/2 gallons of generator fuel Plus some other miscellaneous "stuff" The above fits nicely with room to spare. It is possible that the larger AFA's could as well, but it would be a tight fit.
-
A Thread for OTT Owners of "New-to-Them" Ollivers...
Geronimo John replied to MAX Burner's topic in General Discussion
I recollect that it may be SeaDog at Hull #12! -
Am calling you directly. GJ
-
Here is my PI HW30 cheat sheet and the manual. Handy info to have when on the road. GJ OM - Progressive Industries HW30-50C (4 MAR 2023).pdfProgressive Ind. Surge Protector Codes (4 MAR 2023).docx
-
If that does not work, call me. I'll PM you my phone number. GJ
-
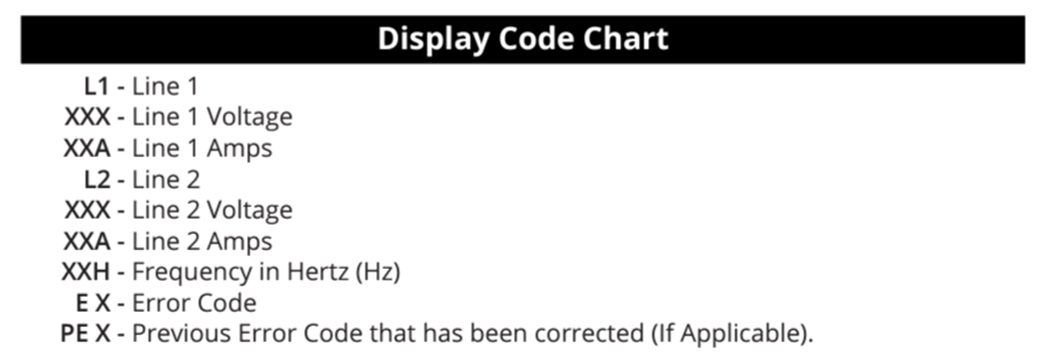
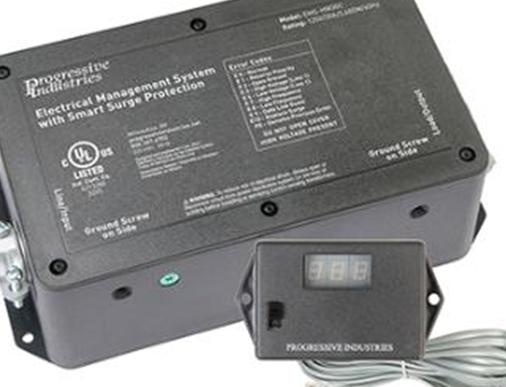
Hello Liana. My 2018 OE2 is the same model year as yours (Hull 342). Your inverter display is saying you have no 120 V power. Which one do you have? So first lets look at the power supply into the trailer. My assumption is that you do not have a multimeter. A. Take a 120 Volt appliance that you know works and plug it into your home or RV park outlet. This is just to ensure you have 120 V power there. B. Hook up your Shore power cord to the verified power source. On the trailer end there is a small LED light. If you have power to the cord end at trailer, then your cord is good. Connect it to the trailer. C. Now open up the street side bed and check the Progressive Industries Surge Protection System for power status. It looks like this. The small box is where it will talk to you. Looking at the small display LED,s here are the Display Codes. You should have power here. Advise if not. Advise if you have a display code. here is the chart. If you have power to the PI smart surge protector, then next step is to go to the breakers under the dining table, aft end. Check the 20 amp breaker. Turn the breaker OFF, and then reset it. Did the breaker imediatedly trip? Is it "Soft"? If you have power into the panel, cycle on the Air Conditioner. did it work? IF yes, you have power at the electrical panel. Hence likely is a bad 20 amp breaker to the GFCI or the GFCI itself is bad. Let us know what you find out before we go to Phase II. Geronimo John
-
Just a fog clearing question: From the above, all your terminals are tight and assumed to be corrosion free. Remaining square one questions on the battery side are: Are all your battery to inverter cables 4/0 AWG? Are all your 12V terminals copper? For your 1500 watt test, are you plugging it in directly to the inverter to eliminate any possible OTT 120 volt system from the test? GJ
-
OTT must have changed something as our touch lights don't act that way. They must be pushed on/off manually.
-
Roger and thanks for the link to my own post. I searched for it, but ..... My note to Jason was to update the other location where the 120 torque is STILL posted. GJ
-
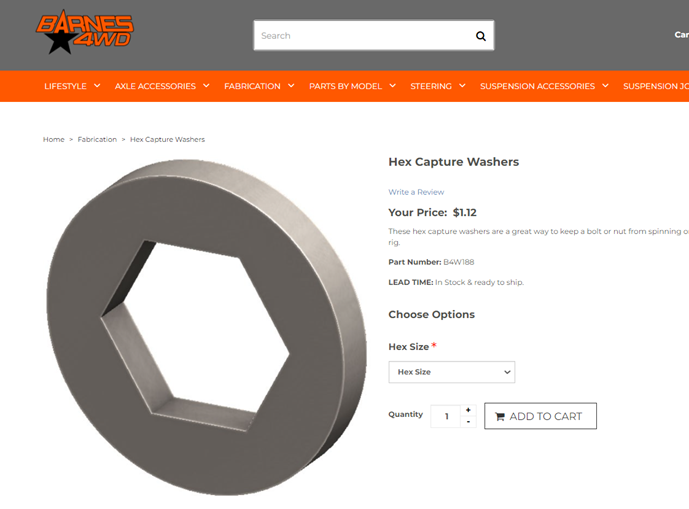
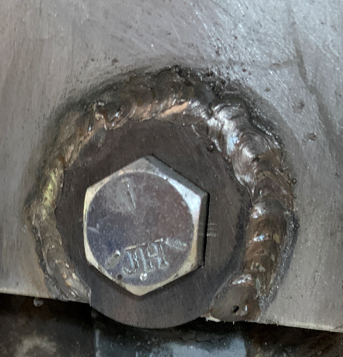
Actually the process of installing an Ez-Flex is straight forward IF your splines are intact. If the splines are not intact, or if your trailer does not have them.... then you MUST either: Repair the splined flange hole by drilling out and heating to cherry. Then using a special metal cutting punch an hydraulically forcing the punch into the flange to create matching splines. A major PITA. Replace the tang and have a machine shop press in the splines. Easier than Option 1. But cost of welding and shop work is a consideration. Do a home remedy using a polimer machinable repair compound such as made by Metalink. Or use a ballpeen hammer to try to "tighten up" the flange. Spend three years like I did trying to figure out a better way to fix them. In which case you'll using all the bad words you know AND creating some more. The above options all have risks , costs, and time considerations. OR you could spend under $5 for two Hex Nut Capture Washers and have them welded in place. See BackofBeyond post and GJ responses over time if you want the details. This past summer, Our Houston to Alaska and back trip logged over 12,000 miles and the Hex Head Capture Washer fix worked worry free. Full disclosures: Every spring my bearing service now includes cleaning and recoating the two welds with sacrificial zinc spray paint. So Option 5 is not totally maintenance free. But I think I can handle it. GJ
-
And they are still recommending 120 ft lbs of torque. This really needs to be changed. I have sent a note to Jason about this. I recall it being reduced. GJ
-
Sorry about that. The link got lost in my edit of the washer picture. I have re-inserted it in my post above. Thanks for the catch! GJ
-
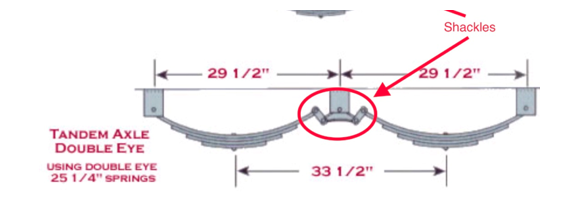
Likely you have already seen this video. Of interest is that at 14:31, it shows the owner using never seize on the center bolt shank. This was a change that was adopted a few years ago and is not shown in older DYI sources or O&M's. One of the "Good/Bad" elements of the OTT OE2 Dexter Axle setups is the length of our springs. They are not standard for the 3500 pound axles. Here is what mine appear to be: The good is that the tires are closer together and it causes less wear on the tires and makes turnng tight easier. The bad is that the springs are not "common". Here is what my EZ flex Info: EZ-Flex Kit: Oliver uses the K71-653-00 Dexter EZ Flex kit. (8,500 Capacity Version installed) EXTREMELY IMPORTANT TO CHECK: If OTT was not using EZ flex devices on the vintage of your trailer, there is a possibility that your "Center Bolt" does not have splines on the nut end. Another possible is that if it did have splines, that they were damaged by tightening the bolt/nut from the bolt side. This will spin out those splines. The splines are absolutely essential for "Fixing" (As in prevention of rotation) of the bolt head. IF this is the case, it is essential that you "FIX" your bolt head. This is a life safety issue that has scared the XXX out of myself twice and two other owners that have been documented. There are a few ways to fix the bolt. Using one of these is one of those solutions. Search the forum for other solutions if you like. I did for the better part of three years, and did not find any alternatives that met my safety and effectiveness concerns. PM if ???. GJ Center Bolt Capture Washer Source: Barnes 4WD (828) 551-7616