Hokieman
-
Posts
344 -
Joined
-
Last visited
-
Days Won
5
Everything posted by Hokieman
-
The wheels on my 2021 are Sumec brand. See pic of sticker that was on my spare. I could not find any info on the web about the recommended torque for these wheels. Let us know if Oliver responds with OEM info.

-

Battery maintenance for 4.5 month storage
Hokieman replied to Citrus breeze's topic in Mechanical & Technical Tips
Good catch, thank you. Poor choice of words, I edited my post. -
Battery maintenance for 4.5 month storage
Hokieman replied to Citrus breeze's topic in Mechanical & Technical Tips
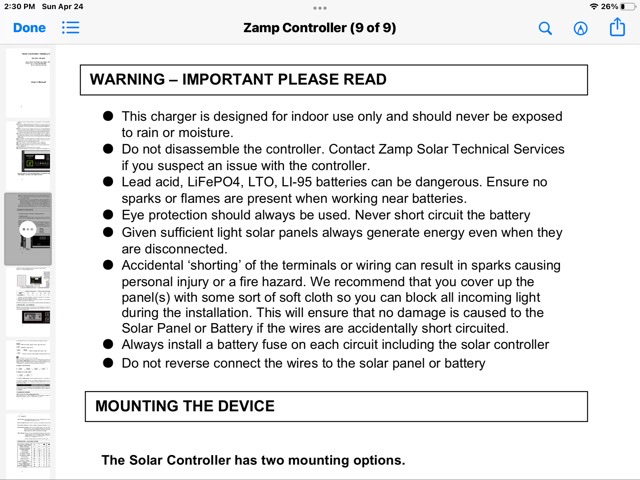
I believe you have a potentially unsafe situation, the solar circuit is energized, even in the garage. I don’t know if the live circuit is harmful to the controller, but I would not take a chance. . There should be two blade fuses on the roof under the solar panels, one for each panel. If you pull those, you won’t have any current flow. You could also place a tarp over the panels. See screenshot below from the Zamp Controller manual. If your trailer is parked in a garage that can get to periodically, why not just leave the batteries connected? You will still have some small parasitic draw. Flip the AC charger breaker on occasionally and charge the batteries, then turn off.
-
Battery maintenance for 4.5 month storage
Hokieman replied to Citrus breeze's topic in Mechanical & Technical Tips
I assume OTT installing them on all solar packages now. Might be useful if you ever have to disconnect batteries. The solar circuit can be turned off so the circuit is not energized when sun is shining. -
Battery maintenance for 4.5 month storage
Hokieman replied to Citrus breeze's topic in Mechanical & Technical Tips
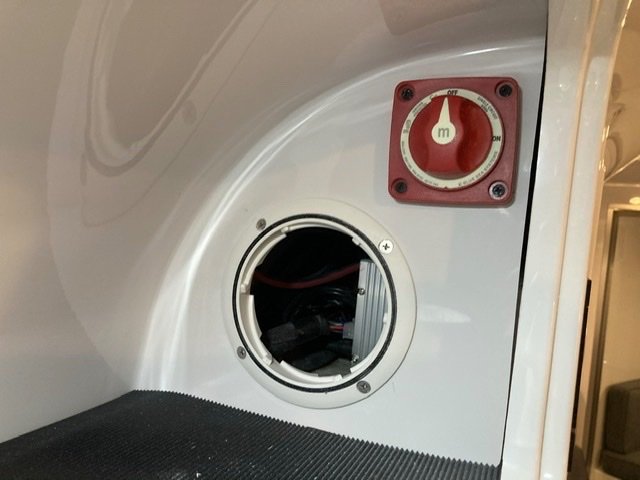
Cameron….Does your Elite II have that red BlueSeas solar cutoff switch? -
Battery maintenance for 4.5 month storage
Hokieman replied to Citrus breeze's topic in Mechanical & Technical Tips
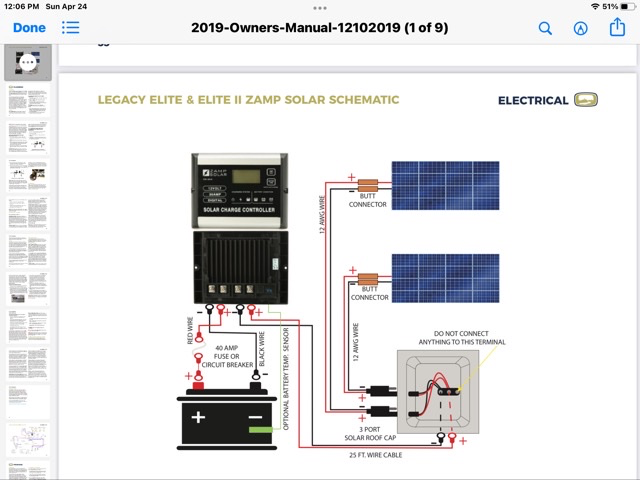
Do you have a red battery disconnect switch in the upper cabinet above street side bunk? That’s the solar cutoff. See pic of the one in my 2021. Not sure if 2020 had that or not. If you don’t have that switch, see pic of 2019 solar electrical diagram. You should disconnect at the batteries. Caution, the circuit will be energized if the solar panels are exposed to light. This could lead to accidental short circuit and fire. You can turn the solar panel current “off” by removing the two blade fuses on the roof, or putting tarps over the panels. See topgun2 post from April 6 above . Depending on the answers to his questions, disconnecting the batteries for just a few months might not be necessary.
-
Power down the trail pigtail for cleaning and sealing?
Hokieman replied to nrvale0's topic in Mechanical & Technical Tips
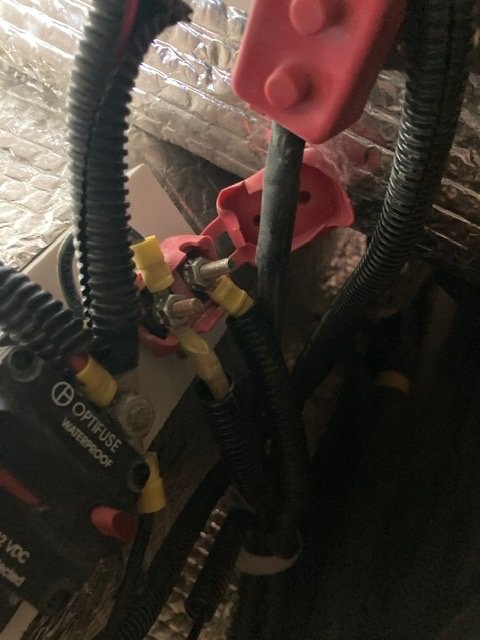
It’s probably located just to the forward side of the 60A breaker. In the pic attached, the one you are looking for has the red plastic cover flipped open.
-
Anderson Levelers Warranty Replacement Question
Hokieman replied to Trainman's topic in General Discussion
I’ve been using the Beech Lane Camper Levelers for about 2 years. So far they have been good, seem very durable, and lower cost than Andersen. If you check their website for details, they emphasize their nylon construction is stronger than competition. Marketing hype? Maybe. -
How to remove the kitchen drawers?
Hokieman replied to Imelda's topic in Mechanical & Technical Tips
https://support.olivertraveltrailers.com/portal/en/kb/articles/galley-drawers-elite-2 -
Owners Manuals, Component Guides, Specifications & Warranties
Hokieman replied to Boudicca908's topic in General Discussion
Oliver should provide you printed and bound copies of the exact same docs that are in the Oliver University. I received 3 booklets: 1) Owners Manual 2) Standard Features Guide and 3) Optional Features Guide. You’ll notice the individual components manuals are from the OEM and usually mention the warranty. I personally have downloaded .pdf of these on several devices, along with many other OEM technical manuals in my offline library. I don’t bother to carry the paper copies in the trailer, prefer to use my iPad. -
It’s factory installed in the newer trailers. Just inside the door on left side wall, above the switches as @SeaDawgmounted hers. I regret I don’t have a pic of mine to show.
-
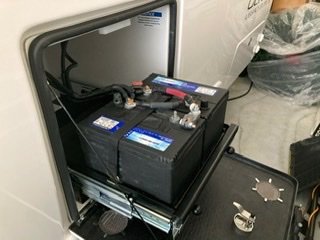
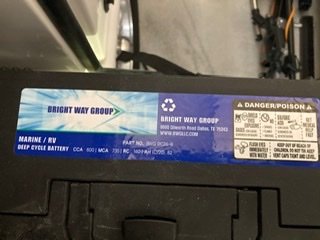
@Seadawg is correct. My 2020 trailer came with 2 standard lead acid deep cycle batteries, no extra cost. I also had the optional solar package with controller (no longer an option). See pics, my batteries looked just like @Ralph Mawyer, sealed. Controller was set at Lead Acid, not AGM. I used them for about a week, they worked well! However, I couldn’t resist the urge for more power, sold them on Facebook Marketplace, and replaced with 2 BattleBorn Lithium.
-
I haven’t noticed any.
-
I had a black DB on previous TV, and now I have the polished aluminum on my current TV. The black looked better (to me), but was hot! I live in SW Florida and it was way too hot to touch for a good part of the year. That translates to a surface temp of ~140F or higher, which makes the cargo space hot. The polished version is several hundred $ less expensive and significantly cooler.
-
Sometimes the fixed middle section gets in my way, not often. It’s sturdy, it is essentially another level to put cargo on, stand on, etc. The front and rear lids come off fairly easily. So, for example, if I load my pressure washer in there, which is too tall, I can just remove the rear lid and set it in the garage. If I carry my dual sport motorcycle, I take the entire cover off, takes about 15-20 minutes I’d guess, not rushing. Mine doesn’t leak, but I think that’s partly luck, because none of these things are waterproof. All things considered, I like it, but I don’t think it’s worth selling your Backflip and buying one.
-
I’m sitting in #797 right now, so I should be able to answer the question for 2021 E2 models. AC Outlets: 1) Outside near the hot water heater 2) Under forward dinette seat 3) Under pantry close to SS bed 4) Over Curb Side bed under rear attic cabinet 5) Over Galley counter under cabinet 6) Inside rear attic 7) Inside the forward cabinet on the curb side USB/12V Outlets: 1) Under forward dinette seat 2) Over Street Side bed under rear attic cabinet 3) Over Curb Side bed under cabinet next to Galley I’ve got no complaints, don’t need more. I have a short extension cord just in case. I wouldn’t want one anywhere near the wet bath. My wife stands outside the bath and blow drys her hair hair in the big door mirror.
-
Details to follow…..
-
Several posts with photos about Diamondback covers at this link.
-
No power outlet below the closet door in my 2021. OTT must have eliminated it. Nearest one is under the forward dinette seat.
-
I failed to mention it in my reply above, but I have a 2020 gasser….with a steel driveshaft. Only the aluminum shaft models were recalled, but the point of my post was that my vehicle had same problem. As the article pointed out, F150’s were recalled for same reason some time back. So if you have an F150, and you were not recalled, I think it’s worth a check.
-
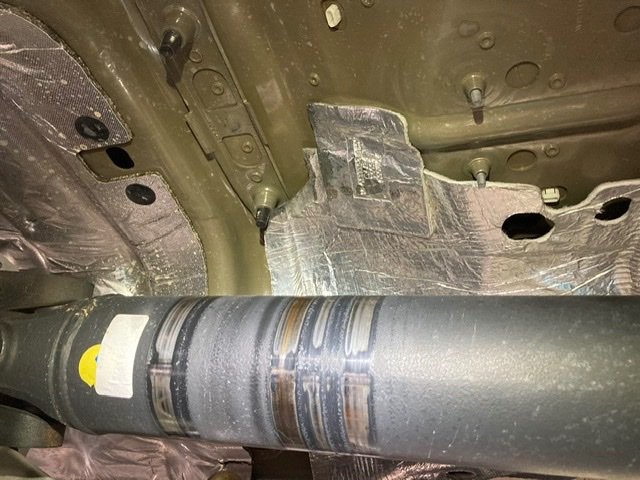
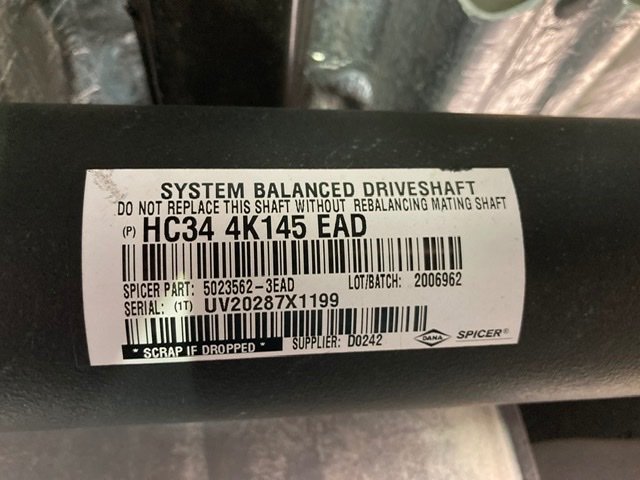
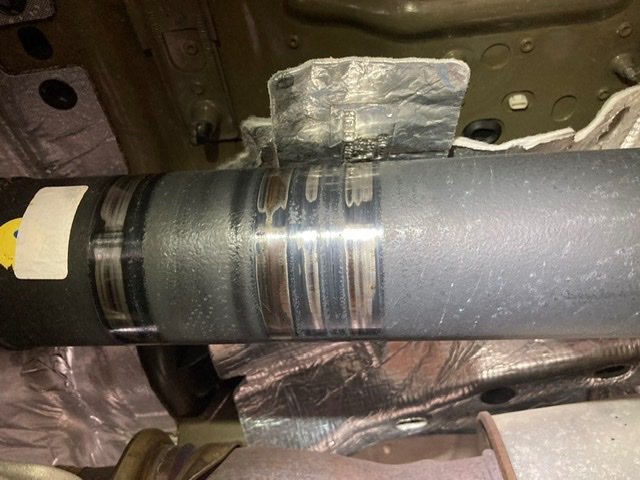
Many thanks Frank! This is important! After I read your post I crawled under my 2020 F250 and found the insulator had come loose as described in the press release, and was rubbing on the driveshaft. The insulator is held in place with adhesive patches that apparently failed. My driveshaft is steel however, not aluminum as described in the news article. Nevertheless, it’s still a problem. It’s the shaft up forward, behind the transmission. I called my dealer and made a service appointment tomorrow morning. They advised my truck is NOT listed in the recall, aluminum driveshafts only, but it is covered under warranty. I also called Ford Customer Service and confirmed, but I asked them to take note that the problem includes steel driveshafts also. You can see from the pics that the steel heated up enough to cause a slight color change, and I can feel some smooth wear channels that go around the shaft. I followed Franks advice, and I encourage everyone with a Ford Super Duty 2017-2022 to check it out themselves.
-
Outdoor cooking stoves and Ollie low pressure systems.
Hokieman replied to Donna and Jim Y.'s topic in General Discussion
Timely post, I’m also using my vintage Coleman 2 burner stove. I’m reluctant to give it up for sentimental reasons, but unfortunately it won’t operate off the low pressure QD on our trailer. I don’t use the small green bottles, I carry an extra 20 lb tank with a conversion hose. Griddle pans readily available to fit the stove. I’m worried it’s going to die soon so I’m researching new stoves. -
No need to get out of bed! The thermostat on the newer models will connect to an app on your phone.
-
I like Craig’s Water Transfer Pump solution, using the fresh water inlet. Keep your bed made, valves in normal position, make only one trip outside. It has the additional benefit of always having a spare onboard water pump on hand. I’ve only got a heavy twin bed mattress to fuss with, but now this project is on my wish list.
-
My Garmin RV785 gps has a dash cam. I leave it on all the time, seems to work well. My truck shuts off the power after 30 minutes or so, so I don’t drain my start battery,