jd1923
-
Posts
3,243 -
Joined
-
Last visited
-
Days Won
243
Everything posted by jd1923
-
Forum member near 5 years, now 1 post, no signature...
-
So when did OTT stop using ABS sewer pipe for PVC? Fancy! 🤣
-
Why just Texas? Dallas to Hohenwald 615 miles Miami to Hohenwald 960 miles Boston to Hohenwald 1180 miles Phoenix to Hohenwald 1590 miles Seattle to Hohenwald 2410 miles Personally, I believe OTT should have just left things alone and continued to retail their own trailers from their special factory location! 😂 Glad our hull is well beyond warranty years. I generally buy used and prefer to pay when we need work or do it myself. Warranty claims are a true pain as has been witnessed in many Oliver Forum threads. I talked to a Sales Manager here at Blue Compass RV, “now in 34 states.” This company bought out three locations of Affinity RV in our Prescott and surrounding valley areas that had been here for decades. He said, "You can't make money selling Olivers!" Not worth carrying the inventory for such a niche trailer when for every Oliver we can sell 10 Alliance, Forest River, Grand Design... and Winnebagos. Lots of Toy-haulers sold in the SW too! But he was trying to get me to trade in my Oliver on a fifth wheel, while I was dumping tanks at their location (a 35-ft 3 axle beast, no way)! There are likely more RV dealers in Phoenix and Mesa, across the desert valley down to Yuma AZ than any other market in the country. OTT has not been able to get one AZ-based dealer to carry their product.
-

NO BRAKES ; 2019 Oliver Elite II-Hull #448
jd1923 replied to BoondockingAirstream's topic in Mechanical & Technical Tips
Or the Ford issue that @Steph and Dud B cited. First thing to try is to test for voltage at the Ford F350 TV 7-blade connecter. Jump the BLUE and WHITE wires with a test light or meter while a friend applies the brake pedal then releases, on and off. @BoondockingAirstream you don't need another trailer. If it shows voltage, then test for amperage through the blue when connected. I believe @Geronimo John wrote that brakes at each wheel should draw 2-4A, so at the main harness it should show 4x this number when all 4 brakes are working. If you have 12VDC at the hitch and no amperage draw downstream to the trailer, then you have an open circuit along the path to the wheels. No brakes at all likely means your issue is not wiring at individual wheels or in the axles. It would be between the TT 7-blade connector and where it's connected to the first wheel in line. -
Pilgrimage to the Mothership! 🤣
-
Good thought, If just the tab is missing you're done in 2 minutes!
-
This item is on my Christmas list! It costs the most meaning it's likely the best, smaller size, max power! 🤣
-
Groovy is a matter of opinion! 🤣 🤣 🤣
-
Trailer Brake Disconnect Warning/Message
jd1923 replied to Mike and Carol's topic in Mechanical & Technical Tips
🤣 🤣 🤣 Yeah, but the brakes should work given power from ANY brake controller! Voltage and correct amperage draw at the wheels? -
Yep, it could be broken or folded back and the should be two of them. They are designed to spread out to hold when tightening the mounting screws. If broken, it’s a $2 HW store part. You would need to rewire the outlet replacing the box. First open the “outlet” breaker or the main 30A breaker in your 120VAC power panel.
-
This 3/4" impact has an insane amount of torque, at "1900 ft-lbs of breakaway torque." and you would need the 3/4" to 1/2" reducer most of the time to turn nuts and bolts 1" or less which includes TT and TV lug-nuts. This 1/2" model would be better for everyday use. A little more expensive, but smaller, 1.5 lbs. lighter and breakaway torque spec'd at 1750 lb-ft. Still a beast! https://www.homedepot.com/p/DEWALT-20V-1-2-in-High-Torque-Impact-Wrench-Tool-Only-DCF961B/328393371 Or you could save $38 and go another 1.25 lbs. lighter and go with this very capable model with breakaway torque spec'd at 1400 lb-ft. https://www.homedepot.com/p/DEWALT-20V-MAX-Cordless-1-2-in-Impact-Wrench-Tool-Only-DCF900B/317991357 Either model would be preferred by most of us vs. the 3/4" beast! I have a 3/4" to 1/2" reducer for when I need sockets >1" like the 1 1/4" socket shown above required for the bearing press. The 3/4" breaker bar shown removes wheel lug-nuts easily or just put the weight of your foot on it to get it started! 🤣 However, not all 1/2" models have the required torque. Check the torque specs. I purchased one years ago, when they were not as strong as some today. It could pull lug-nuts off 12mm or 1/2" studs torqued to 120 lb-ft but it would not budge lug-nuts on a 2500 series truck with 14mm or 9/16" studs torqued to 140-150 lb-ft. I returned it after it failed to loosen a lug on my Dodge Ram. Ever since I've used my pneumatic 1/2" impact in the workshop and work to keep our vehicles well maintained so not to breakdown on the road, having hand tools for this rare case! I work on the TT and TV too much at home and thankfully we did over 50 days of travel in the last 3 months and all my tools stayed in the bottom of the TV toolbox! 😂
-
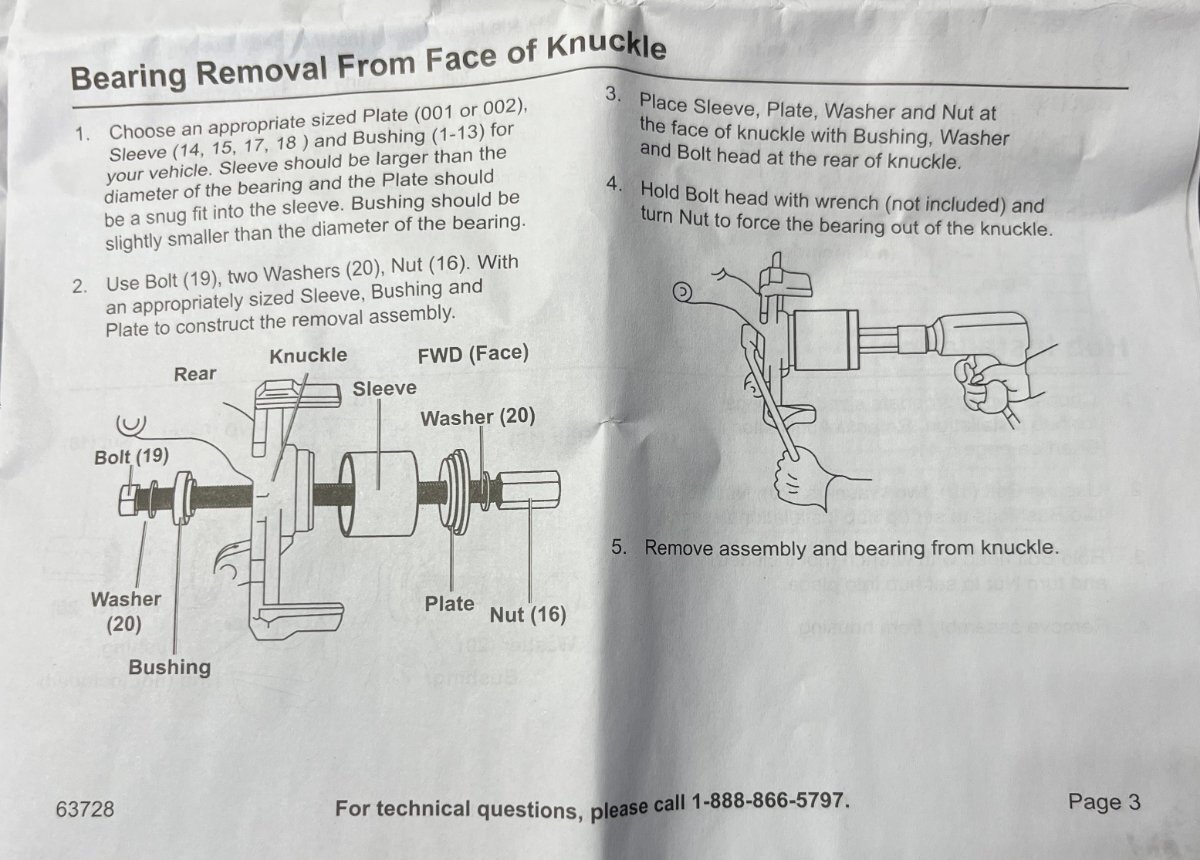
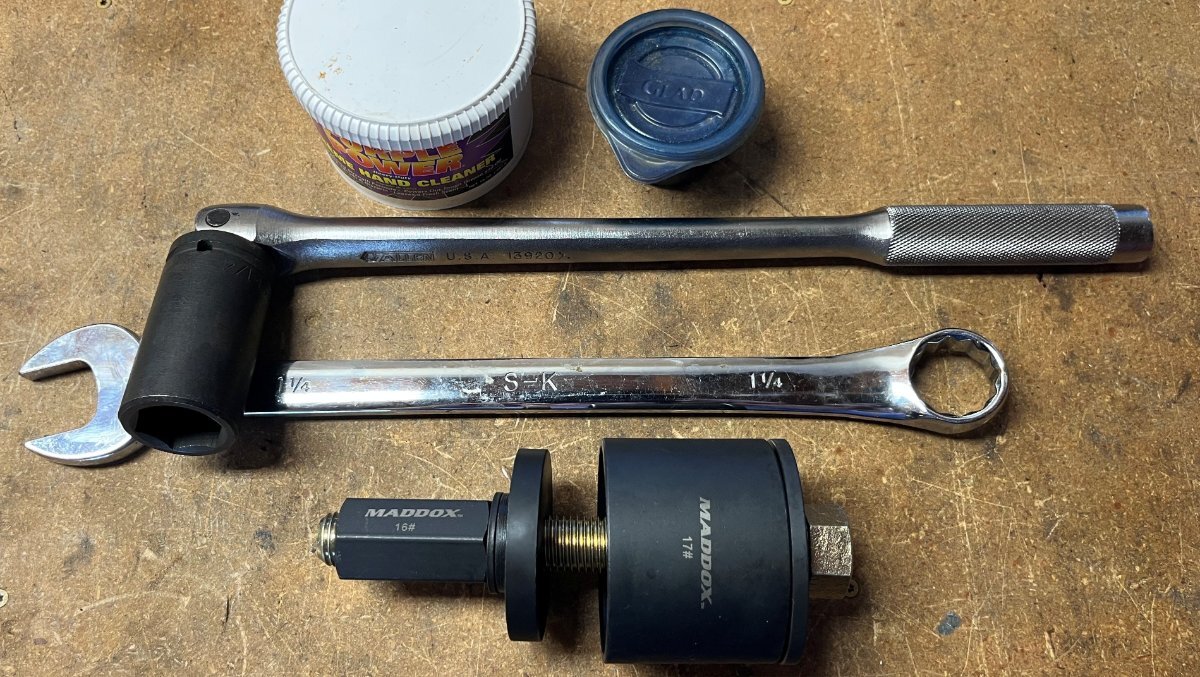
CRM, now I believe you are correct in your thinking. Please let the misses know I approve. Get the friggin' 3/4 impact! 🤣 (Do note the press instructions show using an impact)! Chris picked up the Maddox kit today (had to get it while my 15% coupon was running) and needed a shopping cart to carry it away! The HUGE box measures 17x15x4" and weighs near 20 LBS. No way I'm carrying this kit with me, but our dear friend @ScubaRx would likely store it right next to his battery-powered grease gun and another 800 LBS of tools onboard (love you Steve)! The first pic shows part of the installation instructions. In my professional opinion they show the 'bushing' in the wrong direction, TBD. Second pic shows the tools I would bring, given I have guessed the right bushing/sleeve sizes. The instructions also have an application guide which lists the 2001-2010 PT Cruiser! Holding the drum will not be an issue, but holding both sides of the press may be! the bolt is 7/8" DIA with heads of 1 1/4" on both sides. It would be great if you could torque down the wide nut and the bolt would stay, but you should have both sides held and the drum would not turn anyway. Sitting flat on the truck tailgate may not work, TBD. How many of you have the automotive tools I have in the toolbox (1 1/4" socket and 3/4" breaker bar and 1 1/4" wrench)? Not many, but this will be my toolkit, after testing of course that I have the complete and correct set of tools. Don't forget the grease and the Go-Jo hand soap that's always packed in our rig! 🤣

-
Minimize the use of Construction Glue, but OK as a repair when needed. Mounting a styrofoam sheet to a wall to hold it temporarily in place until I screw down the paneling to finish. This was the original purpose! Many over-use glue and sealants for lack of better solutions. The worse part is having to remove something you’ve glued down! 🤣
-
Driving with AC on for a short period
jd1923 replied to Wayne and Karen's topic in General Discussion
We started doing this on our last trip when it got to mid 90s up north unexpectedly for too many days. Great results! Please see my most recent post on our DC-DC Charger mod thread -- -
Yeah, that would do it, no crow bar required! I have the baby 3/8" version and at home use air and a 1/2" drive Ingersoll Rand impact. They have an 1/2" model which should be enough, but if you buy this beast, get something like this to fit your 1/2" sockets. 🤣 https://www.homedepot.com/p/K-Tool-International-3-4-in-Female-1-2-in-Male-Impact-Socket-Adapter-KTI34016/207024761
-
A long HD screw driver or crow bar between the hub and two lugs should hold it. Your spouse or travel partner holding the bar may help for the 3rd hand! Yes, we'll see! At least we are preparing ahead of time vs. broke-down-on-roadside! 🤣
-
I would think given the hub-drum off the axle is substantial in weight, it would be easy to hold not allowing it to rotate. I would sit the drum on a piece of rubber on my truck tailgate. The press requires a specific socket with 1/2" drive ratchet or breaker bar. I would use some grease to allow the press parts to turn more freely. It should not be too hard. The press is designed for hand-use and advertised "while keeping the steering knuckle and strut assembly intact on the vehicle." Should be easier with drum on a flat surface. Chris is going to Harbor Freight for me today since she will be in the same shopping center for something else and my 15% coupon expires tomorrow. I hope it's the right kit. The numbers look right, but if wrong I can return it later. When my axles get here, I will remove one drum and mount the tool to see how it works and which of the many pucks and spacers are needed for this job. I'll post pics. I'll just need to figure out where to order the correct spindle nuts, given the Timken parts on Rock Auto are correct.
-
FYI, I edited the above post adding info on the bearing tool, after @CRM and @Mike and Carol had read this.
-
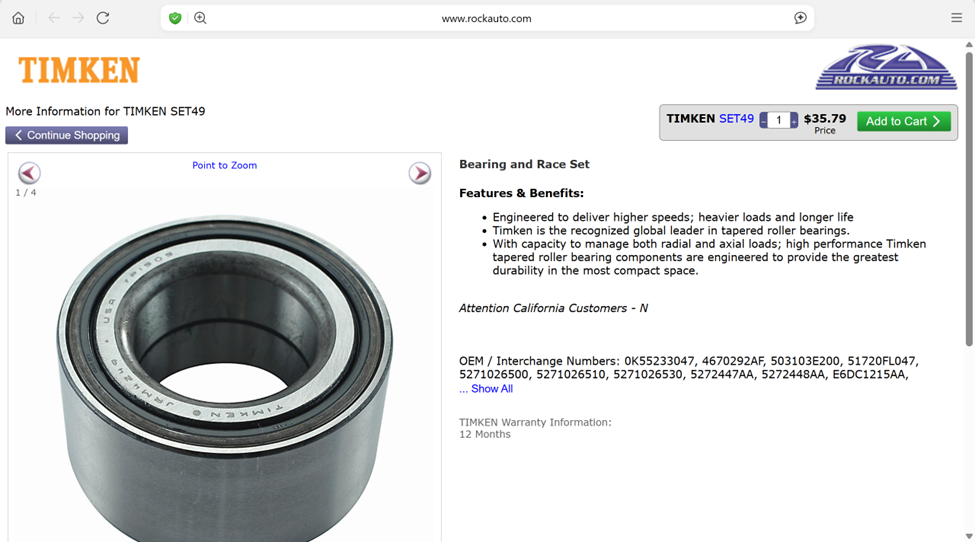
Thanks @srthomsen. I'll get a photo of the label off my new axles when they arrive for comparison. And thanks again Ken @mountainoliver. I really like the forum post that mentioned it is the front wheel bearing for the 2010 Chrysler PT Cruiser! Went straight to RockAuto.com and found this very reasonable Timken Bearing. Rock Auto for the PT Cruiser shows a different kind of non-locking spindle nut. They do list the larger snap-ring which along with the washer can be reused. I will verify when my axles come that this is the right part. The spec shows 1.654" ID which does convert to 42mm. Nice! Re the bearing press. This bearing has a 76mm OD. We'll need a kit that has a 75mm puck to pull and press this bearing. The Maddox kit that Ken showed from Harbor Freight has one at 2.96" which converts to 75mm. This kit will likely work well and Harbor Freight just sent me a "We miss you" email with 15% off! Two bearings and this bearing kit at $200 OTD plus the cost of a couple correct spindle nuts, now we're talking! 😂
-
Yes, stop and say Hi! Get hull #s, take pics… 🤣
-
Yes, there’s got to be better pricing for real Timken bearings and the hub-drum assembly! (I’ll get 2 extra bearing kits and the proper tool, no hubs for me.) For those of you who have service companies do your maintenance and repairs, just buy a couple bearing kits to have with you. I do not believe this style bearing will immediately freeze up. There will be warning signs, heat and noises, allowing you time to tow more slowly to a trailer repair shop. But if you don’t have the parts, you’ll be there waiting 2-3 days! Think about the etrailer price of $655. We just purchased whole axles for $1,001 each that include two hub-drum assemblies, two brake assemblies and all working (spare) parts! Who would buy a hub at this price? Maybe I should have ordered three axles!🤣 Alcan was going to price the bearing kit for me, now that I remember. I’ll have a couple items to talk to them about this week. Will keep you posted!
-
Good point, depending on the tool as Ken mentioned. I'll know soon enough when I receive shipment of our axles. I looked at a few pics online, like this one from eTrailer. It appears the Nev-R Lube hub and drum are integrated one part. Swapping this part would mean bring the shoe adjusters in for the new drum and you will have to go through break-in adjustments. Also not fun! I would prefer to carry a proper hand tool with correct spacers and two spare bearings kits vs. carrying two hole hub-drum assemblies. These would be pretty heavy and take a bit of space in the truck toolbox! It appears this is a $650 part, so with tax over $1,400 to carry two with you! The Timken bearing kits on eTrailer are $228 plus tax and include a new nut, washer and snap-rings, $500 OTD for two kits. Not certain these are the right components, but as close as I could find today. Again, I would verify when I have a drum off one of our new axles! Agreed with @CRM, don't trust a $38 Amazon Chinese knock-off! (And I could not find one on Summit.) https://www.etrailer.com/Trailer-Bearings-Races-Seals-Caps/Dexter/31-73-3.html https://www.etrailer.com/Trailer-Hubs-and-Drums/Dexter/8-388-80UC3.html
-
That's OTT for ya! I would think yours would look closer to mine since our 2016 was actually built fall of 2015 when you check the label dates on all components. But there is also some distance between #70 and #113.
-
Actually they look a lot alike except yours only has the 3 stabilizer jack wires. Did you test for power at the 7-blade adapter? You got to get a yes/no answer to this before doing anything else. You have a fuse all the way to the right in your picture. It looks just like the one @Ray Kimsey pointed to as his Black Charge Wire. It could be yours too. You can see how your system a 2018 is somewhere between mine a 2016 and Ray's 2020. Our Oliver has none of those two-post fuses at all.
-
Why is it 5033#? I thought the standard D52 meant 5200 LBS. I'll have to see what my new axles state on the label when they arrive.