jd1923
-
Posts
3,479 -
Joined
-
Last visited
-
Days Won
261
Everything posted by jd1923
-
We've had quite the opposite experience in our 2 1/2 years with hull #113, manufactured 10 years ago. Though I have read everything on our Forum since and I do see many more issues in late-model hulls vs. the oldies but goodies! I've worked a LOT of upgrades, but only a few repairs. And every issue I've found is when we were home. 130 days on the road everything has worked, no issues while traveling, knock on wood! I found a breaker wired in the wrong direction. I have issues with how OTT wired things, but no electrical failures to-date. I've upgraded and rewired everything anyway. I recently found OTT forgot to fully weld (tack-weld only) the mount to one stabilizer jack. OTT blamed Barker, but actually OTT makes these welds as part of the standard installation procedure. I made a new bracket with $10 of steel. We also had two small welds fail on the frame, two cross-members were hanging on one side. Local guy welded them for $75. We had a drawer latch fail, the orange colored connector to the slide, just $10 and 10 minutes to repair. Now I have extra parts if another fails. Prior owner complained of a noisy Suburban furnace, so OTT install an Atwood furnace back in 2018. Likely prior owners had worked through other issues of which I would be unaware. The interior panel of the entrance door is lightly cracked, but this is from wind banging the door. This will not happen anymore now that Lippert friction hinges are installed. We love our Oliver as it is now with my upgrades (inverter A/C coming soon)! We purchased a used Oliver at a good price and I do not expect anything out of OTT since it's long out of warranty. Yes, I would feel differently if we paid new price and had 21 issues listed to date. I don't see better quality out there. Even Winnebago, that some consider to be the best, is not better. We plan to keep our Oliver and leave it to our son when we are done with it. Don't want another brand, don't need something better. If I found this crack on our hull, I would leave it alone and just keep an eye on it. Often bodywork on something small is worse in the long-run! They will likely just do something cosmetic, some fill on the surface. Which is fine, but certainly not worth a trip to Hohenwald for me, in my opinion.
-
We have two 10Ah batteries. One will power the Starlink Mini all day! One's on the charger while the other is being used. The 50' power cable is supplied. We've just never had a need to use it, so recently I stopped bringing it along! I guess if your going to sit two weeks at a campground with hookups... But that's not us. I can setup the dish on a lunchbreak while traveling, in a minute with no cords. No thin 50' power cord getting wet and dirty, tangled up in the weeds, needing to be wound-up and stowed each time. Everything in our Oliver is battery-powered! 🤣
-
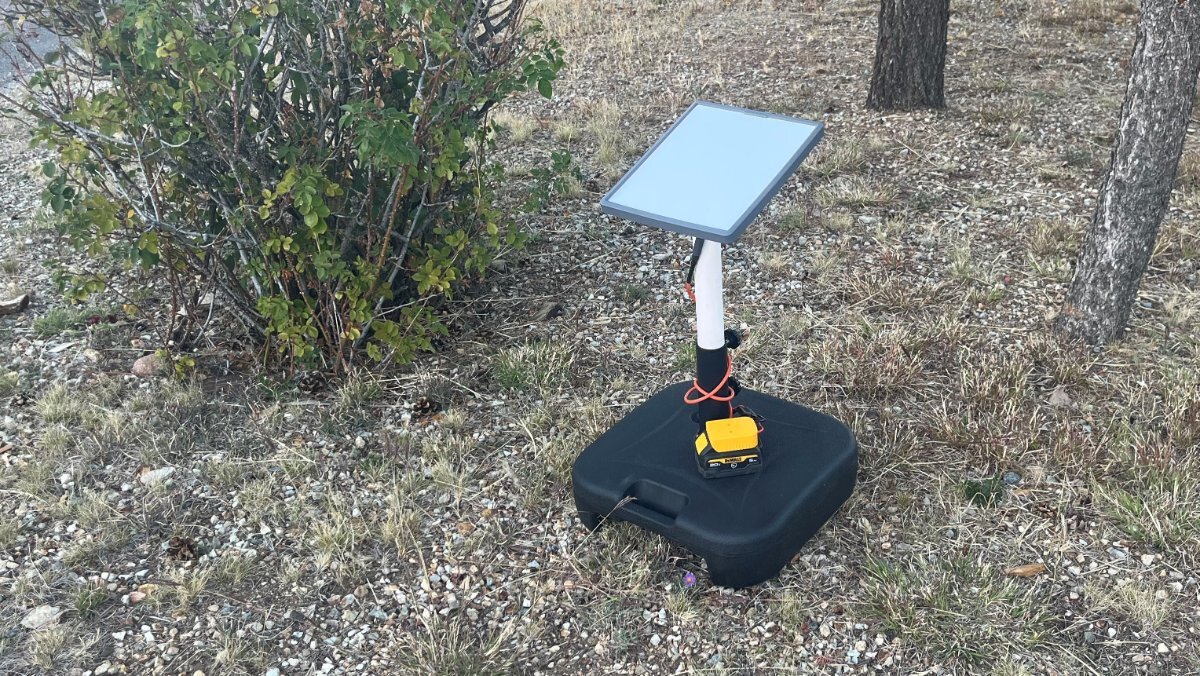
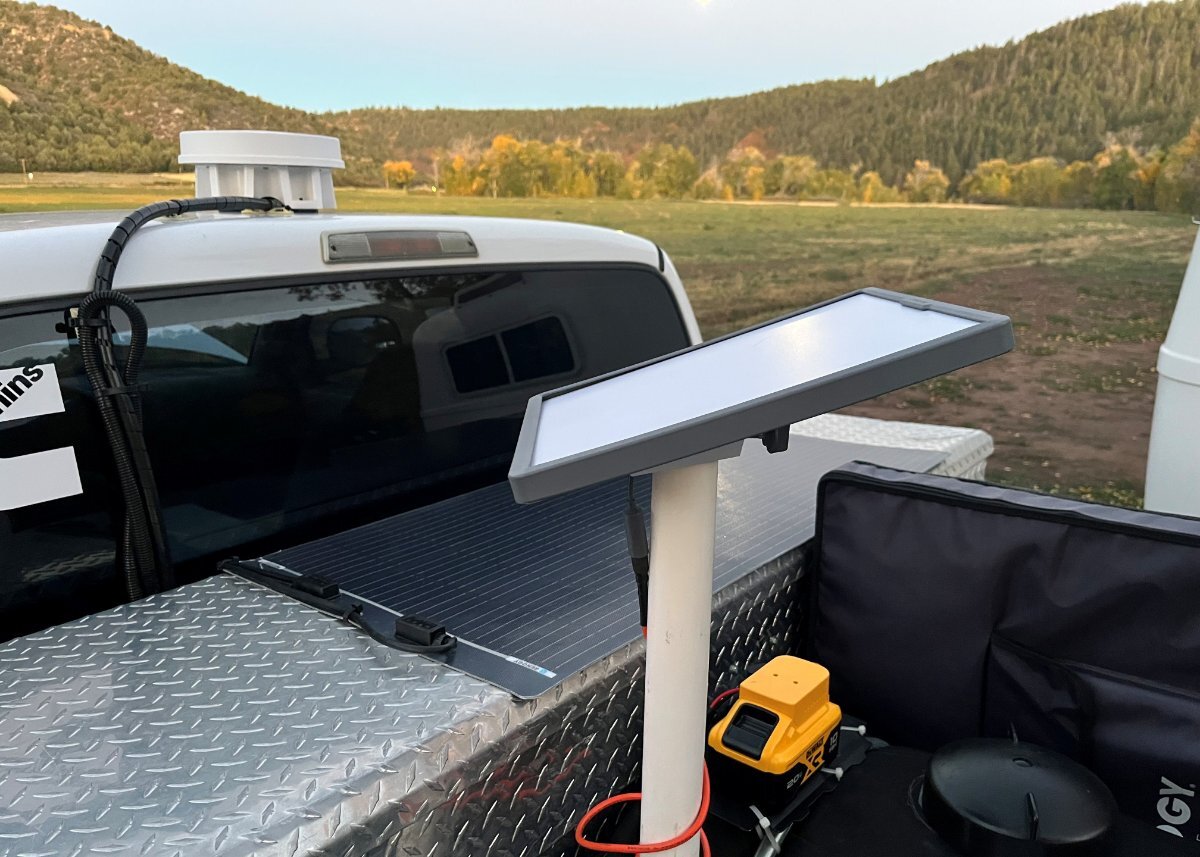
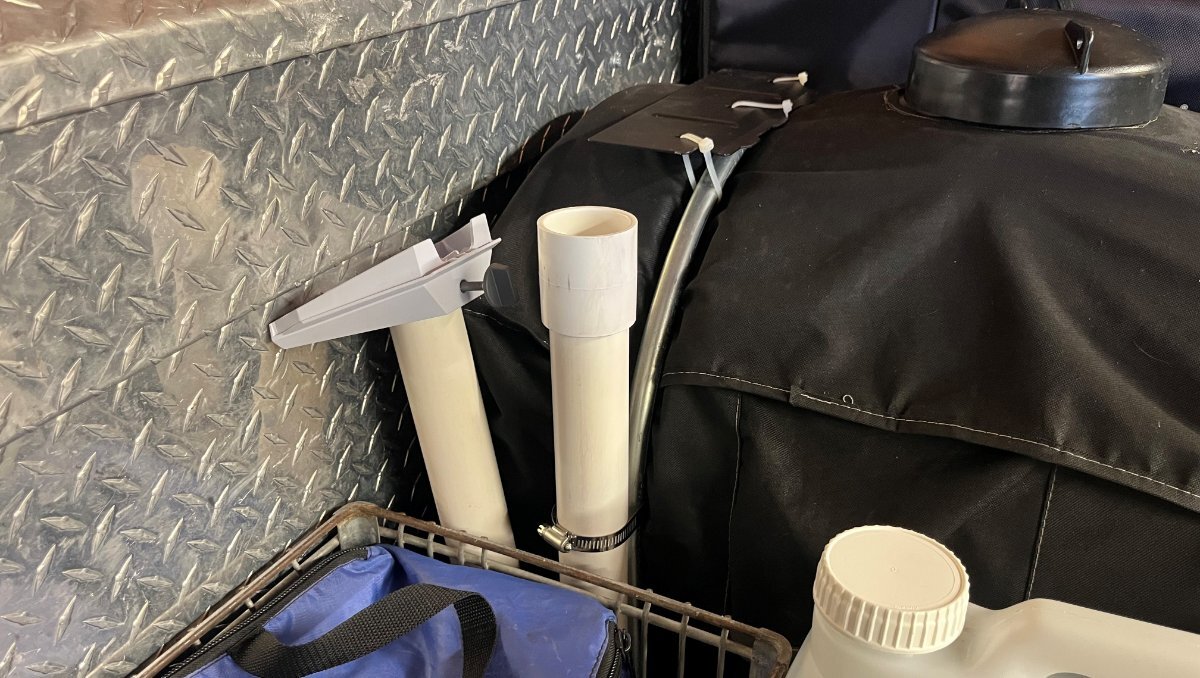
Must only be moved to get a clear view of the Northern sky. My claim is 2/3rds of the time mounted to my truck works great with clear view (and only $10 in 1 1/2" PVC parts). The other times, I'll use this umbrella stand (another $30) with the SAME pole-mount which makes setup sooooo easy! 🤣 Tripods are generally made for cameras with a 1/4" screw attachment. They are fully adjustable which takes fuss to get lined up on both angles required. My setup uses the supplied pole-mount plate from Starlink at the correct angle to the horizon, so all you need is a 2" pole perpendicular to the horizon. It spins easily with one hand (no screws, no clamps), to get the correct angle in seconds. Just my opinion. Others want the long-pole setups and some are OK with laying the dish on the ground or picnic table. I was laying it in my truck bed prior to creating these mounts. Tripods, tall masts and suction cups are fine, but this is much easier for me! 😎
-
Thank you, Jerry. I will try a credit card tomorrow, I should have saved some hotel keycards from when I traveled for business! Maybe I have one or two somewhere. I pulled on a few edges today and thought, I better look into this. And thank you @KenB for the good info in your posts! 😂
-
BTW, Starlink includes the the pole mount attachment which fits the 1 1/2" ID PVC pipe, about 2" OD. You will need a Starlink power cord and a connector to your battery of choice. Any battery from 12VDC to 30VDC will work. We already had MANY DeWalt 20V batteries for my power tools, so it made sense to use these. https://www.amazon.com/dp/B0DSV45LHQ?ref=fed_asin_title https://www.amazon.com/Pigtails-Connector-Adapter-Security-Surveillance/dp/B0C5DXTD43/ https://www.amazon.com/Compatible-Conversion-Projects-Connector-Terminal/dp/B0FM2XYRKW/
-
Given this is our main mount, nicely sitting in our truck bed, I was thinking of a moveable stand for the occasions where the truck cannot be parked clear of trees! Meanwhile, my son broke the base to a fan he uses often in his apartment. After removing the broken base, I thought, "a patio umbrella stand would work nicely." So why not use an umbrella stand for the Starlink Mini dish? The kind you fill with water would be convenient, since when empty it weighs less than a pound (we always carry 35 gallons extra water on the TV). It works great and can be placed anywhere! I purchased this model from Lowes, since it is rectangular (most are round) and it has a nice handle. https://www.lowes.com/pd/Patio-Premier-Patio-Premier-Square-Blow-Mold-Umbrella-Base-Black/1002629278 You can configure all the fancy poles and mounts you want and I'm done with $50 total in parts ($10 for PVC parts) which will work anywhere without cables. 😎

-
My goal for a Starlink installation is something neat and simple! What I don't want and will not have! 1) A cord-powered ONLY solution, not in the day of LI batteries! 2) Suction cups on the side of our hull or windows (Chris keeps our windows clean regularly and suction cups leave stains on glass and fiberglass)! 3) Any kind of tripod or camera stand! 4) Something long like a flagpole (anything needing a ladder)! Starlink satillites are 100 +/- miles away and a 10-20' pole doesn't get you any closer! 5) OMG, please NOT sitting on a campground picnic table (they put these in the shade on purpose)! 🤣 On another thread, I showed my truck mounted solution, and in less than 24 hours, one or more Forum Members poo-pooed my installation claiming the dish must always be moved. I truly like this mount (pics 1-2). Last time out it worked every night on the road on a short trip. I truly believe it will work 2 of 3 nights on the road regularly (1 of 3 nights where the TV is in the trees regardless of where parked in the campsite). I have power and Ethernet wired to this location, so that the Starlink can be a WAN input on our Pepwave router. However, the battery solution works anywhere.
-
Agreed, an example to the contrary is Blue Compass RV. They are a chain buying independents around the country. We had a local company “Affinity RV” with 4 locations in our county (not that they were great, service always booked months out). I bought an occasional part from them. Two years ago they sold to Blue Compass (hardly family-oriented)!
-
OTT should have never considered working with dealers. It was unique that Olivers were sold and serviced at what some here call the "Mothership!" A sales manager at our local Blue Compass dealer said, "Nice Trailer, want to trade it in?" as I was draining tanks at their free dump station, right down the street. I then asked him about the dealership idea. He replied, "There's no money in selling Olivers! I can sell 10 Winnebagos, and 20 Thors, ... in a month where we might sell one Oliver." Yep, Hohenwald TN is far-far-away and in our 2 1/2 years we've done fine getting things done locally, no travel necessary. Even our Oliver was listed on Prescott Craigslist! Upon sale, prior owner delivered it, backed it right into our home RV parking spot! 😎
-
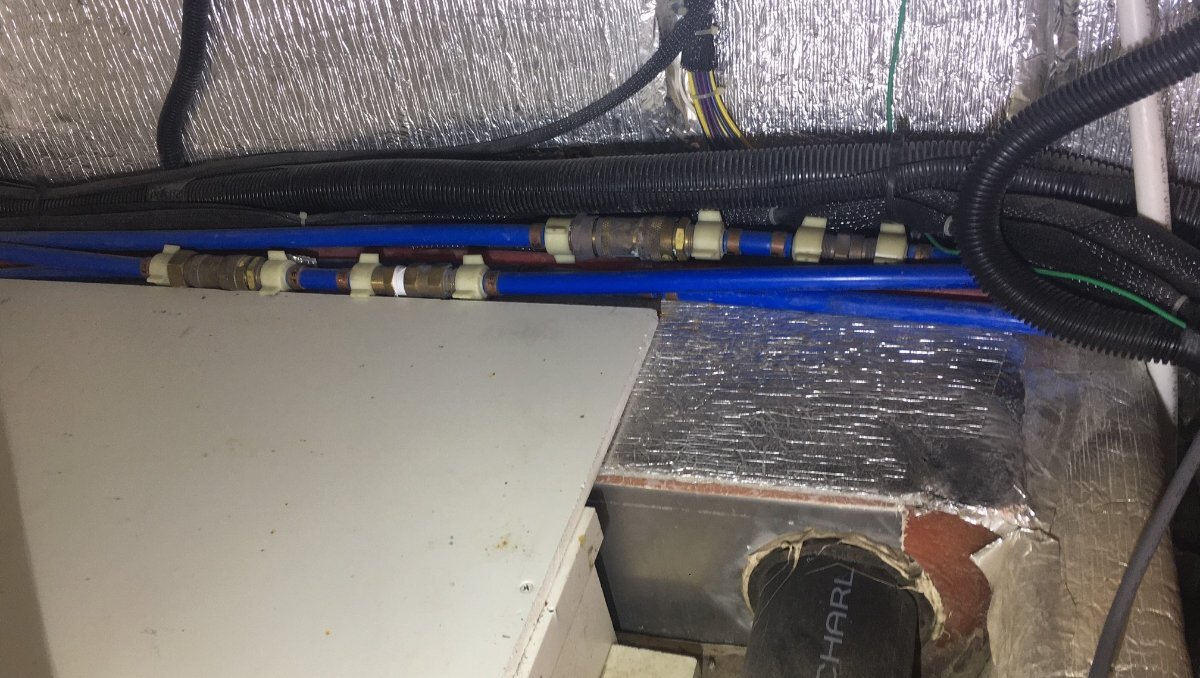
The City Water plumbing in our Oliver consistently has lower pressure/volume than using the water pump and Fresh Tank (though we do have an upgraded variable-speed water pump). In a way it's neat that when we do not need much water, City Water gives us just that (water savings) and when we want better pressure we turn the water pump on at the same time. This works to supply extra water pressure and volume! I have it on my long list to remove the water restrictors in both lines and remove and clean and/or replace the backflow preventers (check-valves). Not sure how your 2019 is plumbed, but you can start by looking here to see what you have and decide what to do. Look closely to see we have BOTH check-valves AND water restrictors on BOTH City and Fresh water lines.
-
Agreed, E2 means no ground connection. Given you are certain shore power has proper ground (be sure) then it would be within the PI EMS. Make sure ALL 6 connections (3 in, 3 out) are clean and tight. The 4 you see quickly in the picture are the hot and neutral connections. Then look closely at the green wires which are bolted to the case of the EMS (inside top of the case in picture). I can see that one of these could get loose easily.
-
Yeah thank @Steph and Dud B, I missed that he had the "wash station cold faucet" turned on. I guess that means the outdoor shower? I would try it again with the kitchen sink faucet on, handle centered both hot and cold, just to be sure. If all fails, I suggest blowing compressed air though it! 😎
-
@Dexter Adams Do you have a faucet open? I use air vs. antifreeze, but know that at least one faucet needs to be open, otherwise the plumbing is pressurized! Don’t need faucet open for the Fresh Water line since tank overflow is always open.
-

Oliver Legacy Elite I wanted: Great Lakes region.
jd1923 replied to BradAndKay's topic in Introduce Yourself
This one a 2023 on RVTrader with all Truma equipment! Good time a year to visit New Orleans! 🤣 https://www.rvtrader.com/listing/2023-Oliver-LEGACY+ELITE+STANDARD-5037415149#sid=456733 -
Oliver Legacy Elite I wanted: Great Lakes region.
jd1923 replied to BradAndKay's topic in Introduce Yourself
You’ll likely need to look nationwide given the rarity of the Elite I. -
I know, you anal retentive guys with the fancy poop accessories! 🤣
-
Originally from the album American Beauty and my childhood favorite Workingman's Dead are two great albums, the best of the best! Very good cover thank you, great voices! 😂
-
To dump tanks at night? And if you have the hose permanently connected, there's no need to see connections down there! I only go in there every few days and with eyes closed can pull out the business end of the dump hose! 🤣 It would be odd to have an electric valve down there when you have to manually open the black and gray valves anyway, the ones built into the Oliver. Some of us have changed the OEM waste valves with electric valves which seems more practical. Looks like Ron's hose can fit inside attached and maybe yours was installed too far out? This is all too fancy for me and likely most of us. I want to be back there with that bumper open for 10 minutes max! 😎
-
I see it now looking closer, just one hole. That's better and you should be able to find the wires in the interior easily. Cool that @Steve Morris recognized the Waste Master connection. Looks like a great setup but perhaps too big to keep inside the Oliver bumper. It would not be easy, but a standard fitting could be put back in place. Check out this. It's the same brand/model light as OTT installed for Porch lights and mount it rear-center at the same height as the porch lights. It will look OEM: https://itcshopnow.com/products/assurance-exterior-flood-light?variant=50392962007319%2F I'm thinking to add the new rear light on the switched circuit for the Side Porch Lights. Three lights on that switch. @Snackchaser wrote up a post where he located the wiring, which will be a big help in where to start looking, given our older hulls may be different. When I get to installing our rear light, I'll add a mod post. The rear light is a good mod.
-
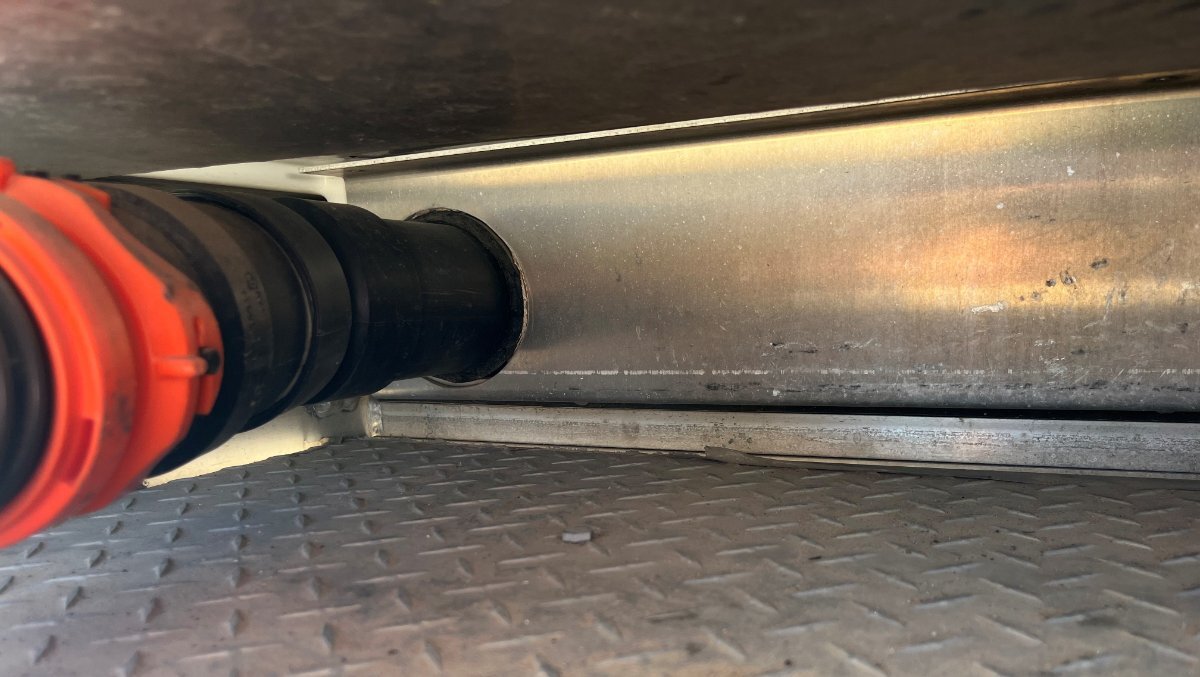
I was curious and just took a look at our Oliver (pic1). No wires, no buckles, and I'm happy to see it's cleaner inside than out! 🤣 (I'm having a guy clean and polish the outside soon!) Prior owner must have had some poop macerator pump wired in there, yuck! And who knows why they needed two cables and drilled two holes. Everybody should think of any alternative so not to drill into these hulls! First thing i would do is to remove both wiring harnesses, then plug up the holes with plastic plugs or butyl. Go inside your lower rear opening, I call it the Oliver trunk! Take a look where the waste drain pump comes in and the wiring harness will be right there (just to the left of the pipe shown in pic2). I would also get rid of the waste line extension, buckled onto your waste drain, to make room. We keep our RhinoFLEX hose always connected there, so not to crane my neck and sprain my wrist every time we're at the dump station. It's so easy just to pull the length of hose out. We keep a clear elbow fitting on the other end, so everything is ready, always connected.
-
I don't remember any wires in there. I can take a look today. I also do not believe we have that buckle on the waste pipe. Does yours disconnect there? Our hulls are close to the same vintage. The rear LP quick connect in the bumper was an OTT OEM option. I never have used ours, preferring the front connect vs. lowering the bumper. Wish OTT mounted a rear port next to the bumper (near the boondocking water inlet) vs. inside with the dirty waste dump hose. It's not a sanitary area inside there!
-
Our Oliver is my first experience with the dual LP regulator setup. Previous RVs had single built-in tanks. Is this necessary merely due to age? Our hull now approaching 10-years-old with OEM regulator. I haven't used the auto change-over feature, just turn the valve left or right. Everything is working as designed. This may be a good replacement, or is there a preferred brand? https://www.amazon.com/RecPro-Regulator-Changeover-Connector-Mounting/dp/B0DK626918/
-
Good to know of your experience, John. I thought that LiFePO4 batteries could freeze given 60% +/- SOC and fully disconnected from load and charge. This is as easy as it gets for winter storage! Good to know it has worked for you. Your Oklahoma storage location certainly gets a number of freezing days and nights over the long 8 months you are off the mainland. If we ever see some real cold coming, I'll do the same. Run SOC down to 60% and then pull the ground cable on our battery bank. So simple! Way better than the manufacturers that state charging power can be left on all year just as long as SOC is low once a year. I don't see that advice. Thanks John, your Battleborn method is the best plan yet and so easy to implement! Battleborn was the best choice when you upgraded years ago. No power required during storage, no battery removal, no fuss, no worries! 😎
-
How to stop AC from clicking (attempting to start?)
jd1923 replied to GlacierGirl's topic in Mechanical & Technical Tips
Clicking when the breaker was off too? Then it could be the Dometic control box vs. the thermostat, given the thermostat is operating the furnace and the clicking is coming from above where the control box is located. The only device in the A/C unit running on 12VDC. @Ronbrink and @ChristianD, in the thread re updating the AC unit with a Tosot, had a discussion re the Dometic control box. Here's a link of what might be needed, if reset doesn't work. Nice kit for $120, contains both new thermostat and control box. https://thervsurplus.com/products/dometic™-oem-3316230-700-9600024570-single-zone-ct-thermostat-w-control-board-cool-furnace-white?_pos=1&_sid=827d20bfd&_ss=r Many of us are replacing the NOISY Dometic A/C and if you do that, all you need is one of these to run the thermostat. No clicking sound if the furnace has it's own thermostat! 🤣 https://www.amazon.com/dp/B00H6ARNXO?ref=fed_asin_title -
How to stop AC from clicking (attempting to start?)
jd1923 replied to GlacierGirl's topic in Mechanical & Technical Tips
Barb, do you have the Dometic thermostat set on furnace only, or on the heat pump setting. I don't think we have a heat pump, but there is the setting on the thermostat. When I accidently switch to that setting, no clicking, but the fan starts running above. There shouldn't be any signal sent to the A/C when in furnace mode. If not, could be your thermostat is failing. I've got a possible work-around. Turn the 120VAC breaker off for the A/C. This may keep it from clicking, if it needs the 120VAC to make that noise.