jd1923
-
Posts
3,216 -
Joined
-
Last visited
-
Days Won
240
Everything posted by jd1923
-

Convert Old Paper Manuals into Digital Format
jd1923 replied to Wayfinder's topic in General Discussion
That will be two dinners after we install new axles on #110 at half price! 🤣 -
Convert Old Paper Manuals into Digital Format
jd1923 replied to Wayfinder's topic in General Discussion
Exactly what I have done! 🤣 -
Furrion Chill Cube – Product Review and Installation
jd1923 replied to jd1923's topic in Ollie Modifications
Thanks MosseyI In a way I made in impulsive buy, and maybe could have waited for better pricing. Though I noted list prices of about $1400 for just the main unit (ABD required) and thought the current Amazon prices of $987 ($1,006 today) and $138 ($143 today) for the ADB was good enough (saved $24 plus tax vs. buying today): https://www.amazon.com/dp/B0DM6YMJNY/?th=1 https://www.amazon.com/dp/B0F1464FSX/?th=1 -
Furrion Chill Cube – Product Review and Installation
jd1923 replied to jd1923's topic in Ollie Modifications
GJ, I'm sure you have not had time to study this relatively new model. Even though the video below is 6 months old. I just watched it for the first time two weeks ago... Who knows re the thermistor... I'm not up on the ME as you are. Maybe they have designed and positioned it appropriately, who knows, TBD. 🤣 Re the drain... This model may not need one! Watch the video which I have copied again here... FF to just before 10:00 minutes... -
Local web page to search Oliver forums via Google
jd1923 replied to Wayfinder's topic in General Discussion
Chris, you are one Rock'in Tech Guy! Works great, love it! 😎 I like how it opens every query in a new tab. Exclude words is a nice feature that I've never been able to use before (wish an Amazon search would return results so clean). Efficient tool (and I say that from years of being website and training content PM and editor). I've used site:craigslist.org <search words> for years to search Craigs nationwide. Awesome, thank you Chris! 😂 -
He’s just a young man, not the battery-god! 🤣 I think making a LiFePO4 investment is important and without internal heaters you’ll be doing work-arounds for as long as you use them, disconnecting them, heat blankets or something. Do it once, do it right! We live in a moderate climate, but over the last few nights with lows to 20F, at 8AM the Ruuvi in our basement at the rear wall measured 27F and the Epoch BMS kept all out battery cells right at 36F. I prefer knowing we can travel any day, at any temp, and use and charge our batteries! 😎 $500 vs. $1200 per 300 Ah is a huge difference though. When we bought our “Essentials” I don’t believe there was an Eco Series available. We purchased Essentails since they were lower cost vs. the Elite Series.
-
What is Towing "Level" and Does It Matter?
jd1923 replied to Sam Heumann's topic in Towing an Oliver
Thanks Ron. BTW, reducing tire pressure will change ride height some due to the weight of the vehicle. Change in diameter of a deflated tire without weight applied would be negligible. Some tires might even be taller when deflated, and with air pressure making them a little wider instead. -
What is Towing "Level" and Does It Matter?
jd1923 replied to Sam Heumann's topic in Towing an Oliver
The AGILIS CROSSCLIMATE LT225/75R16 tires on our Oliver have a spec dia of 29.3". They list the Cooper Discoverer HT3 LT225/75R16 at 29.2". They must have changed the molds, the question in when. I'll measure the ID of the fiberglass spare housing and soon we'll know for hull #113 too. -
Yes, "According to the NEC, the general rule of thumb is that the circuit breaker size should be rated at 125% of the ampacity of the cable and wire for continuous loads." 45A x 1.25 = 56A, round up to 60 as a 50 would be too low. 60A x 1.25 = 75A, but your 70 should be fine at 10A over.
-
Thanks Mike, I’m happy I’m not the only one! Even our OLIVER taillight has a proper seal. As GJ suggested, perhaps we’re Blessed! You know those hull #s 100 +/- are the crème de la crème! 😎
-
What is Towing "Level" and Does It Matter?
jd1923 replied to Sam Heumann's topic in Towing an Oliver
Thanks Ron, I appreciate your effort! Next couple of days I’m working on mud flaps for the Oliver. I’m going to mount mine in front of the stabilizer jacks (others have gone behind). I was thinking the task of custom cutting the mud flaps to fit into the wheel well would be easier with the rear axle wheel off. So while doing so, I’m going to remove the spare and see if my LT225/75R16 tires fit. If yours do and they haven’t changed the hull molds… -
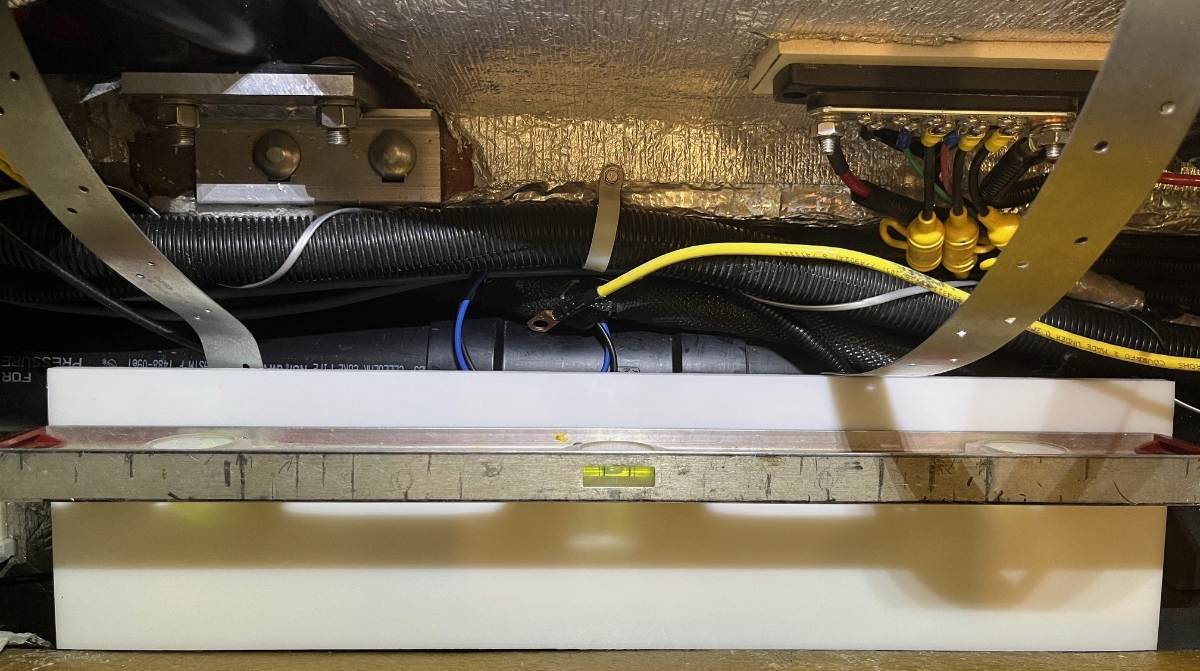
You could use adhesives. OTT is really good at gluing things down, and drilling into fiberglass, but there are better installation methods. I wanted our Victron MP2 mounted on a solid platform and sitting on rubber to reduce vibration and sound, no way screwed to a board glued to the inner hull! 😎 https://olivertraveltrailers.com/forums/topic/10420-off-grid-upgrade-minimal-design-–-victron-multiplus-ii-and-600ah-epoch-lifepo4/

-
What is Towing "Level" and Does It Matter?
jd1923 replied to Sam Heumann's topic in Towing an Oliver
Just topped off the air for our trip to Quartzsite next week. Pressure was low since the weather got cold. 55 PSI with Alcan Springs would be jarring! Now all 4 tires are set right at 46 PSI. I like this number! 😎 -
Furrion Chill Cube – Product Review and Installation
jd1923 replied to jd1923's topic in Ollie Modifications
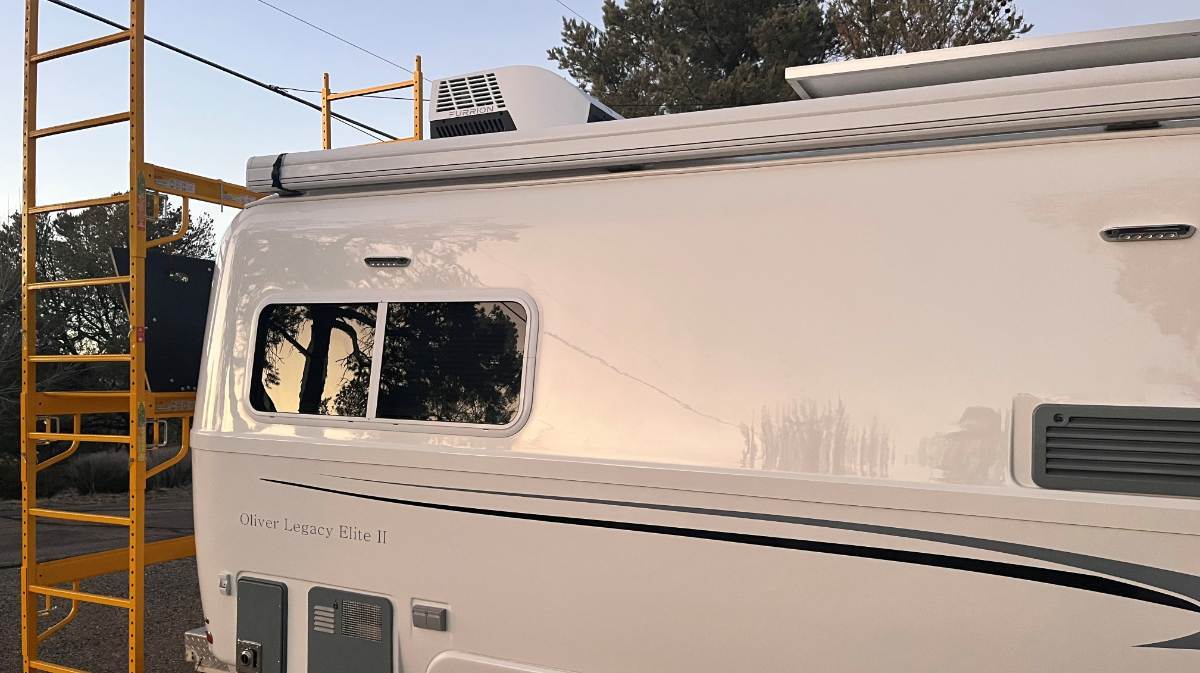
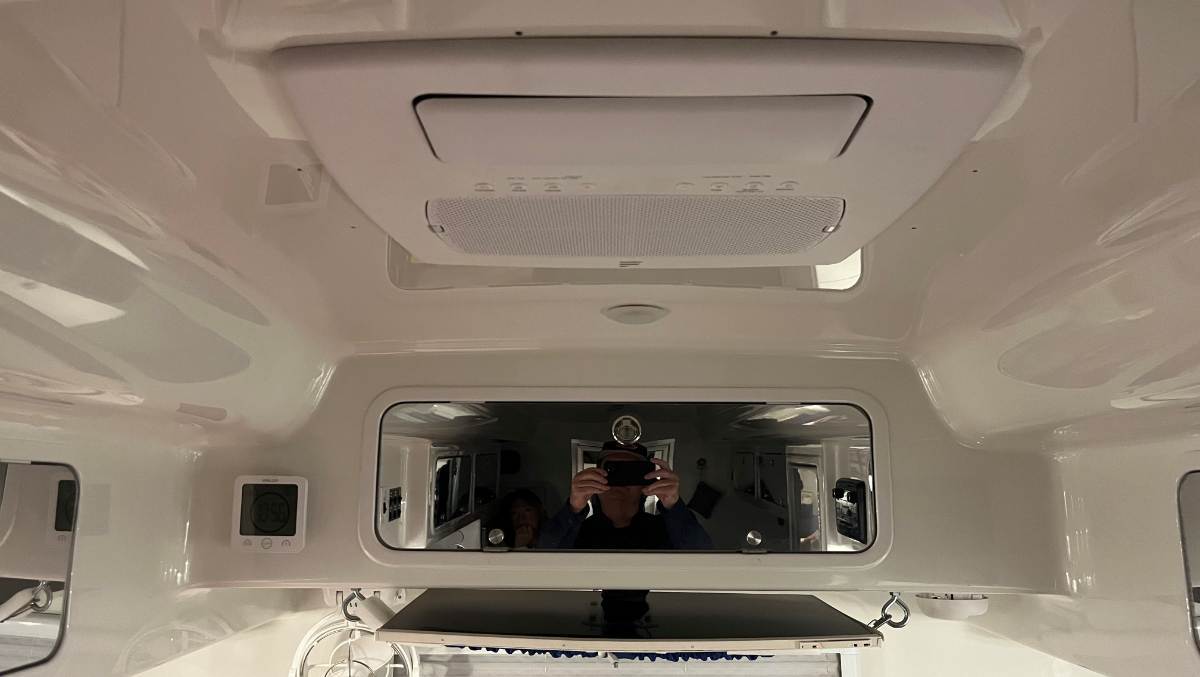
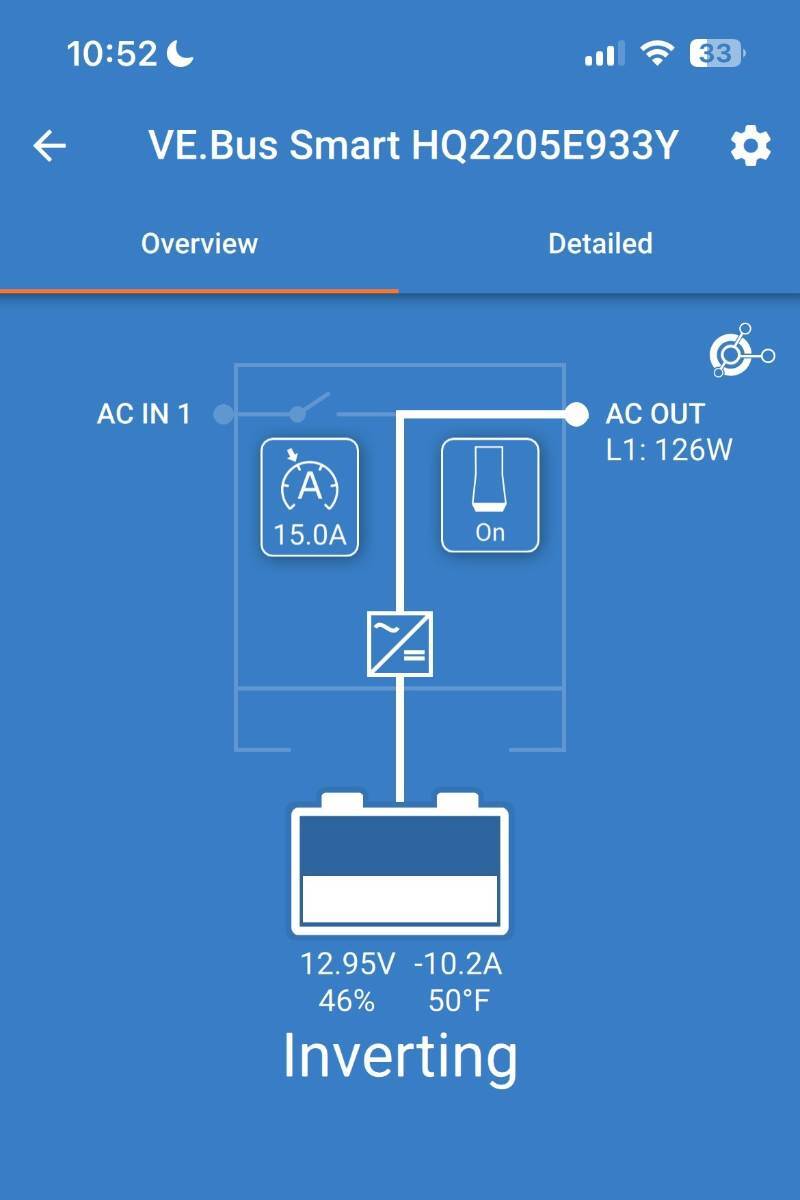
She's up top and installed, running ever so quietly... I'll write more on the installation soon and total height measurement. It does appear a bit tall, though I took the picture from higher ground. I ran the furnace during the Bears game (love when the Packers get beat, it's so sweet)! Then Chris and I went out to check on the Oliver... The cabin was at 74F and with the Chill Cube set to 60F it cooled quickly (but true testing can not be accomplished during the winter)! When it kicked in, it started drawing only 2A, OMG! We're always on inverted battery power, no shore line. it took a few minutes to ramp up. Highest reading was 18A. The Dometic Penguin II needed over 150A to make that freight train sound and would take 2-3 times as long to cool (how does that work)? I didn't measure total usage this time, but at the high draw of 18A (which sounds crazy, but it would certainly draw more on a hot summer day) I could run this A/C for 50 hours! I'm thinking with 900 Ah LiFePO4 batteries we will be able to run this on at least 3-5 hot afternoons when boondocking, get a hook-up after a week out. Out west you rarely need to run A/C overnight. A/C in the afternoon, furnace by dawn, so yes if they ever sell an upgraded model with heat pump and Bluetooth it would kill the market. Then it settled down at 10A, in AUTO mode the fan was running a low-medium speed (as recorded, run movie). The fan can run even slower/quieter! The huge evaporator fan in the Non-ducted version of the Chill Cube is the secret, and it's what sold me. When turned off the oscillating vent goes back to closed position, love how the air handler hangs <1" below the ceiling! I'm 6'2" and when the vent was full down, standing tall it was still 2-3" above my head. Love how it pushes a lot of air up and down the Oliver hallway but does not blow directly on the beds. Living in the Southwest, and especially after living a few years in South Florida, Summer has become our least favorite season (more so for Chris). I have a feeling that Summers in the Oliver are going to be pretty decent running this A/C unit! 😎 Furrion Chill Cube Running.MOV
-
My take, not accurate. We had them on our Oliver when purchased. I removed them for Mopeka sensors and then ran the Dozyant gauge on our home gas grill for the last 2 1/2 years. It can be on the yellow/red line and you could run the tank another dozen times and the pointer on the gauge sits in the same place. It's not a sensitive gauge. The main issue with a visual gauge, accurate or not, is you have to remove the doghouse cover to read it. That would not be me! Mopeka is the way to go. I have apps for Victron, Epoch, Ruuvi temp sensors, LevelMatePRO, Mopeka and Dometic CFX5 TV fridge. I'm not going outside, just reading the app! 😎 I purchased this bundle a couple years ago -- https://www.amazon.com/Mopeka-Pro-Check-Universal-Bundle/dp/B0CNKX9DRC/
-
Yeah, and has anybody read a report from a true BB customer vs. Will Prowse who makes his living on YouTube clicks?!
-
The Saga of corroded brake wires on older trailers
jd1923 replied to Wayfinder's topic in Mechanical & Technical Tips
Go figure! Visual inspection of shocks will only show leaks. You need to remove them to test them. Good for you Chris! I've never found a creeper that works for me. Been scooting and rolling my body on the concrete garage floors for decades! I did not have ratcheting wrenches most of my life, but 3 years ago I found this awesome set on a good sale. Nice jack! 😎 https://www.homedepot.com/p/Milwaukee-144-Position-Flex-Head-Ratcheting-Combination-Wrench-Set-Metric-15-Piece-48-22-9513/313671329#see-more-details -
What is Towing "Level" and Does It Matter?
jd1923 replied to Sam Heumann's topic in Towing an Oliver
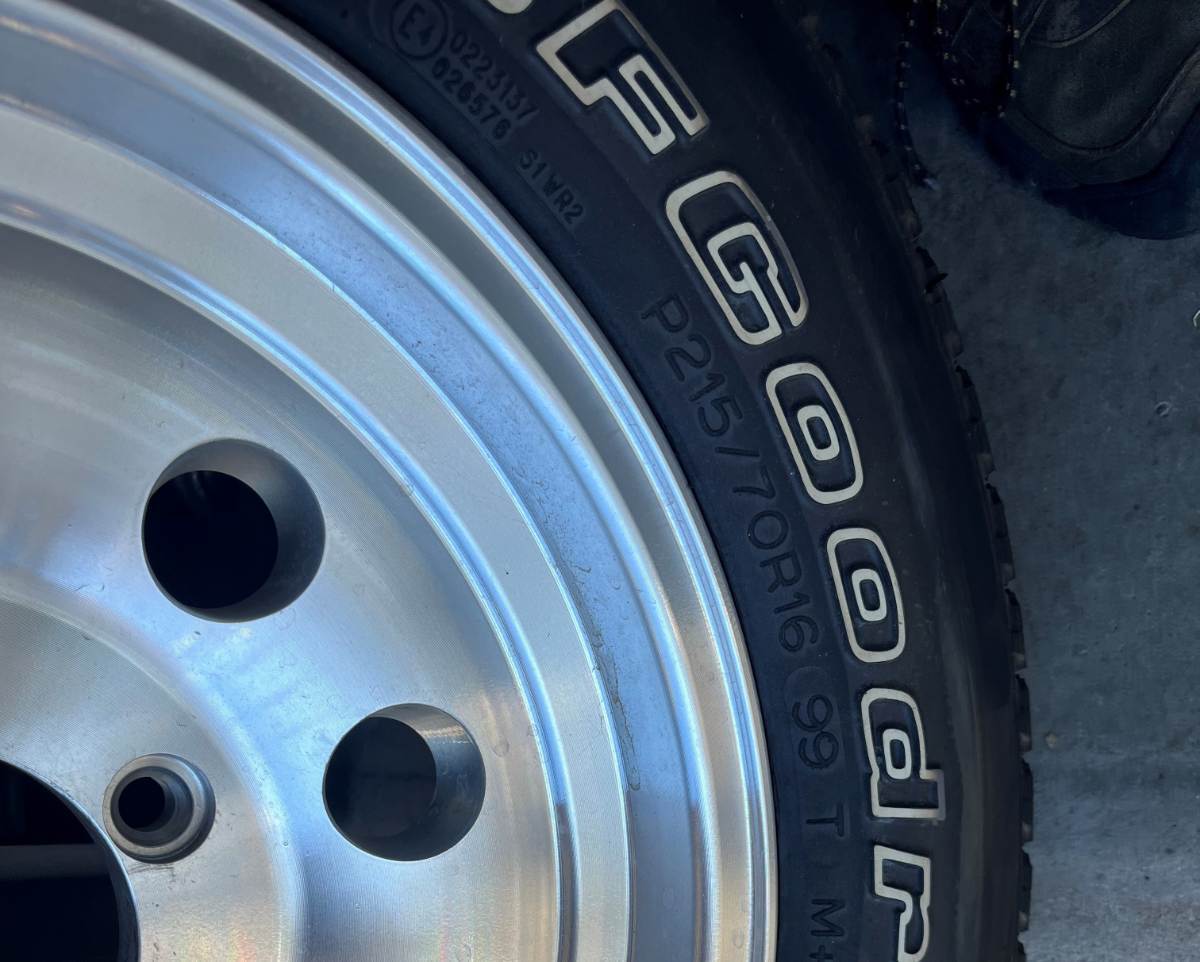
Including the spare tire? Ron, please verify size. According to what Bill @topgun2 wrote, that wouldn’t be possible. And thanks to our other Bill @rideandfly for the link to the spare tire thread. I have 5 identical 16” wheels so I’ll replace my spare tire with the same LT215/70R16 size I have or something very close to the smaller diameter. -
What is Towing "Level" and Does It Matter?
jd1923 replied to Sam Heumann's topic in Towing an Oliver
Hmmm? Is my spare something a prior owner changed? Ron has a 2020 and Sam a 2025. Asking @topgun2 and @Mike and Carol who have 2016 hulls: Are your 5 tires all the same size? It would be great if I could replace my spare with LT225/75R16 if it fits inside the fiberglass surround. Our spare tire is as old as the trailer but I believe it's been replaced, since a P-rated RWL tire that doesn't seem to be OEM. Replacing the spare has been bottom of my list because if/when we get a flat, I would more likely park/detach the trailer, remove the wheel and run it down the road for repair.
-
Furrion Chill Cube – Product Review and Installation
jd1923 replied to jd1923's topic in Ollie Modifications
Yes, working this installation today! Wish temps would be a little better, high of only 45F today (furnace ON) but al least it's another sunny day in Arizona. I'm hoping the remaining snow will soon melt off the top, or we're brushing off snow first. Also, I do plan on measuring total height so that I know what bridge heights we can travel through. Our hull is likely already 1/2 - 1" taller due to the Alcan Springs. I'll also measure height of the body at the wheels. With the Furrion being 3.25" taller and some additional spring height, we should be about 4" taller overall. Thanks, I'll add to this post with installation pics and measurements. 😎 -
We had the same mattress Mike pictured above when we purchased our Oliver used. I didn't think "heavy and firm" but more so squishy, like you would sink into the foam, but who knows they could have been up to 8 years old. I did not want to spend on custom mattresses and shipping. We went with our local Brooklyn Bedding made in Phoenix AZ. We've driven down to their plant to pickup the Cali-King bed we have at home but the all foam mattresses ship at no additional cost. We went with two singles 30x75", removed the stitching on one corner and cut a radius with an insulation to fit the curved end (used cardboard to model the shape). We went with the 10" for medium firmness but it's actually nicely firm for me, at times a little to firm for Chris but she has gotten used to it. A 4-6" mattress is better for sitting, and the taller you go your heads may hit the cabinets when sitting! They are heavy but I've added electric water valves and moved all fuses and switches to under the dinette. Chris stands them on their sides to fit sheets and I will remove a mattress, stand it up at the pantry when I'm servicing anything underneath. There's a lot to think about re the sizing depending on how you use the area. We sit up to watch TV or read a book, I sit up with my laptop but we do not regularly use our sleeping area as a daytime living area. These are the products we use in our sleeping area: https://rvmattress.com/products/brooklyn-wanderlust-memory-foam/rv-bunk-30x75-10-inch https://www.amazon.com/Retrospec-Sequoia-Yoga-Bolster-Pillow/dp/B092DYYR5W/?th=1 https://www.amazon.com/Sofia-Sam-Purpose-Supports-Laptops/dp/B013KHAIKQ/
-
What is Towing "Level" and Does It Matter?
jd1923 replied to Sam Heumann's topic in Towing an Oliver
Tire profiles of the 16" and 15" are identical, so an Oliver with 15" rims sits a 1/2" lower than on 16s. Glad we have the extra 1/2" for traveling our Forest Service roads. Though the Oliver sits nicely high enough given its underslung springs. I have dragged the rear-bottom end of other trailers on dirt roads, or on steep aprons leaving some gas stations, but so far clearance on the Oliver has been good! 😎 Did they go to 15" to go to ST vs. LT tires? ST tires being more readily available in 15". The spare tire on our Oliver is LT215/70R16 which is -0.7" smaller radius than our four LT215/70R16 tires (-0.2" smaller radius than the 15s). You really would not want to tow too far, or too fast, driving on this shorter spare tire. Are all 5 tires the same size on newer Olivers? That's a good reason to go with 15" wheels, so that all 5 tires the same. It would be great to change a flat tire and not have to change it again immediately. It's like having a car with that dumb little spare, but I do think those are thinner profile with the same ride height. -
Got a whole 2" here in Prescott yesterday. Drove to pickleball on a neighborhood sideroad, down a 10% grade. I drove my truck like a baby (2WD TV not towing), about 5 MPH but only for a couple hundred yards until the road flattened out. I got a little used to it and was soon more relaxed. I'm past winter weather after leaving Chicago in 1999. Loosing my nerve and likely some skill. We find snow traveling with the Oliver, we'll be boondocking right there, waiting out the weather. During high school, we would practice how quickly we could slide through a snow-packed turn, handling the heavy 2WD cars of the day. I remember back in the 80s and 90s driving my 1967 Wildcat, trunk filled with tools and/or bags of water softening salt for rear-wheel drive weight, blasting down I-90 the Eisenhower Expressway at 70+ MPH in a BLIZZARD, not a worry in a young man's mind. That day is gone! But when it does snow here I try to get out some, so not to lose my winter driving skills. Our snow generally melts next day and this is just what's left today. Got down in the mid 20s last night, 36F now so some snow is surviving. All roads that see sun are back to bone dry.
-
I'm with you on this line of thinking. Years of use without issues reported. Now there is an instance, one reported issue, only in test of a brand new battery. What we don't know is if BB changed their build process, or did a supplier in China change/cheapen the process in one one or more battery components?
-
What charger are you using? Can you set the charge amps in some setup or configuration menu? If you can, set charge rate to 50A.