
Leaderboard



Popular Content
Showing content with the highest reputation on 10/29/2017 in all areas
-
Wow, quite a thread John. Thanks for diving in to this. Still not sure why you decided to swap the intake/outtake lines out. Wouldn't it have been just as easy to put the new siphon tube in the lower hole? Or were you worried (as I am) about access down there. Curious to see how well your setup will work when it comes time to drain the tank. You may have to get under you Ollie and suck on the exterior drain port to get it all going! But hopefully not. Curious also about your pic of the factory spin weld fitting. It appears to be of a different design than the one that was sent to us. Can't figure out why there would be any tank showing inside the fitting as there has to be that collar on the weld side of the fitting to key in the fitting for spinning. That collar is larger than the FPT part of the fitting. To have to file the tank out to get the tube through is a real PITA. I asked Oliver about months ago as I was worried about this very thing. They assured me that 1/2" pex or copper would go through. Hmmm. Finally, do you think in hindsight that you could have gotten a copper bend in your tank instead of the PEX bend you made? I'm a little worried about the PEX in a compression fitting that is unsupported by the little support sleeve that came with that fitting. I think copper would better resist deformation by the compression ring in a pass through situation. But perhaps with the pressures we are talking about, the PEX will do fine. Thanks again for the write-up. It must have taken a bit of time and is appreciated. Dave3 points
-
Although it doesn't apply to this Southern good 'ole boy redneck, for all you Yankees that have to winterize, don't forget your toilet valve.2 points
-
Good work John! Nice fix. You can put pipe dope on the compression fitting ferrule and nut threads to act as a lubricant and sealer which will allow much less torque without leaking. I suggest anyone else that does this use Rectorseal 5 on the tank fitting, but teflon will work well if you're careful. Just be careful not to tighten it beyond hand tight. I don't think you mentioned it, but when tightening the compression nut, everyone should be careful to hold the fitting on the hex nut with another wrench. When I was looking at mine, I never thought of swapping the top and bottom fittings to gain access. Good idea.2 points
-
Canoe12, Yes, we're old school, I guess. We collect the rainwater from our roof, and filter it 7 times before the uv sanitizer. And that is solar powered. Whole house pv, grid tied. Battery availability wasn't great when we built, but we've ordered battery backup now since hurricane Irma blew through. Post Irma, we shared one of our camping gensets with the neighbors for a week.... Enough to keep two fridges, a few lights, a few fans, and the cistern pump running... On the bigger Yamaha. And power the ignition on the gas instantaneous water heater, so everyone who wanted to could use our outdoor shower. It's amazing what 3000 watts can do, if you are careful, and have good extension cords. We were sad that our trailer was in North Carolina... That would have given us more options. But, it was safe. The new battery backup should allow us to live off grid, when the grid goes down, even in town, except for sewer. Septic is no longer allowed here... We collect 100 per cent of our water, and more than 100 per cent of our power needs, and no polluted groundwater discharge to the bay behind us. Paul put a lot of time into research and planning on the rainwater collection system and cistern. Our project engineer had to jump a lot of hoops to get it done in code, because no one does it anymore, so few people understood what we were trying to accomplish. ... But, we got it done. And we are very happy to collect our own sweet, naturally soft water and power our home with quiet, clean solar power. Sherry2 points
-
OK, try this. I also have a 2015 Oliver. You will need the HDMI cable. Check the back of your TV for it. Turn on your TV and with the TV remote, press the MENU button. Scroll over to AUDIO, then scroll down to TV Speaker, then turn the TV speakers OFF. Go back to main menu. Scroll over to SETUP, then to AUDIO OUT, change from Variable to FIXED. On your Furrion (not the remote) set Sterio to AUX. That's what I did and it works great. Use the A, B, C buttons to select which of the trailer speakers you want to use. Hope this works for you. Dave2 points
-
My 2015 came with this fan, I don't think I've ever really closed it, right now it's pouring out and it's 3/4 open http://www.campingworld.com/shopping/item/maxxfan-deluxe-remote-control-rv-ventilator-system-white-lid/48933&utm_source=google&utm_medium=cpc&scid=scplp48933&sc_intid=48933?utm_campaign=SC_Shopping_Low&affiliateid=6338&gclid=EAIaIQobChMIj8KC5dyW1wIVEJBpCh2zNg8TEAQYBCABEgK1mfD_BwE1 point
-
I don't think that the copper would split in the tank because there is no pressure on that line, if someone did let the tank get cold enough to freeze, it would freeze in place and maybe expand a touch, as could the pex and the tank would probably split... Either way, letting the tank freeze with water in it at the rear is a bad idea, by lowering the tongue either back to level or forward a bit after draining the tank as low as possible, the remaining water would be out of the area of the dip tube anyway leaving no way for any accidents.1 point
-
I just remembered another reason I decided against copper.... the risk of splitting when the tank contents freeze. It might only affect an inch or two of material right at the bottom, but that would prevent it from drawing from as far down next season. PEX is much more tolerant of freezing. I’ve had a couple of residential copper lines freeze in really severe cold and I don’t care for that, no way....! In regards to restrictions or using smaller tubing, that might work but it is not the best solution. For a suction line, there needs to be minimal restrictions (narrowing or sharp bends) and ideally the suction line should be the next size larger diameter all the way to the pump. With the small pressure and flow rates that RV pumps are capable of, it isn’t a big deal, but you should be aware of this when you start thinking about changing stuff.... John Davies Spokane WA1 point
-
When I first looked at this problem and was working on a solution, I quickly gave up on using the existing tank fittings because of the poor access. John's fix using the upper fitting helps to get around this problem. Dave had already come up with a copper pipe formed into a Z, sort of, shape to fit through the existing holes and then lay on the bottom of the tank. That seems like a good idea too, but hard to install in that lower fitting, in fact, next to impossible to install. The use of 1/2" PEX (5/8" OD) means it's too big to fit through the hole and John had to enlarge the hole to get it through. Another method would be to use 3/8" PEX (1/2" OD) or 1/2" copper tubing. And then adapt back to the 1/2" PEX outside the tank. John's curved copper example is good, but the bend is too sharp to make the corner. A hand formed 1/2" copper dip tube 90 might work very well if someone wanted to use copper instead of PEX. I debated between using copper or PEX for my dip tube coming in through a fitting on top and decided that copper was best for me. I was able to make the holes in the pickup so close to the bottom of the tank that mine will draw down to 6% before getting air and will struggle on down to zero percent with some bubbles. Those plastic PEX fittings that seal only with an O ring against the outside of the tube seem barely good enough and may leak with the sloshing water and vibration while driving. The drilled out brass fittings John used are much better. And they can be easily taken apart if needed. I want to re-stress that the tank fittings, especially the ones from the factory, are not very strong and can crack if the fitting is screwed in too far. Be careful! When using the copper crimp rings to connect the valves or splice the tubing, the tool can be cumbersome and hard to get in place. Lowes sells another one called a "pinch ring". The tool for these is more compact and works well. The rings are also stainless and can be removed easily if needed.1 point
-
Don - I would have thought that passing the pink stuff through the toilet valve by "flushing" the toilet would have done the job. Therefore, I suspect that there was some other unrelated cause for the failure. A few nights ago - as usual during the middle of the night - I realized that I did not put the pink stuff in the black tank flush line. So, I took all the winterizing stuff out to where the Oliver is stored and got all set up to perform this minor task and realized that I forgot the little piece that I put onto the line coming from my hand pump that allows me to attach it to the Oliver. So, I get to make the ten mile trip again! Bill1 point
-
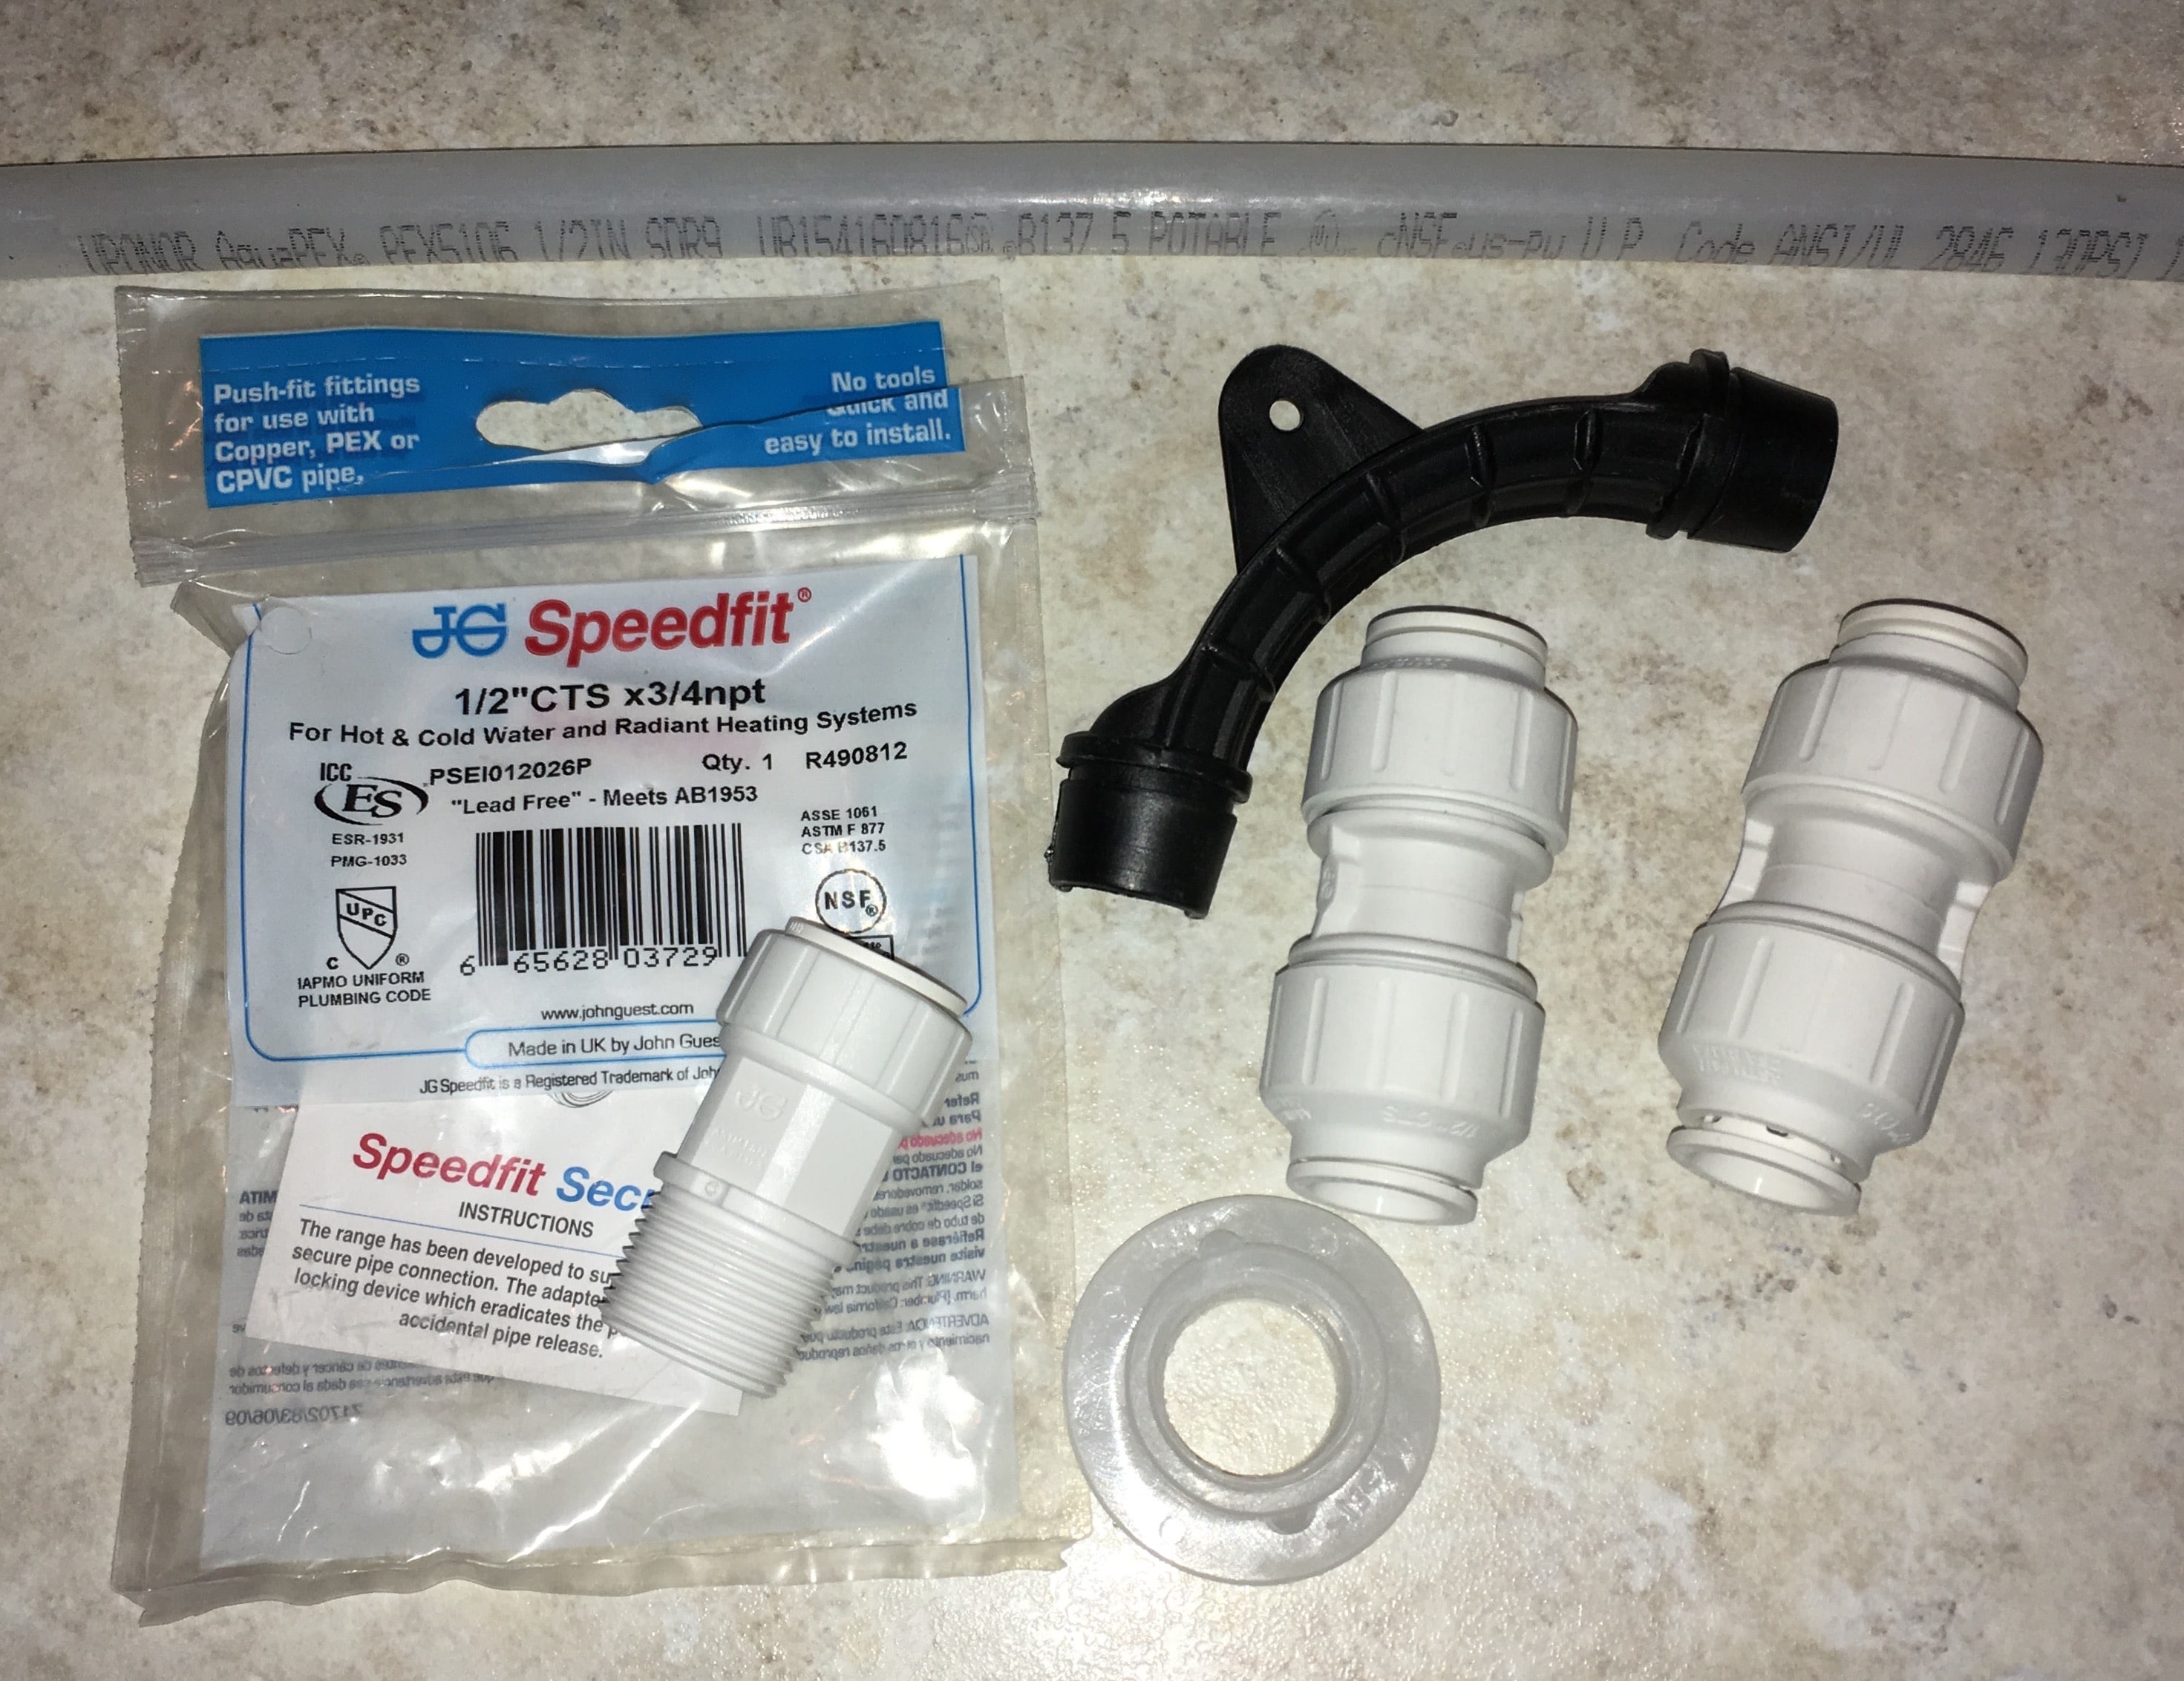
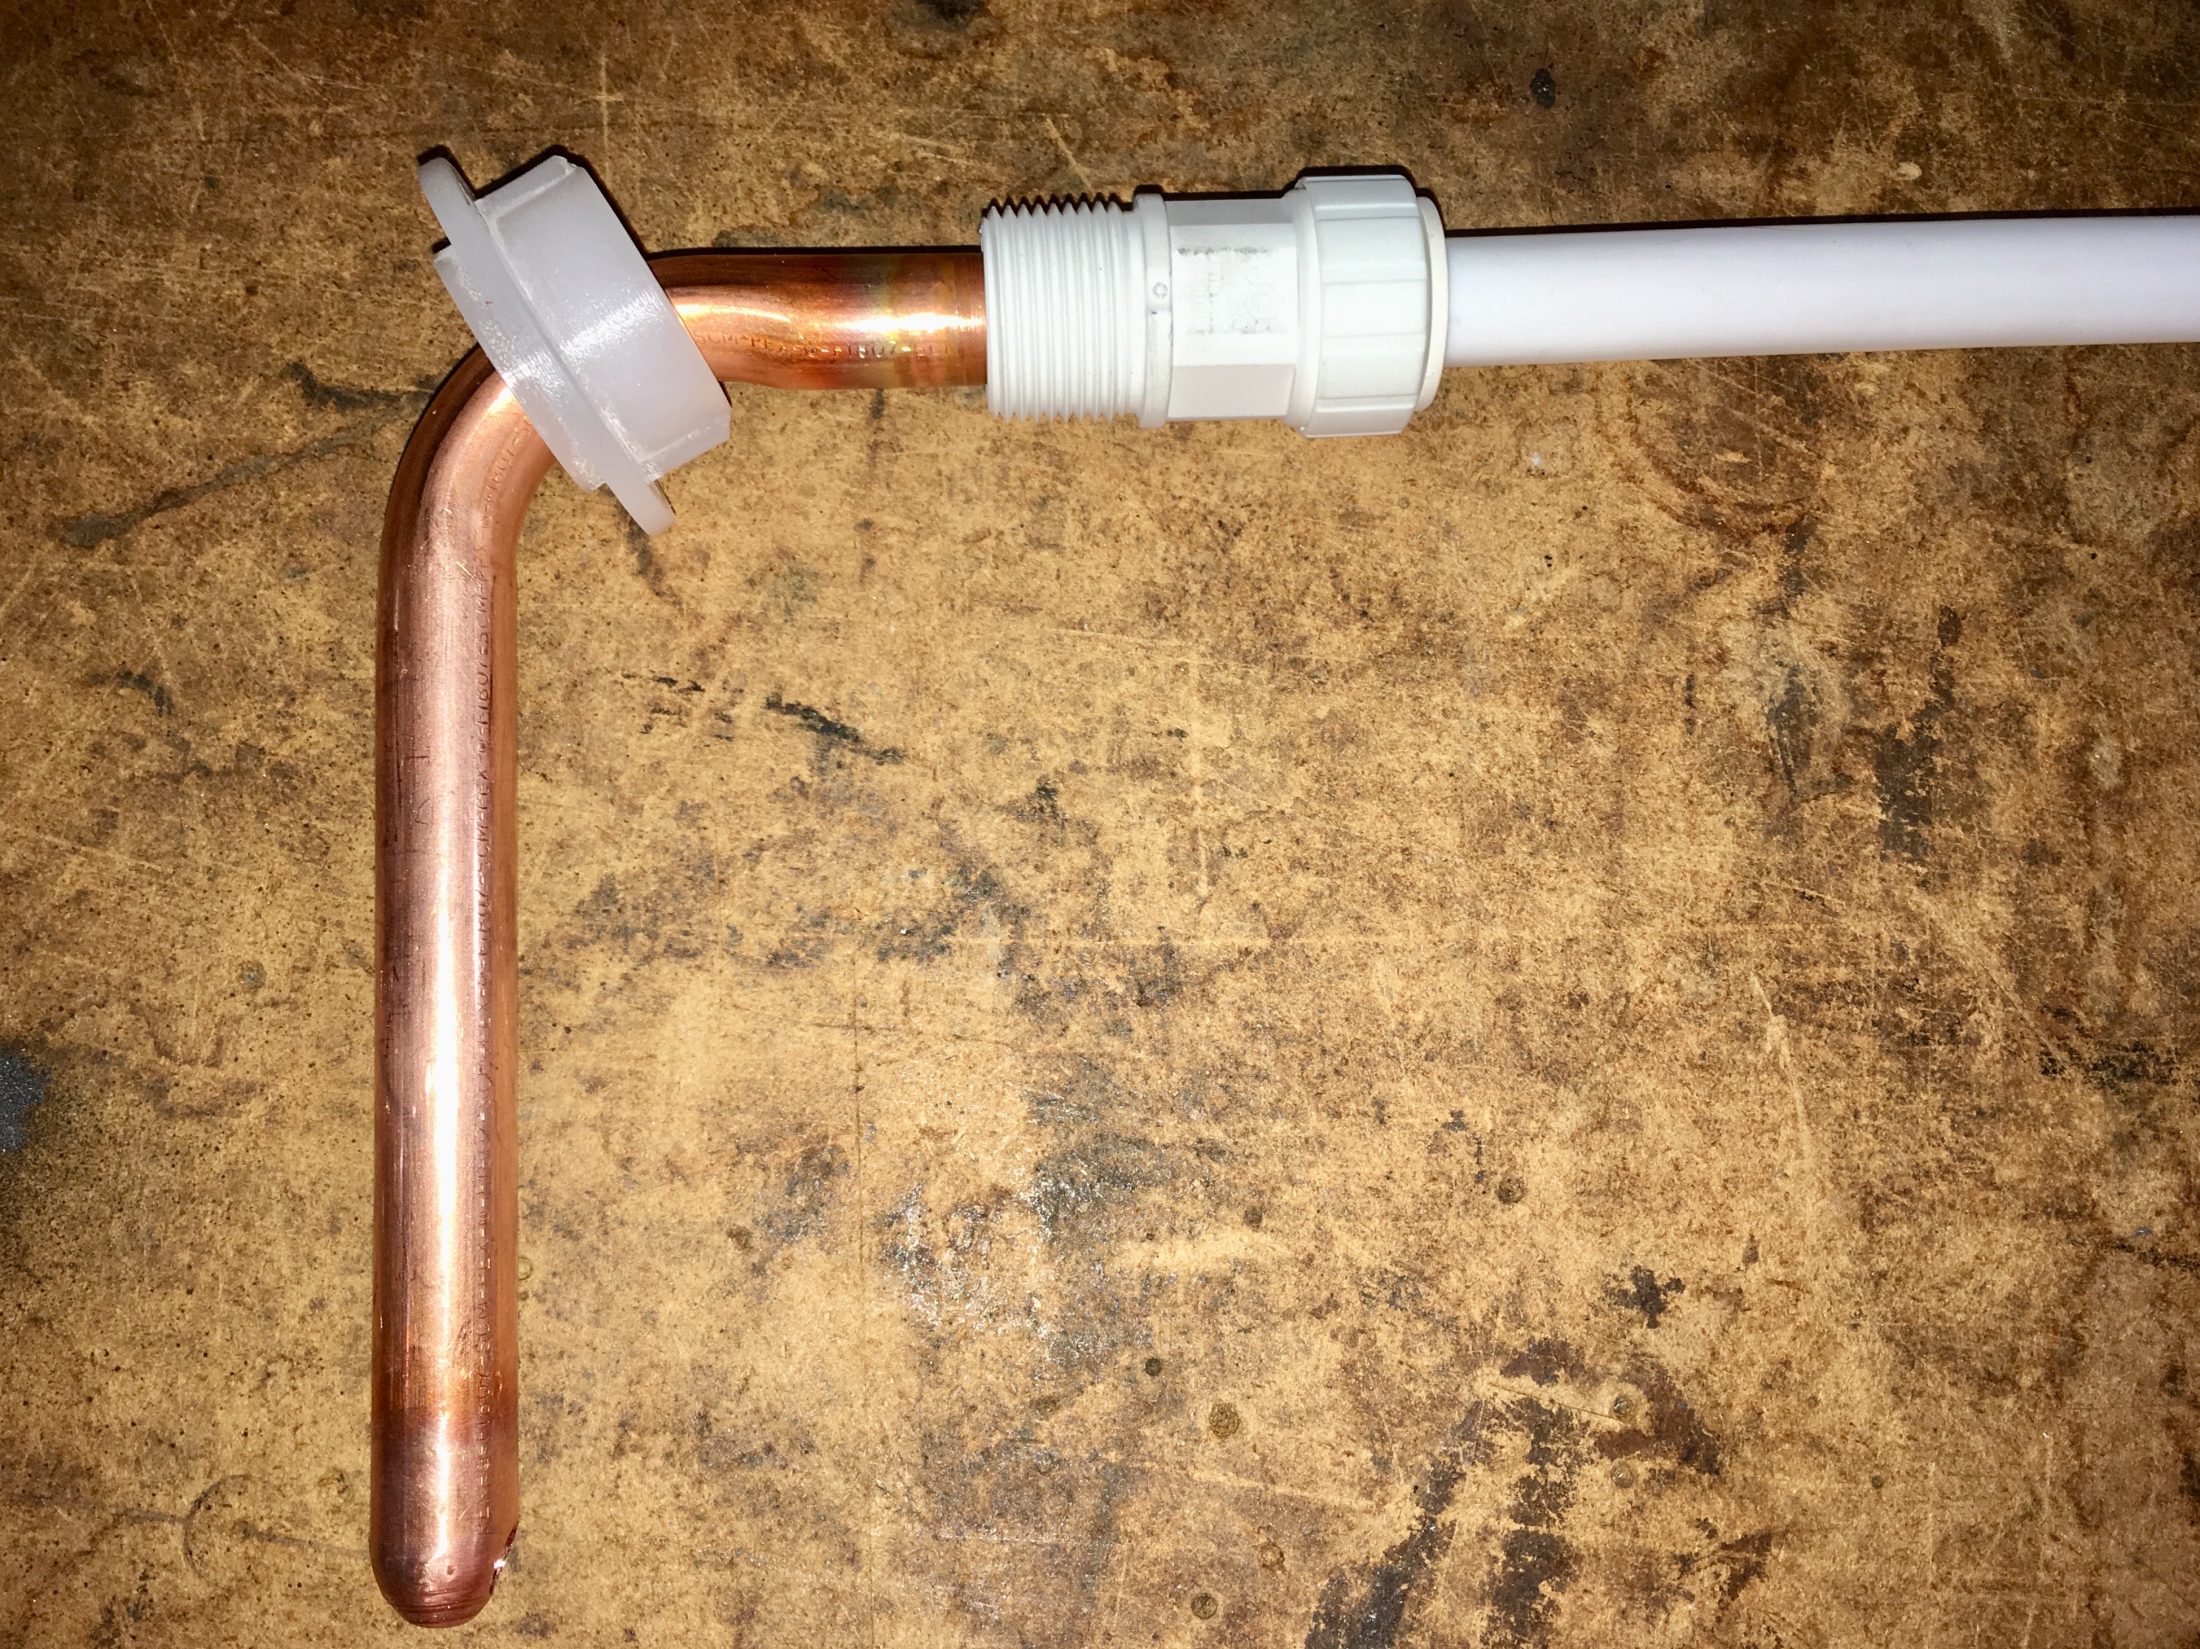
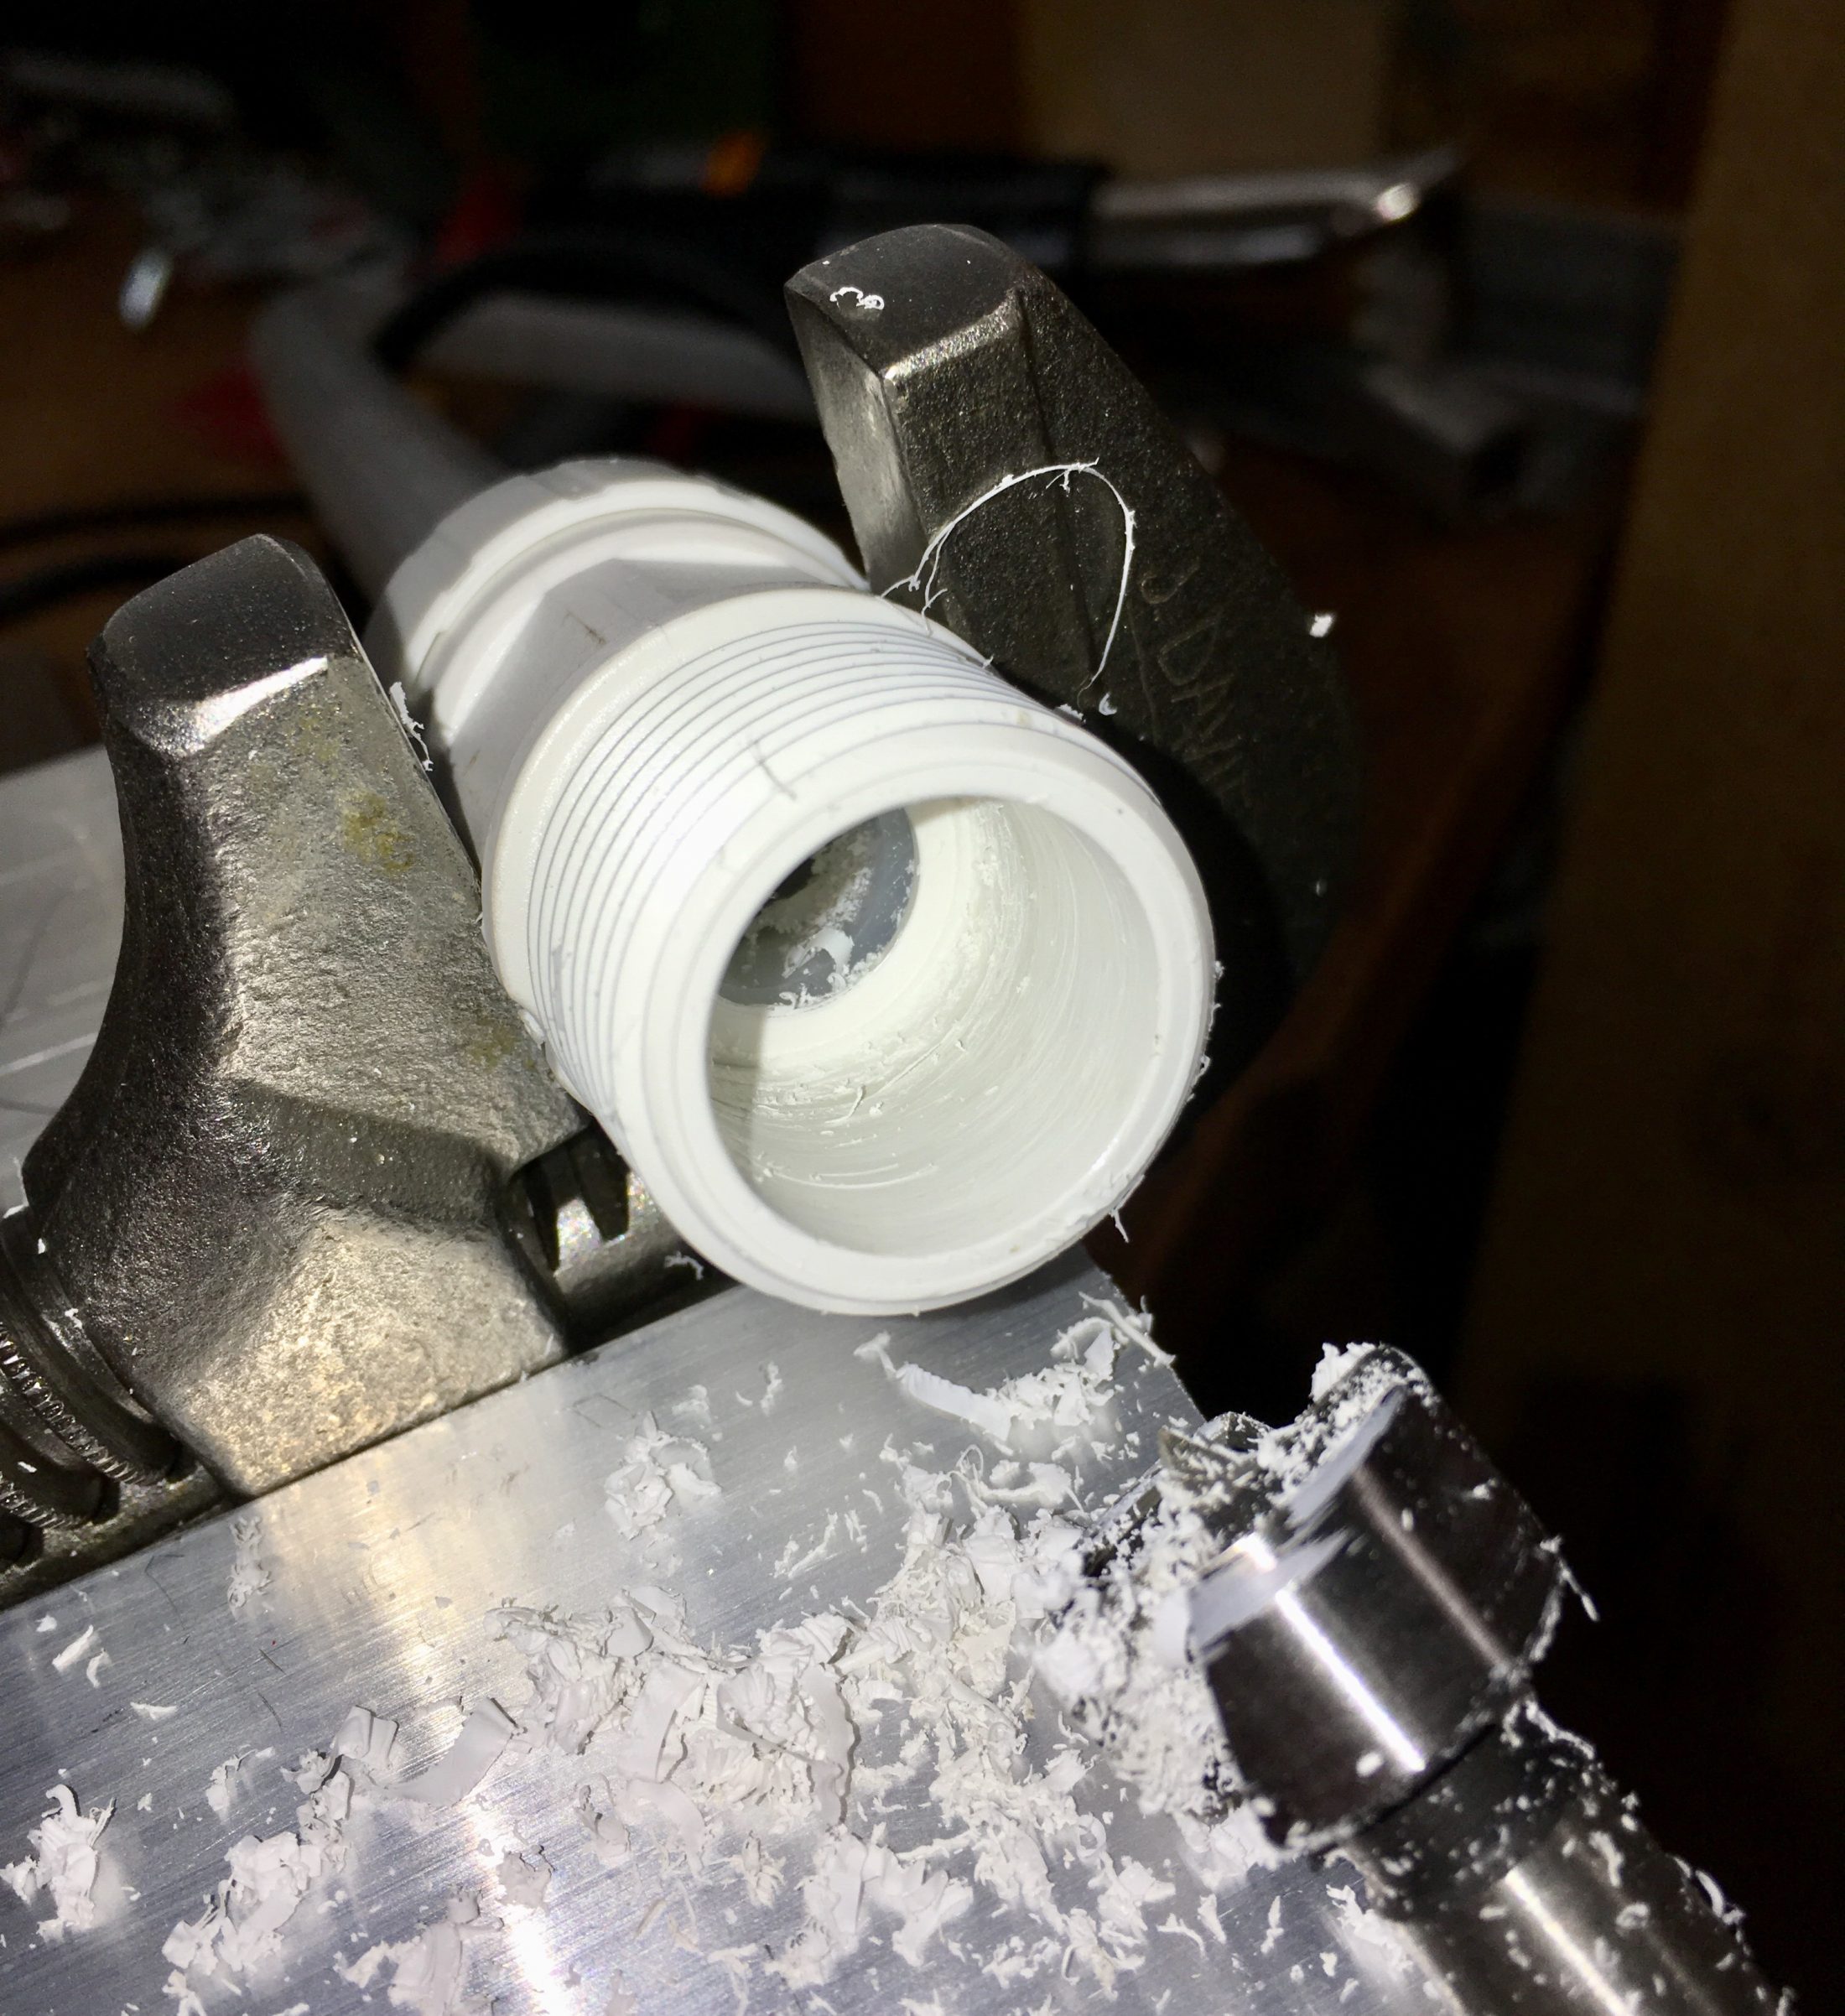
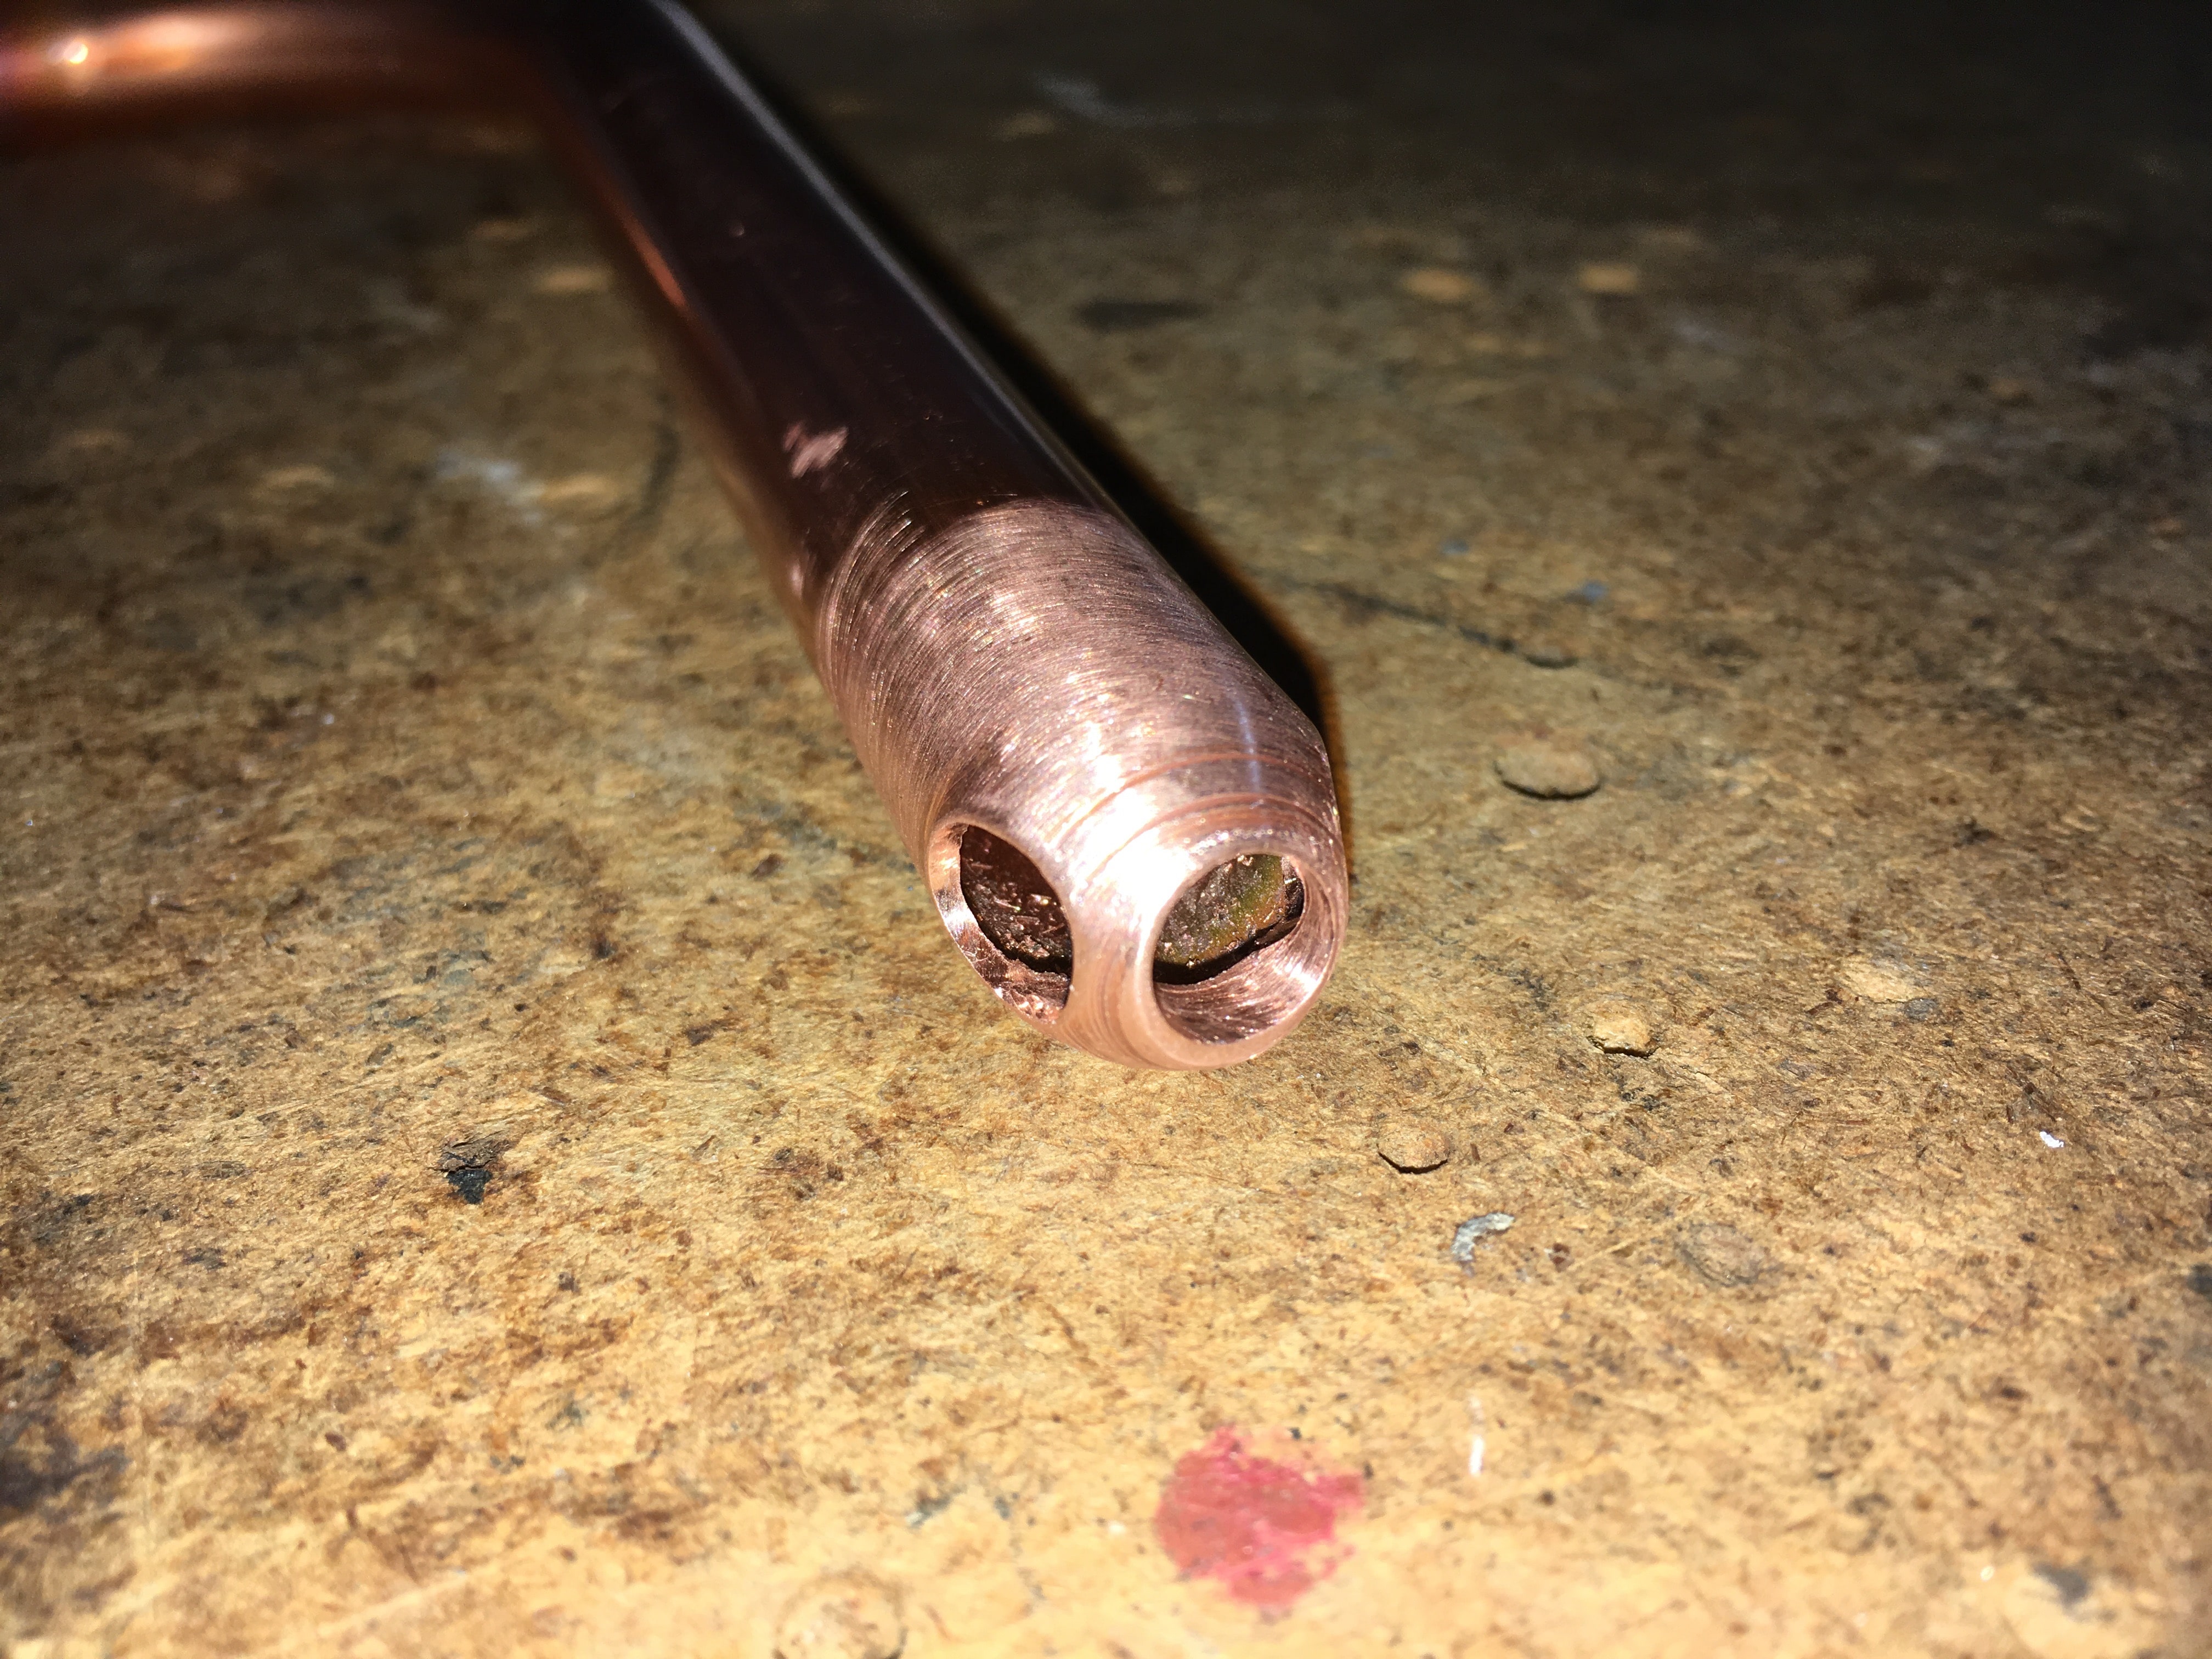
Dave, lots of good questions here. This entire scenario is one big compromise, since ideally all fittings should be above the static water level from the every start.... Siphon tube in bottom hole: Access is a real problem, you still would have to remove both sets of lines to reach the area, and if you had a leak in the siphon, you would have to take both apart to repair it. With the tube on top, the bottom fill line does not have to be touched, and the fill line is the only one that has positive pressure in it, so it is most likely to leak. It is prudent to just not mess with it a second time. Siphon tube in top hole: Easy access after the installation, the static water pressure on the connection is less (less water that high up), so it is less likely to leak. Ideally, one mounted on the very top surface e of the tank (like the factory mod) has zero static water pressure, so it can never leak unless your are towing. Draining the tank: It should not be a problem, When the line is full (no air pockets) it will drain naturally and do so until it sucks air. If you try to drain the tank after towing, there will be air in the line and _maybe_ nothing will happen. Simply turn on the pump and it will fill the line. If you want to get anal, open the ball valve that sends water to the tank and the pump will recirculate water in a loop and completely clear the line of bubbles. Once the air is gone, the siphon will start when you open the drain valve. Or you could just raise the tongue 6 inches, as you normally would, and it will force a siphon action by piling the water up in back. No sucking on the pipe under the trailer! You still have to raise the tongue regardless to get the remaining few gallons out.... Spin weld fitting: I can't answer your questions since I have never even seen a spin weld tool in person. The fitting that Oliver sends in the kit looks the same to me, except it has a back flange to slip into the tank wall.. Hole in the tank: It is 1/2 inch, you cannot slip a 1/2 inch PEX or copper tube through it since they both measure 5/8 inch outside diameter. When you are talking about a CURVED tube, you need even more room for the bend. PEX vs copper tube: I thought a long time about this and I considered the environment that the tube would have to endure. A fixed tank in a structure does not have any water movement. An un-baffled water tank in an RV, especially a long and low one like this, can sometimes have incredibly violent water motion. When full, the water can't slosh when you slam on the brakes. When 3/4 full, you have a large amount of water that is thrown forward by inertia, then it rebounds and sloshes back and forth. Water has a lot of mass (have you ever had anybody throw a five gallon bucket of water at you?) and that force gets transmitting to the tube in back. A copper dip tube will have no give and much of the energy will go up to the compression fitting. I would be really surprised if it did NOT develop a leak over time. A PEX tube has a significant amount of flex and will dampen out a lot of the force. I actually pursued this idea at first, since when I got my parts from Oliver I thought all the tank fittings were 3/4 inch, like the one they supplied in the above picture. Not everyone has the ability to heat and bend a tube, so I thought using off the shelf Home Depot parts would be a good compromise. It does require a PEX crimping tool, however.... Here is a standard $6 "stub-out" going through the drilled out fitting supplied by Oliver: [attachment file=76435] Pretty slick, eh? I was proud of it! I drilled three angled holes around the closed end and it is very nice to look at, but it won't go through the existing holes on my tank. Maybe yours has 3/4 fittings installed, in which case this would work fine. However, there is a significant restriction where it is swaged down into a nipple for the tube, plus it has the risks I mentioned above. So I can't really recommend this. PEX tube and the compression fitting: I think this is the weak spot of this design, no doubt about it. If there was a good way to insert a thin metal sleeve where the crimp occurs, it would be better. The fitting Oliver supplies for the top location has an o-ring under tension, so it should theoretically remain leak free. You still have to drill it out though, they do not supply the correct fitting for a pass-through. For my Beta test pipe I used a 3/4 inch Forstner wood bit. I pushed a piece of tubing all the way into the fitting to protect the o-ring, drilled out the restriction, until I hit the PEX tube, then pushed the tube all the way through, de-burred the end, and pulled it back out. It's really easy if you have the bit. It takes about five minutes. I think my setup is as good as it gets, using the two factory holes. I think a 3/4 or 1 inch spin welded fitting on the flat upper surface would be better if you can get it done. I will keep an eye on mine as I tow, and if it doesn't work out I can easily put it back the way it was. Did that cover all your concerns? As a final comment, if I am ever back in TN (doubtful) I will have Oliver add a top fitting and plug it. Even if my setup hasn't leaked by then, it might in the future and then I would re-route the suction line through the new top opening and return the rest of the plumbing to the original configuration. But I would probably just plug the bottom hole and rely on only the top siphon for draining. John Davies Spokane WA
 1 point
 -
Actually, in our area, most homes have an accumulator tank. It might even be code now. At Lowe's, they're located in the water tank area,, and I'd have to look up the name, but they're called something like an expansion tank. Designed to eliminate said issue. At home, at, least. Never had that issue in our older 2008, but we don't have the same tank fill/drain issues, either. Sherry1 point
-
This doesn't sound right, your water heater should not be heating to the point that it pops the pressure relief valve. We had one of these in our first Oliver Elite. I couldn’t tell that it made much difference in decreasing the run time of the pump. I still have it with all the hoses and fittings in a box somewhere. If you install one, you need to have EASY access to the air fitting so that you can fill and check the pressure without jumping thru hoops.1 point
-
Doubtful, since Oliver buys these tanks with the fittings molded in.1 point
-
All I've done is blow out the lines, admittedly pretty extensively, and I don't use antifreeze (yuck). Two New England winters, not a problem yet, knock on wood.. Never realized the fresh tank didn't fully drain, and no problem, I agree with the space to expand being adequate.1 point
-
So if there was a small amount of water in the tank, say an inch or so and it froze solid, would that really hurt anything? There is plenty of room for expansion. I just wonder about this as we use large plastic tanks (250 gallon) for watering trees and there is always some water in them through the Winter. It does freeze here, though not probably as hard or for as long as other parts of the country, and the tanks are fine come Spring. I just hate having to put AF in the tank the way it is currently designed. It's just too hard, if even possible to get a complete drain and flush. I know they say it's non toxic but, well, I prefer not to use it in that location. Traps yes, tank no. The rest of the water lines I carefully and thoroughly blow out with compressed air. Dave1 point
-
Sherry, If I've ever known a "Tinkerbell" its you!1 point
-
The low oil cut off switches in the Honda's was a problem back in the day also, somewhere along the line they changed the switch these days from what I've read. Basically, on the older models you need to run a higher viscosity oil and Honda recommends 10/30, which works fine. But if you try running a lighter oil like 5/30 in these older models, after the oil is warm, it gets thrown around more inside and the low oil sensor shuts the motor down even when it looks like you have plenty of oil in there. What I have done after switching to running 10/30 Mobile 1 Synthetic in all of my motors is I add a little extra in the Honda 2000i also, because if you're running the motor just a little off level, the low oil sensor can shut it down again... So when filling it with oil, block it back a few degrees, top it off, and put the dip stick back in and tighten it down normally, then when checking the oil, remember that you over filled it a touch and tilt it back before removing the dipstick and checking the oil. Having plenty of the right oil in the motor will keep it running really well. Some people think that running a lighter oil will give you more horse power, but with Synthetic oils, this is where the shutting down problem starts, they switch to a 5/30 Synthetic and the problems start because of the reasons listed above. My simple fix for years now is to run the Mobile 1 for the most horse power because Synthetic will add a few percent more over regular, plus I tip it back a touch and over fill the reservoir just a touch, keeping the low oil sensor covered at all times. I realize that to some, this will sound like bs, but there have been many discussions on this over the years here on the net and it's a well known, old school problem that is easily fixed. It use to be that the old 5hp Honda's would only run on SAE30 and not at all on 10/30 without the shut down problem occurring back in the day... Another thing, is running only Premium 92+ Octane gasoline in the generator, this is what I run most of the time, but I have run 87 with not much of a noticable difference. Try them both and see what you think, at higher elevations the 92 Octane makes a big difference in the sound of the motor. If it sounds like it's knocking some, then only run 92+ or add some Octane boost if it's knocking above 6000' elevation. If you're having problems and you're running 5/20 or something lower then 10/30 oil in it, then change out the oil first along with running a good quality 92+ Octane gasoline and see if the problem disappears. Reed1 point
-
I've pumped from the bed of the truck, 30' away with no problem with the onboard pump with 30 gallons of water parked at the front of the trailer. I put a brass hose Y at the water inlet hose connection on the back of the trailer, opened both valves, then started a siphon from the back of the truck. It took a few seconds for the water to get to the Y and start coming out, but then I closed the top valve on the Y that I was using to prime the line with water and get the air out, then went inside and turned on the pump and it worked fine pulling all of the water from the tanks, thru the 30' of hose and filling the onboard tank. I was thinking bladder because I want to be able to roll it up and store it when it's not needed, leaving more room for gear, but the RV tank under the front tonneau cover mount is a great idea also because I could just fill it and take it from the beginning... Thanks everyone :) you have my wheels spinning now :) Reed1 point
-
Upinor PEX in our home bends once, easily. You can even use a heat gun to seal a leak.. one time. Ditto on bends. A second run with a heat gun was not recommended, at least with our type of PEX. Great thinking and invention, John. Thanks. Let us know how it works for you.1 point
-
On our way home to Florida after our Ollie factory tour, Duke & I stopped by the Lake Guntersville State Park. All I can say is that this is the nicest State Park I have ever visited! We hope to attend the May Rally & meet everyone!1 point
-
</span> Actually, I was going to do basically the same thing but with copper until Raspy came over with all of the parts in hand for the 1" spin weld after doing his :) I had never seen pex permanently bent with heat like you did until today. Once again, Nice Job! Reed1 point
-
Reed, I was concerned that a rigid dip tube would be hard to work into the opening since the maneuvering room in the compartment is a little limited. A plastic tube has enough flex that I did not envision any trouble. It indeed went right in, once it had the correct sized hole. If the side tank fitting were 3/4 MPT instead of 1/2 MPT, then maybe a copper pipe would go in there. I know you did this kind of stuff for a living, I would greatly appreciate any comments and tips. John Davies Spokane WA1 point
-
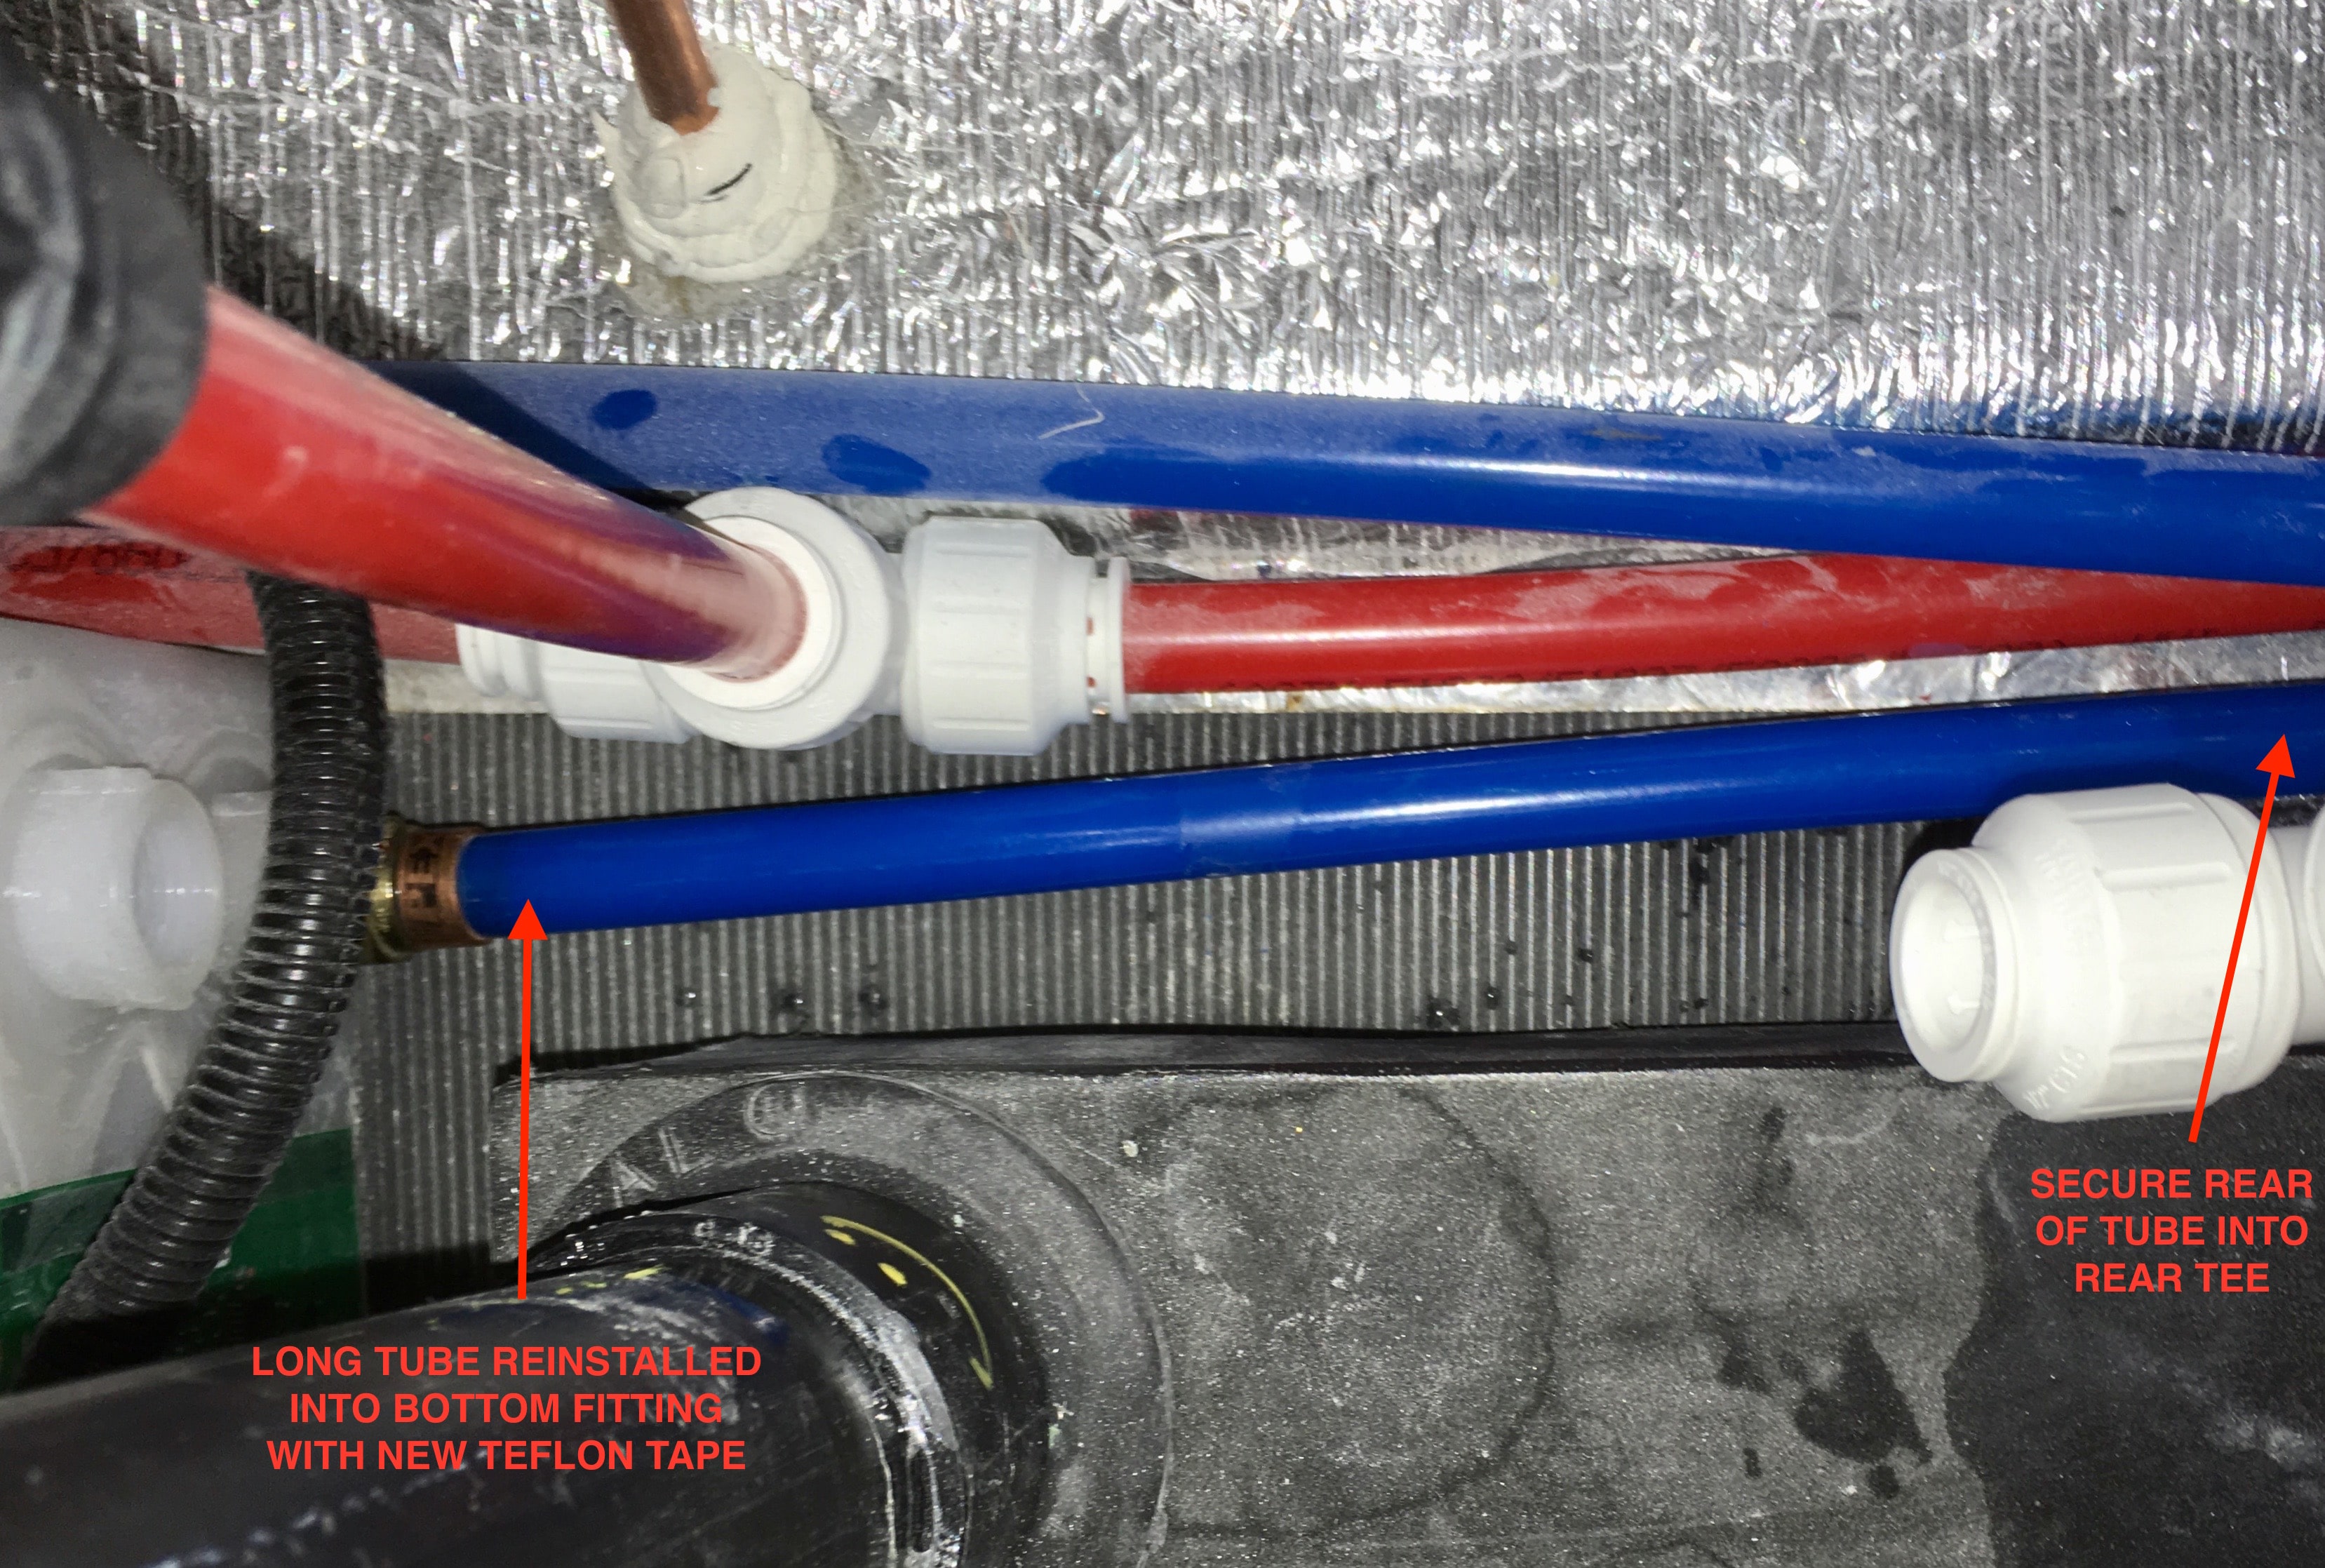
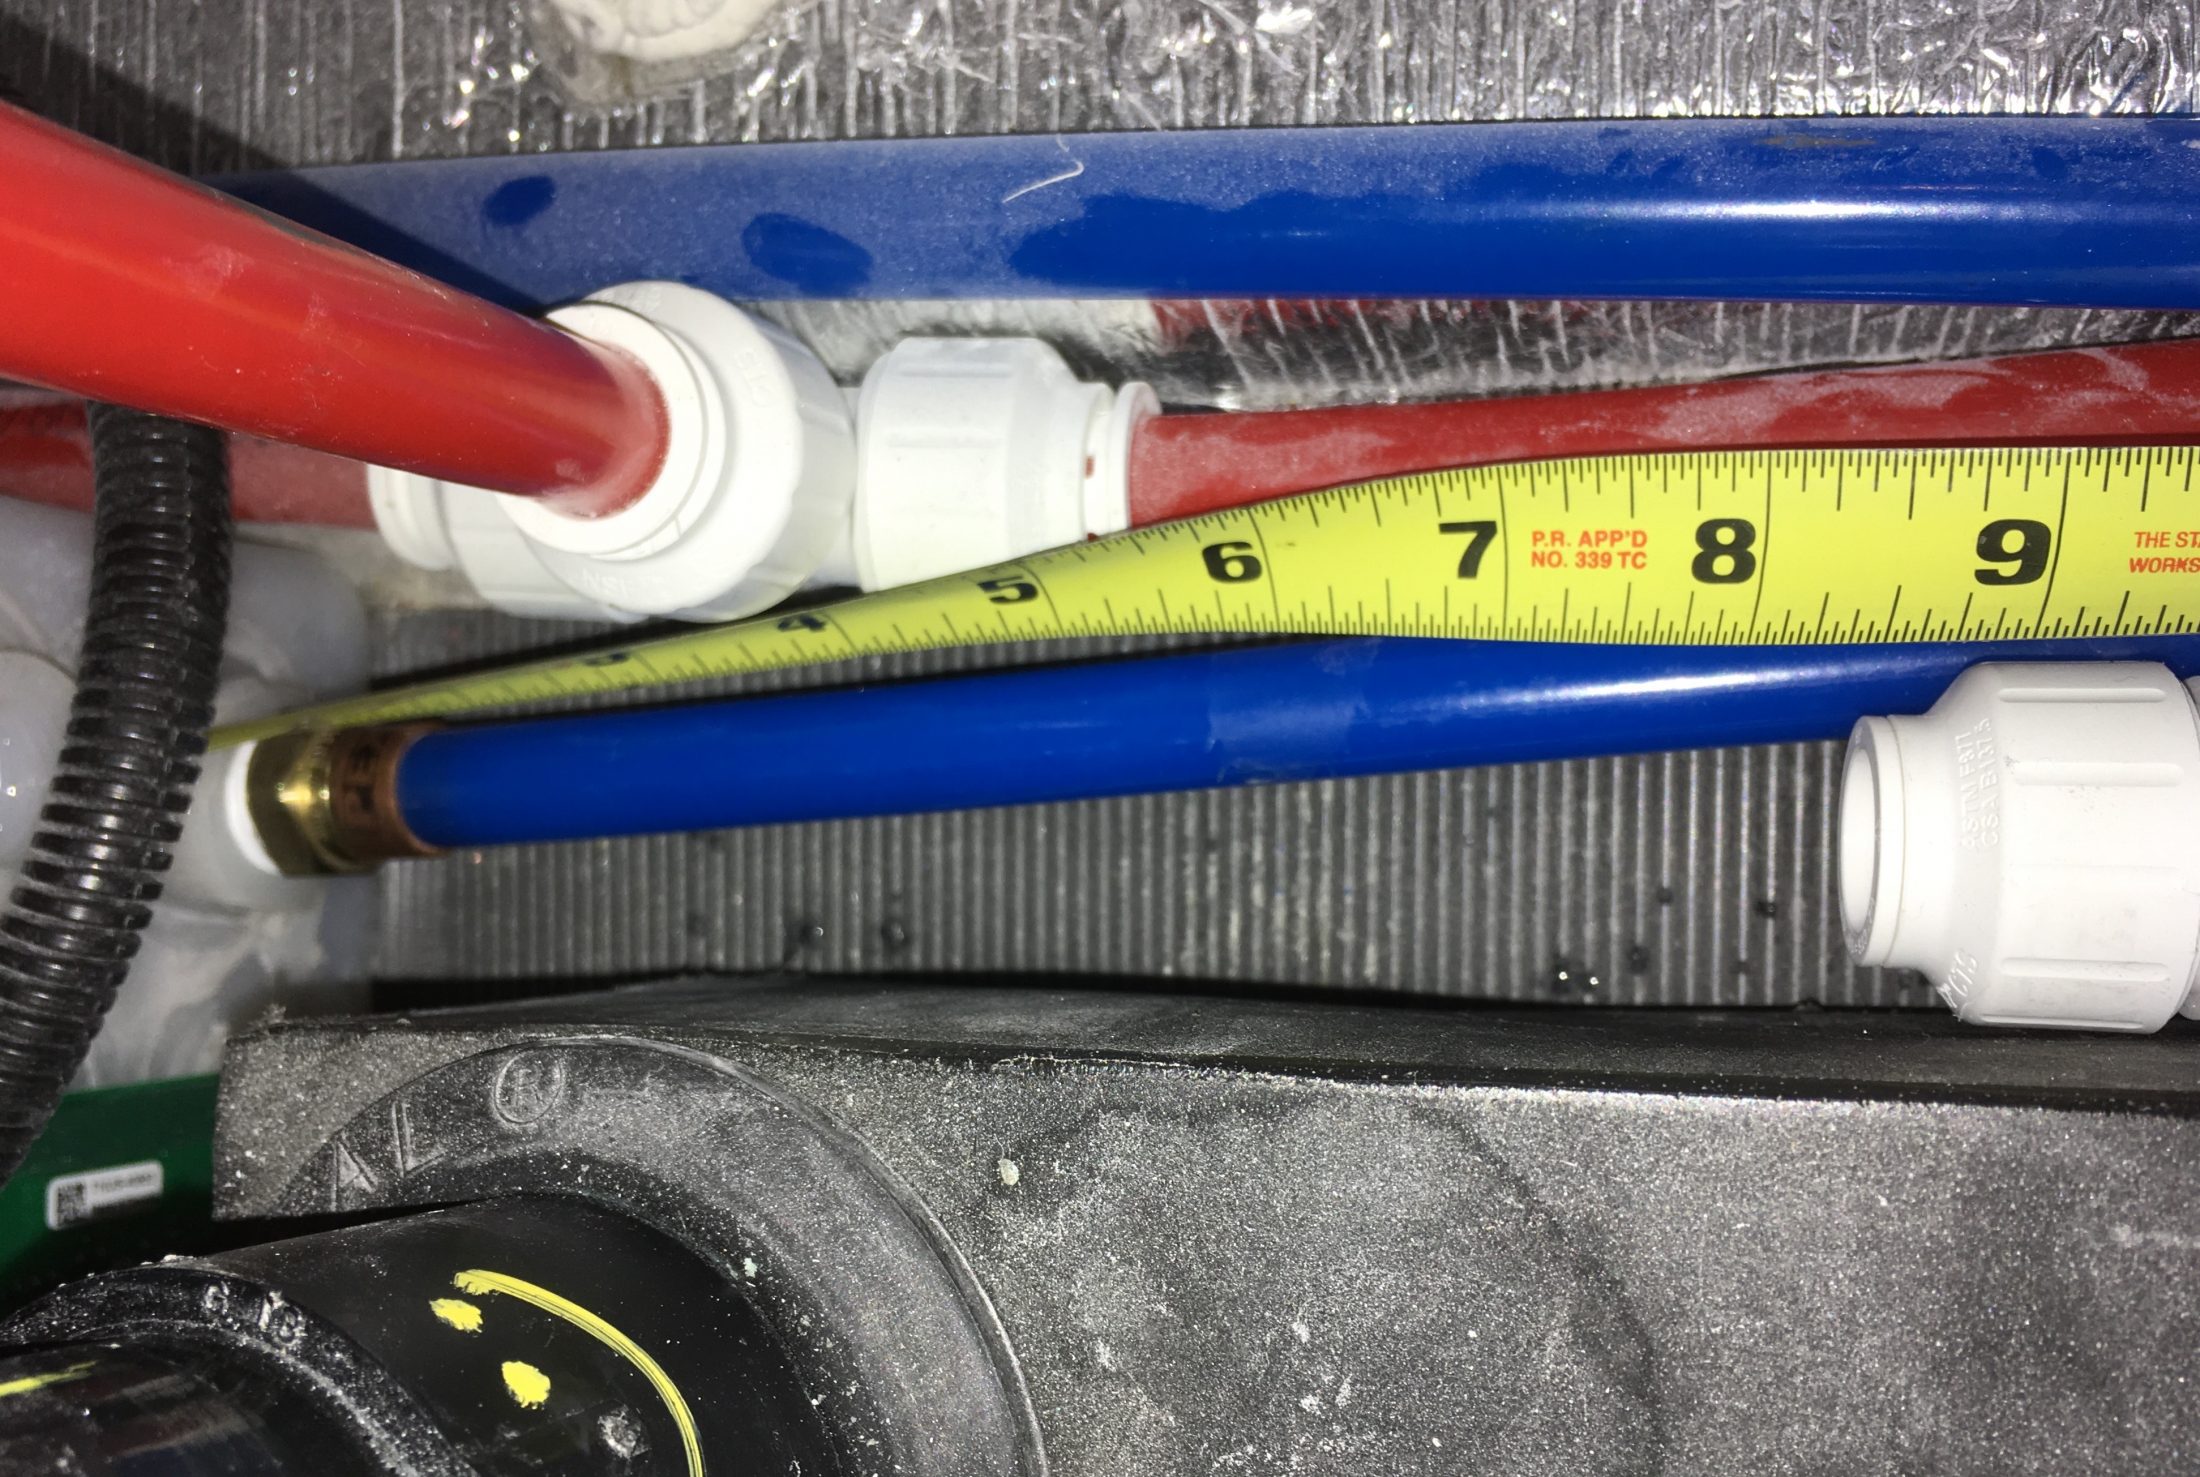
Reinstalling the factory plumbing. Install thread sealer on the CLEAN pipe fitting of the long line and install into the bottom port and also the rear tee. This line will lie nicely on the floor. Raspy recommends in the second post to use Rectorseal #5 for a better seal. The factory uses tape, and I had no leaks using tape. Insert the long elbow line into the rear tee and the appropriate Tank Fill fitting on the manifold, as shown. Secure the tee collars down below since they will be harder to access afterwards. View of the lower hose installed, showing that you will need about 9.5 inches of extension to properly seat the new tube into its tee fitting, past the o-ring; make sure you have MORE than this length left when you make the tube. You will trim to length after installing it. Test fit the new tube into the upper port. I was expecting it to slip right in, but the hole in the side of the tank was drilled undersized (1/2 inch). This is poor practice since the barrier will trap water and possibly cause freeze damage. There should be a small weep hole drilled at the very bottom of any vertical opening to keep it water free in winter storage. The guy who welded these fittings on could have done that in about a minute. Note, this is pretty hard to see without a good mirror, I just stuck my cell phone down low and looked at the pics. I had to open up the hole to allow the 5/8 inch OD tube to go through. I used a coarse, large rat-tail file (with HANDLE so I could not lose it inside the tank!) while sucking up shavings with a shop vac. Any residual shavings will collect in the filter for removal. Be very careful if you have to file, to prevent damage to the pipe threads or it will leak. It's not pretty, I guess you could use a straight soldering iron to melt the edges.... but the fraying doesn't really matter. I marked the approximate location of the old Water Line, where the pump will suck air and cavitate, and also the location of the new line. This difference represents a lot of extra usable water. Make SURE this is very clean before installing the new tube. I used a blast of compressed air. More to come. John Davies Spokane WA
1 point
-
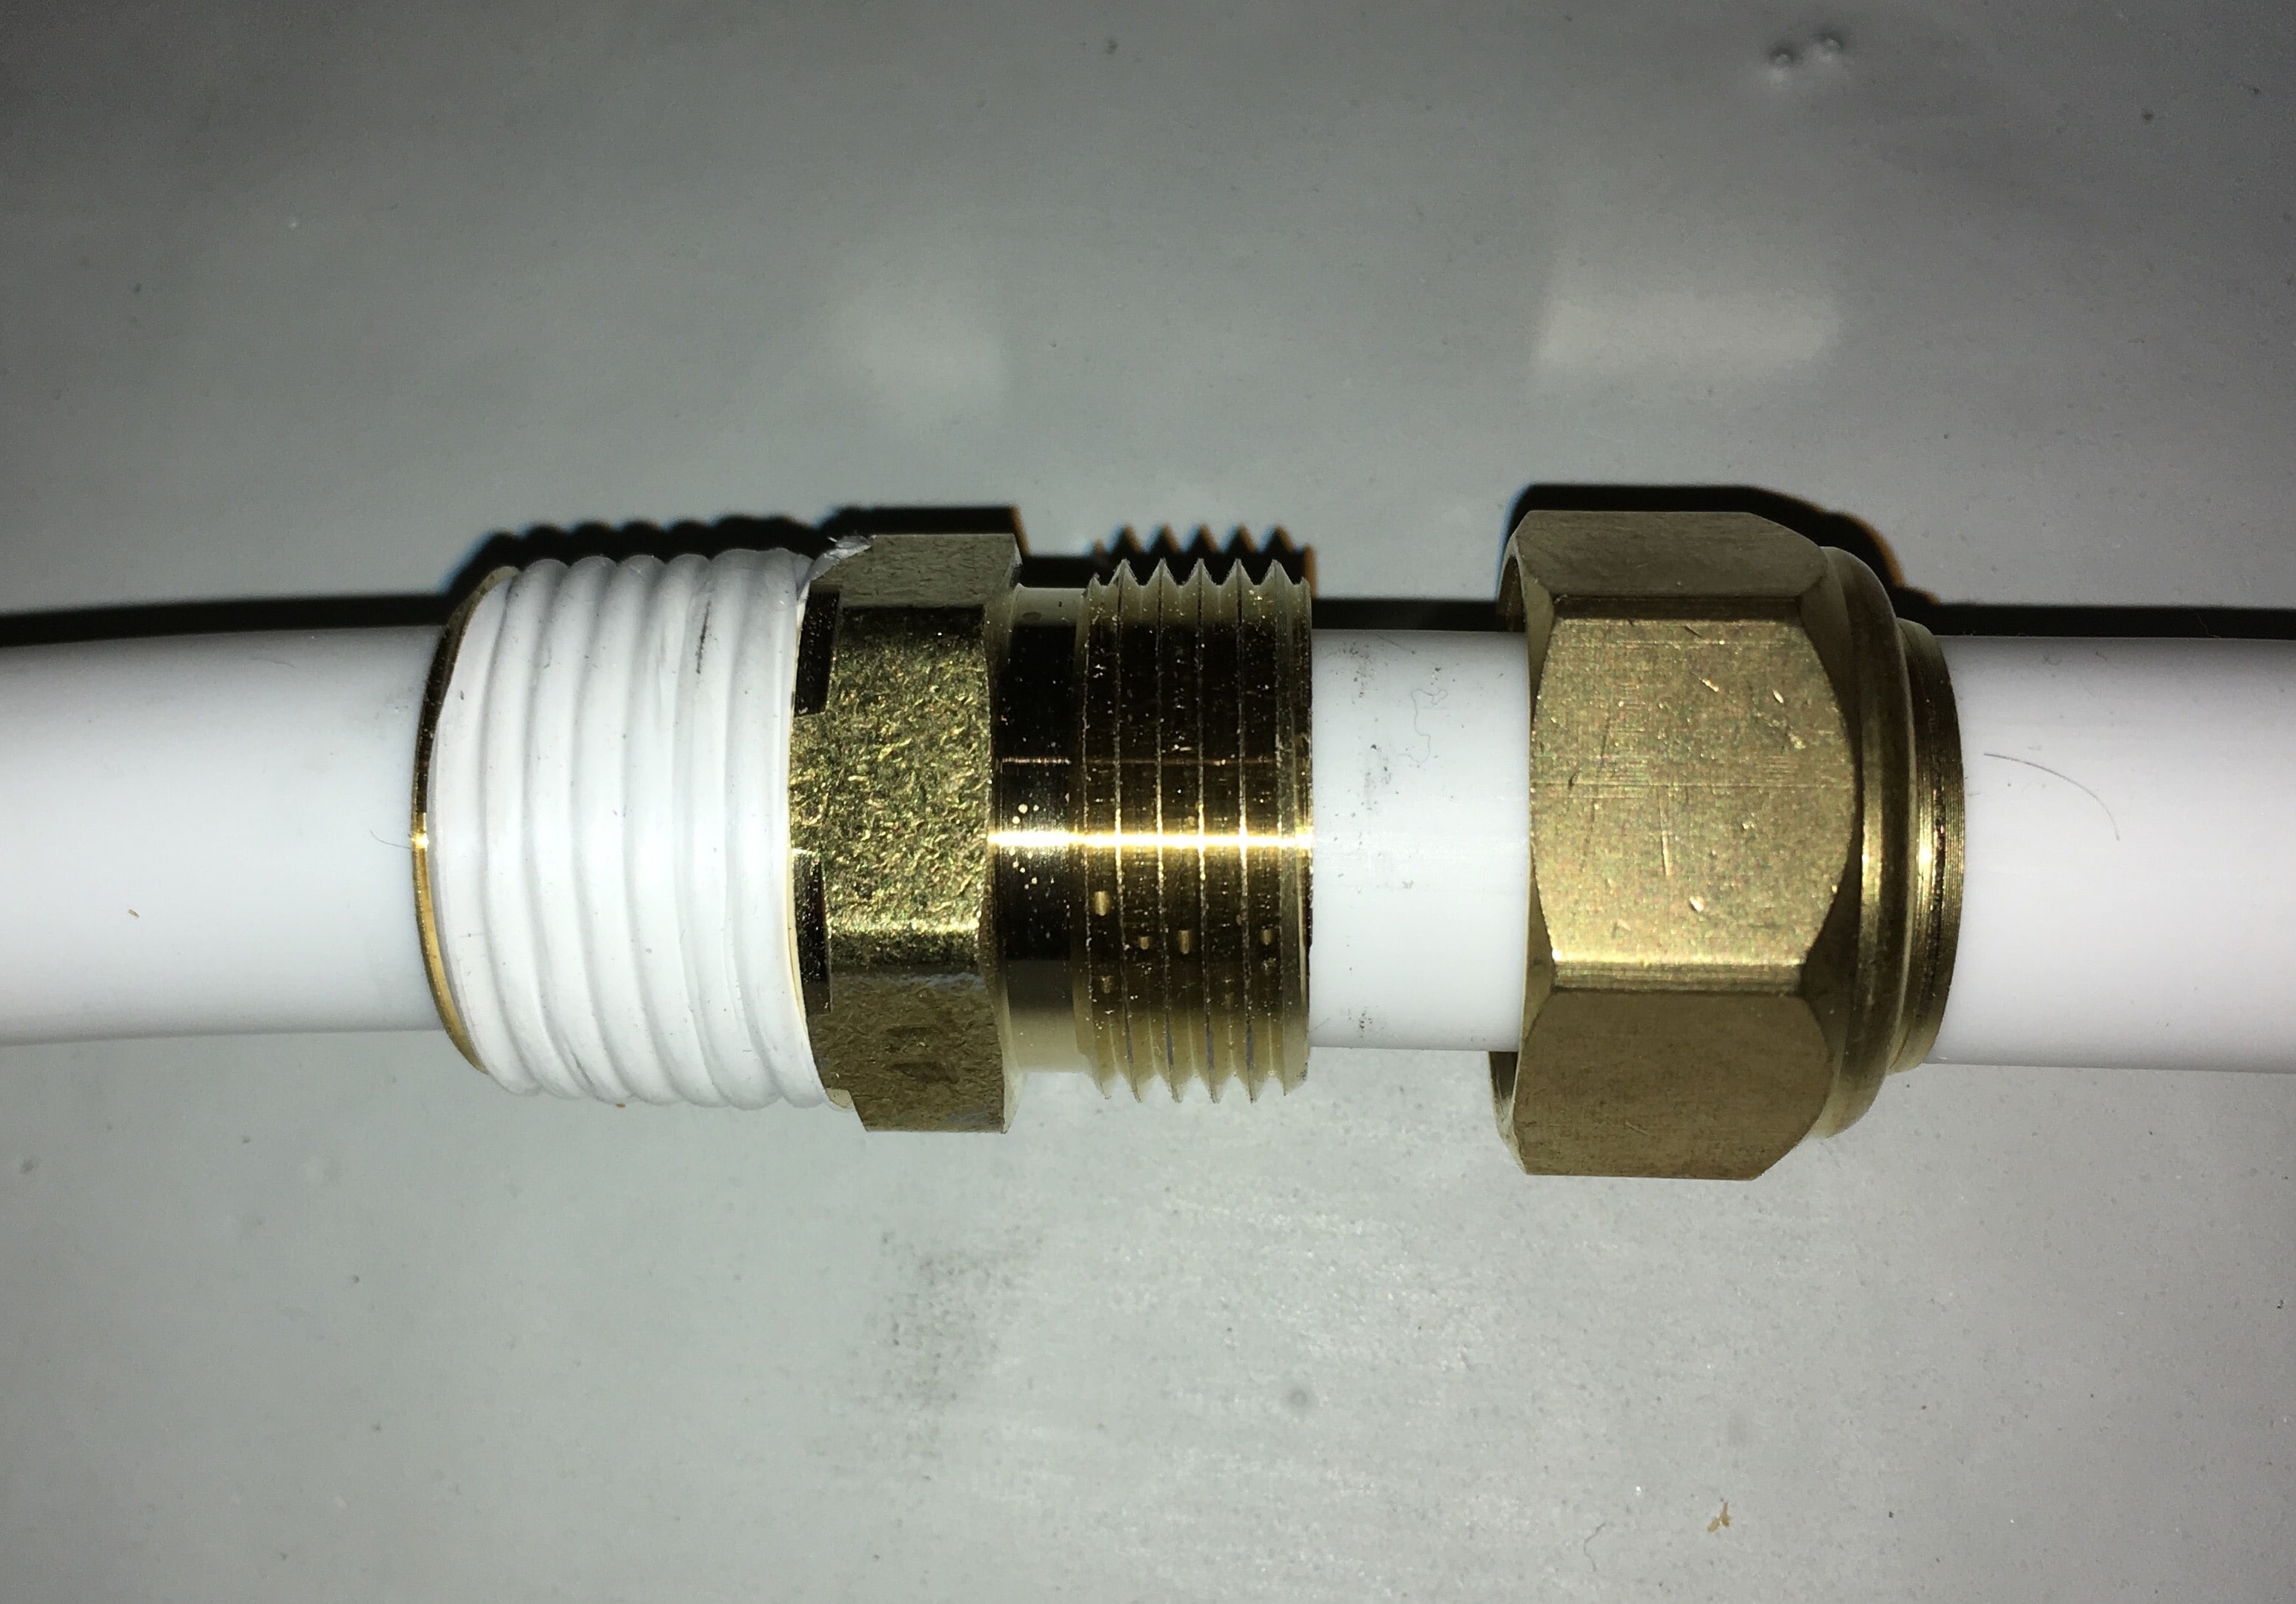
Compression fitting. There is a "pass through" version available, but it is not commonly found in box stores. I used a regular version with internal stop, and I removed that section. The threaded port is 1/2 inch FMP, so we need a fitting with a MPT and also a 5/8 inch opening (the PEX hose is 5/8", as is a copper pipe). I drilled out the passage way using a regular 5/8 inch bit, followed by a 5/8 inch Forstner wood bit to clean up any rough gouges. You can do this with a file but be careful not to damage the cone seat on the left side, or it will leak. Ideally a PEX tube should have a metal insert inside to help support it when you tighten the nut. This is not possible in this case. More to come. John Davies Spokane WA
1 point
-
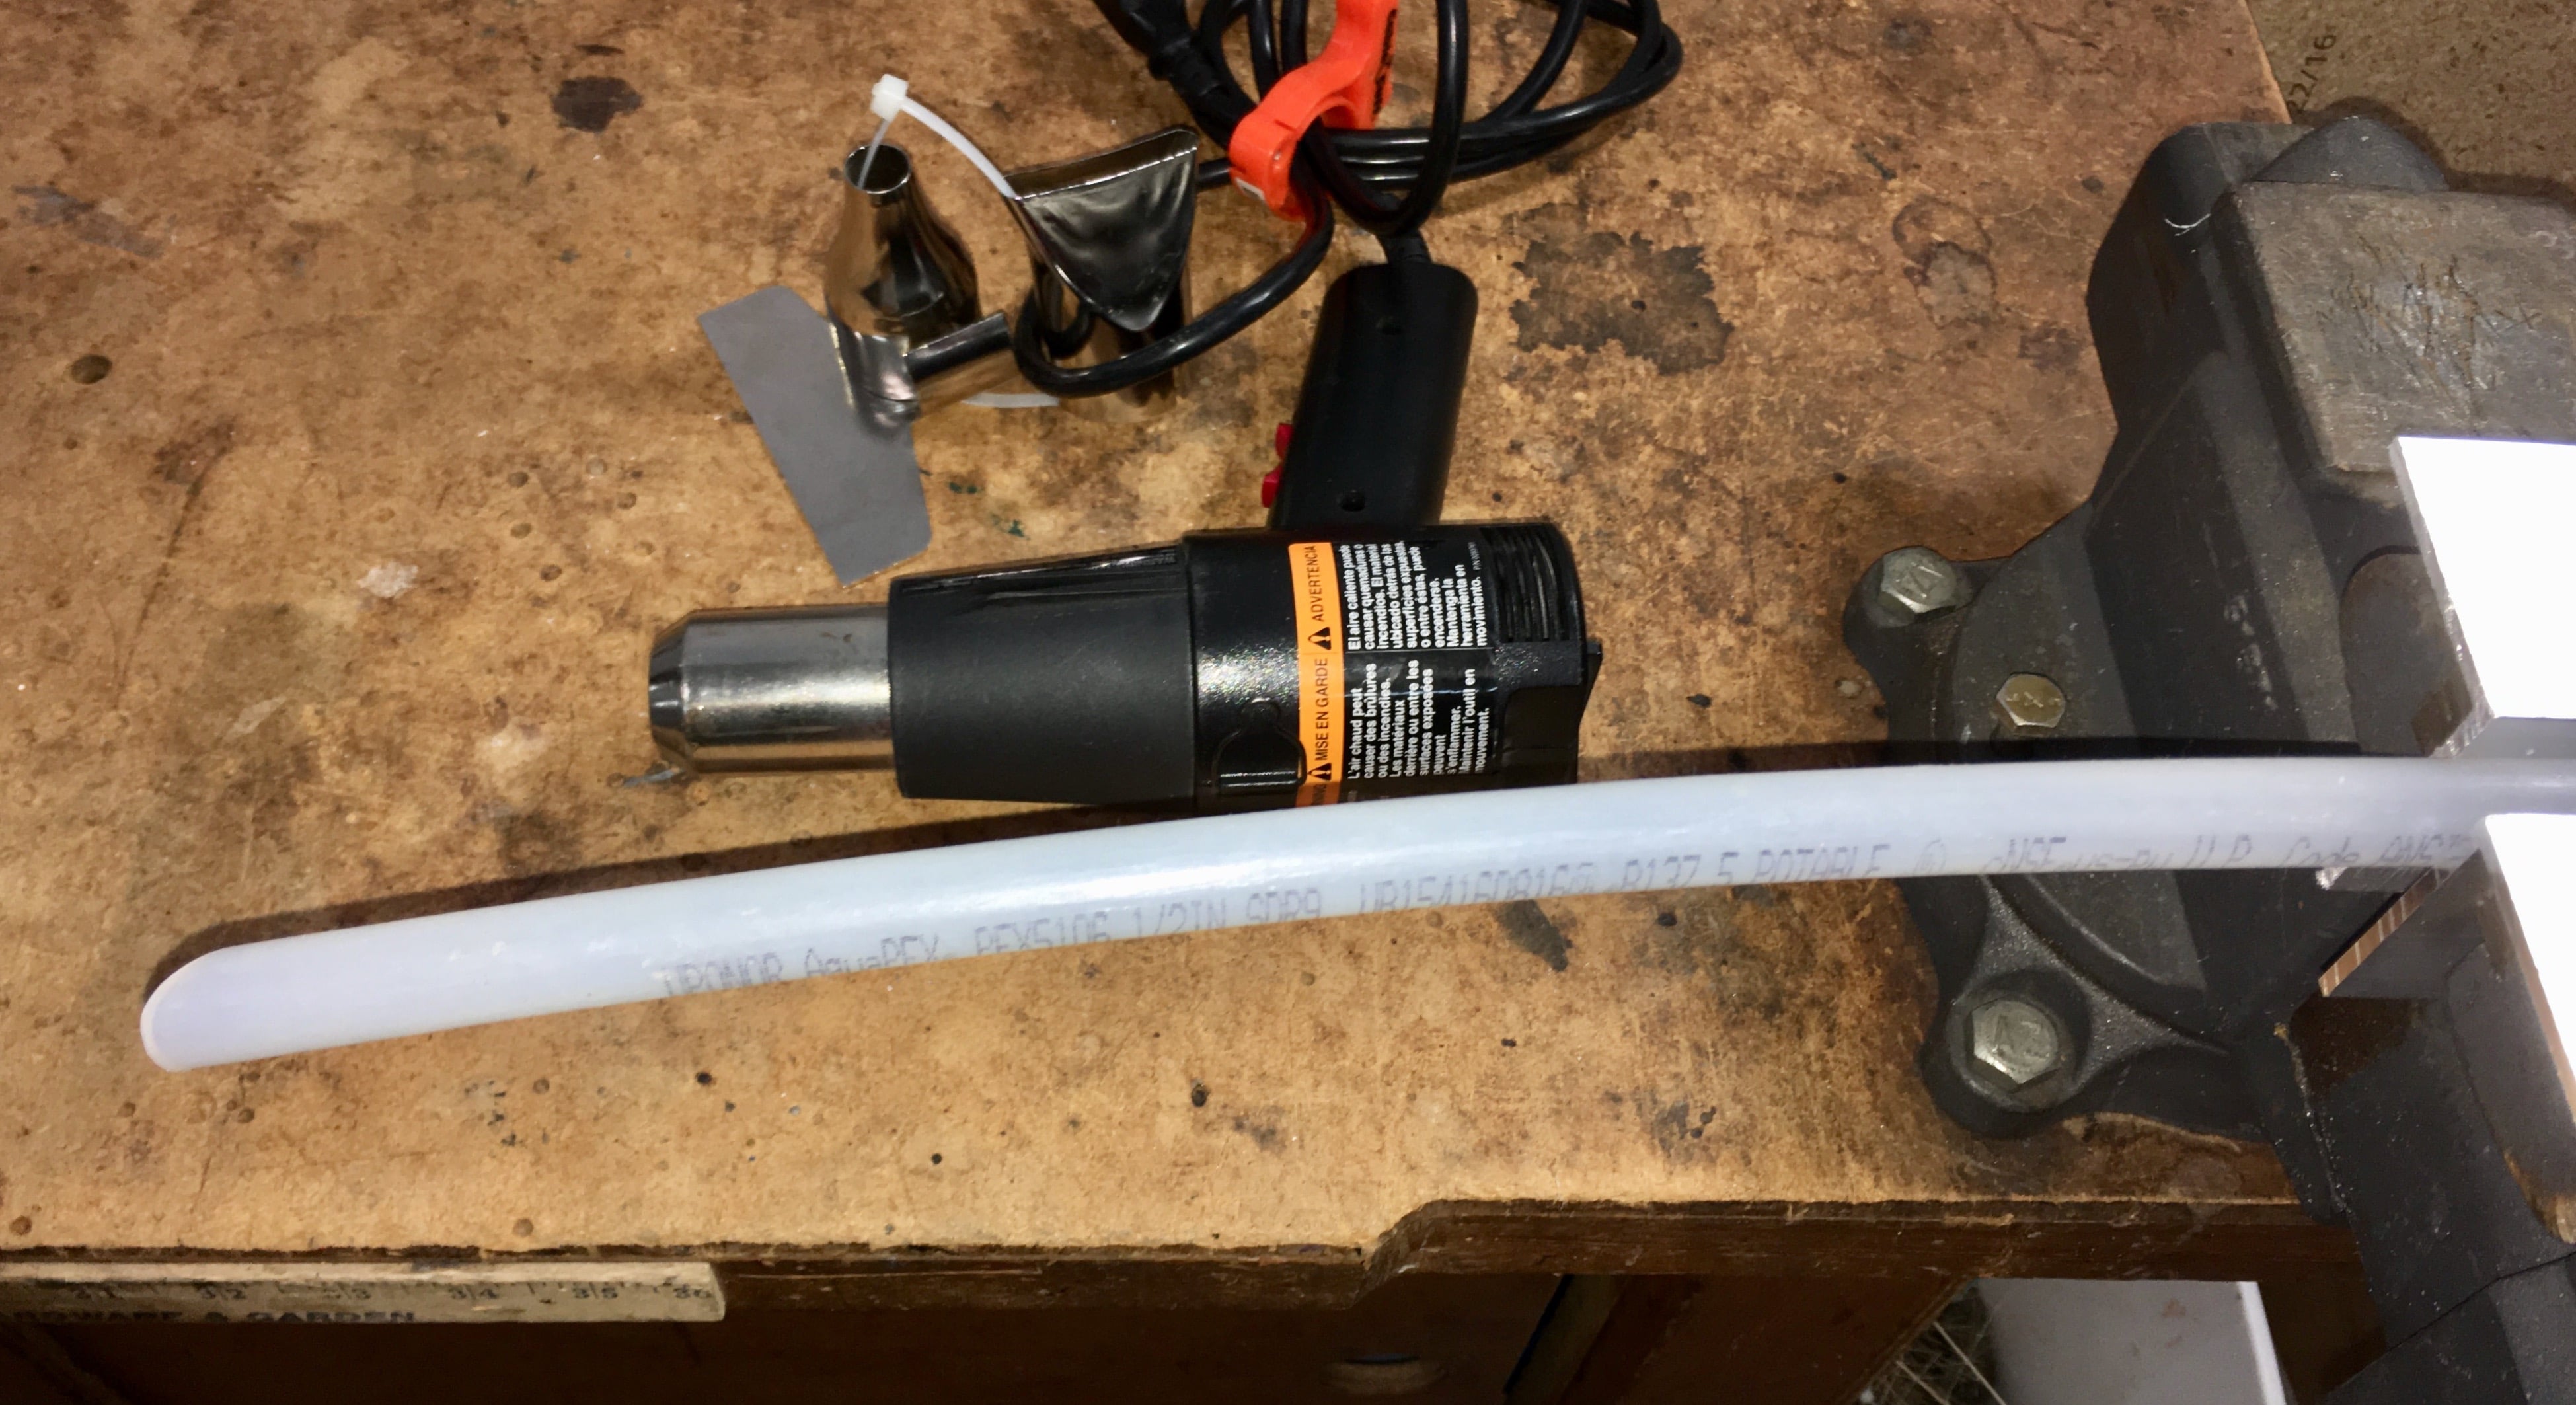
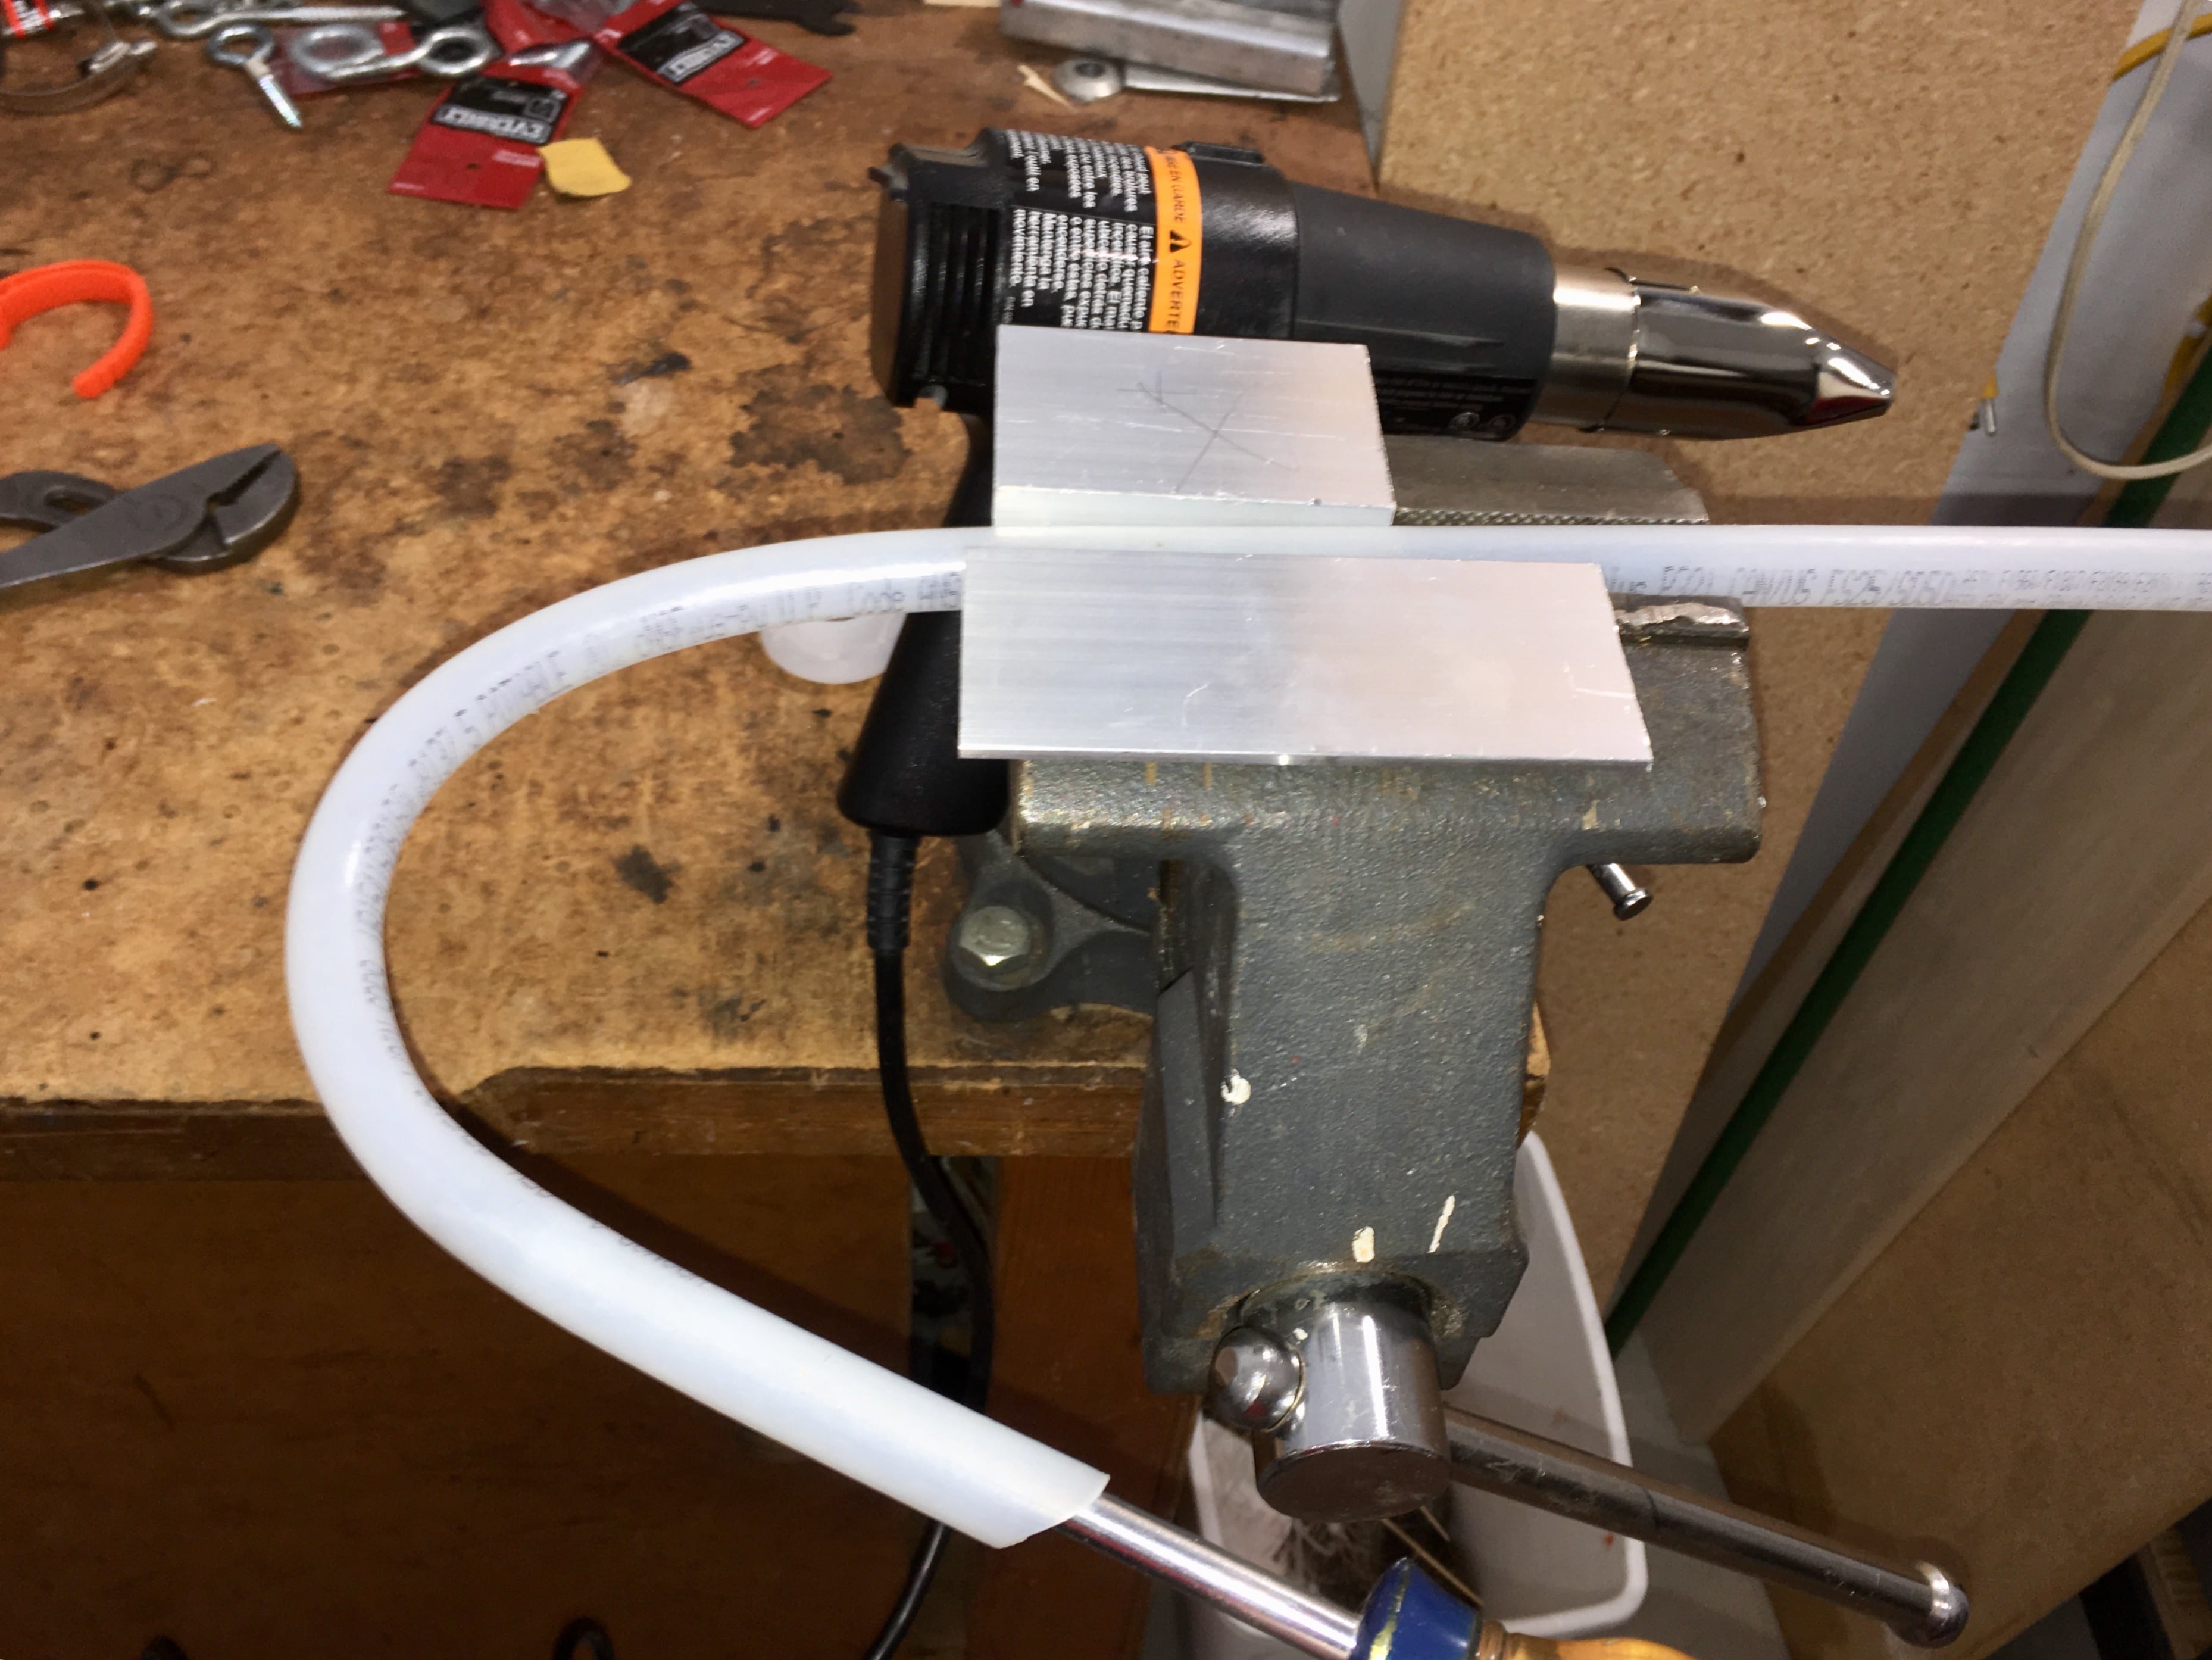
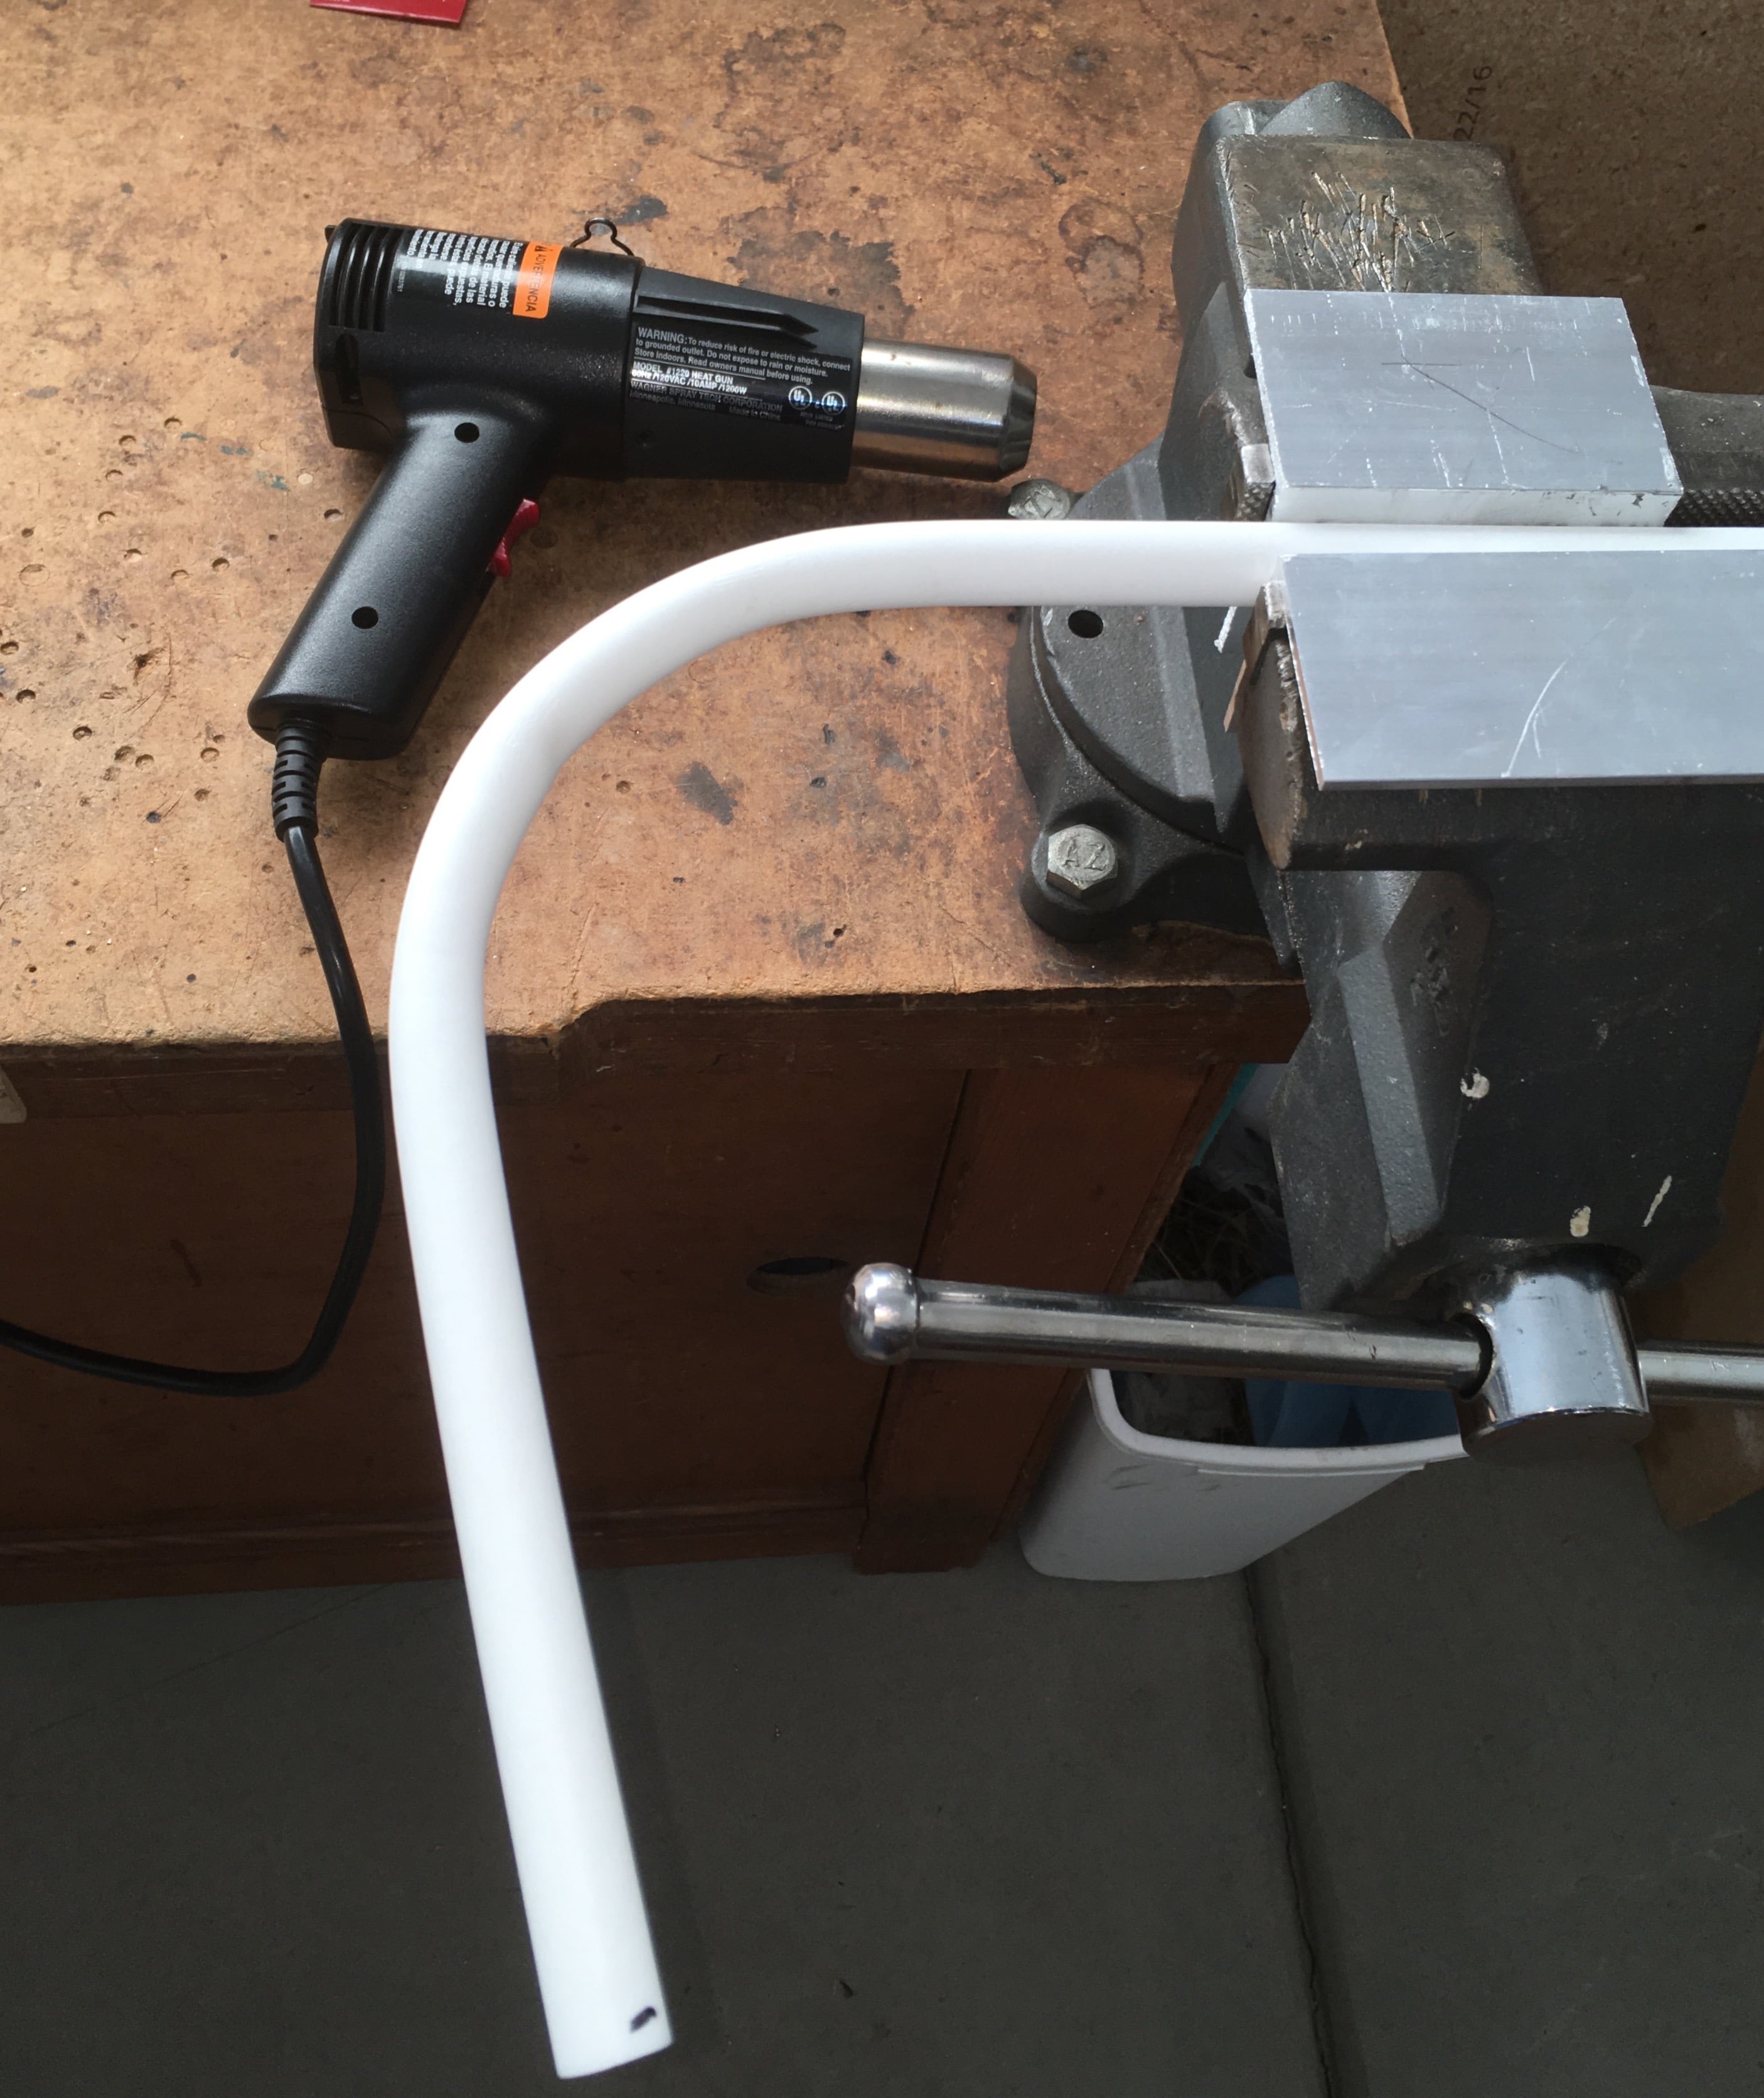
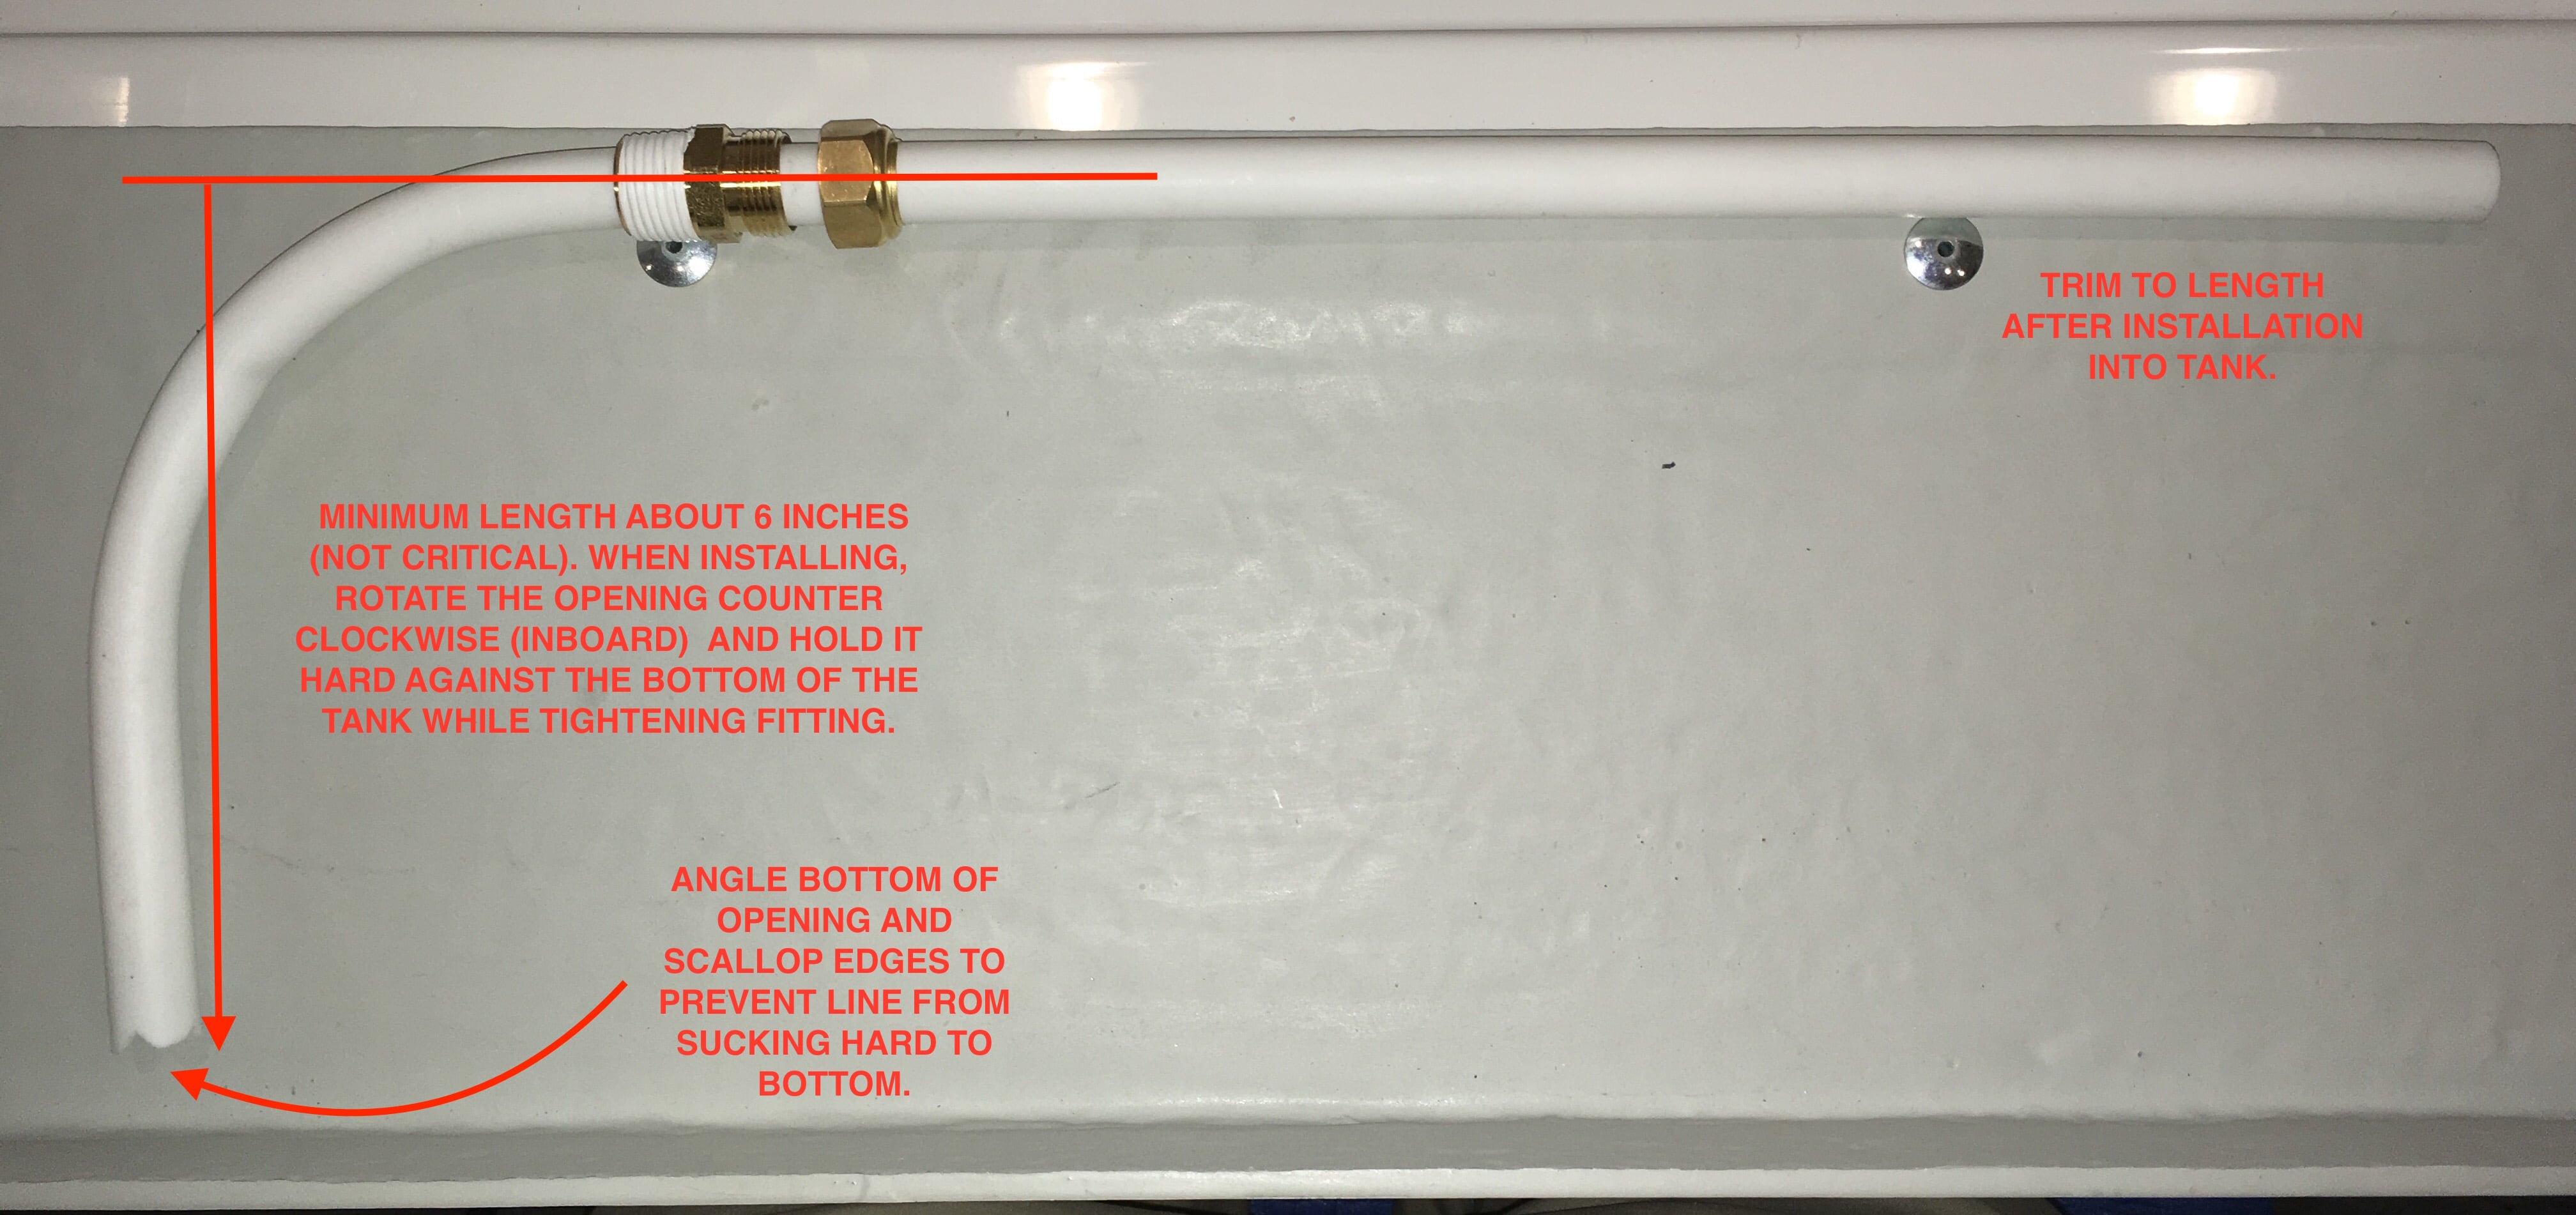
!!! NOTE: THIS MOD WORKS WELL ON MY ELITE II, HULL NUMBER 218. EARLIER HULLS THAT DO NOT USE QUICK RELEASE PLUMBING FITTINGS WILL BE MORE DIFFICULT. Even if your trailer has these newer fittings, your configuration may be slightly different which will require some re-design. As always, do this at your own risk. It will not void your factory warranty, but Oliver certainly will not help you with stuff that your altered from the factory configuration, without charging you for their labor. _____________________________________________ Here's the full installation, with pics. I will answer specific questions after I have finished, to avoid repetition and confusion.... I noticed that the two lines attached to the water tank are parallel and about three inches apart, the same spacing as the holes in the tank. After a lot of pondering, I decided to swap the lines so that: The lower Pump Suction/ Gravity Drain port becomes the Tank Fill port. The upper Tank Fill port becomes the Pump Suction/ Siphon Drain port. I think that this is an elegant solution since you can easily reposition the lines top to bottom, and also easily swap the two existing elbow sections that go vertically to the pump manifold. So the only fabrication involves making a new curved dip tube to go into the top hole, and a few unexpected but easily fixed problems associated with doing that. The system is not really changed except that the water now flows into the tank at the bottom, and the water is sucked off the bottom of the tank through the top port, and can also gravity siphon to drain it through the same line. And it is all easily (but not quickly) reversible to put the system back to "factory configuration". I would really rather have a new spin welded fitting on top, but I can always do that later if I decide it is necessary. I never understood why there are fittings on the side of the tank anyway. They are not needed and they just develop leaks. ALL functions of a fresh water tank system can be done through the top of the tank, where leakage risk is very minor. View of the original system, with the heat duct lying in the way. The heat duct is pulled up and to the outside and secured with long nylon cable ties. Access is pretty easy with it held there. The white arrows show direction of water flow. We will be REVERSING those. First and most important, manufacture the curved dip tube. Once that is made correctly, you can start disassembling lines and fittings. Clamp the 1/2 inch PEX hose in a vise, leave lots of its length extended to work with. You need a good hot heat gun, not a hair dryer, to get the plastic warmed up enough to soften and reform. Once cooled it will maintain its shape. Stick a big screwdriver in the end and carefully heat the curve over a span of about 6 inches, moving the heat gun back and forth and around so that you do not melt the plastic. If it starts to turn gray you are over heating. Apply pressure to force the bend, you will feel it start to move. Do this SLOWLY and always keep pressure on the screwdriver. The inside will try to kink as the outside stretches. That is OK unless it is major collapse, in which case you need to try on a new section of tubing. You will have to drastically over-bend the curve since it will spring back about 45 degrees when your are done. The hose will try to flatten. A little is OK, but you can squeeze it with pliers to force it back to a round shape. Keep heating the plastic! When you are happy with the curve, remove the heat and hold the screwdriver in place for at least a minute for the plastic to cool. release tension on the tool and the pipe will spring back to about 90 degrees, a little more is better than less. It took me two tries to get this right. I wanted about a 100 degree bend. Anything more and it will be hard to get into the tank opening. Less will move the pickup opening away from the rear wall of the tank, which is the most desirable spot. This is the finished shape. Elbow length is not critical, it needs to be at least five or six inches from the unmolested section. I cut the area that will lie near the bottom of the tank at a steep angle, to lower the top of the hole (which is the first place that will suck air). It is important to keep the angle steep, say no less than 60 degrees, since you do not want the cut to be perfectly parallel with the bottom of the tank, or it will suck down and block the opening when you turn on the pump. You want to scavenge as much water from down low as possible. I added scallops - vee shaped cuts - at a few places on the end to increase the opening size and also make it impossible for the tube to suck down hard against the bottom. They are probably not needed, but they will not hurt. The length of the straight section is not critical, leave it long since it will be trimmed after installation into the tank. More to come. John Davies Spokane WA
1 point
-
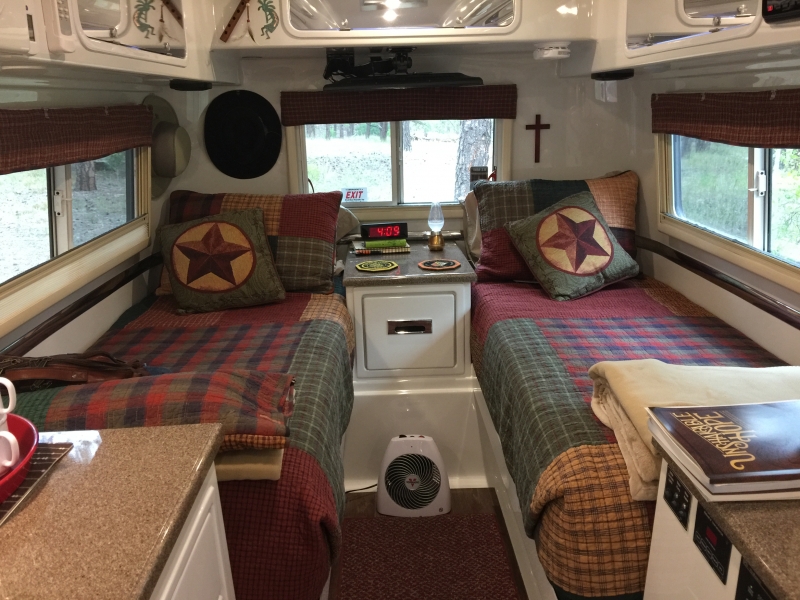
Don, if we’ve got electrical hookups I’d rather use electricity than my propane. Our little Vornado is quieter than the furnace and keeps a more consistent temperature in the trailer. It doesn’t take up much floor space and is not in the traffic pattern in front of the nightstand. Mike1 point
-
We use a small Vornado. It has three settings, 750W, 1150W and 1500W. We almost always have it on the lowest. It’s quiet and doesn’t blow hot air. It blows warm air and keeps us plenty warm. We had a few nights in the low 20s last year and it kept up on the medium setting. It’s here: https://www.amazon.com/gp/product/B00W1Q5GWI/ref=oh_aui_detailpage_o04_s02?ie=UTF8&psc=1 We leave it in front of the night stand, so it doesn’t get in the way. At night the bathroom door is open so the heat blows back keeping the bathroom warm. It’s easy to reach when in bed. In our trailer: Mike
1 point
-
Check out the Delonghi oil filled radiator. They seem to be a safer option for consistent steady heat. We use one in our sunroom during cold snaps and it does a great job.1 point
-
Your inside AC outlets are protected by a 15 amp circuit breaker in the dinette fuse panel. 15 amps is about 1800 watts so you want to keep a constant load like a heater well below that.... 1500 gives you a good safety margin. Unlike powerful motors (like the one in your air conditioner) there is no huge surge of current when an electric heater starts up, though the fan will make a very small spike when in turns on. You won’t trip a breaker unless you overload it, or the device at the other end (or its power cord) shorts out and causes a massive current draw.... If you are relying on a regular 15 amp house circuit to power up the trailer, not just run a heater, you need to figure other constant loads like the converter, to make sure you do not get too much going on at once. A 30 amp/ 120 volt rv connection for your house might be a good thing to add to your Honey Do list. Then you can run your air conditioning in summer. ... http://www.myrv.us/Imgs/PDF/30-amp%20Service.pdf John Davies Spokane WA1 point
-
Did you open the drain valve? If so I guess your tank was indeed empty. Does your water level gauge read anything while the front is raisd? The level sensor is in the very back of the tank and will register any remaining water. John Davies Spokane WA1 point
-
I believe that the camping discounted rate is $20/night plus taxes. Nice review and am looking forward to it. I completed my registration yesterday by using Matt's on-line form and payment system - (see the "2018 Rally"). It really worked great, is simple to do and quick if you have a credit card. If no card then you can always simply send them a check with the appropriate information. Bill1 point














-
Recent Achievements
-



















