Leaderboard


Popular Content
Showing content with the highest reputation on 12/20/2017 in all areas
-
Speaking of Checklists: Here are the checklists that we use when setting up and breaking down camp. Liz takes care of the inside, while I work on the outside. We keep the inside lists on a clipboard in Ollie and the outside lists on a clipboard in Stan (our Tundra). So far--knock on wood--we have avoided major--expensive or dangerous--errors. They are composed in MS Word. Feel free to download and modify. P.S. "Hank" on the checklist is our dog, who is secured with a "seatbelt" in the backseat of our Tundra. Also, we have the Nature's Head composting toilet, so no sewer hose, etc., is mentioned on the lists. --Jeff Breaking-Up-Camp-Checklist-OUTSIDE.docx Breaking-Up-Camp-Checklist-INSIDE.docx Setting-Up-Camp-Checklist-INSIDE.docx Setting-Up-Camp-Checklist-OUTSIDE.docx3 points
-
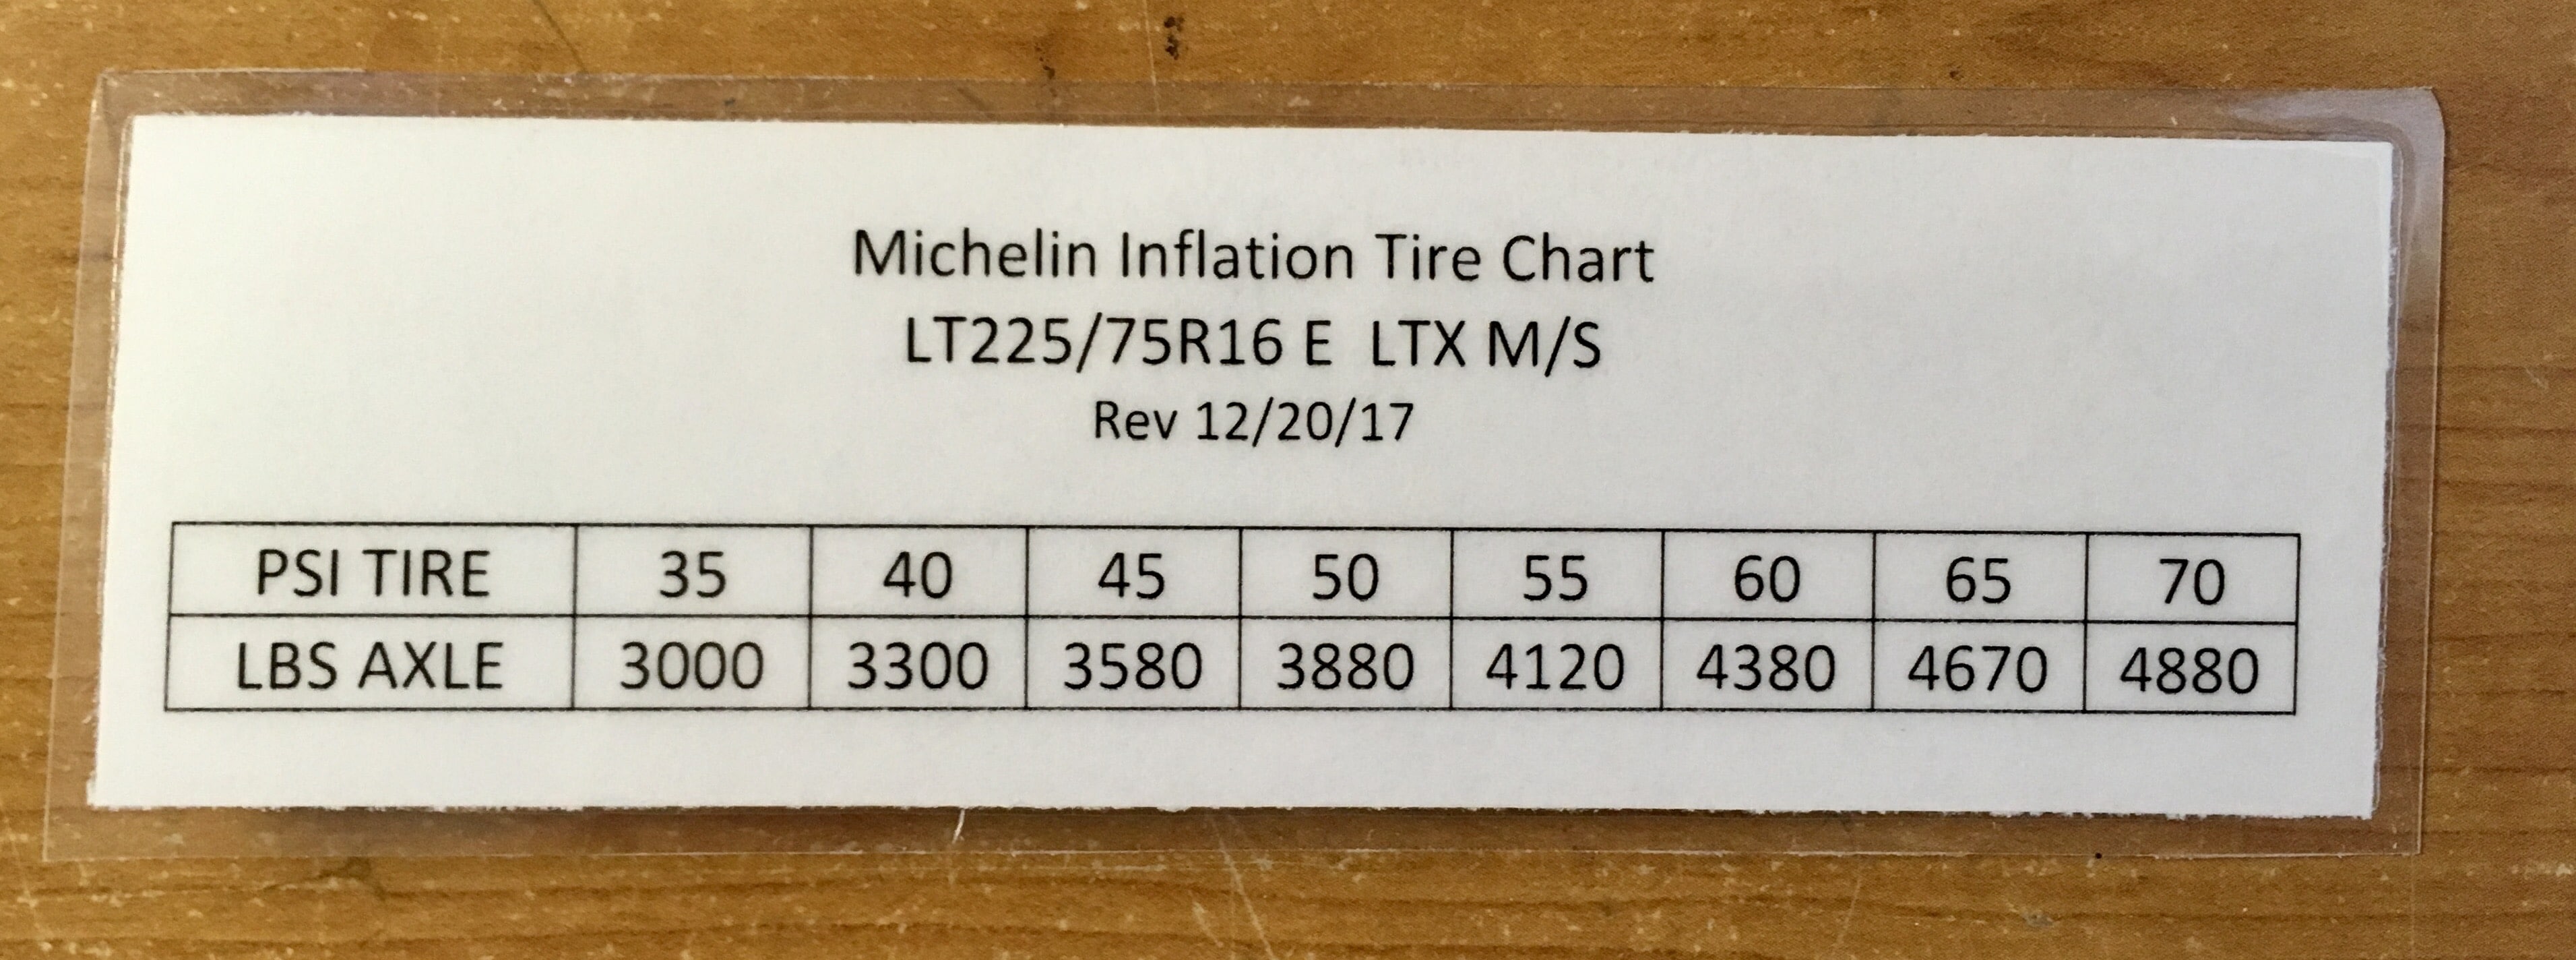
Here is a load/ pressure chart I made using Michelin data. I plan to tape it to the inside of the closet door next to my Towing Checklist. Their info is published as a Flash page and it does not run well (or at all!) on some computers. Attached is a Word Doc that you can print and laminate if you like, or just insert the whole page into your Owners Manual. printed at 100% it gives a 5 inch long placard. Oliver-Michelin-Inflation-Tire-Chart-122017.docx BTW I have suggested to Matt Duncan that this should become a new Tech Bulletin. John Davies Spokane WA
 2 points
 -
My Ollie weighs probably 5,500 lbs. when towing. I run my tires at 60 PSI and I set them there when cold before we leave. This is a good default pressure that will handle the trailer load just fine and keep the tires cool. It still has some flex and is not rock hard like it would be a 80 PSI. It also allows them to build pressure on hot desert highway runs where the asphalt might be at 140 degrees and the air at 100 or more. I can tell the temperature difference in the tires even at 55 PSI. They are warmer. Every fuel or grocery stop, I go around and touch each tire. They are always the same temp, if inflated the same, and they are just slightly above ambient air temperature. On the road, I don't use a gauge, I just touch each one and compare the felt temps. Every time you use a gauge you let some air out and run the risk of the valve leaking. It's not necessary to use a gauge when stopping for fuel, just use temperature. Warmer tires are under more stress and they make the trailer harder to tow. This is why I would never run them at 45 psi, for instance, even if the chart said they could handle the load at that pressure. The chart is more a minimum guide than a definite number that you must follow. And as John mentioned, you have no head room at the lower pressure in the event of a slow leak. Off road, or on secondary gravel roads, it's a different matter. I'm talking about droning down the highway at speed. That is when the higher pressure is a good policy. On back roads, it's a good idea to air down and travel slowly, but you have to factor in the difficulty of airing back up. This applies to the truck too as I like to air it down on rough roads or in the snow. When going into Death Valley I'm on gravel, or worse, for a hundred miles or more and when I come out, I can get back to town with limited speed on paved roads to air back up. I have a compressor, but it's for emergency use as it's not real easy to use. If we are only going five miles on a rough road, I'll just go slow and keep the pressure up. This is what we did at Sun Valley for the Eclipse. Just idled along for a few miles on a rocky road as we climbed to our spot out in the forest, then idled back out. No need to hurry in that situation.2 points
-
Knowledge Base Article for proper Winterization - Depending on your location it may be necessary to properly winterize your unit to ensure that freezing conditions do not damage any part of the on board water systems. First lets discuss what components are susceptible to freeze damage which would result in water leaks and potential costly service repairs. Brass Check Valves - These valves are in-line valves that keep water from spilling back out of the water fill ports. These valves will be located on the Fresh Water Line, City Connection Line and the Black Tank Flush Line. Plastic Check Valve - The Dometic Standard toilet has a plastic check valve located at the rear of the toilet. Water Valves - These valves are used to control the flow of water. You may have 2 or 4 valves located next to the water pump, 1 located on the lower shell floor to drain the fresh tank, and 1 located on the black tank flush port line. P-Traps - These are used in the sink and shower drain plumbing lines. It retains water and traps debris that has drained from the sink and prevents it from forming a clog deep within the plumbing system, and stops sewer gases from passing into the camper. Water Pump & Filter - The water pump filter is used to trap debris and keep it from entering the pump and water line system that is delivered to the faucets. PEX Push Fittings - These fittings are used to connect different runs of pex pipe through out the camper. Pex itself is freeze tolerant but these plastic and/or brass fittings are not. Faucets - The kitchen, bathroom and external shower faucets all maintain water at the faucet when in use and thus present a potential freeze issue if not properly winterized. Water Heaters - All water heaters should be fully drained of all water and the bypass valve must be set to winterization/bypass mode. This allows for RV antifreeze to be utilized in the plumbing system without filling the water heater itself. *Proper winterization method to ensure that all components are protected. Drain all water from the system (All tanks, water heaters) Set bypass valve at water heater for winterization mode. Change valve configuration at water pump for winterization mode. Use water pump to draw RV Antifreeze (potable Safe) into the camper. Turn on the kitchen faucet (Cold Line) and run until antifreeze comes out. Change to the Hot line and run until antifreeze comes out. Perform steps 5-6 for the bath faucet. Ensure plenty of antifreeze drains into the P-Traps for the kitchen, bath and shower drains. Flush the toilet until antifreeze starts to fill the bowl. Leave antifreeze in bowl to lubricate seal. Turn off water pump. Connect hand pump with antifreeze to the fresh tank fill connection. Pump at least 3- 4 times. Antifreeze is potable safe and will not hurt if it goes into the fresh tank. Connect hand pump with antifreeze to city connection line, turn external shower cold line on and pump until antifreeze comes through shower faucet. *TIP: It will be hard to pump in the city line if the faucets are closed. Turn cold line off and hot line on, pump until antifreeze comes through shower faucet. Connect hand pump and antifreeze to black tank flush port. (You may have to go inside and turn the in-line valve open to allow the antifreeze to freely pump into the tank. *One pump should be sufficient as we are only protecting the check valve. For 2018 Models and newer you will need 4 pumps to sufficiently protect the new flush port system. This change was put in place to meet new codes for the black tank system ensuring that no backflow of waste water can get inside the water supply line. If you are not certain if your camper is equipped with this new port then pump 4 times to be on the safe side.) FAQs The camper can be used in cold weather applications as long as the furnace is utilized to keep the components warm and above freezing temperatures. If traveling between camp sites during cold weather season it may be necessary to winterize depending on outside temperatures. If water is left in the water heater during freezing temperatures even for short periods of time, it can cause damage. RV Antifreeze is designed to replace water and should NEVER be mixed with water as diluting it will defeat its purpose. 2016-Prior-Elite-II-Valve-Configuration.pdf 2017-Current-Valve-Configuration-Sheet.pdf 18.5-Elite-2017-Current-Valve-Configuration.pdf2 points
-
We have no problems with the Fiamma being out and tied down in 25mph winds, but I do different sets for wind and rain, use awning Deflapper, tie downs, etc... Reed2 points
-
John. I noticed in the other current thread on tire pressure that you said your tire pressure was at 60 PSI. I may be confused but I thought the axles on the Oliver were rated at 3500 lbs. So according to the table for psi, a max loaded trailer would be about 45 psi. If I read the other thread currectly 80psi is the max, but appears to be way over what is recommended.1 point
-
Here is a new thread with a Tire Pressure Placard I made. You can print it out and/ or laminate it. The data came from the link above, which has way more info than we need, and it is a little flaky on some computers. http://olivertraveltrailers.com/topic/how-to-tire-pressure-placard/ John Davies Spokane WA1 point
-
I run mine at 60 psi and have noted no issues. I may try 55 next season. I dropped the pressure the morning after we picked up the trailer.... I have TPMS sensors that also show temperature. The tires heat up during normal use by about 4 to 6 psi, which is what they are supposed to do. If the pressure is a lot lower than ideal, they will heat up more and have a bigger temp rise, which is their way of telling you that they may not be happy. Low pressure means more heat, increased rolling resistance, less mpgs, possible tread wear issues (edge wear) and increased likelihood of failure. High pressure means less heat, possible tread wear issues (center wear), higher chance of puncture, rougher ride, and higher mpgs. Just right pressure balances all these factors to give you the best ride and performance. If you have to, err on the side of too much air since the natural tendency is to lose pressure over time. Starting out a little low just gets them that much closer to the trouble zone. If you don’t use a TPMS system that shows temp, then you need to make a habit of manually checking your tires and hubs to see if one is too warm compared to the others. Your finger will work, but a temp gun is way better. Don’t run 80 psi, that is just way too high for the load they carry..... FYI, running excessive pressure on a tandem trailer will wear out the center of the tread on all tires more quickly due to scrubbing (dragging sideways) when backing hard on pavement. Plus it reduces braking because the tires can skid more easily. Here is a tire load chart specifically for the LTX tires .... it would be good to print the table and keep it where you can refer to it. Weight given is “per axle”. Keep in mind that around 10% of the total weight is not carried by the trailer tires, but by the hitch. http://read.dmtmag.com/i/41477-digital-toolbox/41? In theory you could run 35 psi, but that gives you zero “reserve air” if one gets a leak and the pressure starts to drop.... I would be very reluctant to go under 50. John Davies Spokane WA1 point
-
That's the max pressure. ST (standard trailer) tires should be inflated to the max pressure listed on the sidewall, (usually 50 psi) but LT tires don't need to be run at their max. Doing so will result in uneven tread wear and a rougher ride for the trailer. I don't have an Oliver so I can't give you first-hand experience with how different tire pressures will handle long-term. I expect that you will get a lot of opinions on this topic. But according to the Michelin load tables (http://www.michelintruck.com/reference-materials/manuals-bulletins-and-warranties/load-and-inflation-tables/#/) 55 PSI should be fine as that will give you 2060 lbs of load capacity per tire, for a total of 8240 lbs trailer weight capacity. You could go up or down 5 lbs and still be fine.1 point
-
I think 80 is the max if I remember right. The best way to set your pressures is to weigh the trailer and then go to the manufacturers website - they usually have a chart for each tire that lists what they recommend for different weight ranges. I think mine are around 50 but I’m not able to check right now. I had a long discussion with another owner I met at Oliver about whether Oliver puts way too much pressure in the tires from the factory. They thought that was part of the reason that people are seeing damage, doors popping open, etc. I’m interested to hear what others think about that and what pressures they’re running.1 point
-
I installed the new designed Anderson WD Hitch that I obtained from Sage; then we took a 10,000 mile trip out west for two months, we did not experience any noise. During the trip we hid some very hard rain at times and so far no issue with the upgrade, other than having to pay a $100.00 for it.1 point
-
Rumline - I thought that I did a short review of the new design in a previous post but can't seem to find it at the moment. Anyway - I only did a relatively short trip of less than 1,000 miles with it prior to putting Twist to bed for the winter. I did have a little bit of rain one day but I did not travel any real dirt roads. Having said that - the hitch performed great with no noise at all. In addition, the new design is easier to hook up because you do not have to get the "whale tail" up tight under the hitch ball post while at the same time aligning the holes for the pin that holds it in place. Since there has been precious little discussion about it on the Forum, I'd take that as a good sign that the previous noise problems have been taken care of. Hope this helps. Bill1 point
-
It's the Freedom model. In brief, it looks and functions just like the Fiamma. We had difficulty with it in the wind, however, even small breezes. Not having used the Fiamma, I can't tell how it compares in that respect but judging from other people's posts I have to think that it wouldn't compare well. Basically, the clamp on the legs isn't tight enough that you can really cinch the awning down, since the legs won't hold. And there's no good location to add stronger poles apart from a couple of holes on the legs themselves that really aren't designed for that. My fix, that we're going to try out next week hopefully, is that I've drilled holes into the case to accept some strong REI poles I have, and I've bought some hefty ratchet straps for tie downs. I also bought the center support rafter which should help make it sturdier. And finally, I have an awning shade extension that will slide into the groove on the front and we'll see if that helps to hold it down and divert the wind. So, lots to try and see what combinations work. We'll be in Big Bend, so finding some wind shouldn't be difficult. I guess the other criticism I have is that the accessory market isn't nearly what there is for Fiamma. I'm actually curious how closely the design of the Carefree copies the Fiamma and what accessories might be interchangeable. I guess the one plus in its favor is the number of color choices, though you'd have to twist Oliver's arm to take advantage of those. We got a solid charcoal gray that I think looks great against the white and the acrylic fabric feels really tough and is tightly woven. But if I had to make a call now, I'd have to say that if you can source a Fiamma awning, then that would be the better choice. I noticed that the Fiamma US website is back up now so it may be possible to get one.1 point
-
One piece of advice. If you carry a small vacuum with a rechargeable battery, don't leave it in an unheated Ollie during the winter. The battery in my "Shark" vacuum didn't survive its first winter. A replacement battery costs almost as much as a new vacuum, so I threw the whole thing out. Purchased a small auto detail vacuum from Griot's Garage online to replace it. It plugs in and with the solar package and inverter, I won't have this problem again. Don1 point
-
OK I know I should stay out by my two Cents...... Correct buy what is right for you, I first towed the Oliver II with a Ford F150 and I as well loved my Ford ride comfort were great. Then the BUT under powered 5.0 not good in the mountains, short bed under 5.5 bed not good for carrying things like a Clam. Now a friend had a Toyota he also loved his truck but had a 25 gal fuel tank i would be reaching a half tank and he was looking for a gas station we usually camp for 2 to 3 months at a stretch so like Alaska and New Foundland trips a nice reserve helps you feel better on some days. The only thing I will say on the Ford Turbo is they tow great ran into a Airstream 26 or so length that loved his ran into him in Haines Alaska a few years back and another in Virginia but had the small one and he was very disappointed on his ability with a stick built trailer being underpowered. The repairs in and around 125,000 miles on a Ford turbo engine could be a issue I'm not sure,so I would read all the ford reviews on line for me to make that type of decision. Best of decisions, good travels, be safe. Thanks Gary
1 point
-
Ok, I get that some people like apples and some like oranges. I liked all the trucks I tried. I just liked one more than the others. All the trucks I tried were more than adequate as a TV. Since this will be my daily driver I want a truck that gets pretty good mileage, is good off road and fun to drive. I am impressed with the creature comforts, technology and safety features on the Ford. After test driving these full size trucks, driving my Taco is a lesson in humility. Well, until it comes to off road, where the Taco will leave these comfortable behemoths in the dust. Cruising down the highway in a QUIET cabin with a leather cooled seat that is adjustable 10 different ways will be a new and welcome experience.
1 point
-
Isn't there a LAW that comes into effect just as soon as you throw out or donate that "thing" that you have not used in ten years, you suddenly have a real need for it? Both my wife and I came from families that had very limited means. Because we take care of our things they tend to last a very loooong time - we both are still wearing some of the same cloths that we had in high school! We actually get enjoyment from finding new uses for things that no longer can be used for the original function. However, at some point, enough is enough! We have just got to start getting rid of "stuff"! But, the Velcro on our finger tips makes it so hard to do. Bill1 point
-
Exactly... But the newer trailers will or should keep improving as they come out because Oliver implements our fixes into the next generation of trailers. I still have a list that's waiting for a call back from them now, but one by one , each issue has been taken care of.1 point
-
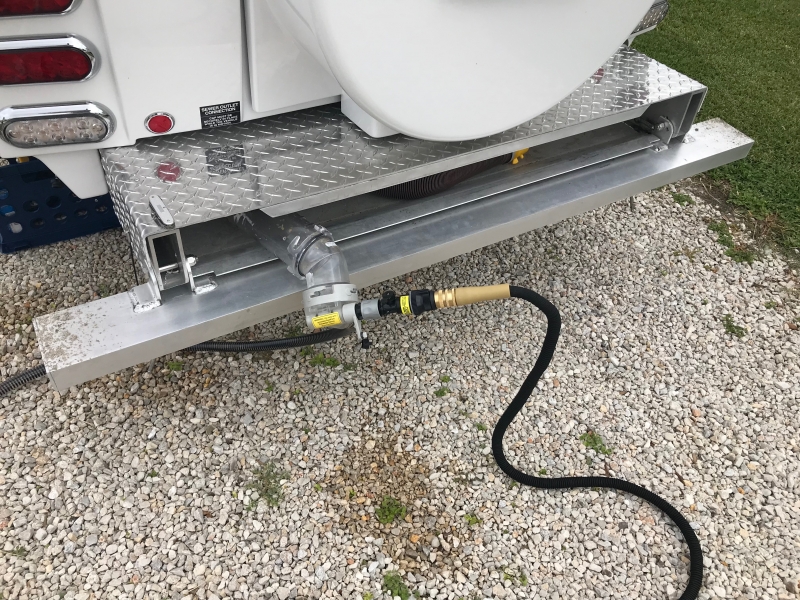
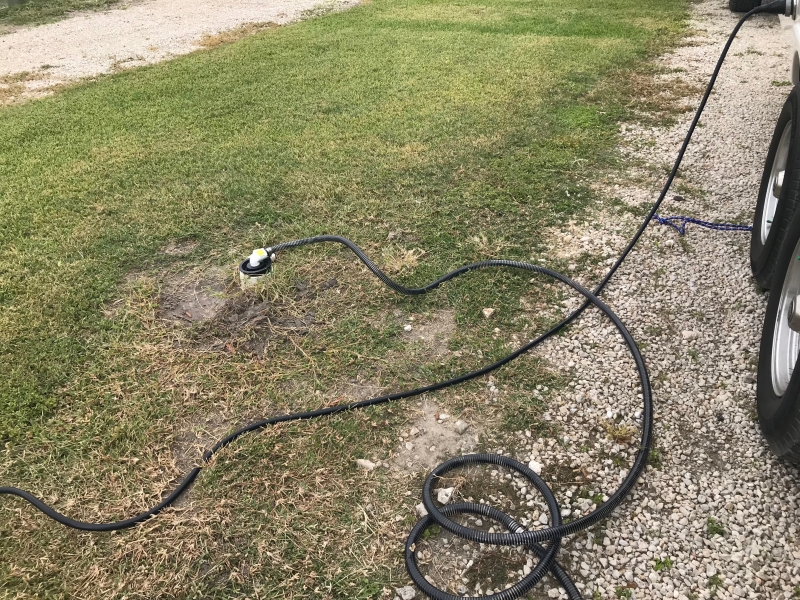
Here is my Stinky-Slinky alternative. Pro's: no moving parts (like with a mechanical macerator) with all functions visible through the clear plastic. Hose takes very little space and is easier to handle. The internal water jet does a great job with creating a siphoning effect to get fluids to travel uphill or without gravity effects through the entire tube length. If anything clogs up, it is an easy fix (remove the fitting once all water has drained out and dump clog in a doggie poop bag). Very little setup time or fuss. Con's: You need decent water pressure at the site to maximize the breakup capability of the high-pressure nozzle. The smaller hose takes longer to dump Black & Grey tank but does help clean out hose and fittings. You will need to run another water hose to your setup to use (but use the same hose as blackwater tank clean-out). BTW - I keep the factory supplied stinky slinky as an emergency backup. Parts: Valterra SS01 Sewer Solution Kit with 10 Ft Hose $75.71 Amazon Valterra SS15 Sewer Solution 15 Ft Extension Hose $40.33 Amazon Valterra T1022 10" Clearview Adapter $20.78 Amazon Valterra T1026-1 45° Clearview Adapter with 3" Bay Lug $9.95 Amazon
1 point
-
This mod will most likely create the most questions and I believe is the single most beneficial addition I could make to my Oliver. BTW prior to joining Apple, I lead mobility enterprise solutions for 10 years with AT&T and I know what really works and what is just a gimmick from a cellular and wifi booster reference standpoint. CradlePoint Cellular Router: COR IBR900 Series https://cradlepoint.com/ products/cor-ibr900-series Here is why: Enterprise Commercial-Grade hardware Supports LTE-Advanced (next generation Cellular protocol - next 3 years Future Proof) Supports SIM-Based Auto-Carrier Selection built in 2 SIM trays expandable to 4. Allows you to have either more than 1 Cellular Carrier (AT&T, Verizon, T-Mobile, Sprint, etc.) or allows you do double up on SIMs from same Cellular Carrier to prevent throttling back or exceeding data plan. Fully Ruggedized and built for vehicle vibration, temperatures, etc. Intelligent remote configuration via Cloud Access Redundant Power Capable WiFi: Dual-band, dual-concurrent WiFi (802.11 a/b/g/n/ac)* Wave 2 External Mounted Antenna: 3-in-1 GPS & Modem Screw-Mount https://cradlepoint.com/ products/accessories/3-1-gps- modem-screw-mount Amplifies Cellular & GPS Reception by a full 5 watts (Cellphone & Tablets only 0.5 watts) Significant improves cell & GPS signal reception thereby giving you stronger signal strength and increased bandwidth throughput. Gives you priority ranking of network vs. cellphones, tablets, & consumer hotspot devices. AT&T Data Plan (Unlimited +) You also have the option to buy program month to month or prepaid. Only subscribe when you need to use it or add it to family plan Allows you to use your home DIRECTV account with no charge against your Data Plan or you can subscribe to DIRECTV NOW if you do not have DIRECTV at home. https://www.att.com/bundles/ data-free-tv.html https://www.att.com/bundles/ directv-now-unlimited-plus. html The Cradlepoint router will work as the nerve center for your Oliver. Providing you constant and consistent wifi coverage in about 98% of the US. Also, it gives you the ability to jump from carrier to carrier via a webbed portal. Now that you have WiFi all the time you now have a connected RV. You can use wifi to place wifi calls, FaceTime calls Video or Audio only. Stream video, Music, gaming to your Trailer via laptop, iPad, iPhone, or AppleTV, and stream Over the Air Directv without data charges if you are an AT&T customer. I may use devices inside trailer like Nest Protect battery version (Smoke & CO2 detector). You can hook up WebCams, and other home automation products that run on WiFi. I'll also run my iPads of the trailers WiFi vs the iPads embedded cellular receiver because the trailers wifi will always have a stronger signal than the iPads embedded cellular antenna. I will also run my MacBook via the trailers WiFi which is great for working on the road.
1 point


-
Recent Achievements
-


")


")


")


