Leaderboard


Popular Content
Showing content with the highest reputation on 04/28/2018 in all areas
-
The back frame weighs about 20 pounds. Oliver rates it to carry 100 pounds. I built a frame utilizing the dual receivers a few years ago and Oliver used this as the prototype for their bike rack platform. I use mine to mount a basket that I carry large, but bulky, items like tables and chairs in. My total (empty) setup weighs 65 pounds. Aside from any concerns about upsetting the balance of the trailer, I would be ok with up to 400 pounds back there. The rear platform and attachment points would fail before the trailer frame would.2 points
-
Apologies for not replying earlier. My password was corrupted and it has been difficult to re-set it Regarding vendors, below are the ones we have invited. To date, we have had only two to respond that they were unable to attend. Those two are either working on sending a replacement or providing a static information center and documents. Truman Dexter Dometic Progressive Industries Zamp Andersen Micro air Furion Trojan FYI the weather for Lake Guntersville looks terrific High in the upper 70s and only a 20% chance of rain !! Coy2 points
-
At the suggestion of Montanaoliver entries under this thread have been moved to a new thread titled "Using Fasteners and drilling in fiberglass". Bill p.s. thanks to Mark for the suggestion!2 points
-
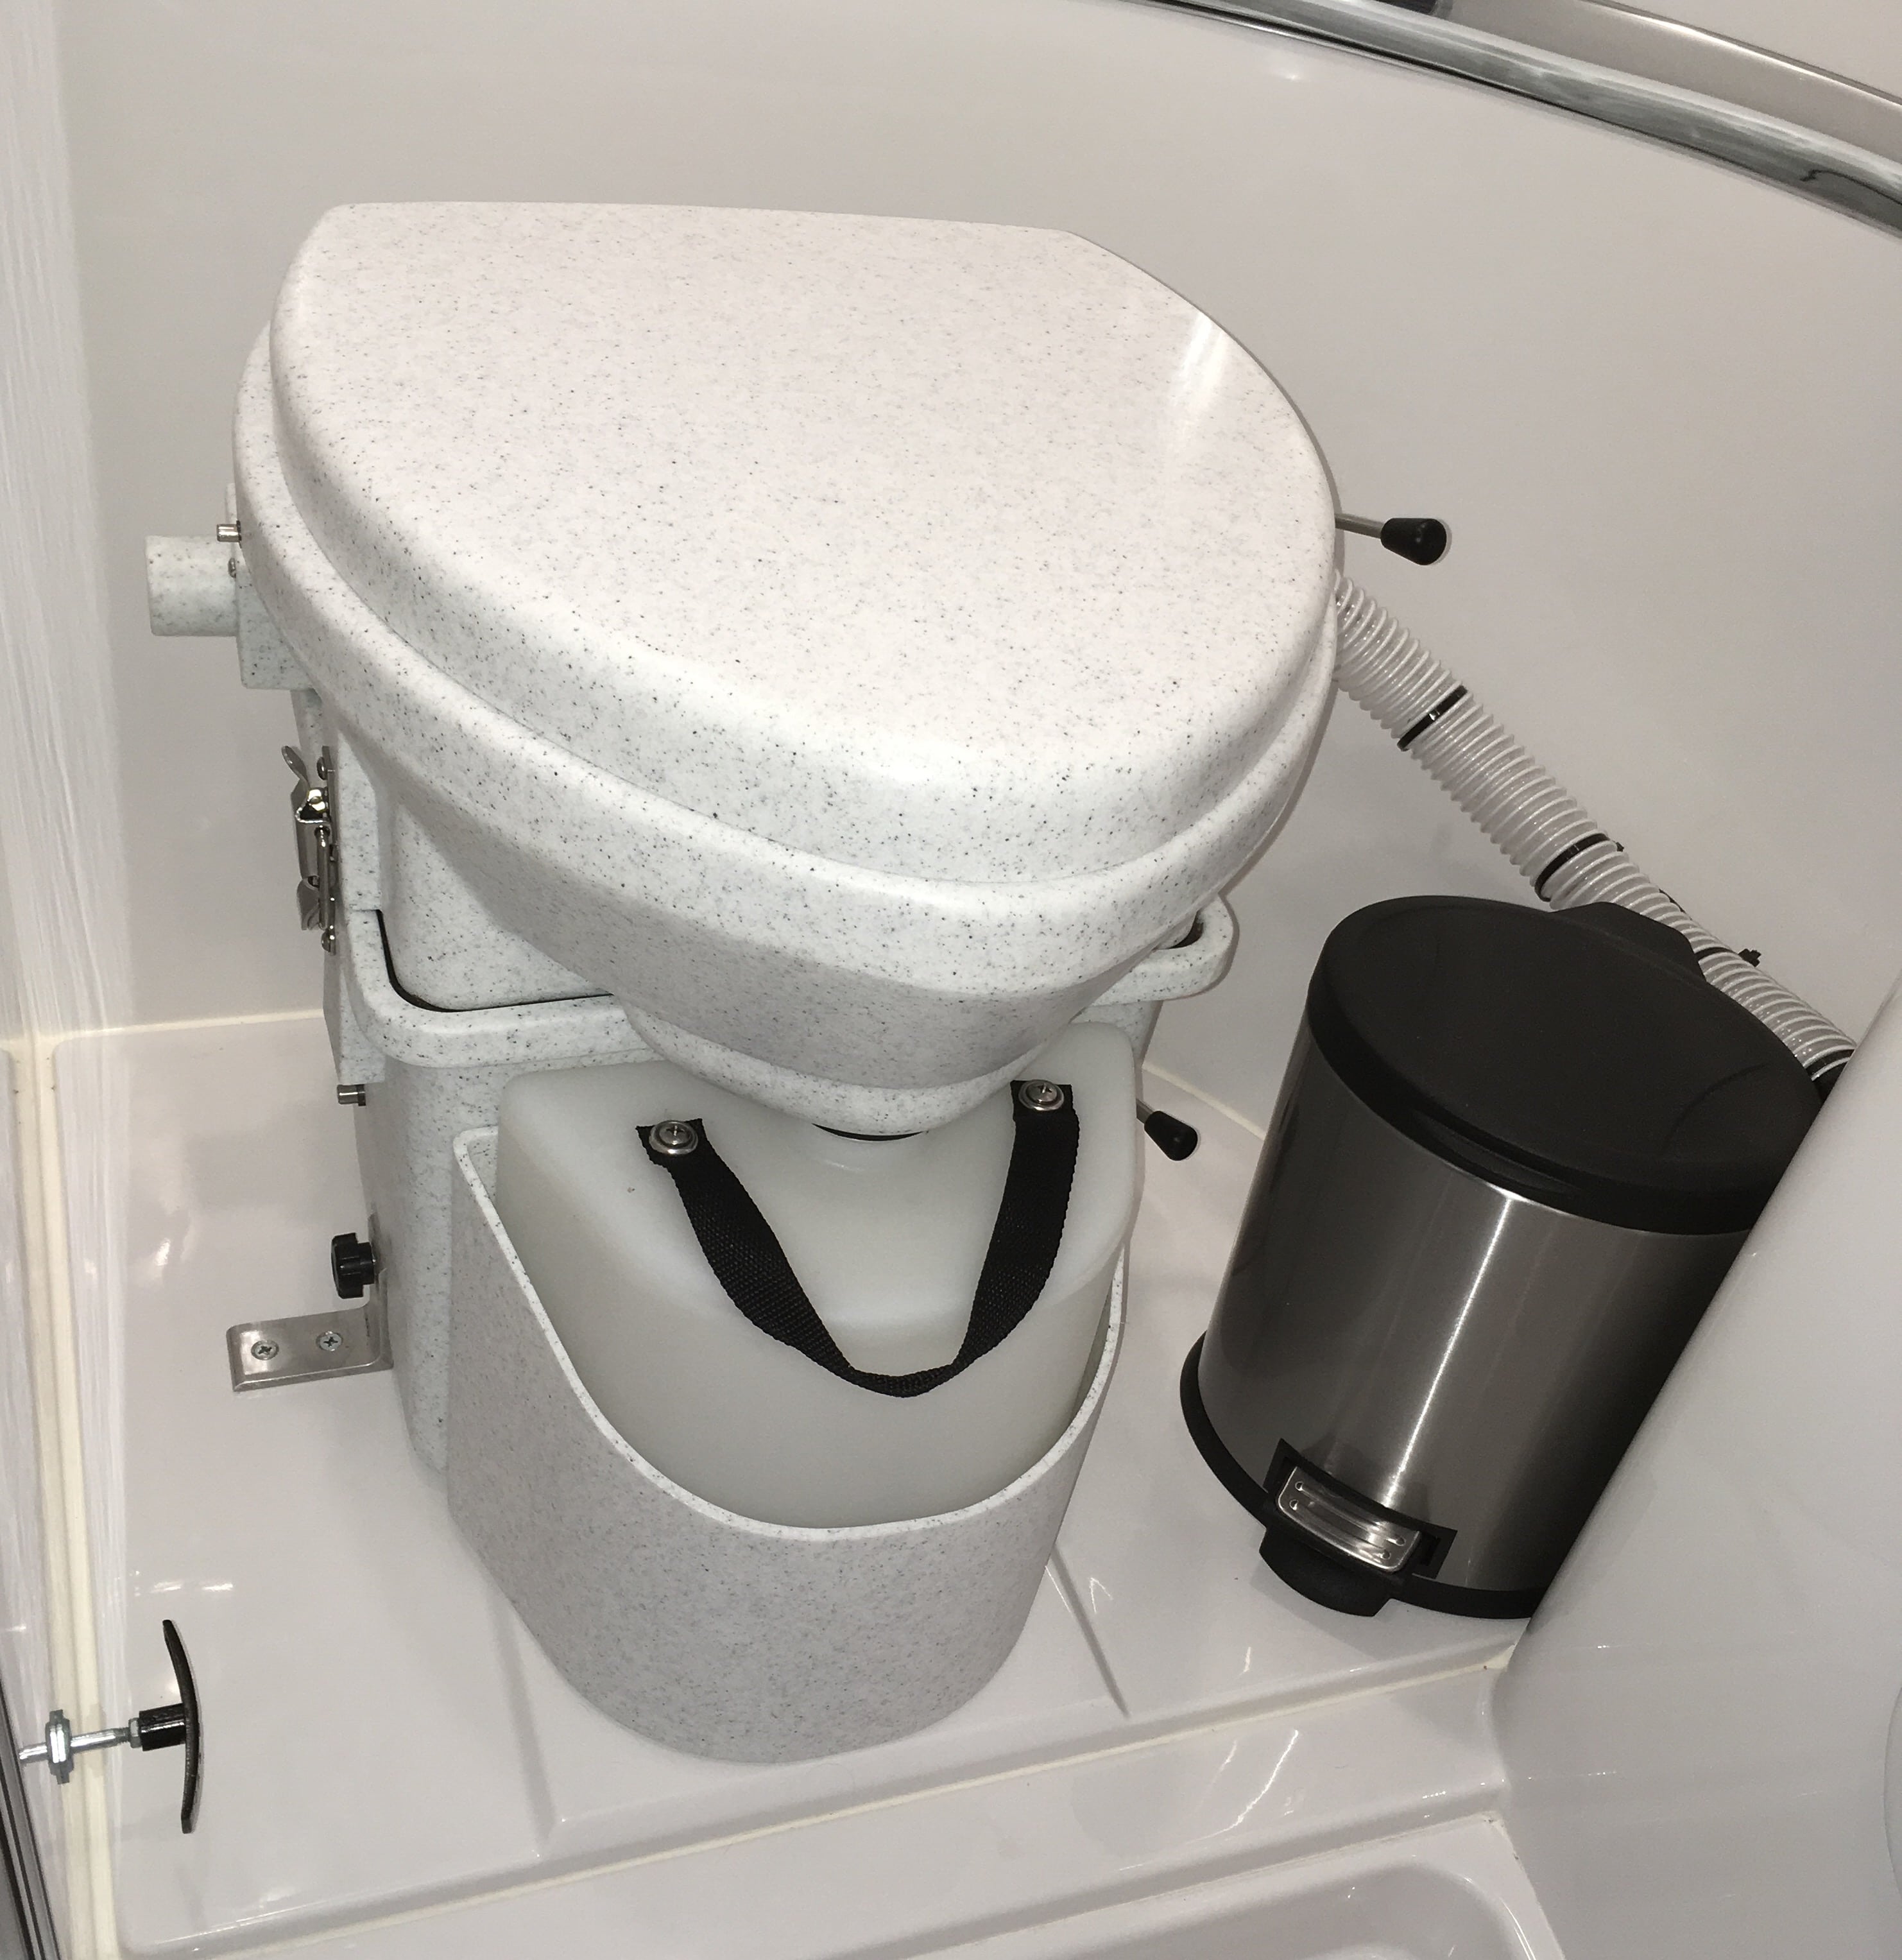
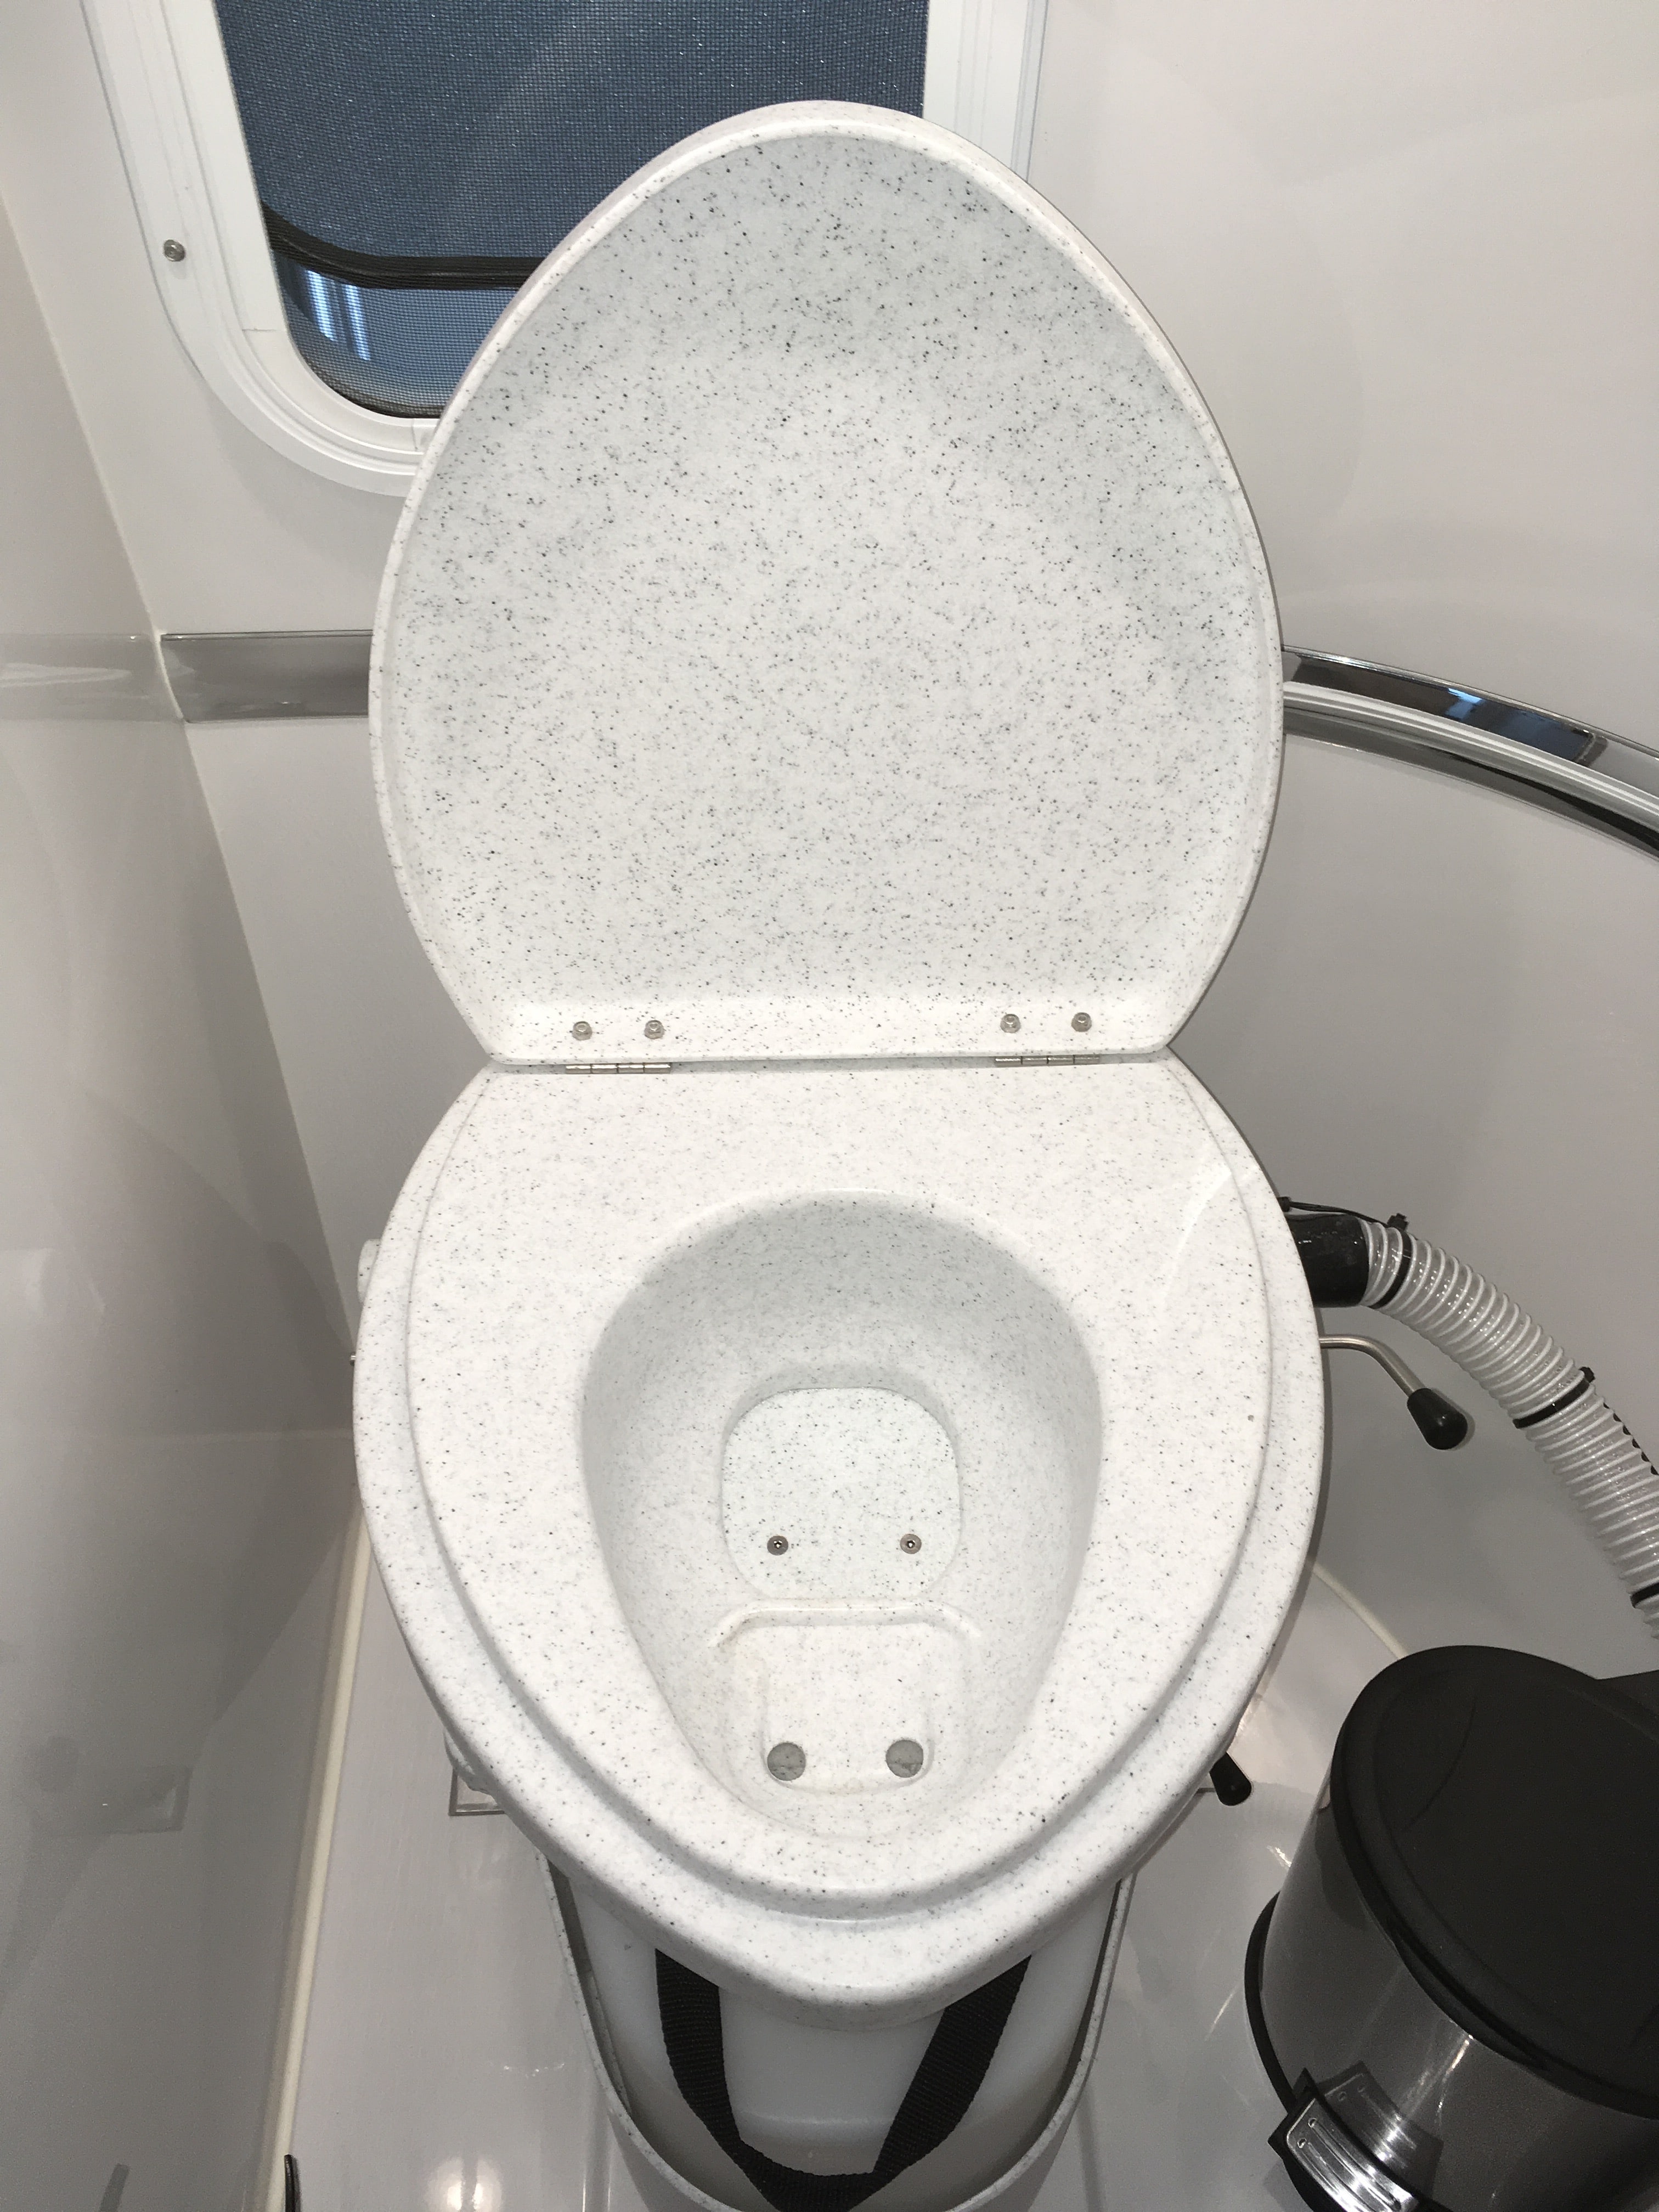
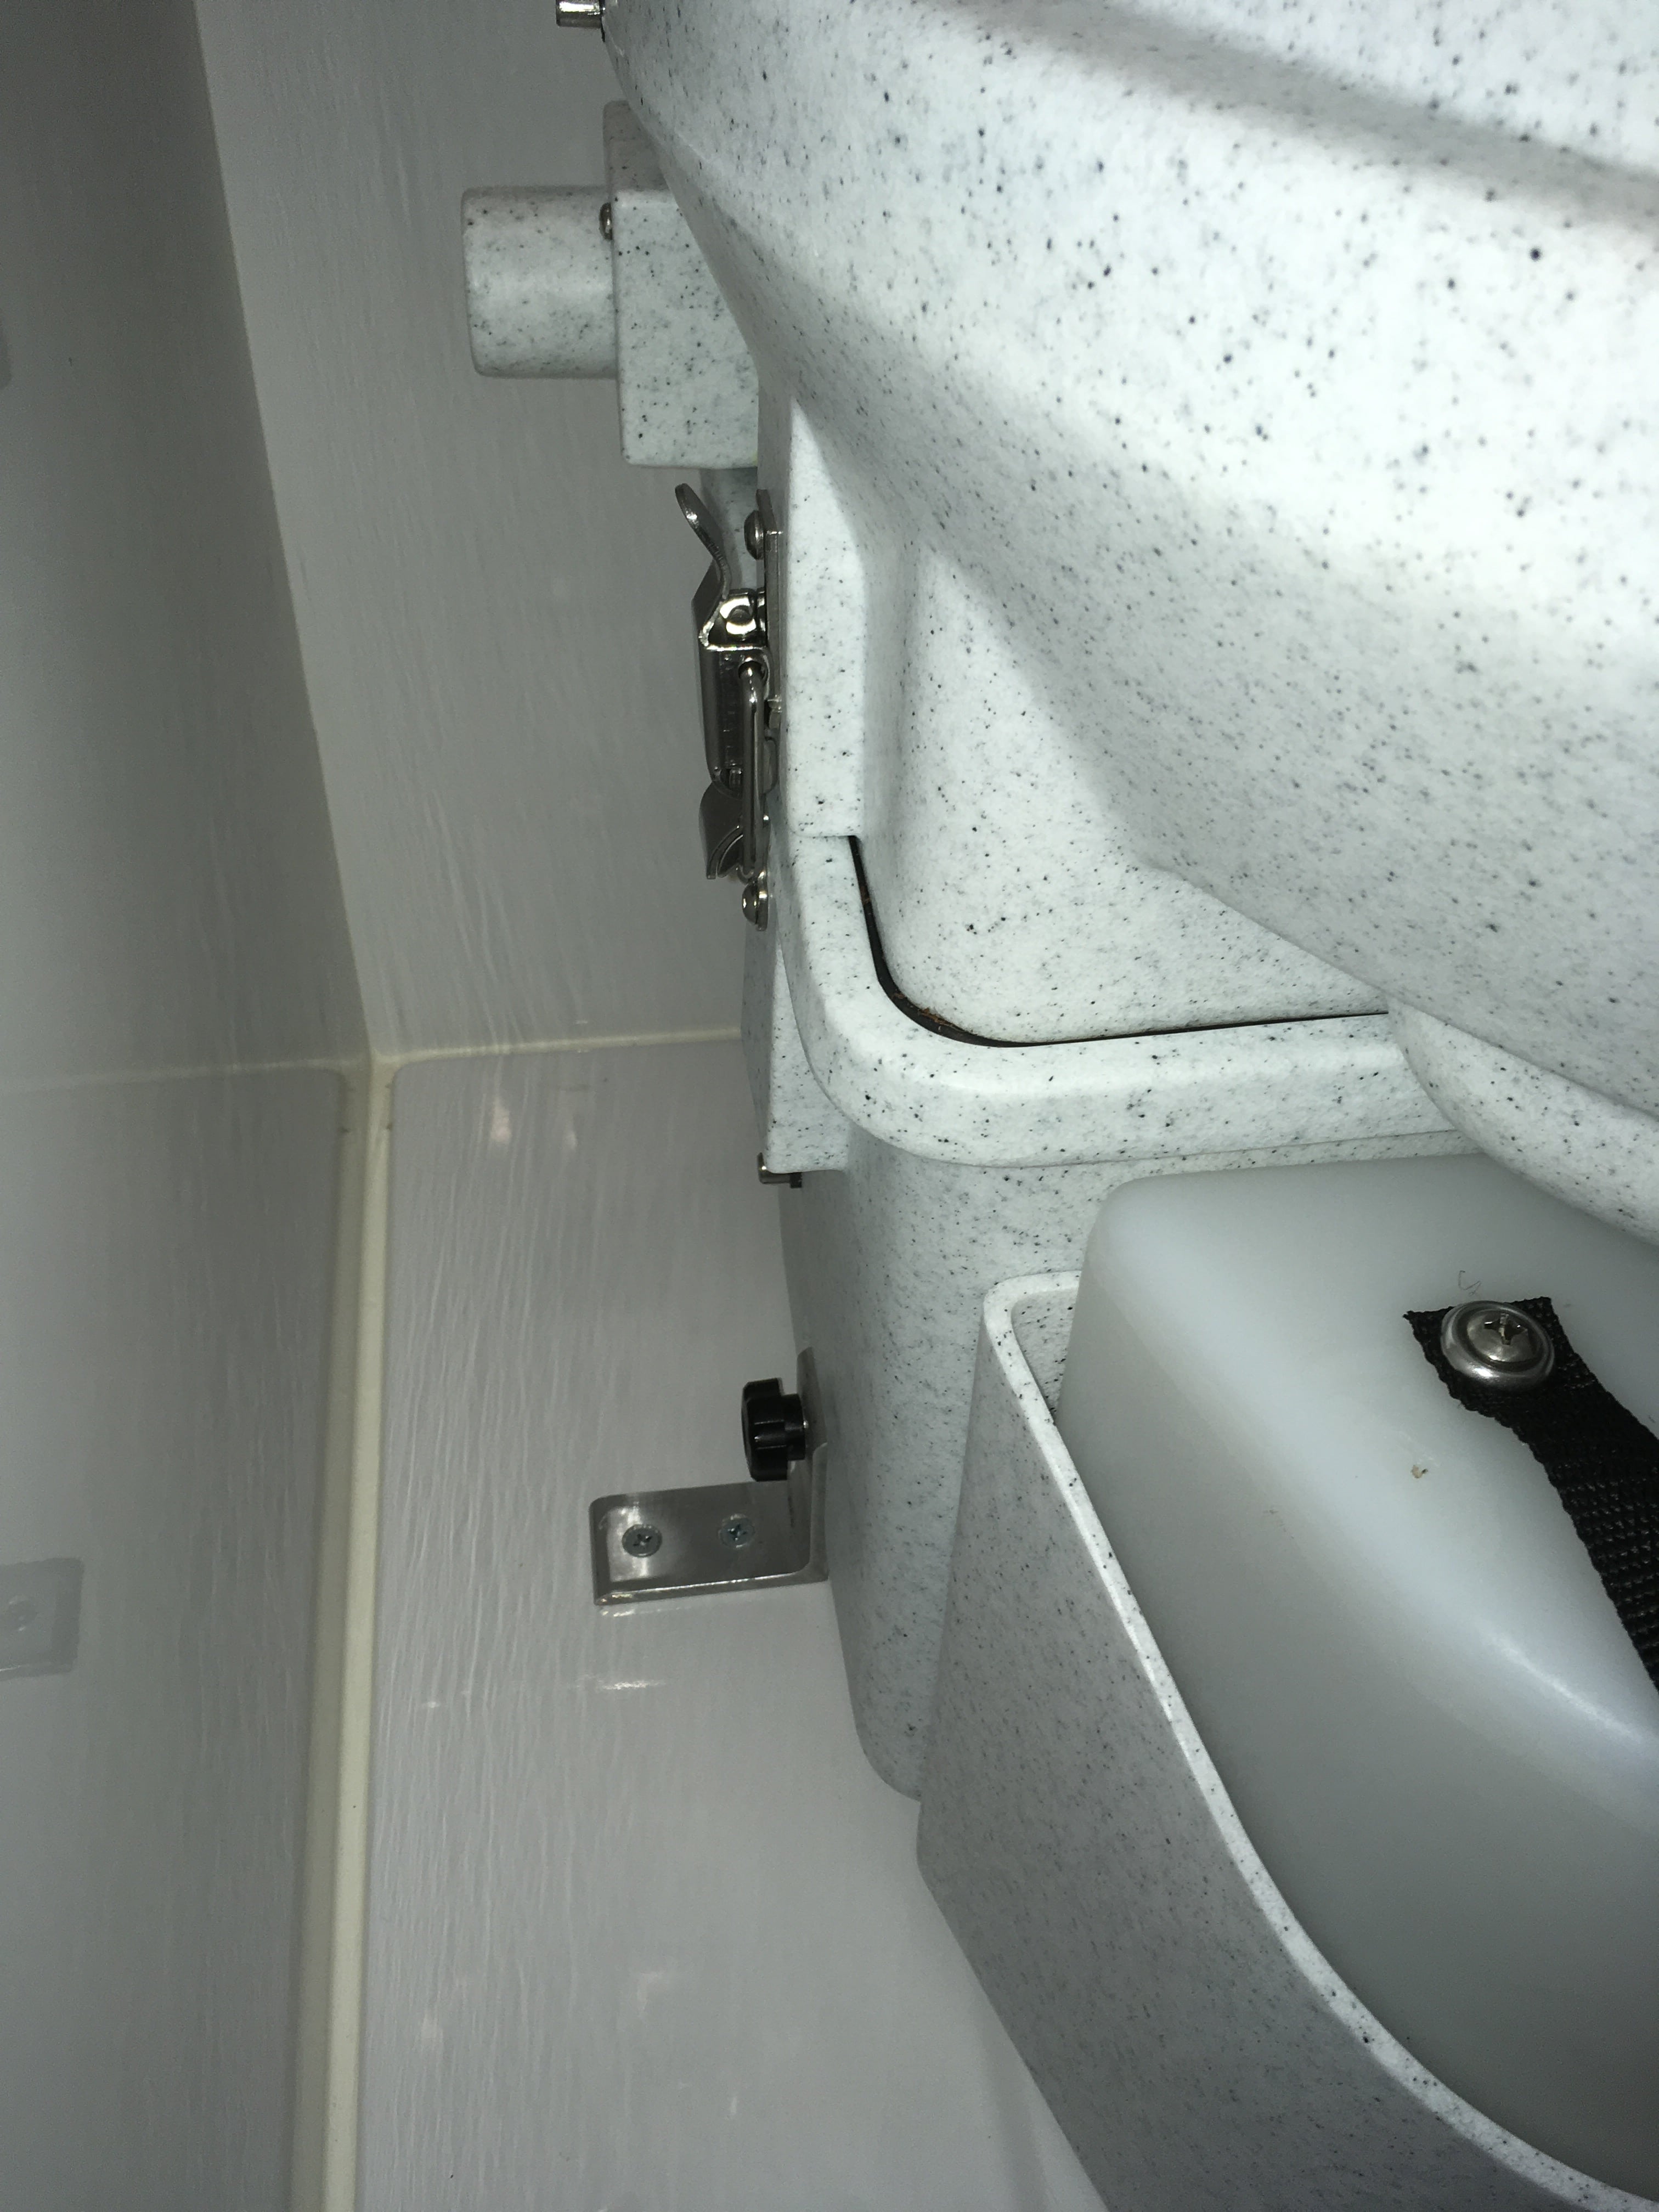
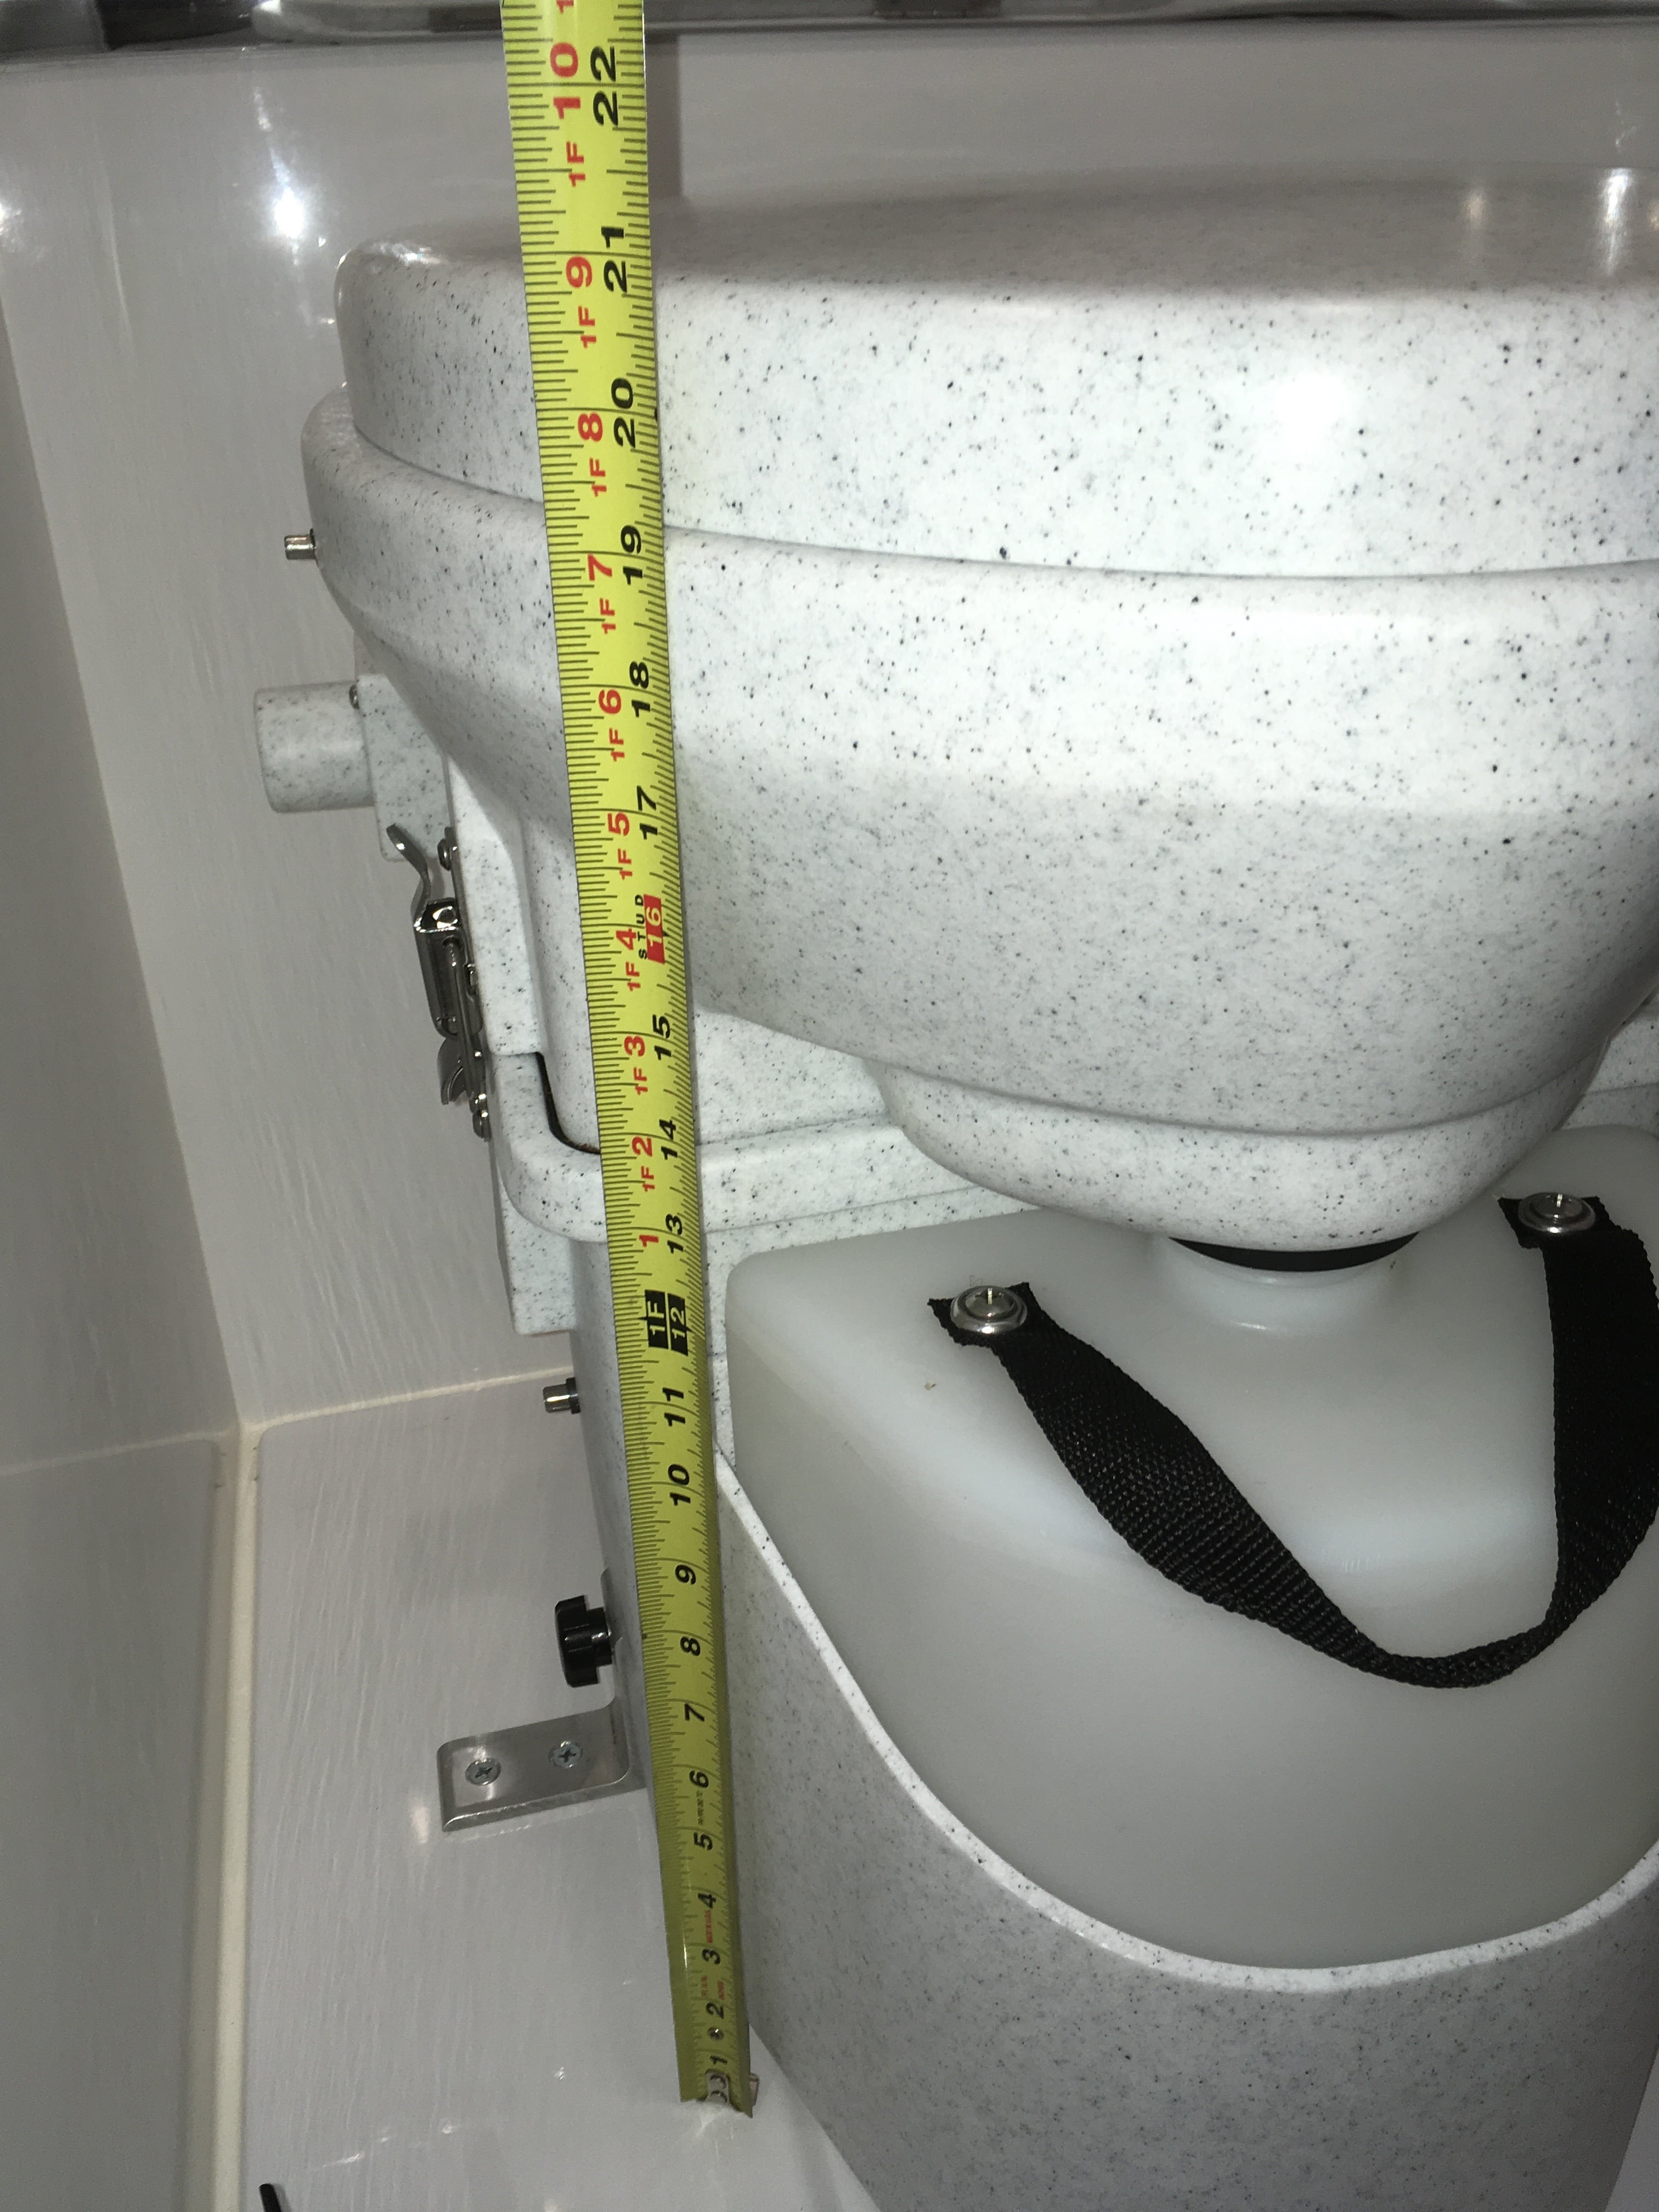
EDIT 12/10/23. Useful link: https://olivertraveltrailers.com/forums/topic/6720-natures-head-compost-toilet-troubleshooting-user-guide/ EDIT 06/06/23. This is an Oliver factory installation, not mine. One member has assumed that I did this. There are a number of threads asking about this toilet. I hope we can gather up a lot of the talk here in one place. I think there has been one other installation in an Ollie but there have been NO published pictures of any kind, that I have been able to find, even from the factory. This is baffling to me. I really wanted to cut the dump station umbilical. We routinely dry camp and finding an open station during a busy holiday weekend or off season is not something I want to face. With the NH toilet we can get rid of our grey water with a 3/4 inch garden hose. In many western states it is legal and encouraged to run a hose out to a nearby shrub and let your water trickle into the ground. The black tank, drain plumbing and vent system are all completely retained. The factory folks are extremely reluctant to delete these parts, since they are part of their certification. If you wanted to reinstall a regular toilet, it would be a very minor job. The fresh water line is even in place, next to the wall. You could sell the used NH for $400 and that would pay for the replacement conventional RV toilet, with a lot left over. An RV toilet is less than $200.... I chose to charge the base with coconut coir rather than peat moss, since it is a renewable resource and doesn't damage the environment. https://smile.amazon.com/s/ref=nb_sb_noss_1?url=search-alias%3Daps&field-keywords=coconut+coir I made the mistake of just dropping a dry 2 pound brick into the bottom, adding water and then letting it hydrate. I ended up with WAY too much material. You need to do this in a bucket, outside, and then transfer the expanded stuff into the base, and the leftovers into gallon zip bags. The correct height is even with the internal agitator centerline. Any higher and it becomes difficult to turn with the handle. It takes about two gallons, I did not measure. There are many online sources with info. To summarize: Sit to pee, everybody, so there is no splashing. The trapdoor stays closed and your pee goes forward, and then down into the reservoir. Which you pre-treated with a half cup of vinegar, to kill the odor. That part is easy. To poop, open the trapdoor, finish the job, wipe and close the door. Give the agitator handle two or three turns. The poop and paper will decompose rapidly once the natural process gets going, which may take a few days. The fan keeps a steady flow of fresh air into the reservoir and out of the trailer through the existing roof vent. I never noticed any bad odors except the first days, before I figured out that Oliver had installed the wrong fuse, a 1 amp, which had blown. Once I installed the correct fuse (2 to 5 specified, I used 3 amp), the fan worked as designed. The fuse is located in the main distribution panel under the dinette table, right row, bottom position (UN-labeled!). It is best to put only the absolute minimum amount of RV toilet paper into the base. If you put a lot in, it wraps around the agitator and makes it harder to turn. Only stinky paper goes down - the rest (damp with pee) goes into the small covered waste can to be disposed of weekly. The can came from Walmart, $10 I think. Cleaning is simple: spritz the area lightly with a dilute vinegar spray and wipe down with a disposable baby wipe, toss in can. Done. The residual vinegar and wipes control any odor from the can. The pee tank is big but it will fill up faster than you can believe if you have four people using it! Empty when it gets to within an inch or two from the top: Flip the two side latches, carefully rotate the top off the base, remove the pee bottle and cap it. Dump it in any approved location - a pit toilet or a rest stop restroom. Rinse with fresh water a couple of times and recharge with half a cup of vinegar. Reinstall into the toilet and close and latch the top. The pee will eventually form crusty yellow deposits. The fix, I have read, is to add gravel and water and shake it hard, then rinse several times. In two weeks of use I never noticed any significant deposits. The longer you let the poop decompose the better. If you can leave it over the winter, dump it out in the spring and it will be totally benign. If you need to empty it mid-season, remove the pee bottle and vent hose, unscrew the two hold down knobs and lift out the entire unit. Carry it outside and put a 13 gallon or larger trash bag on top, flip it over and empty the compost. Refill with clean coir to the centerline. There is NO need to clean it out. Any residual material will just help the next batch get started. The organic waste you can double bag and put in the trash, or if fully decomposed, it can be spread out in the woods, but not near a potable water supply or garden. The way to keep the smell in control is to keep the pee out of the main reservoir. It's the urine that makes a pit toilet smell so bad.... If you throw up or have a messy poop, you can add a little more fresh coir to help absorb the extra fluids. I keep a gallon bag of the hydrated stuff in the overheard cabinet (along with a quart of vinegar) and haven't had to add any extra. The fan has a dust filter that is supposed to be checked every few weeks, by removing two Philips screws. I think that is way too often in the clean environment of a fiberglass trailer, unless you have a dog that sheds. You can put your hand over the left (inlet) opening and feel a light suction. If that isn't present, you need to clean the filter. The pee bottle sits in a sealed cavity to catch overflows, This is a problem since when you take a shower, a bunch of fresh water gets trapped there. I intend to drill a couple of small drain holes in the bottom. I don't care if the pee bottle overflows onto the floor of the head, at least that way I will notice it! unless it is dark, and I am barefooted.... that would be bad 😉 This is why you want to empty the tank before it gets too close to the top. Agitator handle: ours fell off right away, the shaft has a set screw with lock nut. It is very easy to tighten correctly. I am not sure why the factory guy couldn't do it successfully. Spares: I intend to purchase a spare pee tank ($40), spare lids, and a fan.I already have extra 3 amp fuses. ... http://store.natureshead.net I intend to wire in a small LED in the wire harness to show that the fan has power. You can probably hear it running, faintly, if you are in a very quiet area and don't have bad tinnitus, as I do. The Nature's Head is a cool device, but it is really just a fancy bucket. A solidly built, very expensive bucket. I wish the price were about $250 instead of $800. That seems about right for what you get. OTH it is very rugged, and long time users seem to love it. My wife still has some reservations about using it, and we need to get a short step stool since it sits so much higher than even a tall toilet. This one might work well, and it might fit in close to the base with a bungee cord around it for travel: .... https://www.squattypotty.com/shop/poop-better/classic-ecco I am still learning, but I have no regrets at this time. Questions? John Davies Spokane WA
 1 point
 -
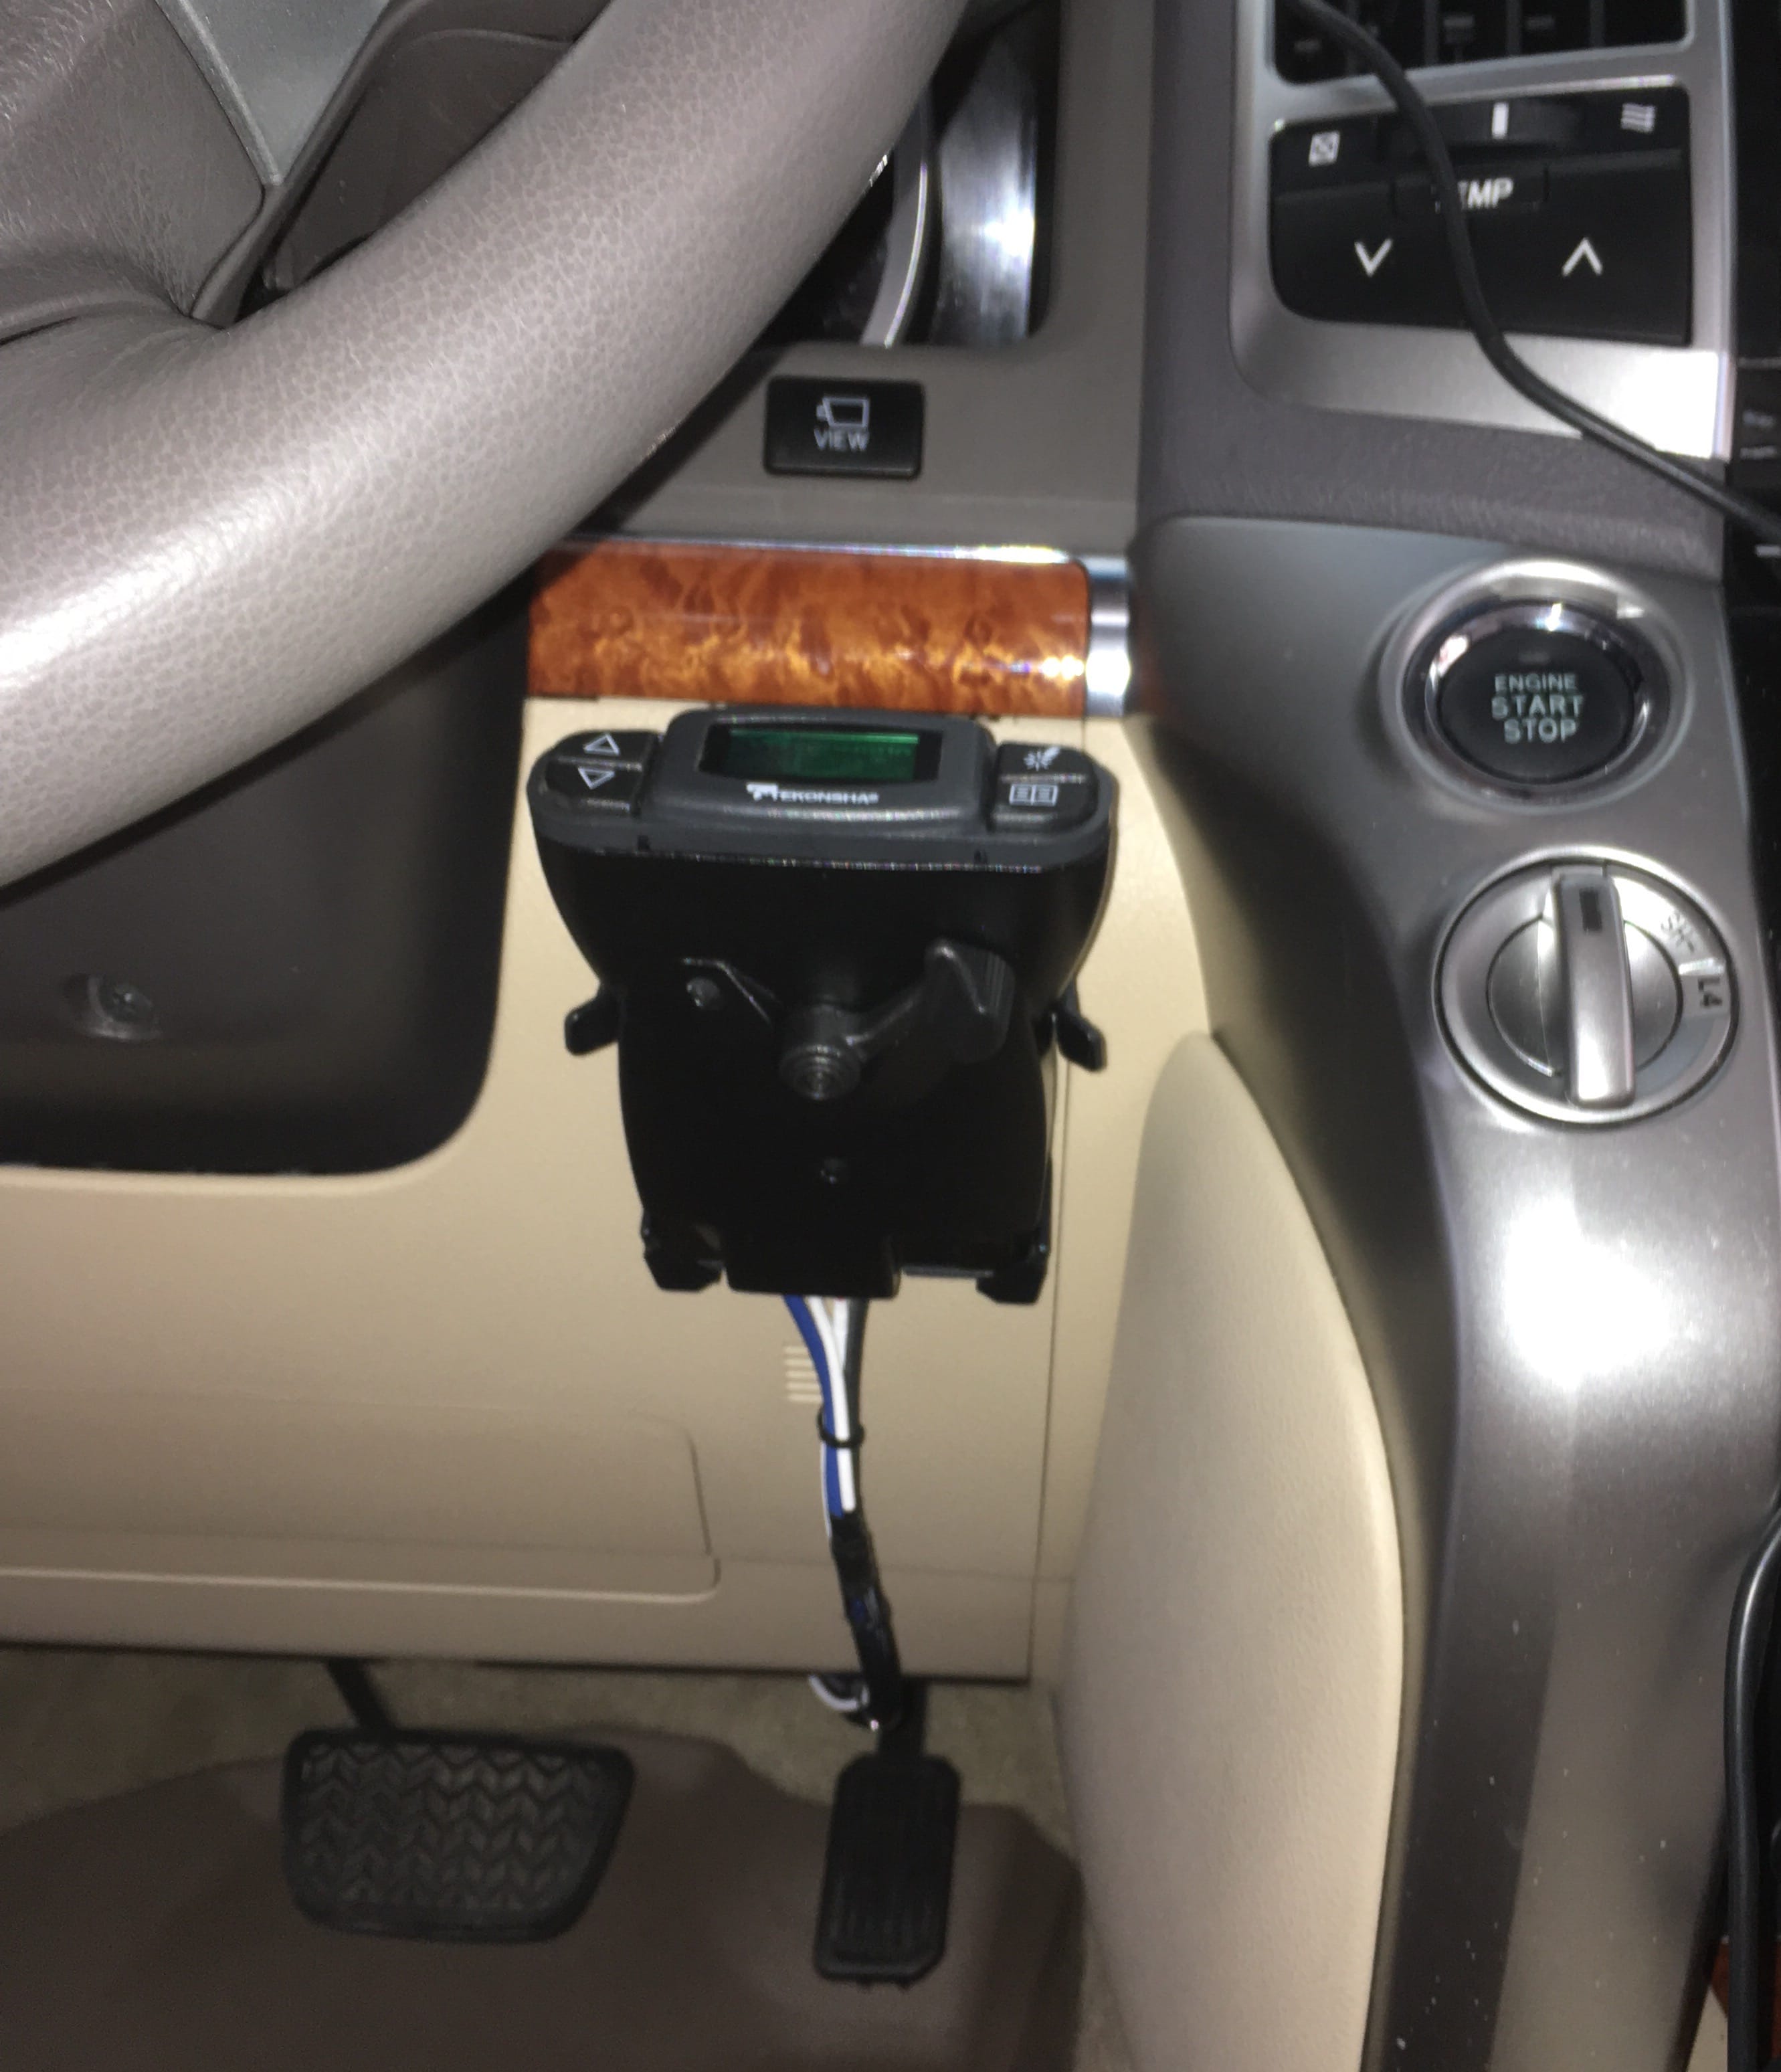
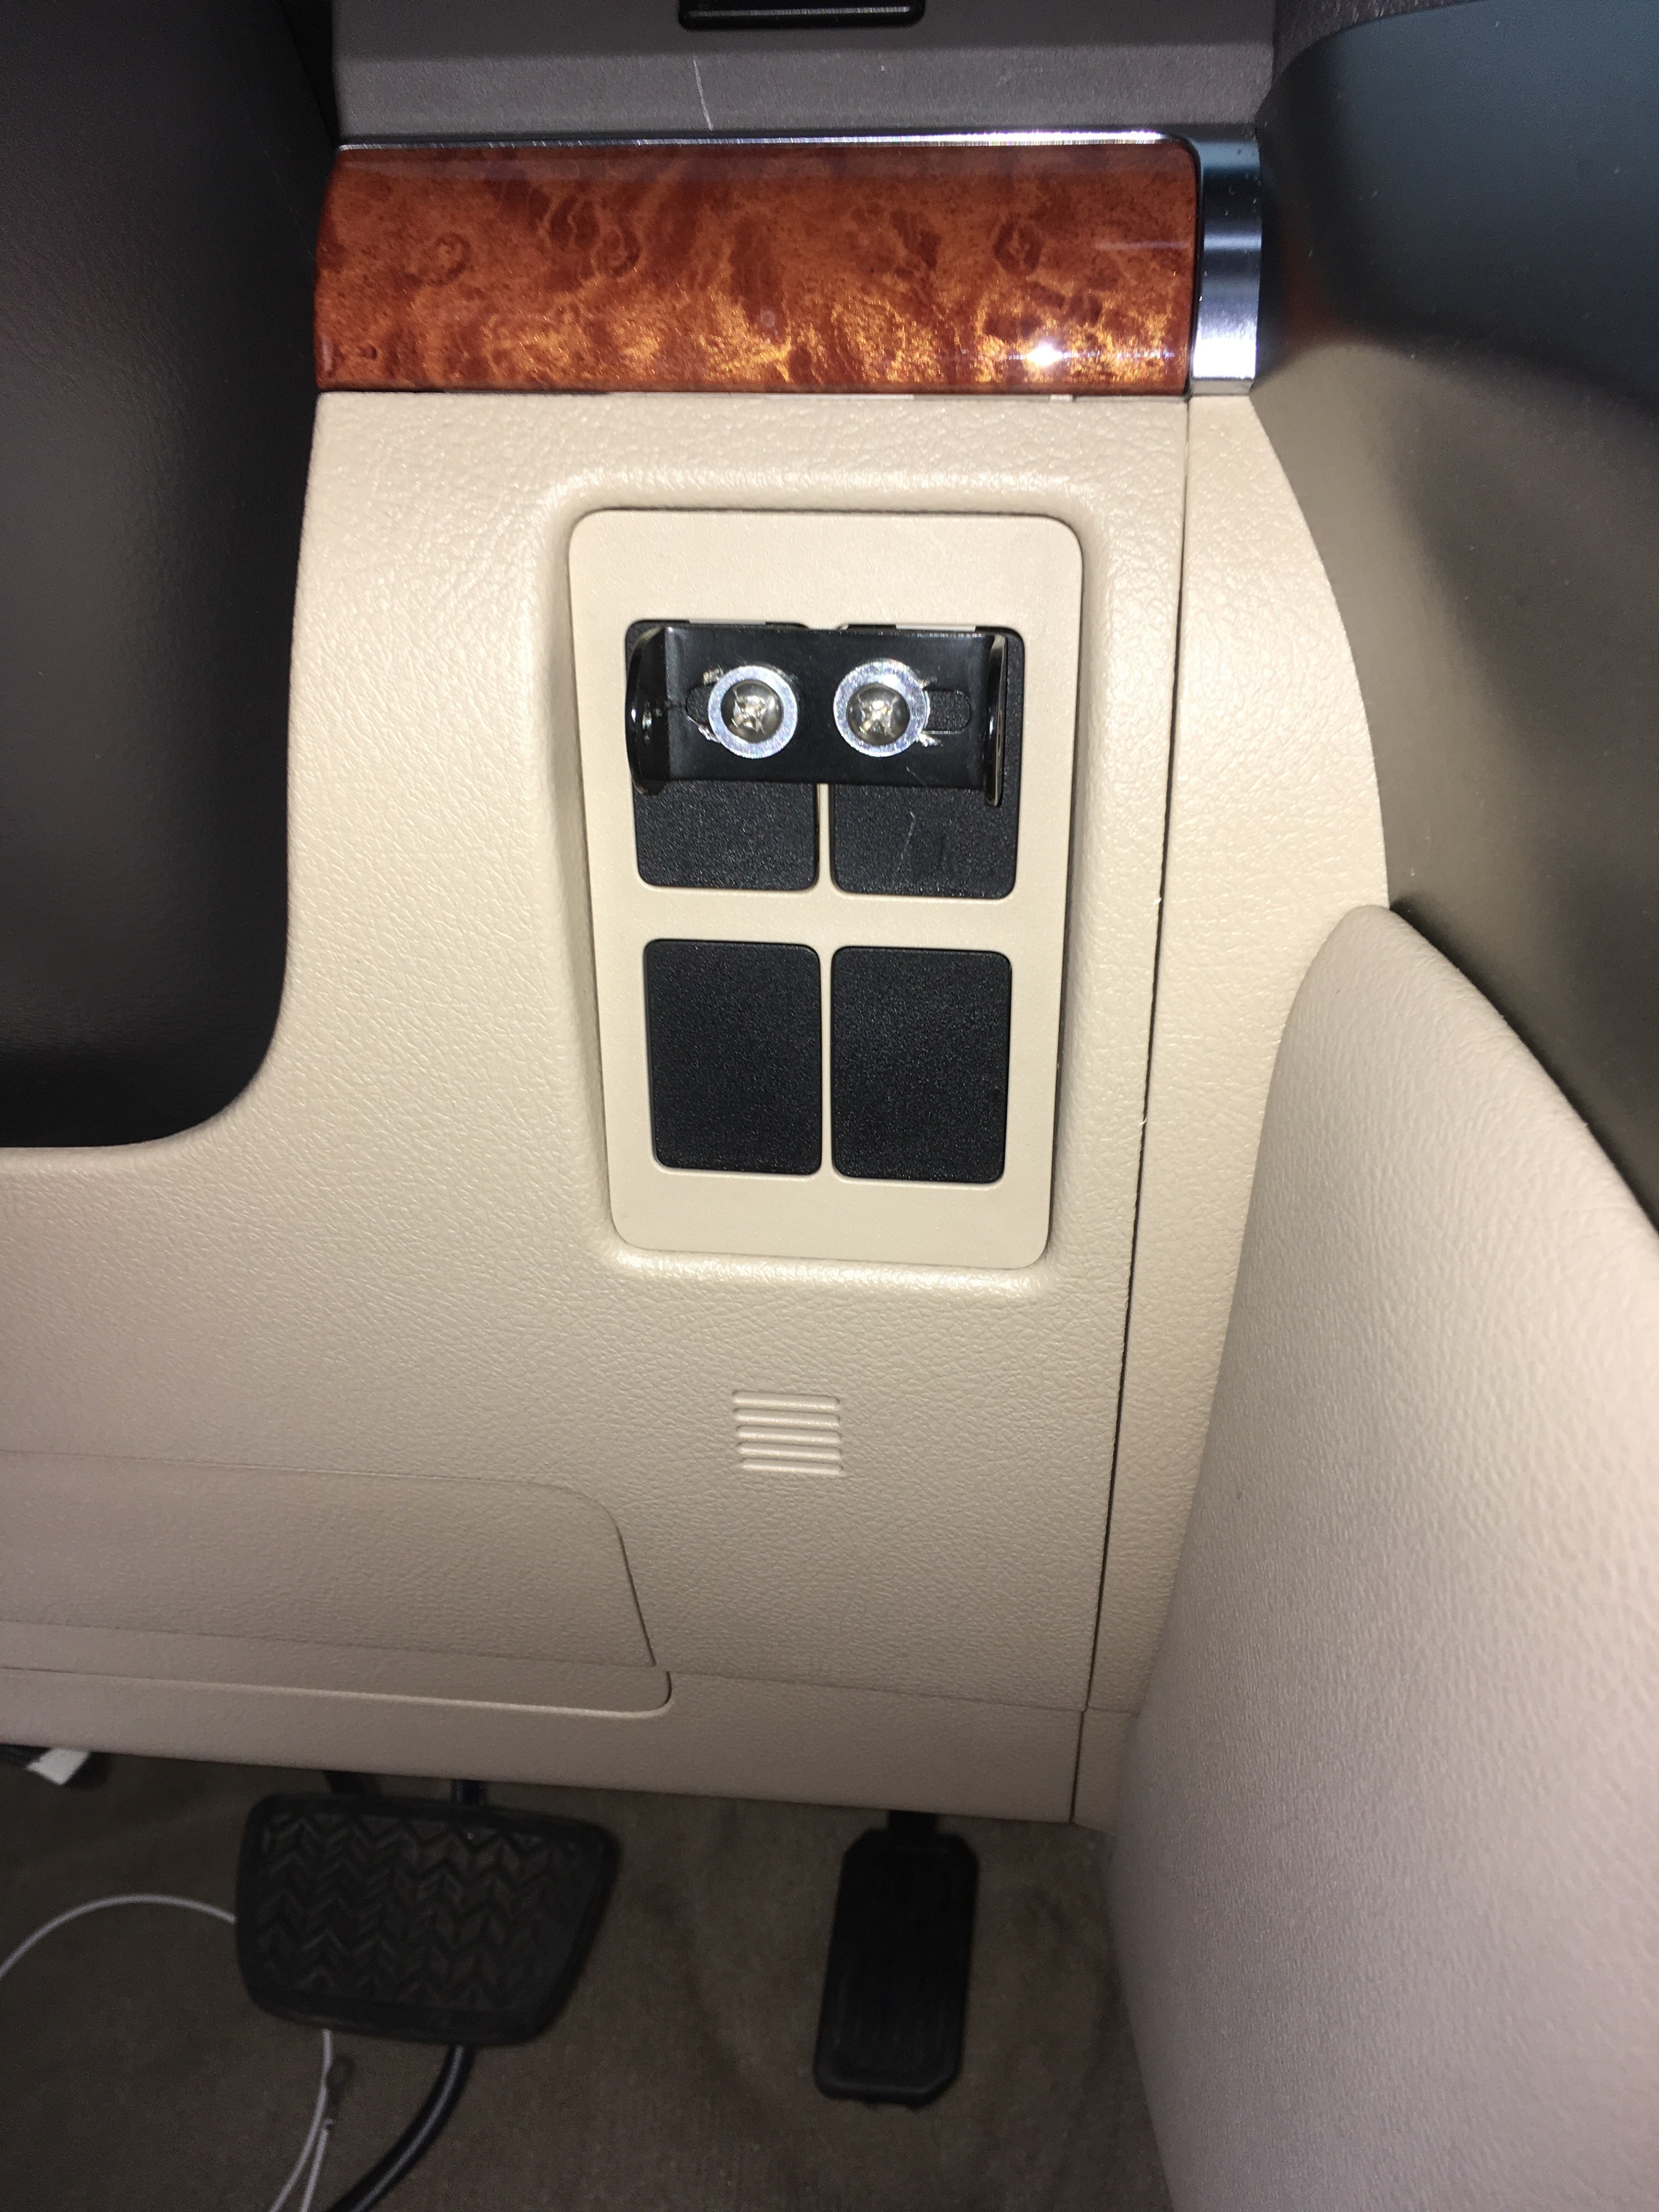
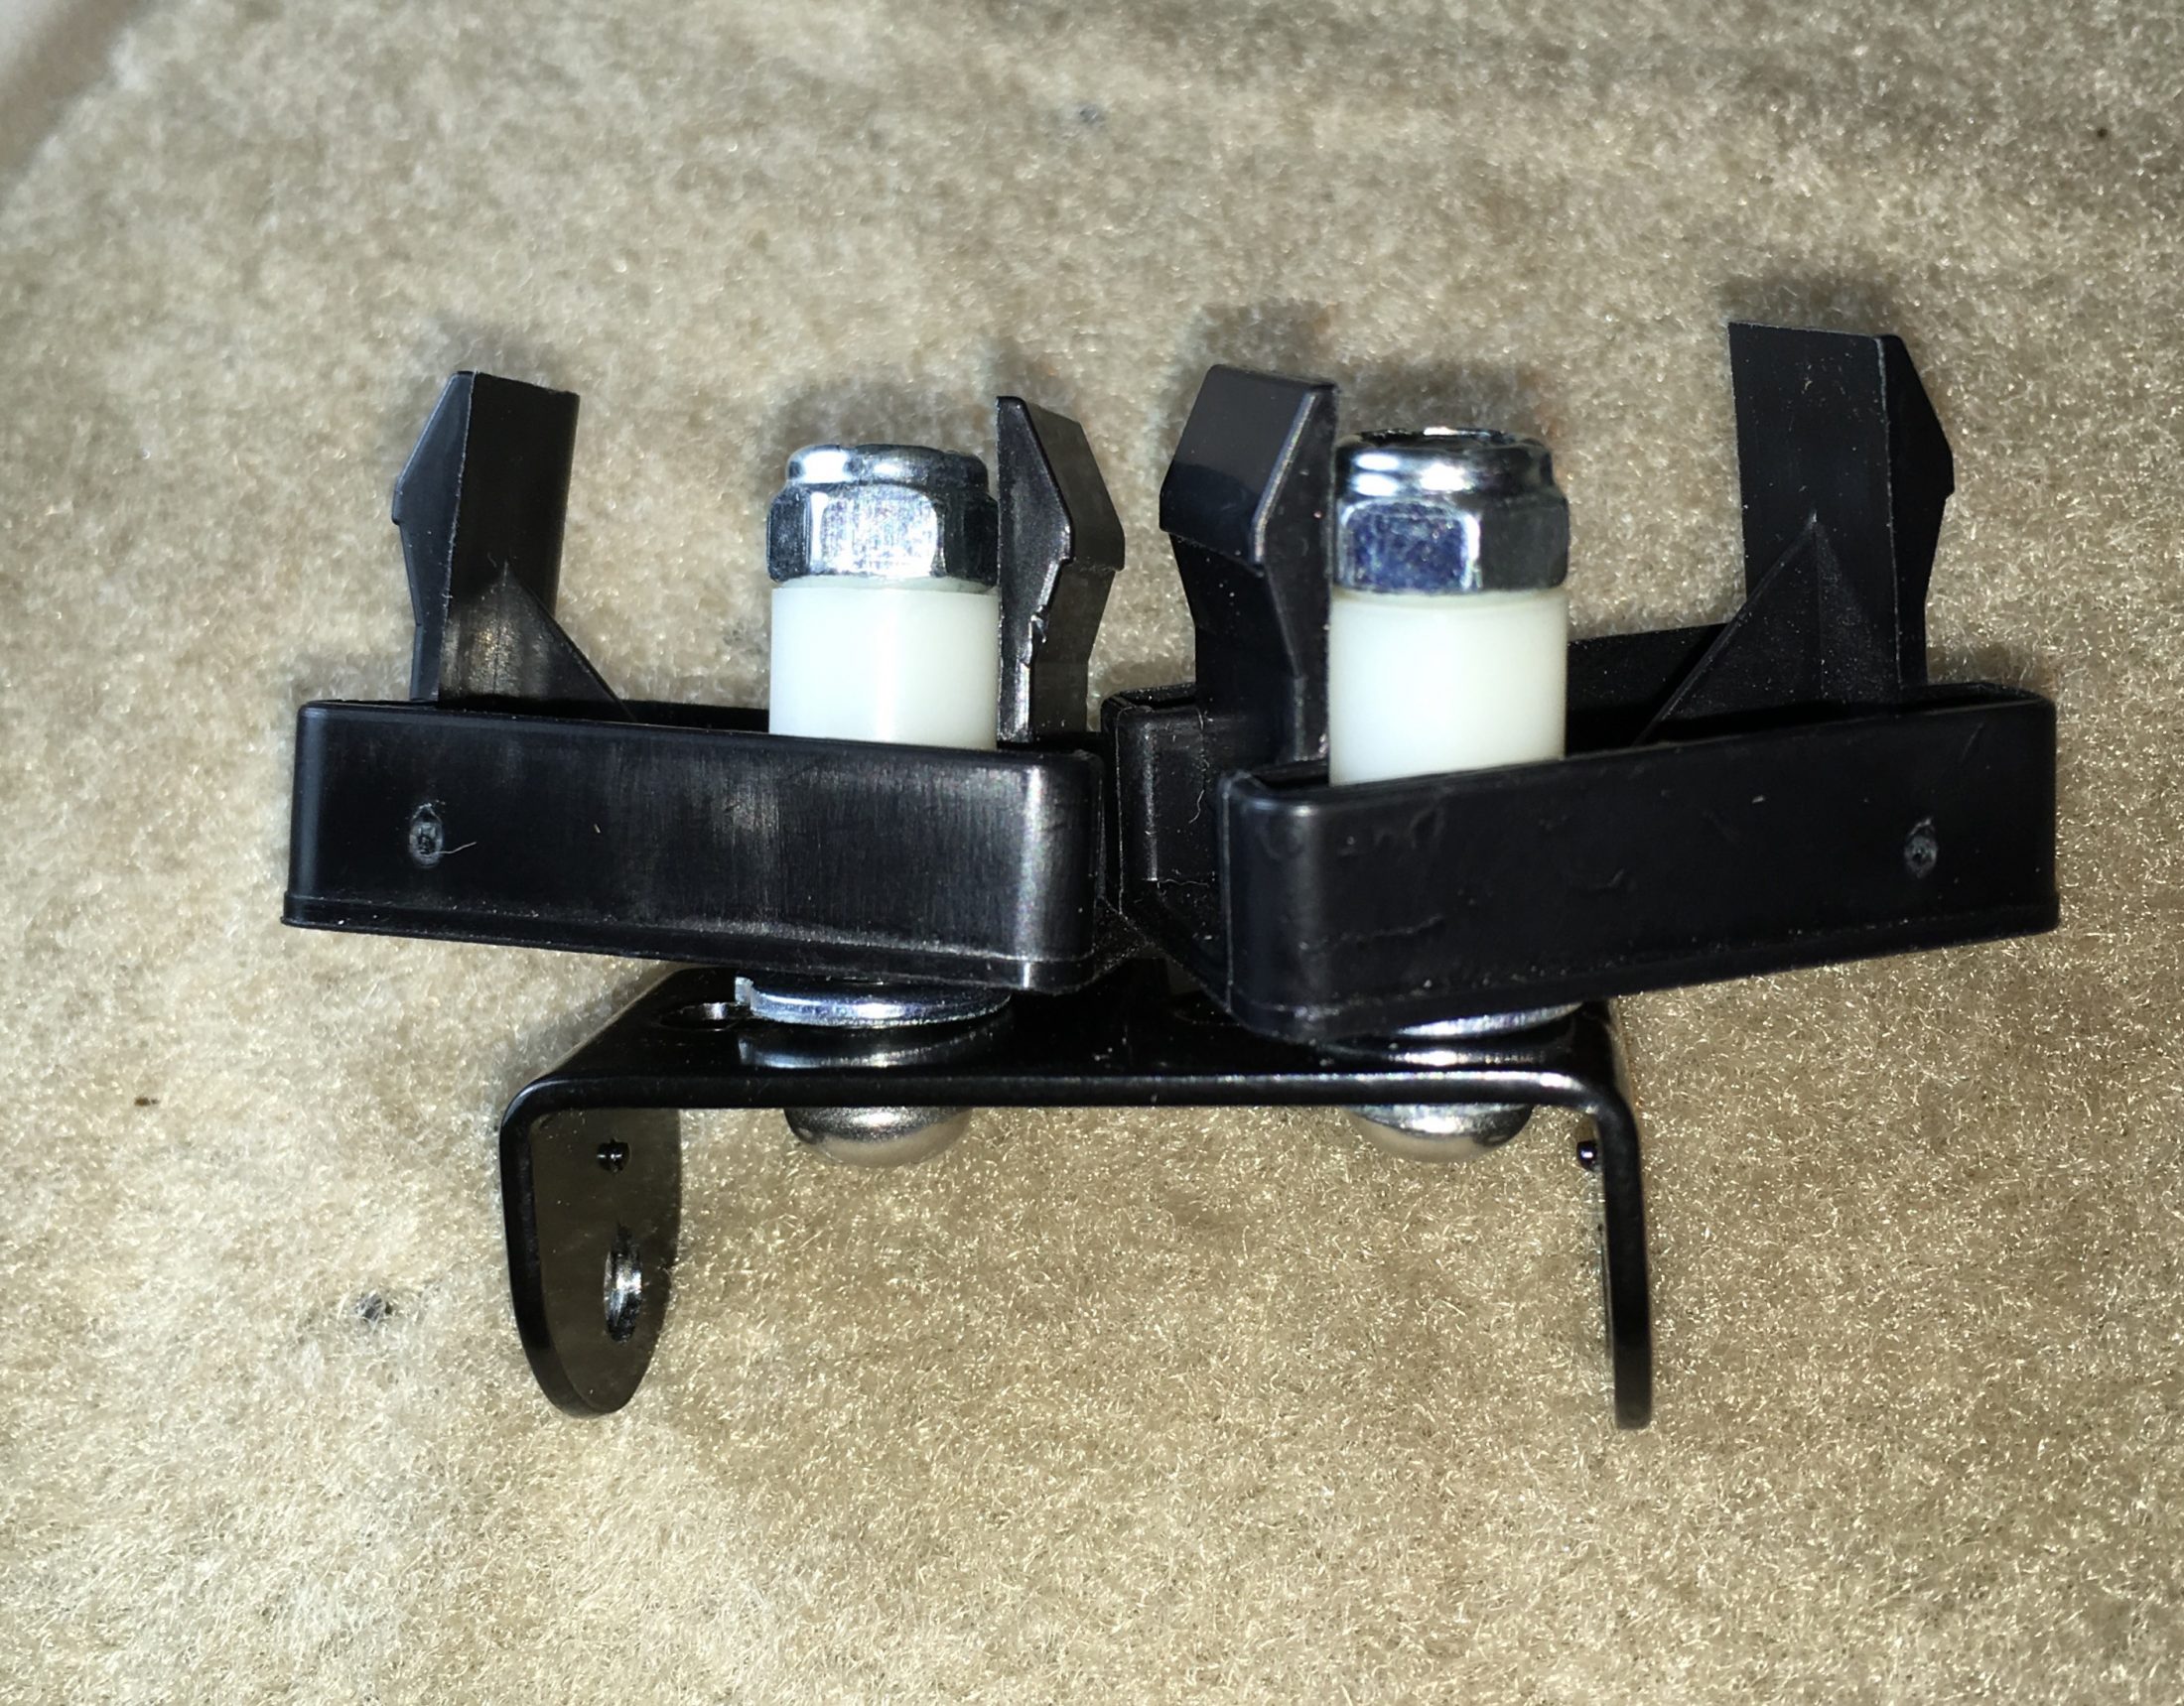
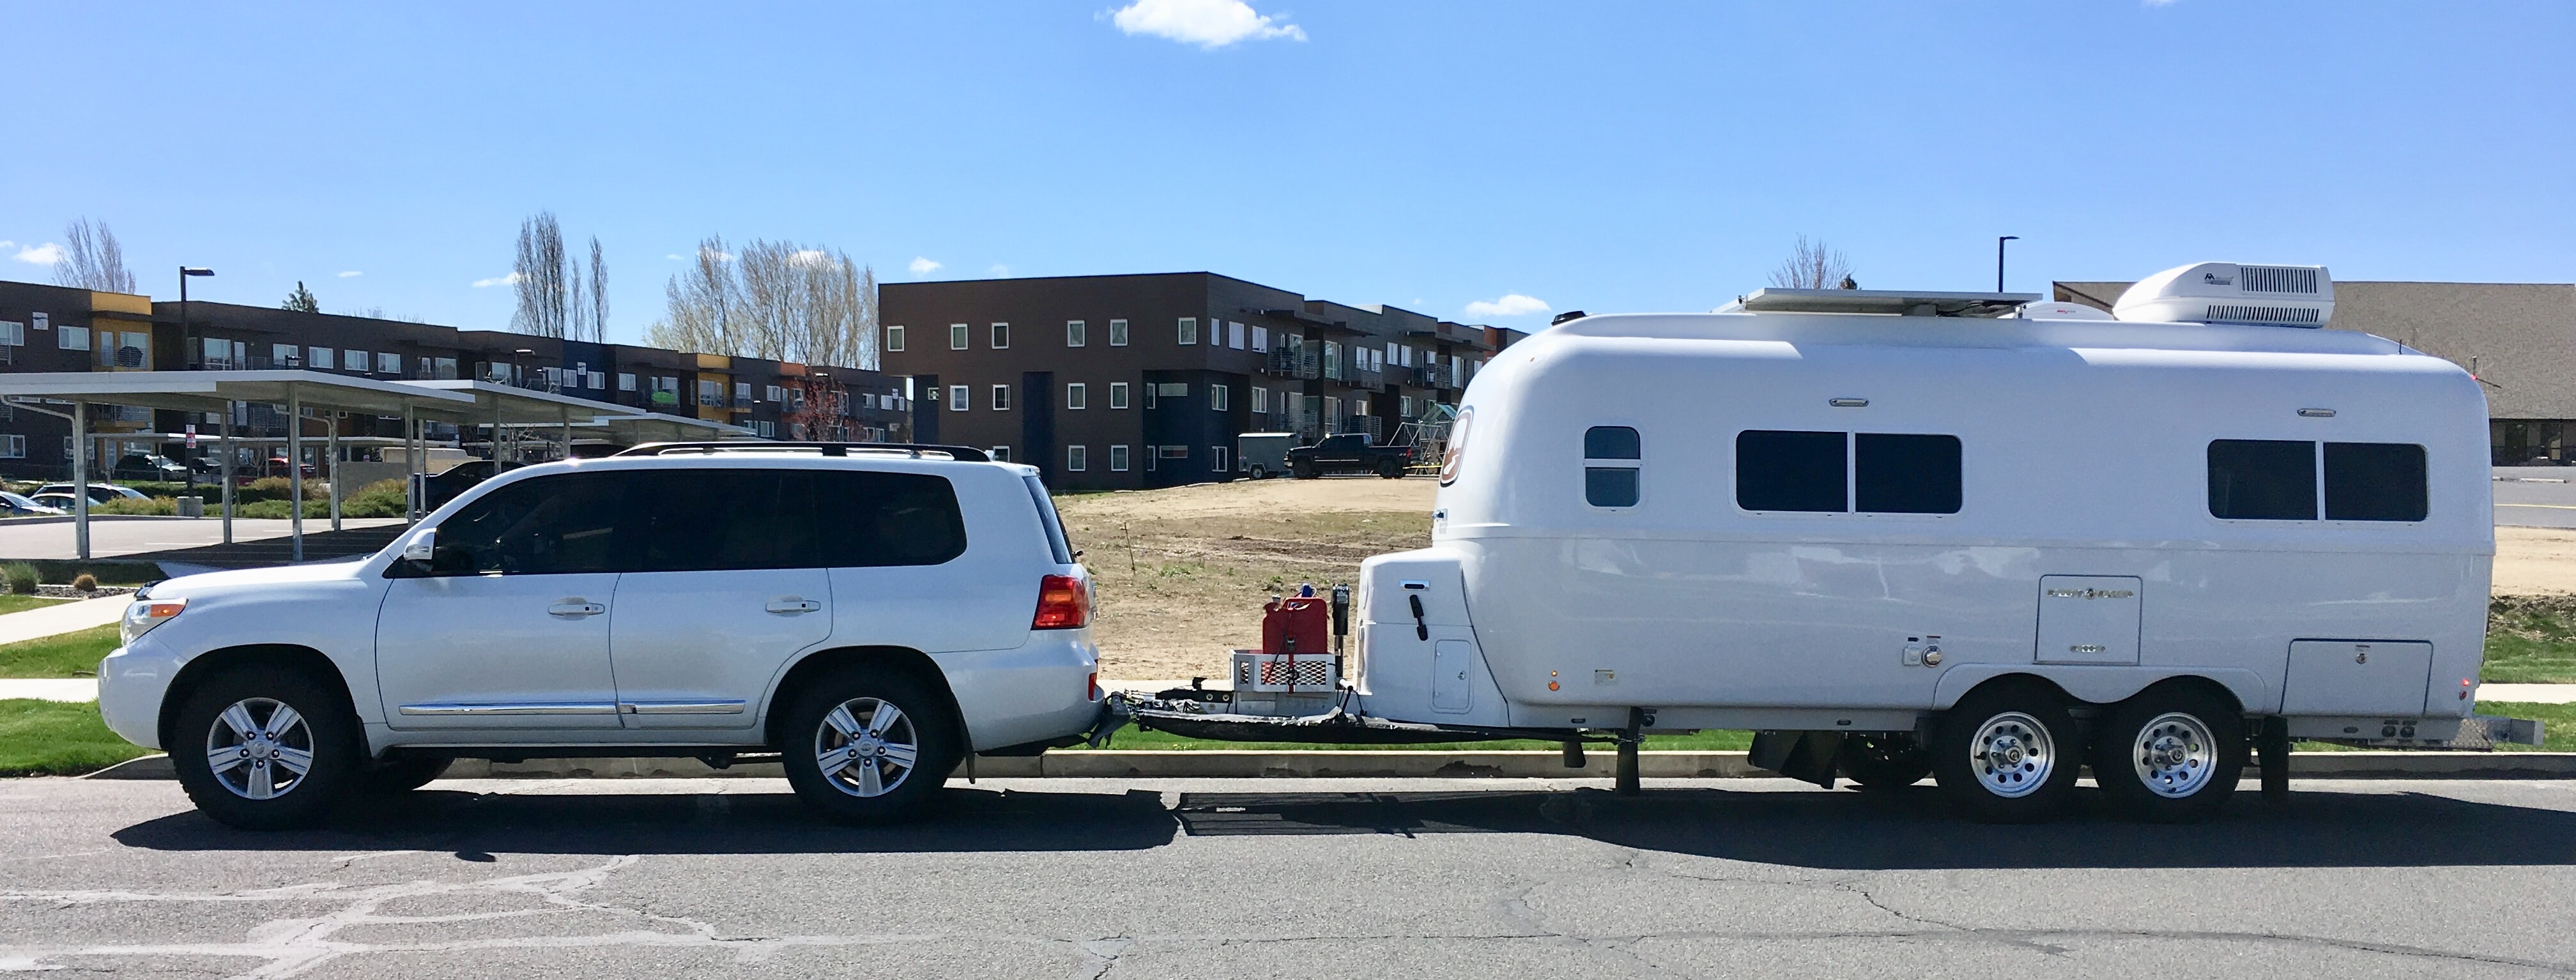
I will put any tow vehicle info and pictures here in this new thread as I get my new 2013 Land Cruiser 200 sorted and adjusted. Today I mounted the Tekonsha P3 from my old Ram onto the dash, below the wiper stalk. It is the best spot that I could find. I popped out the switch panel that has four dummy unused switch plates and mounted my P3 bracket through the top two plates, using 8-32 x 1 inch stainless machine screws with 1/2 inch long nylon spacers and nylock nuts on the back. If I decide to remove the controller, all I have to do is buy two new plates and pop them into place. I used a Tekonsha Toyota wiring adapter and ran the cable out from under the dash to the right of the OBD connector. The unit is blocked by the wheel when steering straight ahead but is easily seen if the wheel is turned a few degrees, and it is super easy to reach the buttons and, most importantly, the Emergency Lever. I tow tested the Ollie for about 30 minutes and it is definitely in need of an Anderson hitch, which I ordered today. It tows well on smooth roads but the butt end of the truck pogos badly over large undulations and dips. It never felt out of control, but the steering feels light and it definitely does not feel settled and comfortable. Here is Mouse hooked up the the Cruiser, butt low in my driveway, in front of the RV bay, AKA "The Hanger Deck". Tongue weighs 575 pounds with one gas can full and the other three empty, using my nifty new hydraulic tongue weight scale. The truck settled almost 2.5 inches under the dead weight. More to come, my hitch arrives in three days. John Davies Spokane WA
1 point
-
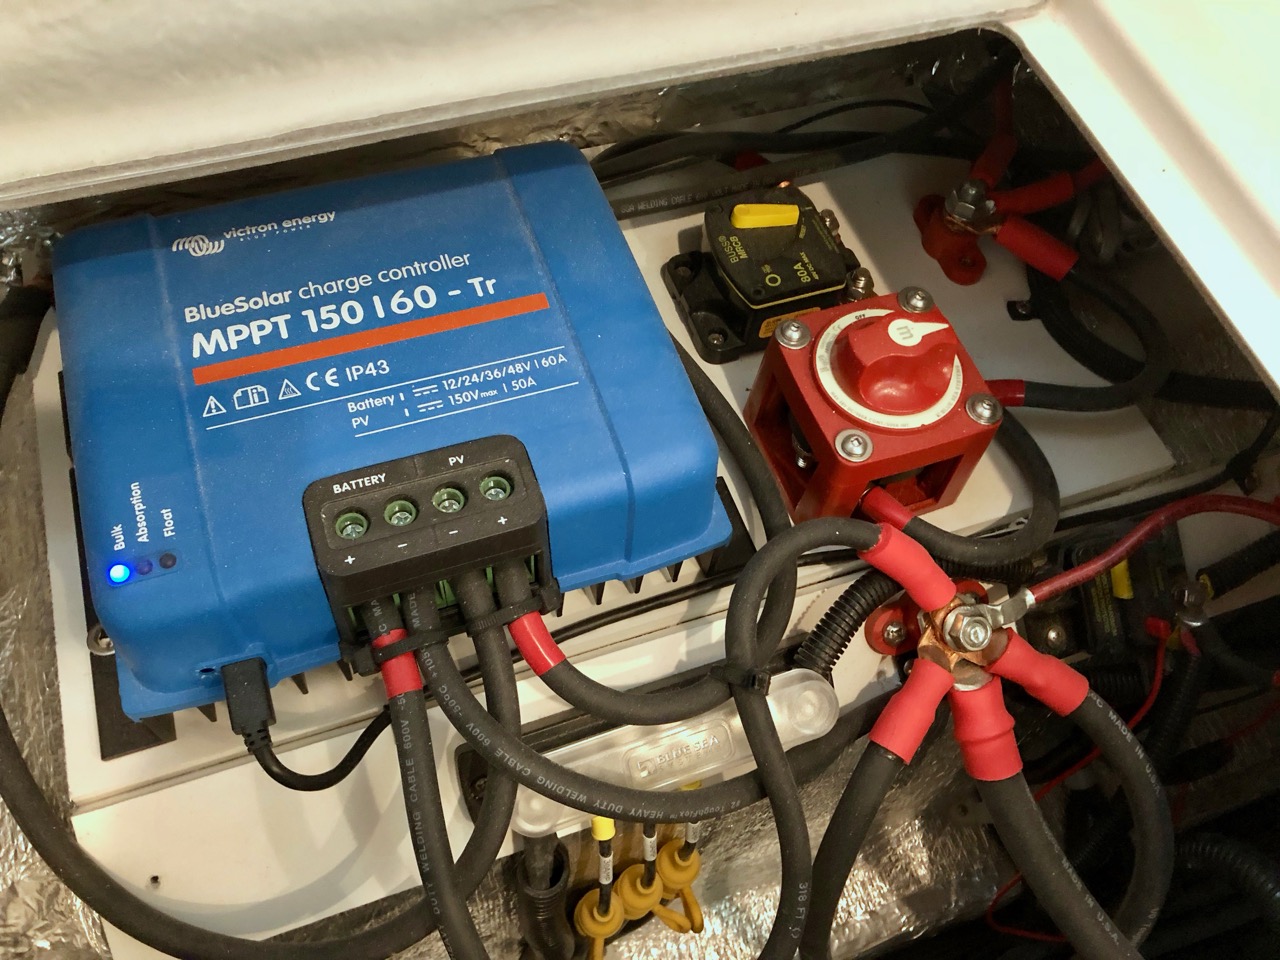
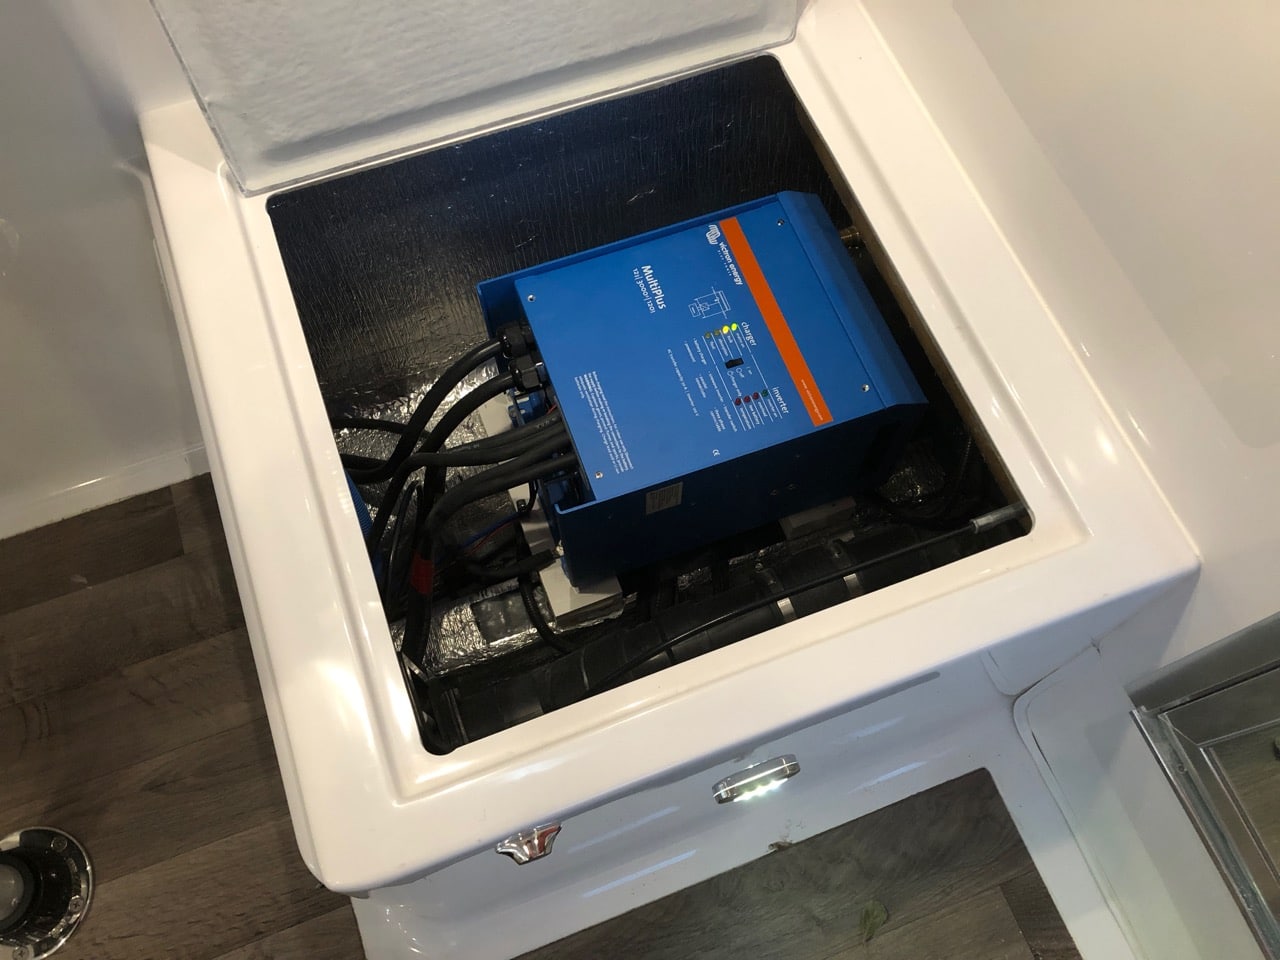
Starting a new thread since the other one seems flaky. This is mostly for Mike since I can't figure out how to send photos via PM. I'll do a big post on my electrical setup someday, after I've redone a few things and added a different hookup for my portable solar. Mike, this is the inverter itself, mounted under the dinette seat by the bath. You have to run pairs of + 12v, at least 1/0 AWG, in and out and also 120v both ways. And a ground strap to the case, so that's 7 large cables plus a coms cable and a temp sensor wire. I ran the 120v along the side and the 12v, ground and and coms through the trough under the dinette. I plan to pull the inverter and screw down a plywood base to secure it better, though it seems fine as it is, screwed into 2 layers of PVC. One thing I do want to do on this end is to install a manual transfer switch for the 120v, in case something ever happens with the charger. [attachment file=IMG_0078.jpg] The inverter has plenty of space for airflow in there. The only time I hear the fan is if I'm really loading it to the max, or if it's really quiet in the trailer when I just plug it in and it's bulk charging the batteries. This is the 12v + side, under the street side bed. Solar comes in at the top right, + goes to the combiner post, then to the cutoff, then though an 80a breaker, then snakes around into the charge controller. + out goes to the combiner post on the lower right, as does the twin + 1/0 from the inverter and the 4/0 + from the batteries, as well as Oliver's cable to their + bus. The bus bar and breaker on the small angled PVC panel are both Oliver's. I moved them a bit to get the post on there but otherwise, I tried not to touch anything on Oliver's side of the electrical. The battery + goes through a cutoff and a 400a fuse first, which are mounted out of sight on this side of the battery box. Solar negative goes around the back of the charge controller onto a combiner post that's hidden, then around the left side and in. Negative out goes down the open space in the hull to the terminal in the next photo. When I redo all of this, I'll add a much larger plywood base, swap the main combiner post for a bus bar, move the battery cutoff and fuse to the board for easier access and generally tie everything down better. Negative connections are kept away from the + on the dinette side of the battery box. Battery - goes into the shunt for the battery monitor, then I have the charge controller coming directly off the shunt and a short 4/0 jumper to a combiner post. Off that goes the twin 1/0 from the inverter, the ground from the inverter, and Oliver's - cable which goes into their distribution box. I removed the charger unit from their box so it's just a fuse and breaker box for me now. I'll redo this in plywood, swap out the combiner post for a bus bar and secure the wiring better.
1 point
-
Nominated for Best Thread Ever1 point
-
Amazon tells me that item will not fit my 2014LC. Did you look at the TIMBREM TORLC1 System at all?1 point
-
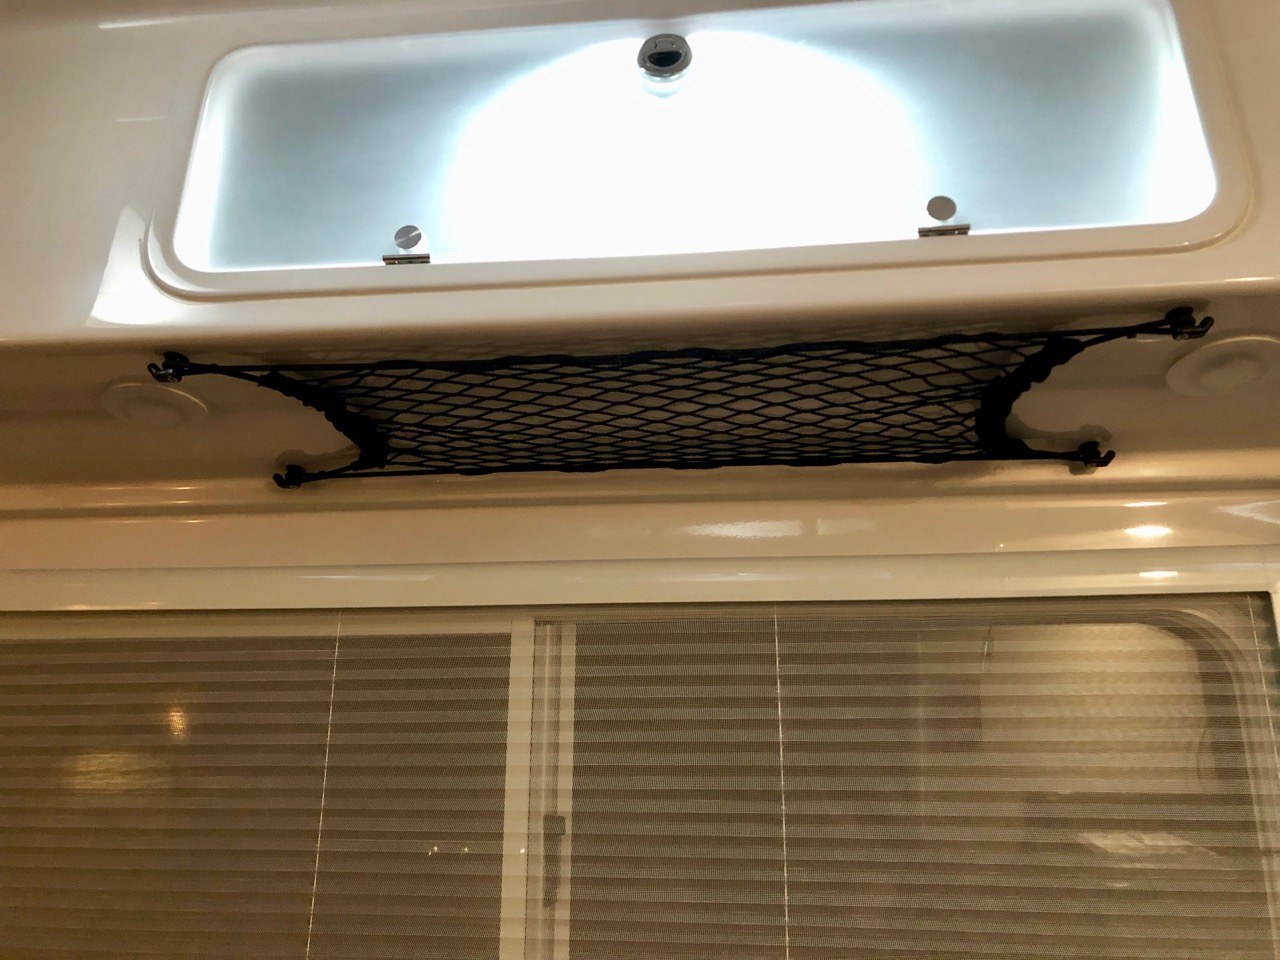
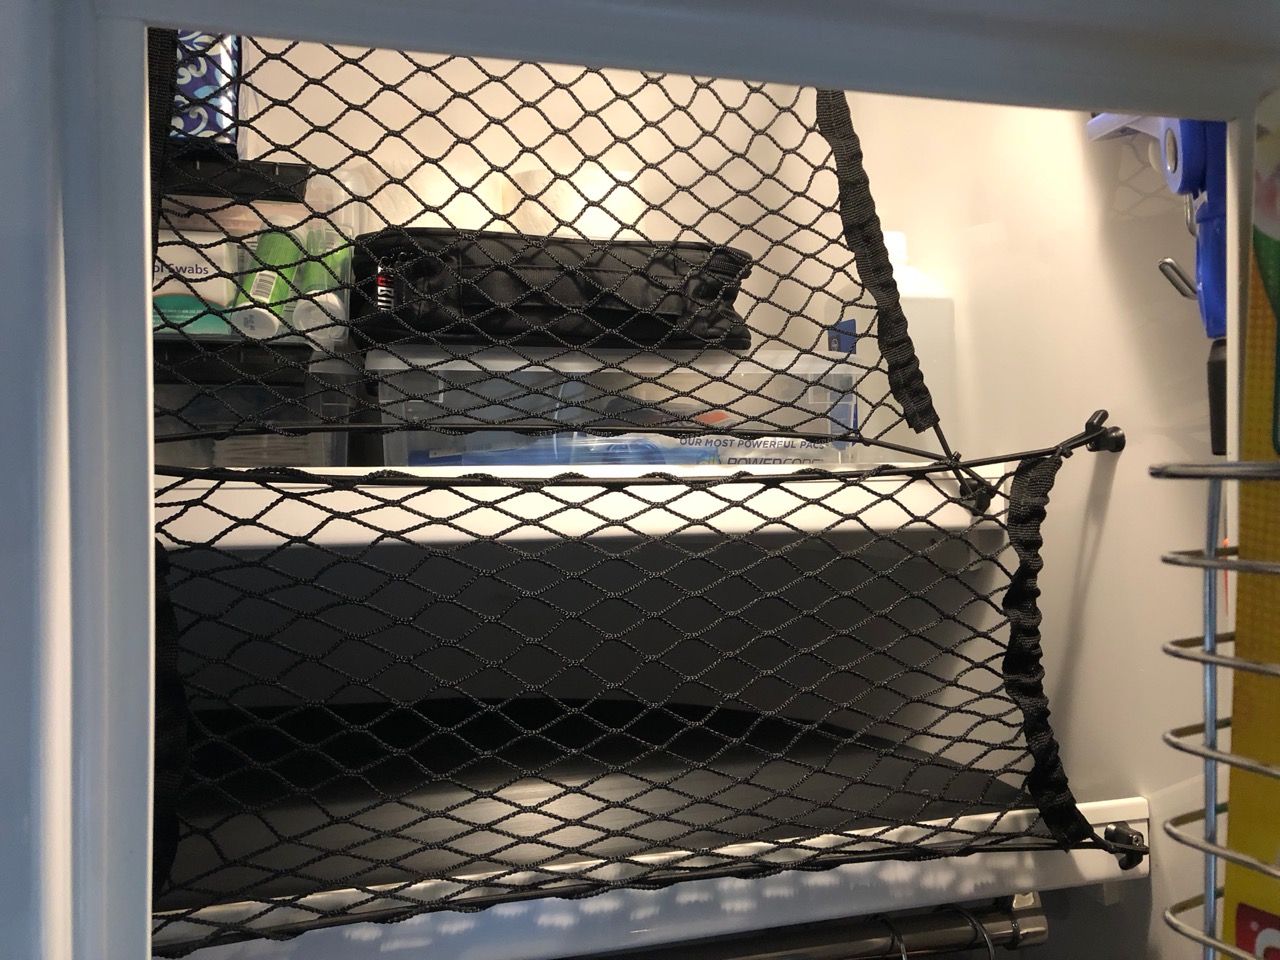
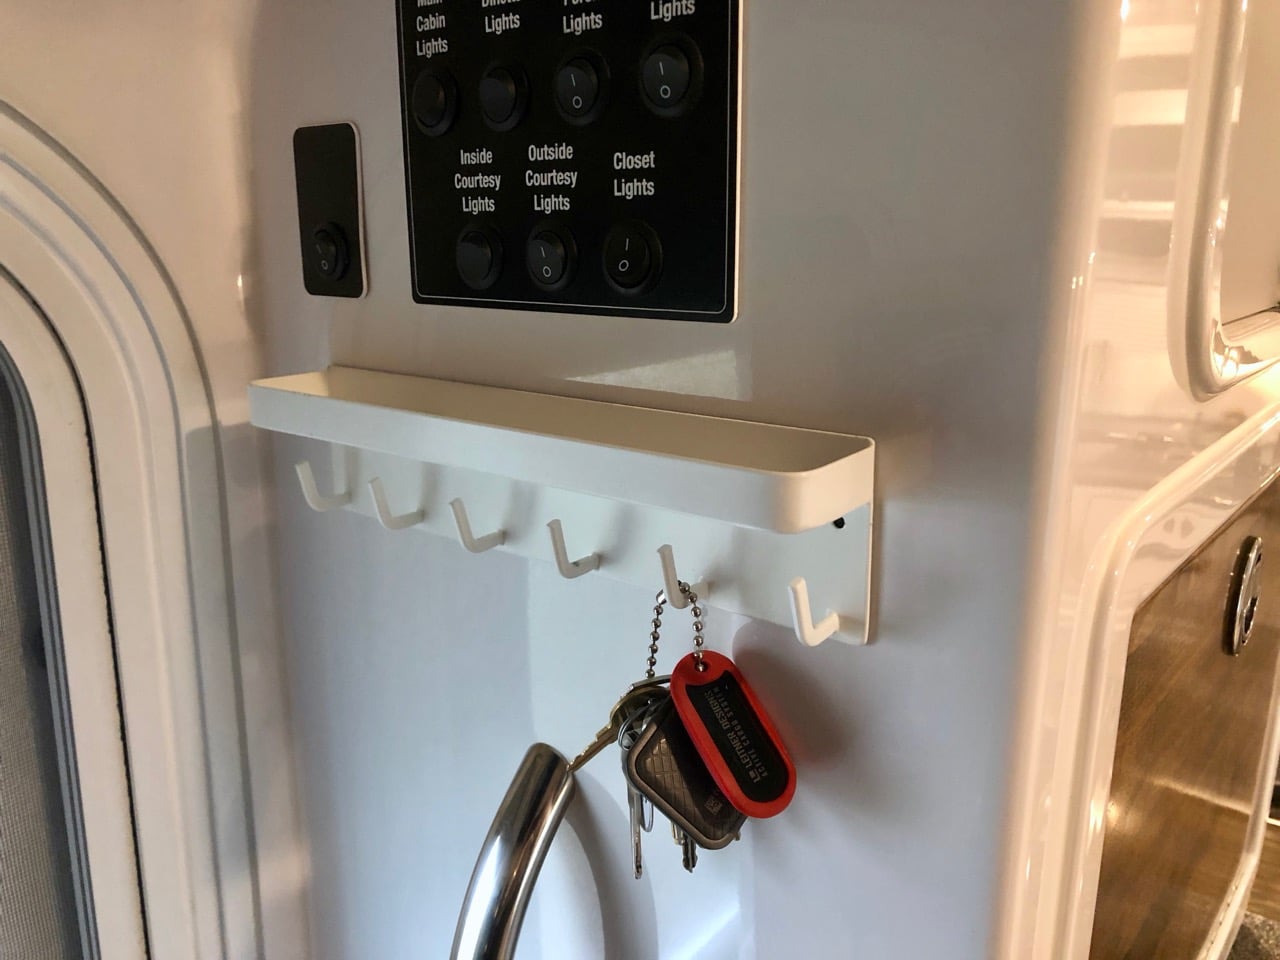
Someone asked about the cargo nets we installed. I bought several of these and two of these. They're a bit expensive for nets, but they're well made, and most importantly, the only ones I could find in those sizes. The smaller ones we have over the front door, over each bed, and then we also use two in the closet to hold in stuff on the shelves and one in the attic. One of the long ones I put under the street side bed to stash shoes, and the other went under the attic - that one we use the least. The one over the door gets hats and gloves and is the perfect solution for us for that stuff. The ones over the beds get down jackets or maybe a sweatshirt and also gets overflow clothes storage from the cabinets above. Under the attic is mainly a spot for day to day stuff that get's brought into the trailer, like maps and brochures. I just like having a place for all of that stuff so it doesn't go onto the beds or countertops. With such a small space to live in, I find that if there's a place for stuff within reach, then you'll use it and things stay pretty neat. We also bought a couple of these to go on the sides of the nightstand. They're great for stashing the phones while they charge. A few other organizing things we really like - This key holder is great by the door. We usually keep a flashlight on the shelf. These baskets for plastic wrap and stuff have really worked out well for us. I glued strips of 1x2 PVC to the door with 4200 and then screwed the baskets into that. Most everything we store goes into these stackable plastic buckets. They're small enough to fit places and to be able to see everything in them while still being large enough to hold stuff. I wish I could find some a little smaller that would fit more efficiently into the upper cabinets. Also, I noticed on this last trip that one of the handles had snapped so time will tell if these are rugged enough to last. For basement storage, I found that the rectangular milk crates fit perfectly and really keep the basement organized. In the very back, we have spare parts in several of the plastic boxes above, but in front of those you can slide one of these crates sideways, which will fill the back section of the basement and be flush to the corner of bed wall, and then two more will slide in lengthways to fill the front section of the basement efficiently. One crate gets water hookups, one gets electrical, and the one in the back gets water filters and things we don't pull out often. The plastic boxes are accessible from the interior hatch that we had installed under the nightstand. Being able to just pull out the two crates in the front when we have hookups and working from them really beats sorting through stuff in the basement. Our grey water hose and propane hoses go in the bumper. Chocks and blocks go in the bed of the truck, along with the grill, stove, fire bowl, and chairs.
1 point
-
Airbags: https://smile.amazon.com/gp/product/B003HJ3JOA/ref=oh_aui_detailpage_o06_s01?ie=UTF8&psc=1 KDSS warnings: http://www.sleeoffroad.com/technical/pdf_files/200_Series_KDSS.pdf Install video: I had a local shop install them, they charged $300, which seemed a little high... I had the two hoses routed to the jack compartment, with 24 inches coiled there so I can pull them out past my generator when fully loaded, for easy access. I use a compact mountain bike high volume hand pump to adjust them. I will take some pics and post them. John Davies Spokane WA1 point
-
I don't think Oliver supplies them any longer. I already had one but did not get one during delivery. Here is a video on how to make one.1 point
-
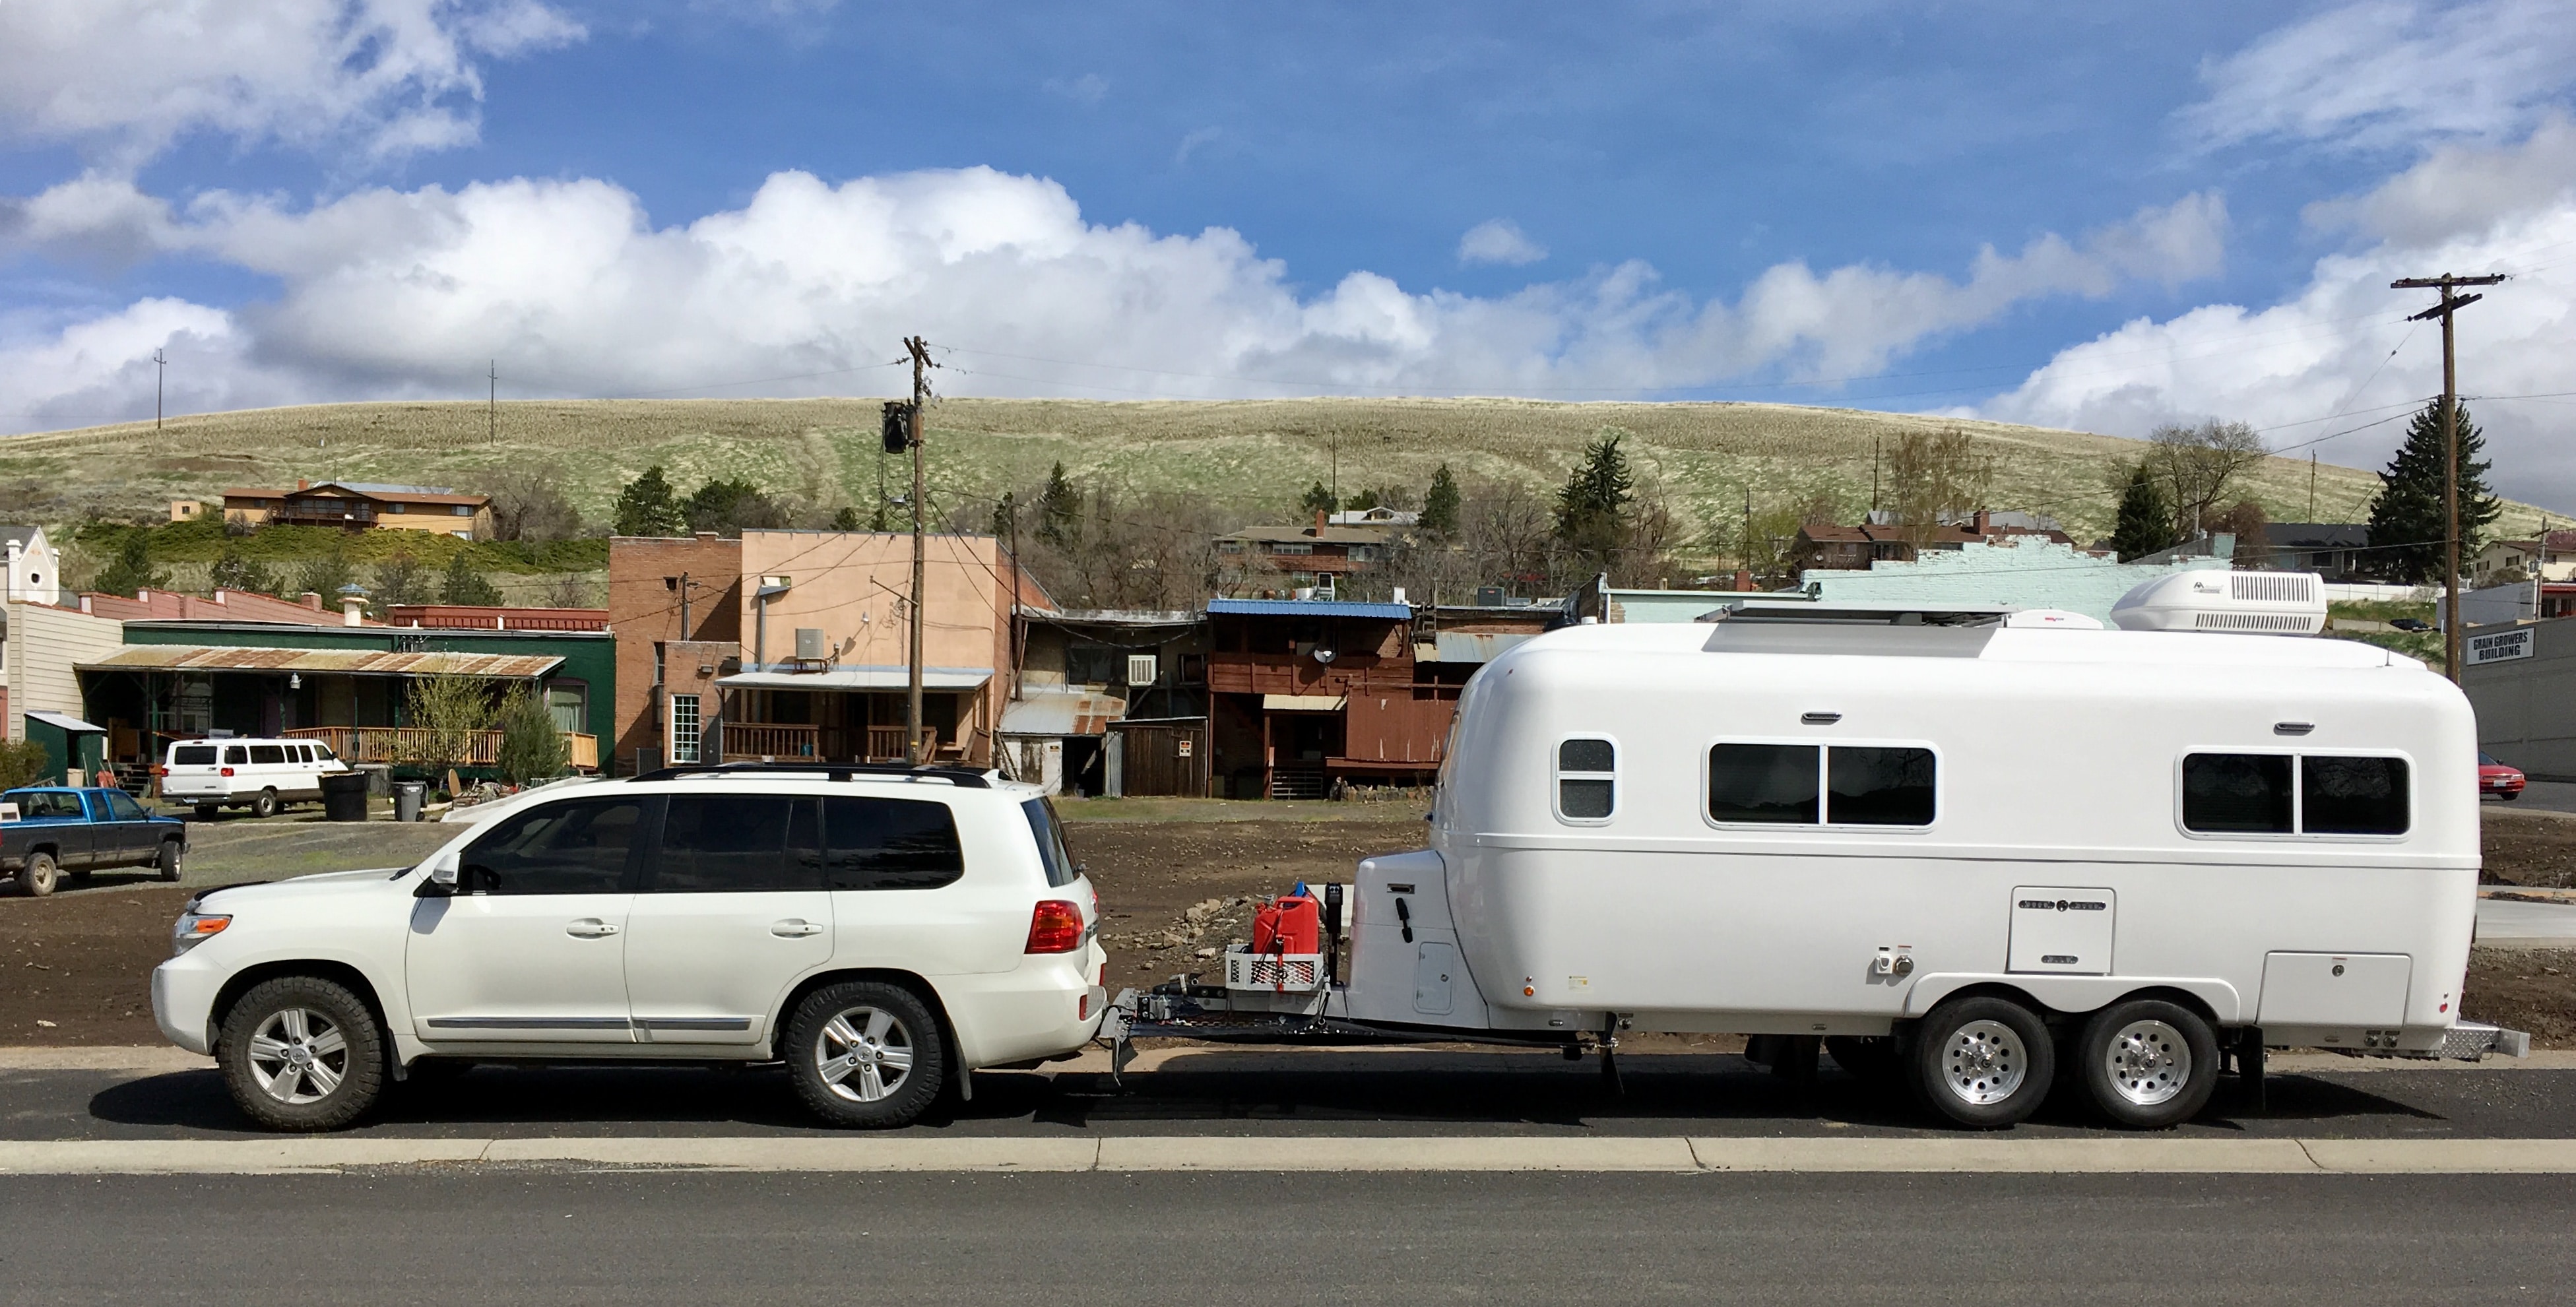
I see no need for extensions. I can see down the sides perfectly well, I canNOT see behind, at all, through the mirrors. In heavy traffic at slow speeds I turn on my Garmin backup camera to let me keep an eye on tailgaters and people pulling out to pass. I strongly recommend a backup camera, spend your money on that instead of mirror extensions. I just added rear airbags in order to allow me better control of leveling when fully loaded. I will report back after my next trip. I think they are going to be useful. The downside is that at minimum pressure (5psi) they raise the back up 3/4 inch and they do stiffen the empty ride slightly. Not necessarily a bad thing, considering how soft the factory springs are. Show me some pics of your 200,how do you like it? Here is my current setup: 5 psi in the airbags, lightly loaded (no water, nothing in the jerry cans, nothing in the back of the truck), Anderson hitch lowered to level the trailer. When I add heavy stuff in back of the 200, I can pump up the bags to carry the extra weight. It may only need 10 psi, I will experiment. Before adding the bags, the 200 was butt low and the trailer was too....it was a little dorky looking, like this: Now it is more betta! John Davies Spokane WA
1 point
-
I did some research on the web before I was ready to drill through the fiberglass. It was recommended to put down masking tape and drill through that to prevent splintering of the gel-coat. It was also recommended to wear a mask to prevent inhaling fiberglass particles.
1 point
-
Absolutely. I've learned to go maybe one bit size up from what I normally might use. I just hold the bit in front of the screw and pick the largest size that still allows me to see some thread beyond. And I've found that you're more likely to crack the gel coat with the screw than the drill bit. Also, if you're drilling a larger hole and want to drill a pilot hole for the larger bit, then just drill enough to get a good centering divot in the gel coat. If you drill deeper with the pilot, then you're more likely to catch the edge of that hole with the larger bit and pop off a bit of gel coat. I think it's inevitable to have some chipping or crumbling around the edge of the hole, since the gel coat is so brittle, especially the white. But I've yet to have a disaster, knock on wood. The only visible scars I've made were inside the closet like I mentioned above, and then inside the battery box, where I drilled out a large hole to run 4/0 cable, but when I went back to the hardware store to get a grommet for the hole, they were out and only had one size larger. Stupidity forced me to try and enlarge the hole and the drill skipped and gouged the fiberglass about a half inch over. Fortunately it was inside the box and I've learned not to do that.1 point
-
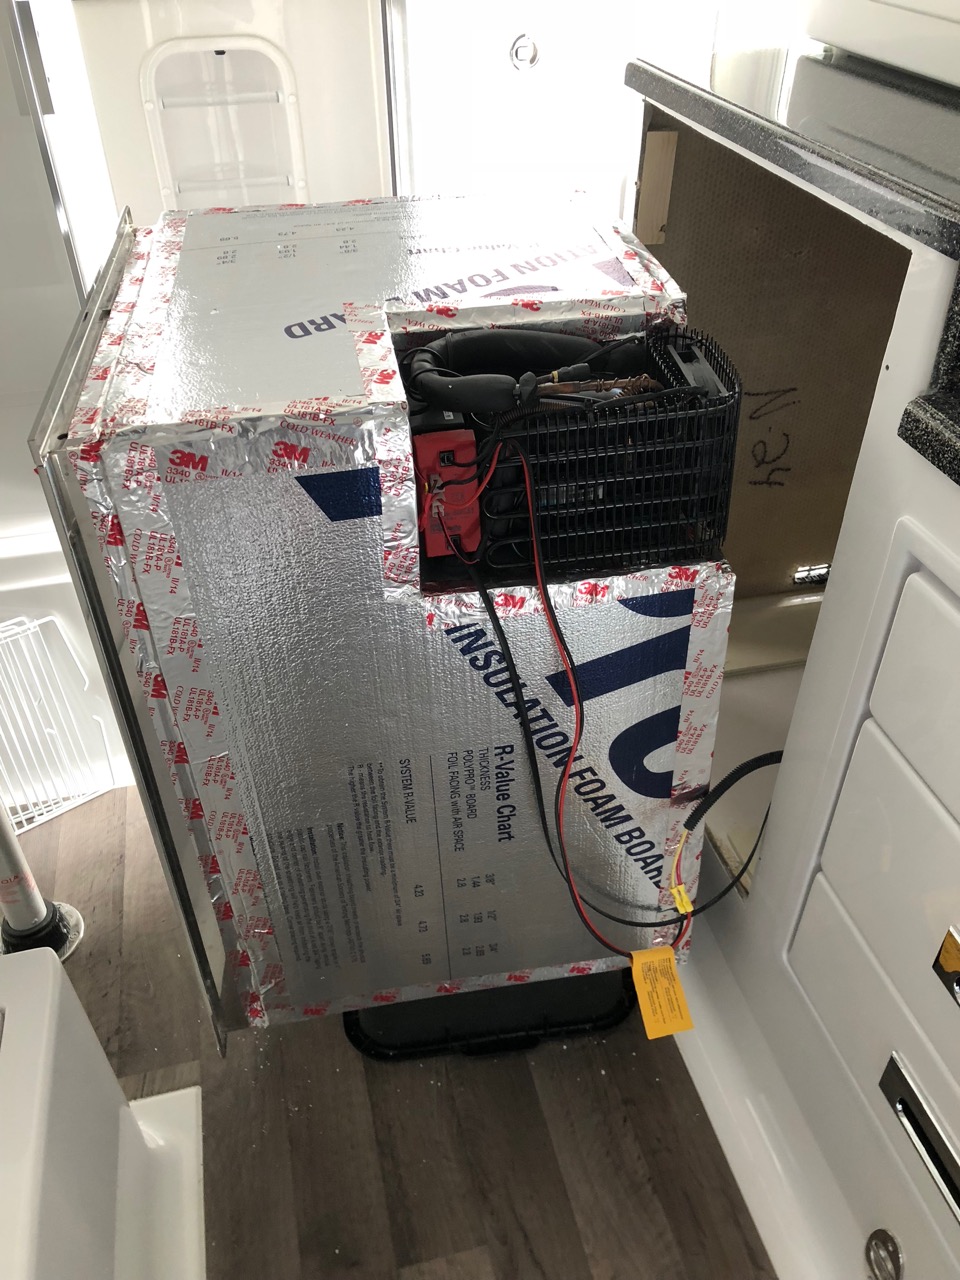
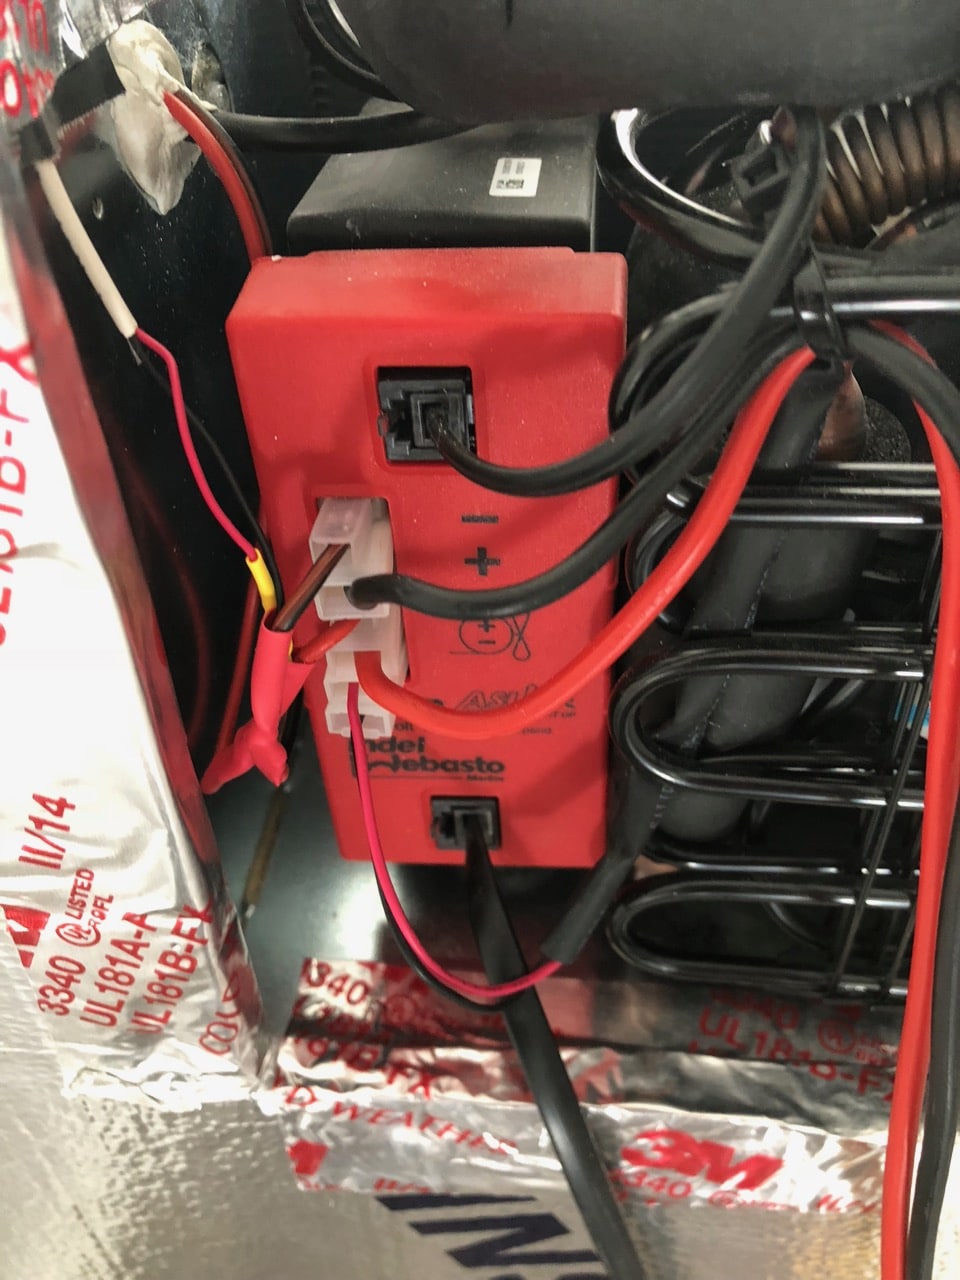
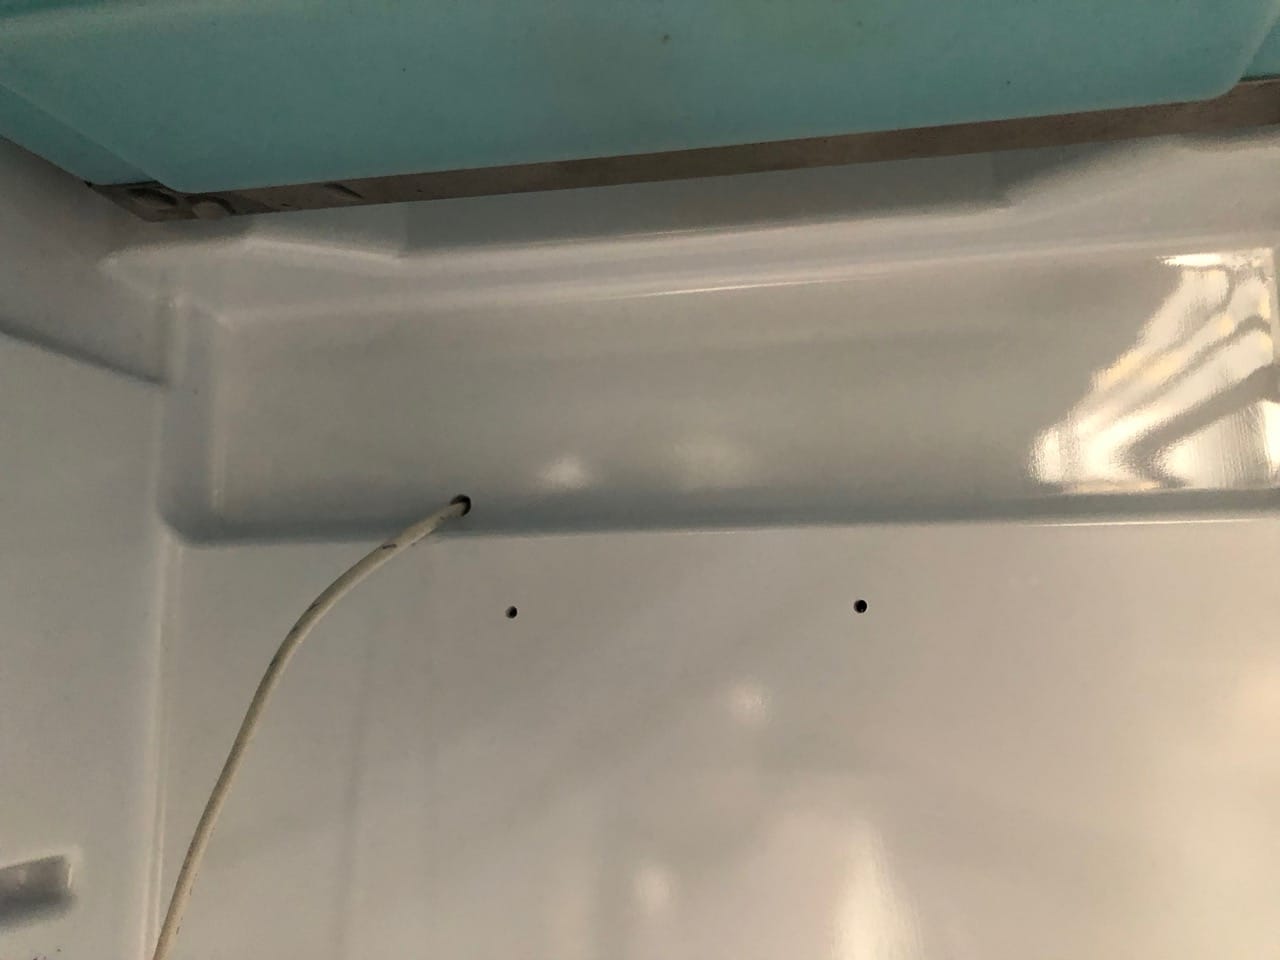
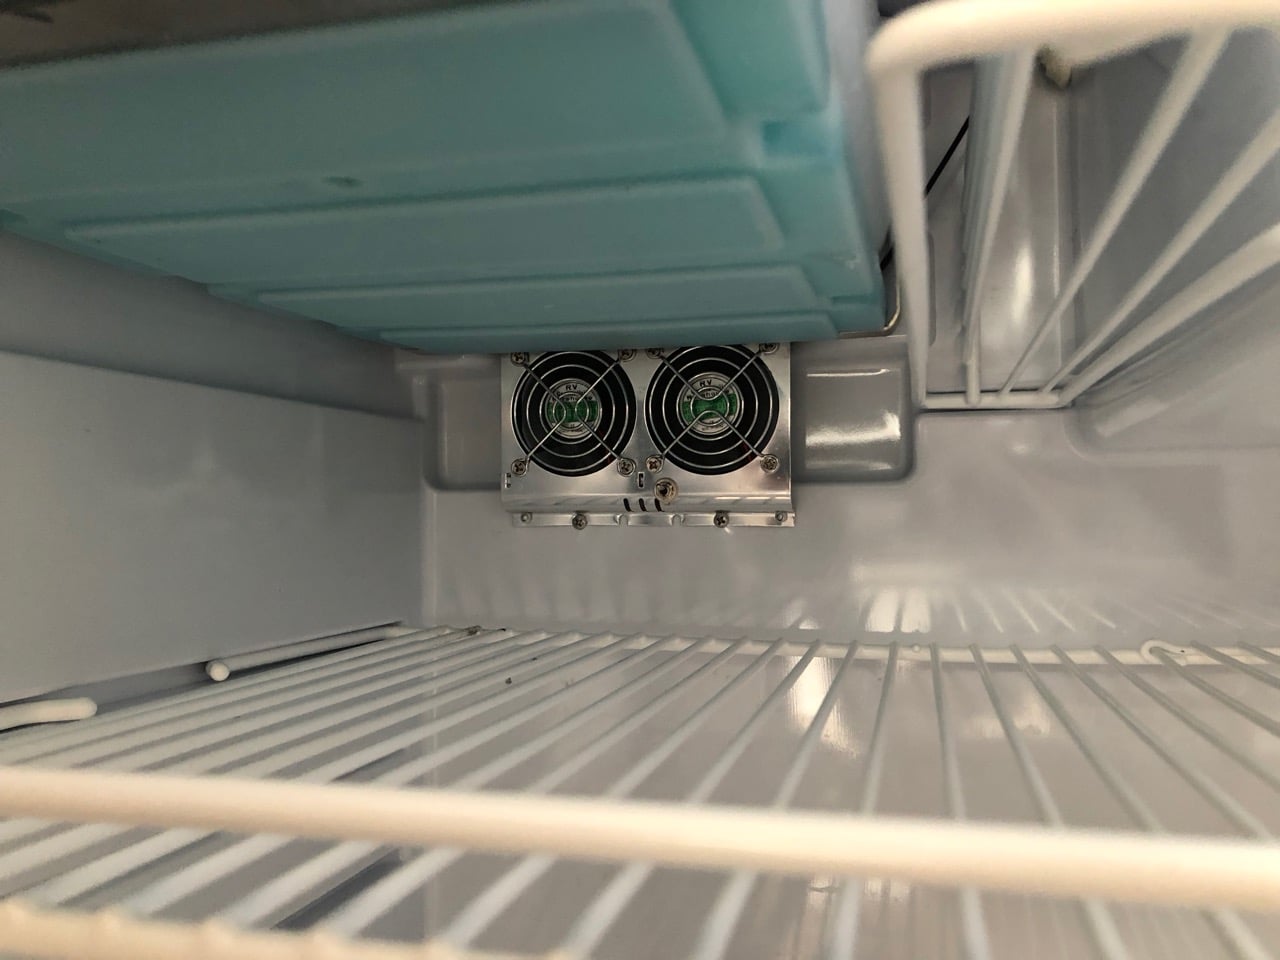
I posted a while back that we were having trouble with cold spots inside our Isotherm fridge. Basically, stuff under the freezer on both shelves would freeze more often than not. So I decided to add a fan just under the freezer to circulate the air. We'll see how it does. This is the fan I got - seemed much nicer than anything else I could find. It has two fans and connects directly to the 12v supply. You can keep the wiring in the fridge and connect to the light, if you have one, or if you don't, or don't want wires cluttering up your fridge you can do as I did and drill through to connect directly to the DC supplying the fridge. I drilled straight through the back behind the fan, ran the wire and caulked both sides. I tapped in to the DC fan supply on the side by the compressor. I had to flip the fans around in the housing since the fan kit is designed to blow into the fins on a dometic fridge. The fan has an on/of switch and seems to draw about 0.1 amp. You can hear it pretty well when you have the door open, but is completely inaudible with it closed. The fan isn't super strong but you can feel the air coming off of it even at the front of the fridge. I decided while I had the fridge out to add a layer of insulation all around. 1" in the back and ⅜" on the top and sides, which is all that would clear the cutout in the fiberglass. It was a tight squeeze even at that. I also spotted a couple fins on the coil that were touching the top of the fridge, which were probably what was causing an occasional buzzing, so I bent those back and generally made sure everything was rattle free. Drilling for the DC power - This is the ASU module on the side of the fridge where I tapped in to the DC. The wire with the white insulation sticking out is to the fan. The yellow bit is an inline fuse that comes with the fan. Not particularly convenient if it ever blows. All wrapped up in insulation. Cut the bejeezus out of my finger on that aluminum tape - And the finished product. I was fortunate that there is that little scallop in the fridge liner right where I wanted to put the fan. Otherwise I'd have had to block it out for airflow. Two screws hold the bottom, and the top is fixed with my favorite 3M 4200 since I didn't have access for screws. A little 4200 on the screws as always to hold them tight -
1 point


-
Recent Achievements
-
")


")


")

