Leaderboard


Popular Content
Showing content with the highest reputation on 06/05/2018 in all areas
-
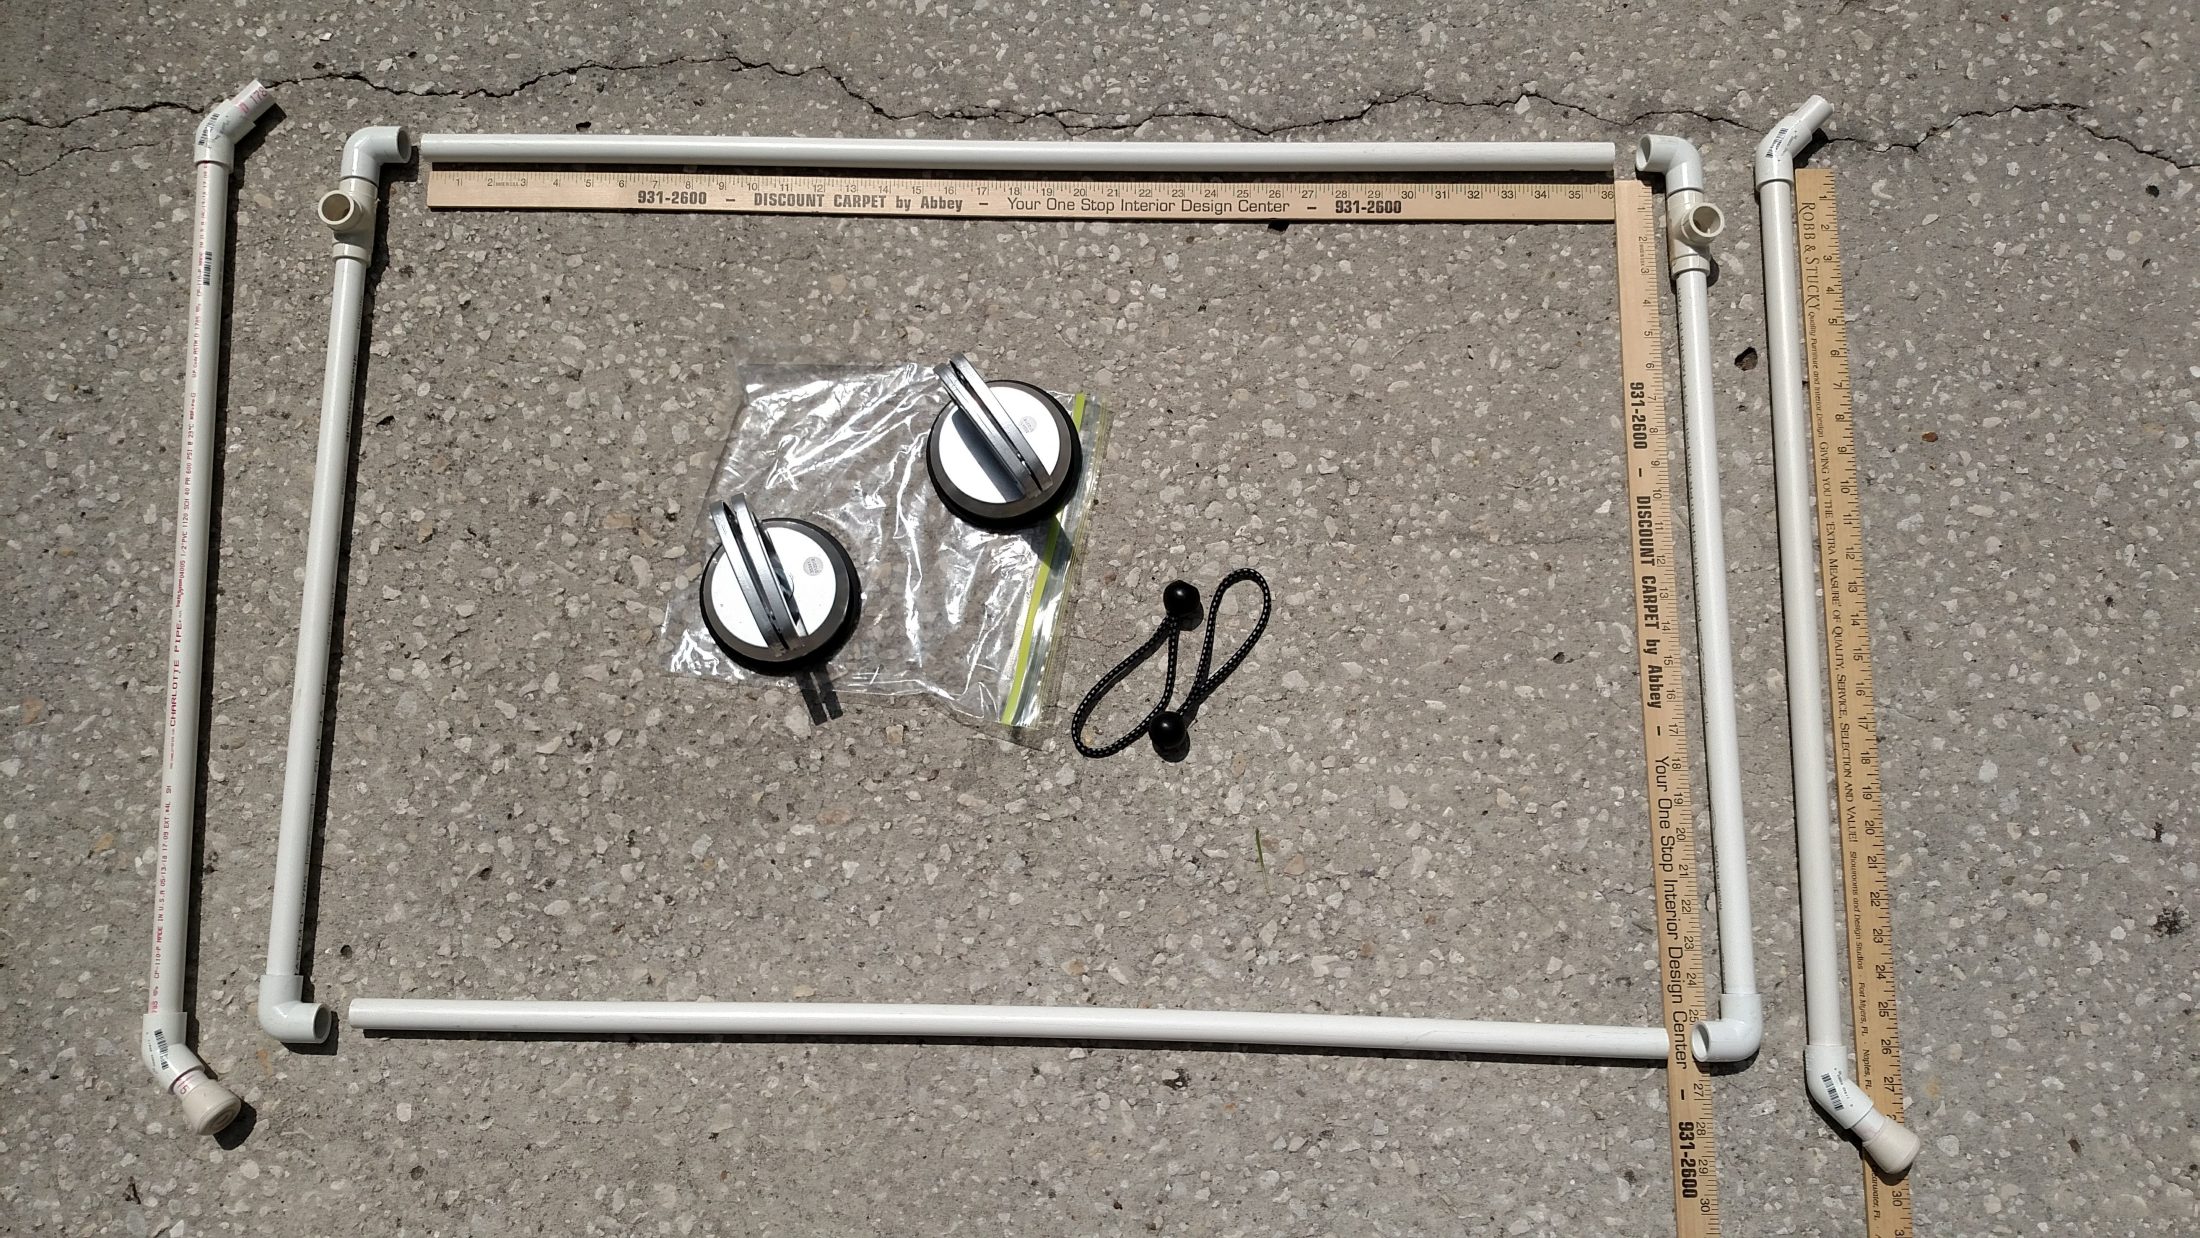
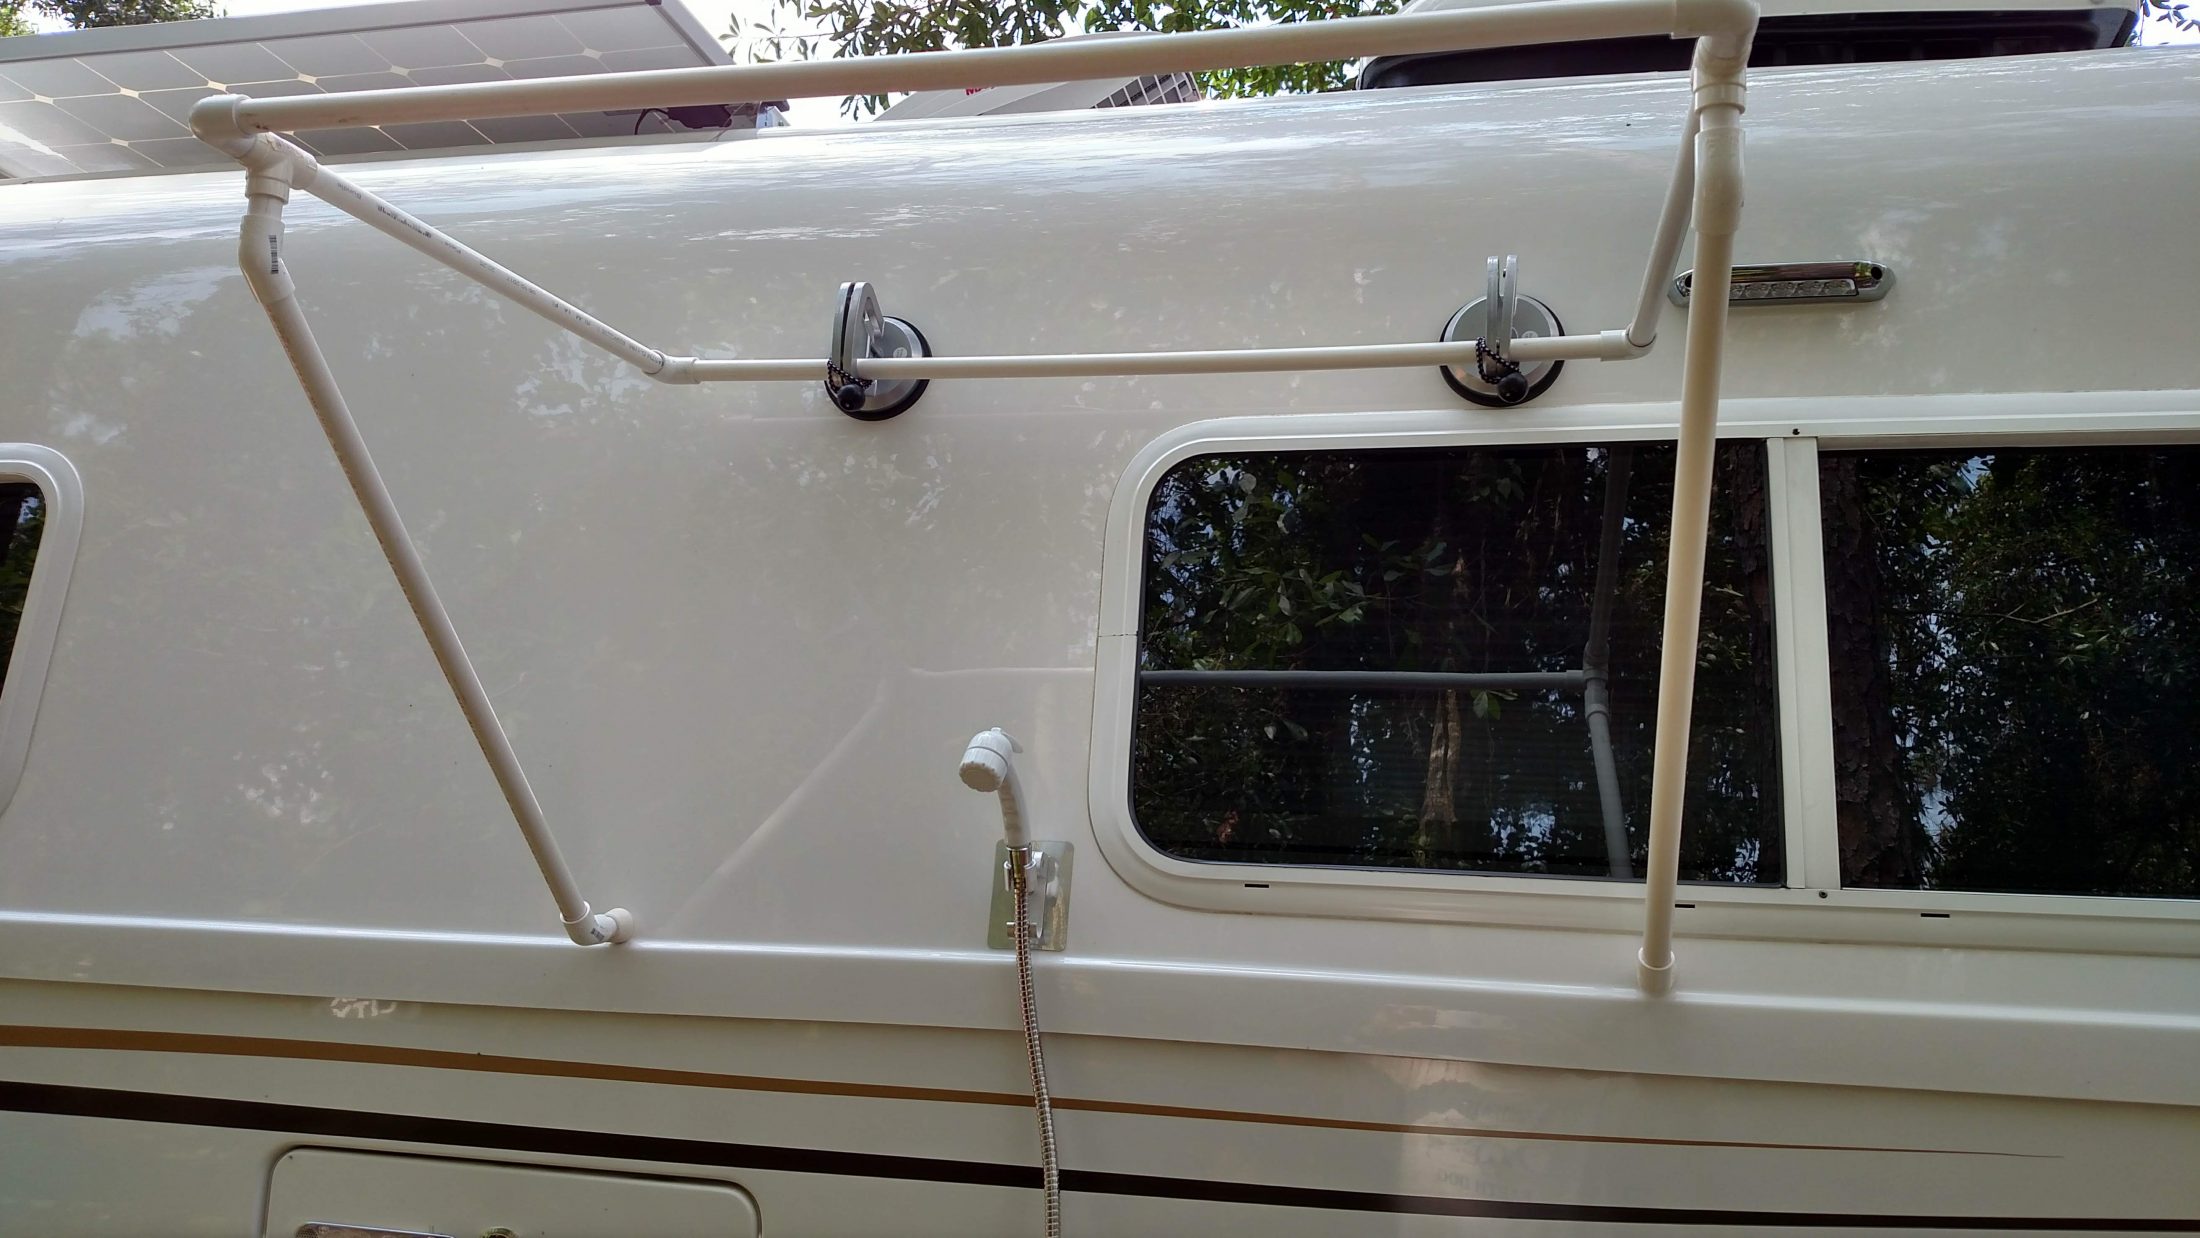
I was trying to figure out a way to reduce grey water production and have a larger shower and came up with this mod. It doesn’t take long to set up and it affords us some privacy. The first pic is the gear bundled for storage and travel. The second pic shows the frame installed. The third pic has the shower curtain installed and ready for use. And before everyone has a laugh ? at my expense, these pictures are on the curb side for demonstration purposes only. There is too much vegetation on the street side for pictures.
 2 points
 -
The Dexter EZ Flex system adds another layer of protection to your camper. The EZ Flex equalizer comes with a rubber dampener to lower the impact from cracks, potholes and other imperfections in the roads from causing unwanted stress on the camper shell. This system also replaces the standard bolt & plastic bushings inside each leaf spring eye with wet bolts and bronze bushings allowing you to keep them greased for longevity and less noise from heat and resistance. For this system to operate properly it is recommended that the bushings are greased every 3 months or 3,000 miles with a good high quality Hi-Temp grease. We use Citgo Mystik Hi-Temp at the factory but there are several other approved greases from Dexter. *2018 Elite I models utilize bronze bushings and wet bolts but does not have the equalizer as it is used on the dual axle only. The Dexter Axles used on the Oliver Elite and Elite II models are the 5,000 lb and 3500 lb axles. The Elite models have a single 5,000 lb axle with 12” brakes while the Elite II models have dual 3500 lb. axles with 10” braking. These axles and brakes do have a break-in period as they are Nev-R-Adjust braking and adjust automatically as you brake while pulling forward or backwards. The break-in period may vary slightly but usually adjusts to 100% somewhere between *50 brake applications from the brake controller only or over a period of about 500-700 miles with normal vehicle braking. *Please make sure that you do not overheat your brakes by trying to achieve the break-in too quickly. If you do choose to utilize the brake controller over 50 braking applications it should be done over a 75 mile trip at low speeds allowing the brakes to cool in between and not putting too much stress at high speeds on the trailer brakes to stop the tow vehicle. Both the 3500lb. and 5,000lb axles have serviceable bearings that require maintenance every 12 months or 12,000 miles. The same grease that is used for the EZ Flex will work with the bearings. Both the inner and outer bearings should be cleaned thoroughly and inspected for any imperfections or improper wear. This is also a great time to inspect your trailer brake components as well. These maintenances can be performed by most RV service centers or if you prefer, you can perform your own maintenance. For more information on how to repack your wheel bearings see the Dexter Bearing Maintenance Video.2 points
-
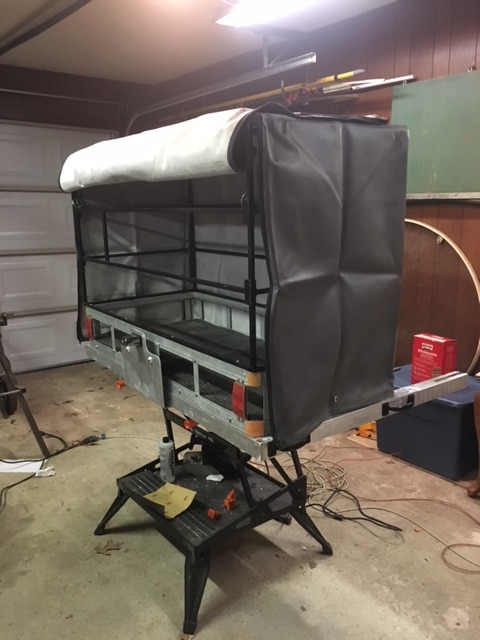
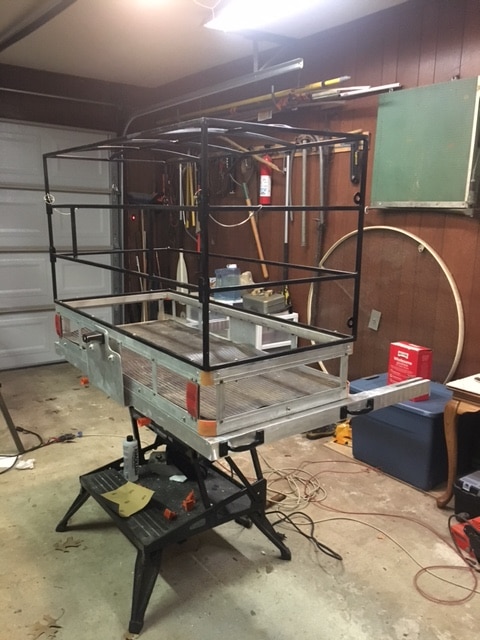
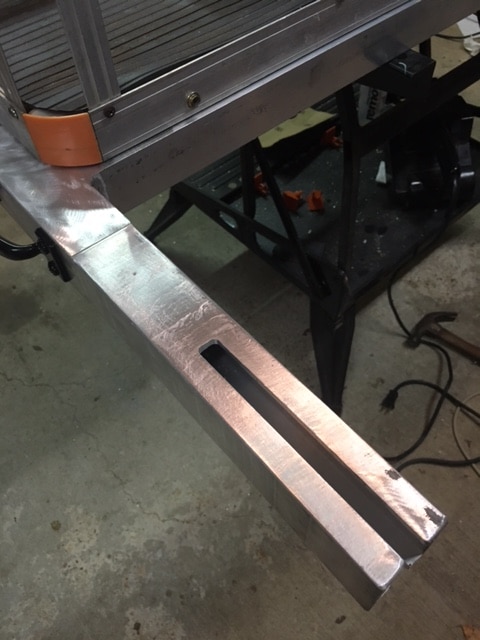
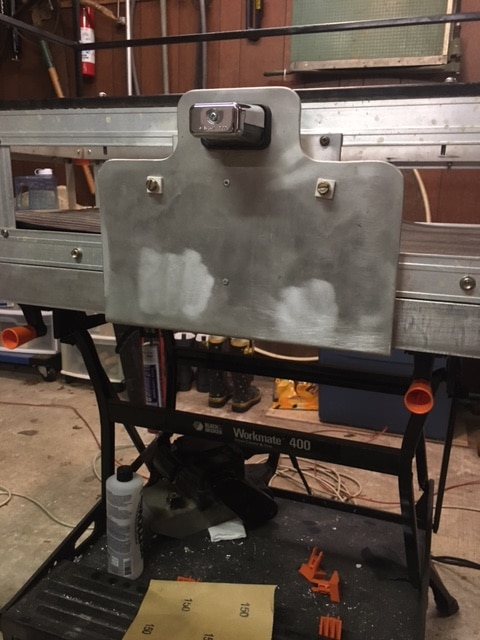
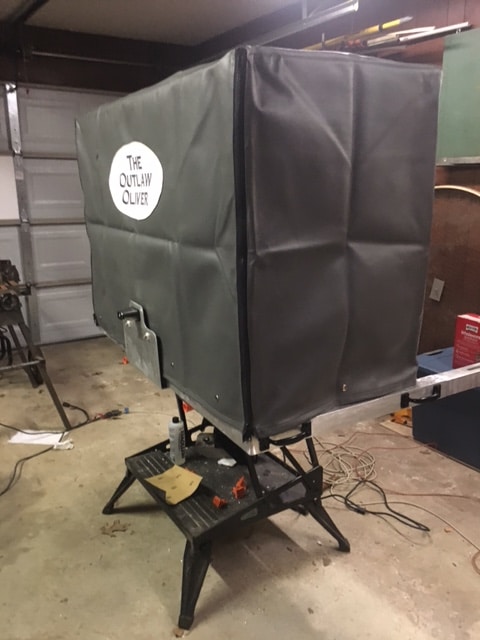
It seems that I just can't leave the Outlaw Oliver alone. This is a mod I did last summer. It is a rear basket to carry some of our stuff, two of the folding Zero Gravity we got at Sam's Club and two of the folding Sports Chairs we got at Harbor Freight and two of the little folding Camp Tables we got at Walmart. The mod was born from the need to get the above mentioned items out of the back of the truck. The are relatively light weight but, due to their bulk, they took up a LOT of room. The basket started life as a Aluminum Cargo Carrier from Harbor Freight that I bought (but never used) for the original Outlaw Oliver many years ago. I removed the single receiver that was attached to the bottom and built a custom frame to set the carrier on. Then I fashioned a steel cage to attach to the top of the carrier. It required moving the tag to the the carrier and I designed a new mount for it. The items are placed inside through a removable "door" in the rear. We had a custom cover made to match to one on the front that covers the generator. Zippers on the rear allow access to the door. The whole affair mounts to two receivers on the rear bumper like the ones that Oliver supplies for their bicycle mount. Empty, the basket and cover weigh 78 pounds. [caption id=attachment_42881" align="alignnone" width="225] Completed cage, basket and custom carrier.[/caption] [caption id=attachment_42882" align="alignnone" width="225] Latch for the "Door"[/caption] [caption id=attachment_42883" align="alignnone" width="225] Milled leg on the custom carrier.[/caption] [caption id=attachment_42884" align="alignnone" width="225] Redesigned tag mount.[/caption] [caption id=attachment_42885" align="alignnone" width="225] Cover closed.[/caption] [caption id=attachment_42880" align="alignnone" width="225] Cover open.[/caption]
1 point
-
Hopefully these pictures are right side up.
1 point
-
Please give it a try now. I have tested this thoroughly with topgun2 using latest versions of IE, Edge, Chrome and Firefox but I cannot duplicate the error. I instead disabled something on my end to see if that works for you. Please let me know if the problem persists.. Thanks y'all!1 point
-
Why Dexter? The Kodiak brakes are better and will work with your axles. Oliver gave me 5k axles so that they could use the Dexter brakes but imo it’s unnecessary unsprung weight and wish I had the lighter ones.1 point
-
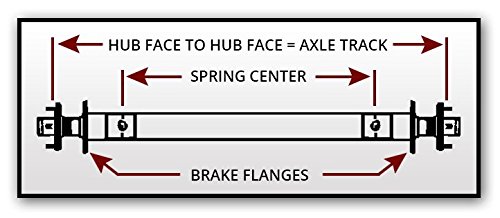
"Thank you for your interest in our braking systems. According to Dexter you have 6 Lug 3,500# axles with 1/2 wheel studs. Currently there is no disc brake available to fit your application. Converting to disc brakes would involve upgrading your axles to 5,200 or 6,000# axles. Please give me a call if you would like to proceed." This is from StopYourTrailer.com Am I screwed? What did those of you do, switch to a 5200 lb axle set? I would not have ANY problem adding two heavier axles with idler hubs, then I could use the slip-on discs instead of the ones with integrated hubs. But it would be an extra pain and also maybe $550 extra expense with shipping. With idler hubs, I could carry a complete hub with bearings, ready to go, and swap out one with a failed bearing in 30 minutes by the side of the road. That is pretty cool. https://www.southwestwheel.com/p-2303-5200-lb-standard-spring-dexter-trailer-axle.aspx Does OTT supply straight or arched axle tubes? I do think it is hard on customers to have a special order axle set on their trailers. I would much rather have an off-the-shelf 5200 pound set that is stronger, with the 3500 pound springs. Can anyone supply the 0em specs? [attachment file=41Rnrrj7c+L.jpg] Comments please! John Davies Spokane WA
1 point
-
What a novel way to set things up. For warm weather use it's ideal. We essentially do the same thing to conserve gray tank capacity except that we take the showers inside and just let the gray water drain out as we go. Looks great.1 point
-
John, here's my advice - As far as brand goes, the two I found to be most recommended were NovaKool and Isotherm. I went with the Isotherm because I liked the stainless door. In hindsight, the stainless is a pain to keep clean in the trailer, so I think I'd still have gone with Isotherm but they have a new model out now with what is supposed to be fingerprint free stainless. Mainly, I think just getting the Danfoss compressor is the key, regardless who makes the box. I think the Isotherm has a wider cutout but like the NovaKool is shorter so you'll have to figure out what to do underneath. I found that adding a fan inside the fridge really transformed it. Our first trip out, the temps were up and down and we were always fussing with the temp control and worrying about it, some things freezing and others too warm. But with the fan the fridge has become something we just don't think about. See my Snowball thread for the brand and install. The Isotherm only cools via the freezer coils which is why it was so uneven before I added the fan. Perhaps the NovaKool has a better design in that respect? I got the ASU unit for the Isotherm but never use it. I should give it a shot again with the internal fan to see if it makes a difference, but the internal temps were too variable using it on our first trip. I added extra insulation just because. I don't really know if it's made any difference. Couldn't have hurt. Real life power usage is minimal. It will pull 3.5 amps when starting and then settle down to around 2.5 amps. Probably has a run time around 50%, but that's highly dependent on the inside temp. Noise is noticeable at times, but never intrusive. I can't hear the internal fan I added at all unless the door is open. The freezer on the Isotherm is too small for anything but a few ice trays. The Isotherm comes in both 12/120 and 12 volt only models. I couldn't see the point in the 120 and still don't. If I remember right, the NovaKool had the compressor located on the bottom, so the internal arrangement was different. And maybe they have a model with an external compressor? That might be a good choice since you have the extra space. Semi-related - I installed a National Luna in the back of the truck before this last trip and wow, that really changed the way we camp. Three weeks worth of food, no trips to the store, no ice sloshing around in the cooler - heaven.1 point
-
Jason Wamsley is aware of the problem and is working on it. Bill1 point
-
Looks like a great spot and I love the videos. One of our next trips will be Washington and then either down along the coast or up into BC. I'll have to hit you up for camping locations before we go.1 point
-
With most any generator you will need to connect the ground and neutral together. If you don’t, the onboard Progressive Industries surge protector will not allow power into the camper. If you get on the Progressive Industries website they talk extensively about this very issue, among other pertinent camper related power issues.1 point
-
Here in the mountains of Western North Carolina, this has been the wettest MONTH on record with some areas receiving as much as 30 inches of rain is just the past two weeks. Flooding, mud slides, people killed due to falling trees, etc., etc. The good news is that a break is finally forecast for this coming weekend.1 point
-
Thank you for the photos. BLM and forest service campgrounds are our favorites. Not always glam, but. Privacy, location....1 point
-
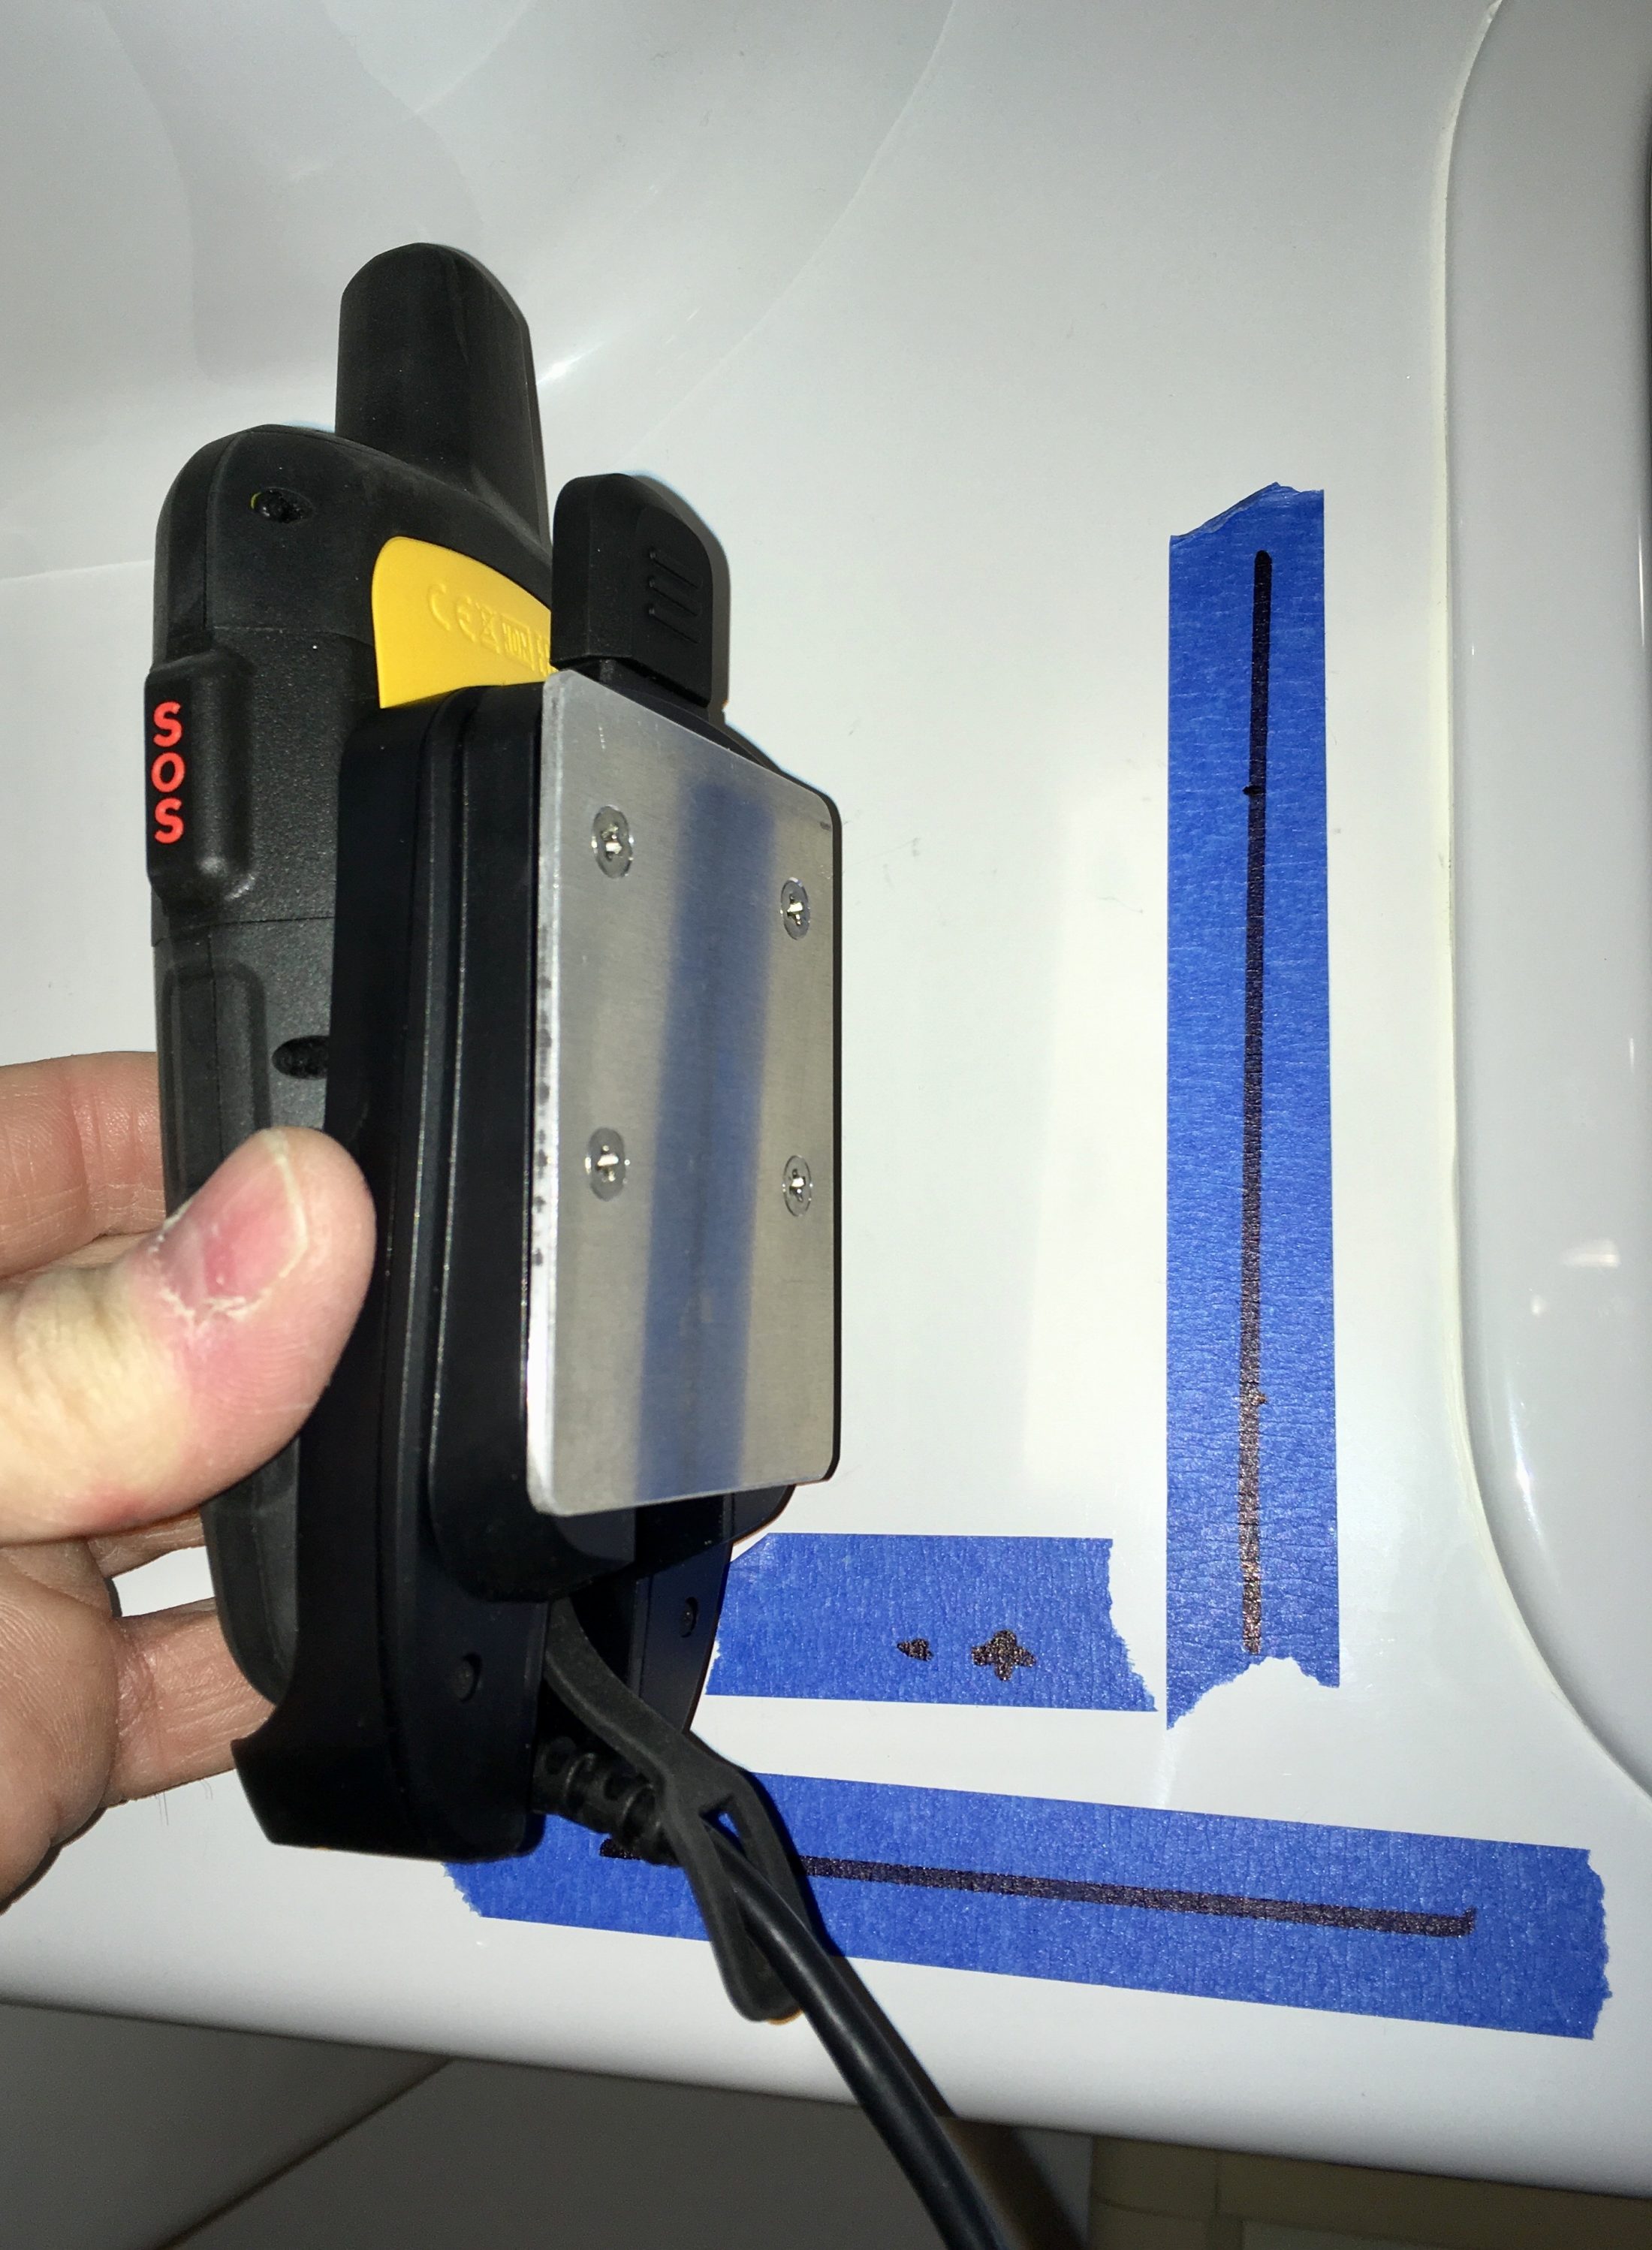
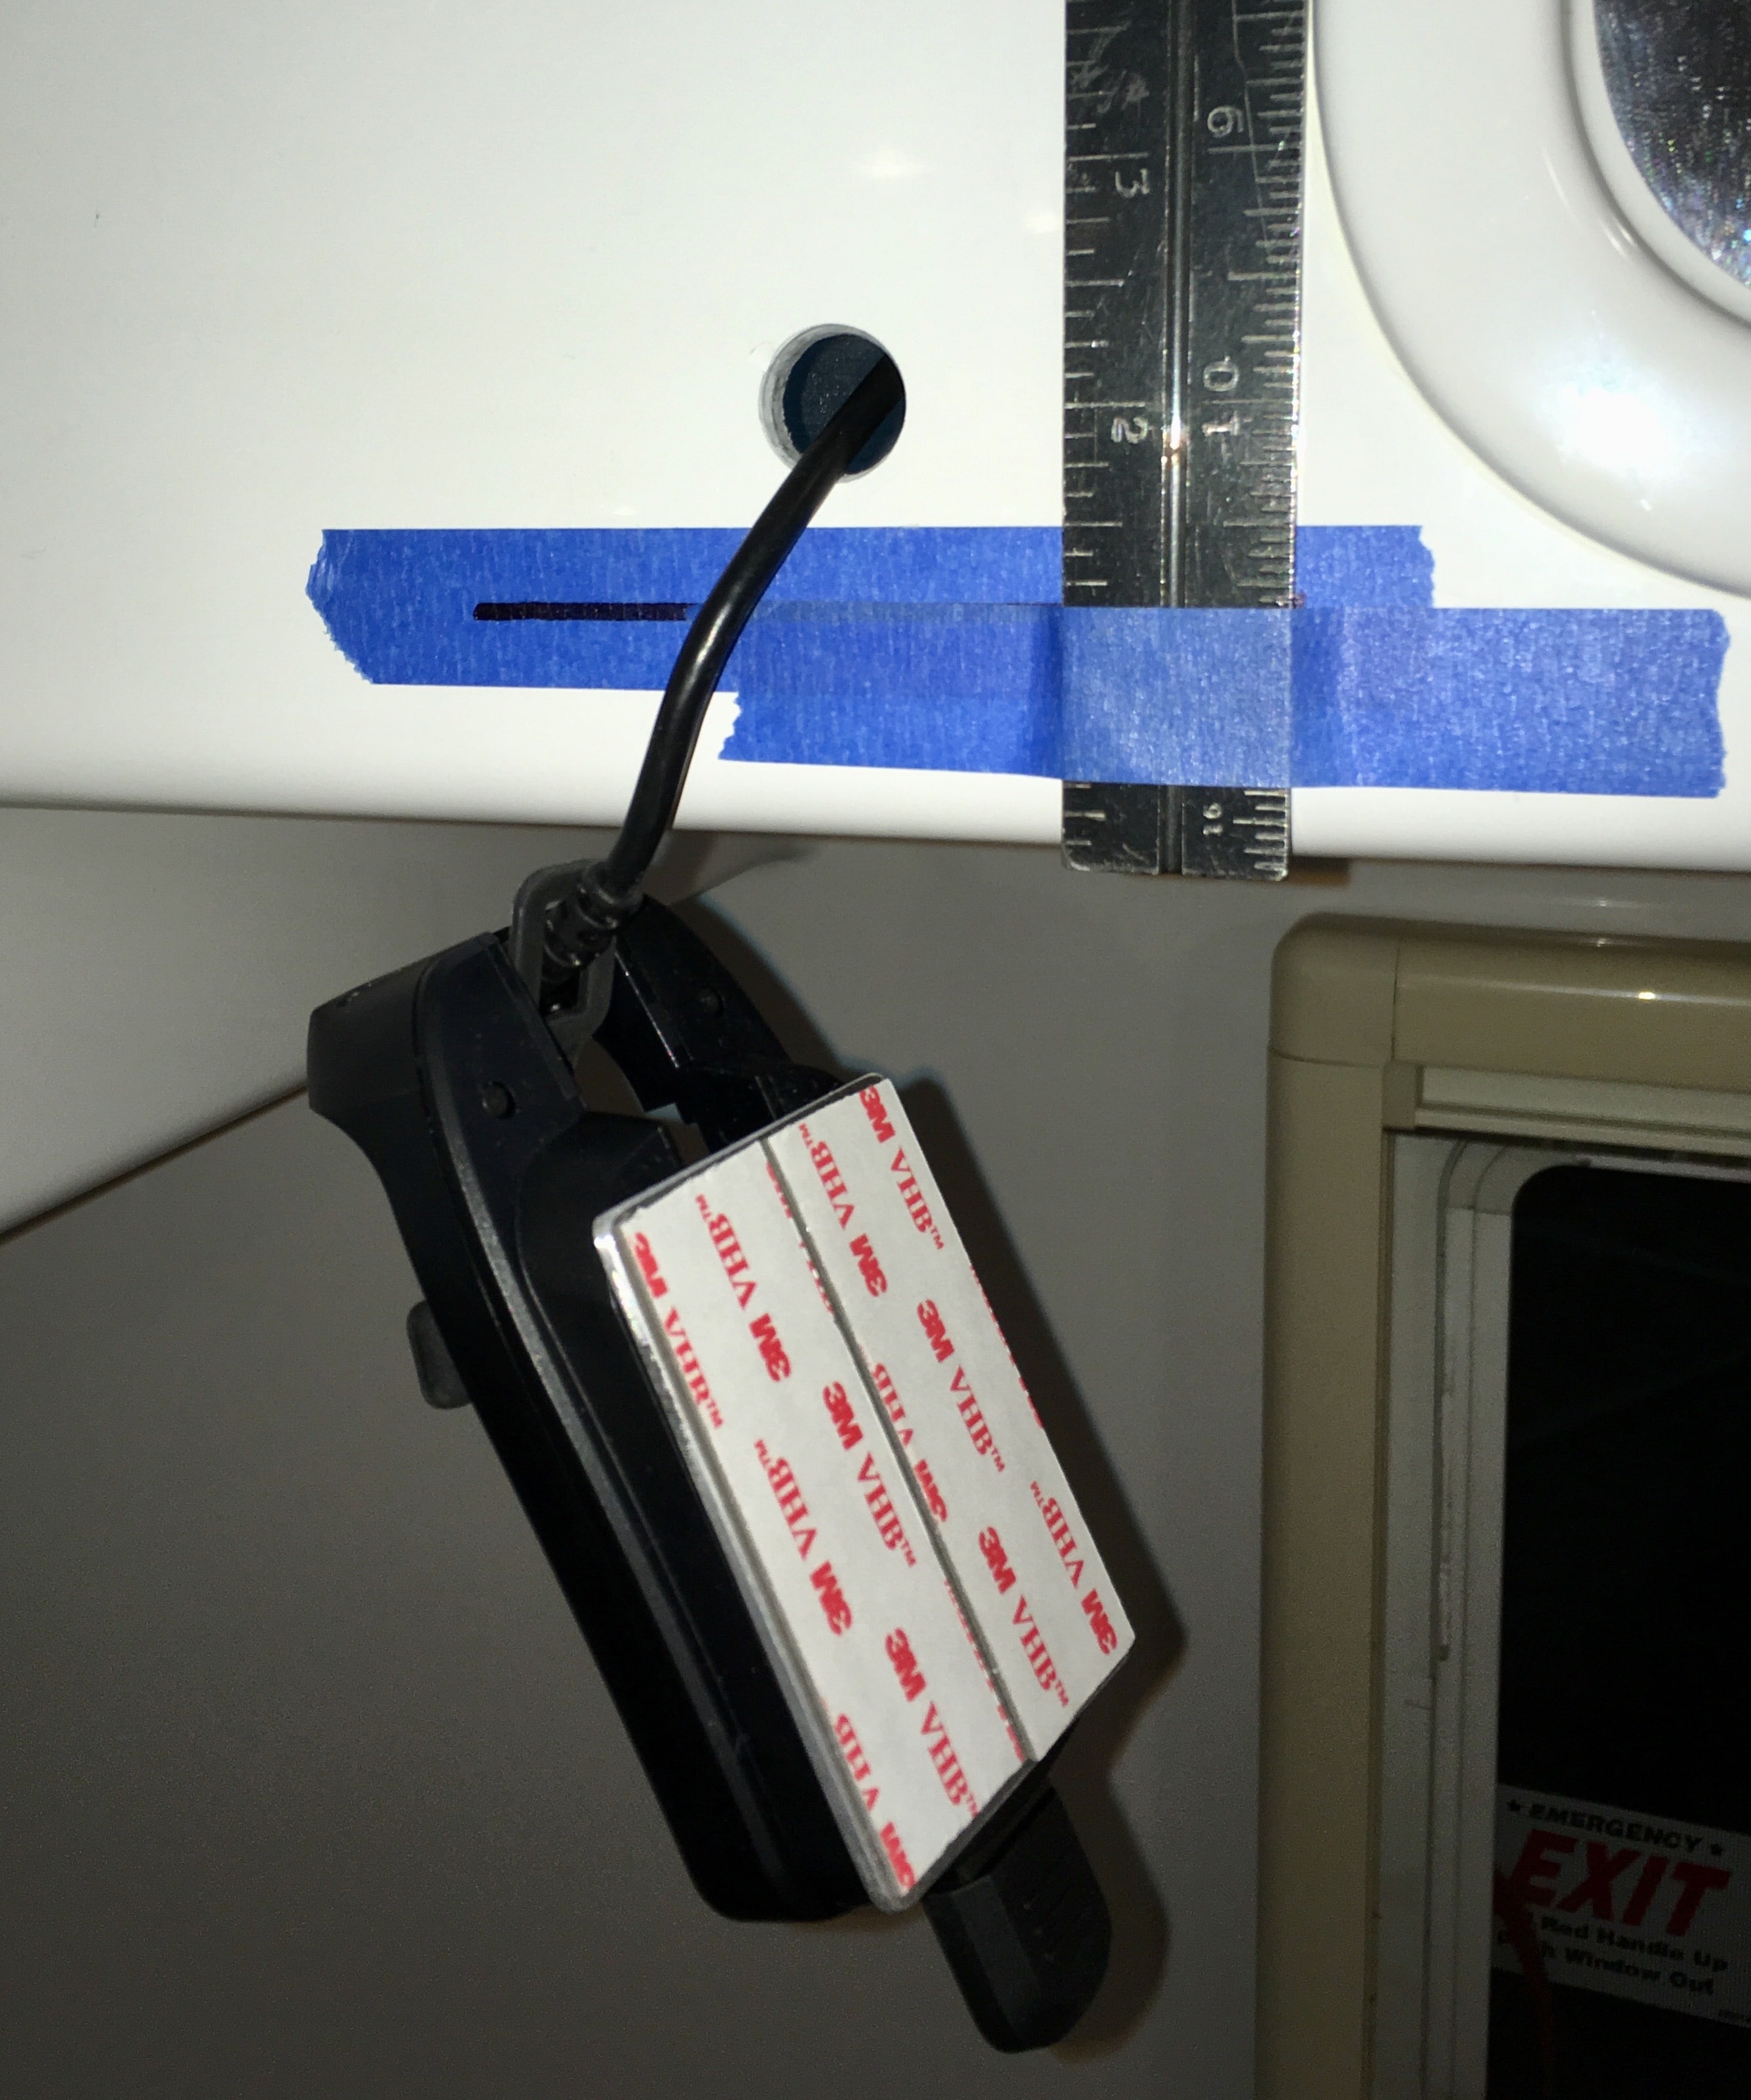
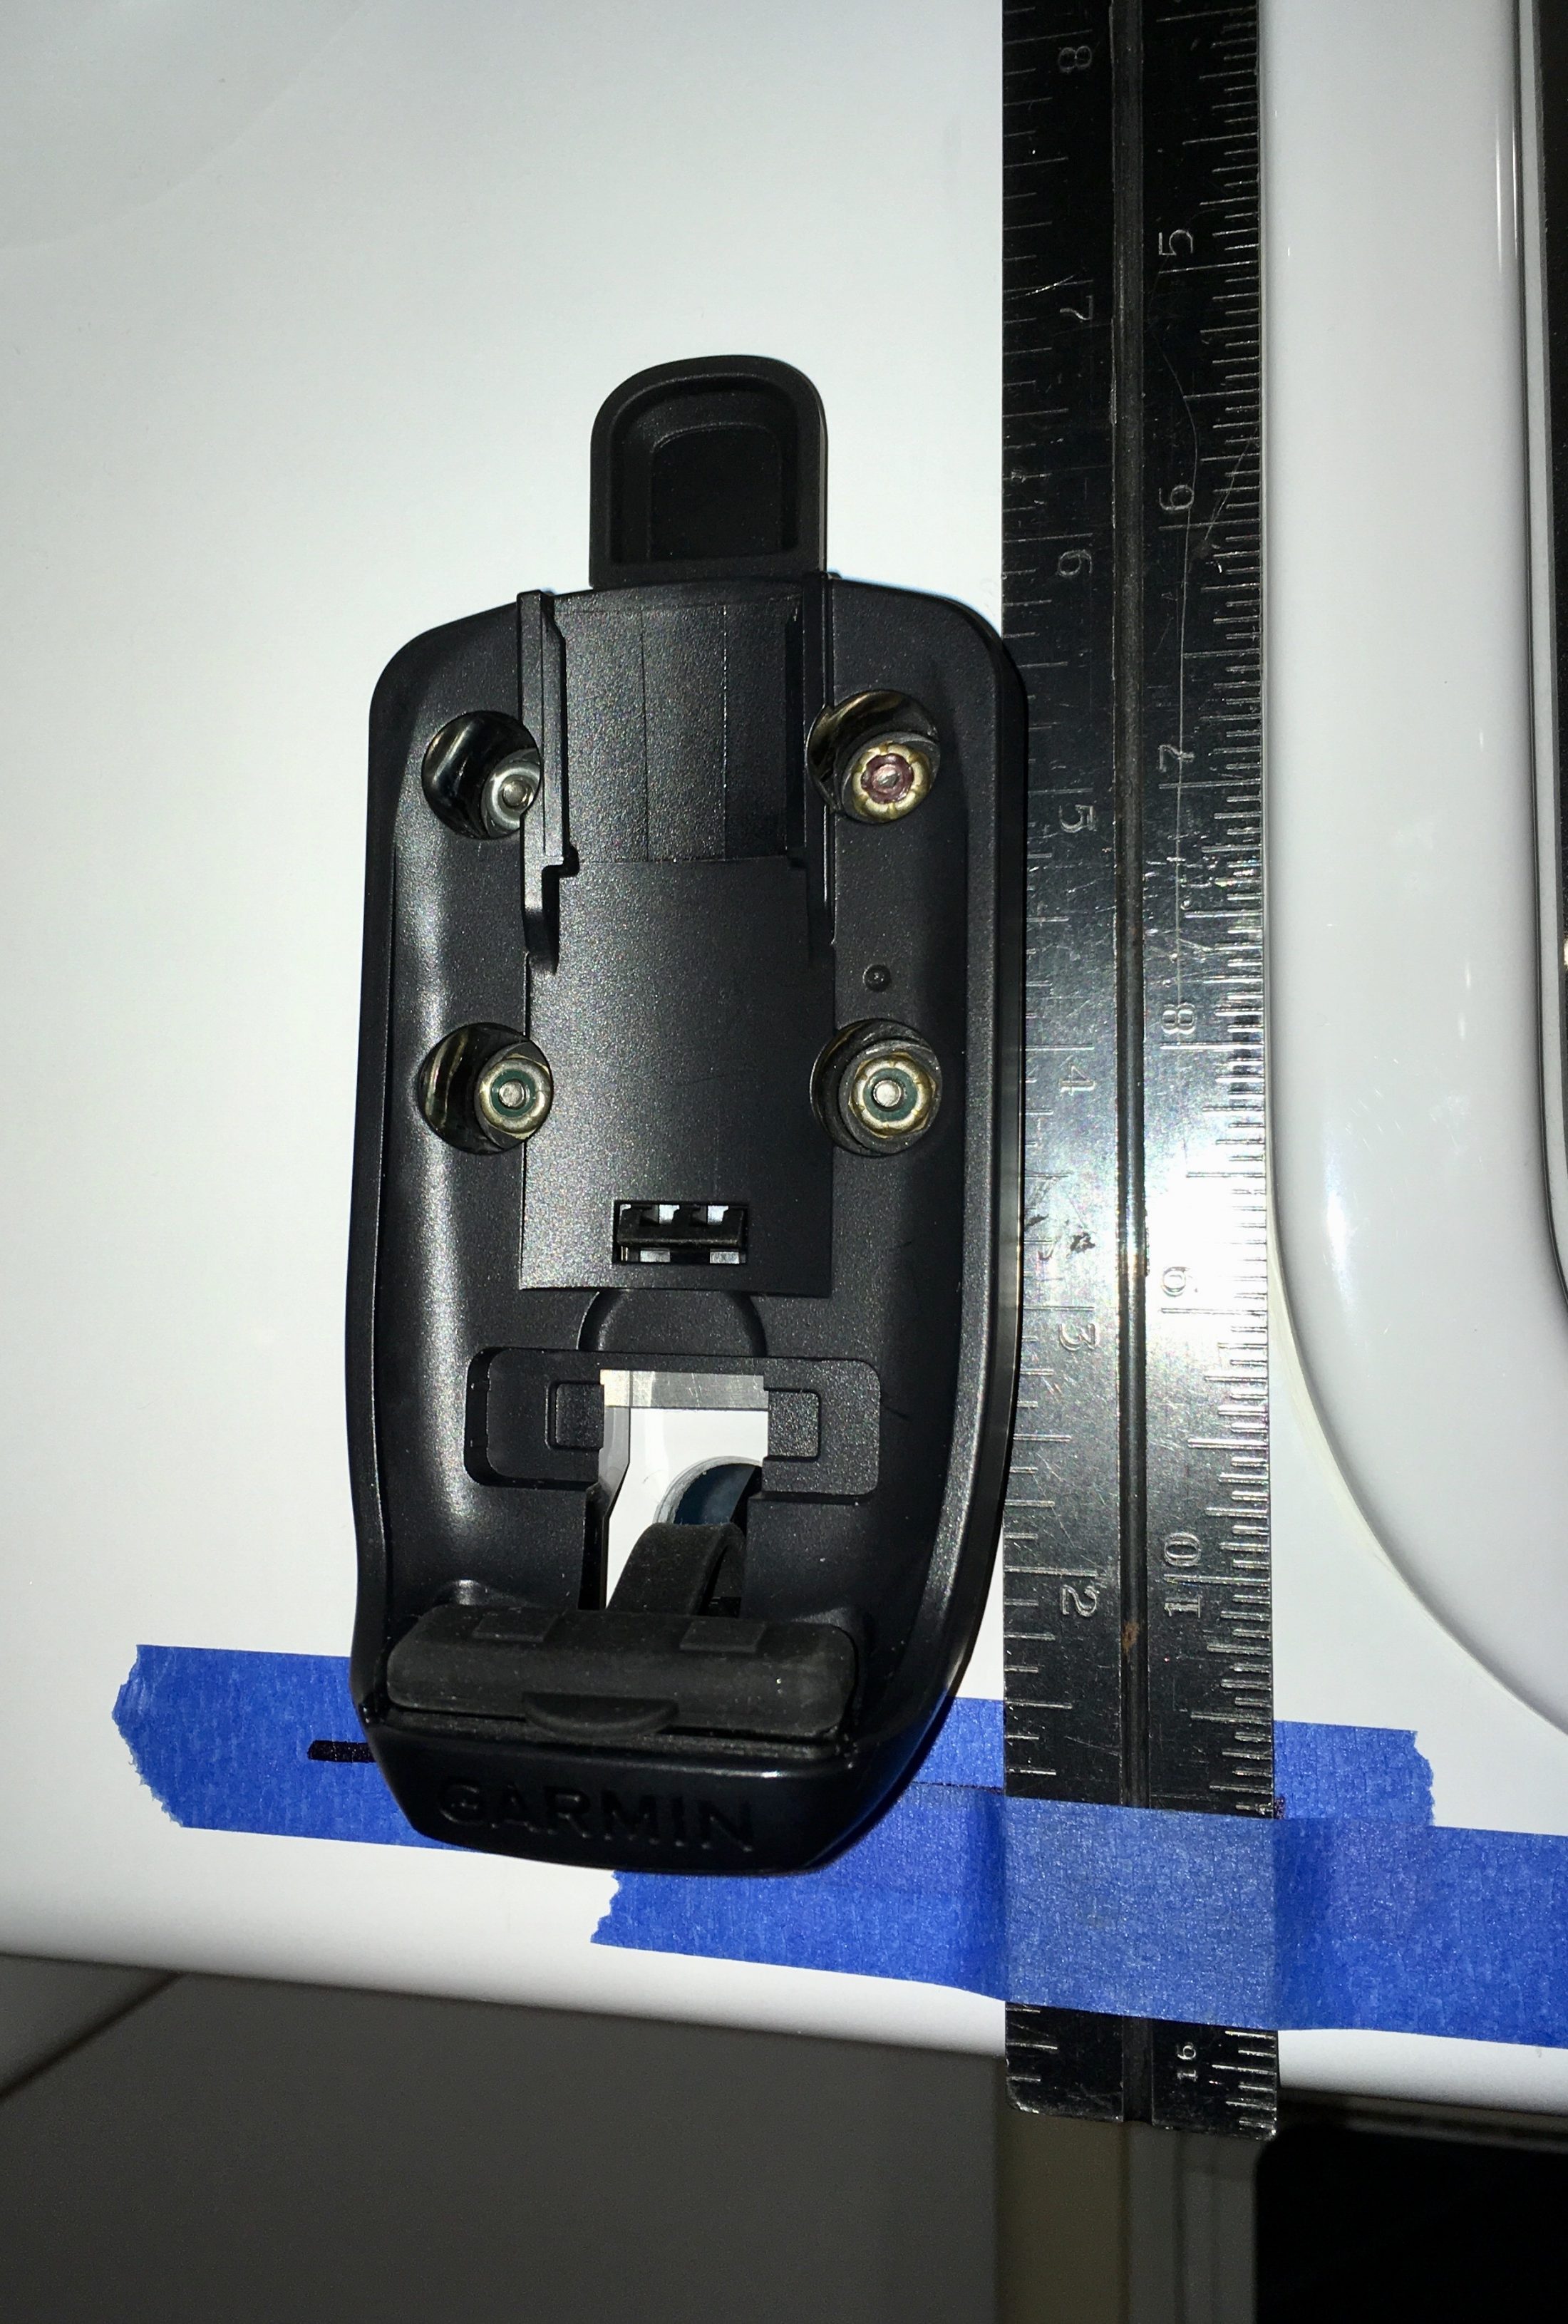
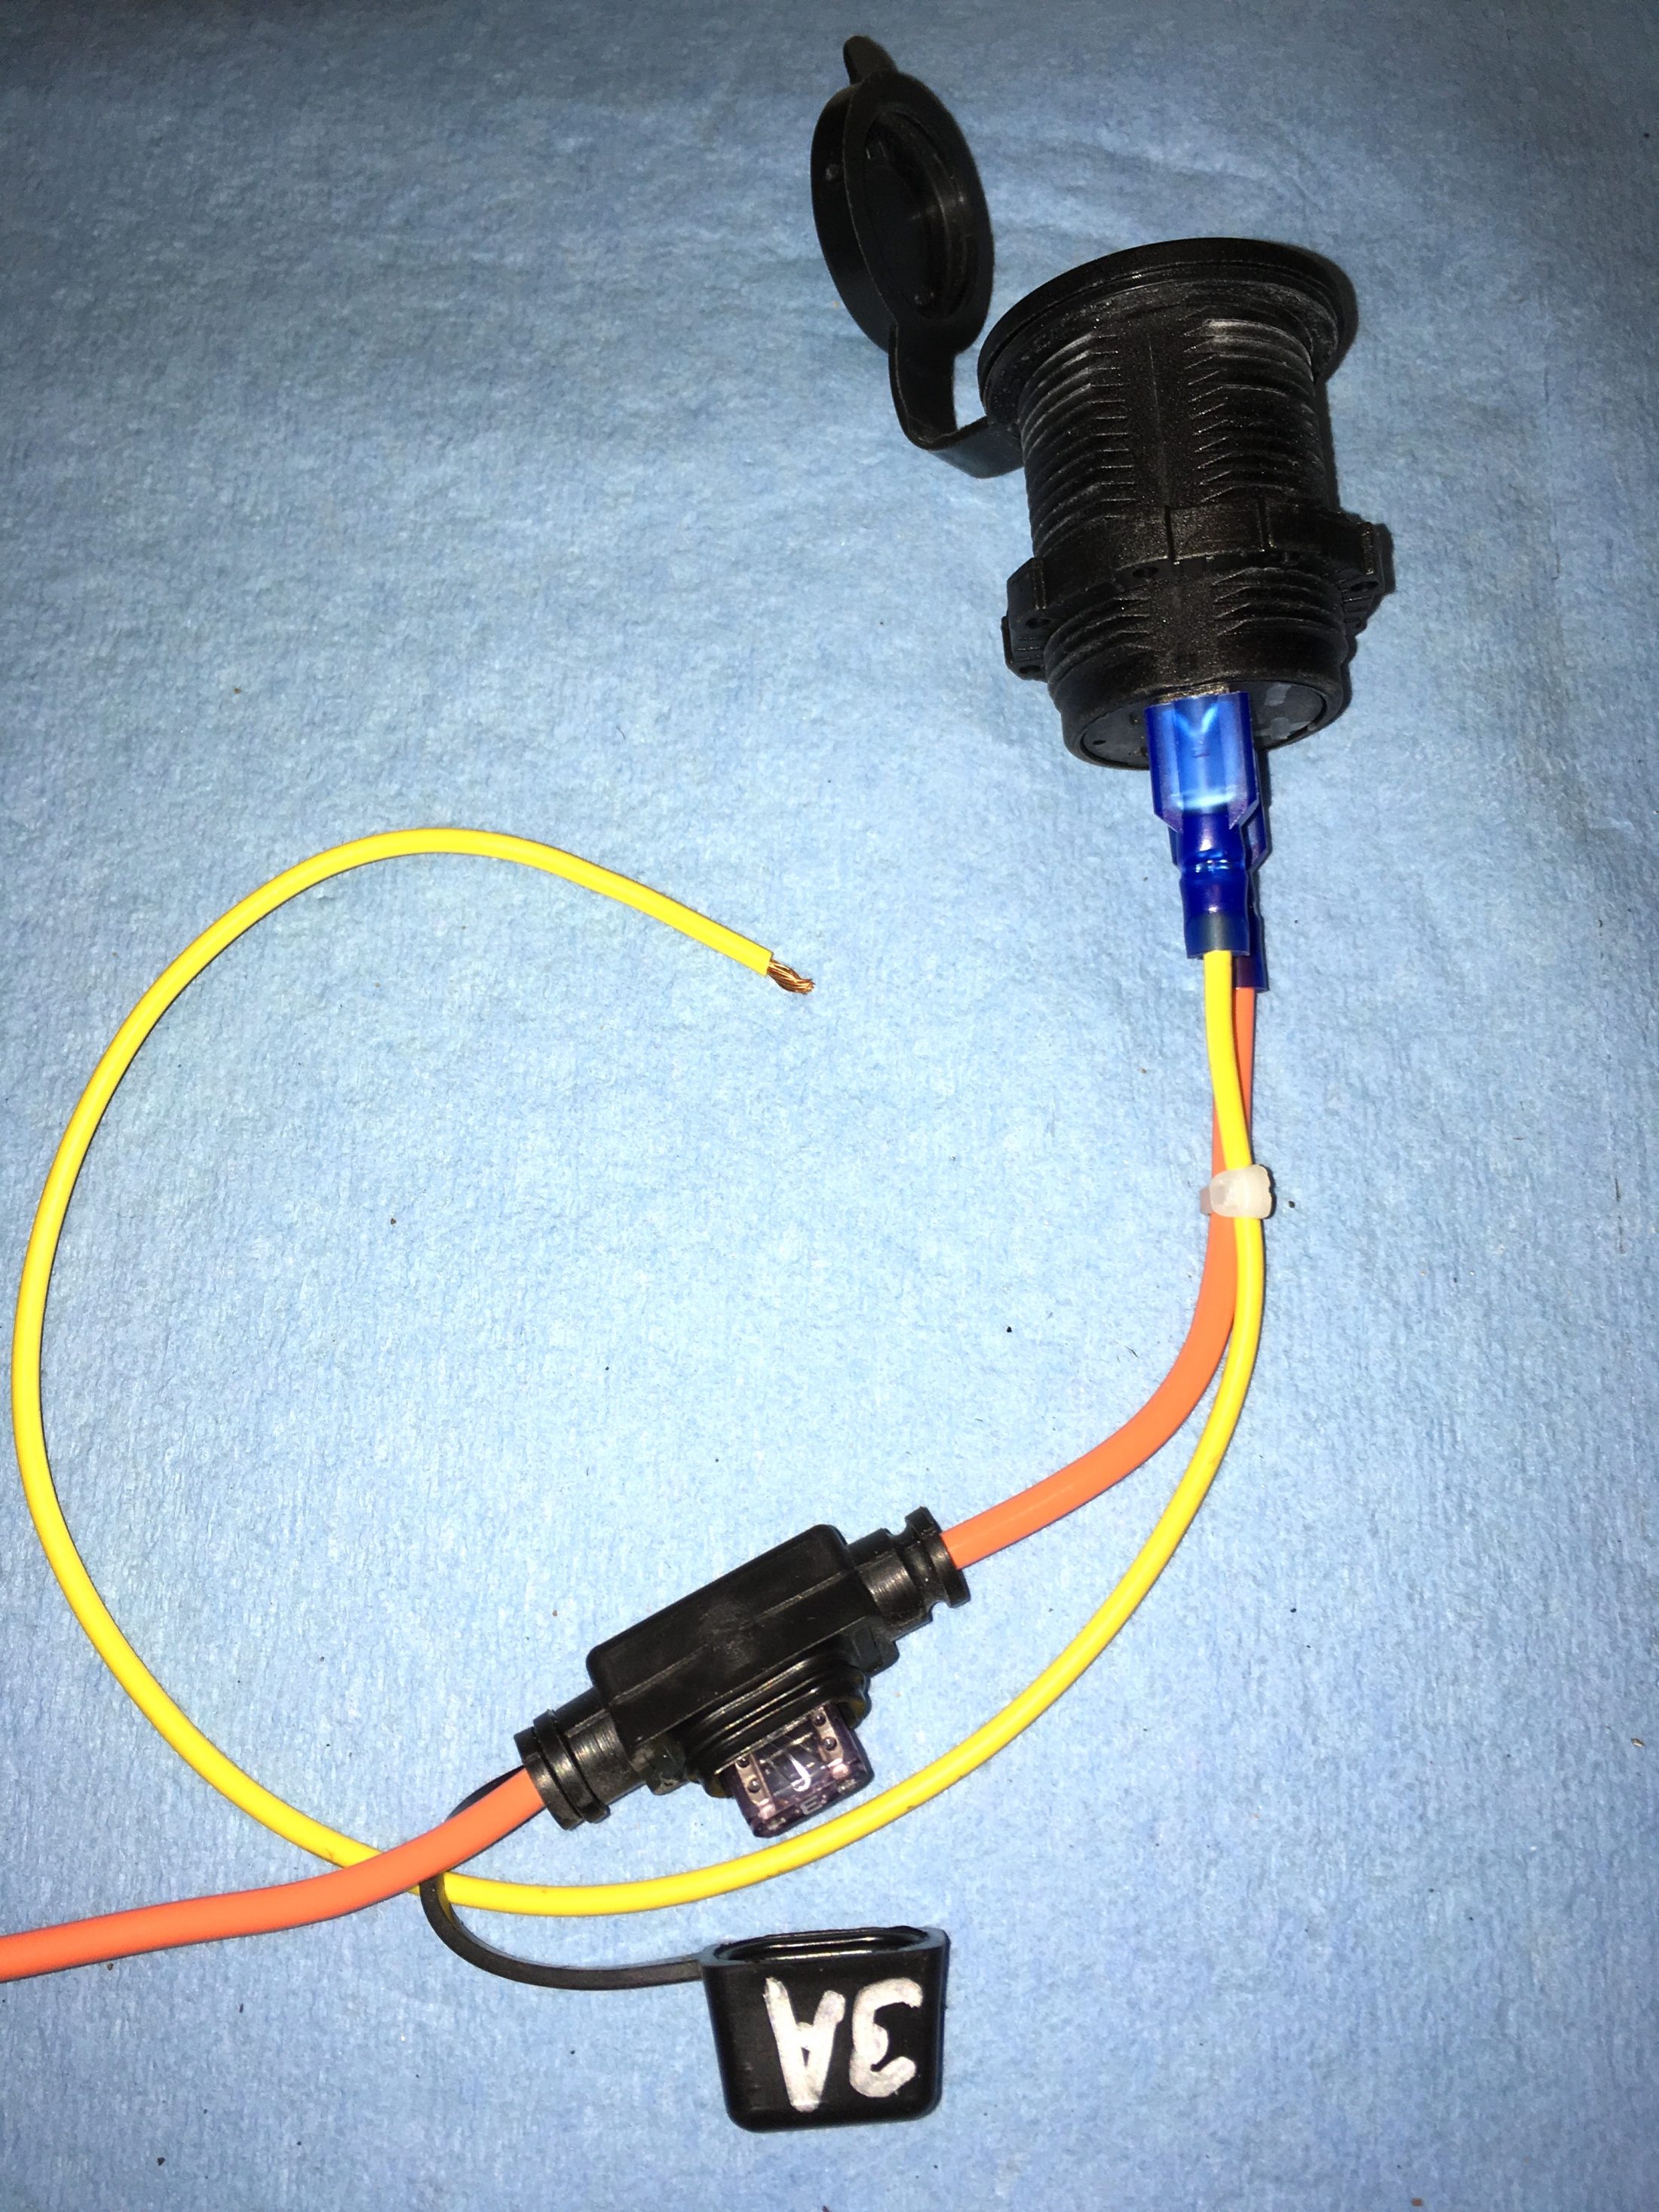
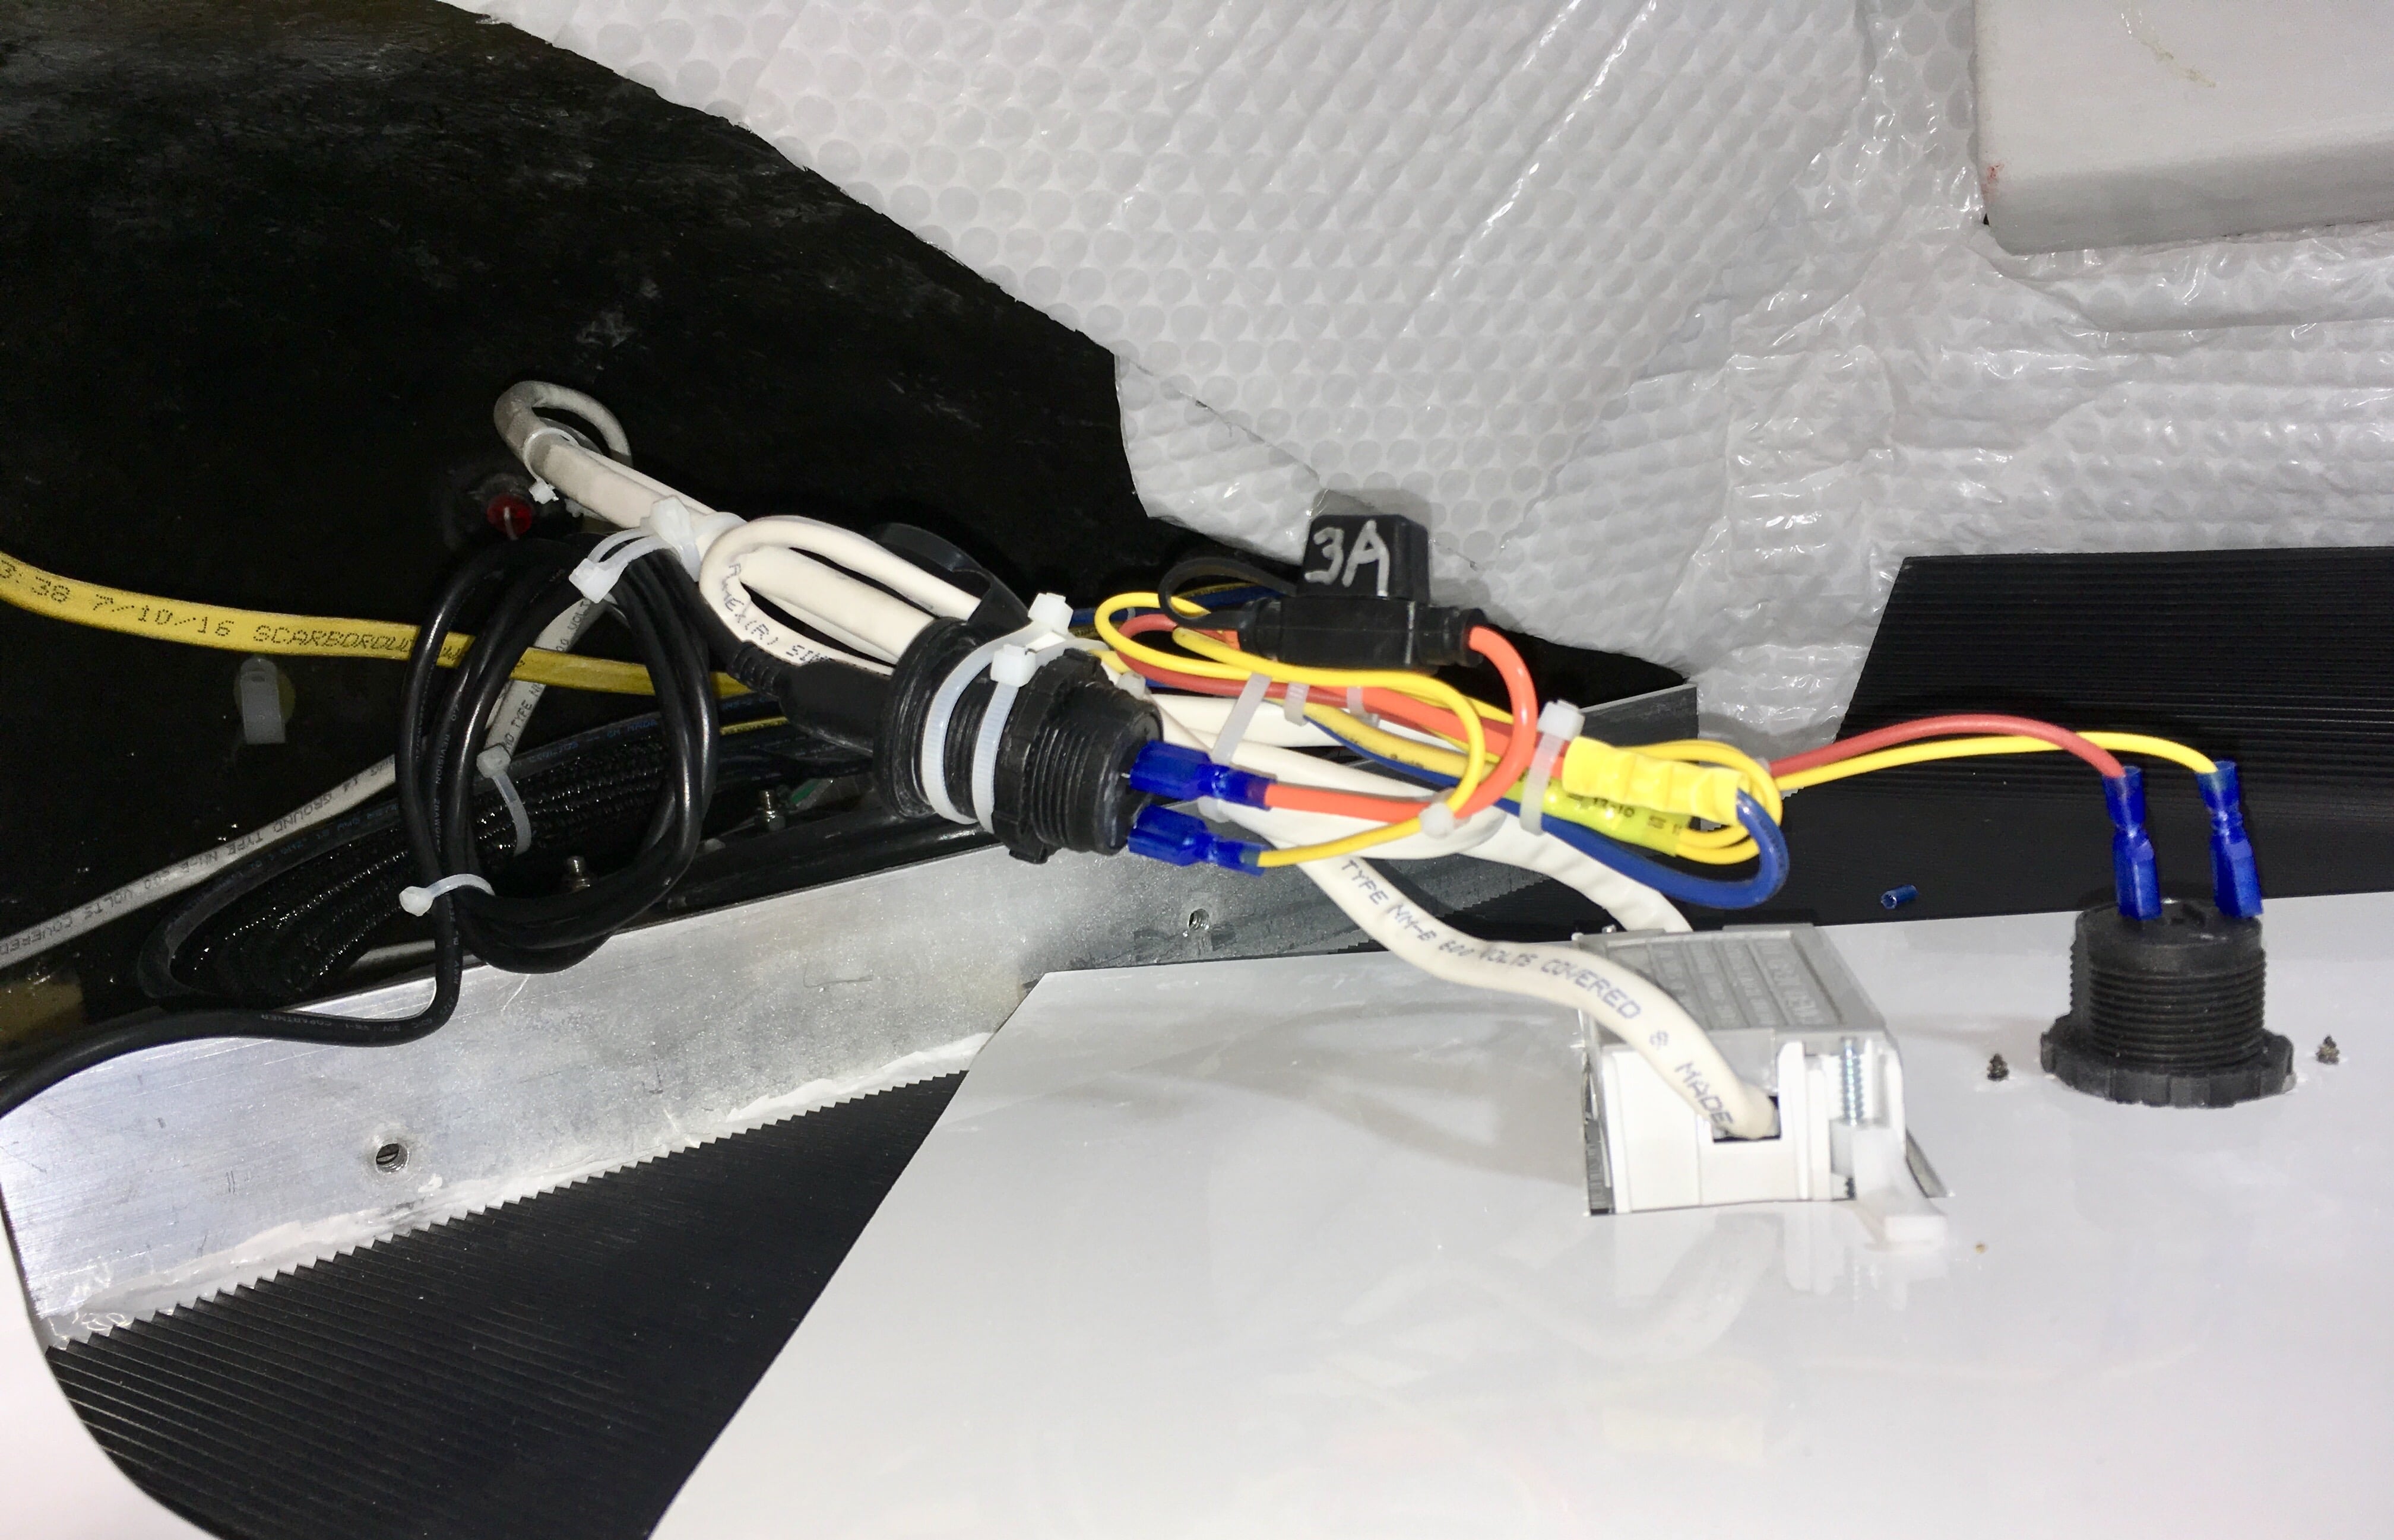
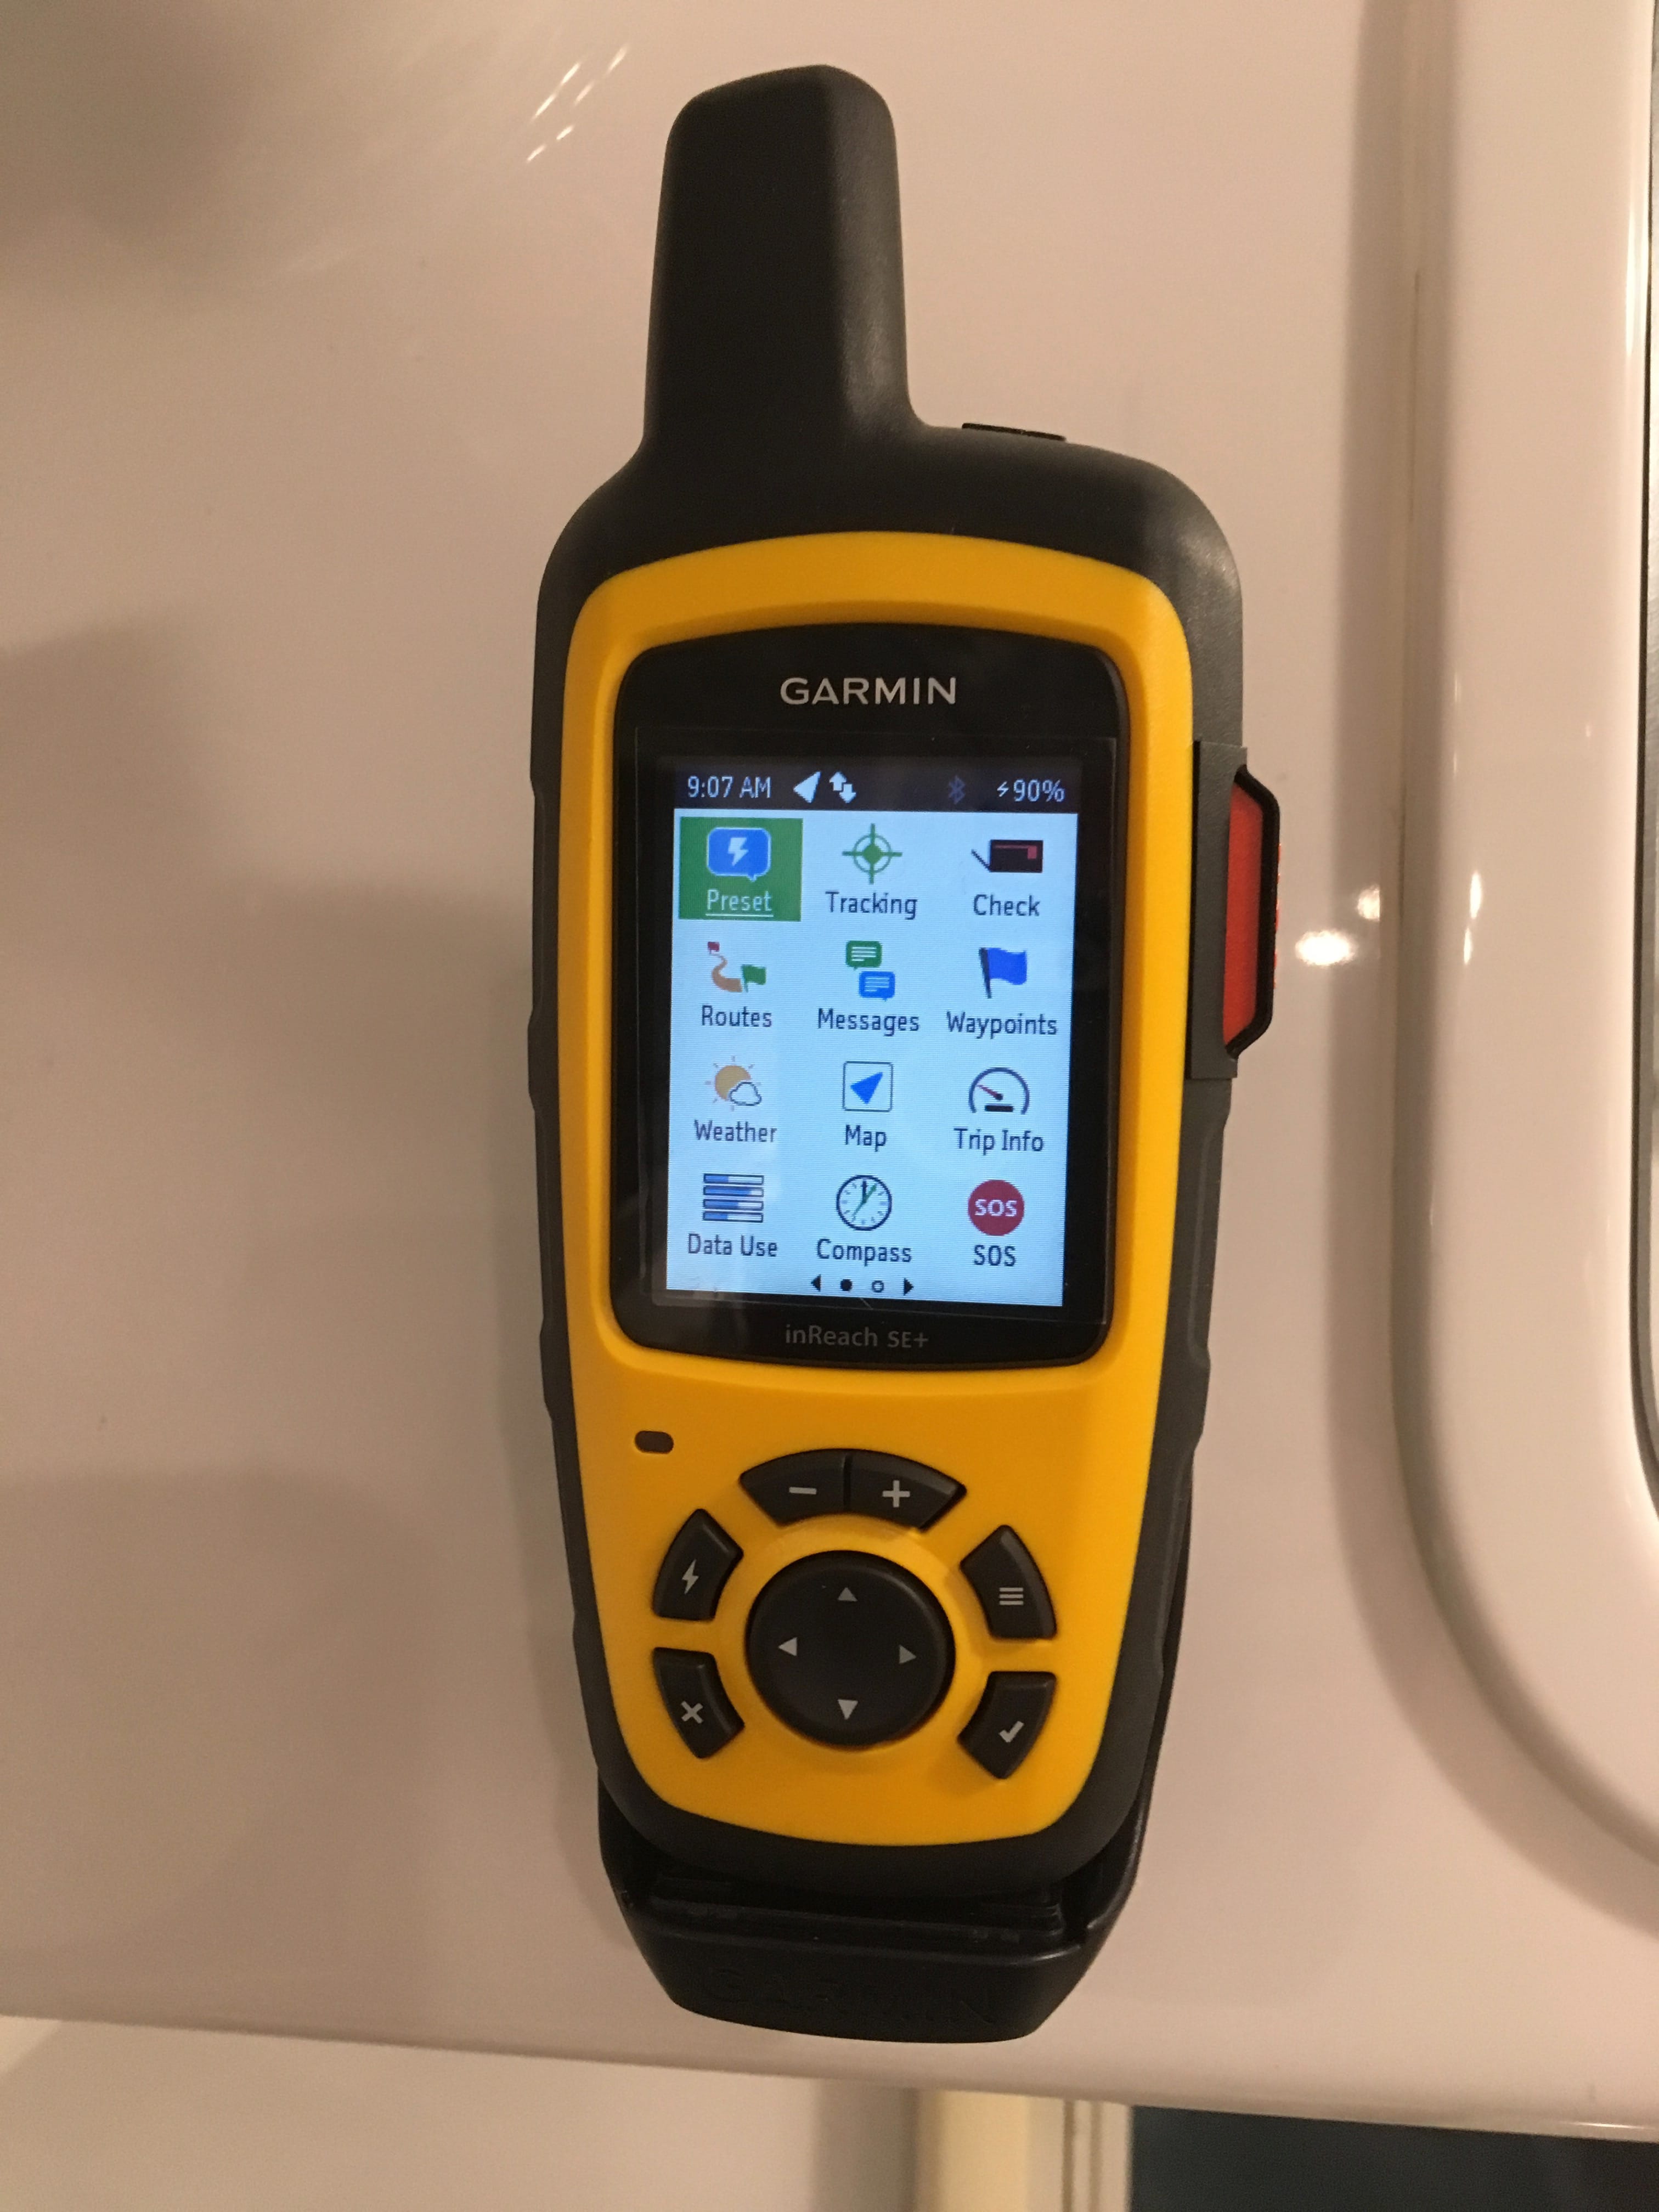
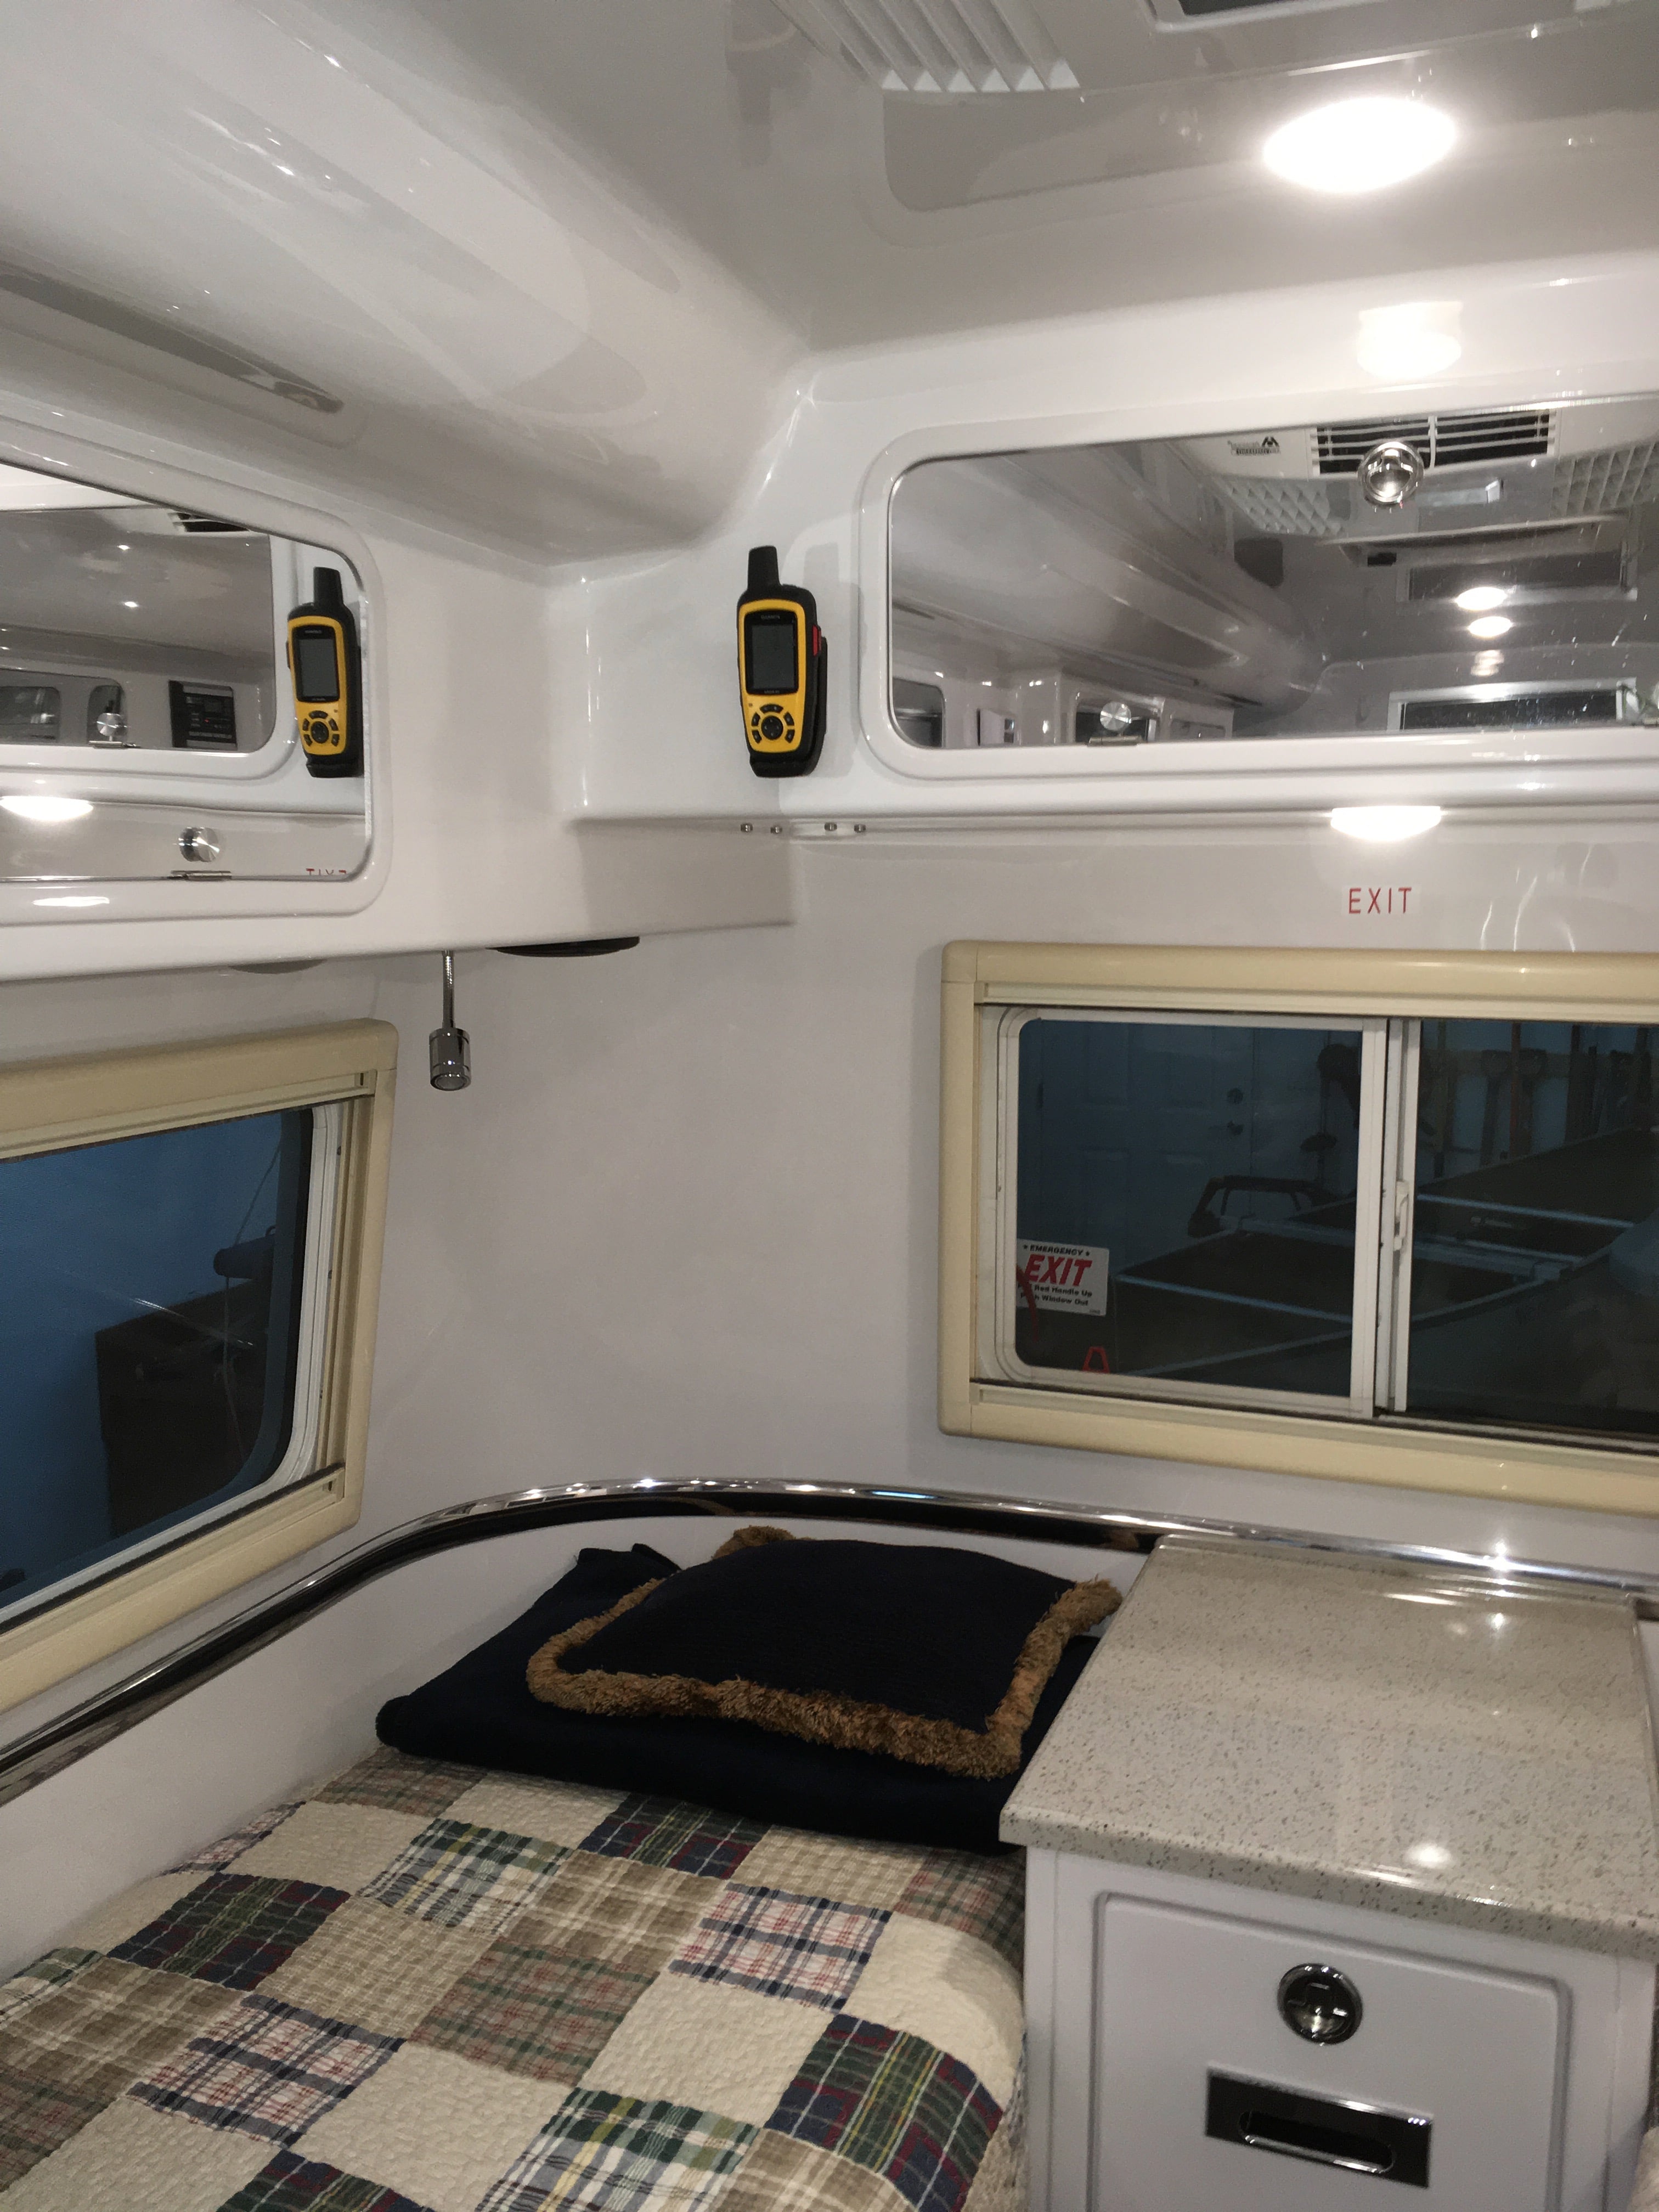
I spend a good amount of time traveling and camping way off the grid, where I have no cell signal. I have been using a SPOT ever since they came out, but I finally decided that I need more capability. The SPOT works great for continuous tracking while riding a motorcycle, but it is very crippled for sending help requests and the plan has gotten extremely expensive. I replaced it with a Garmin inReach SE+, so I can send and receive short text messages, send an SOS, and actually communicate real time with rescuers. It also links to the Garmin Earthmate app on my iPhone so I can use the phone to do stuff, such as access my Contacts. It provides great peace of mind and the basic plan is very affordable, and WAY less expensive than any sat phone. I am on the Freedom plan, and can suspend my monthly coverage if I want to , with no penalties. No mandatory annual subscription! I discovered that the inReach doesn't need to be outside, the fiberglass roof of the Ollie is completely transparent to its signals. I do think that the major appliances and pots and pans might get in the way, so I decided to install the powered mount at the back corner where it is easy to see and reach, and it can communicate from that location while it is charging. Normally a message will go out in under a minute, but sometimes it may be as long as ten. I needed clearance on top to lift the unit up and out of the cradle, and it needed to be positioned where I could route the USB charging cord into the upper rear compartment, so I could power a USB charger from the existing 12v round charger circuit... just to the left of the cabinet door frame looked ideal. I made an adapter plate from thick aluminum and screwed it in place using 6-32 stainless hardware: I taped a steel ruler to the frame, to act as an alignment jig. I was going to be spending hours looking at the mount from my bed and did not want it to be crooked! (Like my wonky rear window...) After adding 3M VHB tape, I stuck it in place: I took the factory installed Blue Sea USB low power charger from its location above the curbside bed, and wired it up: And spliced it into the existing 12 v system; That circuit stays hot all the time, and the inReach will charge whenever placed in the holder. It is easy to see from the galley or either bed (we sleep head to front) and it is easy to grab, and unsnaps from the mount with a flick of the safety catch. I have ordered an UNLIT USB high output dual charger for the empty hole over my bed. That will be a future thread. https://smile.amazon.com/gp/product/B01MRZ9ATL/ref=oh_aui_detailpage_o02_s00?ie=UTF8&psc=1 https://smile.amazon.com/gp/product/B01N2YKO3L/ref=oh_aui_detailpage_o02_s00?ie=UTF8&psc=1 John Davies Spokane WA
1 point
-
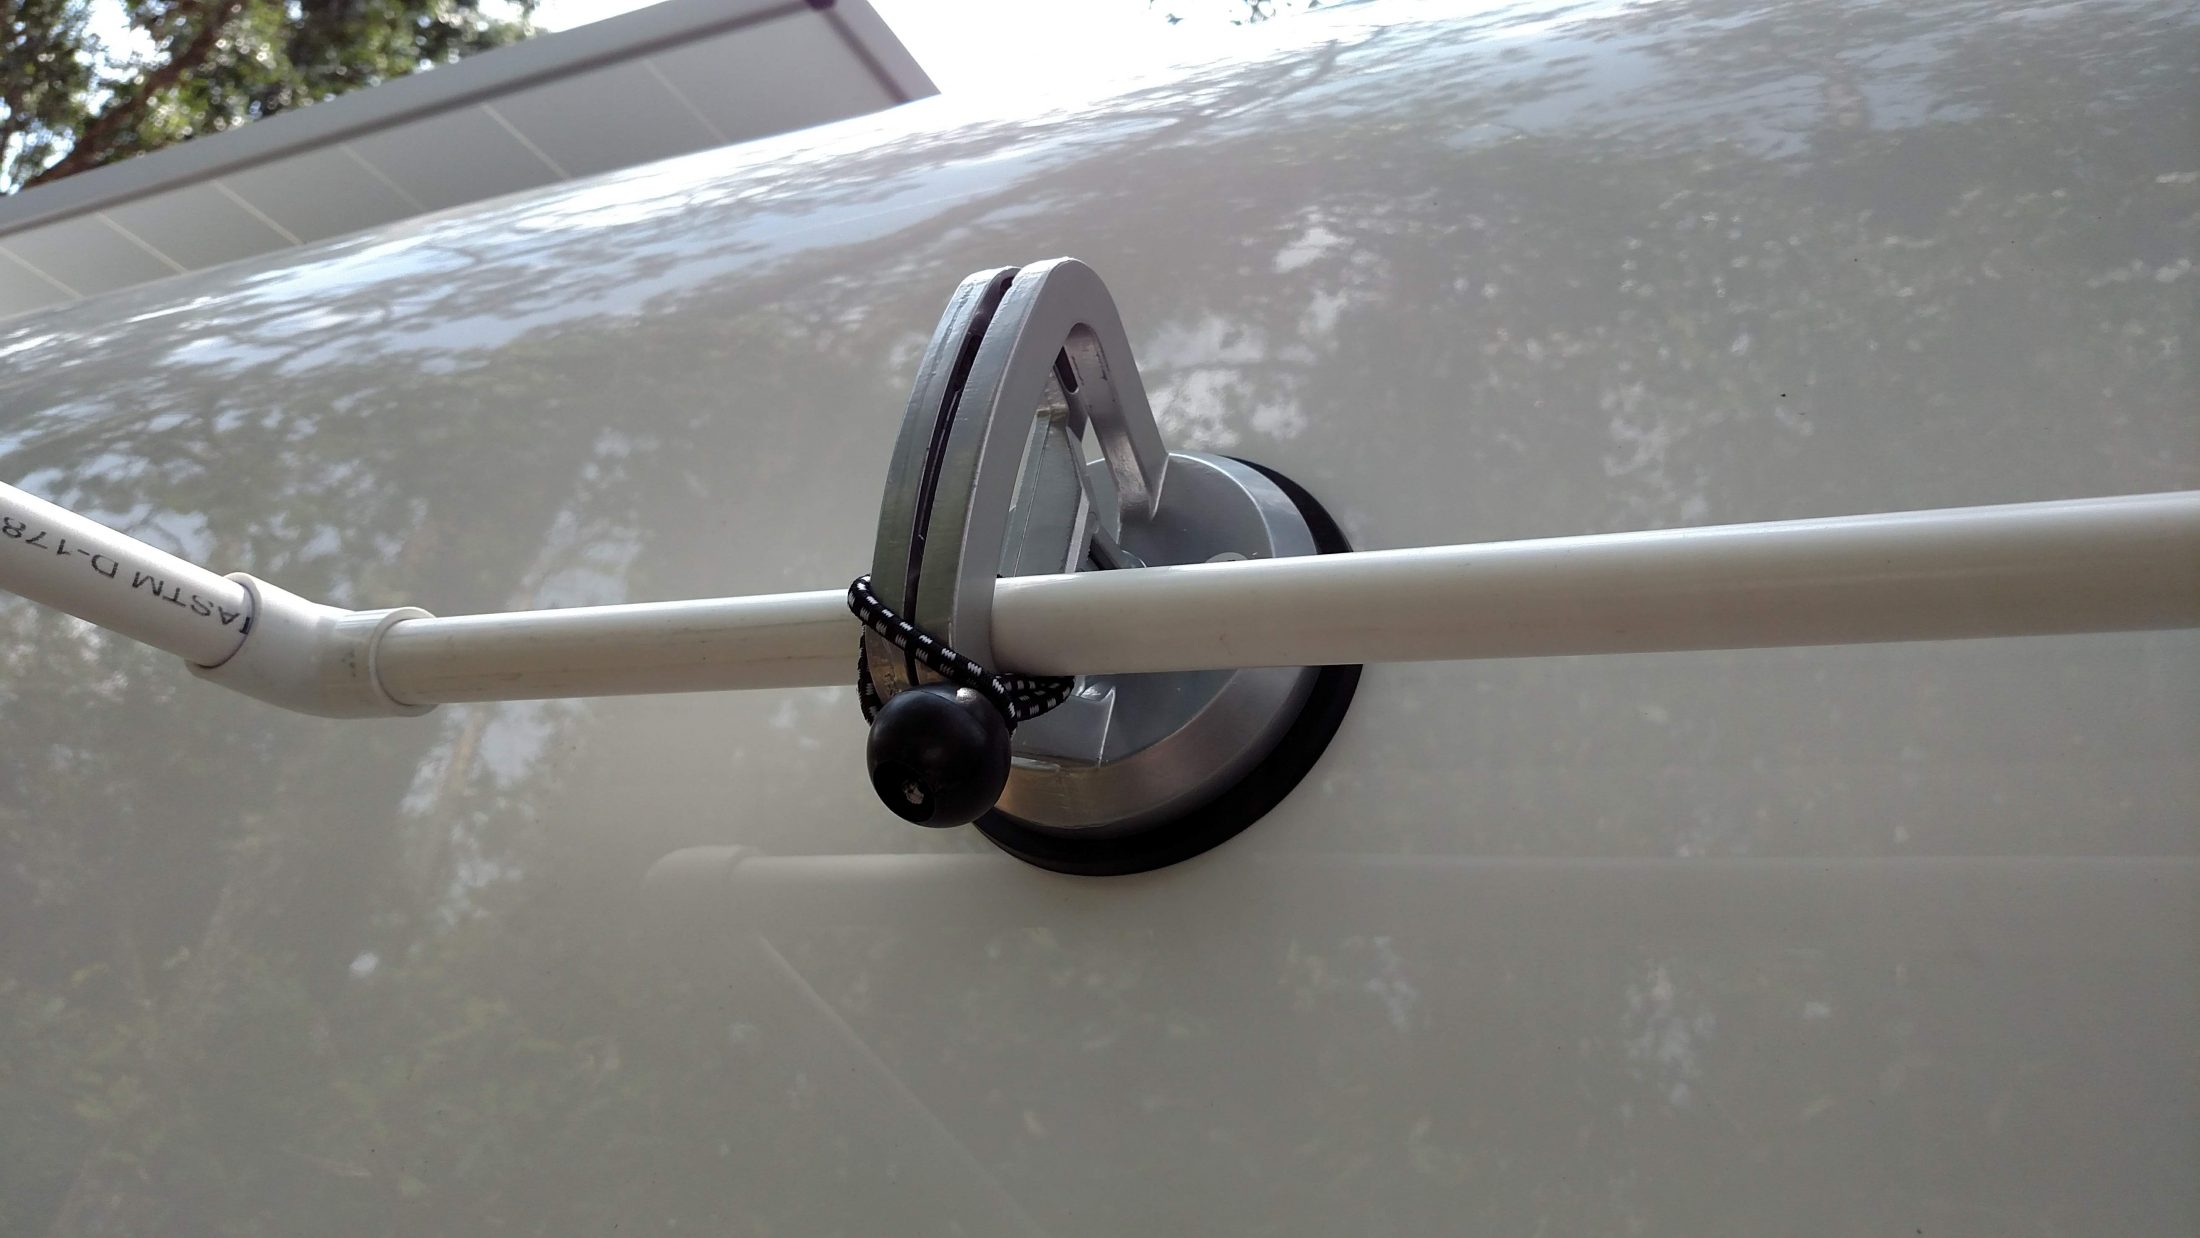
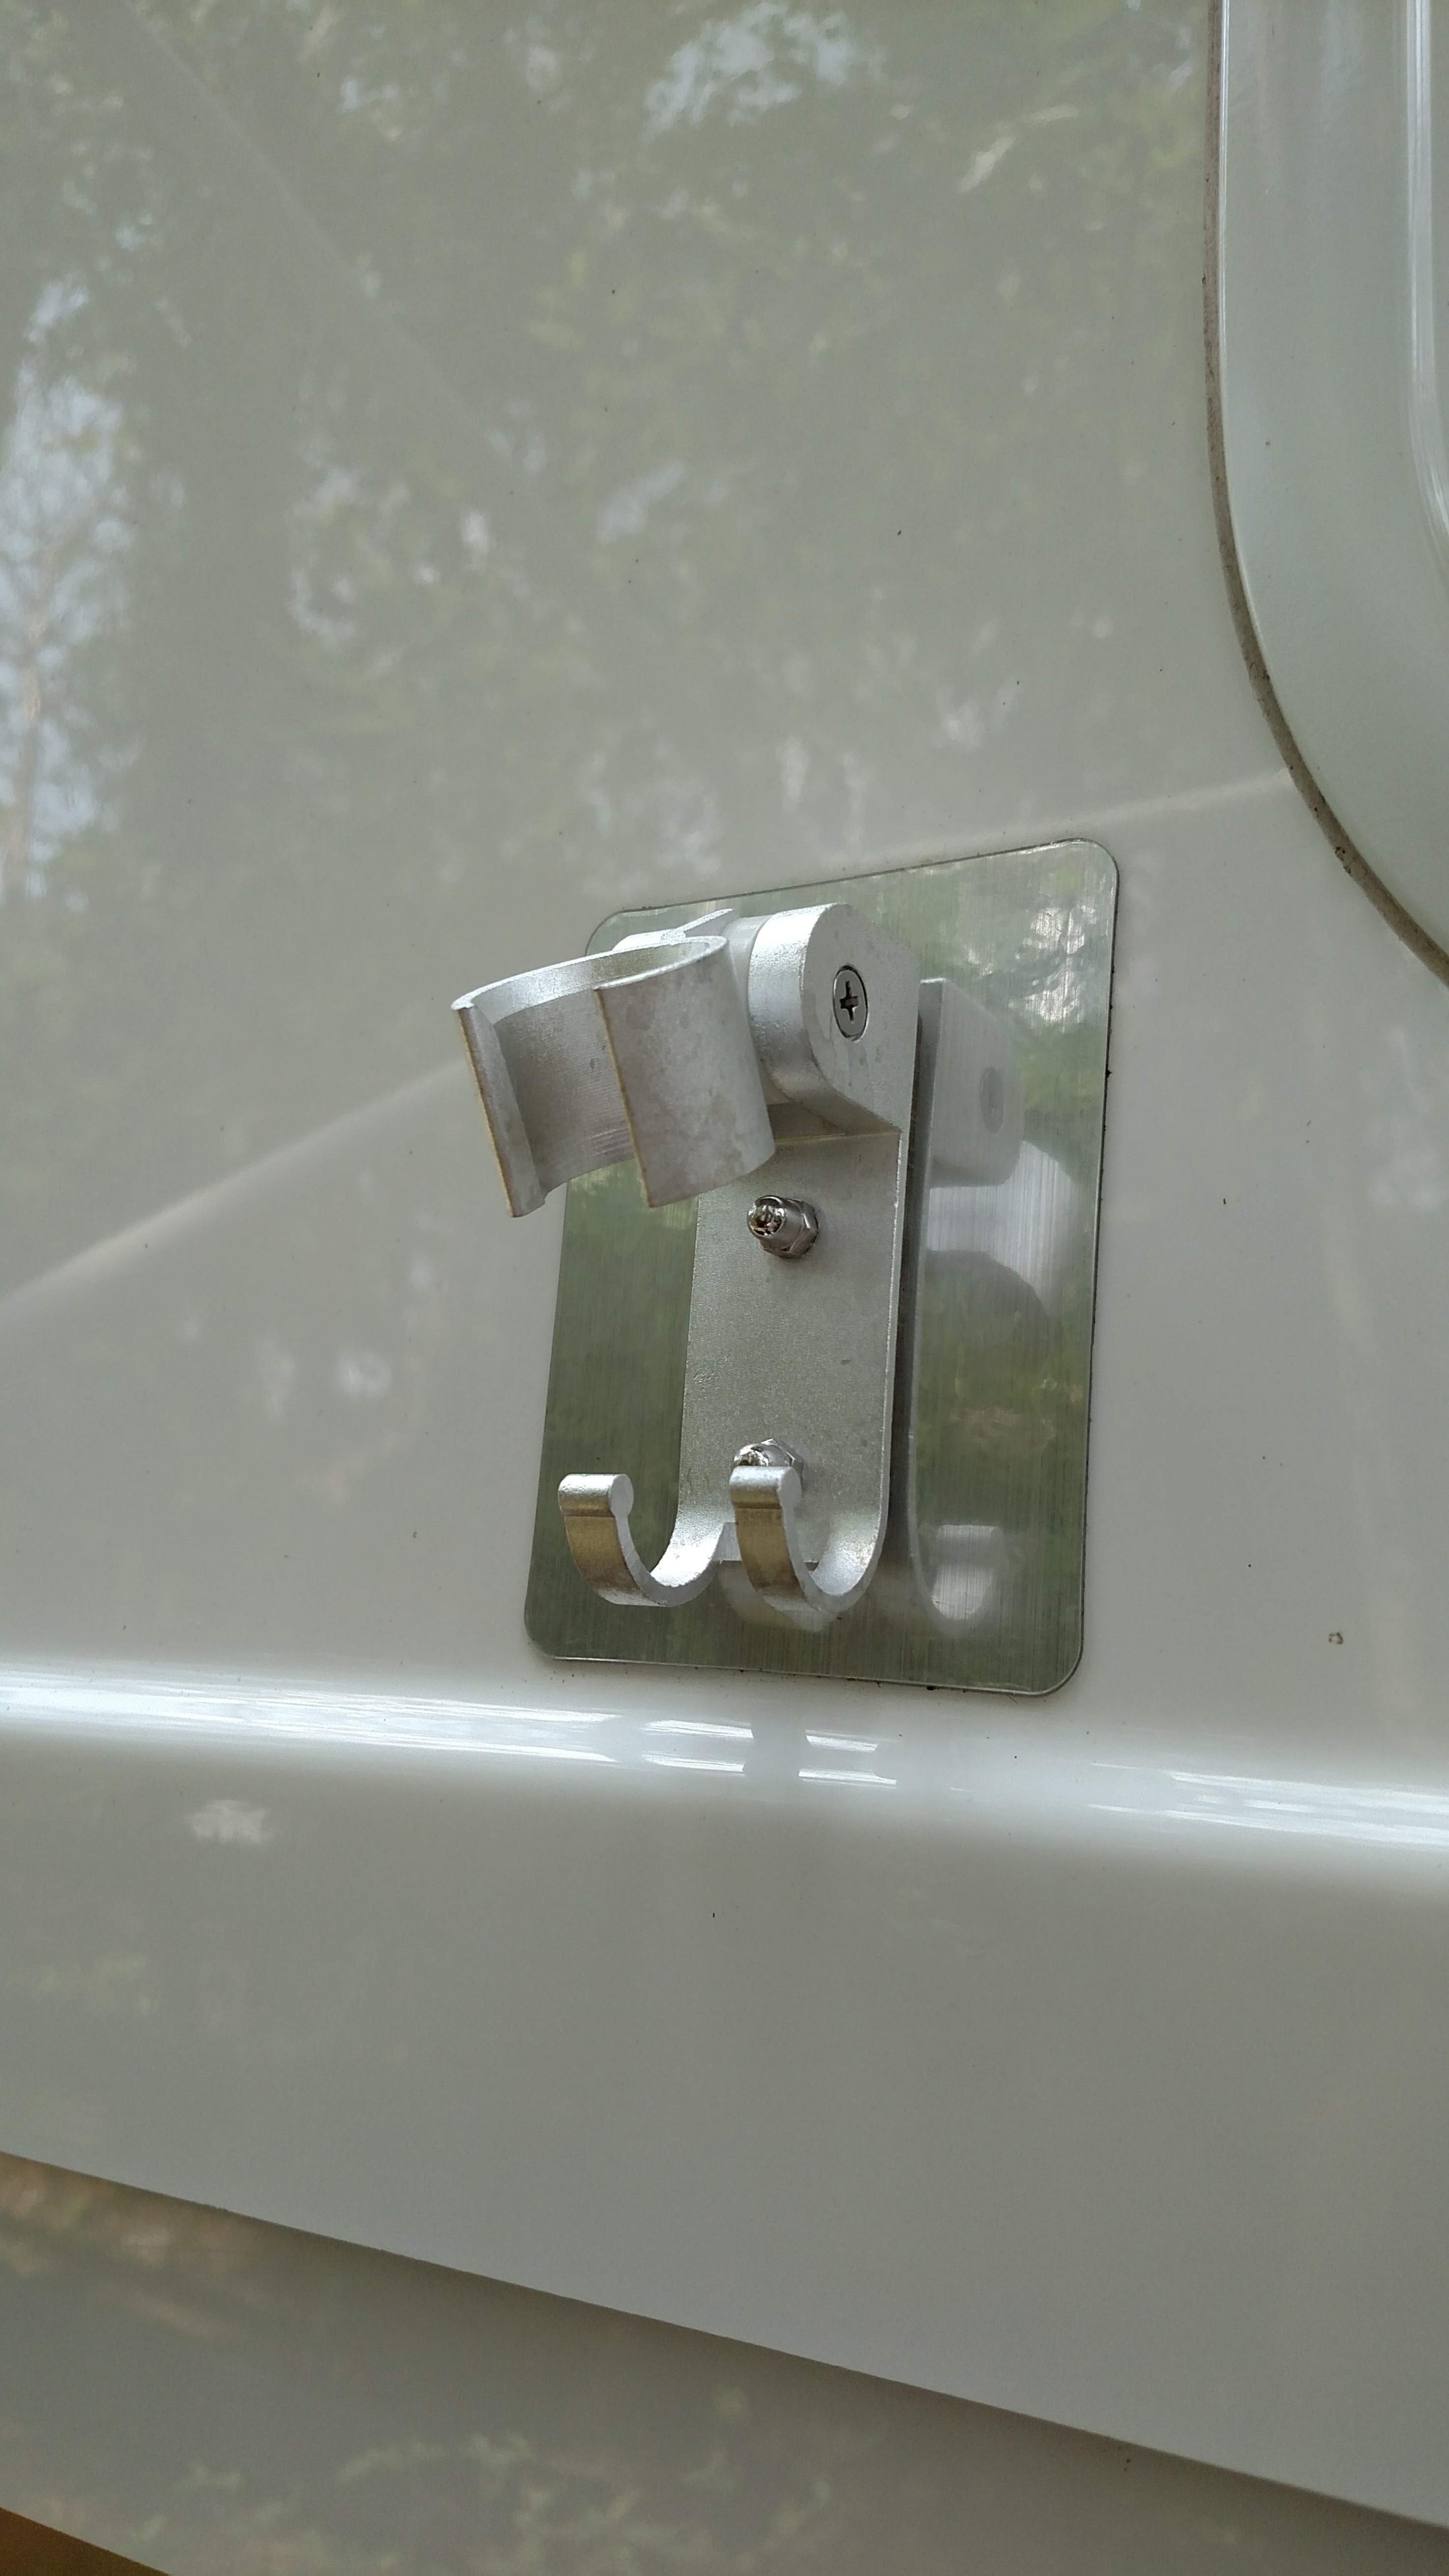
It is very easy to set-up and take down. The 16 ft pole is fiberglass and breaks down into 4 pieces.1 point
-
I'm glad that yours are working. Mine are not. Oliver's insistence on using the Dexter kit was a small disaster, I think. I would recommend that anyone wishing to have disc brakes do the install themselves, or use a third party, using the same equipment as Steve.1 point


-
Recent Achievements
-


")


")