Leaderboard


Popular Content
Showing content with the highest reputation on 08/27/2019 in all areas
-
What they said. And then, how do you even plan to get to the lower 48, when I'm pretty sure neither Alberta nor BC allows double towing with a travel trailer. One allows it with a fifth wheel. (Didn't check YT, but can't say I've ever seen that type of rig in the Yukon) Assuming you make it that far... Ferry landings are in Washington state. Expensive trip from Alaska with all that length. And no double towing in Washington state, once you land. Hmmm... Why do you want to make up this road train, anyway? Sherry2 points
-
There is no way I would put the Oliver in the middle - The frame was NOT designed to be a tow platform. I thought about this possibility early on - for about two seconds. My wife would be driving the Wrangler, or the TV, or I would still be at the house..... RB2 points
-
I was looking around for first night stop leaving Elkhart next May, as we're probably doing another delivery. This newly designated National Park is a little over an hour away, off 20. It looks beautiful. ( and campground opens May 15!) https://relay.nationalgeographic.com/proxy/distribution/public/amp/travel/national-parks/indiana-dunes-guide-what-to-do Sherry1 point
-
A few of us have swapped out the 3way fridge for 12v danfoss/ secop type compressor fridges. Since the compressor is much smaller than the cooling units on the 3ways, you can pick up another .5 to maybe even 2 cubic ft of fridge space, in the same footprint. This holds food for a week or two for us. We use a cooler for extra beverages. I don't think the factory is doing electric fridges, yet. We have an original shorty Legacy, 2008. We removed the unused microwave, and built a big storage compartment instead, which hold a good week or two of drygoods for us. If I ever find an electric drawer freezer that could replace a drawer, or possibly even the former microwave cabinet, I might do that. Haven't found anything for our dimensions, but might be something out there for the bigger EII. The drawer units are much more expensive, though, than the more standard reachins. A dropin induction would be really nice for many people, and probably a possible retrofit. I'm not sure, as we don't have the battery power ( yet), to use induction for cooking, and we don't often camp where we can plug in. rv induction cooktops are 110, not 220 like home builtins, so could be kind of slow compared to what you are used to, if you have an induction range at home, particularly if you use both burners at once. A few people carry a single induction burner, along with the propane cooktop. Sherry1 point
-
The problem you'll run into is that the upper cabinet is shallower than the fridge cabinet below. So you'd have to find some way to build out a cabinet for the top half of the fridge. I'm sure that's possible, but I'd have a hard time envisioning a way to do it attractively. I think that building out something either in the closet, or reworking the dinette with a countertop and cabinet below would be a better route for a larger or extra fridge. But the easiest route by far is to just put a portable fridge freezer in the truck. Between our truck fridge and the trailer, we can carry three full weeks of food. You'll find that your cooktop uses so little percentage of your propane supply that it's really not a factor. If we're not using the furnace, we'll return from a three week trip with practically full tanks. In contrast, an induction cooktop would really gobble up battery power.1 point
-
No sorry...it is oracal vinyl. CS1 point
-
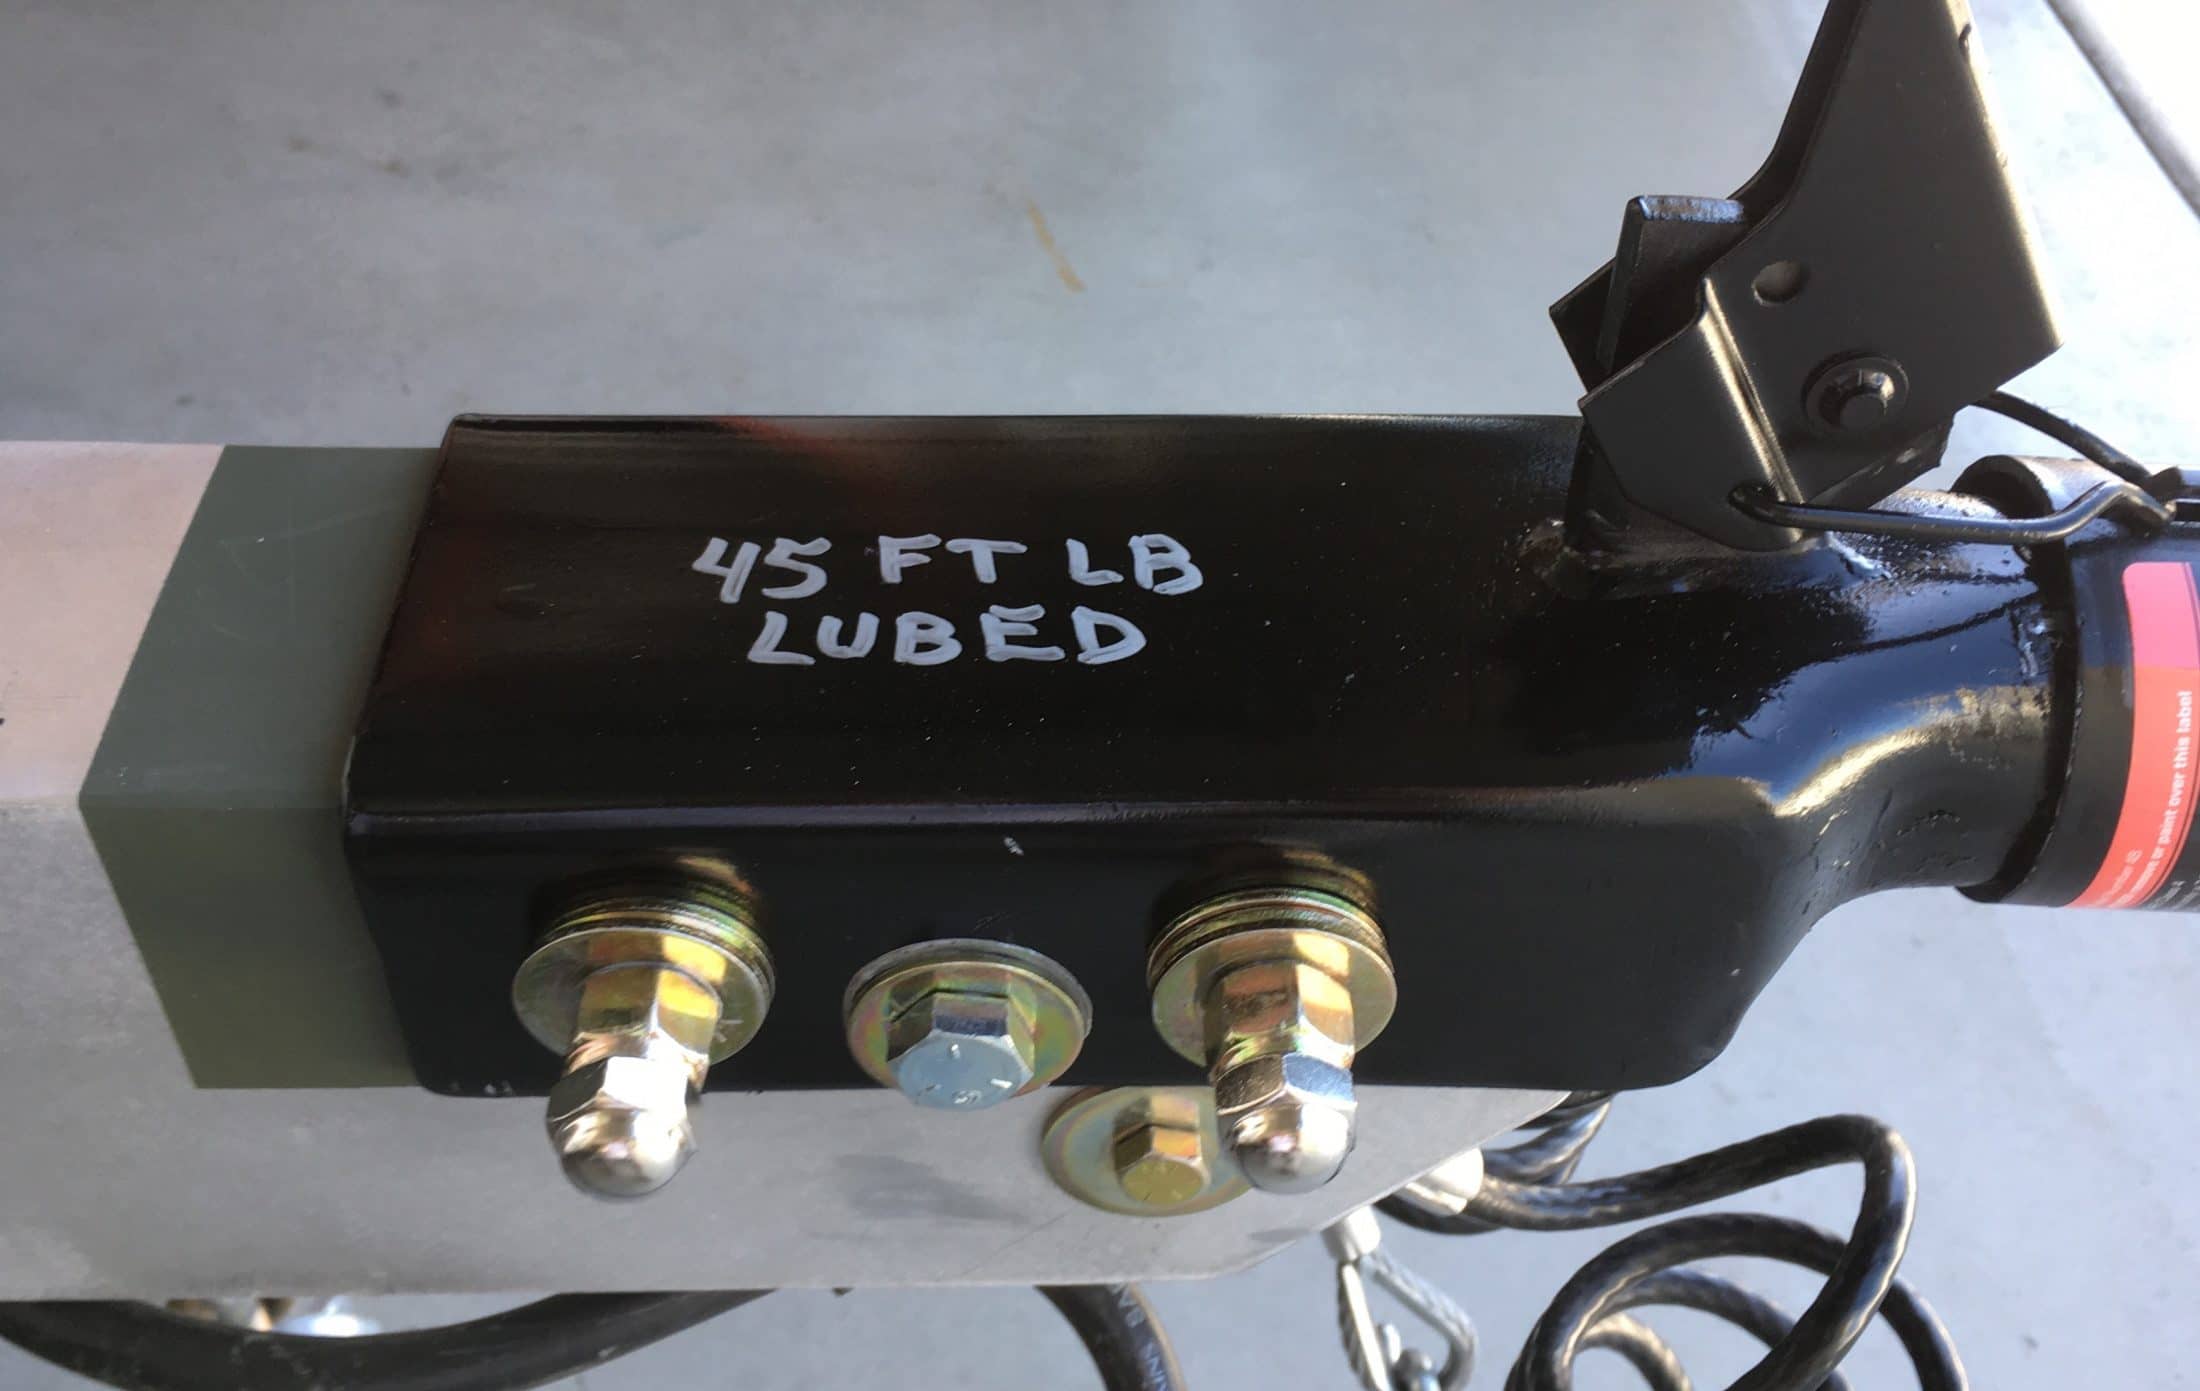
Oliver uses these exact bolts at the factory, the hardware was not an upgrade. Some of their installations, like mine, did not have enough washers under the nuts. I only replaced like for like. But my relacememt nuts had enough washers. I did contact Bulldog, and they said that Grade 5 was plenty good, Grade 8 was also acceptable. I reworked mine with Grade 5 bolts (and Grade 8 washers and nuts) since I think one issue is that when the poorly formed sides of the coupler are squeezed together, they do not mate perfectly with the tongue, and the nut and bolt head experience a bending force. The one that did not snap showed NO signs of distress or stretched threads (which would have indicated over-torquing) but it did have a slight bend at the threads. I added two more short bolts with the nuts inside the tongue. I reduced the torque value by 20% due to the discussion here, but I do not think that was the problem in the first place. I can't recall the last time I busted a bolt or stud during installation.... I'll start a new thread about this mod when I get the time. I do think that additional hardware is a good safety factor, that might prevent a call to AAA if you have a failure on a trip. Thanks everyone, for your patience and participation. I have sent Oliver Service some pictures for their examination. Maybe they will consider adding a third sleeve and through bolt. And bigger would be better... John Davies Spokane WA
 1 point
 -
HMD - All things are possible with enough time and money. The current propane cooktop really doesn't use very much propane - the water heater and furnace consume much more. However, it would appear that what you really want is a larger fridge. This topic has been discussed a number of times on the Forum previously and the "problem" basically comes down to the molds used for the Oliver shells. Without significant alteration to these shells there is simply no way to fit a larger fridge while allowing for proper ventilation of the fridge and room for a microwave/convection oven. Even if you take out the microwave/oven deal there are still problems. Bill1 point
-
Like many I tend to "hope" the products I purchase from known suppliers - like a Fastenal- are better quality -but unfortunately, it appears quality cannot be inferred by the supplier - sad. I use thread lock and never thought about the reduction of torque values - so I learned something here. But I never had a failure either. Were I JD, I would likely replace the bolts, and go at it again. Might do a failure test - may even use a thread lock nut. A fastening engineer, and I've had way to much experience with their "type" :-), would probably start at the calibration and lube issue, then go into some sort of bolt/nut investigation, an on on on on.... Just replace it, and check it regularly is my SOP. Like others, I don't know why Oliver would respond, not their problem, this was a customer installed upgrade. A sensational header would be something like - Warning! Bulldog coupler bolt failure! - Oh wait, that's what I thought was the subject when I first clicked.... Oh well we all know better now. Thanks JD, I did learn something here. keep us in the loop.1 point
-
What's to argue about? The only likely problem you'll see is every single one that you listed.1 point
-
I found that when replacing my Bulldog coupler with the 2 5/16" model, that the bolts as installed from Oliver had bottomed out in the nuts before clamping sufficiently. This meant that almost all of the torque was going into twisting the bolt, rather than tensioning it. With insufficient clamping force, the holes in the Bulldog coupler had begun to elongate. A couple of grade 8 washers added to each bolt,fixed that problem. Lubing the bolt thread with either grease or anti-seize increases the tension on the bolt with any given torque value on the nut. In the case of engine head studs, for instance, the bolts are clamping the head to the engine, and bolt stretch is the best way of arriving at the design clamping force. Nut torque is just an easy way to get there without special tools, but not exact. In the case of the bulldog coupler, we need bolt tension and we need shear strength. The shear is more determined by the bolt hardness and diameter, while the tension is determined by the nut torque. In a perfect world, we'd get the bolt stretch specs and go for that by adjusting the nut torque. But in the real world, we use nut torque. It never is clear how much we should reduce the torque based on the affect of the thread lubrication. But it is clear that lubing the threads increases the tension. It may be that John had a defective bolt. It may also be that any problem with the bolt was made more obvious by lubing the threads, which increased the tension while torquing. It may also be that there was an unfair percentage of torque going into twisting the bolt because of the threads bottoming, or nearing the end of the threaded section. Since those bolts are not designed to be removed frequently, and since they are plated for corrosion, and since they may have been defective, I'd replace them and install them with no lube, while making sure the threads are not bottoming. We want the unthreaded shank to carry the shear load, so get bolts that have a long enough unthreaded length. Then add grade 8 flat washers to make sure the nut does not bottom before reaching full torque. If you have two torque wrenches, work them against each other on a nut and bolt, to see if they agree on their torque values. If not, get the best one calibrated or replace one of them. But really, the torque should not have to be very precise to work properly in this case. If the bolt is near it's full capacity, upsize it. It seems grade 8 is a good choice for the bolts because they are primarily in shear, but I'm not an expert on the differences between grade 5 and grade 8 in that regard. The torque is just a way to keep things from moving around while under load.1 point
-
I’ve been looking around to see if I can find anything authoritative on how much to reduce torque values when using anti seize, but I haven’t found anything yet but forum posts. This particular post I found was interesting - 50% reduction for Teflon based anti seize. Wow. LUBRICANT OR PLATING TORQUE CHANGES Oil, Reduce torque 15% to 25% Dry Film (Teflon or moly based), Reduce torque 50% Dry Wax (Cetyl alcohol), Reduce torque 50% Chrome plating, No change Cadmium plating, Reduce torque 25% Zinc plating, Reduce torque 15%1 point
-
JD, Its difficult to determine the quality of the failed bolt, but certainly is an important aspect of your problem. Its been my experience that the softer grade 5 have a better stretch tolerance, than the harder grade 8. I broke many 8's on my brush hog, change to the softer metals, much better. Sometimes in our efforts to make stuff better, beefier, we inadvertently go backwards. I don't know what Oliver will say, but the quoted Bulldog instructions are clear. Good luck on your quest.1 point
-
Check out Wekiva Springs state park, on your way across. Beautiful. Near Orlando. Sherry1 point


-
Recent Achievements
-


")


")


")
