Leaderboard


Popular Content
Showing content with the highest reputation on 04/08/2020 in all areas
-
This my bathroom shower/faucet arraignment and was installed by Oliver when our trailer was built. I wanted to have my choice of shower heads and also have the same faucet in both the bath and kitchen.
 3 points
 -
We decided to roll our reservation deposit over to the Sept rally dates. We did this by simply calling the park and requesting this change. We spoke with a gal who works in reservations named Kathryn who made this change seamless. Looking forward to seeing everyone in the fall. -Patriot2 points
-
I was looking at duplicating overland's work, and came to the same conclusion he lists above, best to just replace the whole fixture. I just haven't gotten that far as I think I may do a few other things while in there...like maybe throwing in a valve to let the hot water go into the fresh water tank so I stop wasting fresh water and gray water waiting for warm water.2 points
-
https://tpwd.texas.gov/newsmedia/releases/?req=20200407a1 point
-
That's a nice setup. I actually have the parts in hand now to do something similar with mine. I bought this shower valve and this faucet, and I'm pairing them with a stainless vessel sink that I found on closeout. Oliver sold me an uncut vanity top to use with the sink. Right now I'm debating whether to mount the shower valve centered over the shower caddy, or on the closet wall. My wife prefers it on the wall, as do I, but of course that leaves exposed plumbing in the closet. But I think I could protect it, and don't really travel with anything in the closet that might damage it. The only potential problem that I may have to solve is that the shower caddy might interfere with the drain from the sink, since I'm pulling the sink forward. I think it will work though, and if not, I may ask Oliver if they can ship me a shower caddy without any holes drilled in it, so that I can mount it upside down - for some reason, the bottom of the caddy had more clearance than the top.1 point
-
At least they are extending our annual park passes for 2 months.1 point
-
Those pesky Asian beetles...the ones that look like Lady Bugs! Last Fall, we were getting ready to winterize, as we had an early winter event coming in. It was warm, sunny, and a beautiful day. I gathered antifreeze and other supplies. As I came around the stern of the trailer, in the warm sun, it must have been covered with at least 500 of those little pests. We were careful coming in and out as we changed anti freeze bottles, and pumped lines, and so forth. We didn't want those things in there. We probably only had to remove 3 or 4. This Spring "wake-up", I only found 2 "hulls". That tells me the Oliver is essentially tight, and pest free and resistant. We have had SOBs (some other brand) in the past and they used to get invaded. Nice not to have that cleanup...1 point
-
Honey Badger crystals. They are sprinkled around the interior, between the shells , as a preventative measure. Any mention of a honey Badger sends critters into a virtual frenzy of self destruction. Mice, rats, and other rodents , do not congregate anywhere a honey badger has staked a claim. Rest easy, no critters in an Oliver, some owners, excepted. RB1 point
-
You could add a remote display from Progress Industries to your existing surge protector or move the existing display to the battery box or the basement. Mossey
1 point
-
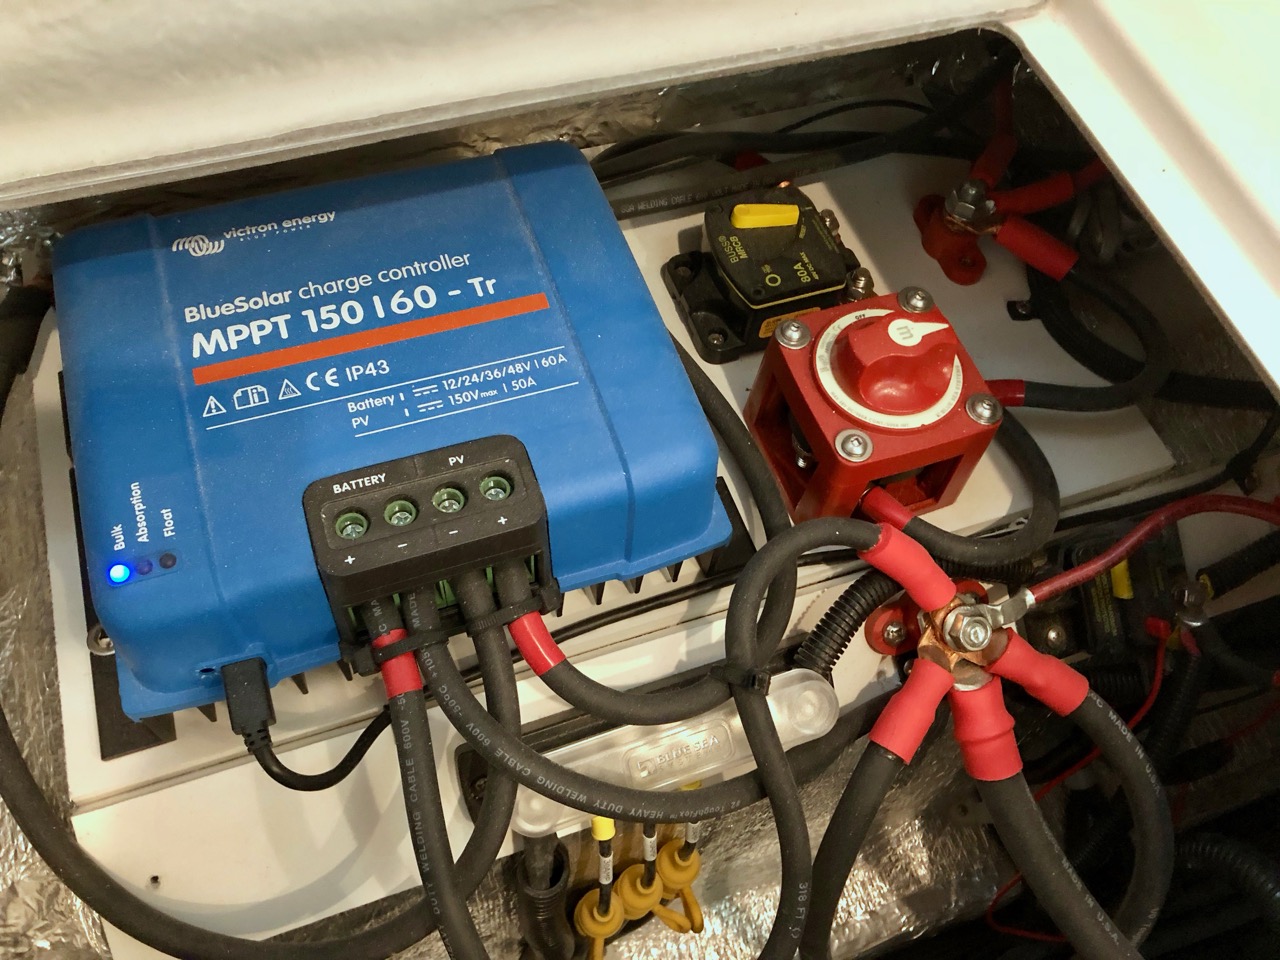
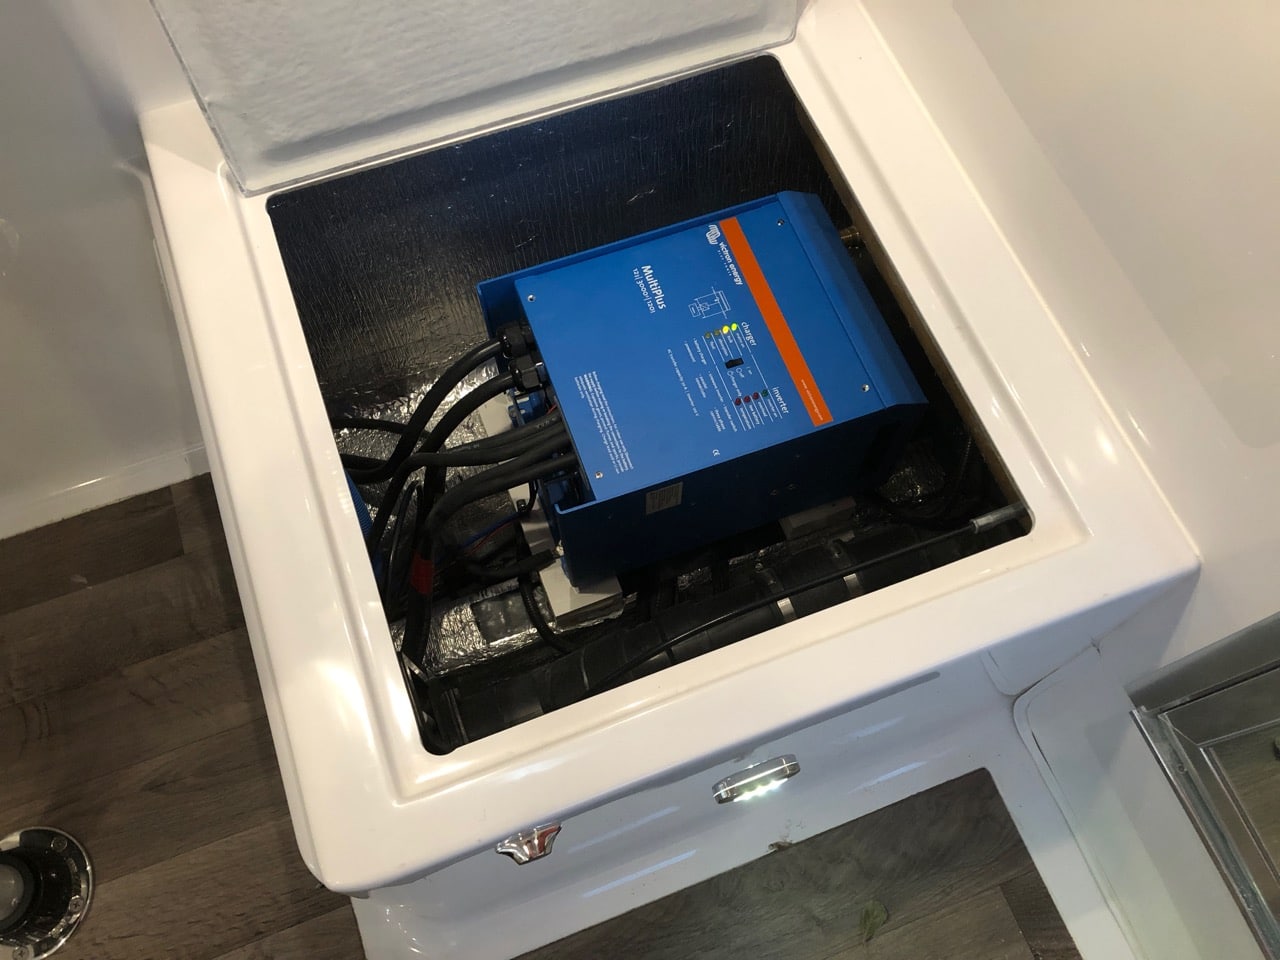
Starting a new thread since the other one seems flaky. This is mostly for Mike since I can't figure out how to send photos via PM. I'll do a big post on my electrical setup someday, after I've redone a few things and added a different hookup for my portable solar. Mike, this is the inverter itself, mounted under the dinette seat by the bath. You have to run pairs of + 12v, at least 1/0 AWG, in and out and also 120v both ways. And a ground strap to the case, so that's 7 large cables plus a coms cable and a temp sensor wire. I ran the 120v along the side and the 12v, ground and and coms through the trough under the dinette. I plan to pull the inverter and screw down a plywood base to secure it better, though it seems fine as it is, screwed into 2 layers of PVC. One thing I do want to do on this end is to install a manual transfer switch for the 120v, in case something ever happens with the charger. [attachment file=IMG_0078.jpg] The inverter has plenty of space for airflow in there. The only time I hear the fan is if I'm really loading it to the max, or if it's really quiet in the trailer when I just plug it in and it's bulk charging the batteries. This is the 12v + side, under the street side bed. Solar comes in at the top right, + goes to the combiner post, then to the cutoff, then though an 80a breaker, then snakes around into the charge controller. + out goes to the combiner post on the lower right, as does the twin + 1/0 from the inverter and the 4/0 + from the batteries, as well as Oliver's cable to their + bus. The bus bar and breaker on the small angled PVC panel are both Oliver's. I moved them a bit to get the post on there but otherwise, I tried not to touch anything on Oliver's side of the electrical. The battery + goes through a cutoff and a 400a fuse first, which are mounted out of sight on this side of the battery box. Solar negative goes around the back of the charge controller onto a combiner post that's hidden, then around the left side and in. Negative out goes down the open space in the hull to the terminal in the next photo. When I redo all of this, I'll add a much larger plywood base, swap the main combiner post for a bus bar, move the battery cutoff and fuse to the board for easier access and generally tie everything down better. Negative connections are kept away from the + on the dinette side of the battery box. Battery - goes into the shunt for the battery monitor, then I have the charge controller coming directly off the shunt and a short 4/0 jumper to a combiner post. Off that goes the twin 1/0 from the inverter, the ground from the inverter, and Oliver's - cable which goes into their distribution box. I removed the charger unit from their box so it's just a fuse and breaker box for me now. I'll redo this in plywood, swap out the combiner post for a bus bar and secure the wiring better.
1 point


-
Recent Achievements
-


")


