Leaderboard


Popular Content
Showing content with the highest reputation on 12/16/2020 in Posts
-
I have been sitting back mostly watching the posts, getting to know "what's what" with the Forum and attempting to decipher how this works. I found it is not really hard to upload photos; however, once they are on the Forum, I cannot figure out how to keep from doubling up sending them out to the end users. Oh, well, I suppose I will learn by doing. So, here is a little bit about us: My wife and I are eager for May 17, 2021, which is our delivery day for our OTT LEII Twin Bed model. I drove to Hohenwald in our bought-it-new, 67,000-mile 2017 GMC Sierra 1500 4x4 (yes, we are going to "try" it as our TV before we decide to upgrade to something "more substantial") and toured the factory with Anita while my wife stayed home social distancing. We live in Central Illinois and had never seen nor heard of an Oliver until I was ready to pull the trigger on an Airstream. However, with the hailstorms we have here and the potential devastation golf ball-sized stones often deliver, I hesitated...then heard about Oliver on an Airstream Facebook page. The rest is history. We support the theory that it makes more aesthetic and financial sense to buy superior quality items ONCE and then take excellent care of them, rather than purchasing low-cost, inferior goods with the expectation of replacing them often. We have pretty much lived our lives in that manner. Oliver Travel Trailers seemed to match that ideal premise, and after my factory tour, I was solidly convinced. We are STOKED! It seems there is a short list of recommended necessities to bring to Hohenwald on delivery day, and that other items can be purchased after we "hit the road." Well, we may be exceeding that advice... Let's just say...we will be adequately prepared for serious boondocking on May 17! HERE IS THE OLIVER FACTORY TOUR WITH ANITA JOHNSTON...Enjoy! IMG_0760.mov6 points
-
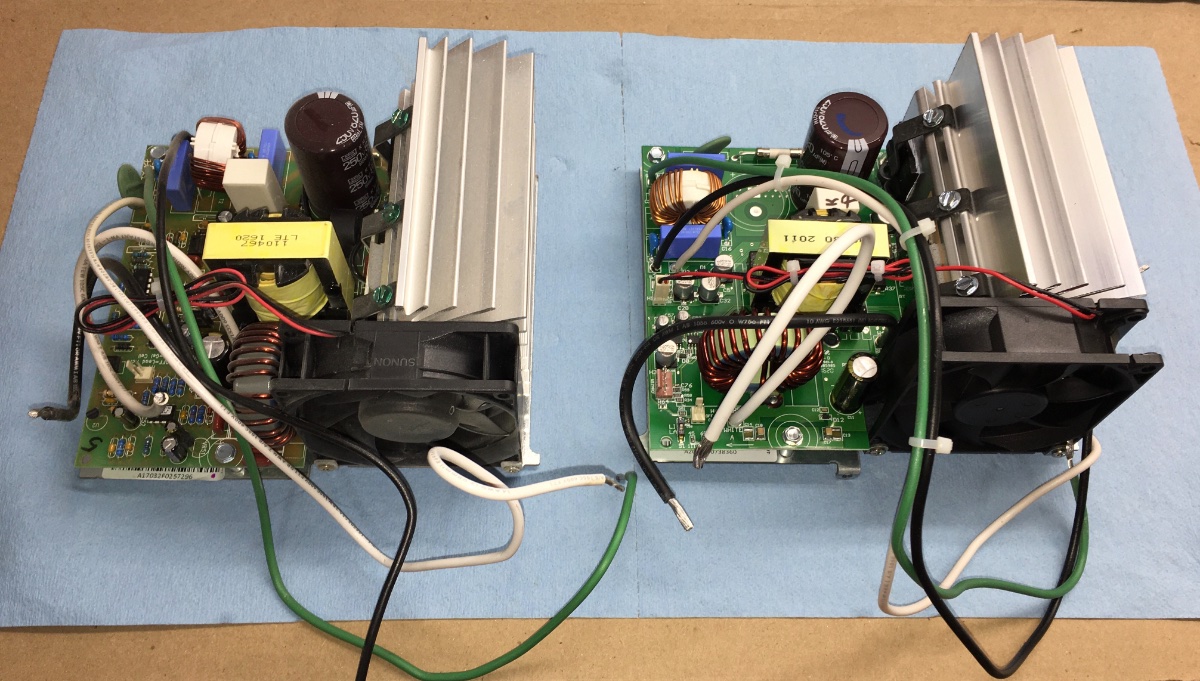
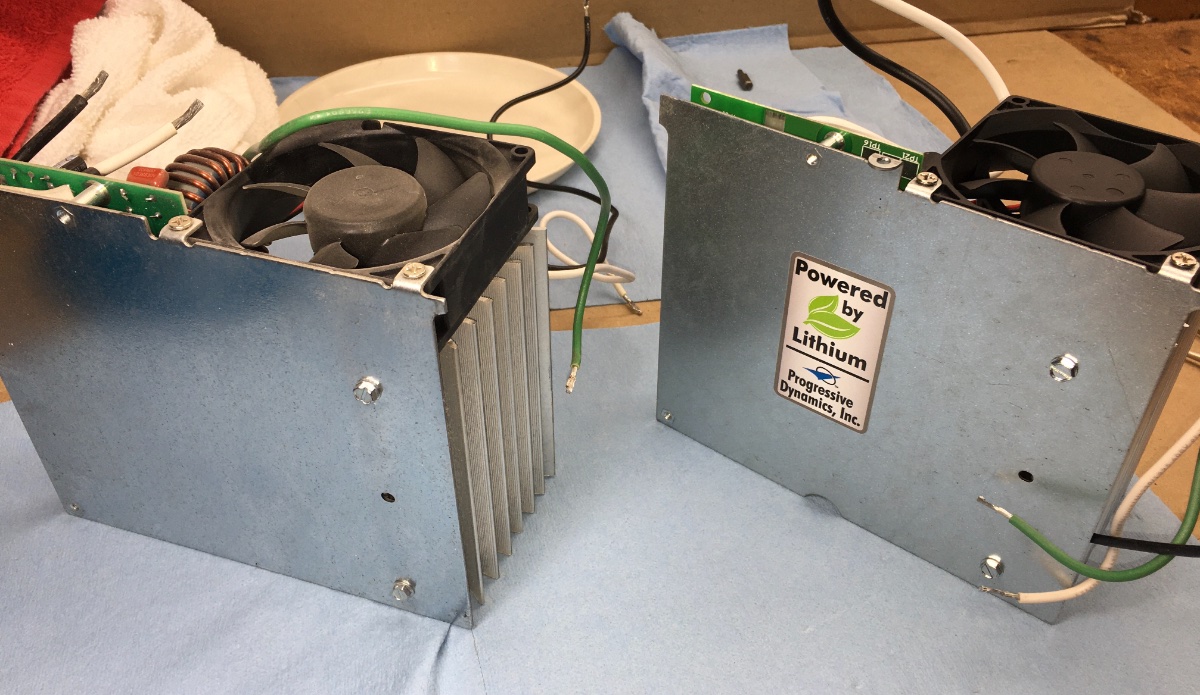
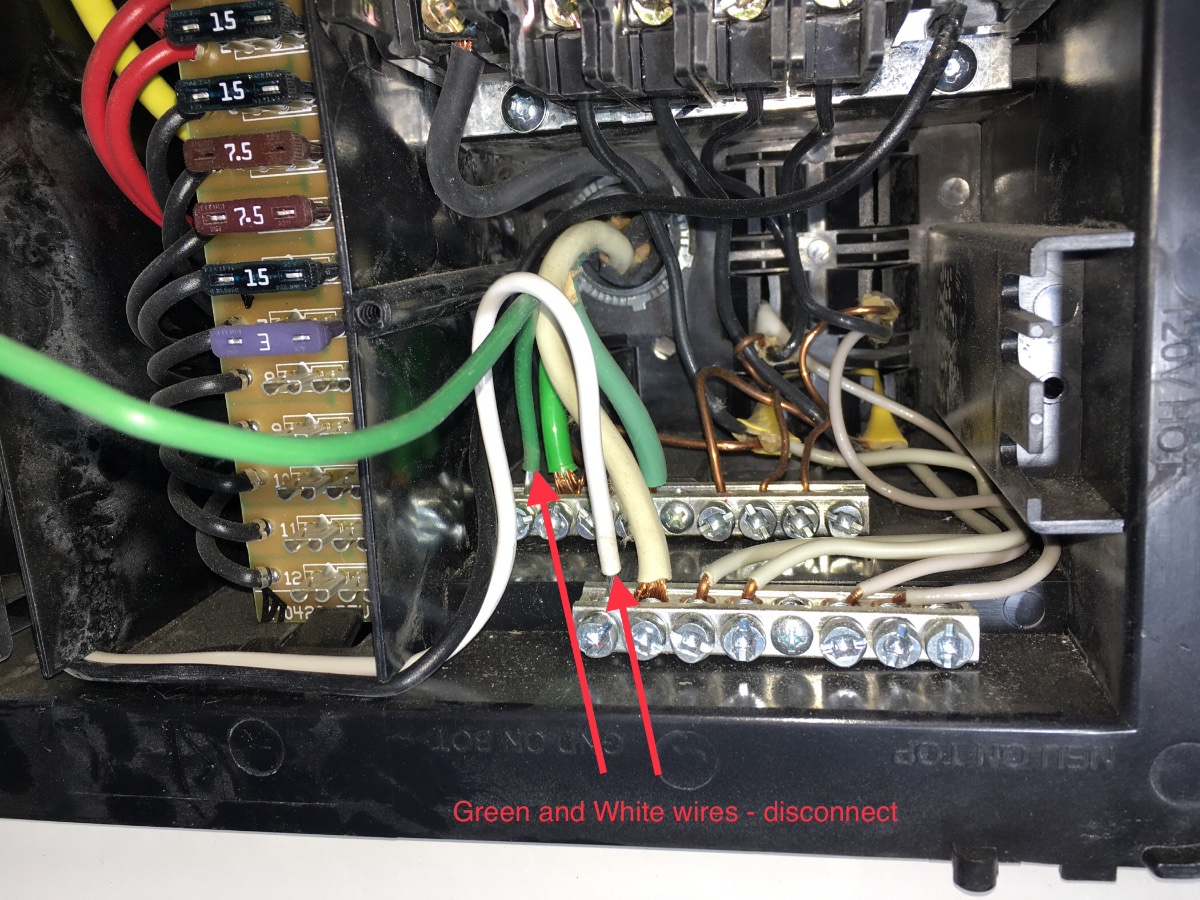
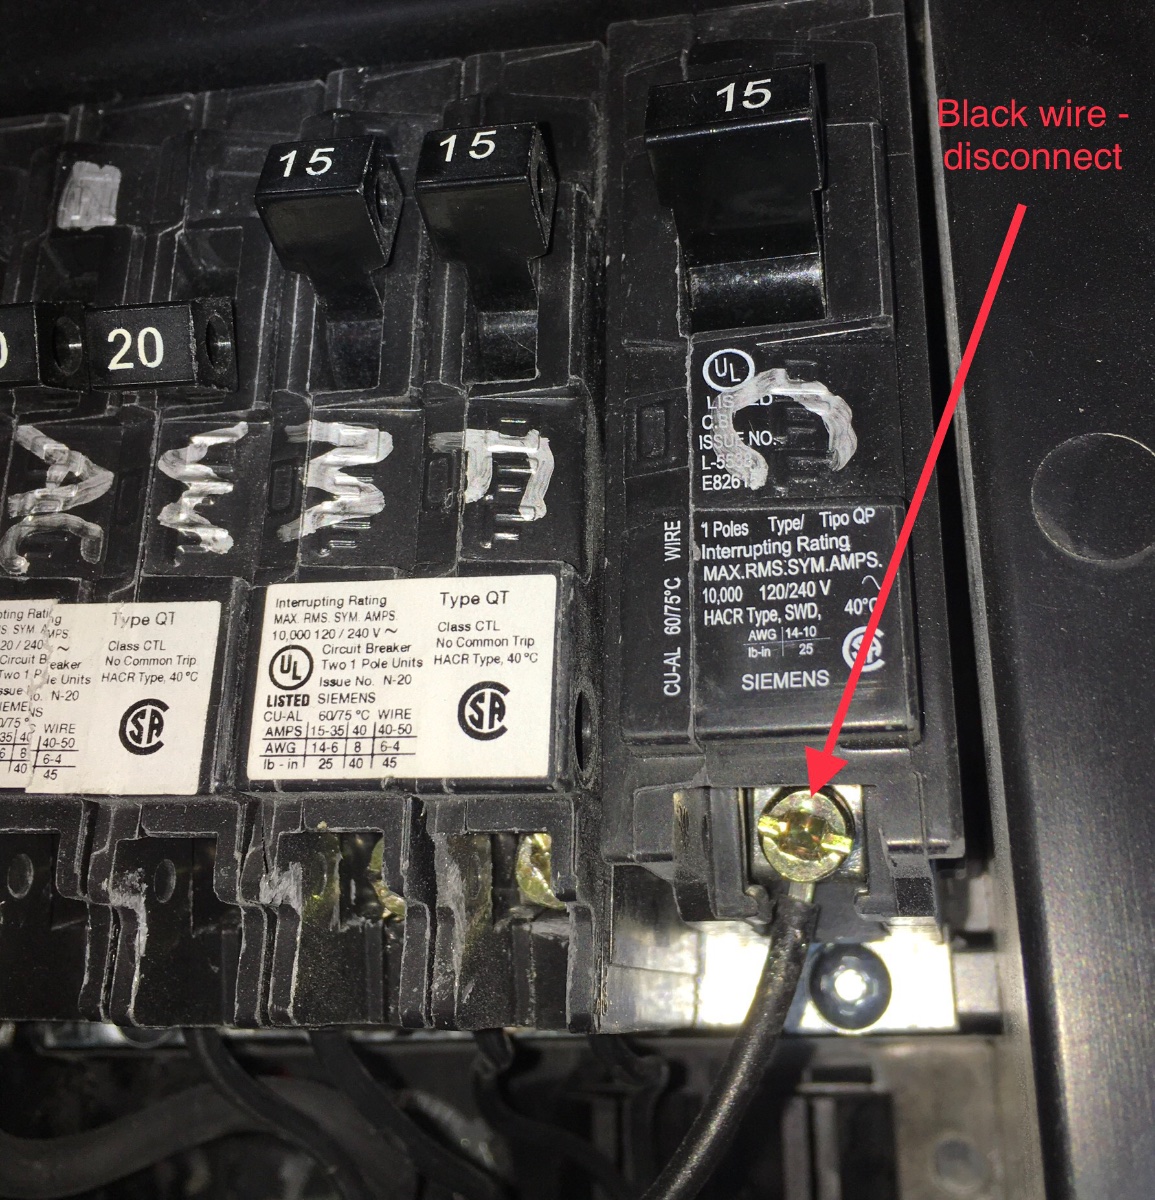
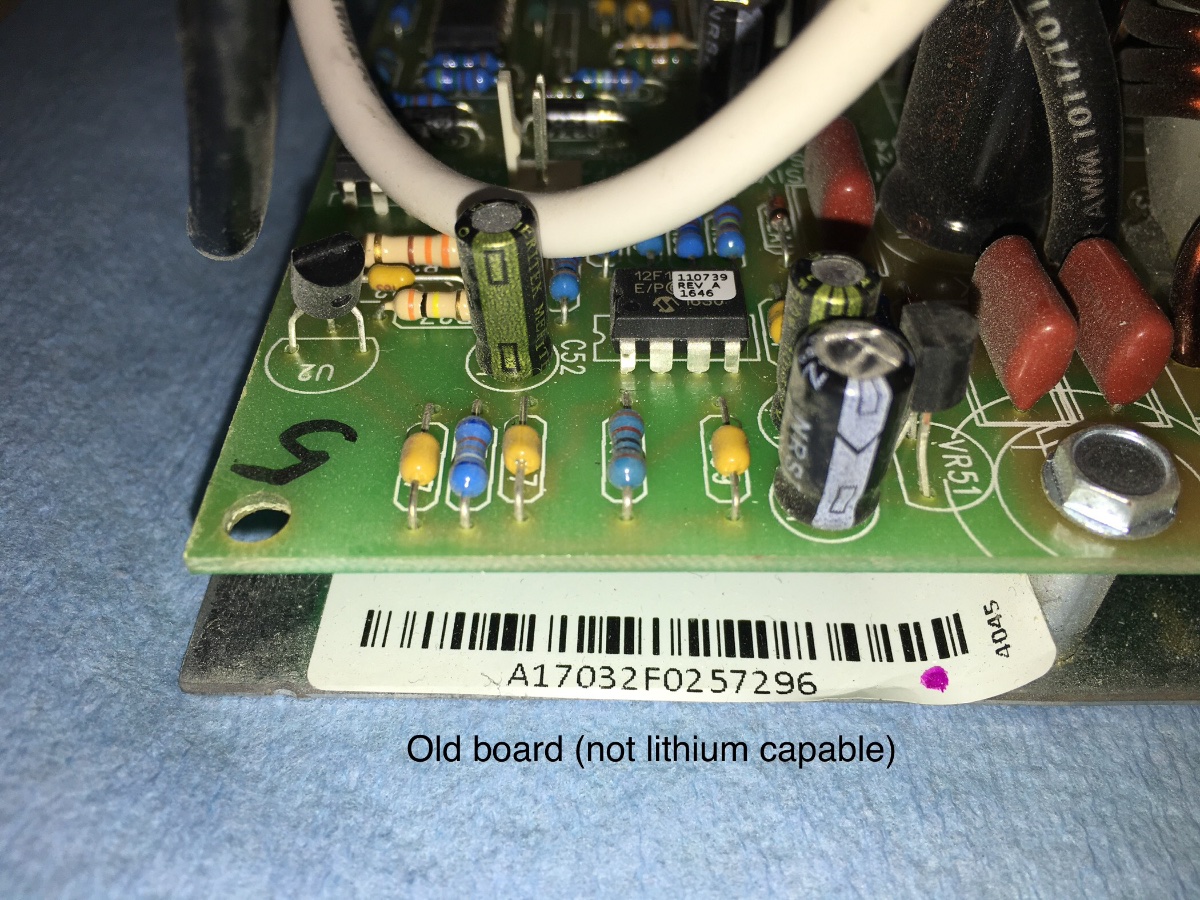
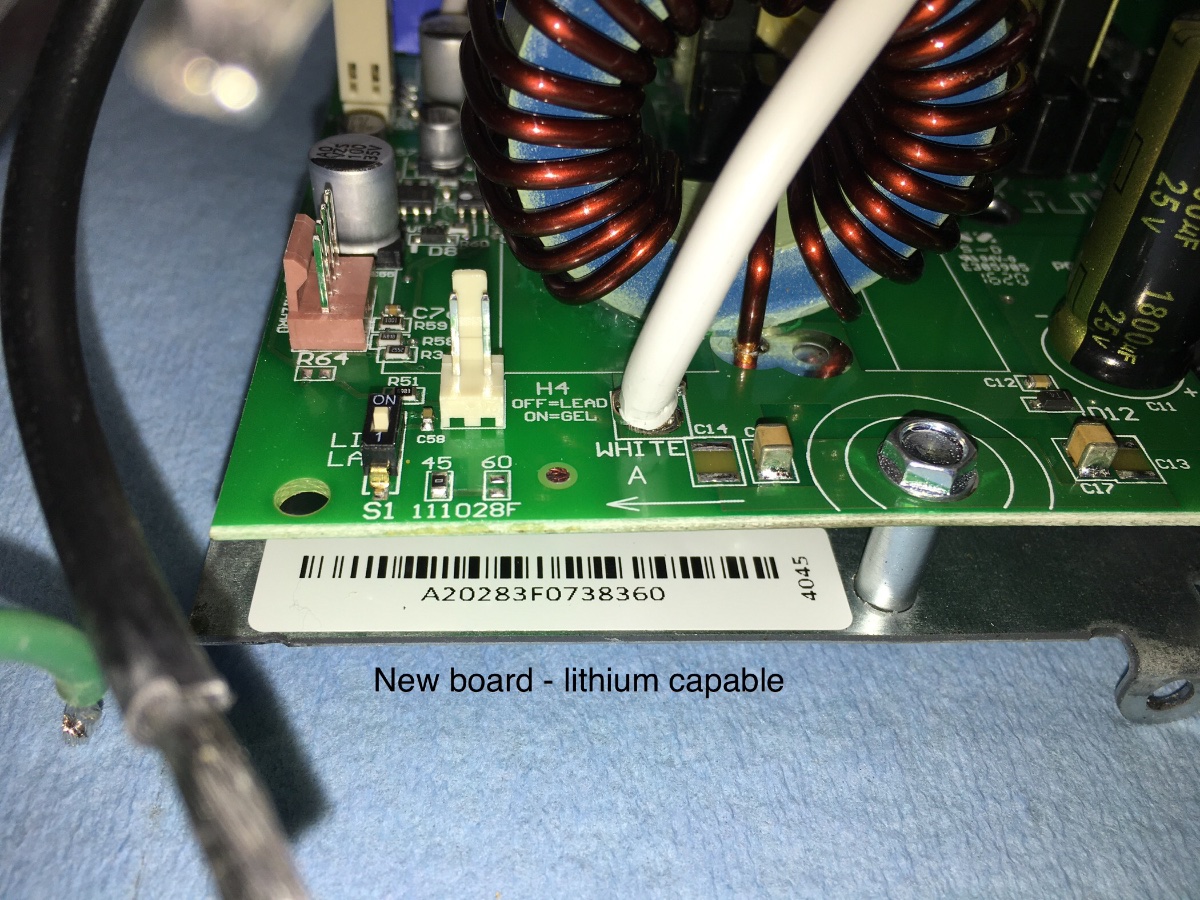
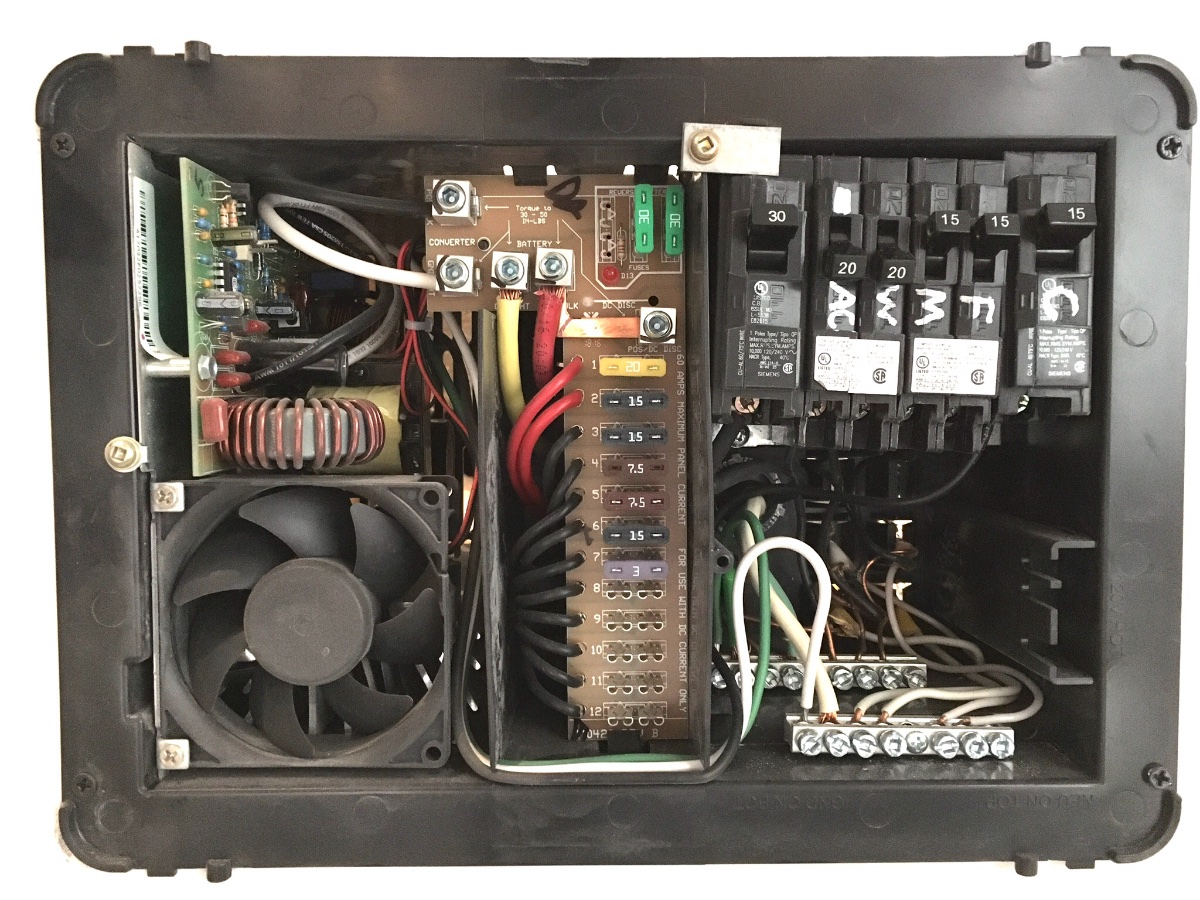
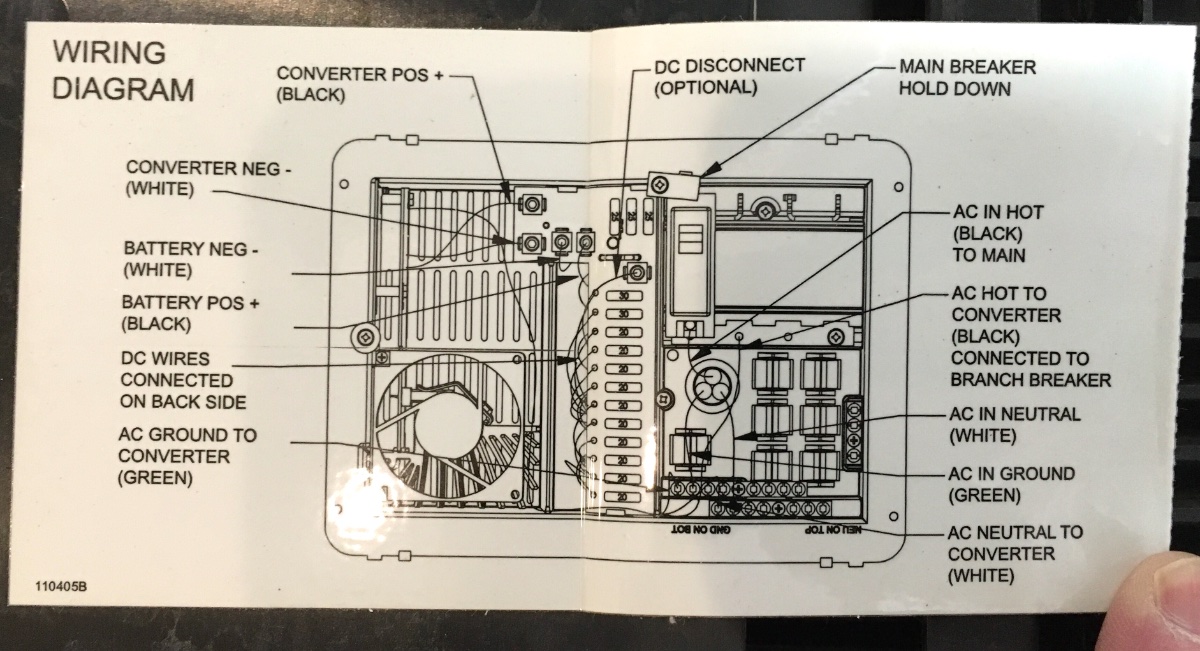
See this thread first: ... https://olivertraveltrailers.com/forums/topic/4743-upgrading-to-lithium-batteries-source-for-cheap-“lithium-charging-section”-for-your-older-pd4045-converter/ Read this: .... PD4000 Series Troubleshooting Guide ... The last page discusses swapping the converter charging section. This isn't at all difficult, but like any electrical mod, be careful, make sure you understand each step, and double check your work. Disconnect the shore power and also disconnect the batteries when doing this mod. You would be working around live wires otherwise. Tools needed: Allen and square drive screwdriver tips. If you don't already have these, consider buying a set that has all types - these are excellent and come with a dandy case: .... https://www.homedepot.com/s/Shockwave%20Steel%20Impact%20Duty%20Driver%20Bit%20Set%20(74-Piece)?NCNI-5 Needle nose pliers Wire cutters Nylon tie wraps Here is the old versus the new one, which comes with a fancy decal: Open the front door that covers the fuses and circuit breakers, remove the small square drive screw in the center of the panel. Grab the frame and pop it free from the four outer retaining tabs. Mine came right off, you might have to pry gently. Remove the square drive screw and tabbed washer on the left side that retains the unit. Remove the five wires: Slide out the old unit. Be careful with it, you can sell it on eBay for a little cash. Old vs new boards; John Davies Spokane WA
 4 points
 -
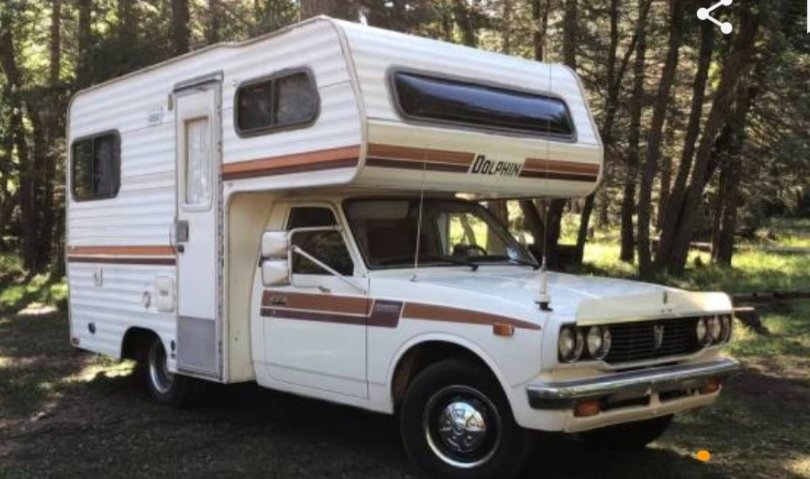
I will also say, none of this is rocket science. Hundreds of thousands of people rent or buy rvs and towables every year, and they figure it out . I do remember my mother-in-law telling me about the adventure of picking up their Dolphin camper in Southern California in the 70s. No initiation. No walk thru. Handed them the keys, and off they went to western NY. No camping experience, beyond cabin camping in Canada. (No cell phones or Google, then, either.) They learned a lot from fellow campers ar rv parks. They made it. And loved that crazy little camper for over a decade. Even when the gulls stole a steak from their grill at ft. Desoto.... Theirs looked a lot like this one. Btw, I really miss my in-laws. They were super people.. but,, this memory makes me smile.
4 points
-
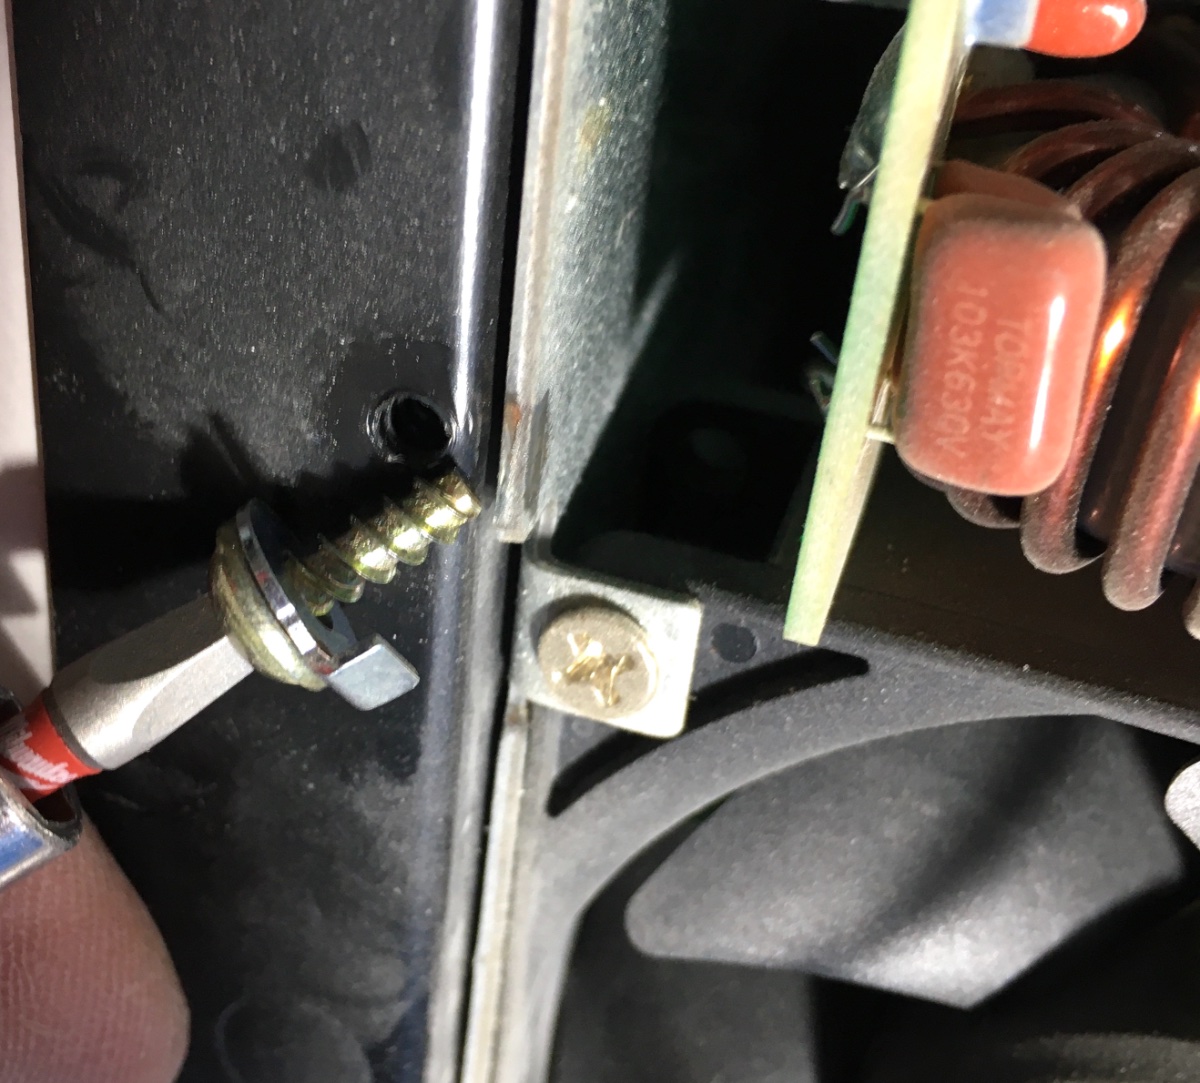
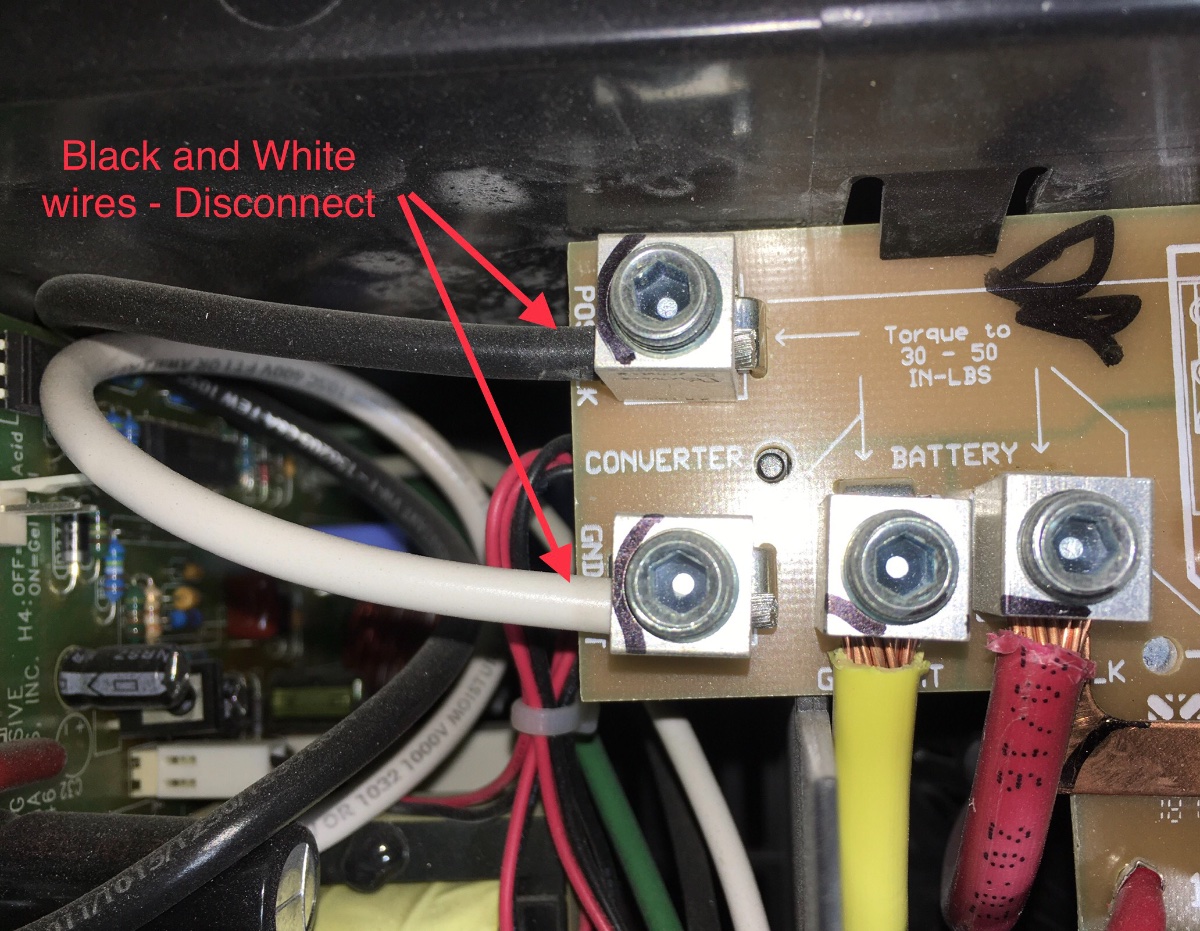
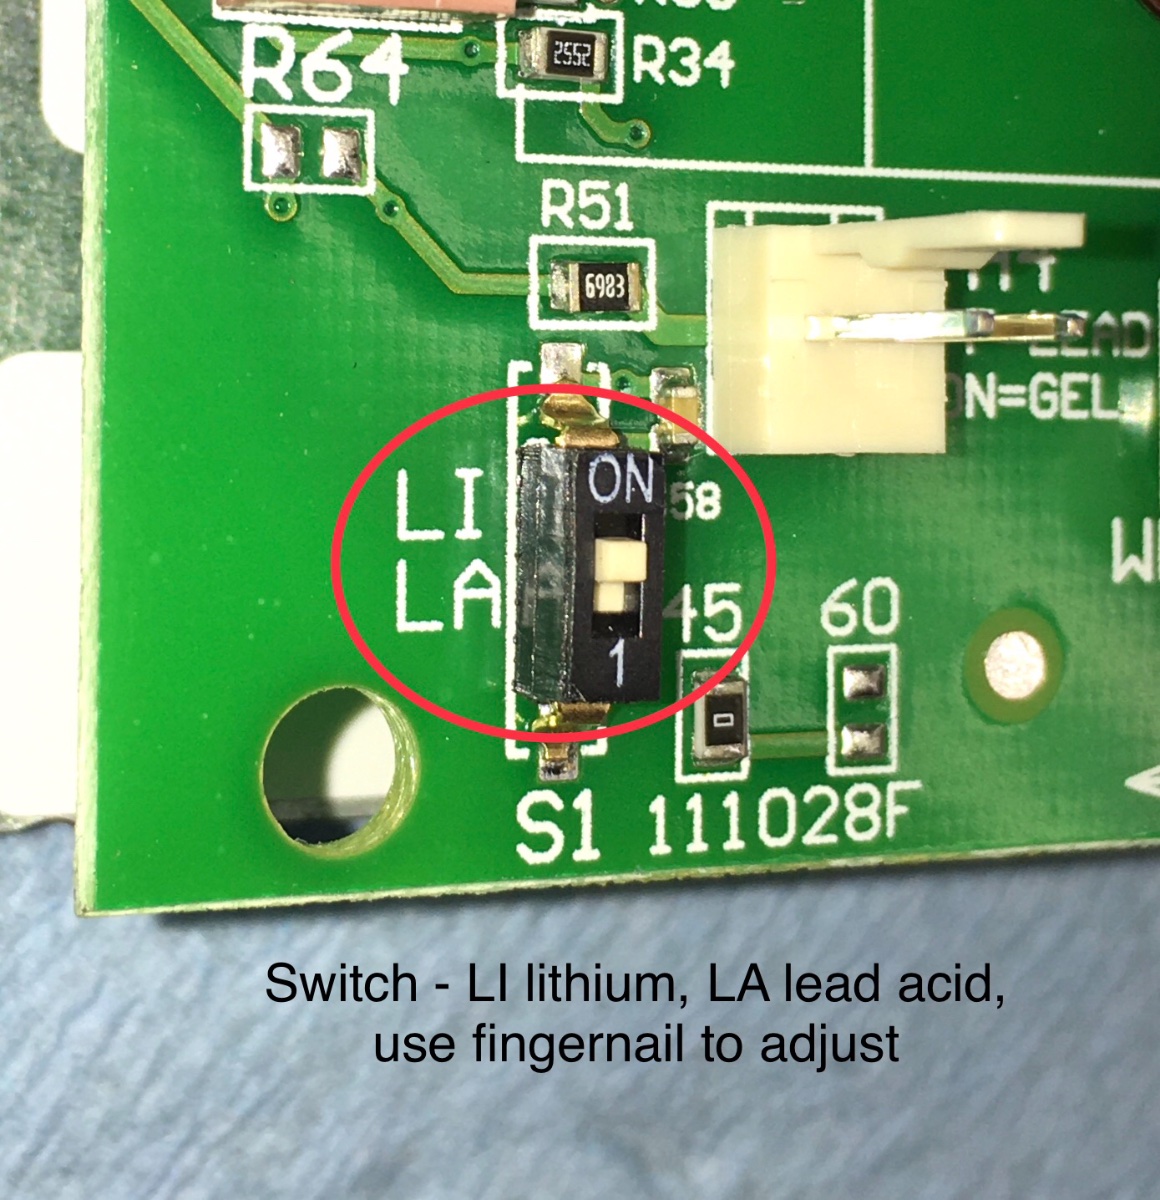
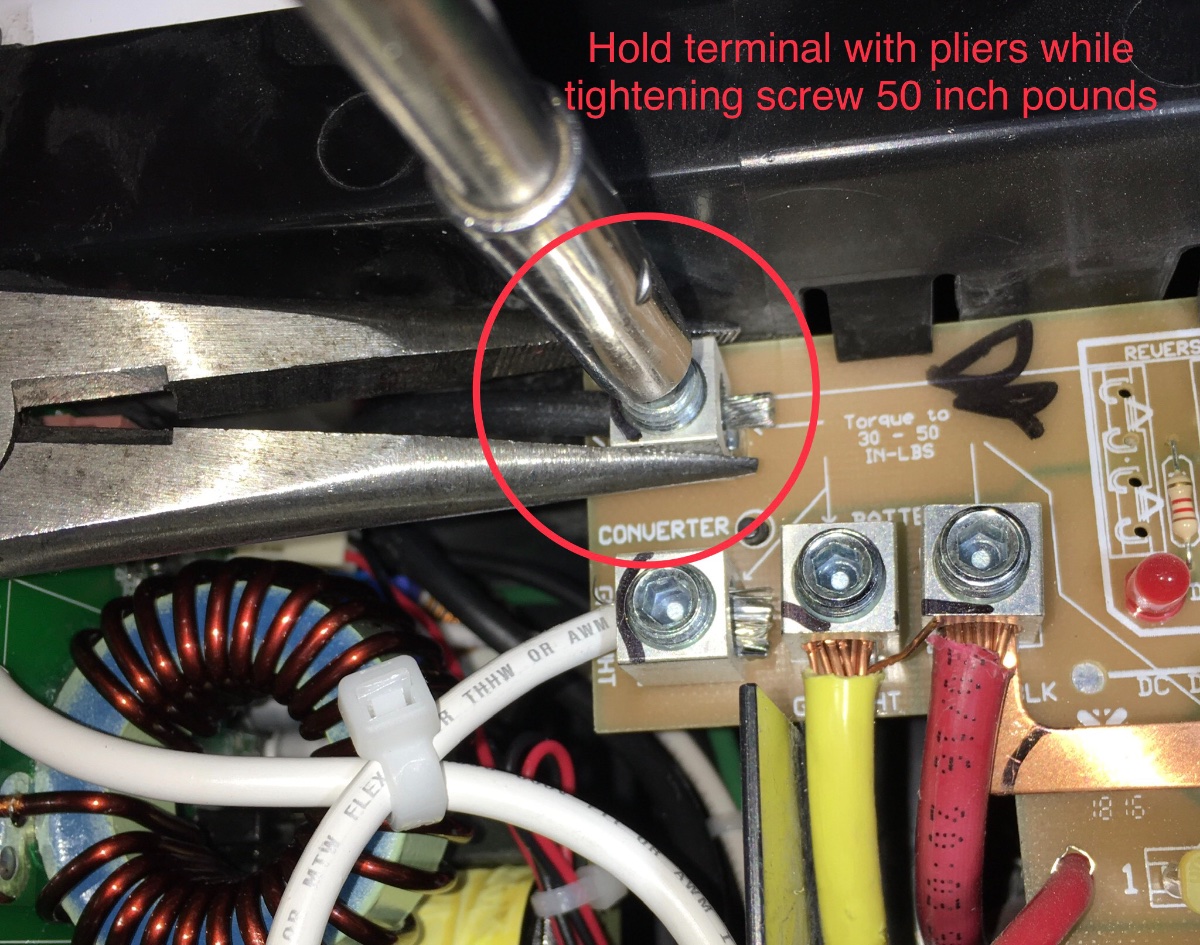
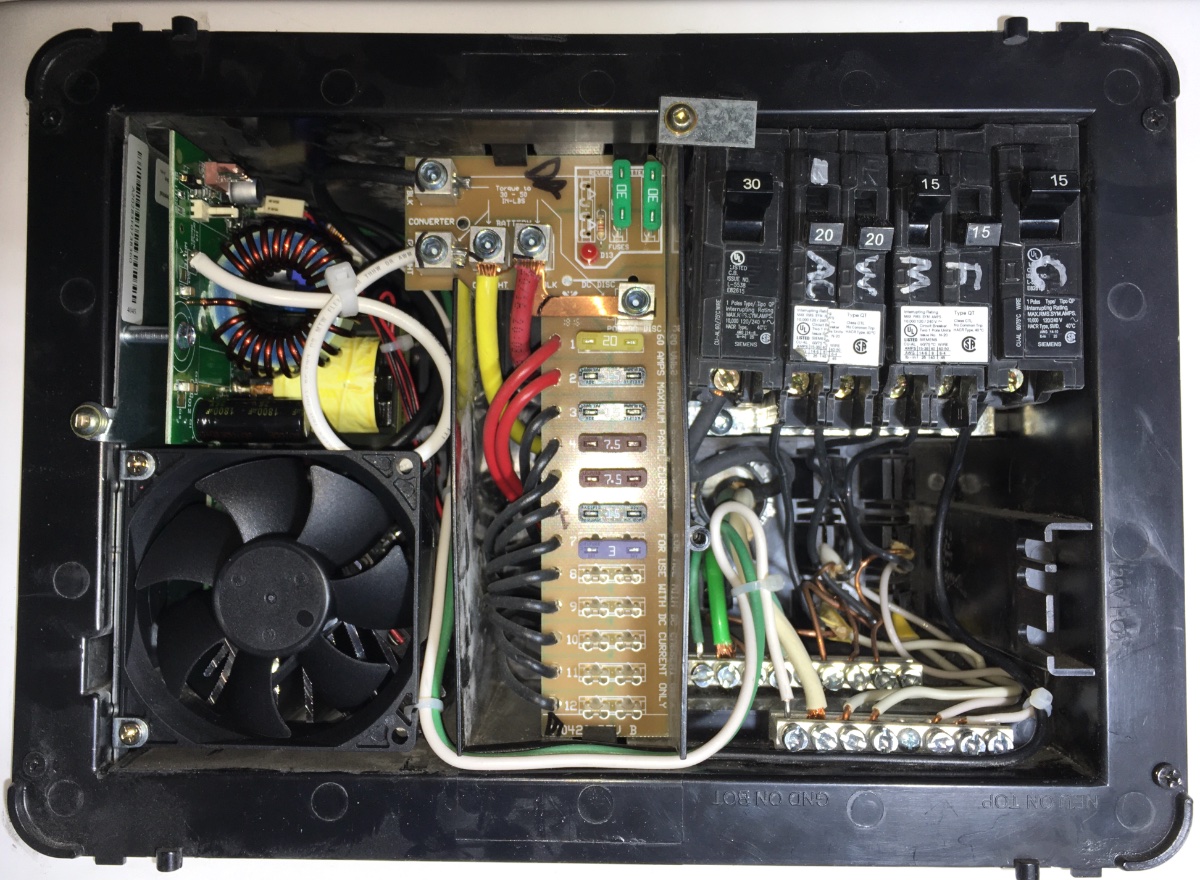
Prep the new unit. Secure the three small 120 volt AC wires with nylon ties. Also secure the black and red fan wires if necessary. This provides "strain relief" for the soldered joints and reduces the chance of damage from rough roads. Plus it looks a lot better. Here is the Lithium/ Lead Acid selector switch which alters the charging parameters to allow a 100% charge. It is an actual microswitch, you slide it back and forth with a fingernail or tiny screwdriver. Make sure it is in the upper ON "LI" position. Slide the new unit into place and install the retaining screw and washer. Connect the wires. The two big wires need to be tight. Mine were actually a little loose. Hold the terminal block with a pair of pliers to reduce strain on the circuit board. You don't need a torque wrench, hand tight is fine. Secure the white wire in a loop as shown. You can't get access to the black one. Add some ties to secure the AC wires. Done: BTW, the circuit breakers just snap into place, I tried to align mine so that they were close to even, but had no luck. The silver letters are lables I added with a Sharpie: C converter (charger), F fridge (or use R for refrigerator), M microwave/ outlets, W water heater, AC air conditioner. The big 30A one on the left is the MAIN breaker that shuts off power to all of the others. BTW also, each 12 volt fuse in the center is held held in place by little brass clips. The "ears" are very soft and can be distorted easily, causing an intermittent connection. (My fridge kept shutting down due to this.) Always be careful removing or installing a fuse, do not rock it sideways or the connection will be loose! You can very CAREFULY squeeze the ears together with mini pliers to make a tighter fit. This is a poor design. Reinstall the cover. Reconnect your NEW lithium batteries and shore power, and make sure the system is charging. I plan blow the dust off my used unit so I can sell it on here or on eBay. I hope this thread is helpful. John Davies Spokane WA
4 points
-
Here are the instructions from PD. It is pretty easy to follow and has nice images too. I received my replacement unit in April 2019 and it was Li capable. My new board showed LI/WIZ instead of LI/LA. NOTE: WIZ is for charge Wizard and is the same as LA for lead acid, while LI is for Lithium I did have a tough time getting the white wire removed from the lug (step #3). Otherwise it was pretty simple.4 points
-
After some research and discussion I ordered two Battle Born 100 AH lithium batteries to replace my 4 old AGMs. I also ordered a new PD charger that supports lithium. I have the parameters to change on my Blue Sky solar controller. Learning as I go and appreciate all the comments, guidance and advice. I do want to clean up my cabling and also secure the two Battle Borns so there will be no risk of rubbing. The Battle Born folks were very helpful and said I could add a third within the first year or two without any issue. I’l also go from about 250 lbs of batteries to about 60 lbs. Quite a difference. Mike3 points
-
Thanks for sharing this video - it's excellent! We just picked up our new Ollie last month and we are very impressed with the workmanship and quality. I will get a lot of value out of the portion between 6 and 7 minutes where you can see the HVAC, plumbing and electrical. Very handy.3 points
-
IMG_0751.mov IMG_0771.movIMG_0771.movIMG_0768.movIMG_0762.mov IMG_0771.movIMG_0771.movIMG_0759.movIMG_0759.movIMG_0759.movIMG_0763.mov IMG_0751.mov I was in Hohenwald on Sept. 29, 2020 for a factory tour and to meet with Anita to order our Legacy II which goes into production on March 24, 2020. Here are some photos and videos from that day. I have fewer pics of the Grey Jay interior because we are going with the brown tone one. Please pardon my narration as I planned to show this only to my wife, who understands my nonsense! IMG_0762.mov IMG_0768.mov IMG_0771.mov IMG_0751.mov IMG_0759.mov
3 points
-
Removed batteries and battery tray from #75 2015 LE2 Ollie this afternoon. There was a little damage caused by the strap hook and rivets to one of the batteries, but battery is OK for use: Going to clean, prep and paint tray. Will also sandwich & secure 1/8" UHMW plastic strips between battery and tray where rivets and strap hook contact batteries. Ordered 1/8" plastic material from Amazon. You can see corrosion formed over the years: Plan to sandwich rubber sheet material between tray & fiberglass where tray rails bolt to fiberglass:2 points
-
Booked space Sect E312 points
-
Mike, just the other day I swapped the Progressive Dynamics charging unit, it was relatively simple but I can offer a few tips. I will make a How To thread with pics. I think we will see more and more owners doing this mod as their “old school” lead acid batteries fail. I emailed Jason last month suggesting that the company issue a technical bullet with official guidance on how this should be done and he forwarded that to somebody. He did tell me that the production department kept no records of which PD units were installed, so an owner must indeed physically remove the cover to check the board. Maybe when enough swaps have been done, we can post a poll to figure out the rough cutoff date for when these lithium ones began to appear from the factory. I also suggested that they could offer an upgrade kit through the Oliver Company Store, for which we have now been impatiently waiting a couple years.... John Davies Spokane WA2 points
-
Yep - good video. I really appreciate the time that you took to film this - I always see or learn something that either I didn't know or that has changed over time. Be sure to keep this video for you records in that in the event you have to or want to repair or change something, your video will possibly help you in identifying where things are in the area you plan to work. Bill p.s. this video took a bit of time to download to my computer - so, don't give up on it if it takes five minutes or so.2 points
-
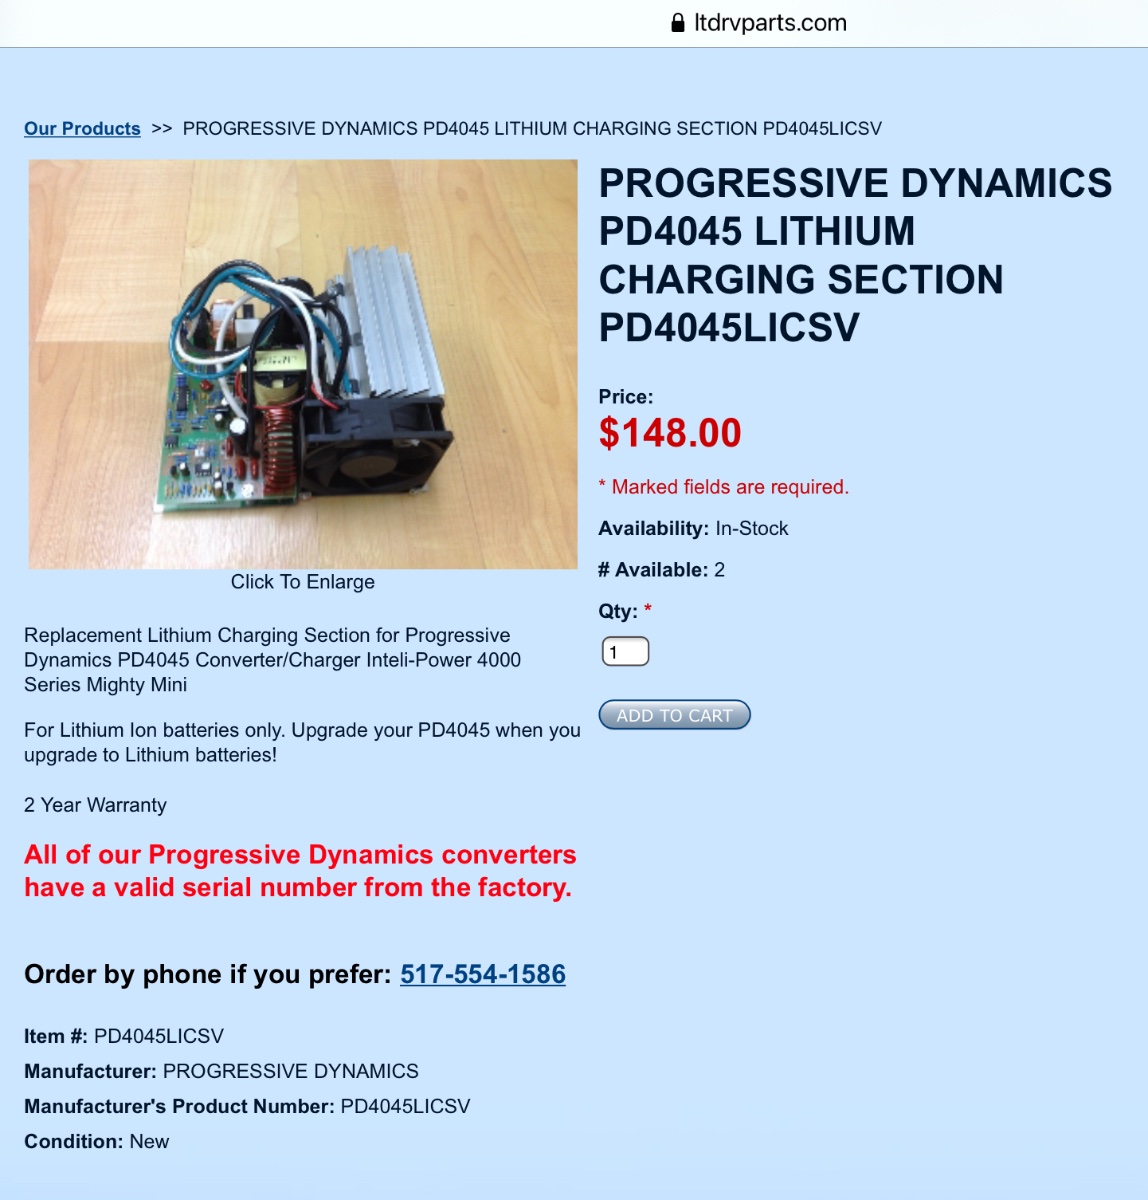
EDIT 12/16/20: see this thread for how to swap: .... https://olivertraveltrailers.com/forums/topic/4812-how-to-progressive-dynamics-pd4045-lithium-upgrade/ $168 shipped, no sales tax. I just ordered one, and I plan to order a couple of Lithium batteries within a week. ETrailer.com sells this for $211, free shipping, plus sales tax. Quite a savings. https://www.ltdrvparts.com/PROGRESSIVE-DYNAMICS-PD4045-LITHIUM-CHARGING-SECTION-PD4045LICSV-PD4045LICSV.htm NOTE: Later units are already lithium capable, I do not know an easy way to tell if yours is, other than looking right at your circuit board or possibly by calling Oliver Service... You have to remove the front cover (1 small square drive screw in the center, snaps around the outside) and check. Be VERY careful if you are connected to shore power, there are lots of live wires in there that could kill you. If you are at all in doubt, disconnect shore power and the batteries, and work by flashlight! Here is mine (Hull 218, April 2016 delivery): This was posted by another member, I edited it for clarity. This is a new Lithium capable board. Note the jumpers. Here is a wide shot of my unit, you must look at the board in the very upper left corner. It is easier if you just take a picture to look at. When I change mine I will post a full HOW TO thread with pics and info. “When” depends on when I get the converter part and the Victron batteries. I already have a Victron smart monitor installed, and the Oliver installed Zamp solar controller is lithium capable already. I hope this is helpful. John Davies Spokane WA
1 point
-
LOL, I just noticed, they dye the pond blue and aerate it, I guess they want it to look prettier than the scummy brown creek feeding it. John Davies Spokane WA1 point
-
I think your plastic strips will work well, however FYI I think the rivets are facing the wrong direction. Mine are installed with the head inwards, so they don’t cause any significant amount of wear. It would be simple enough to change them, but I think the strips are fine too, as long as there is enough room for them. Wow, the acid sure made a mess, didn’t it? AGMs are known for being “maintenance free”, but that is definitely an eye opener. I do recommend the ceramic Duplicolor Brake Caliper paint I mentioned previously, I think you will like it. It claims to not require a primer coat, and I rarely do, but considering the condition of the steel on your tray, I think that should be applied as well. The only caveat about the paint is that while it is dry to the touch in a couple of hours, it doesn’t fully cure for 7 days. I would not install any batteries on on top of it until then. Just think, if the batteries had been located above a regular steel trailer A frame without a plastic box, those steel rails would have been damaged too. The Ollie fiberglass will clean up easily enough....l Good luck. John Davies Spokane WA
1 point
-
https://olivertraveltrailers.com/forums/uploads/monthly_2020_12/IMG_0760.mov.c9a8cbca7afecac8f087befc812caf29.mov1 point
-
Hold down on Posted X hours ago in the original post and the option for download linked file will appear. NOTE: The file is 1.5GB.1 point
-
Great video - thanks for posting! Anita gave us our first tour almost 6 years ago. We keep doing tours whenever we’re there because you still pick up knowledge on each one. Sometimes you don’t know what you’re looking at but after many camping days things become more clear. Anyway, I like seeing all those shiny new Olivers, yours will be there soon! Mike1 point
-
Weird, because mine came with a single page in black and white, no pictures at all. I will add this one to the How To thread I started,. Thanks. John Davies Spokane WA1 point
-
https://olivertraveltrailers.com/forums/topic/4812-how-to-progressive-dynamics-pd4045-lithium-upgrade/1 point
-
I’ll add these instructions to my Oliver manual. Also useful for my upcoming project! Mike1 point
-
This works: Mine were actually a little loose. John Davies Spokane WA
1 point
-
This is very helpful! Thanks, John. Mike1 point
-
Nice work, John. I know these take more time to put together than a lot of people might think. I think I can speak for everyone when I say your guides are greatly appreciated!1 point
-
John, thanks. When I was working with the BB rep he asked if I’d checked my unit to see if it could handle lithium and I told him it was five years old he said not to check, it won’t. He said about 3 years and newer is when lithium was added. I think those of us with older trailers will be doing more updating in the future. Look forward to your How To! Mike1 point
-
Thanks JD - great material.1 point
-
Welcome. I live in the unincorporated region between Redmond and Woodinville, and will be in possession of a new Elite 2 in relatively short order. I hear you about the design and the PNW weather - seems like boat-like is not a bad idea for us!!1 point
-
I couldn't find many examples of the Ultrafabric. This was the best photo I could find of Grey Jay inside the trailer: https://olivertraveltrailers.com/travel-trailers/legacy-elite-2/standard-options/1 point
-
Sak, Greetings from Western North Dakota. And Welcome to the OTT Family.1 point
-
We too will be members of the Soon-to-be-Oliver's Association of Western WA. We will pick up our Elite ii in June 2021 and reside in Vancouver WA.1 point
-
Another thought is, we keep the big dinette made up as a bed, all the time. Not everyone does, but, it's something to consider1 point
-
Sak - See the recent discussion/thread about covers for the Oliver HERE. This will give you a start on this subject but there is much more that you can read on this Forum via the "search" function. Bill1 point
-
You might ask Phil to get you a photo of your choices in either a Oliver they have in inventory or in the little dinette they have as a sample area in the Sales Department. This dinette sample area is not exactly what you are asking for (i.e. doesn't give you as big an area sample as either a inventory Oliver would or a current owner's Oliver would), but, its better than nothing. Good luck. Bill p.s. I too found this fabric/flooring decision the hardest of all.1 point
-
Personally, my choice would be wild west. It's a bit lighter, a tiny bit more brown. From what I see online, never having seen either in person. I'm glad you asked for swatches. Even if they're small, it helps.1 point
-
BlueHighways - If you plan on hardwiring your Garmin after you receive it, please drop me a PM and we can talk about getting that job done without cracking, denting or otherwise destroying any of that nice plastic that is your dash. Ray & Susan - I've not used the "alternative route" function on the 890 yet. But, I'll take a look at it soon and send along any "wisdom" that I can. Bill1 point
-
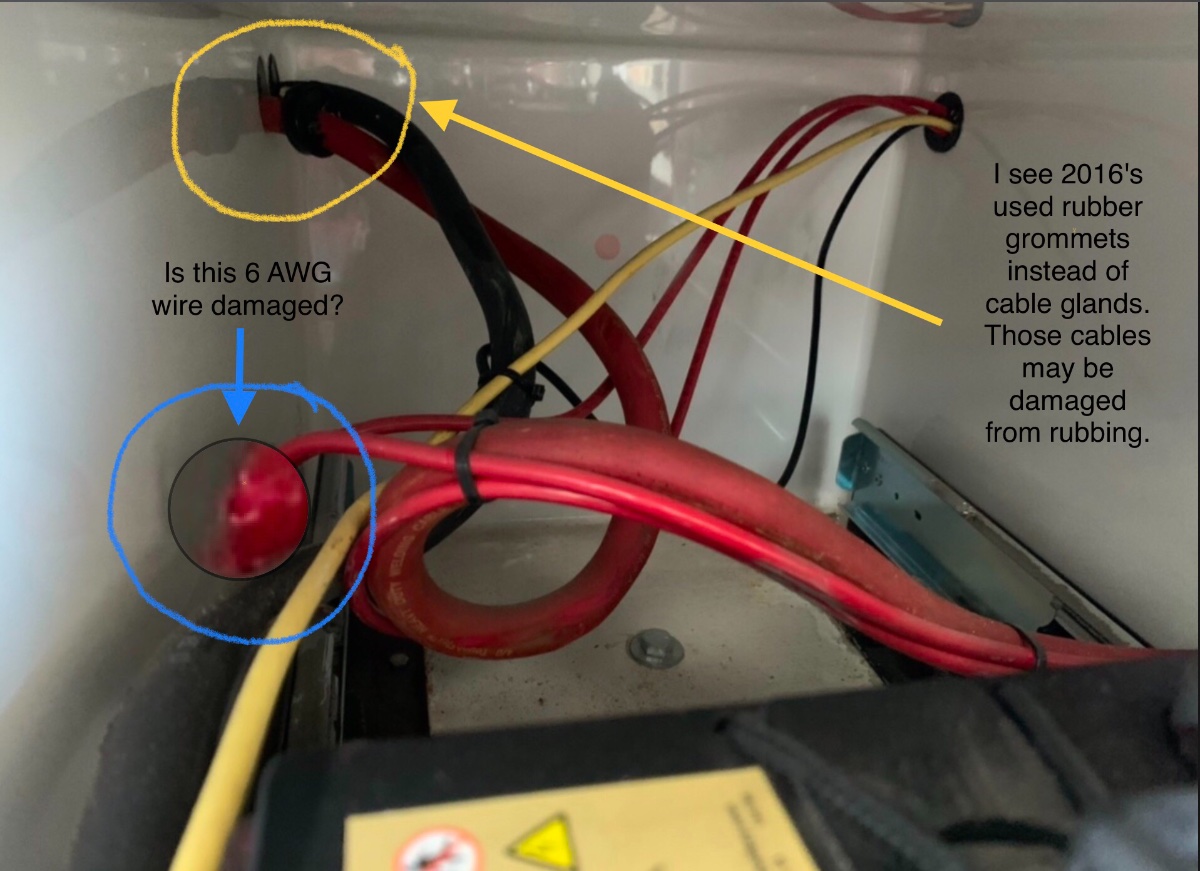
Mike, this picture concerns me. I suspect the battery to inverter cables have been rubbing in the holes out of the battery box. They should be inspected. Also check the red 6 AWG wire I circled, it looks like it may be damaged. It is either the Progressive Dynamics battery charger wire or the Blue Sky Charge Controller wire. I know the Blue Sky CC is a MPPT type controller, but I don’t know which model it is and if it supports LiFePO4 batteries. You should verify that before buying LiFePO4 batteries or plan on changing the CC. Mossey
1 point
-
Alright! All good information and I'm bookmarking the Home Depot pages for the crimpers and clamps. I'll note where the access holes go. I'm becoming puffed up about the ability to fix some plumbing issues myself. And in reply to John's post, this is exactly how I learned the fittings were leaking in the first place. Wet paper towels slipped under the fittings. I didn't have the blue towels but I'm sure they work better than Brawny whites I had on hand. Also, I'm the wife in this case so I give myself full permission to buy any tools we need. Ever since my husband learned he's part Neanderthal he excuses himself from any plumbing repairs, saying it's not in his DNA. If you need stitches, he's your man. Plumbing...not so much. Thanks and I've got lots to consider. It's always a good time logging in to the Forum, I've discovered. Better than lurking. Doris and Bill1 point
-
One REALLY effective trick to locate a mystery leak is to place a folded up blue paper “shop towel”, not a white one, under a suspected fitting. If there is a slow drip, it will show up as an easy to see dark blue spot on the light blue background. Don’t buy from Amazon, you can find them for around $2 per roll at any place that sells auto parts, including Walmart. John Davies Spokane WA
1 point
-
I can’t help with the hole locations, but you should buy this wonderful crimping tool. https://www.homedepot.com/p/SharkBite-3-8-in-1-in-PEX-Clamp-Tool-UC961/202688118 Use the appropriate diameter stainless steel crimp rings. They are easy to install, and what is more important, they are easy to remove. A crimped copper ring requires cutting or chiseling off. The stainless rings pop off with the twist of a flat tipped screwdriver. https://www.homedepot.com/p/SharkBite-1-2-in-PEX-Barb-Stainless-Steel-Clamp-10-Pack-UC953A/202032891?MERCH=REC-_-plpsearch_multi-_-NA-_-202032891-_-N My hand strength is low and I have to have help for the 1” size, I just slip a couple of steel pipes over the tool’s handles. Once you try this system you will never go back to the stupid copper ones. You can tell your wife that you need this stuff to repair your house plumbing too.... it would also work on irrigation lines, but the parts are kind of pricey for that application. I used mine a while ago to install hot and cold water lines and valves for a bidet toilet seat, it worked great and made my wife very happy indeed! I have never had a clamp fail, but if you are repairing a joint that will be forever hidden, like inside a wall, you can double up (install two clamps instead of one) per connection, and you will not ever worry about a possible failure. John Davies Spokane WA1 point
-
A major water leak will be obvious when water starts coming out of the scupper holes in the bottom of the Oliver (those are the little silver metal things on the bottom that "open" towards the bumper). Minor water leaks are a bit more difficult to find. Every now and then I simply run my hand over virtually any "floor" between the hulls that I can reach. If I feel dampness - I investigate further. Bill1 point


.thumb.JPG.dd838cdb3df463dab6a16861fa23a319.JPG)


-
Recent Achievements
-
")


")


")


