Leaderboard


Popular Content
Showing content with the highest reputation on 07/07/2022 in Posts
-
FYI aircraft rivets like Cherry Max require a special gun to install. Your typical hand squeezer won’t do it. This isn’t a problem for a production line, but it makes it a problem for an owner, unless he has access to the special tool. https://www.aircraftspruce.com/catalog/topages/cherryg28.php I have never used one so I can’t comment on the necessary hand strength. I used to use a compressed air gun and it was a painless “kerchunk”. Also, drilling these out is a pain, you drill the locking collar away, then use a small pin punch to drive the steel rivet pin out the back. Then drill the head off and drive the rest of the rivet out of the hole, hopefully while not wrecking the hole. Slightly oversized rivets are available, or go to the next larger standard rivet size. John Davies Spokane WA4 points
-
Hull #193 came factory equipped with a Dometic fridge and a single fan that is controlled from a switch in the main panel in the entryway. My B+ power comes from the bottom of the fridge up to the thermostat and continues up to the switch. The second switch wire completes the circuit back to the fan. The negative wire also comes from the bottom of the,fridge and runs directly to the fan. You may not have access to the bottom of your fridge, but I have two removable vent panels. There may be additional DC power already at the switch panel, but it’s simple run from the attic to the entry switch panel if you need it. Mossey4 points
-
John, Thanks for the heads up on those Cherry Max rivets. Wicks Aircraft Supply sells them as well. I sure don't see the rivet stems in Galway Girl's pics.... Yea, not the best place to employ pop rivets, especially soft, non structural aluminum ones. That box is heavy loaded up, and on the Elite2, since it is located right over the wheels, I wonder if that area may be subject to more vibration than other parts of the hull, just thinking out loud. The way those rivet heads broke off sure looks like a stress (vibration) related failure to me. Oliver may want to rethink this detail. Dave4 points
-
Thanks to someone on here, we just ordered a set of AB Lifestyles custom sheets for our Hiker squaredrop trailer. When we bough the 5X8 Hiker, we added a 6" folding Milliard queen mattress and queen sheets. The problem with the queen mattress is that it is the exact same width as the inside of the trailer, and long enough to push into the open lower galley area. So no ventilation around the mattress, even if I put the venting stuff underneath, Last week I closed off that galley area, and cut the mattress down to full-size mattress length, but wider than full size. Any sheets we found are for 12-16" thick mattresses, so tons of wrinkles. On you guys' advice, we ordered a set of custom sheets and mattress pad from AB Lifestyle, and they should be here after next week. They were going to ship them sooner, but that's when we will be down in Hohenwald. 😉 We got the cheapest set they offered, but the quality and service will be a good indicator if we need to order a set of Oliver Twin sheets from them next spring. 🙂3 points
-
When I replaced my AGMs with lithiums I also had to do some repairs on the slide out tray in the battery box. I had several rivets that failed and I replaced them with stainless steel bolts and nuts/lock washers. It’s doing fine after a year and a half but some of that is due to the significant weight reduction the lithiums afforded. I think the 4 AGMs were just too much weight for the tray. Mike3 points
-
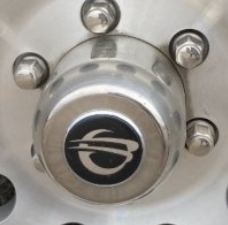
FrankC started a topic in May 2021 re missing 'wheel center trim caps'. He had lost one & wanted to know how to replace it. The post did not provide a definitive answer as the one potential item from Amazon is now unavailable. The post segued into grease caps. So, we needed 2 caps for our camper. As the Forum did not provide an up to date answer [there may very well be an answer but I did not locate] I did various Google searches & finally called Dexter. She had no idea what I was talking about. 🙂 I then opened a Service Ticket. A couple of hours later, Rider from the service center called. Oliver refer to this cap as a 'center cap' & they place a sticker on it. I had no idea that black & silver swish-y looking thing was a sticker! I suggested to Rider that the design be changed. Rider & I agreed that no one would be asking him for his opinion. 🙂 The cylinder protruding from the axle & in which the cap will be placed is called a hub cap. Learn something new everyday. My purpose in creating this topic is to let people know what Oliver calls this thing & where & how to get. See below photos. Center Cap Contact Oliver & they will send you what you need/want. I ordered 4 & was charged $38.60, includes shipping.
 3 points
 -
If you prefer, Service will send those to you without the decal. Bill3 points
-
As an ex aircraft tech, my comment is, those rivets simply do not belong there. Hollow aluminum pop rivets are really weak and not exactly reliable. I would prefer to have an aluminum backing plate bonded inside the hull flanges at the top and bottom. Install the box, drill through the hull and flange, install structural rivets like Cherry Max. Those won’t shear their heads like the ones pictured did. An even stronger setup would be countersunk machine screws and threaded inserts in the backing plates, as David mentioned above. I don’t think nuts inside would work, you can’t really reach the area very well, and they are buried in foil insulation. Putting blind rivets directly into fiberglass is not a great idea, they need a solid material to grab on to. Some interesting reading: “While on the topic of rivet stems, the ability of a rivet to retain its stem under conditions of high loads and heavy vibration separate aircraft rivets from their commercial cousins. A rivet loses much of its strength if the stem falls out. Many low-cost commercial blind rivets will not reliably retain their stems under difficult conditions. This is why they are generally never used for anything on an airplane that holds it together or keeps it running.” https://www.kitplanes.com/best-practices-blind-rivets/ John Davies Spokane WA3 points
-
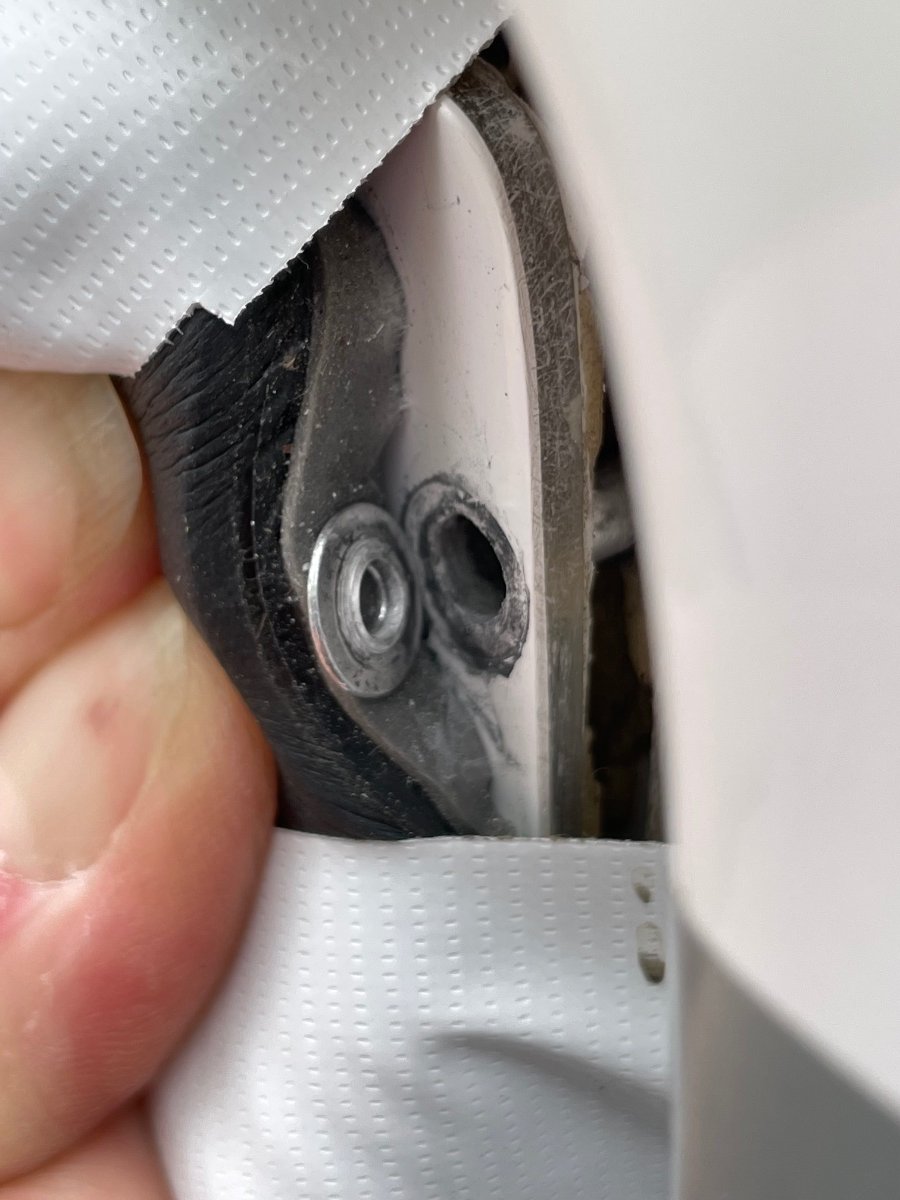
Trying to understand just where the rivet failed. Hard to tell from the pic, but it looks like it failed just under the head of the rivet? If this is the case, then I would recommend 3 things. 1.Put a very slight countersink on the battery box rivet holes, just barely enough to break the sharp edge from the drilled hole. That sharp edge could wear away the rivet from vibration, especially if it's aluminum. If you removed the entire battery box, I'd soften that edge on both sides of the hole. 2. Use stainless steel rivets and not aluminum, they are stronger and I don't see issues with galvanic corrosion in this application. 3. Finally, back up your rivet with a washer of like material (if you can get to the back side of the rivet). Just my 2 cents. If I was designing this from scratch, I probably would have gone with rivet nuts (with backup washers), or a thru-bolt design, for a much more secure connection to the hull. But probably not able to use these as an after the fact repair. Looks like you did a good job. Hope it holds up for you! Dave3 points
-
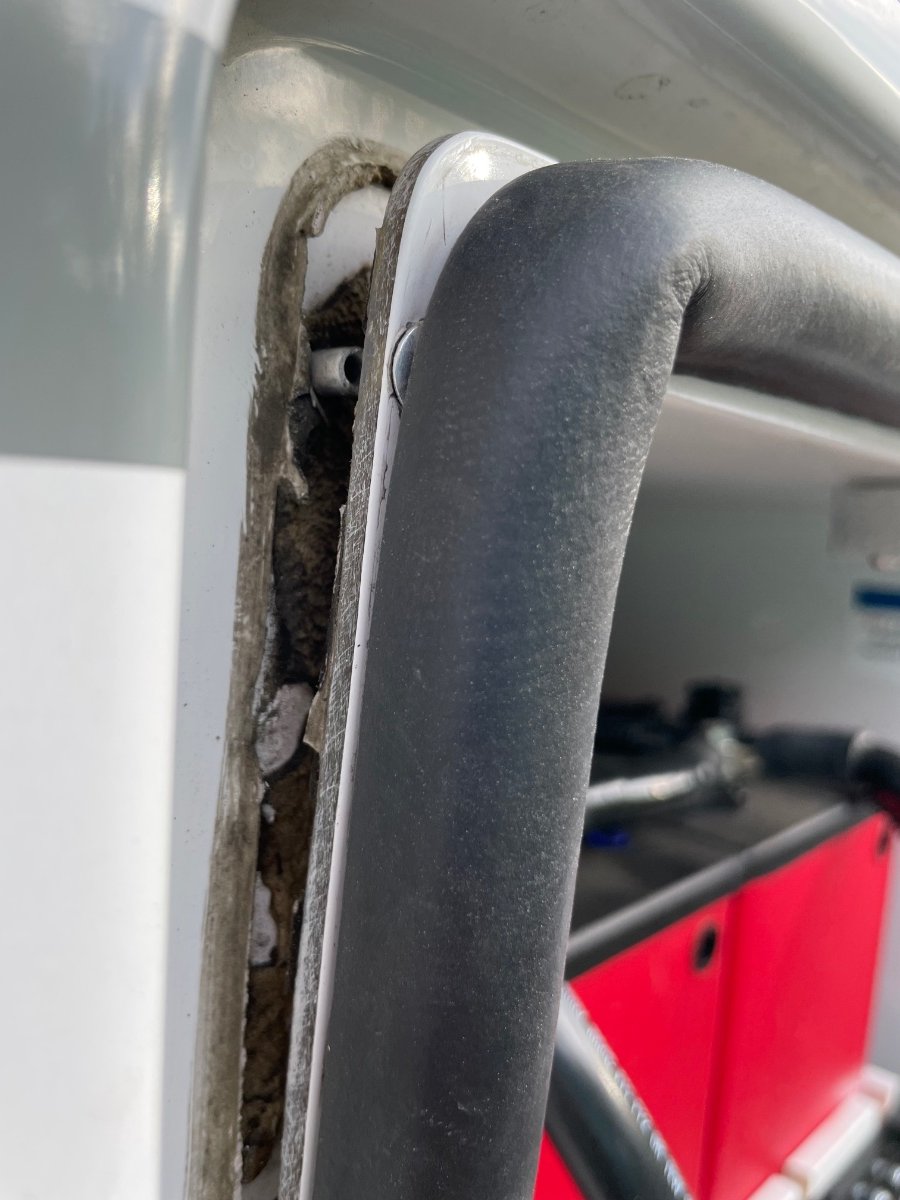
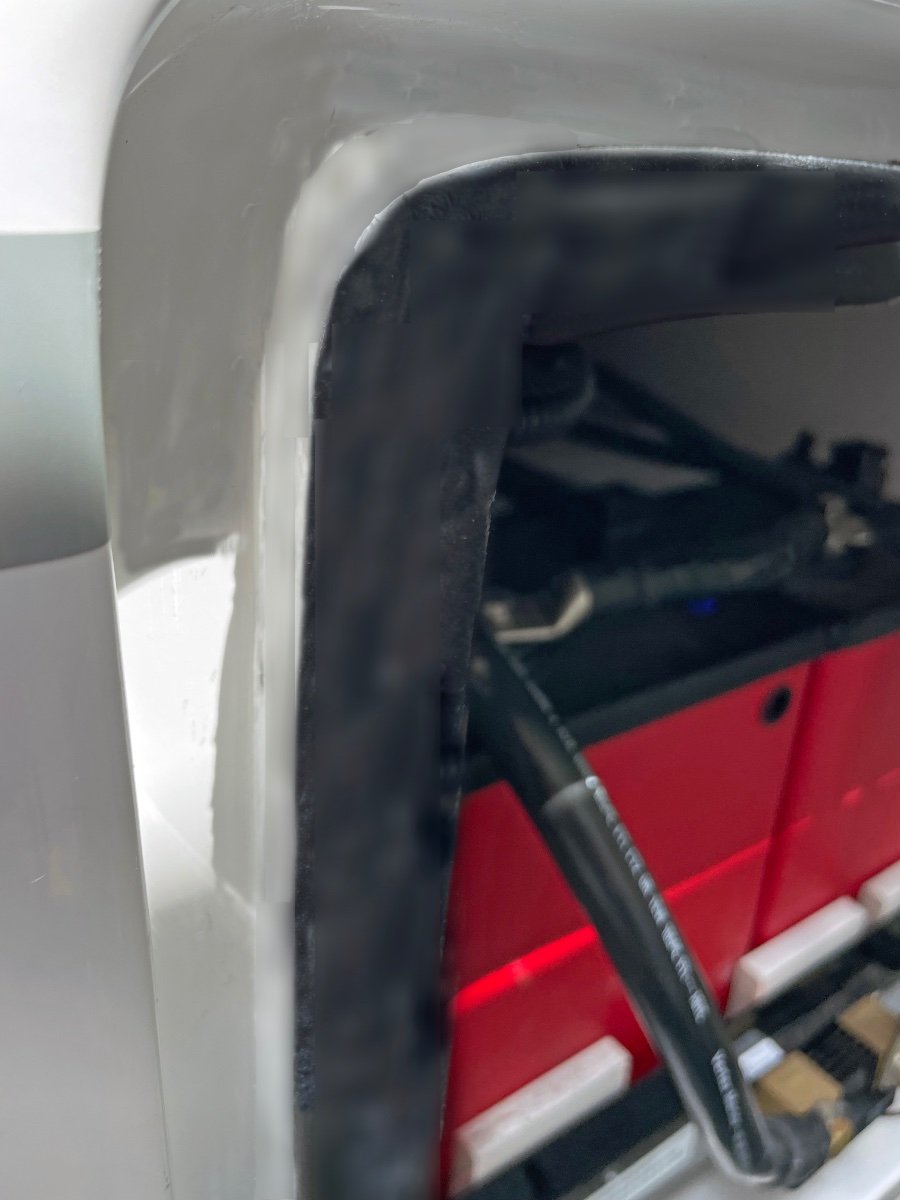
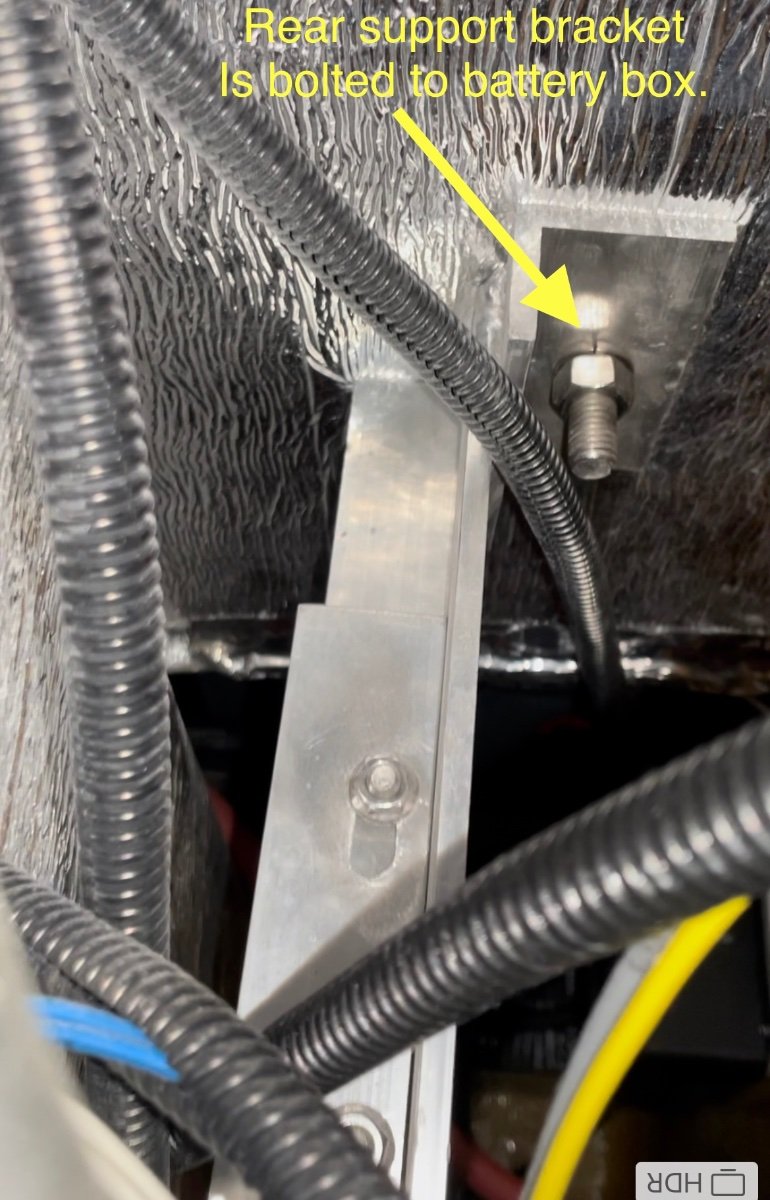
This spring as we were prepping for a new road trip, I noticed the battery box door seemed to be sticking out further than normal. I thought I would adjust the latch to pull the door in a bit tighter. What I found was that the battery box had started to tip forward away from the main hull as shown the pix below. All the rivets up both sides and all across the top of the box had sheared and the box was tipped out about 1/2". I contacted Oliver Support to understand how the box was designed, mounted etc. They cleared me for travel after having me check the support strut inside the trailer (under the pantry area) . After some further consultation I was able to perform a repair. Here's a sketch of how the battery box is installed in our Hull 505 (2019 Elite II) trailer. The repair steps I took following Oliver instructions were: 1) Remove the batteries from the slide tray to get weight off the box. 2) Drill out all sheared rivets. (3/16" bit) 3) Release the 2 support bracket bolts inside the trailer under the pantry (one of which is adjustable). (This step is a pain and requires some long extensions for the ratchet wrench to make reaching nuts possible.) 4) Tip box back into position. (Check that the box base still has a slight outward tip for water drainage.) 5) Re-tighten support bolts. 6) Re-rivet all around the perimeter. 7) Clean seams and add a bead of boat life white sealant around the battery box seam. (See pix below). Repaired Box Above: Door closes with a good seal all around and the box sealed to the body. We are going to keep an eye on this as we travel this next year, and make a trip to the Oliver factory for them to inspect and repair if necessary. I'm not sure of the root cause or mechanism by which the box tipped out in the first place. One concern would be that the box is putting too much pressure on the outer hull while bouncing down the highway. I don't see any indications of cracking in the glass hull or box at this point. Hope this helps if anyone else see's an issue. Craig Hull 505
2 points
-
Get a can of silicone spray lubricant it should help mitigate this issue.2 points
-
Thanks Mike for the tip. One of my rear jacks would not come down. I thought it was shot, on day three of a three week trip. Saw your post, so gave it a try. I went under the bed and hand cranked it down some and then it worked fine. Thanks so much!2 points
-
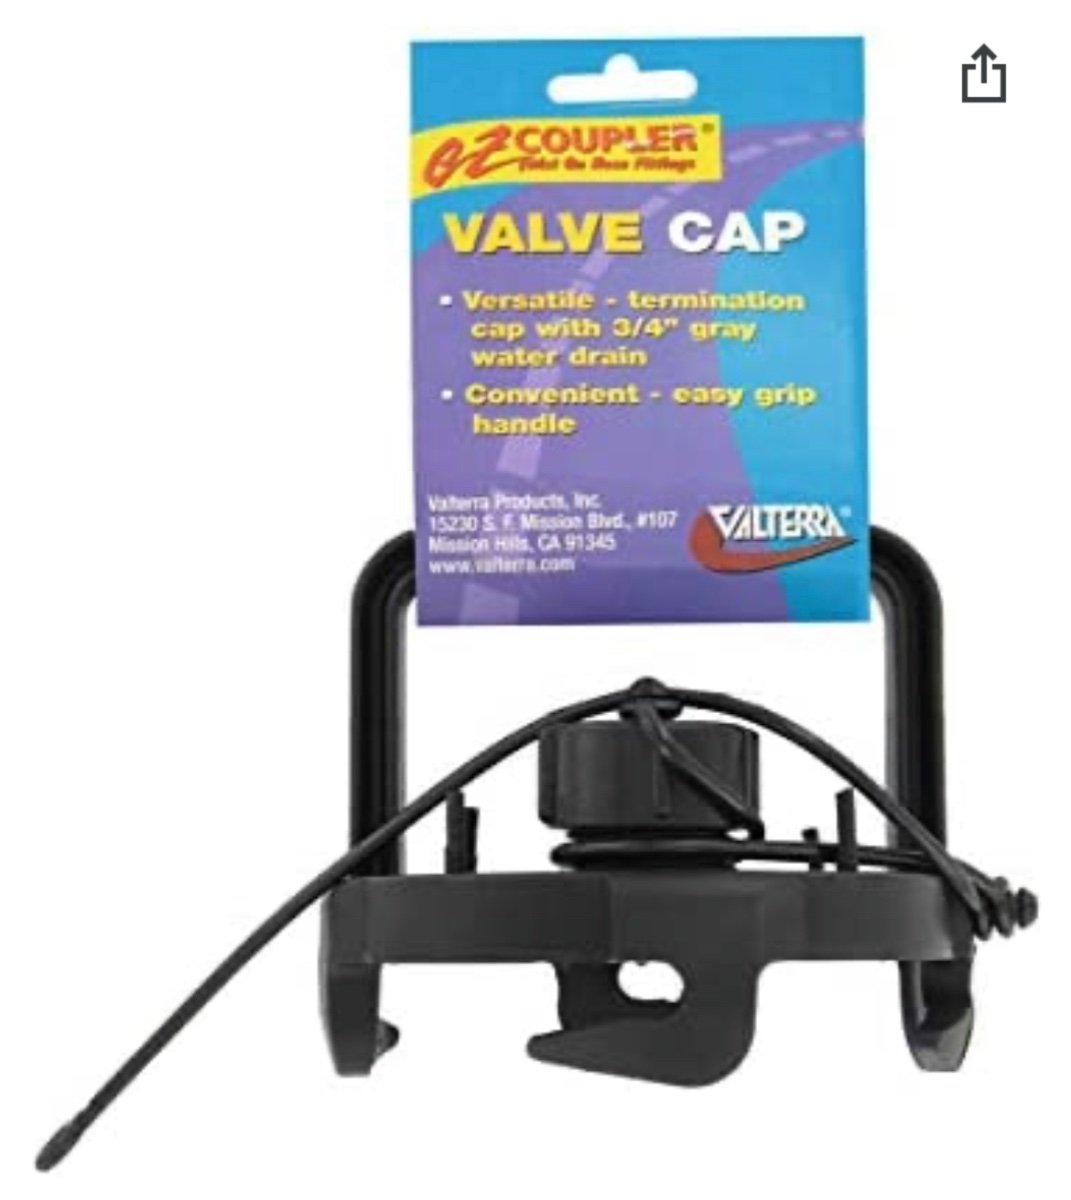
You could try a little lubricant to see if it makes the twist easier. I switched hoses a few years ago to the Valterra Dominator. It doesn’t have that kind of locking cap, just a plug that goes in and stays by friction. Never had an issue with it. The other advantage to the Dominator (and Camco RhinoFLEX I think) is that when you scrunch them up they stay scrunched up. You only need to unscrunch what you need. Mike2 points
-
Pop rivets can be a problem when too much pressure is put on them. Pop rivets in fiberglass and weight don't work out too well, if you could get a fender washer on the back side so the rivet it couldn't pull through and would add very much strength to the holding power and not pull through. Like Mike said, replacing them with stainless bolts and large washer is the correct way to go, but getting to the back side to get the nut and washer on is not always possible. trainman2 points
-
Another excellent write up, thank you! I have had my slide tray out for a re-paint after a battery leak, so I wholeheartedly agree with working the support bolts under the battery box is a challenging endeavor. Four hands to make doable. You detailed instructions will be help someone in the future, so kudos to y’all in the great northwest! Mossey2 points
-
More details would be helpful. I had a rear jack stuck in the up position, like Steve did. I removed the mattress to access the top of the jack and used the supplied jack handle to lower the jack until the gears caught and then it worked fine. I try not to raise the jacks to the click-click-click position for that reason. Mike2 points
-
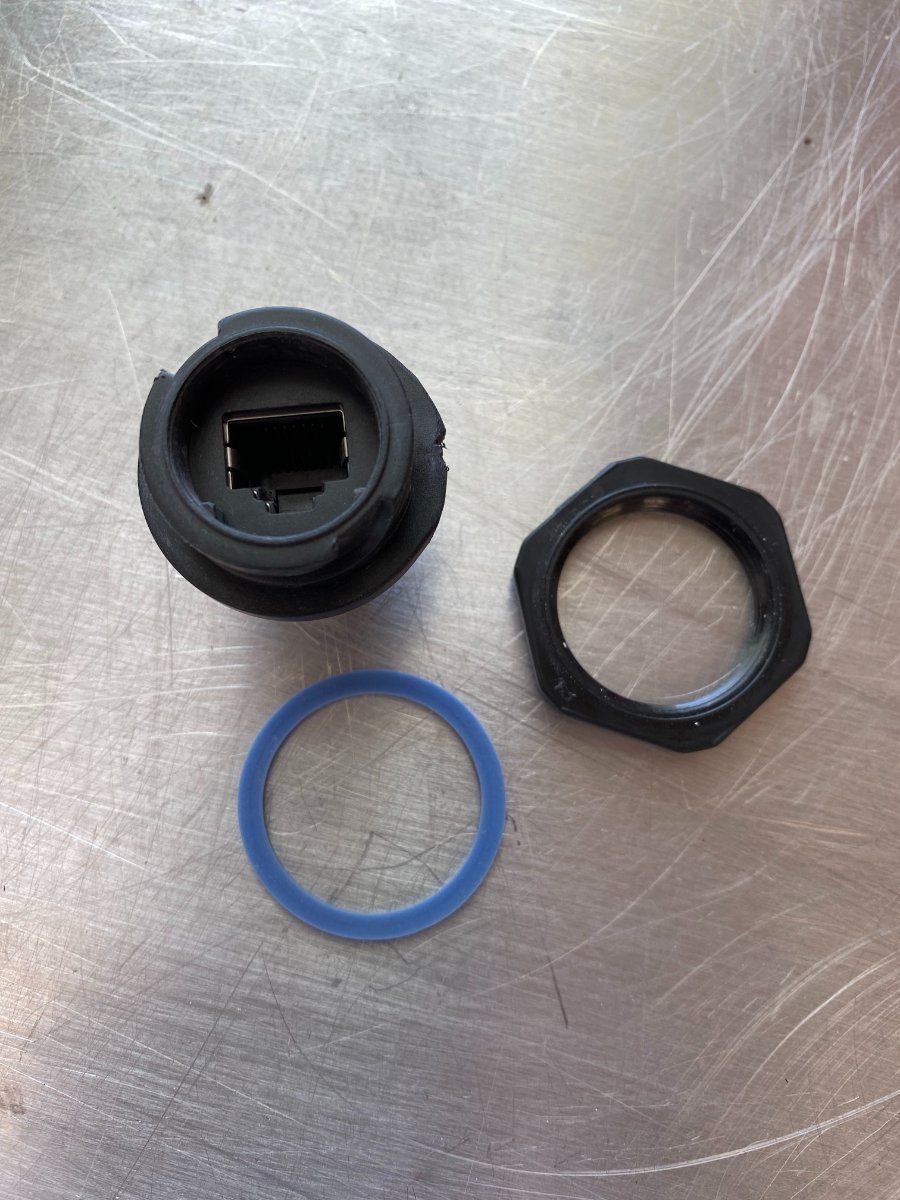
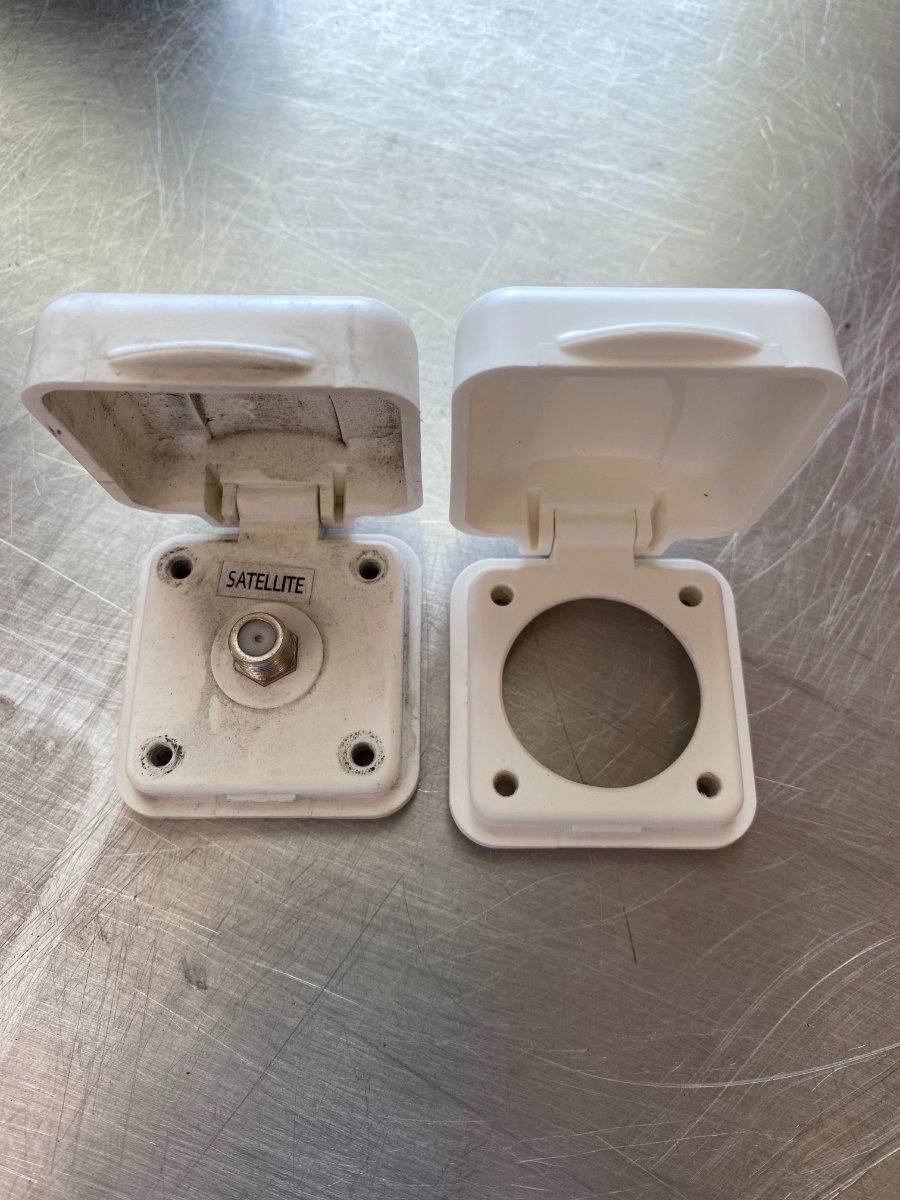
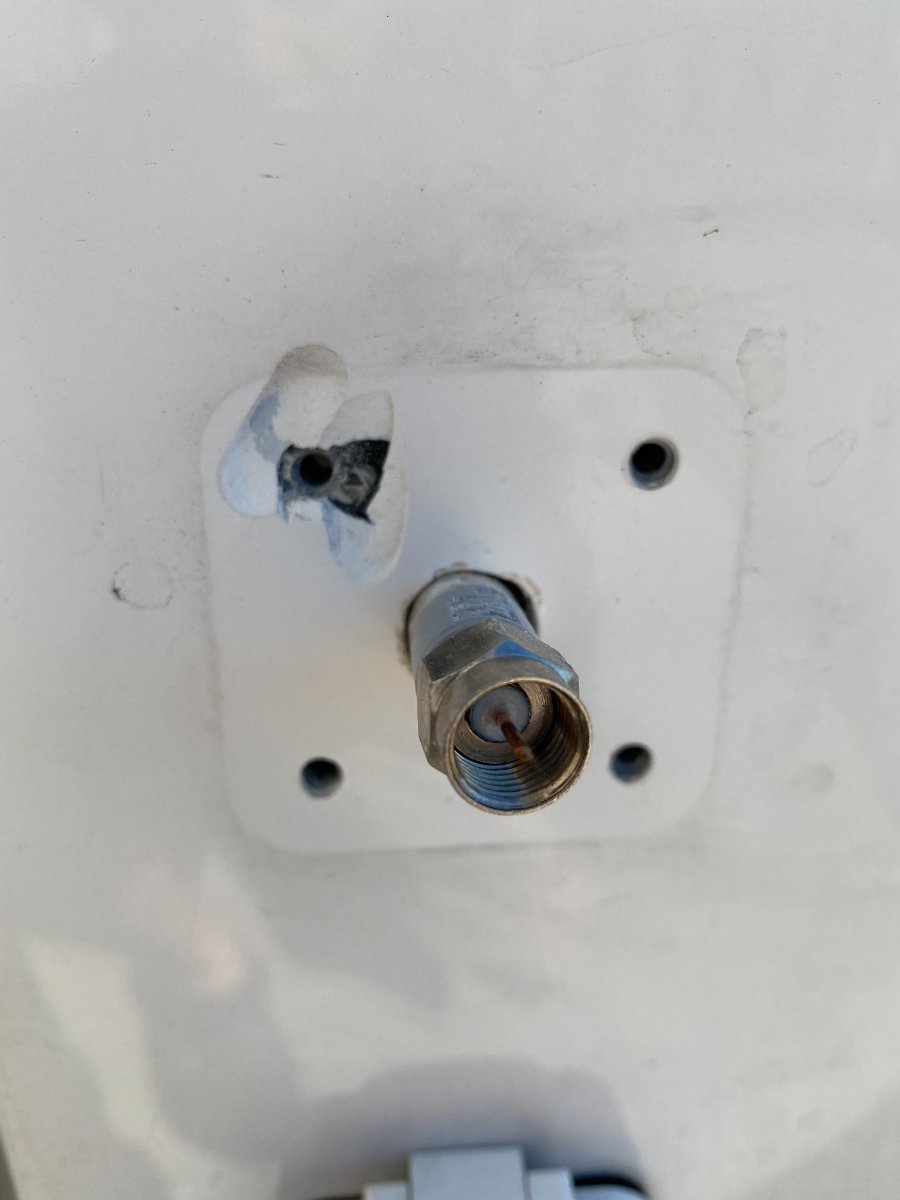
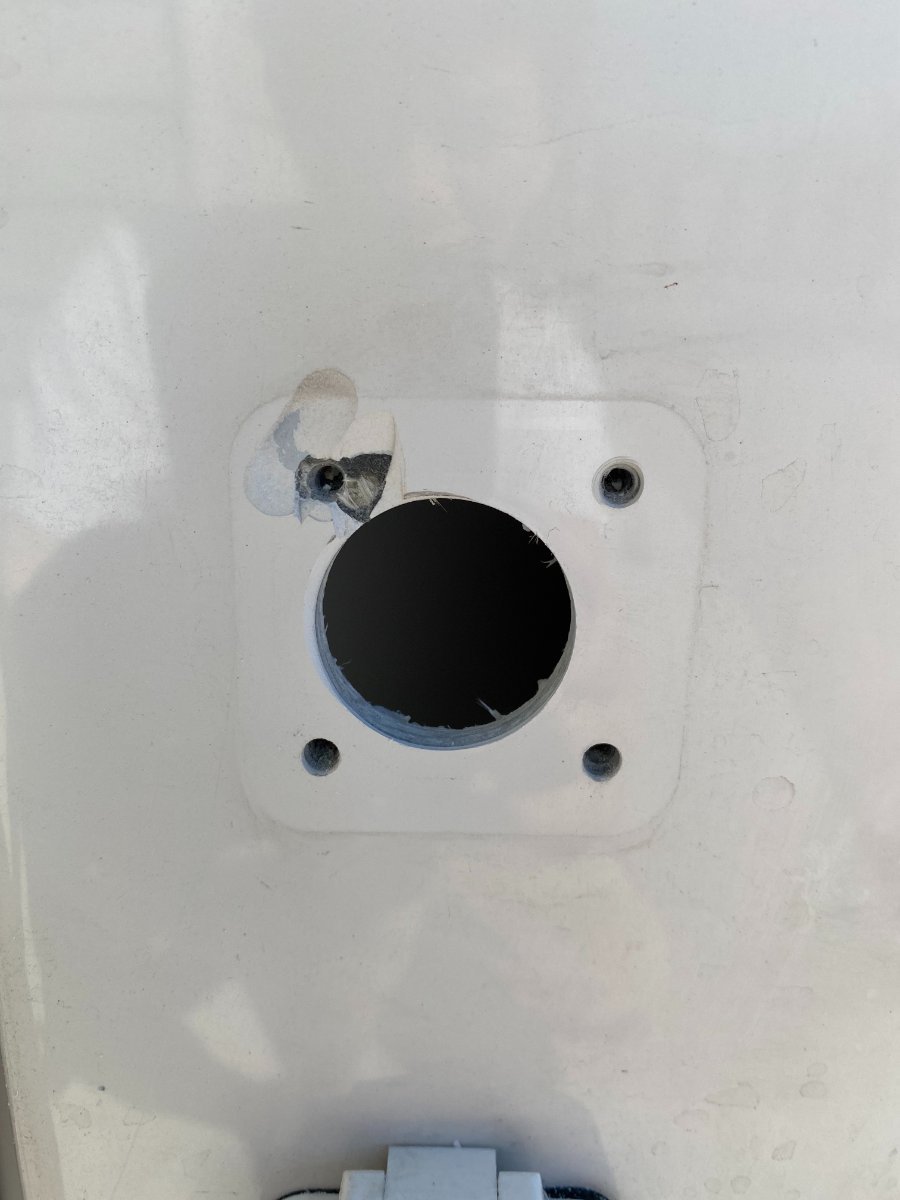
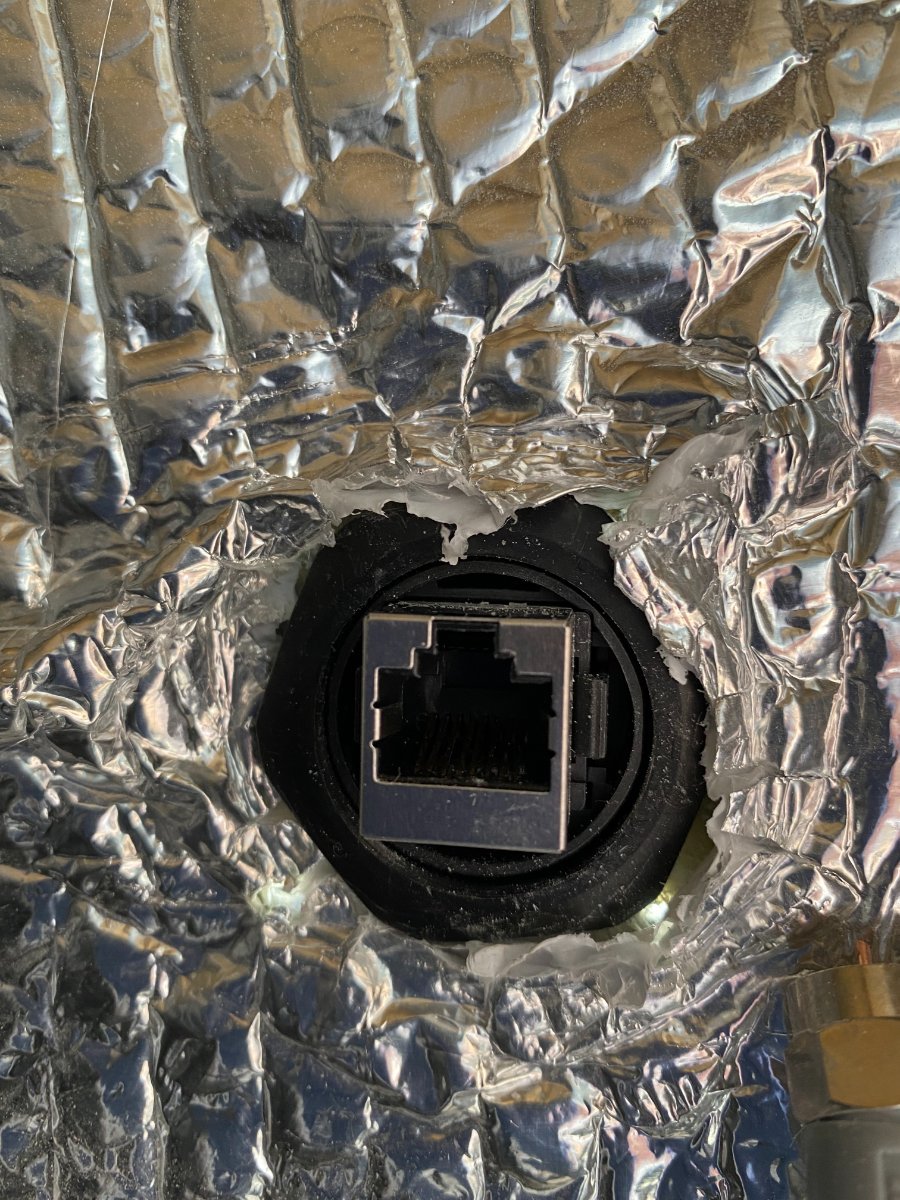
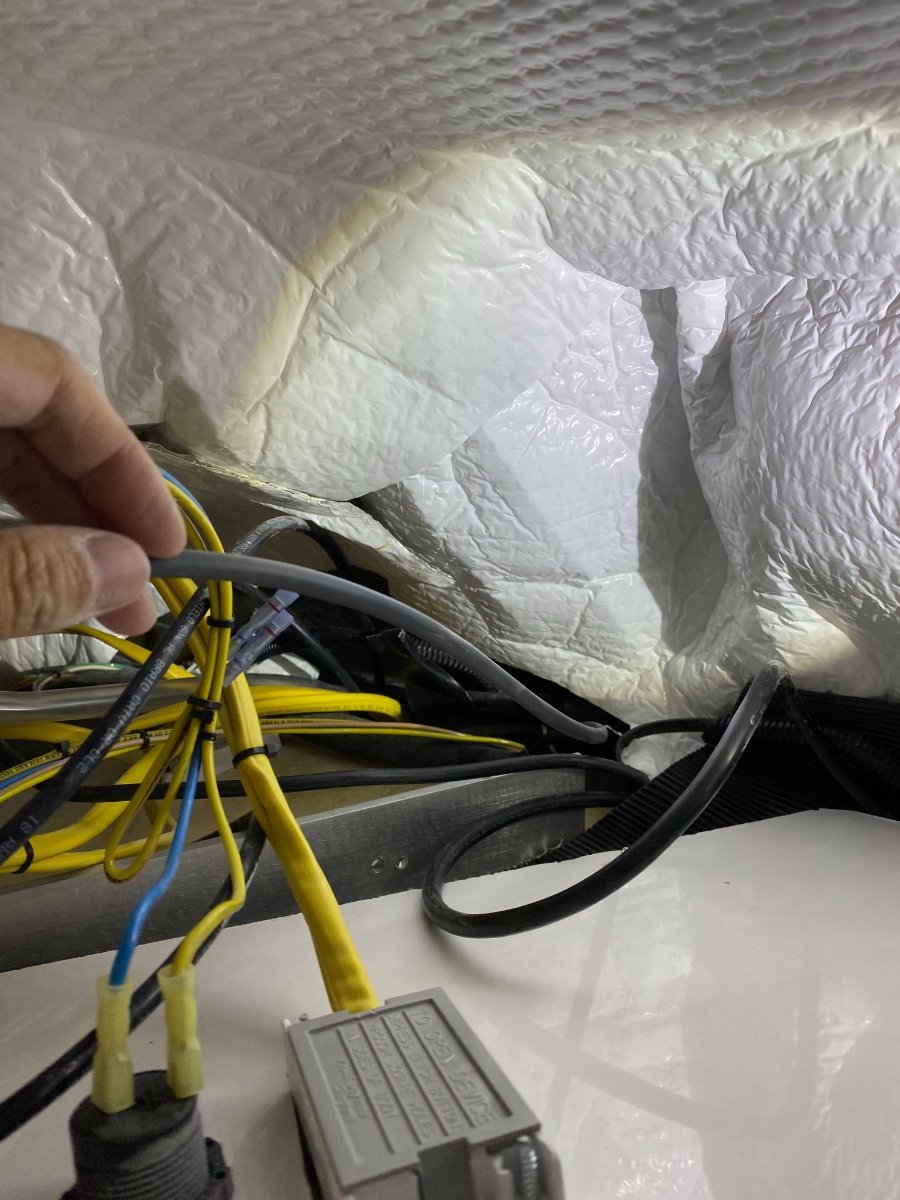
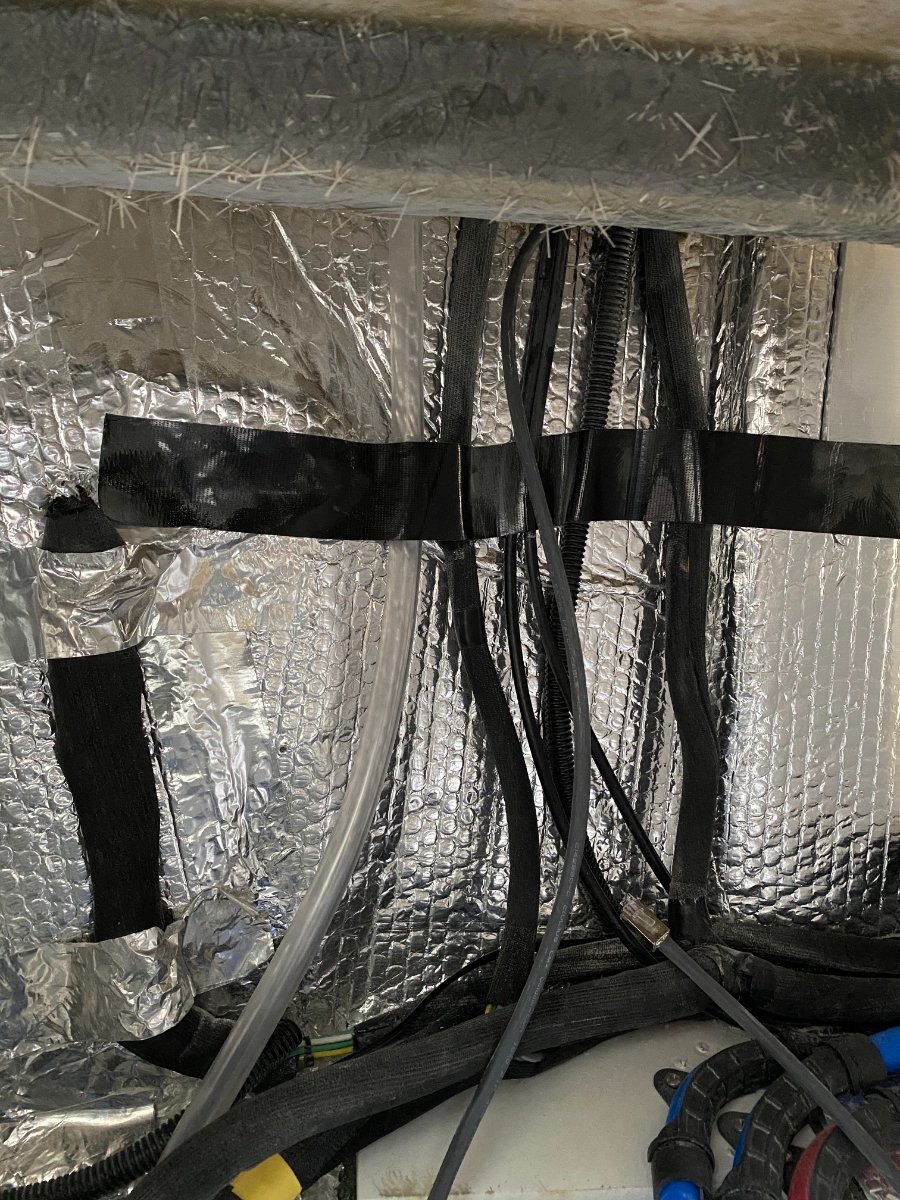
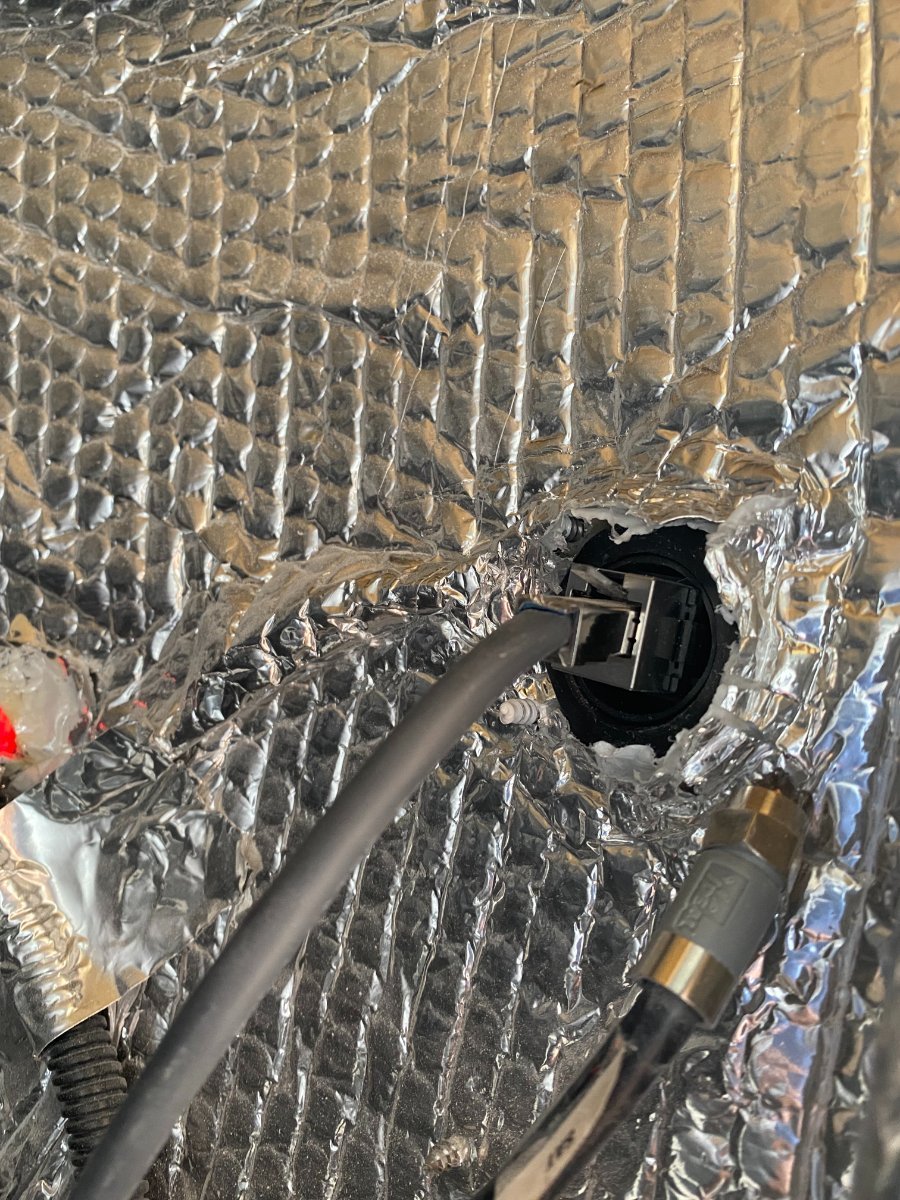
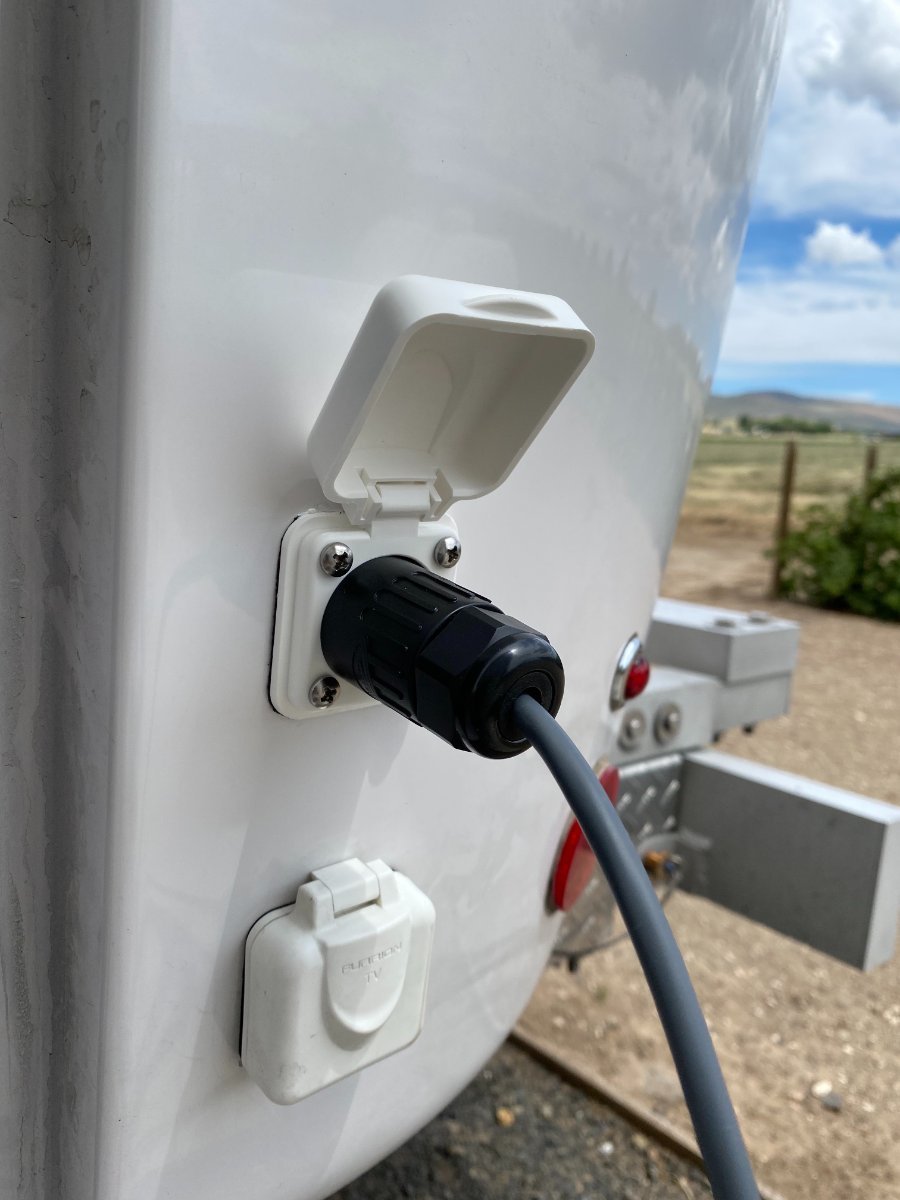
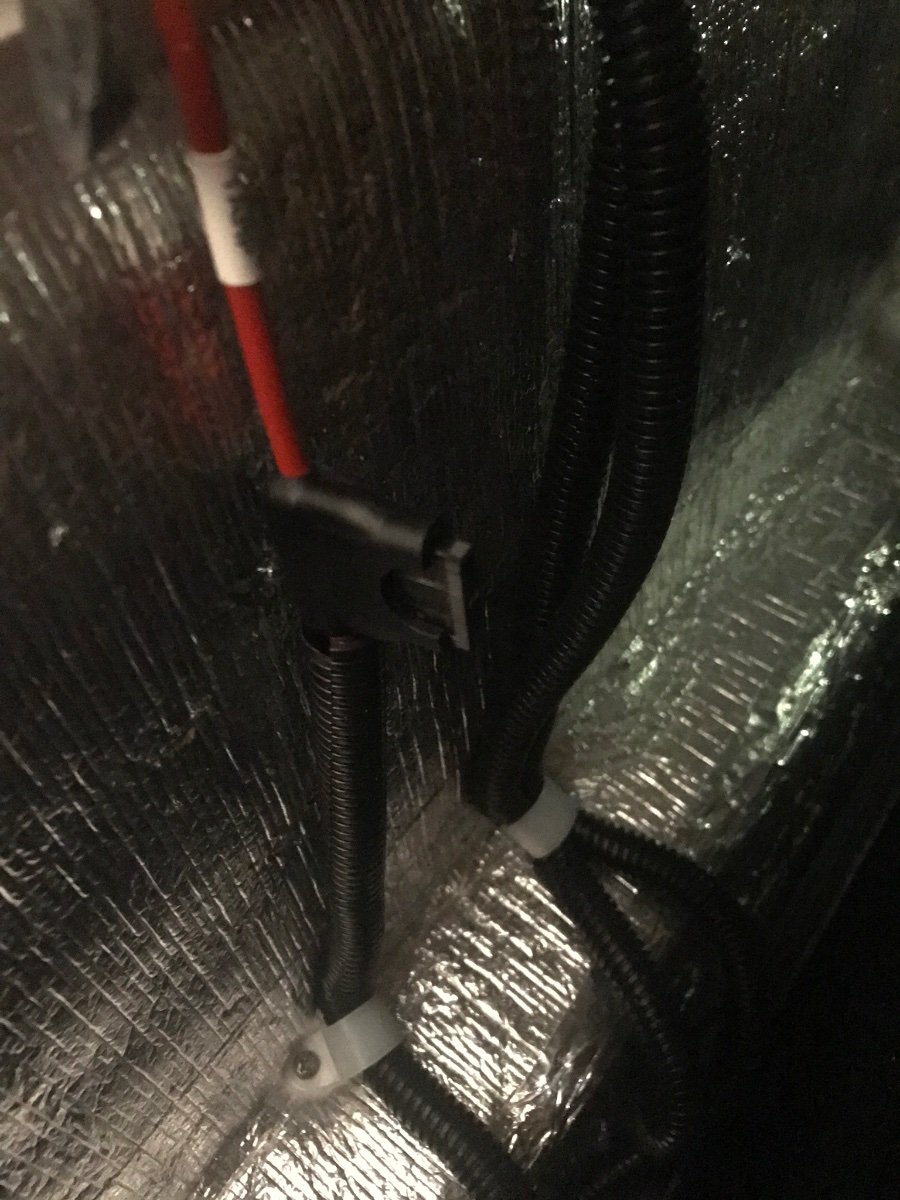
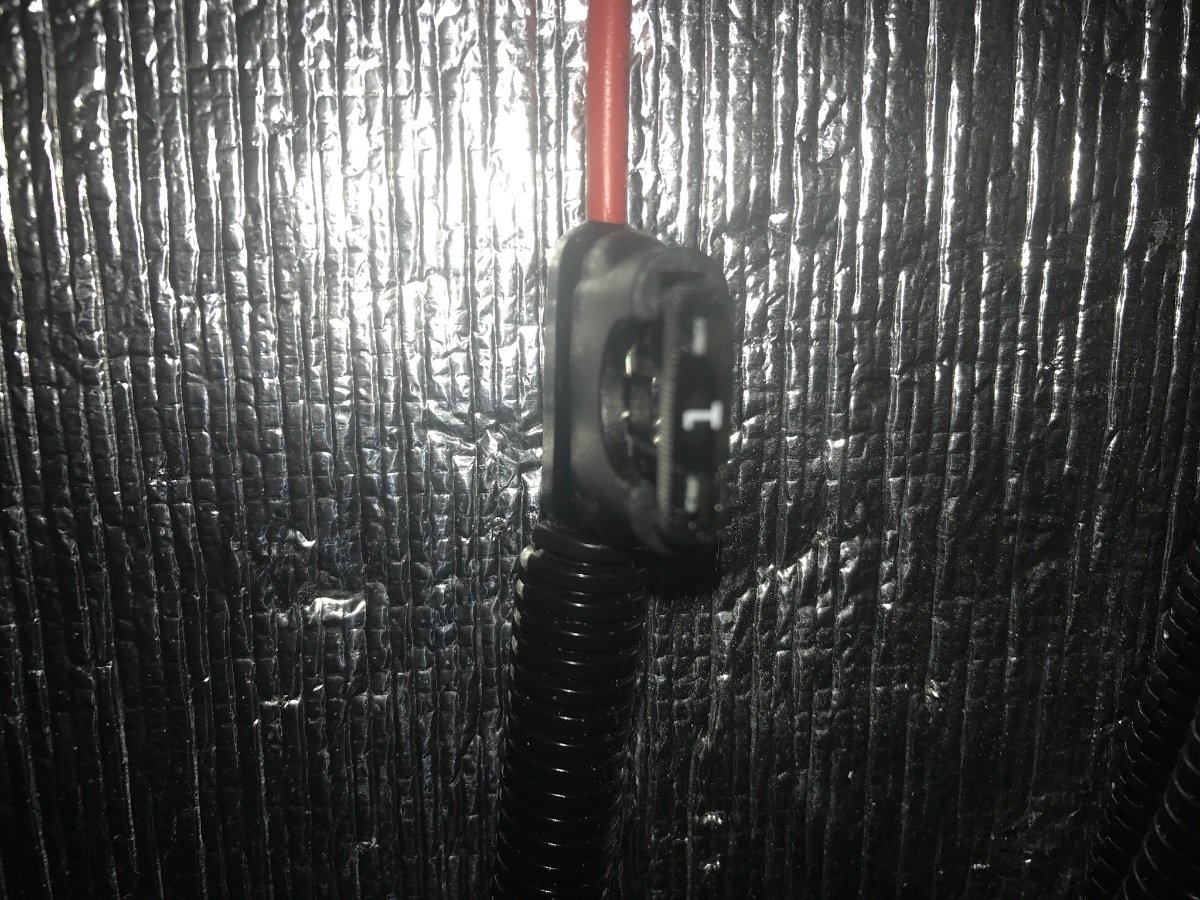
This project is to create an inlet port for Starlink cable into the attic where I put the Starlink router. I decided to repurpose one of those TV/Sat ports. Below are the pictures of the Furrion coax inlets. The left picture is the original and the right one is modified by drilling a big hole using hole saw. This is the waterproof RJ45 inlet port I got from Amazon. Next steps are removing old Furrion and enlarge the cable hole. To my surprise, I found a nice gift from the factory hidden under the seal. No big deal, I can add a little bit of 3M sealant to patch that up. Then install the RJ45 connector, left picture is from the outside, right is from the inside. This is what it looks like after putting back the cover. Next is to fish the cable from attic down to the belly near the furnace and pull it along the back and plug into the RJ45 inside port. You will have to cut the cable and install RJ45 male connectors. There are a few video on YouTube about this. Then plug it in at the RJ45 female at the inside of the inlet. The cable end from the dish will be on the outside. Plug the router in and enjoy fast Internet!
1 point
-
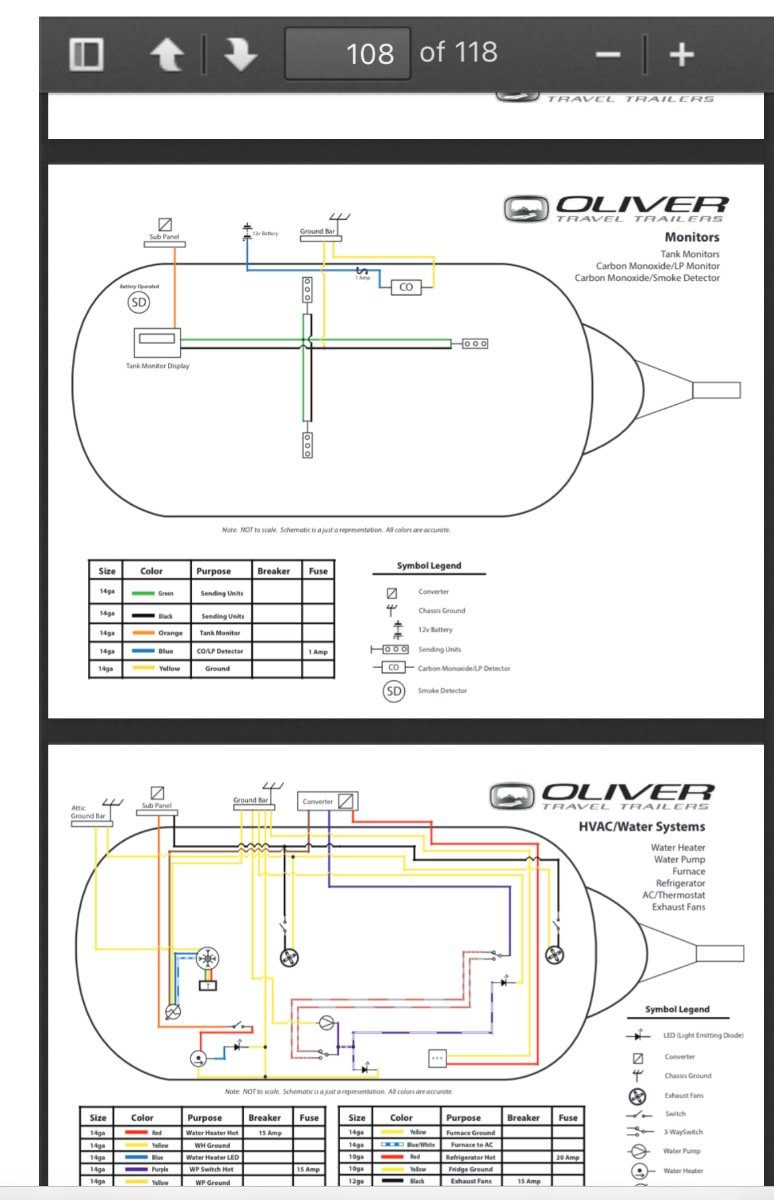
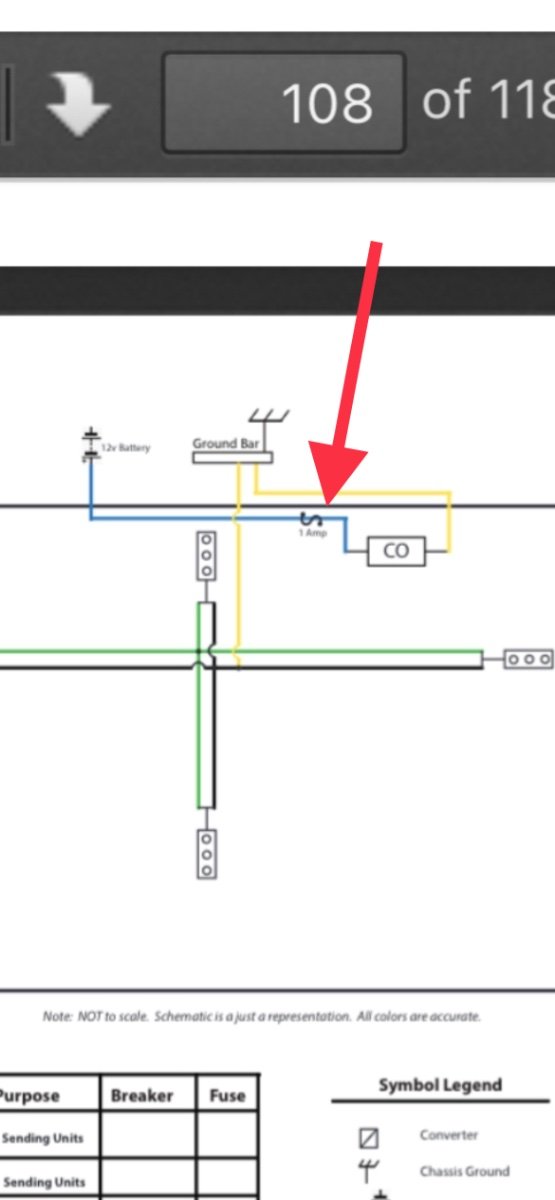
In the owner’s manual for a 2018 Elite, the schematic for the monitors shows a 1 amp fuse for the LPCO detector.
1 point
-
This looks promising. Thank you!1 point
-
What about this https://www.amazon.com/Valterra-F02-3106BK-Black-Coupler-Handle/dp/B0006MRR2Q
1 point
-
I can understand what you are talking about, not that I find it hard to twist, but it just at an angle which makes it a little harder to twist on and off. I did see sometime back that someone used a Camco 6" extension tube which extended the factory tube longer which makes it easier to get the cap off and hook up the sewer drain tubes. Here is one that I'm talking about, shop around for better price, https://www.alumigogo.com/product_detail.php?id=SKUB016V2JMBS&last_node=General&click_src=bingads trainman1 point
-
If you’re referring to the LP/ CO detector under the dinette there is a 1 amp fuse located under the street side bunk. At least there is in mine. Pull that fuse and put it where you can find it later.
1 point
-
The AC is a Truma Aventa on my build sheet, but digging through their websites you can find the Aventa both with and without a heat pump function. Looking in more detail, it appears the EU version is a heat pump but the US version (120V) does not show any heating function -- I stand corrected.1 point
-
If you find it hard to thread the cover back on, use a little lube on the threads, Vaseline, WD-40, lite weight oil, doesn't take very much, less is probably better them too much. trainman1 point
-
Camping in the Texas heat I find direct sunlight on the outside vents is a problem, but keeps the sun off does let the fridge work properly. Usually the awning does the trick, but adding a fan couldn't hurt, but direct sunlight with a fan I would say, might not do the trick. trainman1 point
-
Yeah they mentioned the Garmin App Garmin Tread includes their data, but that app certainly doesn’t receive much love unfortunately. Hopefully someone will take up the mantle and keep it going.1 point
-
It’s been my go to app as well. It’s also included with the Garmin RV890. I always emailed them when I noted any inaccuracy and always got a timely response in appreciation of the input. Mike1 point
-
Ah, nice! Just a quarter turn type catch to retain the lid. Definitely more convenient than the full threaded type I have.1 point
-
I note you have Lithionics batteries. I wonder if the battery box door gets even more wear and tear on the road with heavier lead/acid/AGM batteries. If that happens to our Elite II (once we get it), would stainless steel bolts and nuts with lock washers, sized to match the rivets, then secured with red Loctite, make a more permanent repair? Thoughts?1 point
-
Dave, Thanks for the recommendations. It is amazing that fiberglass (key word glass) cuts through rivets. I need to do the project again I'll implement your suggestions. I'l also discuss your ideas with the factory when we close the ticket. Close ups of how the rivet failed. The factory had asked for these pix below. I'd be interested in your thoughts on the failure mechanism of rivets in the pix.
1 point
-
Hull # 98, 2015 Ollie Elite II. Four T-105’s still going strong.1 point
-
Hello, We are Kathy & John from Michigan. After searching for several months we found a 2021 Oliver Elite ll just 10 minutes from our home! It was exactly what we’ve been looking for and we purchased it on 5/30/22. We previously owned an Airstream Nest that we loved for short trips but quickly found it too small for anything more then a few days. The amazing coincidence is the couple we bought our Nest from and the couple we bought the Oliver from are from the same city and just minutes from our home! What are the odds of that?! We are super excited to be a part of the Oliver family and look forward to many adventures!
1 point
-
They don't come much (if any) better than Anita! Be sure to bring that camera with you - not only will it help you to remember what you saw, but, in the event you actually do write that check, it will serve to help you down the road when you are trying to remember what is exactly behind "that" wall. Also, don't be afraid to ask questions and look at anything that interests you. Certainly you can take as much time as you desire on the tour - I'm certain that you will be impressed. Bill1 point
-
Anita at Oliver called yesterday to make sure we got the printed brochure in the mail, and to answer any questions we had. We had a nice chat, but the old saying of "you don't know what you don't know" definitely applies here. Since we are currently in a 5X8 squaredrop (a boxy teardrop) without plumbing, gas, or any appliances built in, and basic electrical, everything about a potential purchase is unknown. We've done a *lot* of reading and YouTubing over the last couple of years, but I know there will be tons of questions down the road if we go this route. That said, Deb received her "golden ticket" from Maker's Mark as an ambassador, and her bottle is ready for pickup in Loretta, Kentucky. (Side note; she doesn't even like whiskey, but signed up for the free stuff they send at Christmas every year. 🤣 ) Meanwhile, Choice Privileges emailed me and let me know that I need to use my points on a stay before August 1, else lose them. So after Maker's Mark, we're headed to Hohenwald for a factory visit and to tour the Elite II. Who knows whether we'll leave with one less check in the checkbook...1 point
-
This has been my go to app for finding public campgrounds over the years but as of July 2nd the guys decided to toss in the towel and end the endeavor sad to say. They still have a Facebook page sort of explaining their reasons for their hiatus. For those who have downloaded the app you can continue to use, but it will no longer be updated so accuracy going forward will be sketchy. I also use Free Roam but still prefer UPC app. If you folks know of something comparable would love to hear about it, but found nothing that compared in the App Store (Apple) yesterday that I did not have already.0 points


-
Recent Achievements
-


")


")


")


