Leaderboard


Popular Content
Showing content with the highest reputation on 01/12/2025 in all areas
-
Hello everyone, I'm grateful for this community and especially for the helpful post from Mark and Lorraine. Their experience mirrored the issues we had with our intermittent furnace. I wanted to share our solution in case it helps others: it was a faulty thermostat-to-AC wire. Symptoms: Below ~60°F: Furnace blower would start, ignite briefly, and then shut off after a few minutes. Blower would start, ignite, then immediately go out. Blower would start with no ignition. In each case, I heard a "click" from a relay in the AC, followed by another "click" as the system shut down. The blower would then enter shutdown mode. Oddly, stepping on a specific spot near the pantry/seat seemed to trigger the on/off cycle. Above ~60°F: Furnace worked perfectly with no issues. The Fix: Initially, I suspected temperature-related components and replaced the gas regulator switchover valve and upper-limit switch. This did not resolve the problem, so I changed the sail switch, control board, and thermostat, just to throw everything at it. (I now have spare parts on the ready) After finding Mark and Lorraine’s post, I confirmed their diagnosis: a faulty thermostat-to-AC wire. Here’s how I fixed it: Purchased an 18-3 wire from Home Depot. Removed the interior AC cowling to locate the thermostat wire’s connection to the HVAC control unit. Disconnected the thermostat and connected a new wire directly to the HVAC control box using compact splicing connectors. I tested it with this jumper and it worked as expected, without issue. Fished the new wire with a wire hanger from the HVAC towards the curb side (opposite of factory wire routing), back to the rear compartment, over to the street side, behind the radio and pantry, then down to the thermostat. It was actually really easy to fish the wire around. Once completed, the furnace worked flawlessly, even in cold temperatures, regardless of where I stood inside or outside the trailer. I hope this helps someone else!4 points
-
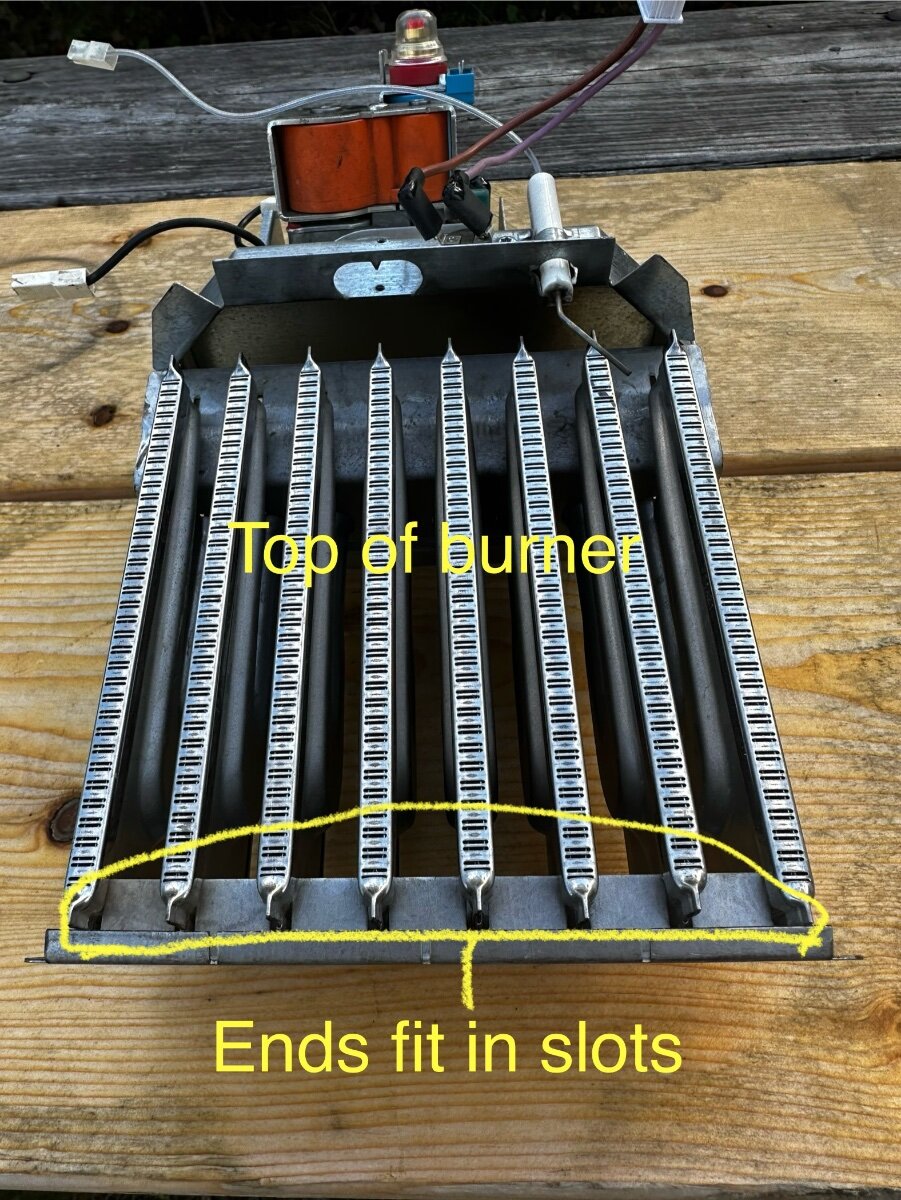
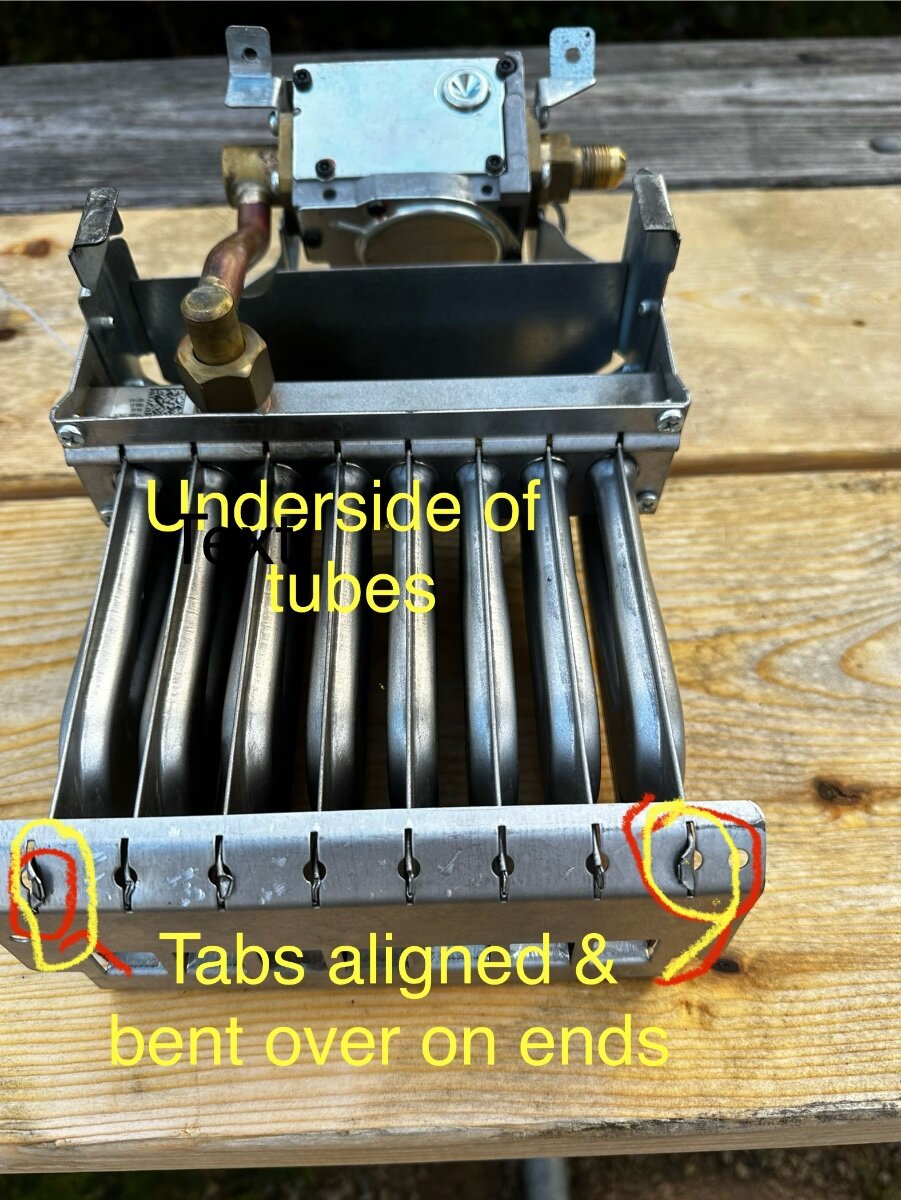
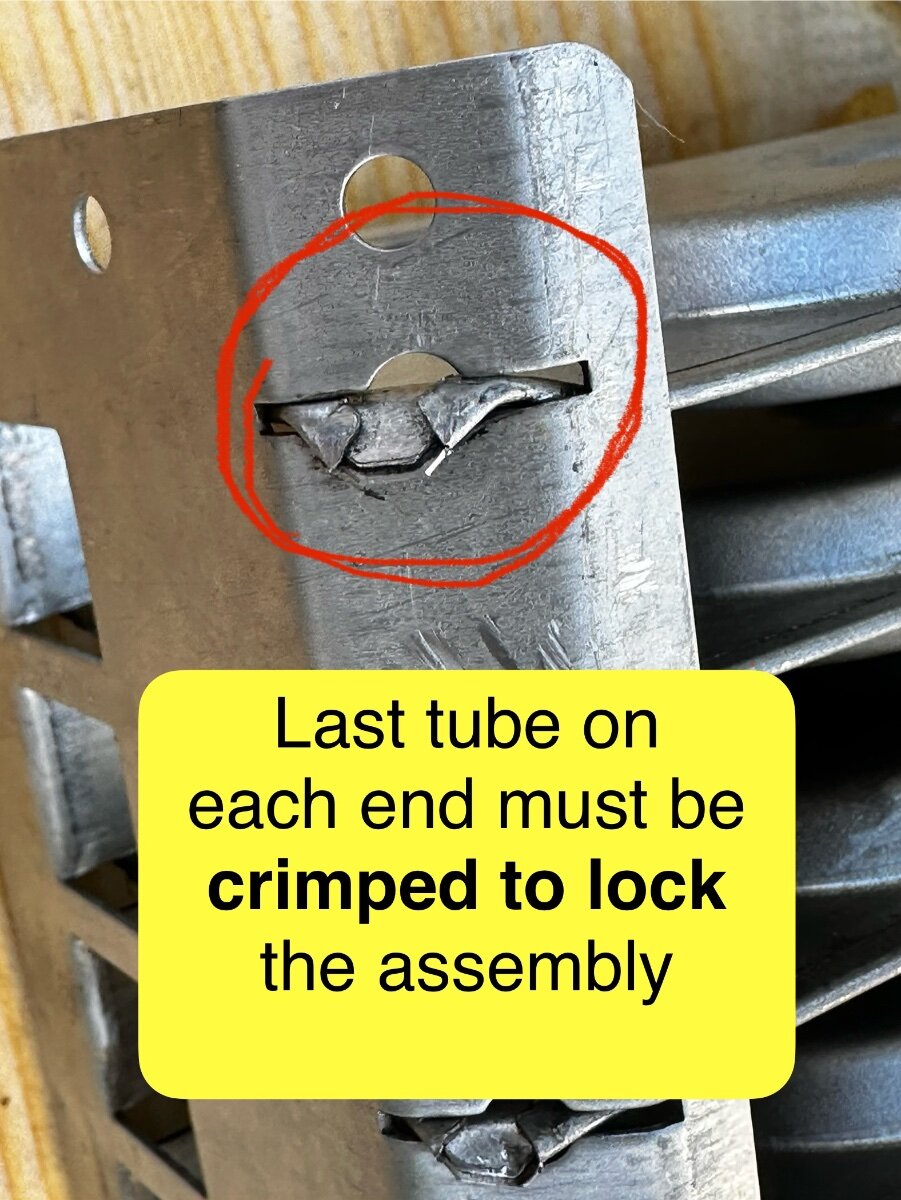
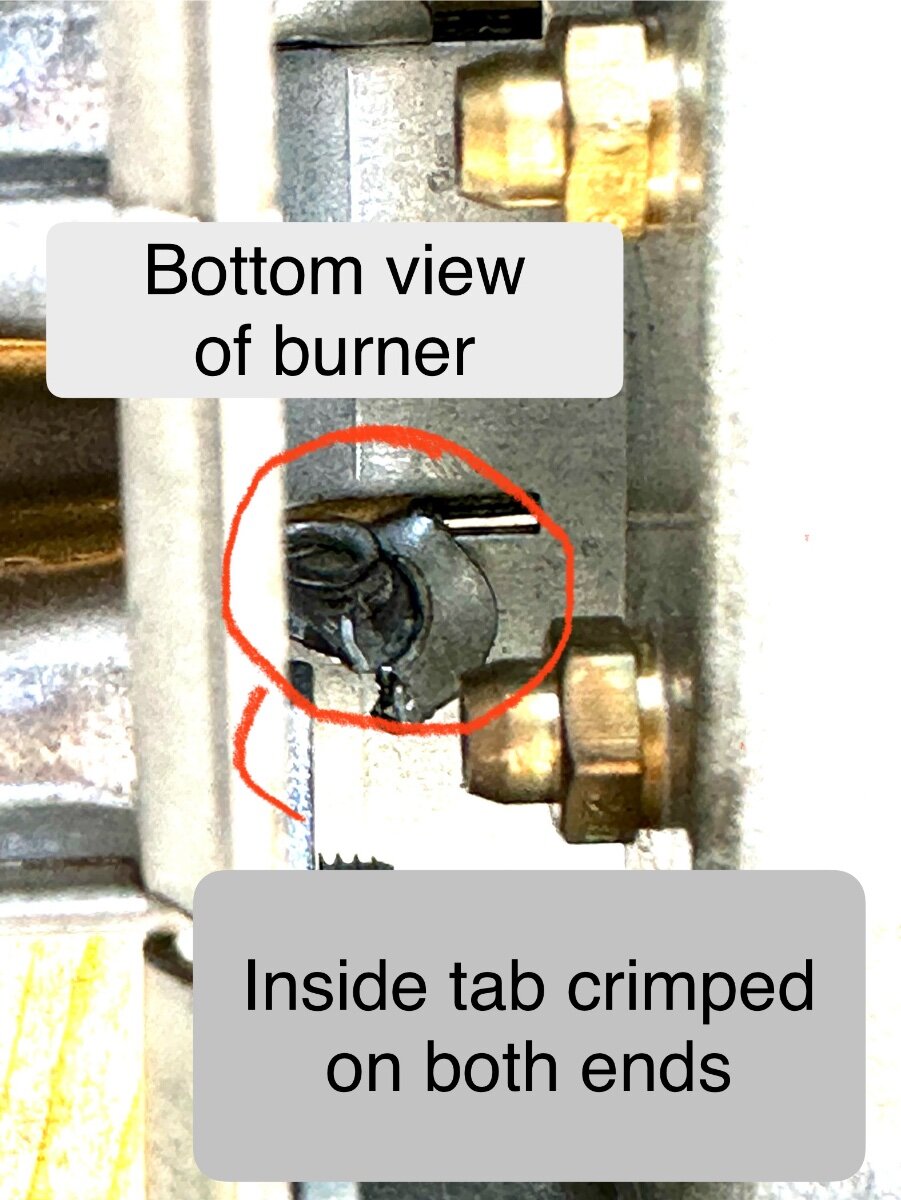
We’ve been on some bumpy roads in Nova Scotia and it caused an issue with our truma water heater. Symptom: Louder than normal water heater ignition. A loud whoosh or pop on ignition. Strong enough to blow out the flame. A smell of gas! Cause: Burner tube assembly had come apart on the end of the tubes by slipping out of the retaining slots (last tube on either end) Fix on the road: Removed the burner and regulator assembly and re-assembled by re-aligning and re-crimping the burner tubes into the frame. Time: 40 minutes Tools: Crescent wrench & pliers for gas feed 2 Different size torx bits for burner screws Steps: Turn off gas & let burners cool down Pull fuse for water heater Take pix of wiring ( for re assembly) Disassemble gas feed using backing wrench Disconnect various wires from plugs & headers ( Includes 2 screws to remove igniter) Remove 2 screws on front of burner/regulator assembly Slide out burner. Reassemble burners in slots and crimp end burners Reinstall in reverse order, checking for gas leaks before reinstalling fuse. Run water heater to test. Enjoy hot water ! The last right and left burner tubes had fallen out of the registration slots. That caused gas to flow from the two orfices directly into the burner chamber. ( A nice big ignition event that blew out the other burners.) I reassembled and crimped them back in place. video describes which tabs need to be crimped. IMG_0872.mov
 2 points
 -
We could swing by you too! 😂 Looking forward to meeting you.2 points
-
It’s interesting to me that hull 1108 and hull 1111 both experienced the same issue. Having a source for owners to share their knowledge and experiences rocks!2 points
-
We are planning to be at Quartzsite on Friday, 1/17. We're camping with family at Hi Jolly area. I'll be wearing my Oliver hat. Say hello if you see me! Paul2 points
-
@jd1923 John as you know we are settled in here in La Posa South, we will swing by the dome rock rally for a visit but not to camp, too much work to break down/setup camp. I’m lazy so this is where we will stay until mid March!
2 points
-
Not much difference, given 4/0 cables, between 1 ft and 3-5 ft. You can have a pair of LiFePO4 batteries in the battery bay and another 1-2 LiFePO4 batteries in the basement nearby. I do not have room under the "rear dinette seat" nor under the streetside bed since I installed our Victron MP2 inverter/charger there, but that raceway under the pantry could host a LiFePO4 of considerable size. You could even install a pair of batteries under the front dinette seat, where there is a LOT of ROOM and the cable lengths would be further but doable. I'm not going that way since under the front dinette seat is Chris' territory. She has many items up there that makes our camping so much more comfortable! 😂2 points
-
Who will be attending the Fiberglass Rally February 6th thru 9th, 2025 at Dome Rock? It seems that many of you are down to Q already and wondering if you are sticking around through first week of Feb. I don't want to repeat last year, getting there in time to see 40 Casitas and all the Olivers had gone! We'll skip Q except to meet up with some of you. I'm off work and can travel Feb 1-8. Thinking of staying at Alamo Lake earlier that week (80 miles and 1 1/2 hours from the Q). There are MANY sites available there always. Rustic sites E loop is where we would book, no hookups but large pads for $15 and if you want hookups check out C Loop, sites at $25. Love to see some of you up there. It would be a very nice change of pace vs. the crowds of the Q!1 point
-
For your purposes that may well be true. But for at least one of us when we are not connected to Ollie, we like to go play where off road conditions sometimes involves stuff impacting our undercarriage, frame and floor panels. Would like to avoid that, but stuff happens. That puts our cables that are exposed at some risk. I prefer to kill the breaker at the TV battery and not worry about it when doing so. Sure we could have run the cables thru the frame, but John Davies taught us that doing so we can not secure them from bouncing around. Since the frame is welded, I am not so sure that they ground down any of those robot welds smooth so our cables would not be taking a slicing as we bounce around out there. Sure there is a price to pay for the power loss through breakers. But I have come to terms with that loss as compared to the time of unbolting the fuse each time I go play. So, I guess I'm the Flipper Camp and you are in the Screw It Camp. Just the way it works out some days. But the good news is that we both agree that circuit protection of those lines IS in fact a very important safety element of our DC to DC charging systems. You did mention not knowing of any quality breaker makers. I don't know myself. So let's ask! After all, this sort of question was asked a few years ago and a fellow owner nicely introduced me to BlueSeas product lines. So here goes? Anybody know of a good quality circuit breaker for under hood install in the battery area that is rated at 60 amps?1 point
-
True. I believe the installation does have a fuse already so a circuit breaker seemed redundant.1 point
-
I am not sure about leaving it open while off. But Oliver did put out a video on cleaning it and operation.1 point
-
You may be able to adjust the bracket so that the TV is closer to the ceiling so it can fold back. We were able to do this on our 2022 LE2 when we installed our Free Signal 12 volt 32" Platinum Smart TV and it folds up just like the original TV.1 point
-
Because of this thread I had repacked my bearings over a year ago, wow, over 1.5 years. Oy! Time flies. Anywho, when putting on my tire I had got checked out at the tire shop I noticed not one, but two wheel bearings needed to be snugged up a tad bit. It was a good find and a quick tweak. All-in-all, a good night for minor repairs and improvements. Maybe a step closer to a super long trip. I still prefer these forums over Facebook. 🙂1 point


-
Recent Achievements
-


")


