Leaderboard


Popular Content
Showing content with the highest reputation on 02/11/2025 in all areas
-
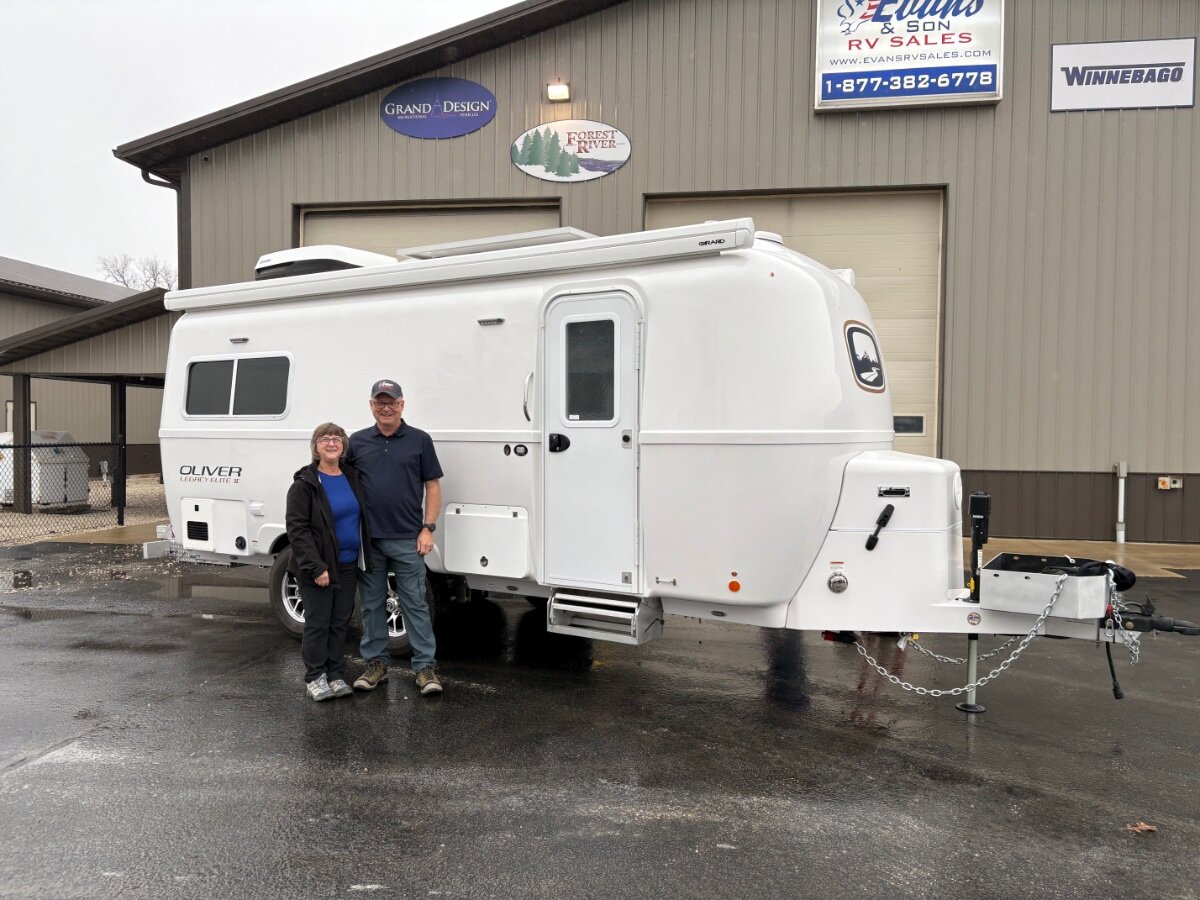
We just picked up our new Oliver Elite ll on Saturday Feb. 8, 2025 at Evans & Son RV in Petersburg, IN. Rained most of the way home to Tennessee, but it towed like a dream. Such a difference from our previous RV.
 8 points
 -
Hello everyone. It's time to introduce myself after lurking here in the forum for a few months. I purchased my 2022 LEII (Hull #1056) from Paul and Tina at the end of January. While yet to begin my adventures (as winter has yet to depart the mid-Atlantic), I've spent the past few months learning about the Oliver and it's systems. The four season functionality, quality construction and top notch customer service made my choice easy. The bonus is the informed, pleasant and supportive user community that I've found here on the forum! I look forward to getting to know you all better through the forum and at future rallies. Warm regards7 points
-
I sent a message asking the folks at RV Trip wizard if they had a feature to overlay multiple trips on one map...and they said no but to try exporting to Google Maps and using layers....here's a result as an example of what's possible, I'm still learning. So Google Maps allows direct import of the .gpx files that are output by RV Trip wizard. Normally the .gpx are used to load into Garmin devices, but Google Maps reads them as well. I started by opening up a new map in Google Maps created "My Map" as a BASE map with the first 2019 trip where we picked up the trailer, and added a layer for each subsequent main trip. I found that 6 is the maximum number of individual layers you can add in Google Maps. There are controls to change the type of marker, color, line width etc. There are also controls to turn on/off the titles for each stop. To create more graphic maps, Google enables embedding photos by geotag into the maps as well. I'm considering adding pictures of each campsite for each stop to see if it's at all useful. The map below lets us see big holes in our travel...so we've still got miles to go before we sleep! Craig & Rose Hull 505 - Galway Girl
4 points
-
Thanks for all the wonderful replies and well wishes. In response to JD1923 Evans & Son RV sales offered a great price on the Oliver and they do not charge any doc fees or add on fees. All the staff and owners just treated us like family. We did take the factory tour last October. It showed us just how well the Oliver is built. That tour was when the decision was made to purchase an Oliver. Everyone at the Oliver factory just treated us like family too.4 points
-
I have 3 clamping multimeters and all 3 measure AC and DC amperage. One of the better ones I have is a Klein Tools CL390 which is around $100. Edit-Just took a quick look on Amazon and couldn't find a clamping meter that didn't do both AC and DC amperage. Might want to check your meter's documentation to verify that it doesn't actually measure DC amps.2 points
-
Off-roading in my 2WD tow vehicle, NOT! We have a GX470, lifted with performance suspension for that. Our TV travels roads tame enough to pull the Oliver. Either way, mounting under the bumper was the mistake made. Besides the greater chance for damage, it makes it hard to reach. I'm thinking the cables and SB175 will come out somewhere between the bumper and license plate. If connected to +12V, beside the physical damage to the cables and connector, you would merely blow the fuse which is it's purpose. I purchased the SB175 Environmental Boots, thick rubber to insulate the positive lead at the rear. I wasn't interested in a cut-off switch for our LiFePO4 batteries either. I'm old school, and NP taking a 1/2" wrench to the post. For the DC-DC charger, I'm not going to pop the hood and throw a switch every time we hitch and unhitch. Much too much bother. More on this, in a week or two, in a new post when I finish my installation. There are so many great variations in thought and mod designs discussed in our great forum! 😂2 points
-
I will not merely ground through the frame hitch, etc. I will have the B- from the charger in the Oliver to the SB175 Anderson connector at the hitch. On the TV side I will have a short cable bolted to the frame. Also, another short cable from the front end of the frame to the B- starter battery post. Most do not include this additional ground. Agreed, I too have noted installations here that do not achieve full charging amperage. Not sure why since many details of their installations were not provided. I believe those examples did run B+ and B- cables end-to-end. I see negligible resistance in a solid steel frame and perhaps less voltage drop than 4 awg copper over another 20 ft of distance. BTW, is voltage drop even an issue when the Orion XS 50A charger can accept input voltage from 9V min to 17V max? Not sure. Given I get mine installed next weekend or soon thereafter, we're heading towards Tucson starting Monday 2/24. I'll make sure we leave at a lower SOC and will measure what the new system can produce! I'll ask Chris to take multiple VictronConnect app pictures (from charger and shunt screens) while I drive, so I can study them later. I should remember to turn off the solar charger during this test to isolate the DC-DC charger. I will start the test at the full 50A capacity of the charger (see if the 4 awg wiring gets hot, or other issues). On another day test after detuning the charger to 30A.2 points
-
Looking forward to your forthcoming post on the install! A couple of things that may or may not be specific to my Renogy DC-DC charger regarding installation: 1) Because I choose to mount the charger remotely inside the Oliver and not in the TV, I decided it best to run a negative cable from the starter battery, rather than the typical ground-to-chassis as done in some instances when separate battery banks share a mutual grounding, like a motorhome for instance. I know when a trailer is hitched to a vehicle grounding occurs, but I find no comfort that it constitutes the adequate grounding necessary to fully safeguard the system; 2) the Renogy manual specifies use of ANL fuses with their systems; and 3) since the charger is in the trailer, use of the D+ ignition wire was not utilized and thus, the solenoid install serves the same purpose. I hope this provides a better understanding of actions taken in my install. I have read where others, for reasons unknown, are not getting the rated amperage from their units. I am pleased to report that is not the case in my situation!2 points
-
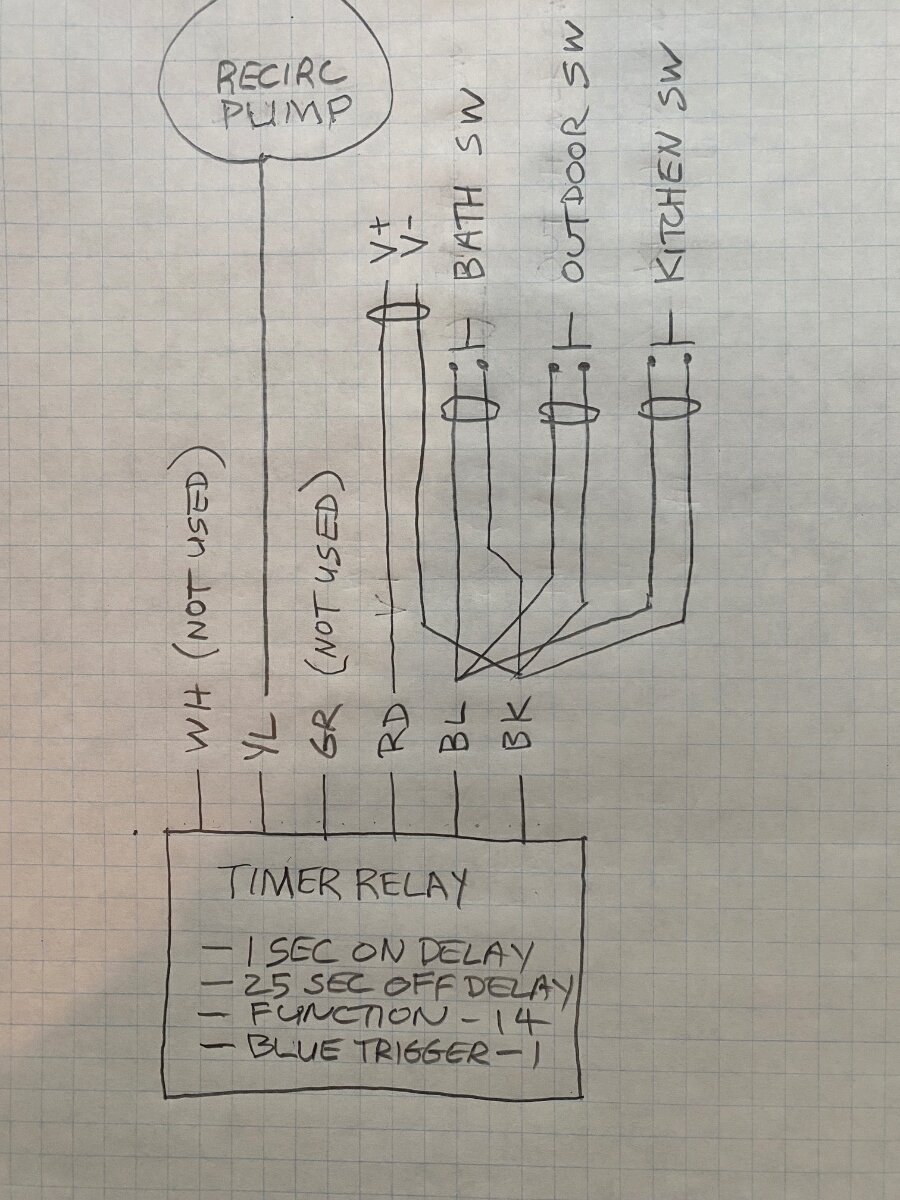
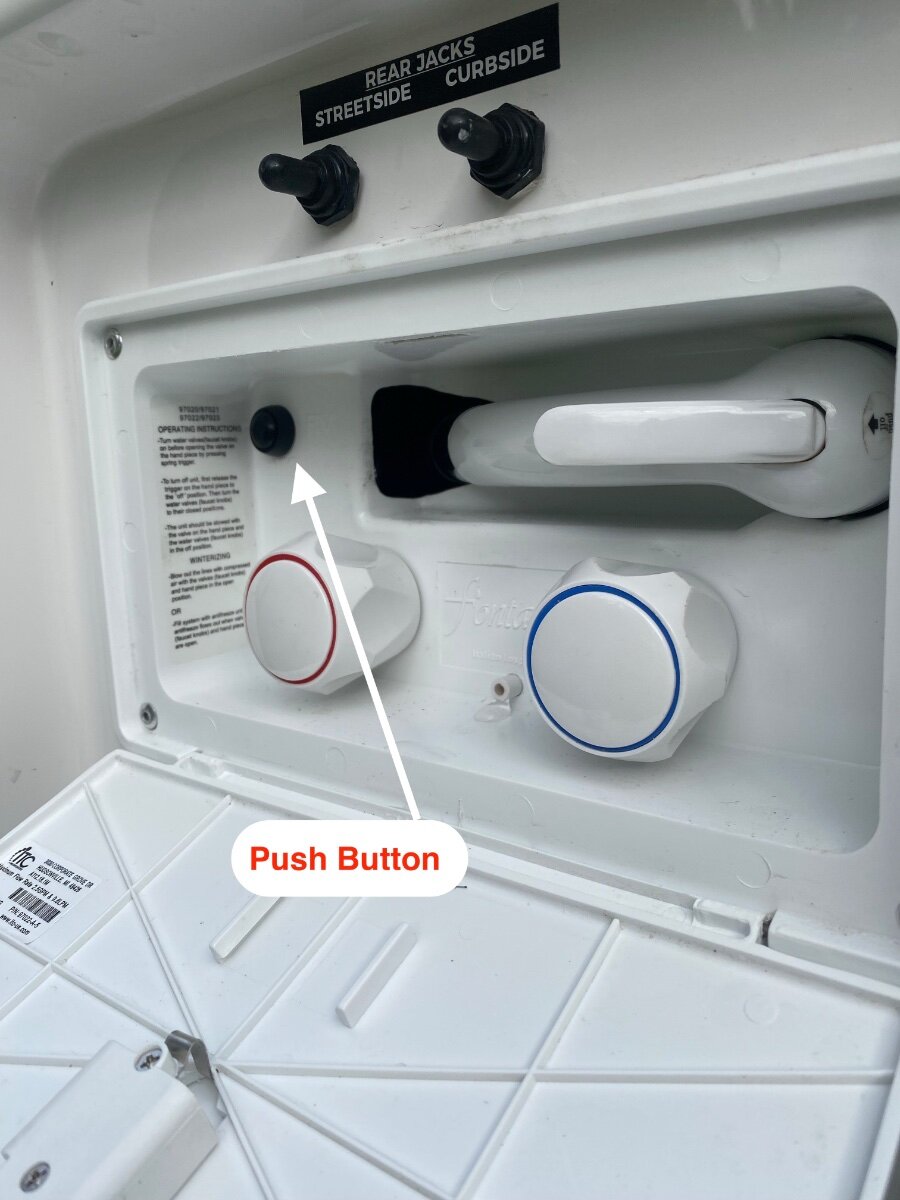
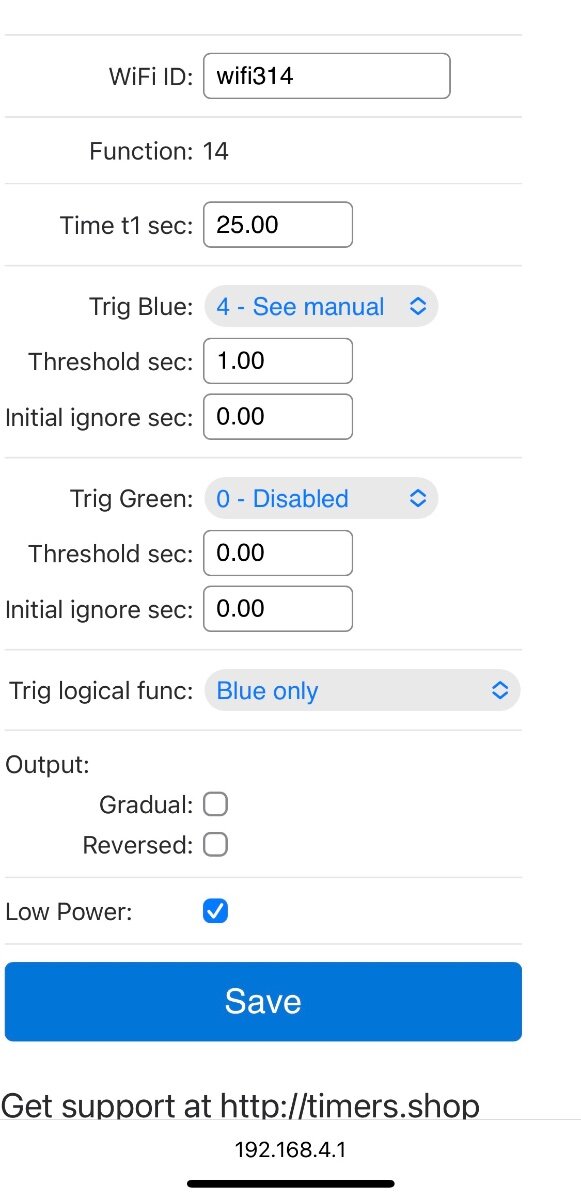
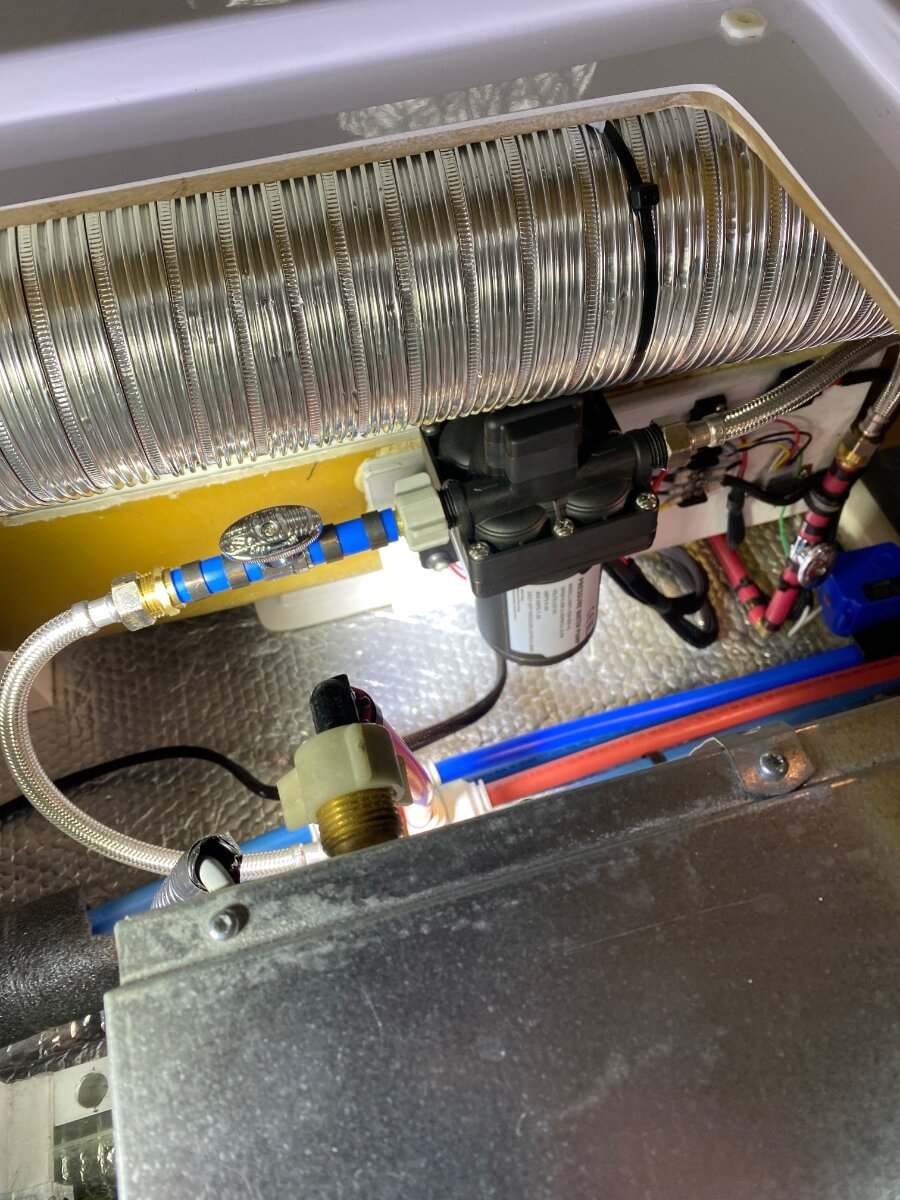
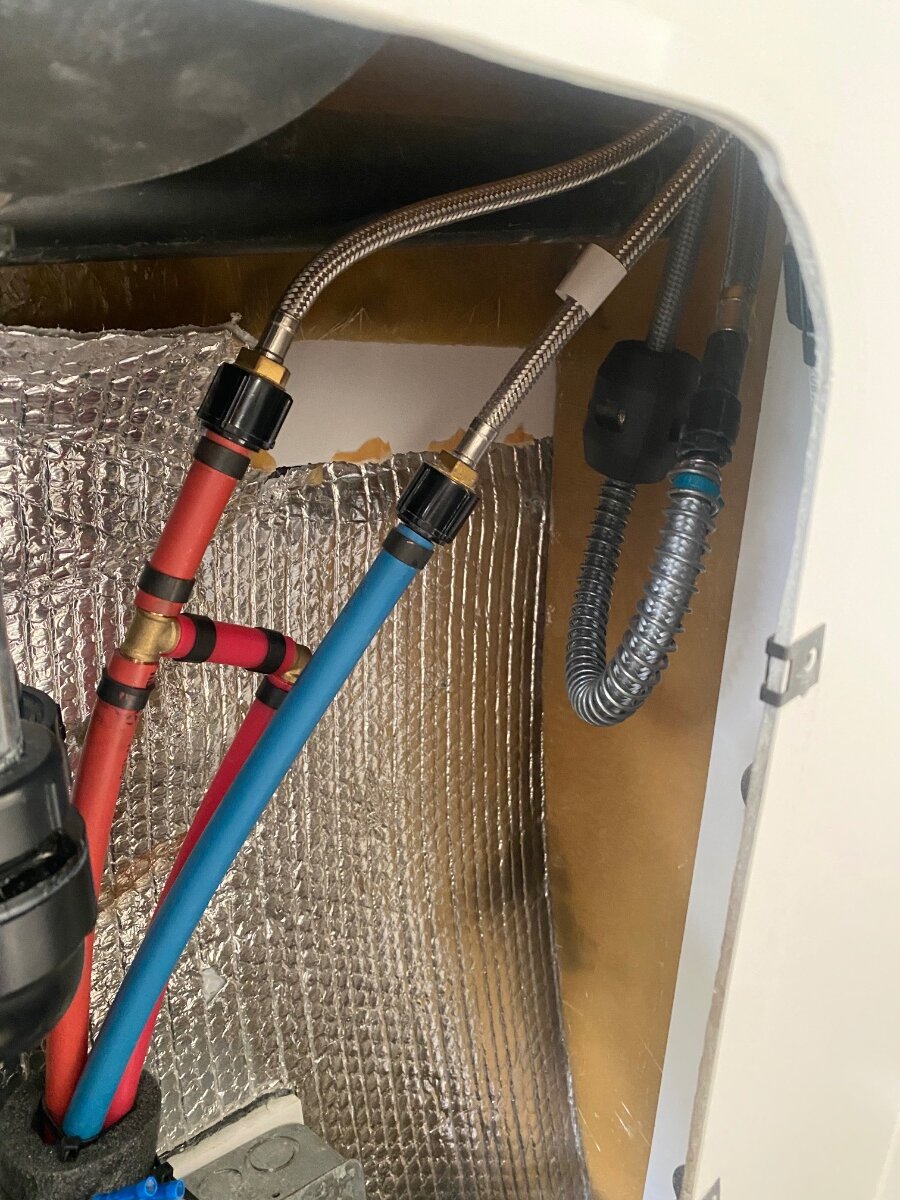
This is yet another modification for instant hot water. I was inspired by @Minnesota Oli who brilliantly installed a timed solenoid valve to circulate hot water from the bathroom faucet back to the freshwater tank. This saves from wasting water down the drain while waiting for it to get hot. I loved the concept of using a timer, but I went with a recirculating pump instead of a solenoid valve. We’ve used this design for about a year now, and it’s been very luxurious and effective. Not only does it help conserve fresh water, it prolongs the grey water tank volume which is now our most limiting factor when boondocking. The recirculation pump is started from momentary push button switches installed at each faucet. The button(s) activate a timer/relay that runs the pump for 25 seconds. Experimentation showed that 25 seconds sufficiently heats the pipes to deliver hot water at full temperature. The pump circulates the hot water back to the hot water heater, rather than into the fresh water tank. The new recirculation pump is the same model as the existing main pump. It was connected with flexible faucet hoses to reduce vibration and isolation valves so it can be used as a spare if needed. The pump was mounted on a plywood board fastened with construction glue to the vertical fiberglass surface by the furnace return vent. Note: Pump pressures can vary, so it might be necessary to slightly adjust the pump pressure switch to overcome the house pump pressure. Also, the pump may not overcome some of the higher city water pressures if a pressure regulator isn’t used. . . as it should be regardless. The Oliver has two separate hot water loops that I joined together so that the kitchen faucet is included in the recirculation loop. Being a shorter loop, there was less water wasted while waiting for it to get hot, but it's used more frequently so it's worth it to join the loops. There is plenty of room under the floor and behind the cabinets to run PEX return lines. “T” fittings were installed at the kitchen and bathroom faucets, and at the water heater input as shown on the drawing. Note: There was a buried 3-way valve, flexible by-pass hose, and a (clogged open) check-valve for water heater isolation. It was restricting flow and pinching the furnace duct so I completely removed it. The Water Heater can be easily isolated other ways if the need arises. The momentary push buttons were arbitrarily programed so that they must be depressed for one second before the pump will start. The buttons were non-intrusively mounted in 1/2” holes. The bathroom button is behind the existing bathroom pump switch, the kitchen button is above the sink, and the outdoor shower button is inside the shower wand enclosure. The sheathed button wiring is joined together under the street side bed along with the timer. I used terminal blocks, but wiring could be joined with any number of splicing methods. The button wiring carries no measurable voltage or current, it’s simply a switch to “low” (ground) for the timer trigger. Wire runs to the bathroom and outdoor shower switches are pretty straight forward, the bathroom vanity shelf needs to be removed for access. The kitchen switch wiring is laid under the liners in the upper cabinet, through the attic, and down the rear wall next to the clear AC drain tubing. I used a programmable timer/relay for the pump. An inexpensive (re-usable) Programer is also needed to program the timer. The Programer has built in App and Bluetooth for programing it on a smart phone and I’ve provided a screen shot of the program settings. This is truly simple to do, and quite fun! As many in this forum know, the Tuma Comfort II water heaters have a built-in circulation pump, controlled by temperature sensors, that keeps a small internal tank ready with hot water. Only one part (unavailable to public) differentiates it from the Truma Comfort II “Plus” that has a full hot water recirculating system. It took a few years, but I finally have the design details for that part and I’ll try to fabricate one when the Truma is removed for the up-coming factory recall work. More to come if I’m successful. The Truma “Plus” recirculation system provides true instant hot water (when not in Eco mode) because it keeps hot water circulating through the system based on temperature sensors. My system has a 25 second delay before the water is hot, then it cools down until the button is pushed again. This is less convenient, but more energy efficient because it doesn’t periodically cycle. I’m still on the fence which system is better, but fortunately the recirculation loop installed in this modification will work for both systems. Hope someone finds this useful! Cheers! Geoff Shopping list: Sureflow pump https://a.co/d/cSLUWEF 10 amp Timer/Relay https://a.co/d/g6C1zaZ Timer/Relay Programer https://a.co/d/9h1HtK6 Momentary switches https://a.co/d/i9wwhNs Terminal Blocks https://a.co/d/bkgrKhh Red PEX and fittings Flexible faucet hoses 1/4 turn valves
1 point
-
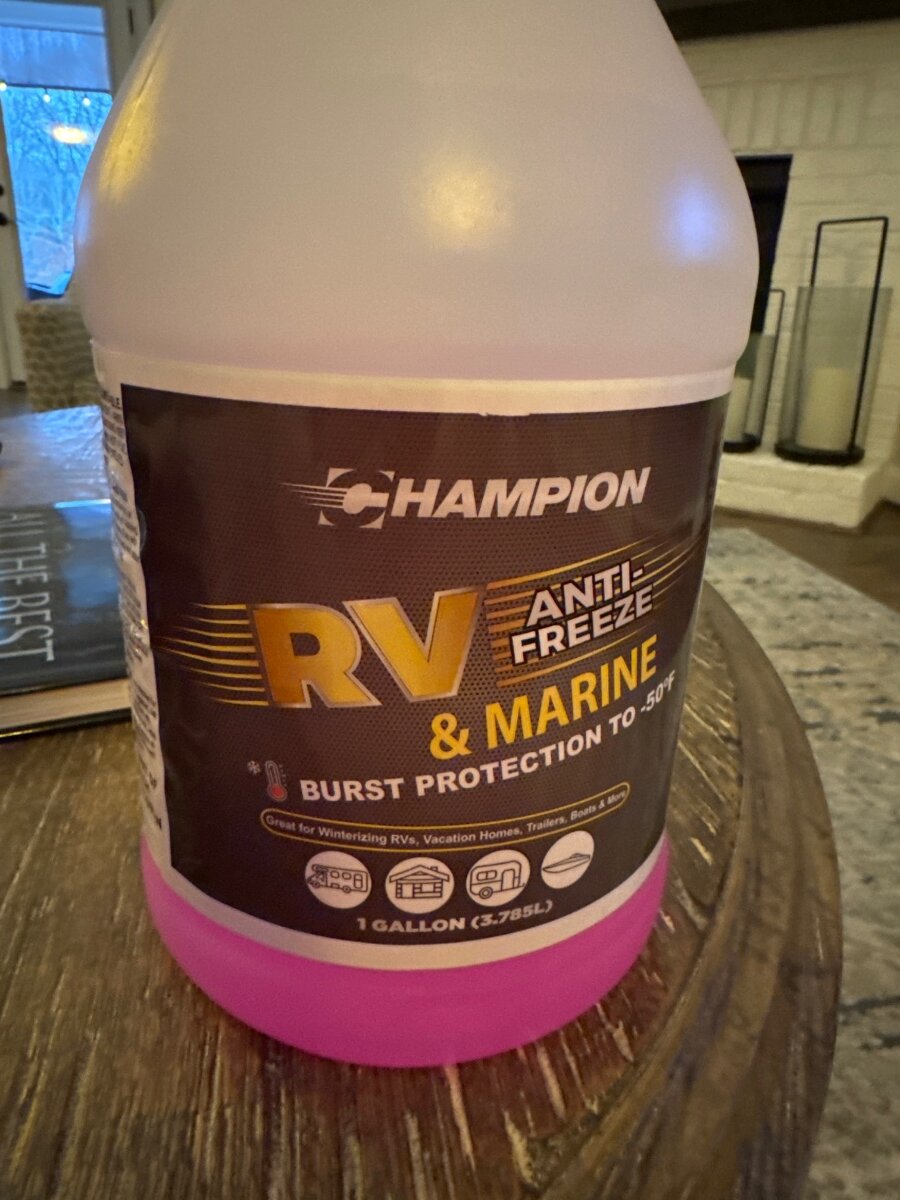
We are getting ready to head west from the Nashville area in a week or so and so I will be dewinterizing the Ollie for the first time. My question is around managing the fluids as I do so primarily for safety of the neighborhood dogs. (Don’t own one but many in the neighborhood.) RV antifreeze is not supposed to be toxic but I don’t want to take any chances. How/where do you dispose of the fluids resulting from the dewinterizing process? This is the product I used to winterize.
1 point
-
Well not completely! Clamp-on amp meters are great tools for RV owners, and many double as multimeters too. But it’s important know the differences and limitations to make an informed choice of which meter will meet your expectations. Clamp-ons are great for measuring higher currents, such as battery chargers and power feeds. But they're not great for measuring low currents, such as branch circuits and parasite loads. They don’t have the resolution needed for lower amps, and they can be finicky if not positioned just right. If you plan on measuring small currents, then get a basic Multimeter with a shunt type ammeter. They measure "in-line" with the current, typically up to 10 amps (+/- 1 milli amp.) Some clamp-on meters with built in multimeters, such as the Klein CL390, also include a shunt type amp meter. But check the specs because a lot of these are in microamps, which is too low for an RV’rs needs. Amperage is subjective of many factors, so if you're really serious, consider a $$$ data logging meter to see whats going on over time. The Victron smart shunt also has data logging (+/- 10 milli amps.) You can use it to measure the current of various loads by isolating the circuits and inputs. Having said all that, I recommend getting both a Clamp-on ammeter and separate Multimeter to cover all your amp measurement needs. You will probably be reaching for the multimeter most of the time. If you want some Oliver real life examples of ammeter accuracy, and how to measure parasite loads, see my post in the topic “Battery depletion rate 3% or more per day... with EVERYTHING off?” My post is way down on the third page with photos. Hope that helps, Geoff1 point
-
Ours originally was going to be delivered in December 2015. But, due to my work schedule I asked to delay until May 2016. They had already started building it in the fall of 2015 and just set it aside, finishing it in the spring. So ours is a mix of 2015 and 2016, not that it matters any since there wasn’t too much standardization then.1 point
-
The CL900 also does and all the way up to 2000 amps. 😮1 point
-
Welcome and happy travels. Here's our web page showing our trips for inspiration and ideas. If you ever come out west let us know. Craig & Rose Hull 505 https://4-ever-hitched.com/trips-overview
1 point
-
As already mentioned, Klein tools have a long history for quality. They only have two clamp-style multimeters that measure DC Amps, the CL390 and the CL800. I purchased the CL800 last year since it has a HD casing and an Ebay seller had one for $85. I still haven't figured out how to use 90% of its functionality, but I can read V, A and R! The CL390 is all you really need. We're all in agreement here! 😂1 point
-
Thanks Mike, you would think ours would be about the same. Our hull was titled in 2016 but I've seen several parts in the basement with 2015 dates. Yours is 22 hulls later which in that day could have been almost a year later. @ScubaRx Steve has mentioned how each was a one-off build back in the old days. You can see in my picture the extreme 180 turn. My SS cable has a bend there to match and another one for some other reason at the midpoint of the cable. Next I'll pull the gray valve cable to the bathroom to see if it's straight. This short cable is equally hard to pull. Later I'm going to see if I can access the gray waste valve, under my Victron inverter, under the streetside bed and then come up with an overall plan. I've always really disliked plumbing! New cables, new valves, motorized... ?1 point
-
I once bought by mistake a cheap Astroai CM2KOR clamp meter that, to my dismay, does not measure DC amperage, only AC. So, I then bought a Klein CL390 clamp multimeter (for a higher price), that measures both AC and DC amperage. I carry the Klein in our Elite II. I also recommend the Klein CL390, about $68 presently on Amazon. https://www.amazon.com/gp/product/B08DTDCG7T/ref=ppx_yo_dt_b_asin_title_o00_s00?ie=UTF8&th=11 point
-
Absolutely agree - if you can find a place to recycle it. Around here THAT seems to be a problem.😪1 point
-
My valve installation looks very different than yours. Bends in the cable will definitely cause binding. My cable was straight with no bends at all. Interesting because our hull numbers are so close. Mike1 point
-
Olive - Check the ingredient list on the anti-freeze you used. It should not include ethylene glycol - mine doesn't. Therefore mine isn't toxic to dogs and I'd suspect that yours isn't either. Bill How does ethylene glycol affect dogs? Even small amounts of ethylene glycol can cause permanent kidney damage in dogs. Less than ½ a teaspoon per pound of body weight can be enough to kill a dog. Dogs can get into antifreeze by drinking from puddles or licking it off their paws.1 point
-
I have this and it works great. Lots of options, comparable to Anderson products. If interested, they have a great weight distribution system that works in tandem with the tongue weight scale as well. It takes the guess work out of weight distribution by utilizing an app and tongue weight scale to help adjust to proper tongue weight. https://www.weigh-safe.com/product/weigh-safe-drop-hitch/ https://www.weigh-safe.com/product/true-tow-weight-distribution-middleweight/
1 point
-
Correction: The tongue weight scale is Sherline, NOT Shoreline. despite what auto-correct thinks.1 point
-
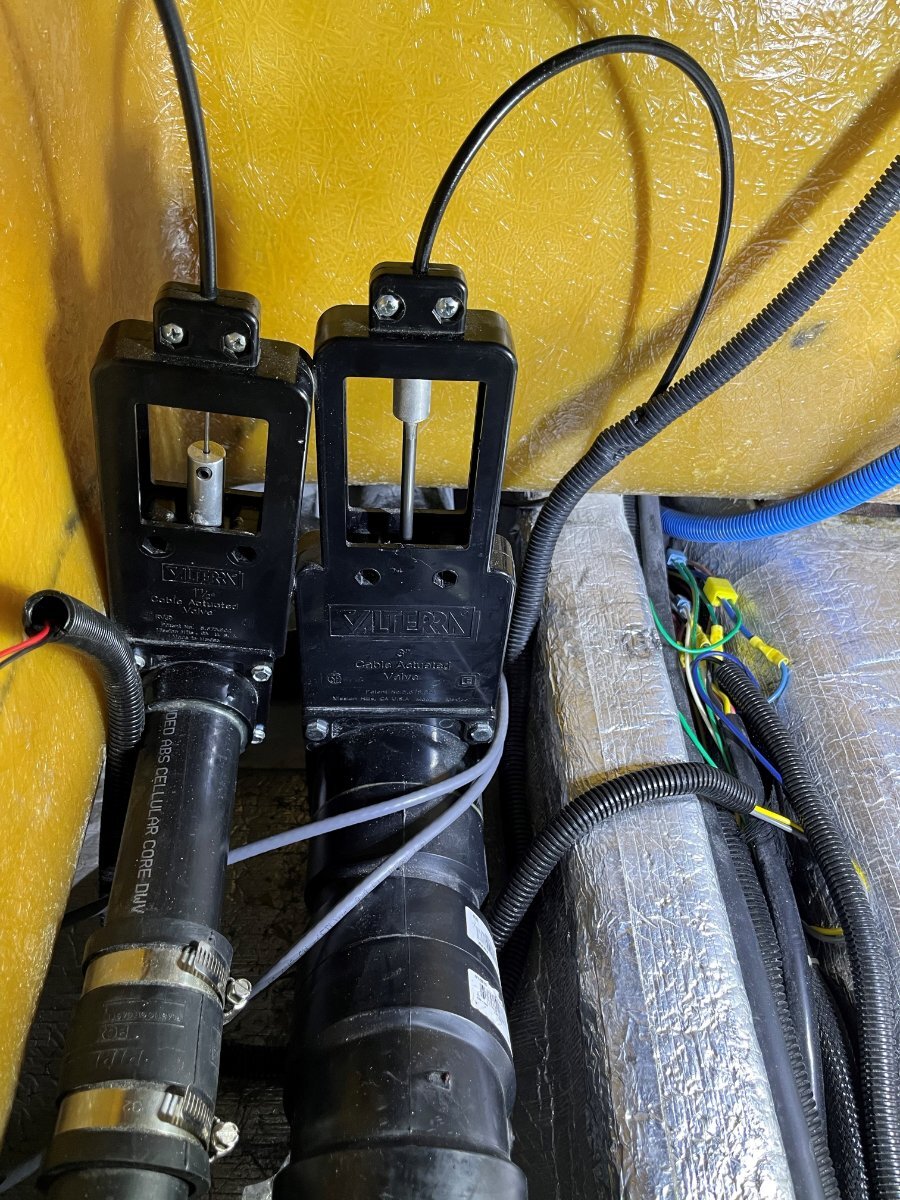
@Galileo I'm starting to feel your pain here! I worked on the long cable going to the black tank waste valve. I tried to merely grease the two ends on the slide pistons with no improvement. Then I tried Mikes method. You need an 1/8" Allen key. The cable came out cleaner than I expected. I cleaned the cable with rubbing alcohol and then greased it as inserting with a silicone-based grease. It got stuck at the end, so I freed the cable clamp (two Phillips screws) from the valve and then it pushed through easily. It's maybe a little smoother, but... When I had the cable out it had two bends in it from the forced turns in installation. One in the middle of the length and a tighter radius bend at the waste valve end. Grease cannot help much with these acute bends. I tried working them out by hand with minor improvement. etrailer wants $50 for the 144" cable alone with mid-March delivery! I still have no idea which way I will go. At least I have time, as they are difficult but still functional. This installation is crude (see pic). Besides the hard angles in the 12 ft cable, the two valves are on top of each other, angled towards each other and rubbing. They also could have mounted the 3" valve on a 45 degree angle so that the cable did not have to turn a full 180! And all they had to do was to install the 1 1/2" gray valve further forward. It's also rubbing hard on the fiberglass wall. To install electric valves on either of these, I would have to move the gray valve and replace the black pipe, from the rubber joint to the gray tank. Val, on your newer hull OTT must have done better work or something was different for you to have the room to simply install the motorized valve. BTW, nobody should really worry about adding extra splices, though I have removed many of them in our hull. Another thing you can see in the pic is all the crimped butt connectors and they were used all over the basement! More reliable than a 3M Skotchlok which should only be used by backyard mechanics adding aftermarket accessories, never in a factory installation. I hadn't noticed any of this until I got into it! More to come, sooner or later...
1 point
-
I totally agree. Have the replacement receipt to prove I was glad I have and USE that breaker when not charging Ollie. See below. Unless you are off roading and/or other people are using your truck hauling gear and pilots up mountains. My Anderson 175 Amp connector is mounted under and in front of the rear bumper. I figured that It could not get damaged there. WRONG. Apparently one of our drivers was jacking the truck around a very tight corner and backed into the mountain. Due to the angle of the mountain, he did not bump the bumper, but he SURE DID tag that connector. Fortunately I don't off road with the circuit breaker energized. GJ1 point
-
Ron, your installation is exceptional! I may be wrong (like my previous assumption) but I think the DC-DC charger would sense the alternator is not running, not pull current from the starter battery by sensing voltage (not near 14V, instead under 13V). If not, why have a DC-DC charger vs. a hardwire connection of starter to house batteries? Yours is safer (redundancy being a good design principle). I was first thinking ANL. John showed me the resettable fuses last week. I had not seen these used in automotive applications before. They did not look to be substantial in design. I went with Marine MRBF instead since they should make for a simpler installation than mounting an ANL holder. https://www.amazon.com/dp/B0BR4X7ZP5?ref=fed_asin_title&th=1 I still feel, yet there is considerable contrary opinion here, that the frame ground is as good as running another 20 ft of 4 AWG copper. I will also wire short redundant 4 AWG leads from the battery + directly to the alternator and from the battery - to the front of the frame. We'll see how many amps I get in and out of the Orion XS 50A DC-DC charger. Hoping to get mine installed next weekend! 😂 Of course, I will author a post on my installation with pictures.1 point
-
Thanks, JD, I hooked the Andersens together and voila, the charger powered up and became discoverable. It detected zero charging as the truck was not running and after startup the charging parameters showed readings and then I put in the remote on/off link and all seems to be operational :) It was defaulted to lifepo4 batteries...yay!1 point
-
True. . . but they were terribly misleading because the circuit is energized directly from the battery, regardless if the alternator is charging or not. Think of it like a jumper cable connected to the battery, if you were to brush the red cable against any grounded surface of the vehicle then you're going to have big sparks like a welder . . . before any thermal fuse will blow. A circuit fused at 60 amps has significant potential and I think it would be somewhat negligent not to have a quick and easy means to disconnect it, as is the law in other applications. It’s straight off the battery, always energized, running the length of the vehicle, with a connector exposed on the rear bumper. Most mechanics wouldn’t have any idea what it is, and may not take precautions to avoid it. I love @Tom and Doreen idea of using a high amperage switch instead of a breaker. The switch is more obvious and it would do a better job at alerting someone of a high potential than might need to be shut-off. I’m keenly aware that I’m too forgetful, and I may not always be around. Cheers! Geoff1 point

.thumb.jpg.e34bf01ef7f7d5e99ad31856d45afbeb.jpg)


-
Recent Achievements
-


")


")
