Leaderboard


Popular Content
Showing content with the highest reputation on 04/05/2025 in all areas
-
Thanks for the quick response and information! Yes... we are going to be at the rally this year (site E-03) and only the second time we've been able to make it since we were there in 2022 right after buying our Oliver. We are almost as excited to get this new truck as we were to get the Oliver! We won't have it at the rally though... delivery isn't until late May... but trying to line up all our truck bling so that we can have it all ready! Also getting a Smartcap Adventure to keep our gear a bit more protected back there. Lets be sure to hook up because I have lots of questions... and you can tell me all about your Alcan springs also! (I have to say this carefully so as not to get another 20+pages started on the subject 🤣) We CAN NOT WAIT to see everyone at the rally again!!3 points
-
In the past (this is our 4th rally) registration typically closes before the rally begins. It appears the deadline this year is April 1st. This is usually to get a head count for the opening ceremony dinner, a rally ‘swag bag” name tag lanyards, and a 2025 Oliver Rally t-shirt. You will likely register at the Gathering Place up on the hill. Plenty of parking if you choose to drive up to register. Here -https://olivertraveltrailers.com/events/oliver-owners-rally/ Hope to see you there! 🇺🇸3 points
-
If you really want to attend - Call Oliver first thing Monday morning at 1-888-526-3978. Good luck! Bill2 points
-
The deadline was April 1st. Just showing up would not be a good idea. I would suggest calling Oliver. Deadlines are for a reason, especially for the dinner, which is based on those that registered by 4/1/20252 points
-
It’s my understanding that the Oliver Seminars, dinner and door prizes are for prepaid registered rally members only. Registered attendees receive a lanyard style ID which identifies attendees as a prepaid rally member at the registration area. If you walk or drive over to the Oliver registration area after you check in at Lake Guntersville SP front desk, the Oliver staff will gladly answer your questions on attending seminars. I don’t know if they allow late registration. Maybe an exception can be made, a great question to ask the Oliver staff. Registered or not, I think you will be glad you attended. It’s a great time to meet a lot of super nice Oliver owners and maybe make a few new friends and learn about how others have added modifications to make their Oliver their own.2 points
-
Hey Gary, when you reply to a 4-year-old post, chances are low to get a response. Looking at MJ’s profile, his last time logged into the forum was 3 years ago. He likely sold their Oliver back then. JD2 points
-
Hull #527 ready for carrying bikes! After the factory tour, I wanted a bike rack receiver hitch but NOT the one they sold. At the time there was not a safe option for an 2” receiver. After buying a used LE II, I decided to look for a good welder. I am happier than ever with the way this turned out and at a fraction of the price.
 1 point
 -
We can't answer that. I would call Oliver. The opening dinner is based on the registration, as is the registration package. You should be on the phone with Oliver.1 point
-
Make total sense JD. Thanks for letting me know.1 point
-
Hey Dave, Great choice on TVs, I really like the 10 speed and of course the engine brake especially on roads like the Teton Pass with 10% grade. Ford nailed it with the engine brake and 10 speed transmission. My particular Super Duty has the Tremor factory lift which if I recall is approx 1.5-2” depending on your tire size. I also run Nitto Ridge Grapplers. My recommendation is that you order the 8” drop and you should be fine since the standard SD does not have the factory lift. I do have another Aluma trailer that I use for various utilities. So the 10” drop with my trucks lift serves me well. I highly recommend this to keep things quiet when towing. - https://www.hitchclamp.com/pages/videos It works great. Are you gong to be at the Rally? If so let’s get together and talk Super Duties! 👍🏻 If you have any other questions shoot me a PM, glad to help. -David1 point
-
Patriot- I did a search and your post was exactly what I was looking for! I'm upgrading my truck to an F-250 Super duty Lariat 6.7L Diesel...and I was considering exactly the hitch you bought. Because I don't have the truck yet... I can't measure it up to determine which "drop" to get and ensure our Ollie rides nice and flat. Did you need the 10" drop to make that happen... or do you just have multiple trailers that require it? I see that the hitch comes in several drops... 6", 8" and 10" drops also.1 point
-
Yep, on the Oliver side, 4 AWG everywhere, front-to-back from the Anderson connector to the rear dinette area. B+ to the Orion in and B- to the ground bus. The Orion B+ out to the new HD +bus and the Orion ground to the Oliver neutral/ground bus directly adjacent to the harness ground. On the TV B+ all the way to the battery. B- to the rear frame. Then two short runs at the starter battery, B+ directly to the alternator and B- to the front of the same frame member as grounded at the rear. Remember, I got 30A charging when the Orion was set to 30A max and I got 40A out when it was set to 50A, with Cummins diesel idling at 800 RPM. We're leaving tomorrow to camp at the NW corner of the Prescott NF. If the road is good, my plan is to camp west of above the Apache Creek Wilderness area (see map). For 20 years we've gone dirt riding in the Prescott NF at the Sheridan Mountain-Smith Mesa OHV area and up to Camp Wood. This time we're heading further north and we do not plan to see a sole once we get up there! Should be an awesome adventure and we also have a brand new Starlink Mini to try out. Plan to activate service today. It will be my first driving test of the Orion 50A charger. There's only 23 miles of paved road at 45-55 MPH, then about 25 miles of dirt, 90+ minutes one-way so not much time to charge. Chris will check the Victron Connect app as I'm towing. We'll get a picture of the charge rate while towing. These are the Motor Vehicle Use Maps that they have of all NFs in Arizona. Not sure if the neighboring states have these or not. Wherever you see dots alongside the Forest Service (FS) roads dispersed camping is allowed. The trick is that some FS roads are good enough to pull a trailer and some are NOT! We'll see when we get there. 🤣 County-5 is Williamson Valley road out of Prescott which is a well graded and maintained road after it turns to dirt. County-125 heading west through Walnut Creek should also be a graded road and I'm hoping that the offshoot FS roads in that area are passible and not blocked by fences since there are patches of private land here and there (the white-out areas on the map).
1 point
-
The early registration might have only included a smaller set of sites. I’d go ahead and try to grab a site. It looks to be a pretty big park, we haven’t camped there yet. I should start another signature map with just Texas State Parks!1 point
-
Hi GJ, Wiring from my vehicle is all 6 AWG to the charger and wiring from the charger to B+ and B- busses are all 6 AWG. I could have used 4 AWG if I trimmed some strands to fit receptacles on the Victron charger but I chose to use 6 AWG on advice from installers. The terminals on my 30a Isolated Victron (4 terminals) will allow up to 6AWG, thus the need to trim strands if larger wire is used. I'm certainly not an expert in this area but this is the way I ended up installing everything. Hope this helps. John1 point
-
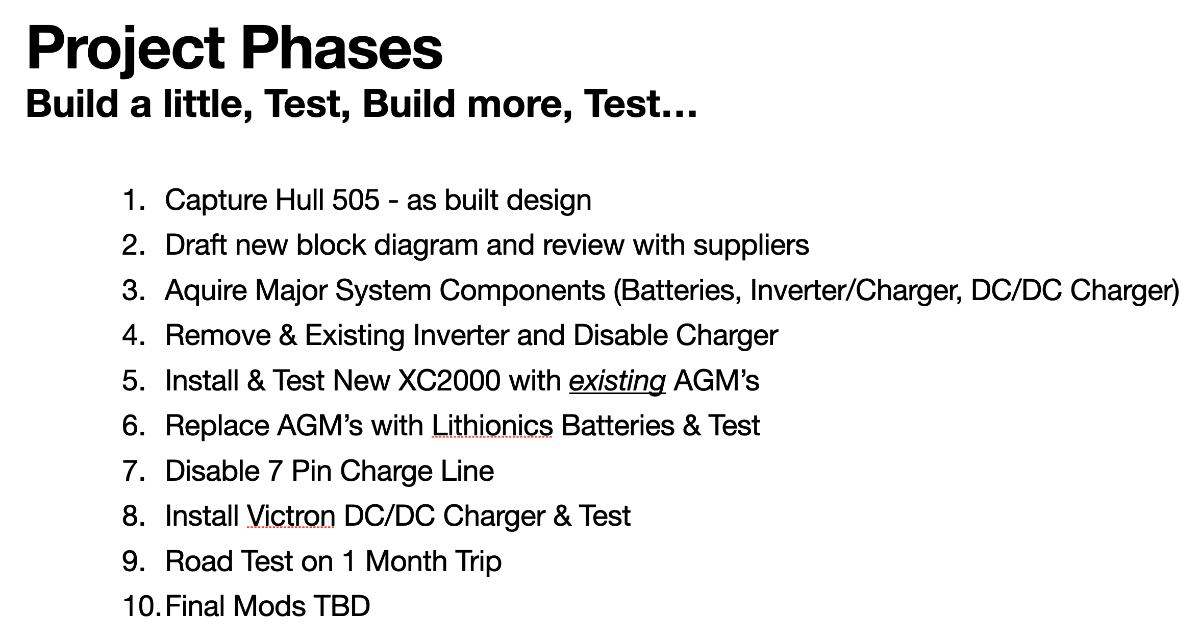
Try reading my upgrade article here... In it I describe all the steps to an upgrade - Also - check my personal message I sent today. Full Article in our Blog Here: https://4-ever-hitched.com/ggs-blog/f/lithium-battery-upgrade?blogcategory=Electrical+Upgrades Slides of the upgrade & Pix in this PDF: 12V Layout.pdf Craig - Hull 505 - (Galway Girl)
1 point
-
My 3” hitch clamp arrived today. I decided to cancel my order with Amazon and order directly from Hitch Clamp for a much quicker delivery. Very impressed with the fit and finish of this product. Zero play or movement with this robust clamp. They also gave me a Veterans discount. 🇺🇸👍🏻 https://www.hitchclamp.com/collections/3-clamps
1 point
-
this table shows settings for various lithium batteries. The red is for 2 large Lithionics using the 2000 watt inverter. Hope this helps.
1 point
-
Rabbit Hole: OK... how about jacking up one side with the rear levelers, remove the rims on that side (take them with you where ever you're leaving to), torque down a keyed lug nut on one or more studs on the rimless wheels...? I'm thinking that would really slow 'em down.1 point
-
Thanks for the message "bump" . . . . . yes, the holidays have been busy and I've not been monitoring the forum much . . . . barely keeping up with my email! I'll try to do better. It's been a while since we (my husband) installed the new 3000w inverter. What JD says is most important: disconnect all power sources (Jason outlines what/where to disconnect in the attached instructions). I don't know if it was necessary, but we also disconnected the solar controller. Our 2021 has a cutoff switch in the compartment over the street side bed on the outside of the pantry wall. It's a big red switch; you can't miss it. Oliver Support (Jason) helped us through the entire process, stepping in when Xantrex drug their feet in resolving our issue. Attached are step-by-step instructions, as per Jason. While the task seemed daunting, at first, it really wasn't bad at all; having written guidance made all the difference. Though Oliver offered to walk us through the entire process, via phone, we found the attached instructions very straightforward and easy to follow. My husband has some experience working with electrical things, but we are hardly what you'd call professionals. I'll try to recall a few of the intricacies of our installation and offer tips to avoid the minor problems we did encounter. 1. As you have probably discovered, the inverter is not situated in a way conducive to replacement. 1. Remove mattress and prop open the hatch to allow the best access to the inverter. 2. Our inverter was held in place by 4 screws at each corner, to the inside wall of the bed base. You'll be working upside down and from the street side in a dark hole; make sure you have good lighting. 3. We utilized our phone to inspect and take pictures of the installation prior to removal. 4. IMPORTANT: absolutely lay a cloth, or something on the floor under the inverter to catch any dropped screws; voice of experience, "there will be dropped screws!" The phone camera also comes in handy here. 2. The only other issue I recall encountering was something Jason neglected to mention. Because Xantrex was not willing to send us a new inverter, our replacement inverter came directly off Oliver's shelf. Having not been handled by technicians, it was programmed, as from the factory, with default settings. Once you have the new unit installed and communication established with the remote panel, you will need to go through the programming and adjust it according to your specific installation. I suggest you contact Oliver for the proper seettings. Once the new inverter was installed, everything worked as intended. As for the annoying fan noise, I can't say, difinitively, that the new installation eliminated the constant cycling on and off of the inverter fan while connected to shore power (charging mode), though it does seem to be less annoying than before the replacement - maybe we are just getting used to it! Don't hesitate to ask Oliver tech support for guidance . . . . . you can do this! If you have any specific questions, don't hesitate to ask. Susan Oops! Forgot to attach file: Steps to remove old and install new Xantrex inverter.docx1 point
-
Follow-up: I emailed Anita to ask if, despite the reported standard practice, the production folks could be asked really nicely to record the model and serial numbers of installed appliances just for us when they build our Elite II. She chose to call me with the answer. Anita reported that Oliver now uses what she called the "IDS" system, which digitally records model and serial numbers, by hull and VIN number, for appliances installed in trailers now being built. She advised that serial numbers can be retrieved from the IDS system by Oliver service techs upon request. She suggested I call Oliver's service department to request the model and serial number should any installed appliance ever need warranty service. As I told Anita, I plan to ask for a printout of that IDS data when I pick up our Elite II. The take away: open a service ticket, and call Oliver service to request the serial number, for any installed appliance which requires warranty service. If any of you actually do this at some point, I would appreciate a report via this forum on how it goes .1 point
-
In my second O&M manual, which has all the component in it, I printed out a index for the book. In the index, I have placed model numbers and serical numbers.1 point
-
Tip: If I remember correctly, I located the sticker using a mirror, then put the phone on selfie mode which put the screen facing up so I could tell if the lens was picking up the serial number.1 point


-
Recent Achievements
-


")


")


")

