Leaderboard


Popular Content
Showing content with the highest reputation on 01/18/2026 in Posts
-
I might be ready to buy a used Oliver Elite II (older than 2022) twin bed by June or July. (Fingers crossed) I've been researching the Oliver for at least two years now. I had to do some other things first. Got my master's degree and started developing an online biology course for high schoolers (I'm a teacher). It's time to find an Oliver. I've owned campers before and love life in the outdoors. It sure would be nice to find one with special features for off-gridding. I will be networking to speak with anyone who wants to sell their Oliver come summer time. I'm not interested in going through a dealership, though.3 points
-
Mike, Please turn a ticket in to Oliver Support as category of structural failure/battery box. My repair has held since 2022 when I turned in the ticket. I followed specific Oliver instructions on my repair as I was too far from the Factory for a repair. I've also had Oliver inspect each time I go back for service...and so far it's held in place. Craig3 points
-
Just found this thread, similar issue. https://olivertraveltrailers.com/forums/topic/7089-battery-box-repair/#comment-1094443 points
-
A thread on "cracks" at and/or near the battery box was posted a number of years ago. But, as I recall, these cracks were generally in the exterior hull right at the corners of the battery box. Have you looked at the "support post" that is between the hulls directly under the battery box (approximately in the bottom center of the box)? Bill3 points
-
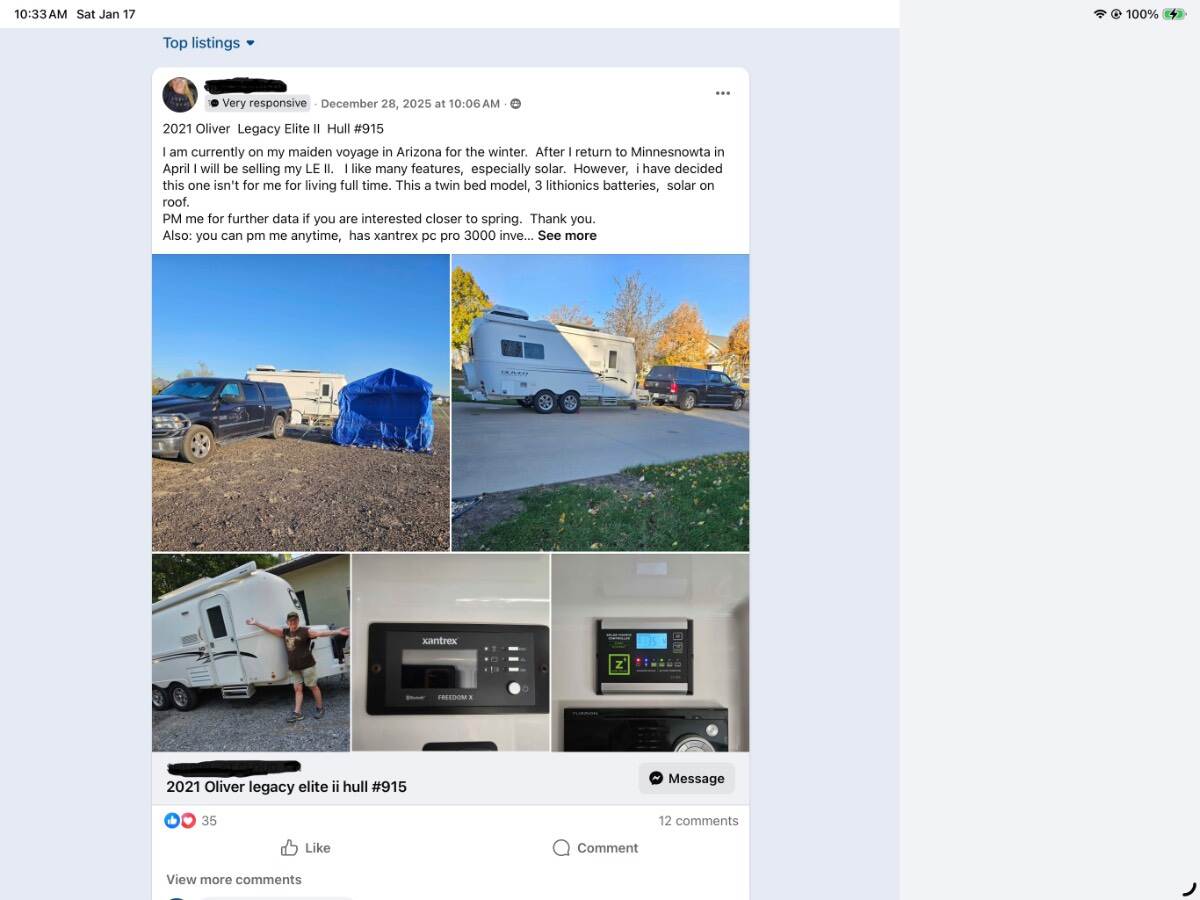
I am taking steps to have cash in hand and watching Facebook. That one in St. Cloud MN just might be the one! And it's close to me (ND)! I'll reach out with a message. Thanks.3 points
-
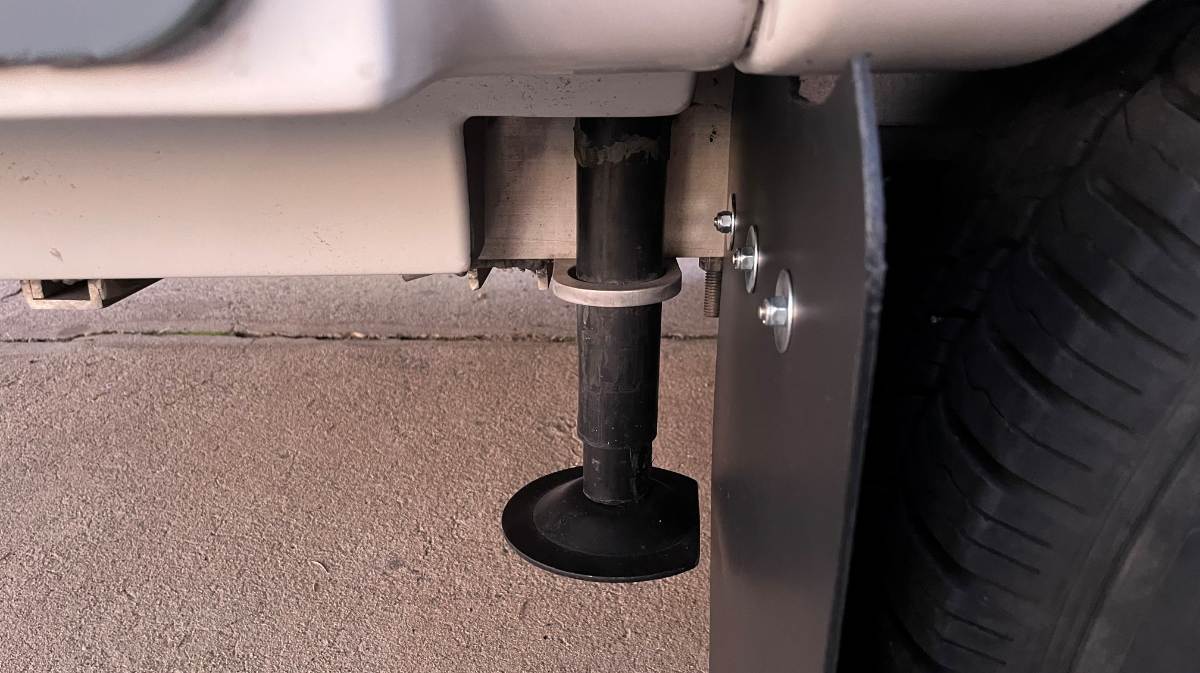
I cut the base of each rear stabilizer jack to have one flat edge. This allows more room for the flap to arc rearward while towing and so the flap material is not always hitting the same point on the arced edge. I don't believe the strength of the part was reduced much and these parts are readily available. I already have one spare! Use a 10" steel cutting blade on a chop saw and this is quite a strong piece of metal. By the time it cut through it had melted a ring into the plastic plate below. Filed the edges smooth on my bench grinder and steel brush. I may hit the open edge with spray paint later. So, the right side is done and I'm very happy with it! 😎 Several views to follow...
 3 points
 -
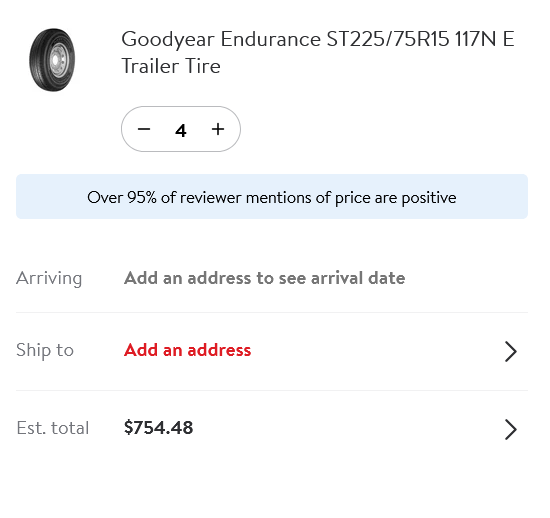
Welcome @TravelWell If you have not already done so keep an eye out on the FB Oliver Travel Trailer For Sale by owner page. There are some really amazing deals that pop up occasionally. I attached a screen shot of one that recently -posted. It’s highly recommend to have cash or check in hand as well kept and maintained Olivers move quickly. Disappointingly to many present forum members/owners, Oliver TT removed the ability for an owner to sell their Oliver on this Fourm. 😏 The concern it would impact nationwide dealer sales. It’s come to pass, that the dealer network really did not take off as planned and is all but limping along sorta of. Many of the original dealers selected are no longer selling or servicing new Olivers. Fortunately Oliver Service in Hohenwald is still servicing Olivers. The good news is as a result an Oliver Travel Trailer For Sale FB page was created. Turns out for those of us that use FB or FB market place now have an even better and easier media to reach out to as prospective buyers interested in purchasing or selling a well maintained preowned Oliver. You will just have to trust me when I say you can SAVE tens of thousands dollars off a new Oliver. Be patient and be ready. Also just beware of Olivers that have little to no actual documented service history. Many owners service their own Olivers as we do. We document everything we do on a spreadsheet to include logged miles, upgrades or mods or any maintenance or repairs completed by Oliver Service. Olivers in my humble opinion and 6 yrs in of long distance travel experience are the best Travel Trailers made. Like any camper they do require regular maintenance. Welcome, do ask questions, and all the best in your search for an OLE2! Edit 01/20/2026- Please note that I have redacted the contact information on the Oliver Travel Trailer Owners FB page for the previous photo in this post. I don’t want anyone “confused” thinking my in intention was to start a classifieds post to sell preowned Olivers. My sole intent in my original post was to only provide a quick screen shot or example of what an FB Oliver TT for sale by owner page looks like to @TravelWell. Advertising or attempting to sell an Oliver Travel Trailer on this forum is not allowed per Oliver Travel Trailers Inc and forum rules. See attached photo with newly redacted contact information of seller. Thanks!
3 points
-
Craig, yes I turned in a ticket this morning. Reading through what you did I might be marginally able repair it. I’ll see what Oliver service says when they come in to work. I would like to talk with you when you have time. I saw your PM. Thanks. Mike2 points
-
If the wiring is correct, also thought there may a loose or bad connection in a cable, but the current draw looked even across all the batteries. The minimum torque on my Epoch lugs is 70 inch pounds. Geoff gave me the torque in NM that I cannot find, but I had converted the minimum torque to inch pounds. When you go to Q, there will be plenty of knowledge there to draw upon.2 points
-
Reviewing this picture taken during installation, I'm pretty sure the new one is the outer one. Hard to see all the wiring though. But it really shouldn't matter! Two shorty 4/0 cables have negligible resistance. I'll soon see if I wired it incorrectly.
2 points
-
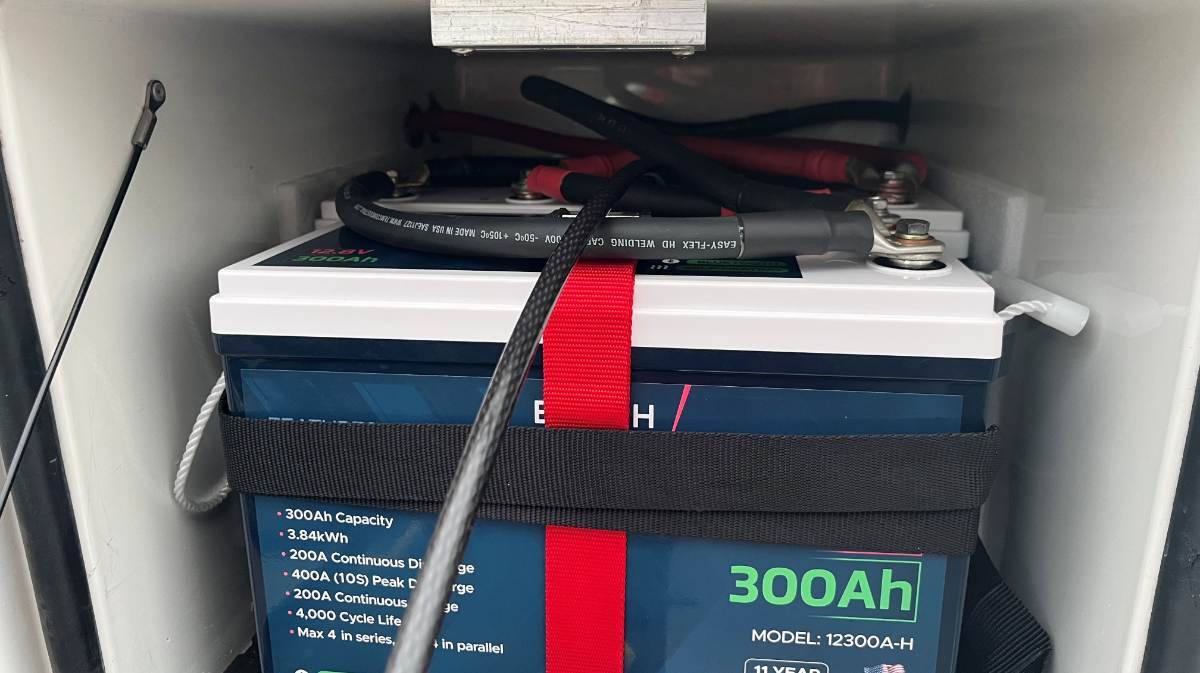
Thanks, Bill. I went and checked the individual cell batteries last night after reading your post. All 12 cells (4 cells x 3 batteries) were 3.2V (12.8 / 4). As far as the three being 12.8, as long as they are connected the voltage is across the set. You have to separate batteries to read individual voltages. Not sure why the BMS would report even voltage across all cells while showing one battery at 20% SOC and the others at 60%+. The new battery got down to 15% by 10PM last night, with our fridge still getting down to temp. I plugged into shore power and we have all three batteries back to 100% SOC this morning. Our Oliver friend Ken contacted me and asked if I had the wiring straight. I sure believe so but I'll check. He also suggested wiring the new battery in the middle (see pic, not directly connected to B+ or B- cables). Sounds like a good idea. Heading to Q tomorrow, so when we get there I'll pull the batteries out with all the Oliver experts and observers in tow at Dome Rock! 🤣 The new battery should be low again and I'll read with a multimeter when the cables are disconnected.
2 points
-
Yes that’s the old man slow poke method we’re all used to, but not nearly as fast and absolutely doesn’t seem to get the same depth of results.2 points
-
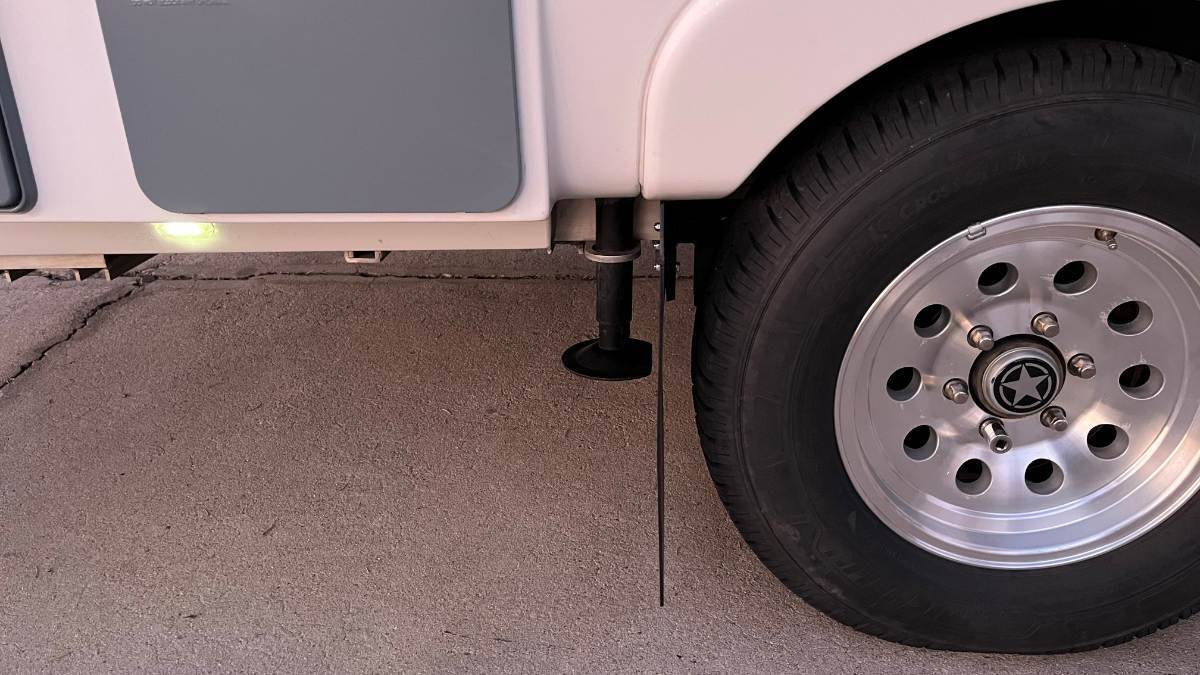
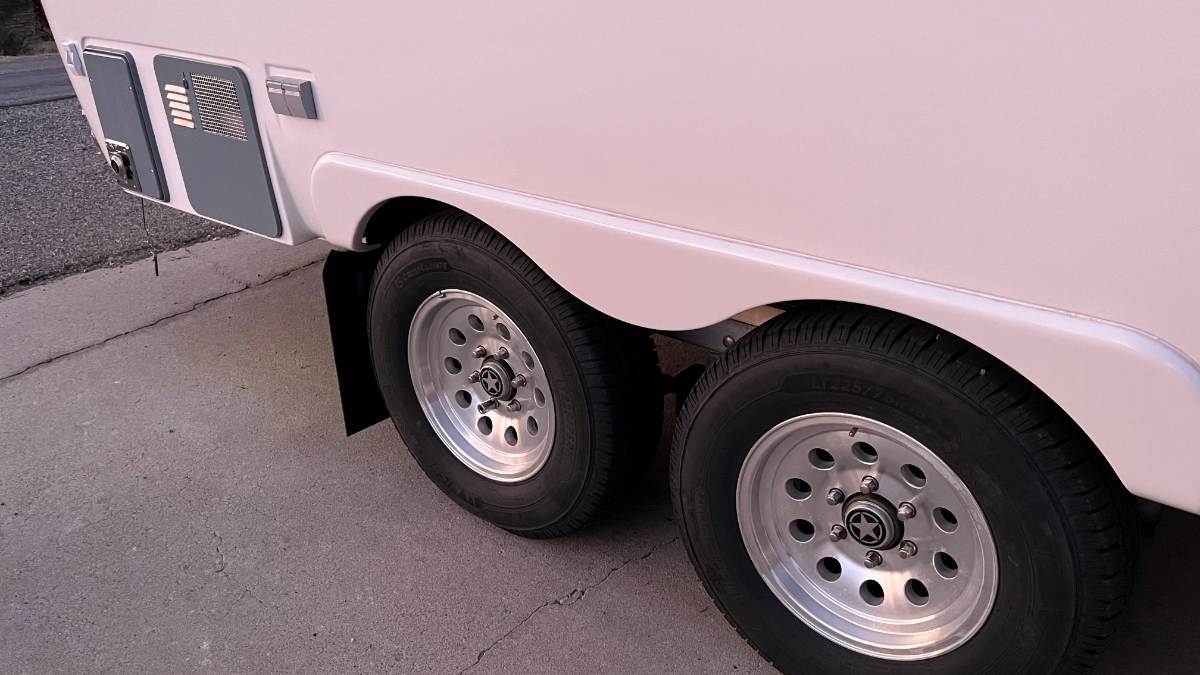
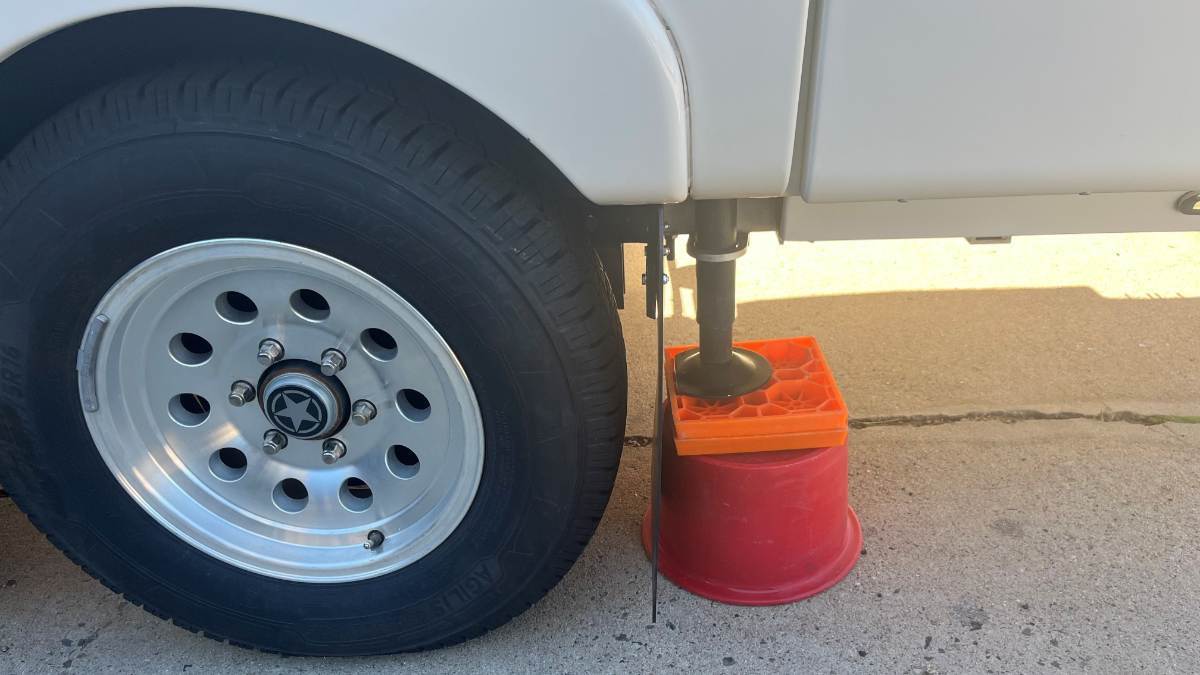
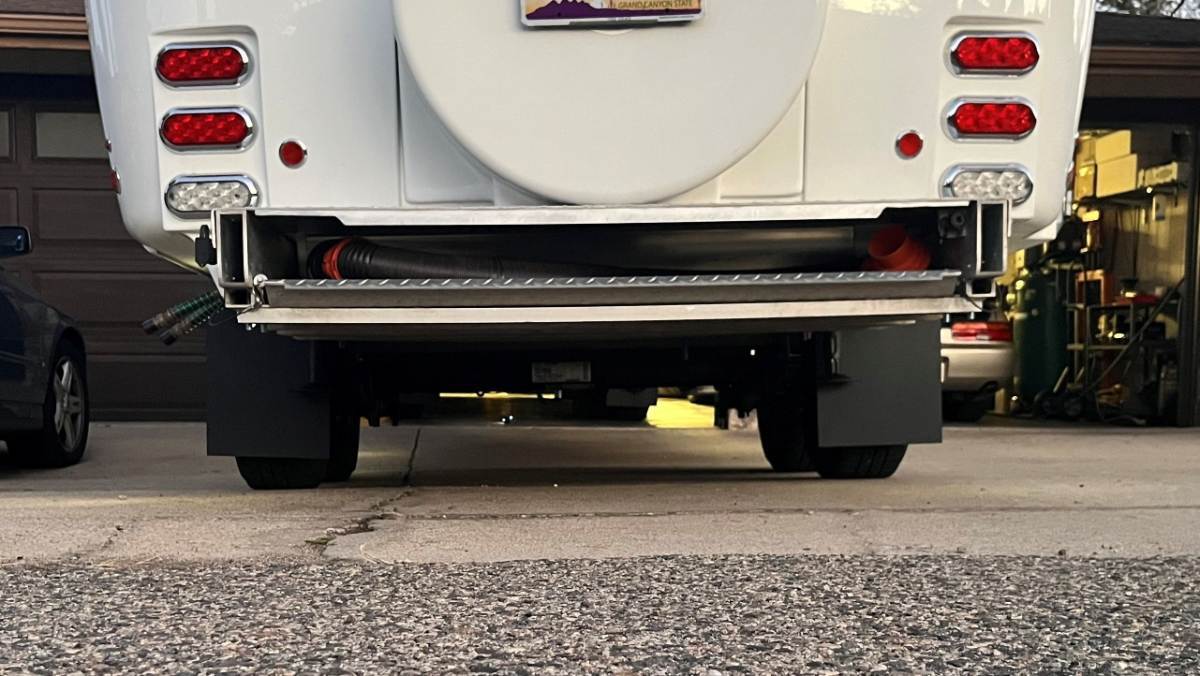
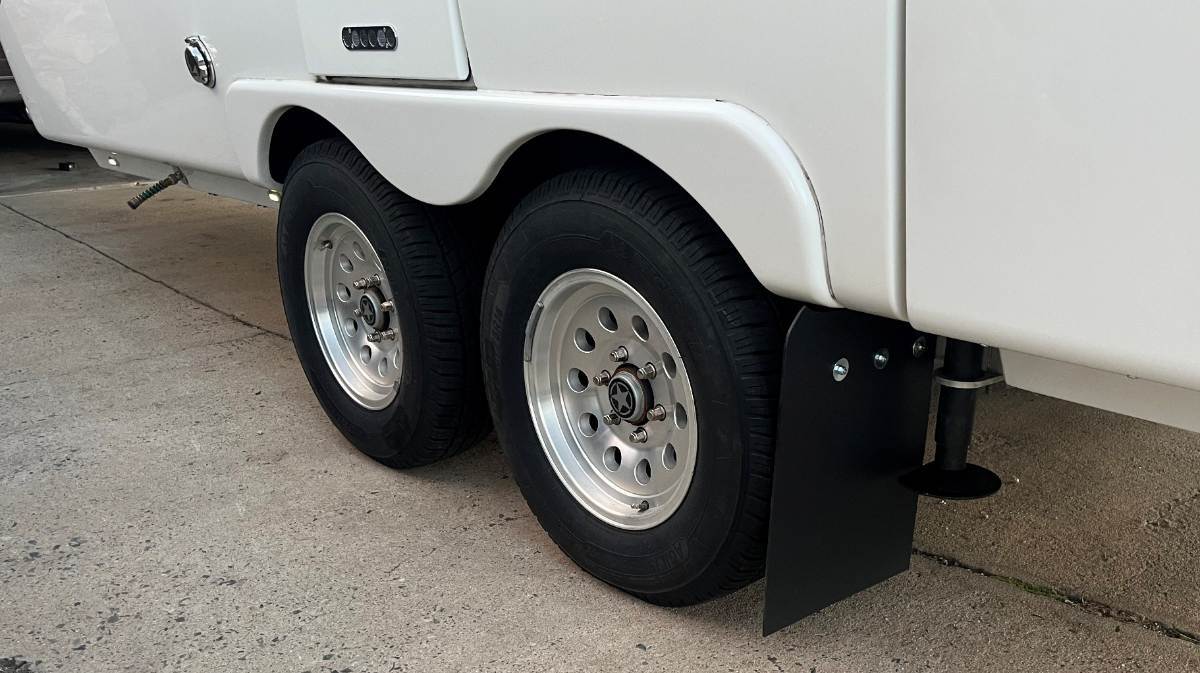
Time to repeat for the other side! Common thinking and my first thought was that I could turn the template upside and trace the mirrored view for the other side. Good thing I thought to measure twice. I positioned the cardboard stencil made for the right side and found I had to drill the holes about 5/16" lower for the left side. Who knows why except that only OTT could do so! Was a simple fix to adjust the drill hole placement, and otherwise the pattern flipped over was identical. Pictures show the streetside and how the jack fits with Andersen blocks, and the view from the rear showing both mud flaps (bumper off for polishing). Boy, I used to hate cleaning the road tar, grease and grime from under there! No more, just pressure wash the mud flaps! 😎
2 points
-
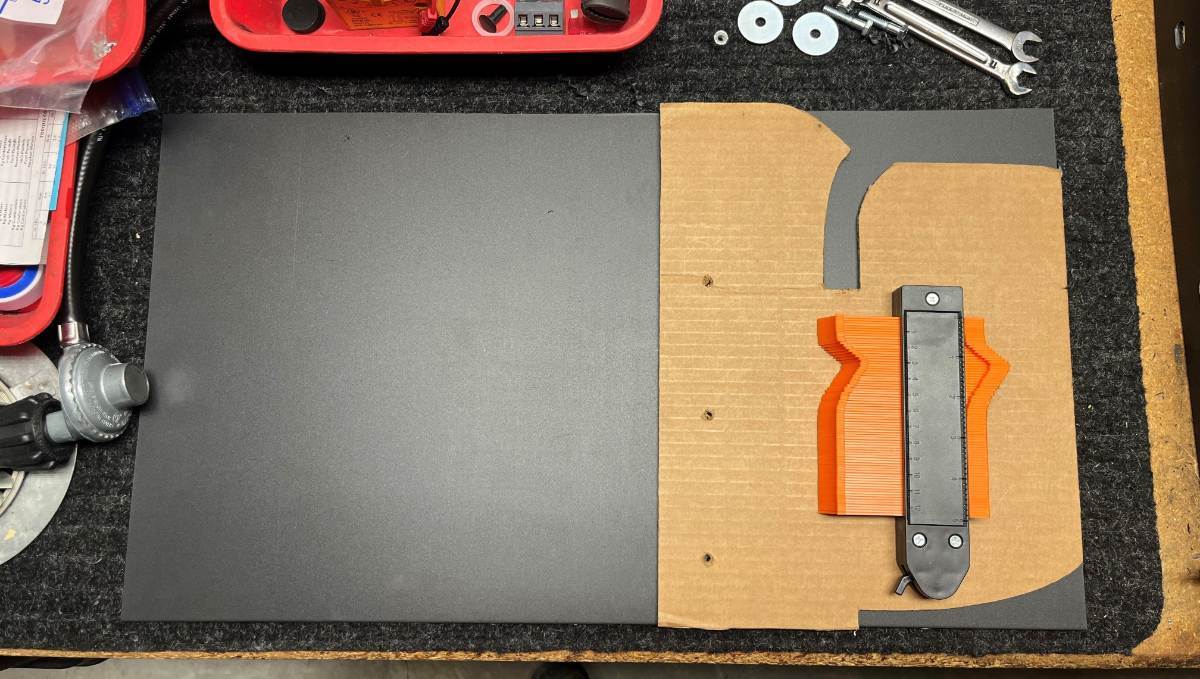
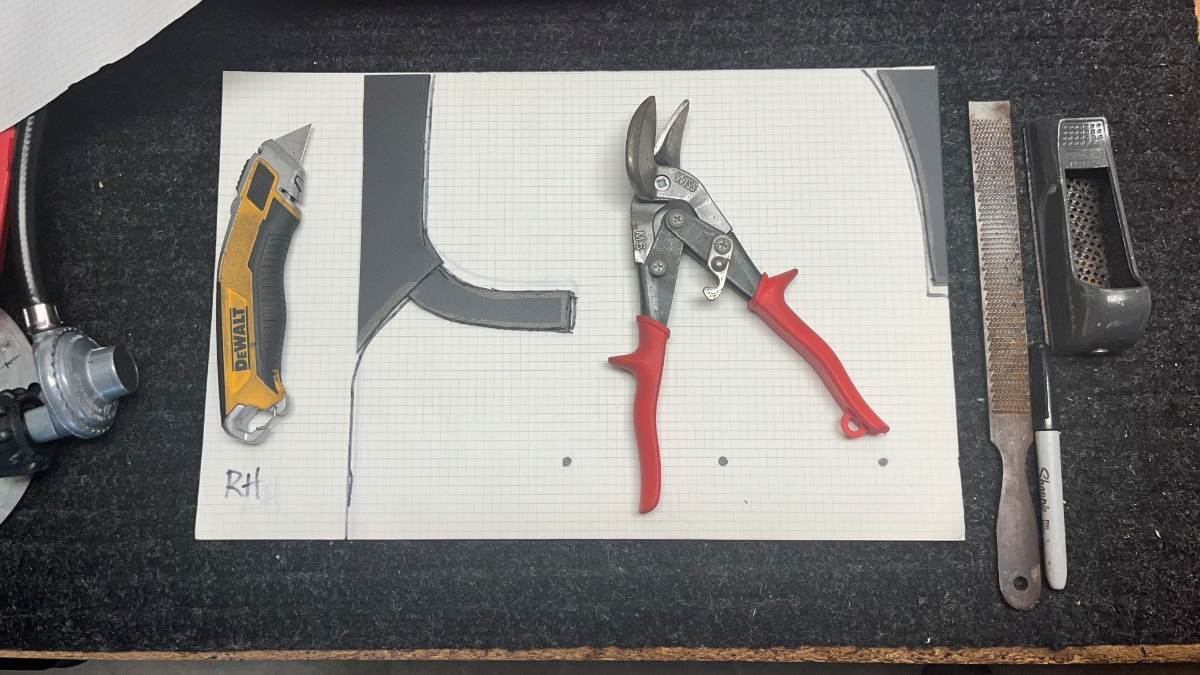
Next step; cut stock for the Oliver flaps. The stock was 24x36" so I cut every flap sideways making them all 24" long to start. I cut the Oliver 13 1/2" wide to stick out 1" beyond the tires and I made the area under the mounting bracket a 13 1/2" square which made the mud flaps sit 4" off the ground. It's too difficult to work with the full length of stock when cutting a pattern to fit around the curved body of the Oliver. So I cut a piece of cardboard 13 1/2" wide like the flap and 10 1/2" tall, the measurement from bottom of bracket to the top. I drilled the 3 mounting holes into the cardboard for alignment. I used the little curvy tool (stocking stuffer from Chris a few years back), took a few measurements and started to cut away at the cardboard making the opening longer and wider. I wanted at least 1/4" clearance above the fender and 1/2" below, so not to touch and to allow for cleaning the fiberglass. Another cut to follow the pattern of the inside wall until the cardboard was perfect. Then traced it onto the poly stock and cut some with a razor-knife and the sideways tin snips worked very well. Used razor blades, a grater block and files to clean up the edges, and voila! 😎 Afterwards, I traced the finished mud flap onto graph paper so I can share my template with our Oliver friends who would like to copy the design!
2 points
-
A locked wheel could burn down a flat spot like that in just a few miles. @topgun2 Bill was correct in noticing from the picture that you're running too much tire pressure and so is anybody running over 50 PSI in an LE2, PERIOD! Unless you have D52 axles and HD springs providing a 10K LB platform and you've added upgrades and tools, every possible Oliver cabinet packed full, so your Oliver is up to 8000-9000 LBS. I know one owner that fits this description, but most of us carry under the 7K GTWR. I'm posting this table for the 4th time on this forum. These are the tires we have, but tire makes are all about the same. What's important is the tire size you're running and the weight you're carrying. Sure go 5 PSI over, but 10-15 PSI over effects the trailer ride and will over time deliver unnecessary stress and strain to your trailer suspension and all components. 65 PSI on our four LT225/75R16 tires carries 4x 2,620 LBS for 10,480 LBS GTW! 55 PSI on our four LT225/75R16 tires carries 4x 2,290 LBS for 9,160 LBS GTW! 45 PSI on our four LT225/75R16 tires carries 4x 1,950 LBS for 7,800 LBS GTW! @John E Davies towed his Oliver for years at 42 PSI, I fill up to 46 PSI, and filling over 50 PSI is ignoring the science for superstition!
2 points
-
Wow - good research! I forgot about that thread - it appears to be exactly the same problem. Maybe Galway Girl would be willing to do the repair for you?😉 Bill1 point
-
I hope it works out for you!1 point
-
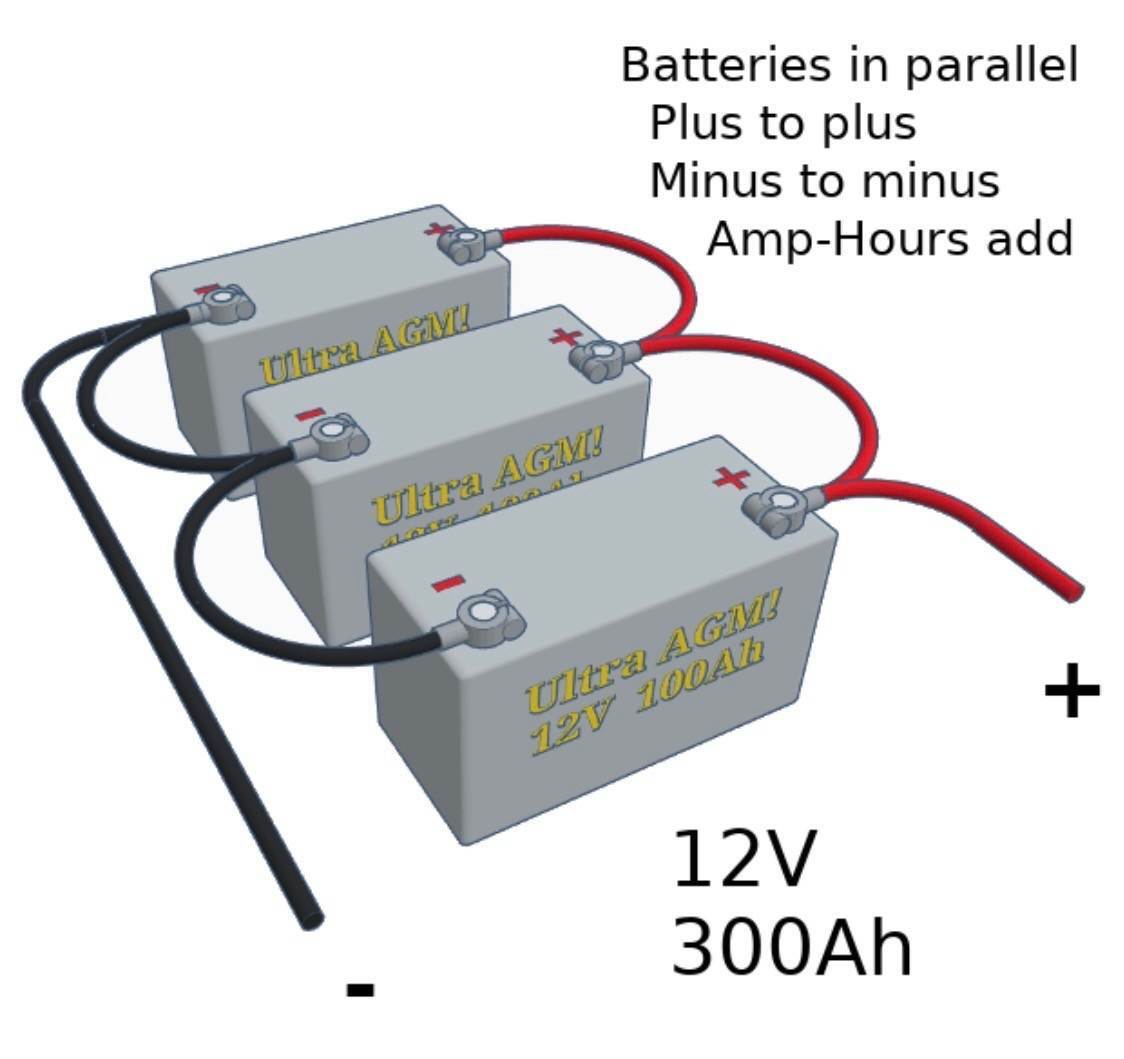
Bill, we were writing at the same time! Your "last in line" comment may be correct, TBD soon. I'm not wanting to add buses but will check the wiring (to be as pictured above) and wire the new baby in the middle, so not to be first or last in line. Thanks1 point
-
John, I'm just learning about Epoch batteries, are all the cells on Epoch 3 close to the same voltage on the Cell page? Edit: The more I look at it they are probably close to the same since the voltages are 12.8 on all batteries. Geoff in support at Epoch has answered all of my questions, so far.1 point
-
It took a couple days labor, but I take my time and enjoy the work! $50 in parts for both truck and trailer, you can't beat it. 😎
1 point
-
I replied to this question on your earlier post. The only preowned Oliver’s for sale social media site is the FB page I referenced. You may occasionally find an Oliver for sale on RV trader. Best of luck in your search for a preowned Oliver.1 point
-
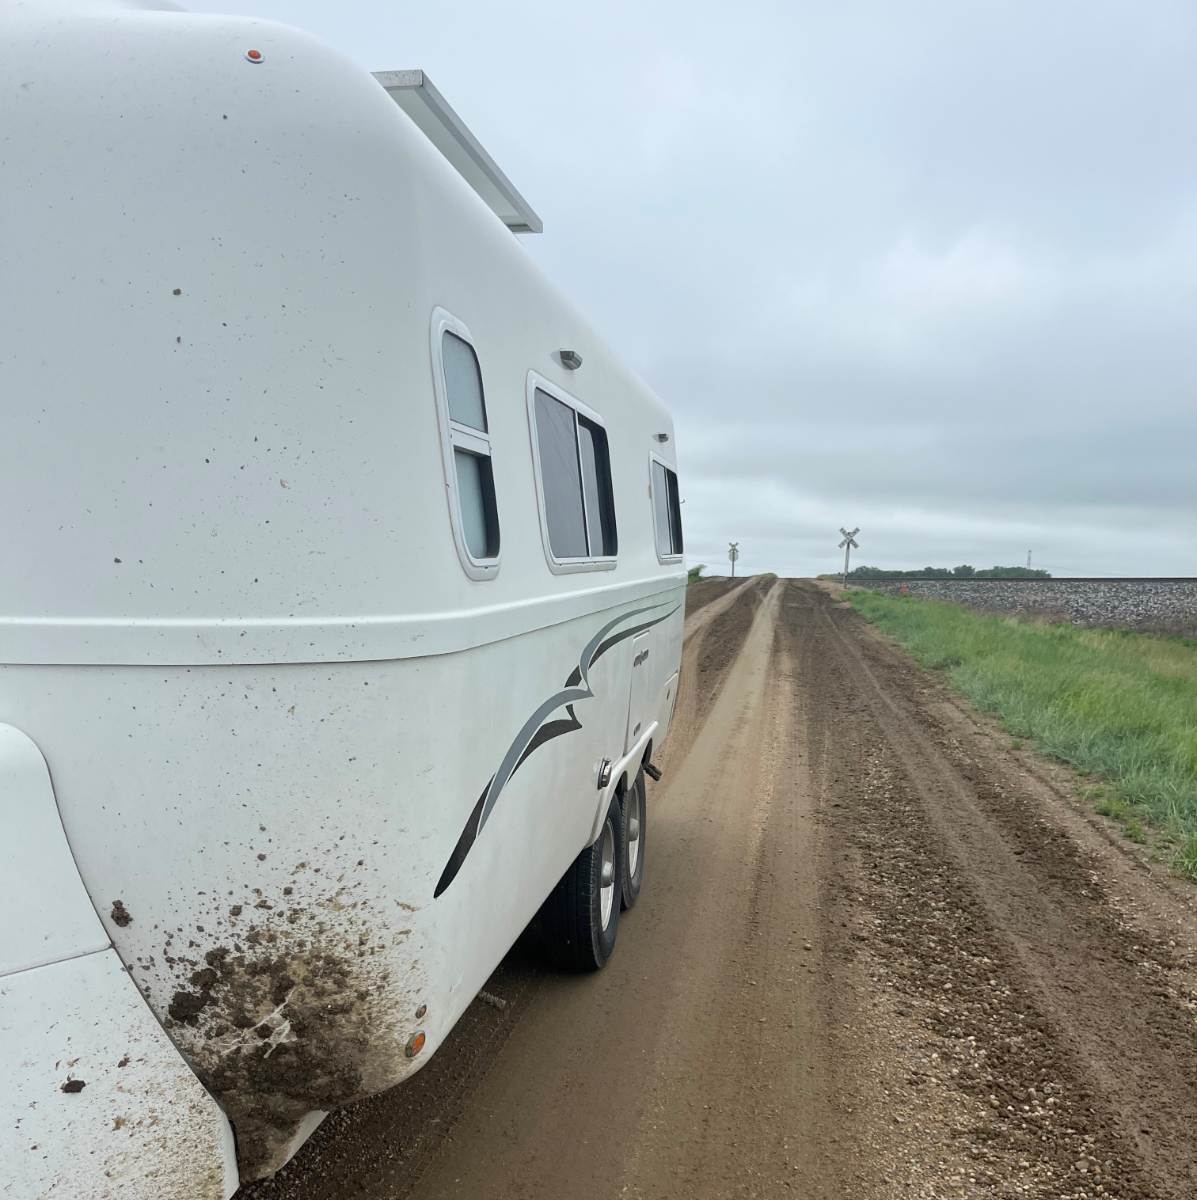
No more dirty Ollie!
1 point
-
Thanks again all. We stopped today at Marathon and got a new spare at Tire Kingdom/Mavis. They were awesome, we were in and out in 20 minutes and I would highly recommend the shop. We are now tucked in at Sugerloaf and no issues today. The mobile service tech is coming Wednesday afternoon, and I will definitely post an update afterwards. I will say that after I got past the shock of seeing the tire damage, my first thought was that I was running the tires with too much pressure. I appreciate comments from jd1923 and plan on researching this further. You know the whole trust but verify thing.1 point
-
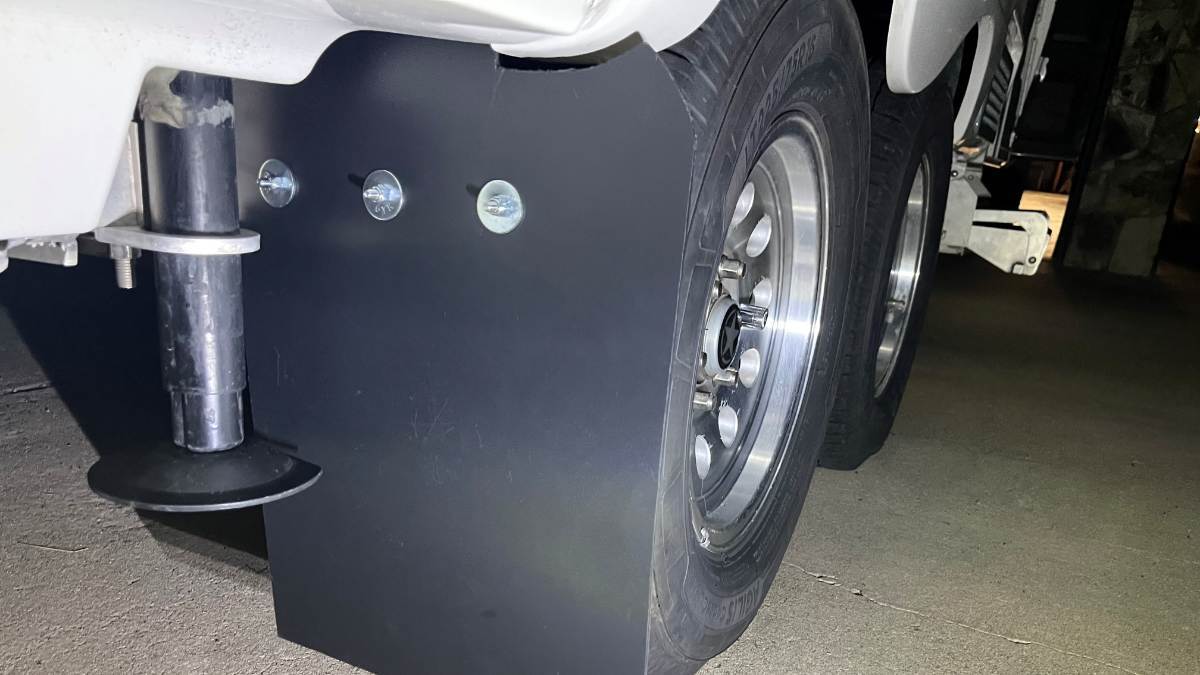
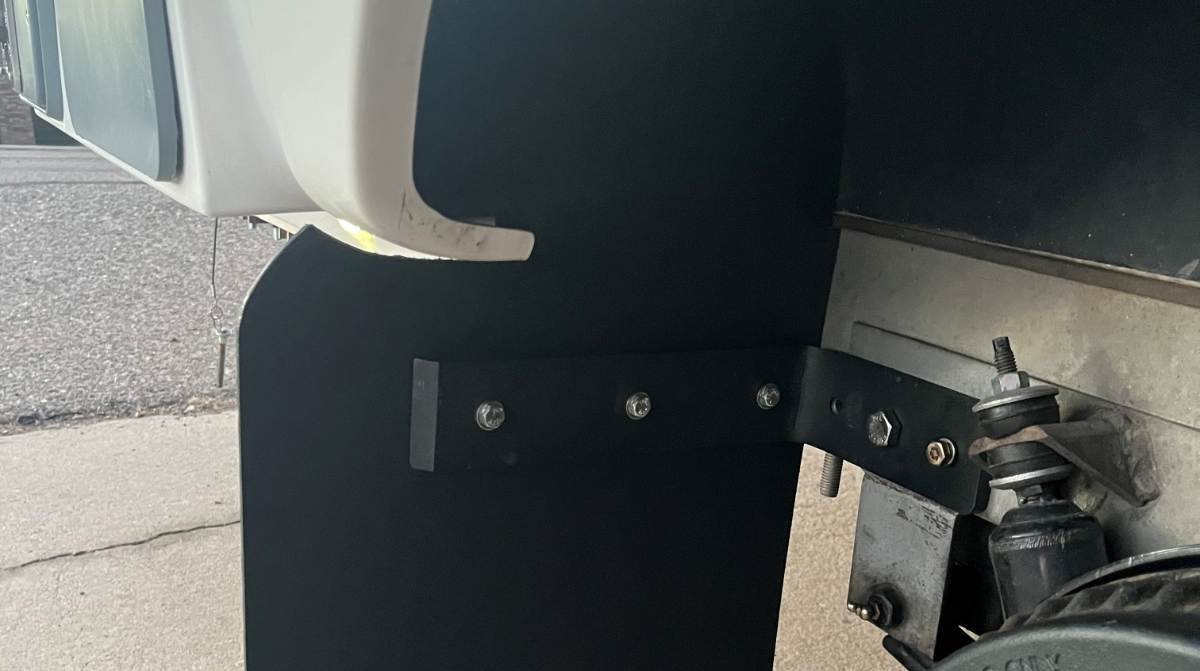
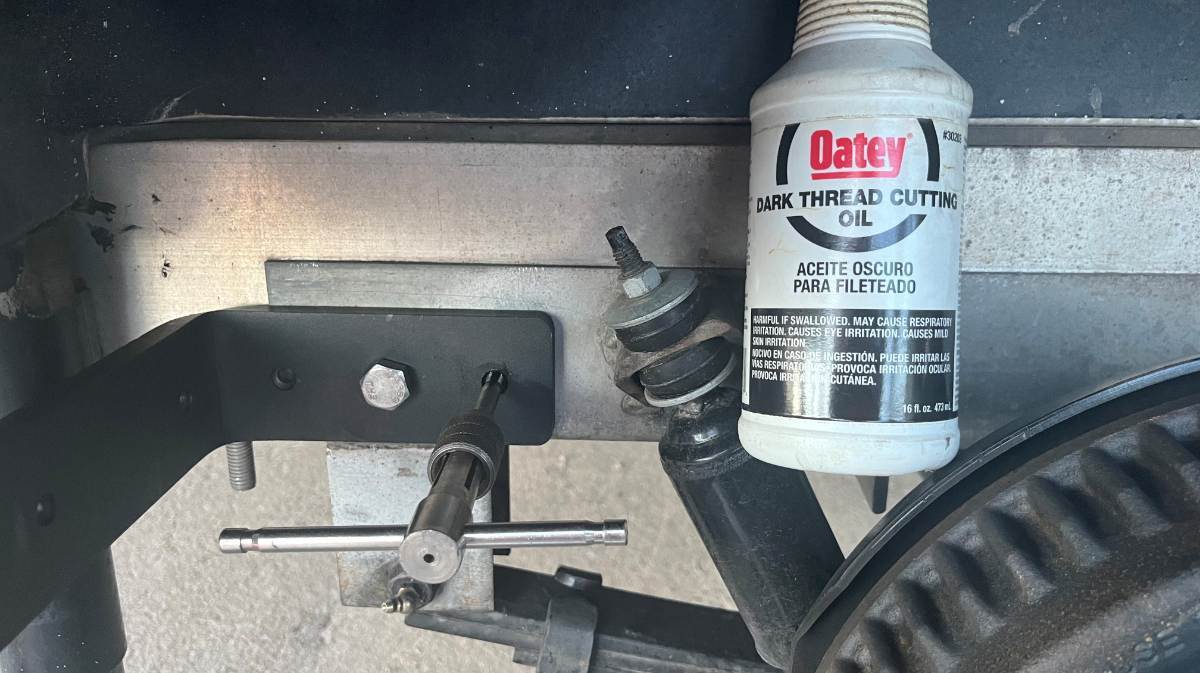
I understand most of you have good mud flaps on your TV, but on your Oliver? @John E Davies installed some on his Mouse back in 2018! Craig @Galway Girl did a similar installation more recently and maybe there are others. In the designs I've seen, the mud flaps were mounted behind stabilizer jacks where there is a frame cross-member, an easy place to bolt a horizontal mount. I was not happy with this design as it does not protect the full underbody behind the wheel, nor does it protect the stabilizer jacks from taking mud. My goal was to install a mud flap between the rear tire and the jack, but there’s only about 3-4" or space! I realized that with a fitting 90 bracket I could use a frame bolt for support. I removed the 3” carriage bolt that holds the rear of the steel suspension subassembly to the main aluminum frame. I purchased #5 ½” bolts, 3 ½” long to be a ½” longer allowing for the 0.4” depth the the HD counter bracket. After an hour and a half searching Amazon, I found these which turned out to be perfect! I got the 6x10” brackets, where the 10” length ends just inside the width of the wheels. https://www.amazon.com/dp/B095NRB6N4/?th=1 I used the stabilizer jack to get the rear axle up on a jack stand (placed under the plate centered between the leaf spring U-bolts). Then I removed the wheel and the base of the jack stand to allow for ample work space. Each side of the brackets has 3 predrilled bolt holes. On the 10” length, they’re perfect to mount the flap. On the 6” length, I got lucky! The center hole is just in the right spot to mount to the frame bolt. I drilled the center hole wider to ½” and bolted it in place tight enough to hold the angle. Then I used a digital caliper to get the bracket perfectly level to the frame. I used a 5/16” drill bit, the size of the existing holes, to scare a center, then switched to a ¼” drill bit which is the correct size for a 5/16”-18 tap. Drill through both the steel sub-assembly and the aluminum frame. I used a little cutting oil to make the drilling and tapping go easier. Then added Grade-8 5/16” bolts which I had on hand with blue thread-locker. The ½” bolt has a Nyloc nut. Torqued them down by feel with ratcheting wrenches and this HD bracket ain't going nowhere!
1 point
-
Good to know. Mine is more than 20 years old. Probably time to replace it.1 point
-
Glad you did not have a blow out or worse. If it were me I would immediately have a complete brake and wheel bearing inspection done on all four drums. It’s more than obvious in your photo that tire/brake was locked down. Safe Travels!1 point
-
Absolutely love this search feature, it’s amazing, my new favorite tool. Is it possible to create an address specific to other forums? I would love to be able to sift through the mountain of invaluable threads on the Ford Super Duty Tremor Forum site in the same way . https://www.fordtremor.com/1 point
-
For what its worth - I'd lower this a bit - say down to 145 - certainly you can go lower but if you have that side of the trailer in the sun, are traveling on dark black asphalt roads and are traveling at speed - above 55 mph - you might have times when you will get a signal that things are getting too hot. While I'm sure that there will be some discussion here about the 65psi to start in the tires, if I'm planning on doing a fair amount of driving on the Interstate (i.e. speeds of above 60 mph) I'll start with a psi of 60. Having said this, I doubt that your 65 psi was so high as to be the only cause of that worn spot in the tire. I wouldn't be worried about the psi fluctuation you saw due to the ambient temperature drop. As things warm up I'd bet that your psi will return to close to what you originally set it. Interesting information on the storage of your Ollie - indeed, that salt air and lack of movement point to rust being a major suspect in the problem. Please let us know what the results are of the mobile tech taking a look at the situation. Bill1 point
-
@Geronimo John I have to agree with you. about using the Step wet bolts. When I was installing the Alcan springs in the Oli. I used the wet bolts from Alcan and found when Torqued down to the specs, I could not get grease through the sides on the Bushing. I finally measured the step bolts and the measured the springs and carriers. I found that the should bolt allowed just over .010 slop. This allowed grease to come out of the sides and allowed the shackles and springs to move freely. This allows the EZ-Flex to move freely, and do what it was designed for. All of the stress is on the bolt itself and is not on the threaded shoulder thus allowing a lower torque.1 point
-
Hello to all! We are the new owners of a 2019 LEII, Hull 514, as of last week! We have owned travel trailers for about 20 years and started seriously looking at fiberglass trailers about 6 months ago. We are looking forward to our first trip in the next few weeks. We plan to do a lot of boon-docking in out-of-the way NFS campgrounds for trout fishing, hiking, etc. and our large toy hauler was NOT suitable for that. Hull 514 did not come with an inverter or any solar, so I am installing Lithium batteries and an inverter over the next few weeks and then will add some solar charging capabilities. I'll probably create a post about that project after I'm done in case it helps others who are in the same boat. I have already enjoyed and gathered great ideas reading about the various approaches others have taken on this forum. We will likely convert to the Twin layout eventually as well. I also plan to swap out to 30 lb Propane tanks and add my LevelMate Pro this weekend (both from my current camper). Anyway, just wanted to do a quick intro for this very active and informative group. Glad to be in the family!1 point
-
Riley Creek COE, just West of Sandpoint, ID, off of US Highway 2, is one of the nicest COE parks we have camped at. Beautiful sites. We had site #8. Great spacing between sites. Their Day Use area has many shelters and the grounds have a sprinkler system. Looked like a golf course over last Labor Day weekend. They have a beautiful swim beach, boat launch, and Dog Island, where your pets can run and swim. Hope we can get back there again. Water and Electric1 point
-
Lots of good info above. I will add that in recent years summer wildfires are increasingly common in the western US and Canada and this is doubly true in the forested portions of Idaho. particularly in late summer. If you are planning on traveling the west in summer you can typically kiss your campfires goodby as things dry out. Smoke can get pretty nasty at times so prepare for that. I have packed N95's for years and have been glad I have them.1 point
-
SE from Stanley a bit is Moore Ideao. Home of the L7 BBQ. Guaranteed the best BBQ sandwich I have ever enjoyed. And I'm from Texas. Just a few miles further is Moore, ID. The King Mountain Glider Park is active in the summer months with all kinds of Hang Glider, Paraglider and Sailplanes flying the beautiful mountains. 8 miles further in Arco is a free dump station. I spend a month there eash summer, so if heading that way holler so we can cross paths. GJ PS: If you only have time for one of those, get the L7 BBQ sandwich. It's a monster. Yummy.1 point
-
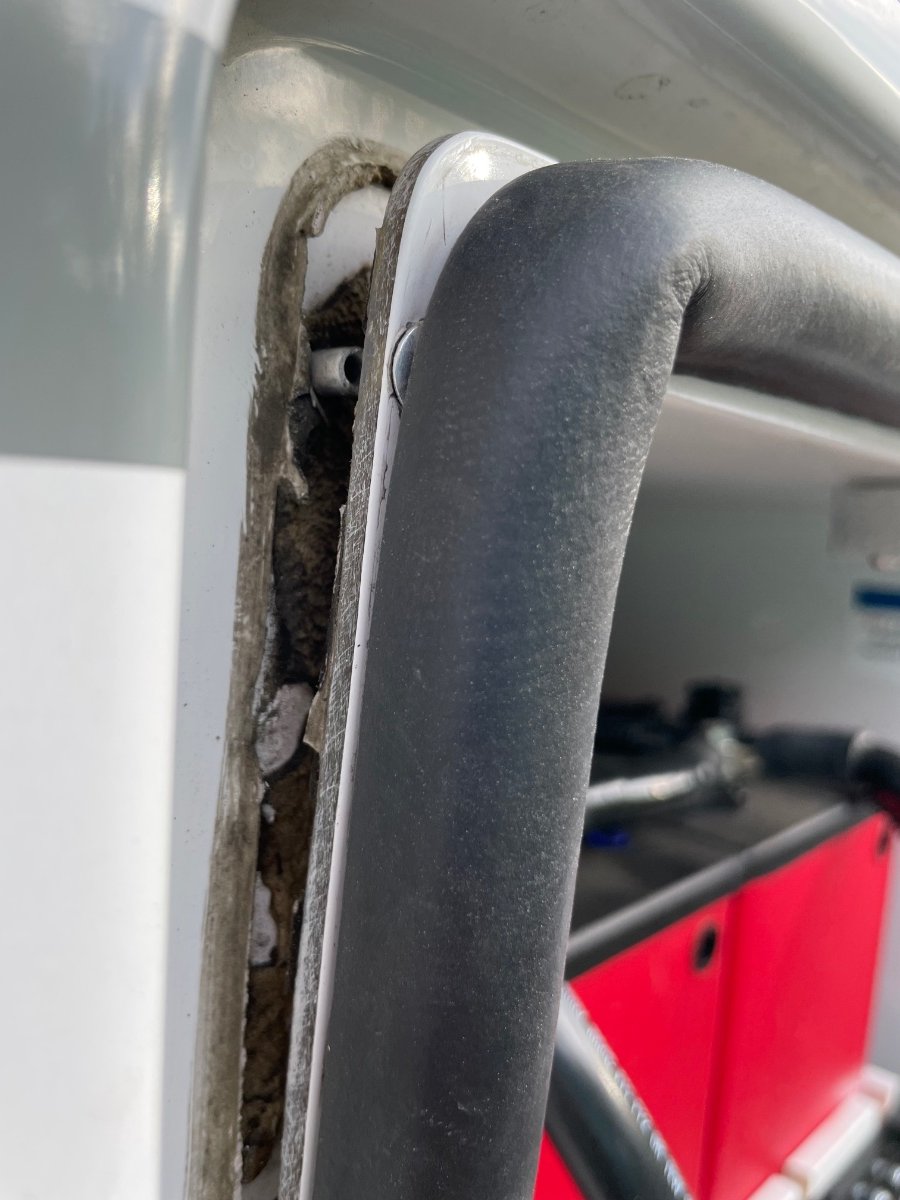
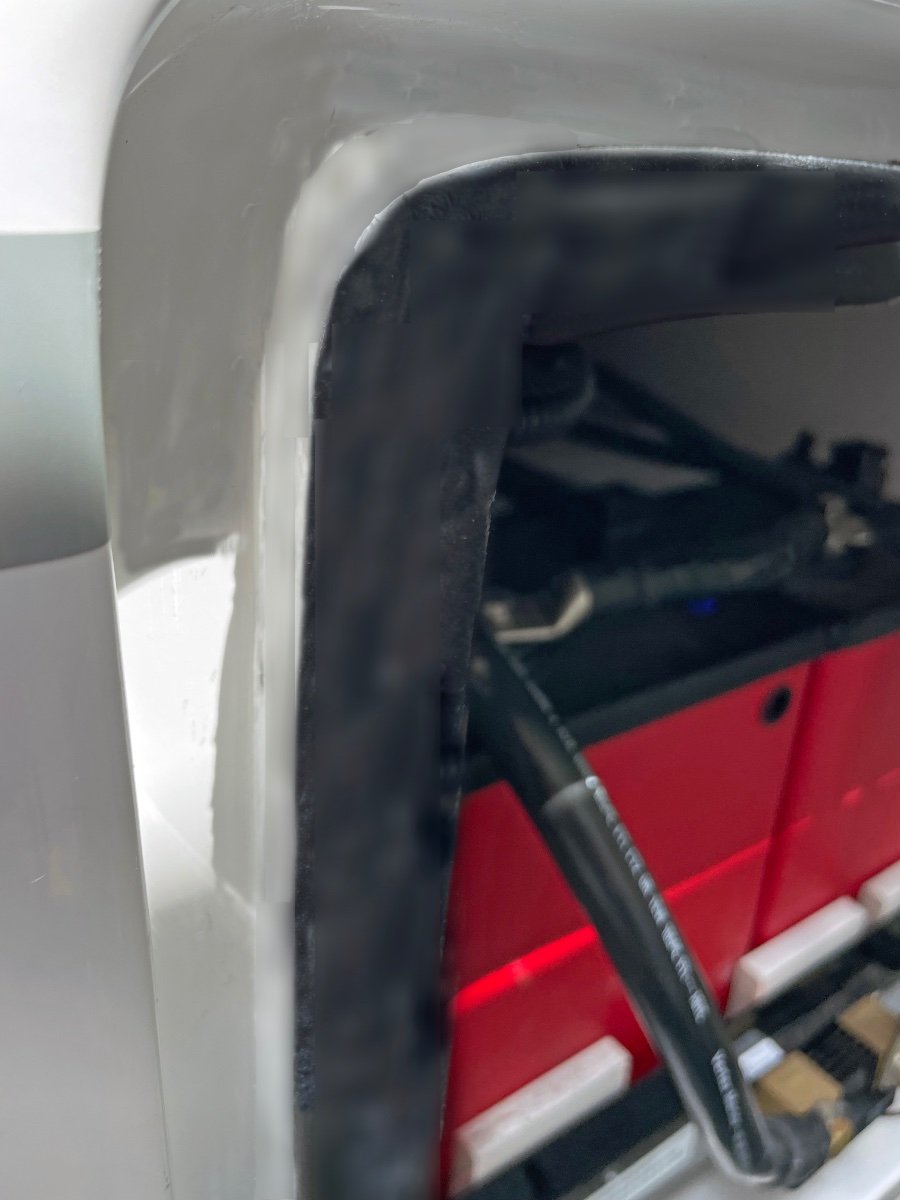
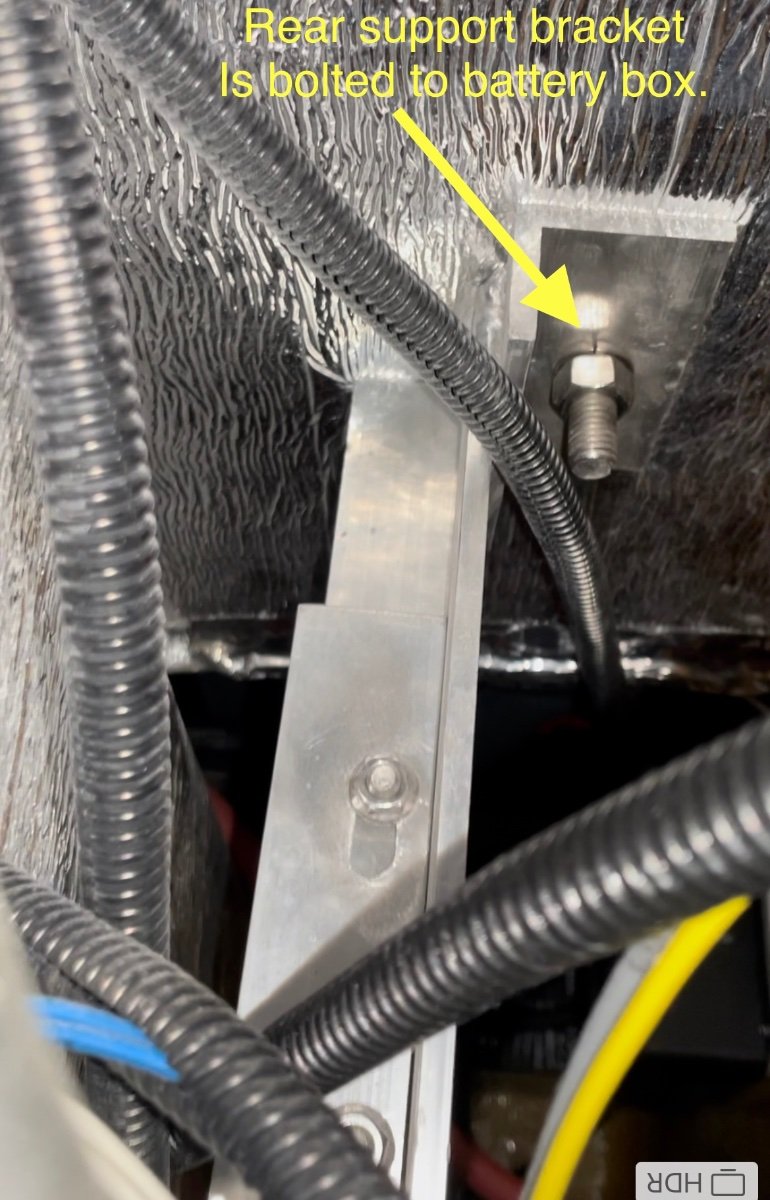
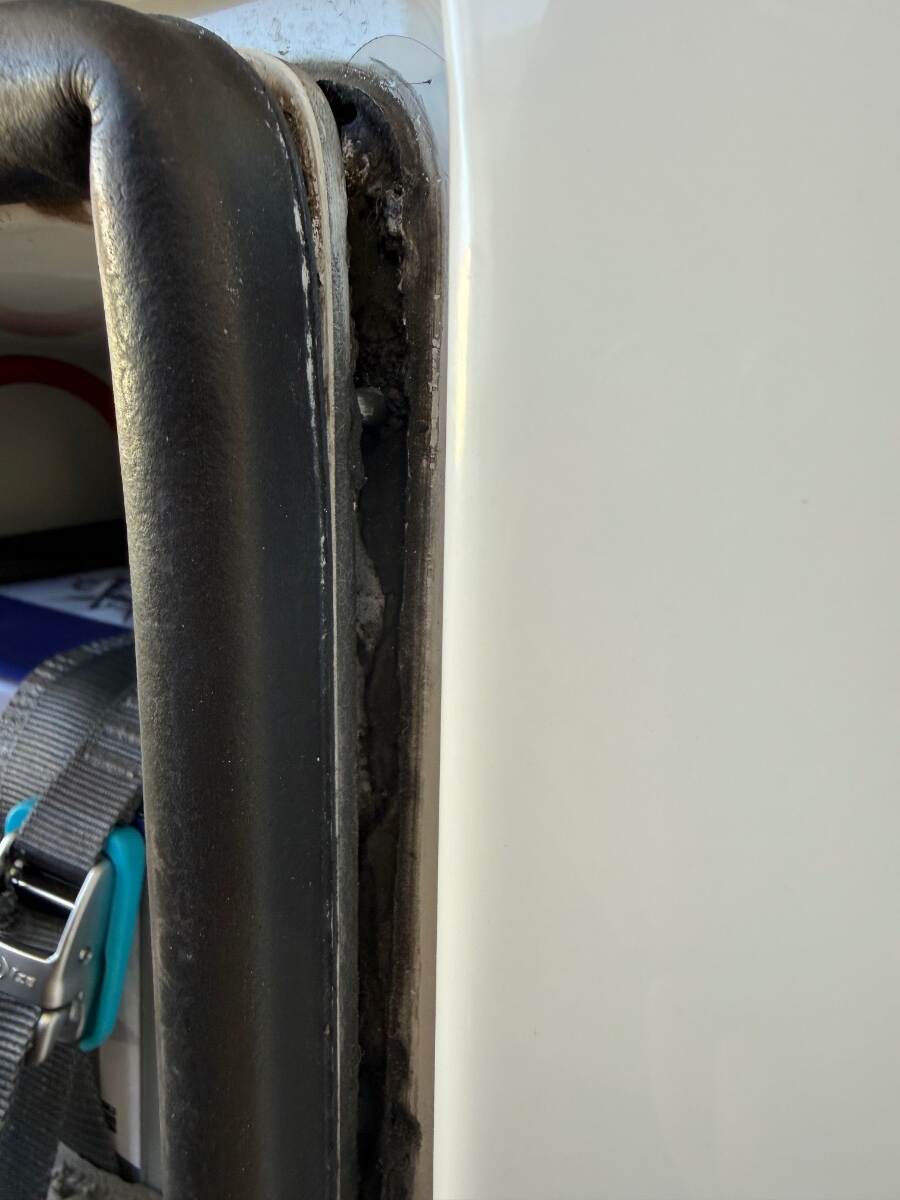
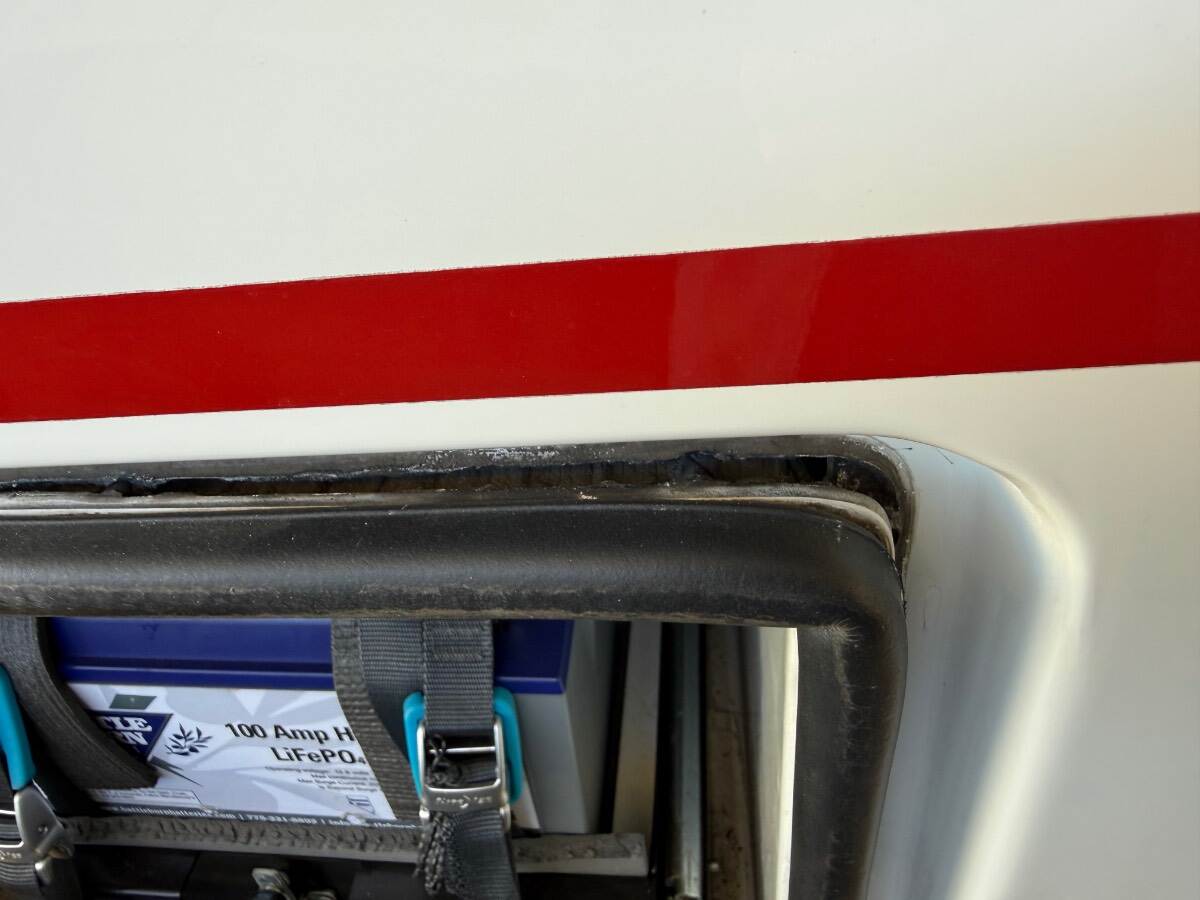
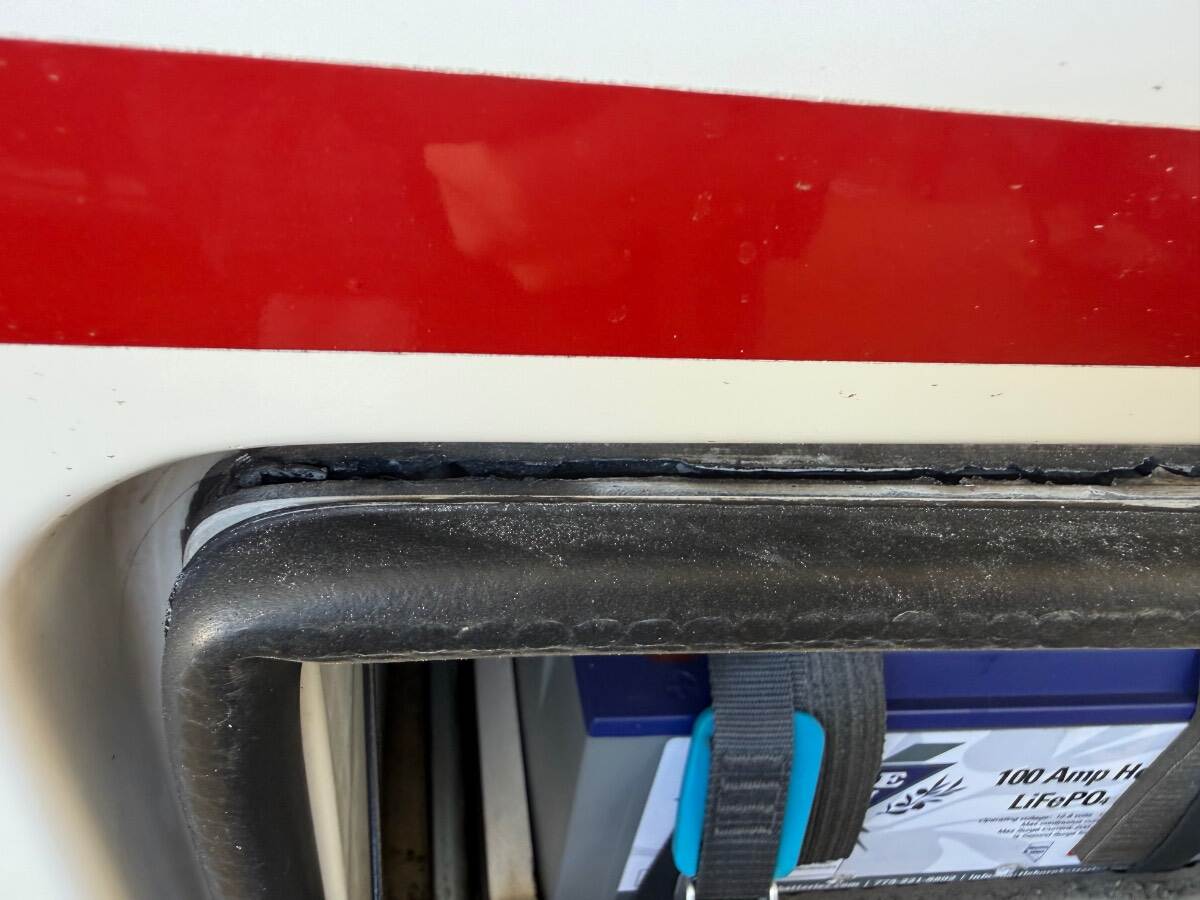
This spring as we were prepping for a new road trip, I noticed the battery box door seemed to be sticking out further than normal. I thought I would adjust the latch to pull the door in a bit tighter. What I found was that the battery box had started to tip forward away from the main hull as shown the pix below. All the rivets up both sides and all across the top of the box had sheared and the box was tipped out about 1/2". I contacted Oliver Support to understand how the box was designed, mounted etc. They cleared me for travel after having me check the support strut inside the trailer (under the pantry area) . After some further consultation I was able to perform a repair. Here's a sketch of how the battery box is installed in our Hull 505 (2019 Elite II) trailer. The repair steps I took following Oliver instructions were: 1) Remove the batteries from the slide tray to get weight off the box. 2) Drill out all sheared rivets. (3/16" bit) 3) Release the 2 support bracket bolts inside the trailer under the pantry (one of which is adjustable). (This step is a pain and requires some long extensions for the ratchet wrench to make reaching nuts possible.) 4) Tip box back into position. (Check that the box base still has a slight outward tip for water drainage.) 5) Re-tighten support bolts. 6) Re-rivet all around the perimeter. 7) Clean seams and add a bead of boat life white sealant around the battery box seam. (See pix below). Repaired Box Above: Door closes with a good seal all around and the box sealed to the body. We are going to keep an eye on this as we travel this next year, and make a trip to the Oliver factory for them to inspect and repair if necessary. I'm not sure of the root cause or mechanism by which the box tipped out in the first place. One concern would be that the box is putting too much pressure on the outer hull while bouncing down the highway. I don't see any indications of cracking in the glass hull or box at this point. Hope this helps if anyone else see's an issue. Craig Hull 505
1 point
-
Hey JT Im a Newbie and learning. I think I see this is for a stronger signal when more than 50ft away. I just wanted to let you and others know for Basic Mini Operations as Rich.Dev Pointed out to Snackchasers write up. I did what Snackchaser had stated in his awesome Mod(Cracking 12v DC Barrier). It works amazing you just plug the Mini in the exterior port and bang Mini is up and running. I cant say enough how great this works Thank You Geoff hope to cross paths one day and tell you in person. Im not that technical and used exactly what the article stated 12v to 24v then turn up to 30v if we had used a 12 to 48v would this let you go even further away or it would not matter because the router is built in the Mini and would not help because of distance and reason needing and ethernet cable and Router inside the trailer. Interested in what Snackchaser would recommend to work further away and Tree issues along with his basic Mod already.1 point
-
I agree completely with all of the above... however its important to note the difference between the Elite and the Elite II with respect to their tire and axle configurations. Ignoring for the moment the differences in tongue weights, the variability between lightly loaded and heavily loaded trailers and whatever safety margin you prefer to factor in, the Elite II GVWR of 7,000 lb / 4 tires = roughly 1750 lb/tire which must be supported, while the Elite GVWR of 5,000 lb / 2 tires = roughly 2500 lb /tire which must be supported. For this reason, for our Elite, we have settled on 55-60 psi with E rated tires for our loaded Elite at highway speeds on "normal" roads. On rougher paved roads we have to slow down some, and on rough backcountry roads we slow down even more and sometimes air-down a bit to help cushion the shocks. There are several prior threads that discuss the relationship between psi and a tire's weight carrying capability, which can be looked up / computed based upon tire manufacturer's data. Camp on!1 point
-
It looks like @Geronimo John and I were thinking alike and writing at the same time! Great minds… 🤣1 point
-
This is an issue I have not seen before. While checking my trailer this morning I noticed that my battery box is separating from the hull. I don’t know when this started. When we replaced my AGM batteries in Dec ‘20 I did not notice this. Once the four AGM’s were out I did a lot of cleaning and work on the tray and I feel that I would have noticed it then if it was happening. I will submit a trouble ticket with Oliver to see what they think. Not sure how this would be repaired. If you have an older trailer that carried those heavy AGM batteries I would check for cracks or separation. Here are some pictures, what does everyone think? Here is the right side: Here are a couple of the top: Left side top:
0 points
-
Paid 155.00 last March through Wally World and quote today is 190.00.. Almost 22% increase in just over a year...
0 points


.thumb.jpg.e34bf01ef7f7d5e99ad31856d45afbeb.jpg)

-
Recent Achievements
-


")


")


