mossemi
-
Posts
1,803 -
Joined
-
Last visited
-
Days Won
43
Everything posted by mossemi
-

Upgrade to lithium batteries blows circuit boards....?
mossemi replied to John E Davies's topic in Ollie Modifications
I have never seen or looked for the 24 hour break-in instructions in print on paper or a soft copy. It was a comment made while discussing the intermittent problem I was experiencing. Mossey -
Upgrade to lithium batteries blows circuit boards....?
mossemi replied to John E Davies's topic in Ollie Modifications
So I will ask this question: Do you think most MaxxFan failures are water/moisture related or is it an electrical supply issue? I know from the reading I have done on RV forums, most of the blame is placed on moisture. And as far as I know, MaxxFan has done nothing to change people’s opinion on that theory. A true test of the voltage question will be when new fans are installed with a voltage regulator from the start. And we will see where the data on fan failures lead our thoughts. By the way, within my support email chain, MaxxFan stated that the fan bearing break in procedure was to run the fan at 100% for 24 hours when the motor is placed into service. How many of us did that? I did with my new motor, but I didn’t with the original. My OTT was used so I really don’t know if it was broken in properly or not. Mossey -
Upgrade to lithium batteries blows circuit boards....?
mossemi replied to John E Davies's topic in Ollie Modifications
The fan problem I ran into was with the fan in auto mode and running at 80%. I noticed the fan running slower than I thought it should be, so I ignored it. And then I noticed it again and again, so now it was on "my when I get around to it list". I can honestly say that my fan voltage problem was not theoretical, but maybe it was a coincidence. And I can’t say it is a lithium charge setting either. What I can say is that I didn’t have a fan problem before replacing my PDI DC charger with the lithium charger and I did have the problem a couple of months later. I will also confess that I did not reinstall the original PDI charger and re-conduct the voltage test I did for PDI's technical support team. I will say that I am not very good at design or theory, but I am pretty good at fixing things that are broken. So once I have fixed something, I move on. And a voltage regulator fixed my problem. I don’t need to know why it was broken, it’s good enough for me that it isn’t anymore. I didn’t associate the PDI charger and my fan issue until JD created this post. And then Mike and mountianoliver the voltage regulator to the conversation. And I said "duh". I am plugged into a 120 AC circuit at home 24/7 so my battery cutoff switch is usually in the off position. So my running 12v supply is the PDI charger. Which is making some weird humming sounds these days, but that is a different subject or maybe not. And now that I have made a long story longer, Mossey Below is part of the email conversation I had with PDI, with the voltage readings I took at the output of the control board to the fan motor. From: Mike Mossey Sent: Tuesday, September 15, 2020 9:44 AM To: RVP Support <rvpsupport@airxcel.com> Subject: Re: New form entry is submitted - 9-14-2020 Time Voltage at the 2 pin connector to the motor 2:20 PM 13.8 3:00 13.6 4:10 13.3 5:10 13.2 6:10 13.5 7:10 13.3 8:10 13.3 9-15-2020 7:20 AM 14.2 8:30 14.1 fan seems to be running slower 10:30 14.1 RVP Support <rvpsupport@airxcel.com> Tue, Sep 15, 2020 at 11:41 AM To: Mike Mossey Anytime the voltage exceeds the 13.6 threshold it can trigger the unit to shut down or do things it is not designed to do. The voltage is above that a lot of the time. Can we get a voltage regulator inline to keep it around 12.8? Mike Dickey Technical Assistance Coordinator RV PRODUCTS, a division of Airxcel, Inc. 3050 North St. Francis Wichita, KS, 67219 Office: 316.832.4357 Fax: 316.832.3417 www.airxcel.com -
Upgrade to lithium batteries blows circuit boards....?
mossemi replied to John E Davies's topic in Ollie Modifications
Amazon has lots of choices in fixed and adjustable voltage regulators if I remember correctly. Mossey -
Upgrade to lithium batteries blows circuit boards....?
mossemi replied to John E Davies's topic in Ollie Modifications
Last August my MaxxFan started running at various speeds. It would start out running fine and then slow down after several hours. MaxxFan support help me conduct some testing and one of the things they noticed was the high voltage on the fan circuit. I installed a similar or same voltage regulator when I replaced the motor in September. I placed my voltage regulator in the attic after the fan breaker. And of course this happened after I installed the Battle Born batteries and the PDI lithium charger. It kinda like an 18 year old rebuilding a perfectly good motor to go faster and the rear end or transmission fails under the strain. And I think it reinforces my appreciation for the products Oliver Travel Trailers produce. When I as an owner decides to change any portion of the product they engineered and built, I can expect it to change something I didn’t anticipate. I think the best we can do is to continue to share our experiments, learn from our failures and celebrate our improvements. Mossey -
Excellent! Just wait until Ray and Susan see your 1UP rack and mount. Mossey
-
Very nice install! Thank you for the detailed report and pictures. Mossey
-
I have heard some reasonable ideas on the issue of fuses, circuit breakers and the way OTT installed the Fastway equipment. So I thought I would look for some installation instructions and this is what I found. It looks like all opinions aside, OTT is installing the product just as the manufacturer instructed. And I’m good with that. Mossey

-
I’ll check mine tomorrow and let you know what I find. Mossey
-
How to Remove 2017 Dometic Penguin II Interior Cover
mossemi replied to Bobfirst's topic in General Discussion
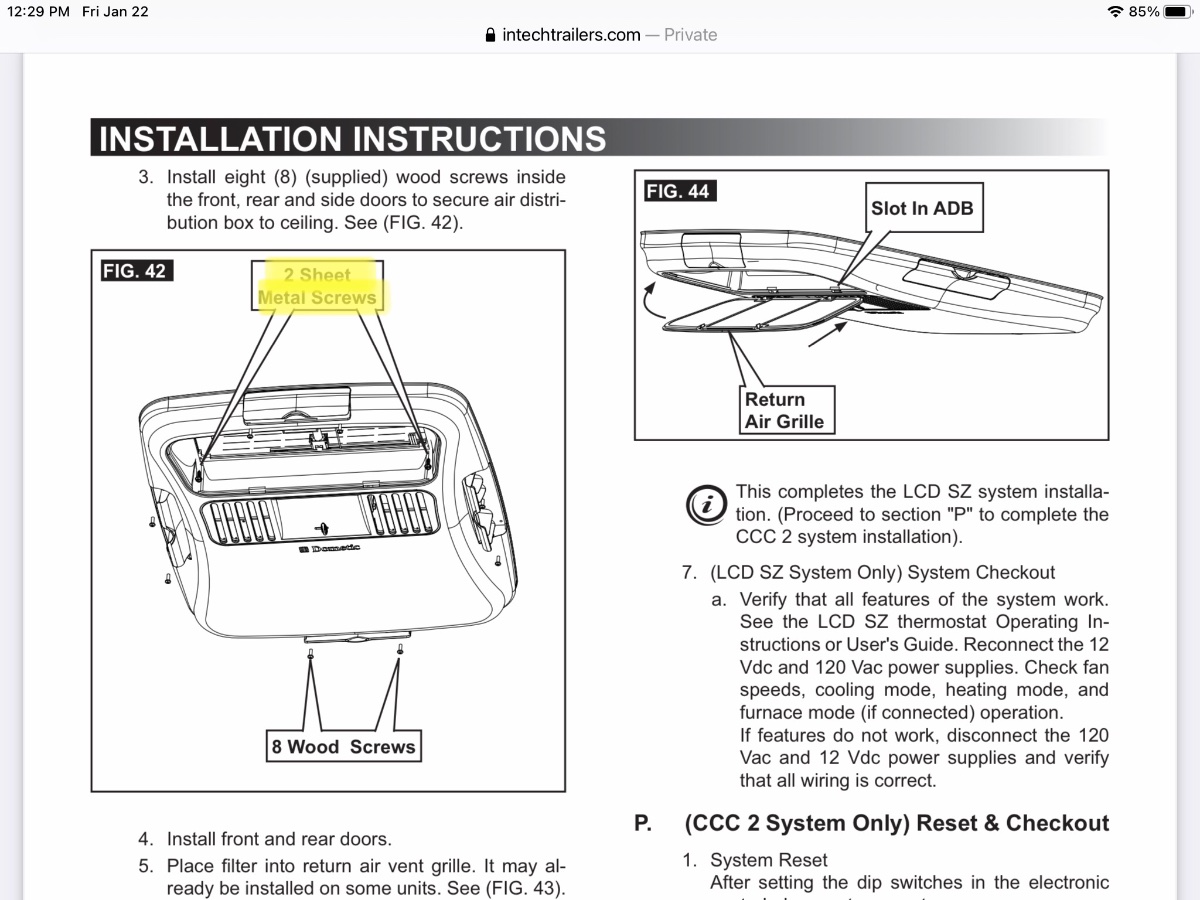
If you have the 8 screws out from the vents, then I think the 2 screws inside the filter area do need to be removed. You circled 1 of them in green. Mossey This picture is from the link Townesw provided.
-
How to Remove 2017 Dometic Penguin II Interior Cover
mossemi replied to Bobfirst's topic in General Discussion
I know the bolt in the red circle holds down the roof unit. I think, because I don’t remember, the screw in the green circle holds the control portion of the inside cover in place. To remove 90% of the inside cover, open the curb and street side vents completely and 2 screws will be visible in each opening. Now that you know where to look, open the front and rear vents completely and look on the hinge side of the opening and you should see 2 screws in each opening, but they are much harder to see. Use a long #2 Phillips screwdriver with a round barrel because you will be rubbing on plastic and a square barrel will hinder your efforts. Mossey -
Streetside shade (instead of awning)
mossemi replied to Fritz's topic in Mechanical & Technical Tips
That’s an EZE Gutter that a lot of OTTO's have installed closer to the windows. The gutters needed to be installed higher with the window shades. Mossey -
Streetside shade (instead of awning)
mossemi replied to Fritz's topic in Mechanical & Technical Tips
This picture shows one of the awnings that Bruce and Cheryl made for LE2 136 that Bill is referring to. As you may be able to see, the were made from PVC pipe and fittings. The head rail and feet, picture below, are marine products. Cheryl traveled with a sewing machine, so of course she made the shades. As I remember, they removed everything except the head rail and feet for travel. They were/are full timers from North Carolina and wintered in Florida. The last time I saw them was at the 2018 Rally where Bruce received an award from Oliver for his contributions to helping solve the fresh water tank capacity issues. Mossey
-
I would suggest that you never fly wind art or a flag of any kind while having an antenna deployed on your mast. The antenna itself will create enough deflection in the mast to affect the cellular performance. MiMo technology would certainly help, but why add to your problem with a moving antenna. And if you are in a cellular signal challenged area, you may not have the benefit of the latest cellular base station equipment suppling your signal. Mossey
-
GO FOR IT! TALK ME OUT OF A COMPARABLE AIRSTREAM. 😉
mossemi replied to Voyager's topic in General Discussion
When I first saw the title of this post, I thought I’m not taking this bait, it screamed trouble to me. It’s kind of like the old Oscar Meyer Wiener commercial when the kids sang "my dog's better than your dog". And it also reminded me of the advice my father gave me "never resist the opportunity to keep you mouth shut". But when it turned funny; I couldn’t help myself. When I bought my Oliver, the previous owner didn’t call it a wet bath, he called it the bidet option and it made sense to me, after all I had never used a bidet. Full disclosure: at our sticks and bricks house, the last one in the shower, gets to clean the shower. Same thing in the Ollie. And somehow that is always me. No big deal, unless I make it one. And if you really want to know how that works out, just let me know. Mossey -
Potential fire hazard - not an equipment issue, but candles
mossemi replied to JRK's topic in General Discussion
Thank you for your words of caution. Your warning based on your job experiences are certainly more valuable than the information on the package the candle came in. Sometimes, all we need is a reminder. Mossey- 1 reply
-
- 1
-

-
Generator for 2021 and beyond
mossemi replied to Ray and Susan Huff's topic in Mechanical & Technical Tips
Susan, all kidding aside, this is what we carry our Honda EU2000i inside of when we take it our SUV. It will also fit in the tongue box. Mossey
-
Generator for 2021 and beyond
mossemi replied to Ray and Susan Huff's topic in Mechanical & Technical Tips
Not a thing! I am still happy with my 16 year old Honda 2000i, so I haven’t been looking at availability. But I do know you are very patient. So I do believe you will get your Yamaha generator. My Magic 8-Ball can not be that specific. Mossey -
Check the second water pump switch switch in the bath. Still nothing, check the wiring at the switch if you don’t have power at the pump. Mossey
-
Generator for 2021 and beyond
mossemi replied to Ray and Susan Huff's topic in Mechanical & Technical Tips
I think it has been established by multiple OTTO's that most any brand of small generator, 2000 watts and above will run the air conditioner in an OTT. The question of whether or not it needs a neutral bonding plug is a different set of conditions based upon the generator you use and the electrical management system of the RV you are trying to power. A really simple solution is use whichever generator you have and plug it into the RV, start the generator and then start the air conditioner. Did the EMS shut down the electricity from the generator and provide an error code. If you did receive an error code, check the EMS manual to determine the problem. If you received an E2 error code and you have a Progressive Industries EMS, I’ll bet a cup of coffee that you didn’t even get to start the air conditioner because the EMS shut down the electric input from the generator before you had a chance to start the air conditioner. The E2 error code is for an open ground and your generator needs a neutral bonding plug or it’s a rare possibility that you have a defective power cord. I just checked my Magic 8-Ball and it said there is something blue in Susan's future.🥶 Mossey -
Generator for 2021 and beyond
mossemi replied to Ray and Susan Huff's topic in Mechanical & Technical Tips
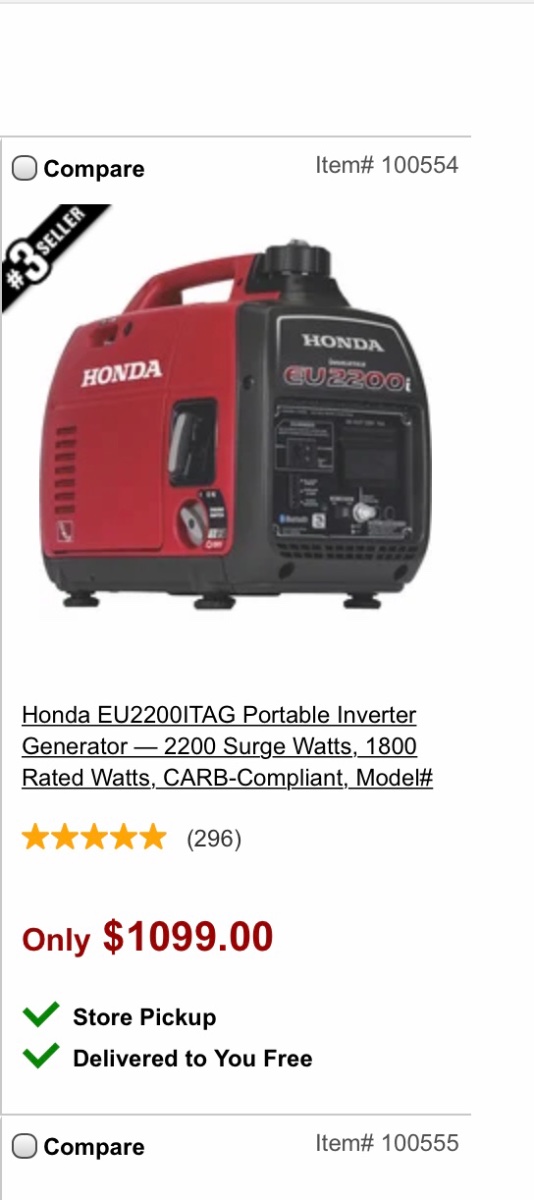
Then I think starting load would equal the in-rush load or as Honda states it Surge load. My test equipment does allow me to see the surge, start or in-rush load, as well running load. The Easy Start stages the start sequence there by limiting the surge, start or in-rush load during the startup process. My 2004 Honda 2000i is rated at 13.3 amps or 1600 watts for a running load and 16.7 amps or 2000 watts for a surge load. At one point in time I did a test, running the Dometic 13,5000 BTU on my generator just to verify my test cable and the AC/DC amp meter. I do not remember to surge or running amperage. I just know it always works when I run the air conditioner on the generator. I am including a link to Micro-Air which explains this much better than I can and I added a picture of a Honda 2200i advertisement with the surge and rated loads. Mossey https://www.microair.net/pages/easystart-installation-faqs www.microair.net/pages/easystart-installation-faqs
-
Generator for 2021 and beyond
mossemi replied to Ray and Susan Huff's topic in Mechanical & Technical Tips
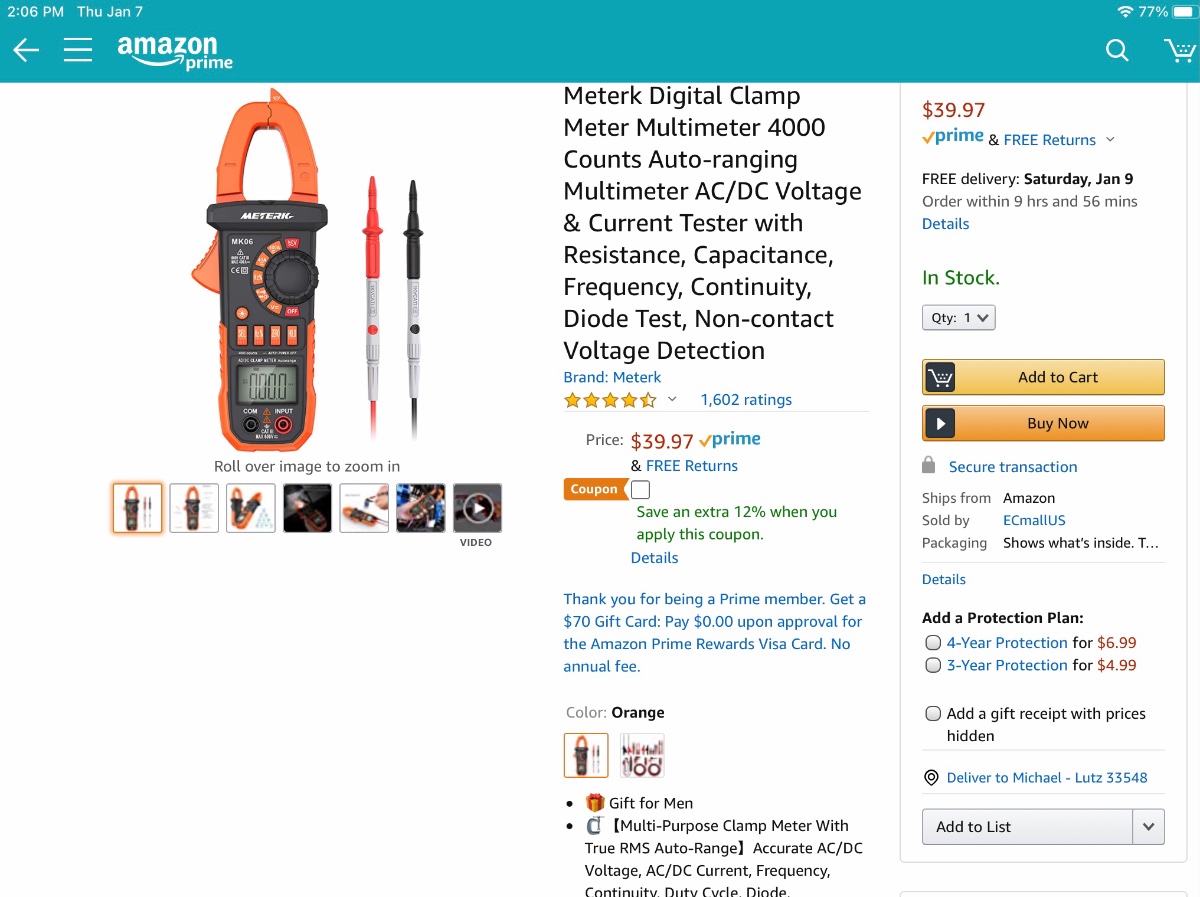
My Easy Start was installed at the OTTO's Rally in 2018. MicroAire sent a tech/engineer to the rally do do installs on the spot. I did not test before, during or after the Easy Start installation at the rally. I bought the meter and built the test cable in 2019 after someone posted about having trouble with their Easy Start and while researching their problem via Easy Start documentation I came across the plans for the test cable and then bought the meter. When I have used it, Krunch started the air conditioner while I monitored the meter. I do not remember seeing anything near the range of 50-60 amps. And I’m not familiar with the in-rush feature. This meter was about $30 on Amazon at the time and I just wanted it because I like being able to look at problems myself. Whether I ever fix anything or not is not as important to me as trying. Mossey
-
Generator for 2021 and beyond
mossemi replied to Ray and Susan Huff's topic in Mechanical & Technical Tips
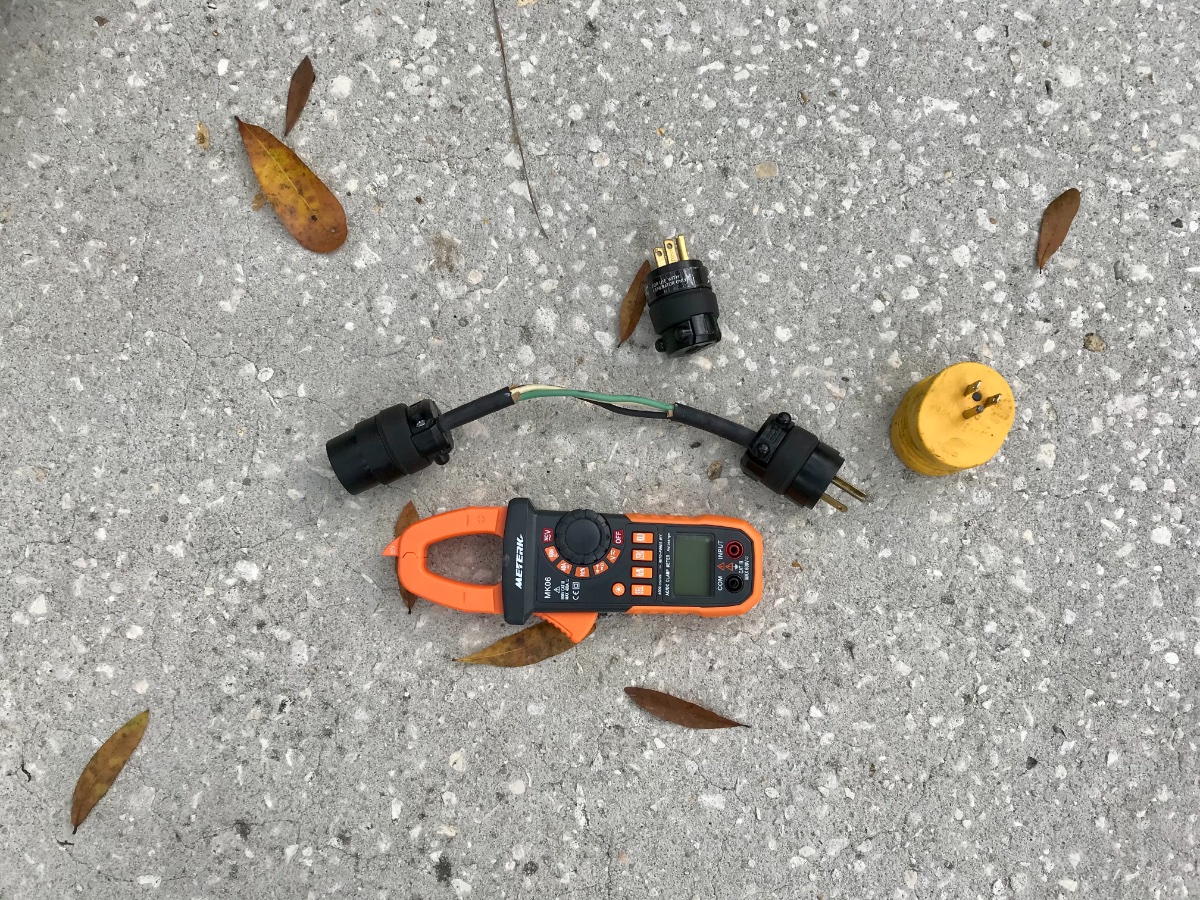
I assume you are referring to the Honda 2200i Companion. The pictures I see on Google look like it but I can’t be sure because I can’t physically test that. And it looks like the newest model have cover over the outlets so that’s another variable to consider. The following pictures show my equipment. I use a 50' 12 gauge extension cord plugged into an outdoor 15 amp outlet at home to power my trailer 24/7 365. But I can run the air conditioner with the same extension cord plugged into the Honda 2000i. And I will mention it again, I do have an Easy Start. I recently helped a friend install a Soft Start on his 10 year old SOB trailer and he is using a Yamaha 2200i. Works just fine. The other equipment in the pictures are the neutral ground plug that came with my trailer. A test cable I made out of a male and female 15 amp replacement plugs and a scrap of wire. An AC/DC Amp meter to take load readings from the generator. A 15 to 30 amp conversion plug. Mossey
-
Generator for 2021 and beyond
mossemi replied to Ray and Susan Huff's topic in Mechanical & Technical Tips
We purchased a Honda 2000i in 2004 after Hurricane Frances. I think it was Frances, we had 4 hurricanes that year and it was a COVID ago. The 2000i runs our Dometic 13,500 with Easy Start without any problems. How many amps is the Yamaha 2200i rated for peak and running? And how many amps does the 11,000 BTU air conditioner pull when starting and running? I can’t and won’t answer your question whether that is the generator you want, because you have stated many times that the Yamaha is the generator you want and I don’t want to get in the middle of that.😊. I can only address my successes and failures. Mossey -
Jensen TV/radio audio cutting out from HDMI input
mossemi replied to nrvale0's topic in Mechanical & Technical Tips
Can you clarify a couple of questions to help eliminate some of the points of failure? Which speakers are you using when the audio drops? There are front and rear speakers in my 2017 LE2 wired to the Jensen stereo and I can select either pair or both. My tv and stereo both have DVD players which will display video on the tv. Which one are you having success with? Do the tv speakers work ok? Do the speakers sound good or bad with the radio? Was the HDMI cable one of the cables that you replaced? Mossey