Geronimo John
-
Posts
2,365 -
Joined
-
Last visited
-
Days Won
67
Everything posted by Geronimo John
-
 YES. It has no 12V connections. It basically is an A/B switch between shore power and the Inverter created 120V power. I believe it defaults to Shore Power. GJ
 -
Both JD's 2017 and my 2018 had the 20 Amp Auto Transfer Switch with lead acid batteries from the factory. When mine went south, the max in the line I could find in 2019 was the 20 amp. So I split my shore power connection and added another 20 amp. I put the A/C on this ATS as suggested by a fellow owner. I figured it was an better solution. I am VERY glad you posted about a 30 Amp being available. Many owners have posted that OEM 20 Amp ATS's seem to have a short life span. I see your point that if you have a 30 amp service, then all components in the 120 system must be able to live happily with 30 Amps. It also eliminates having two each 20 Amp ATS units to do so. Does anyone have an idea why we and others had 20 Amp ATS's installed? John Davies post about changing out a failed one was the genesis of much of my info on the topic. GJ

-
I emplore you to: Purchase a 30 Amp version ATS, not the smaller one some of us have. I was "shocked" that mine only had a 20 A ATS. On yours, where you see toasted insulation on the wires, cut it out and reterminate. This may require some gymnastics. Label each wire as to it's destination. Will save you from using some "bad words" as John D. uses to say. GJ
-
Taylor: Below is WayFinder's post about loose screws in the ATS. Keep us posted on your "adventure in power". Geronimo
-
Please do so only with zero 120 Volts in the trailer. No generator or shore power connected. No solar connected if you have it. We have seen several cases where the wires in the ATS have vibrated loose. Your tapping and getting/losing power would indicate a temporary failure. May just be a loose wire in the ATS. ++++++++++++++++++++++++++++++++++++++++++++++++++++++++++++++++++++++++++++++++++++++++++++++++++ ONLY IN A DIRE EMERGENCY: To bypass all of the shore power system: Turn off your 30 amp main breaker. Turn off any other breakers you don't absolutely need. You want to keep your loads down to under 15 amps MAX. You could energize the electrical system, with some risk, by modifying an extension cord by cutting off the female end, and install a second male 120V plug. Use your generator to back feed power to the outlest by the entry door. I would not suggest plugging it into a shore power source at the RV park as it has even more electrical potential than a 2K generator does. Hence a small generator may short, but it's breaker will likely limit the current flow. Hence not doing this with the power pole at the RV Park. GJ
-
Mud Dobbers and Mice Nests have been seen before in furnaces. GJ
-
Totally agree. I also keep the bath vent open so as to create a chimney effect from the lower hull screened weeps and other sources. Sort of an energy way to bring in a limited amount of fresh air. Esspecially impotant to do so when using an open flame heate inside. For that cracking a window is meeded as well. GJ
-
These vents from Amazon.com matched our 2018 OE2 quite nicely. GJ
-
My concern with this mod is that humidity from showers will be vented to the basement. That could be a problem in the cold areas of the basement in winter. in summer it may be a source of moisture for growing mold/mildew. Some have stated that such a vent would allow more air to flow into the bath area from the furnace. I doubt this due to the poor quality and long duct run to it. Frankly just keeping the bathroom door open when not in use will well ventilate the space with zero potental for unanticiated impacts below. If you want to vent the curbside front basement, I suggest adding transfer vent in the front curbside seat base area. Likely facint the CO/Propane detector. GJ
-
Those guys are a lot faster than I am! But if I could do two axles at their pace, it would be $300 a year cost. Ten years that I hope to be around say $3,000. The Dexter NeverLubes I understand should go ten years. So, mathamatically speaking, I am financially well ahead in getting the 5200 never lubes with their better brakes. RIght? GJ
-
2019 Oliver elite ii lithium upgrade.
Geronimo John replied to Gene G.'s topic in General Discussion
Ditto. Love our Battleborns. But knowing what's out there now, as posted many times by many owners, the cost of three of them (300AH) and the cabling could lead me today to another larger single battery. PS: In addition to the SOC capability, our 2019 OE2's do not have a master 350 amp shut off switch. Yes there are lots of opinins as to where to mount it, but 95% see the need to ba able to stop the source of power in an emergency QUICKLY. So please add that to the need to do list. Below is John Davies' approach. John Davies Master Battery Switch.docx Note that his install was for 200 amps and inside the cabin basement. I suggest using the 350 amp version as it is higher than the fuse in the 4/0 cabling. Also, I suggest mounting it in the battery box to not delay exiting a smoke filled trailer in an emergency. Get out and shut it off outside. Always grab your fire extinguisher and have it handy. But get the family out first. -
2019 Oliver elite ii lithium upgrade.
Geronimo John replied to Gene G.'s topic in General Discussion
I'm with TopGun2 and Mike & Carrol in using a minimalist approach. JD's approach is a good start for cleaning up the cabling and that's good too. If you want to do a 100% upgrade to current technology then there are 2 in 1 Charger/Converter units, computer interfaces with gizmology way over my Pea Brain. So I'll leave it to you to respond back as to your goal. Several of us though like keeping things simple. Personally I LIKE have seperate charging and inverter systems. The combo units, best one is Victron's, is in our opinion overkill in the gizmology zone. Have a blip and you could lose both 120V and 12V capability. Is our world if we lose one, we are still in business in many ways. I suspect that our 2019 hulls were built with the same PD Converters. They likely have the same LI switch that can work with many Lithium Battereis. If you are in the less is better group, then reusing the Converter is a good cost reduction... if you have the switch on the PD mother board. Below is one of my DIY's on this topic. Up to about two or three years ago, the #1 Litho battery was the Dragon Engergy Battleborn's. Now as stated above thee are some higher power density units with good quality too. Finally, if you desire info for minimalist approach, you for sure need a way for keeping track of your SOC. If so, send me a PM and I can provide you with some handy info. So, welcome to the OTT Family and good luck in your project. Geronimo John Progressive Dynamics PD4045 LiCSV Upgrade.docx -
I agree with both posts. I use Consumer Cellular, mostly out west. They use AT&T towers. Their customer service is second to none, and I am very pleased with their connectivity. If you are going to be doing a lot of Off-Grid Boondocking and need multi-media connectivity, or have emergency medial communication needs where WiFi is weak or non-existant; then Star Link seems to be the way to go. LOTS of great install info here on our forum. Like Lithium Batteries, I'm in "Absorption Mode" for the Star LInk topic myself. GJ
-
Music to my ears! Add to that the 20V Impact tool and lug nut socket for off/on of the wheels... Gosh, I already have the kit on board. thanks GJ
-
This ???? Is hard for me to believe that its the same OE2 MaxBurner and I saw last summer up above Alpine AZ. Are you SURE that your Detailer didn't snuck in and swapped out your 2017 for a new one? Seriously nice job. GJ
-
Cold weather propane question
Geronimo John replied to Brian H.'s topic in Mechanical & Technical Tips
Another error we have seen is confusion about the change over valve "ON" orientation. Get wrong and you will have simular frustrations. GJ -
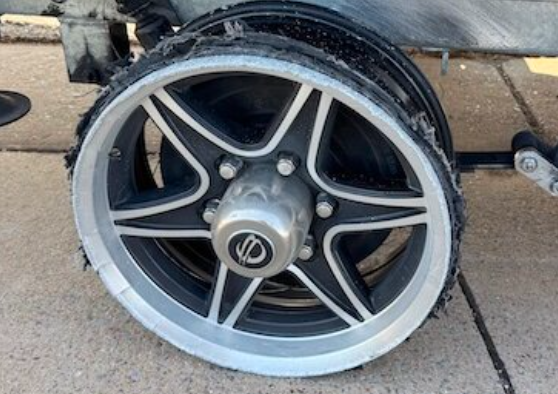
Changing tires in the wild - lessons learned
Geronimo John replied to John and Jodi's topic in General Discussion
Lots of good reminders and recommendations in this thread. There are two more: First, a good TPMS is essential for our trailers. Consider it SAFTEY Required. Secondly, if it hollers at you, immediately turn on the flashers and slow down to buy time. Find a flat spot to address whatever is amiss. Slowing down may likely turn a steel reinforcement wire nightmare into just a wobbling tire event. Great thread! GJ -
Changing tires in the wild - lessons learned
Geronimo John replied to John and Jodi's topic in General Discussion
JD: Which one do you recommend at Summit? GJ -
Run 12v System w/out Batteries in Oliver 1
Geronimo John replied to GeoffChapman's topic in Mechanical & Technical Tips
I personally would hook a jackery to the battery cables in the battery box for maintenance purposes when winterizing with the house batteries removed. GJ -
Changing tires in the wild - lessons learned
Geronimo John replied to John and Jodi's topic in General Discussion
Jon and Jodi: What manufacturer and model of tires did you have trouble with? GJ
-
SDG air conditioner installation
Geronimo John replied to mountainoliver's topic in Ollie Modifications
Roger, that was my thoughts as well. For a multi-speed inverter with the ability to slow down both fans to meet an infinate number of settings (Humidity/Temperature/Desired Supply Air Fan), a Cielbo would seem to be not necessary. However, for RV A/C unit that has multiple supply air fan speeds (Most Do) AND a mult-speed compressor (Cheaper to make than an Inverter style Air Compressor, i.e. an "Old Style" Unit), then the Cielo system would likely be a wonderful mod... so long as it does no harm over time due to so many restarts to the unit self and the soft start system if employed. Of course that's my hesitance and cause for a pause to access for unintended consequences that generally pop up over time. GJ -
SDG air conditioner installation
Geronimo John replied to mountainoliver's topic in Ollie Modifications
Interesting. GJ -
Changing tires in the wild - lessons learned
Geronimo John replied to John and Jodi's topic in General Discussion
As a new member of the forum, welcome aboard! Lots of great owners out here with a many tons of knowledge that's way over my head as well. Especially in electronic gizmology. So please don't be shy in asking questions and then follow-up's when necessary. I can guarantee one, if not several, of the owners is an absolute expert on the topic du jour. Travel safe and enjoy every day, Geronimo John -
SE from Stanley a bit is Moore Ideao. Home of the L7 BBQ. Guaranteed the best BBQ sandwich I have ever enjoyed. And I'm from Texas. Just a few miles further is Moore, ID. The King Mountain Glider Park is active in the summer months with all kinds of Hang Glider, Paraglider and Sailplanes flying the beautiful mountains. 8 miles further in Arco is a free dump station. I spend a month there eash summer, so if heading that way holler so we can cross paths. GJ PS: If you only have time for one of those, get the L7 BBQ sandwich. It's a monster. Yummy.
-
Agree totally. For those not familiar, here is a site with pictures of the lodge and area: https://www.grandcanyonnorth.com/gallery So sad. GJ