Geronimo John
-
Posts
2,373 -
Joined
-
Last visited
-
Days Won
67
Everything posted by Geronimo John
-
It's been several years ago so a bit foggy. But I recall that our blinds were a bit defective and OTT sent us some new ones with clips. I reused the old four clips and added two extra for grins. Put the other two in my "Junk and Precious Stuff drawer in the kitchen. Six clips ended my falling blinds syndone. GJ
-

What is Towing "Level" and Does It Matter?
Geronimo John replied to Sam Heumann's topic in Towing an Oliver
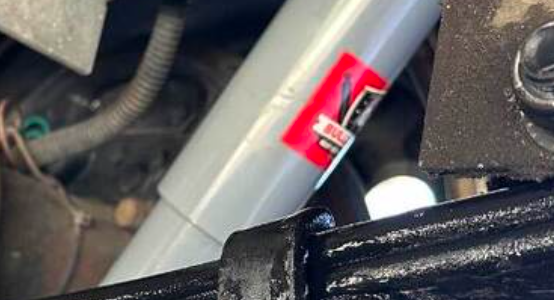
Ron and JD: The above 23.5" to 25" recommendation was for our older trailers with the larger wheel diameter. Sam's 2025 trailer I believe has 15" rims. So likely the target is not the same as those with 16" tires. I also agree that a bit low on the front of Ollie is also advantageous, especially out west were speeds tend to be higher. I agree with both JD and Dave that for setting up the systems for travel.... Stand back and take a gander. For those of us with older F-150's, we have found that a pair of Bilstein 5100's shocks and air bags on the rear axle have made a wonderful improvement in our driving experiences. GJ -
I use them into all the weeps, and then along the trough's both ways. To get to the inside weeps, for most of them you have to go "fishing" thru the outside weep and left and right to find the inner weeps. Finally I cut some of the 18" into 4+ inch small pipe cleaners bend them and stuff one into each weep. I for years thought it was bogus, but now believe it does help with drainage. Something like capillary action. Since they look a bit dorky, I use them when expecting Texas sized "Turd Floating Gully Washers". After the storm I pull them out and they are stored in a zip lock bag for the next time. Got the idea here on the forum by a wiser than I owner! GJ AI Capillary action (or capillarity) is the ability of a liquid to flow in narrow spaces, like tubes or porous materials, against gravity, driven by the forces of adhesion (liquid sticking to the surface) and cohesion (liquid sticking to itself), combined with surface tension. This "wicking" effect allows water to move up plant roots, colors to travel up paper towels, and liquids to fill tiny crevices, making it vital for plant life and everyday tasks like using a sponge
-
JD to answer your points, I took the liberty of adding A, B, C, D in front of them. A. I can assure you that our vintage windows can and do leak, and that they do cause damage (espcally to beddng). Short of an oak tree taking out the window frame, the storm itself does not cause damage. It is the accumulation of "stuff" in the track that blocks the weeps and that causes damage. B. Maybe you are blessed! Or maybe in AZ you don't see much rain! But looking at it from the "other side", why have so many owner installed rain gutters to help mitigate the flow of water INTO their trailers? C. I use and posted using a lot of water carefully from the inside trough to the outside trough to the outside of the trailer. You know the weeps are functional when you add water to the inside trough and it flows to the outside wall of the trailer. The cleaning process is working when you see the system drainng well. GJ It helps to raise/lower the trailer tongue jack to let gravity assist in the effort. GJ
-
Slow Fresh Water Drain; Dewinterizing
Geronimo John replied to Gliddenwoods's topic in Mechanical & Technical Tips
Maybe OTT did, maybe not. After all, more than a few folks don't have city water or well water where they store their Ollie. For them, maybe not. -
Yep, you got options! Love it. GJ
-
Alcan Springs Quote for Jan-2026
Geronimo John replied to Wayfinder's topic in Mechanical & Technical Tips
Chris: I positively think that your choice is the best Alcan option for the vast majority of OE2 owners looking to have a reasonable ride with the best springs. I like that they hedged the bet with giving you the fifth leaf just in case you go wild and jump into the 10%er's team. Our Ollie is out west in the mountains a lot. Since I just this past year changed to the heavier higher rated Dexter's, I'll likely just go with the 5200's to get the 12" brakes, but will stick with the Dexters as they are already installed. GJ PS what shocks did they use?
-
Alcan Springs Quote for Jan-2026
Geronimo John replied to Wayfinder's topic in Mechanical & Technical Tips
Duhh..... They were undersprung for a 6,000 pound OE2. At 7,000 pound for sure the running gear would be stresed to the max and over the limit with about any G-forces from the road surfaces. So I guess I need to include in the 10%er's anyone near 7,000 pounds should also consider going with the super springs. As in YESTERDAY. But at 6,000 pounds and 560# tongue weight, the Dexter PB4's (2400 pound rated) seem to be a good choice. Especially at $60 a leaf vs $149 each as listed above. GJ -
Part 2 Setting aside (Not Fully Removing) the white seal along the bottom part of the window is a good start. Then clean the inside trough, but as indicated above I don't recommend removing the black window guide. If it has slid all the way to the corner, I try to move it back towards the latch a few inches. This gives me a barrier free section for water flow to under the black window glide. It also gives me a way to flush water under the black guide to flush out dirt and gunk. My leaks almost always manifest themselves as an overflow over the inside track and down the wall to the sleeping area. This overflow is generally due to lack of flow to the outside of the track caused by the inside trough weeps to the outside trough being restricted, or rarely due to the water not flowing thru the black window track with the holes. (see above) Once the water gets into the outside track, it departs via the outside facing weeps of the inside trough. Sadly the two sets of weeps are not aligned. As such it complicates cleaning the inside weeps. This prompts the use of the 18" pipe cleaners (PC). Poke them into the outside weeps and get them cleaned and flush this track from the outside. Then use the pipe cleaners to scrub out the entire length of this lower track. GO both ways thru all the lower outside weeps. Now use the PC's to find and clean the inside weeps between the two trough's. Clean and flush from the inside trough to move junk thru and to the outside trough. Then flush the outside and clean the outside track again. Low hose pressure and control is a must to prevent inside flooding. My home made Hot Water Tank Flush wand works nicely for this control.
-
I don't have the courage to do that. It is very delicate and difficult to change if damaged. I do lightly brush it though and rinse well with Dawn/hot water to clean and flush well. Best to relocate the bedding out of harms way, and have a friend inside with towells in case of an overflow. GJ
-
Raise or lower the front end so that the track flows down hill to a weep. 18" Heavy Duty Pipe Cleaners A hose end valve to control water flow to a small fan shaped nozzel to push against the weep to sort of force water into the track and flow water downhill in a controlled manner. Beyond cleaning annually, and checking for junk in the tracks, having window gutters was a HUGE improvement on the older trailers. gj
-
Do I Really Need Self Heating Batteries
Geronimo John replied to Cort's topic in Ollie Modifications
Thanks for the flowers. Self heaters for long term storage are good only if you have plug-in shore power. They are great for boondocking short term in extreme conditions. But are a bit expensive. Enjoy your great trailer and BRAVO for being a four season camper! GJ -
Shock absorbing material on steps bracket coming out
Geronimo John replied to Randy's topic in Mechanical & Technical Tips
Randy: Getting back to your question. Some time along the way, the stairs were severly overloaded and bent the aluminum step angle down. Hence the slippage of the rubber shock absorbing rubber. You could load the stairs to flex the end of the angle down to provide more gap for replacement of the rubber. Then IF you are risk tolerant, you could place a jack under each of the angles and use the trailer weight to bend the angle back to where it was when your Ollie was made. The risk part is that if not done carefully, you could damage the angle's weld at the frame or worse. Or you could live with a bent step frame and discourage high impact loads on the steps.....which is what I would do! GJ. -
Changing tires in the wild - lessons learned
Geronimo John replied to John and Jodi's topic in General Discussion
I like JD's idea. Loosen the lug nuts and then turn the steering wheel and gently drive forward at say a 45 degree angle a foot or two. The side thrust should break them free. Or just use some Nevr-Sieze on the rims to avoid the need for the bigger hammer or fouling the lug thread approachs. Maybe a "Better Option". GJ -
Water pump not working -- problem solved -- FYI
Geronimo John replied to ZLarryb's topic in Mechanical & Technical Tips
For those of who are "Ham Fisted", I have found that my "carefully" crunching is not carefull enough. I suggest unplugging the connection and use a small pair of vice grips. I can crunch it in a much more measured manner. GJ -
Shock absorbing material on steps bracket coming out
Geronimo John replied to Randy's topic in Mechanical & Technical Tips
Be sure to first soap and water clean the rubber. -
Big Tex: I'm in your camp. These to me as well are just a temporary fix. At highway speeds, I would not trust them very long. Much rather take a bit more time and String Plug it. This past summer I came across an elderly couple with a flalt tire, no jack and no spare in a borrowed church car. Great. The hole took three strings to get it to a moderate leak. Aired it up three times to get them off the mountain and to a tIre shop. The above screw type plugs would not have worked, but not without an air compressor being handy. GJ
-
You are on track for sure. However not all mods are not a Priority A. The chain issue is on my list, but it will not rise up to a DIY until the existing curley cables or their hardware wear are near the end of their life. Hence it is on my "Future Project" list, way down near the bottom..... GJ
-
I am thinking that the above statement should be amended to show the reverse. Breaking strength is always way higher than working load approved by the MFG. The breaking strength is the absolute maximum force a piece of equipment can withstand before it fails or breaks. The manufacturer's recommended maximum weight for safe, normal use, is calculated by dividing the Breaking Strength by a Safety Factor. Depending on what is being discussed this can range from 3 to 6 or more.
-
More than a few have stated the same for more than a few of us around these parts. Welcome to the "those that think" club! A few more posts and you too will have risen to the level for consideration in the OTT Rabbit Hole Society. Hope you have a fun New Years Day. GJ
-
Furrion Chill Cube – Product Review and Installation
Geronimo John replied to jd1923's topic in Ollie Modifications
Lots of broken fiberglass light weight fishing poles out there. Cast off small end section is easy to find. Just cut off all but the end "Eye" and go fishing in a different manner. You generally only need 4+feet of it to fish the walls. JD knows how to get from the refergerator to the upper cabinet. This is how I got my Houghton thermistor from the rooftop back into the cabinet over the stove area. If you figure out or know a source for a very white cover to run a 1/4" thermister over the roof let me know! At this point I may just use some of the Gutter materail with the opening facing aft. GJ -
Now that is how to realllllllly stop a trailer! On the perfect adjustment, I came to the same conclusion two summer ago. I was having "fun" weaving the Emergency Break Away through the 7-Pin cable, the DC to DC cable and the "wonderfully easy to use (SIC) safety cables without wondering which one was going to lock up the trailer on a right turn. Came to conclusion that six inches of additional paracord induced slack was the best solution. With my receiver bolt being a double nutted grade 8, the Anderson and it's chaines, and a Bulldog.... I'm not worried about Ollie taking a hike in another direction. Fun discussion. thanks John
-
Ditto! June's 2008 Prius gets 45+ in the hills where we live. My 2012 Prius V, gets 39 MPG. A/C on much of the time. It was 42 until this year. I suspect I need to have the battery equalized. 12 MPG: Either your trip was up hill both ways or the Prius was really ill. GJ
-
Weigh Safe 180 Aluminum hitch with 3” shank, 10” drop
Geronimo John replied to Patriot's topic in Towing an Oliver
Your friend made a mistake. That's not good, but it was a simple mistake. But the jerk that rented him the trailer (or who manufactured it), used connectors that were not appropriate. He/She/They should be held responsible for the damages, not your friend. -
Great pictures for sure. Thank you for posting. GJ