Geronimo John
-
Posts
2,393 -
Joined
-
Last visited
-
Days Won
67
Everything posted by Geronimo John
-
For my D35's I/We run from 8K to 15K miles per year. Lots of interstate and BIG mountains for sure. A suspension failure where we spend time would be a PITA for sure. So like many owners, we service our Timken Bearings and National Seals annually. Since Day 1 with our OE2, I have had to run 8 - 9 on my F-150 brake controller to get the braking needed. I have several times checked the voltage and 3 Amp flowing to all four brakes. So it is what it is, and I have no complants with the Dexter 10" system. But I am running it at the upper end of it's design. And I often pull over with the truck to zap the drum/hub to check on over-temp. I would rather have the Dexter 12" brake system for our use. Just to be clear, I agree with JD on the service frequency for the bearings. But one would still need, IMO to annually check in on the brakes if you are running the mileage that JD, Art, and I run. My observation is that the Dexter Never Adjust "Automatic" adjusters are in the trust but verify zone. See John Davies post about them if you would like an independent opinon. (Spoiler Alert: He HATED them!) This is the exact situtation that many owners are facing with their OTT's that have mileage and years. My intent was to FULLY tear down my D35 brakes before our 2026 Tour. Checked into the prices of brake shoes, magnets and turning the drums. It was high. I found that replacement of the entire brake assembly and turning the drums was not all that much more expensive. Then I looked into the cost of the D52's with Alcan install and I was hooked. Sure I could save a bit less than a grand, but the rebuild would not improve my Ollie's braking situtation in mountains. And I end up with a totally new suspension system with more capacity. I sent Alcan a check last month for my 1 JULY 2026 D52 axles install. (Oh, yes I will be reusing my one season old Dexter 2600# four leaf springs.) GJ
-
I agree with both of the above. With a 5 year old trailer, replacing the OEM bearings is suggested. A difficult task if not experienced in doing so. But with some mentoring it is actually not all that difficult. Temken bearings and National/Temken races are the preferred choice here in Ollie Land. Here is Frank C post with the same mileage as yours and likely the same OEM bearings: GJ
-
You gotta love this forum! Frankly it was a primary reason we bought our LE2.
-
I am too. What usually gets me to actually read the instructions is I run into a brick wall. Just as you did. Then I'll post it to the forum. Just as you did. So no worries. Please do post a pick, one of us out here will figure it out. GJ
-
Yep, that's the way it's done by about 1500 of us. (1500 is my guess as to the number of us with 16" tires.) Some thoughts come to mind. With the downsize of the tires from 16" to 15" was the design changed for the tire removal that would cause your difficulty? If it was, if you were to reduce the pressure in the spare tire to allow a slight reduction in the diameter would that make a difference in your situtation? Was your spare tire changed to a larger size? (Not likely with a 2023 OTT. I believe that from about 2018 to the rim size change, the spares were the same tire as the 4 on the axles. But that is just an assumption.) Best of luck. GJ

-
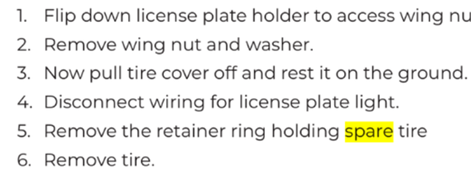
That's a new one. It certainly was designed to just lift the license plate and remove the big nut. The cover can then be removed with the spare tire still attached to Ollie. Kindly post a picture. GJ
-
For most tents, stakes they would work fine. But for our awnings and higher wind areas, I would consider increased diameter and length. Love the 20V impact to drive them idea. For our OTT awning, we carry two milk crates. One in the basement and the other in the basket. For high wind areas, we primarily rely on them with "locally sourced" rocks as anchors. One lesson learned is to emply quick disconnect so that in emergencies one disconnect and retract quickly. I have some ole D-rings that are over 100 pound rated and use them with mil-spec 550 cord as the connection means. Additional weight for two is less than a pound or two. GJ
-
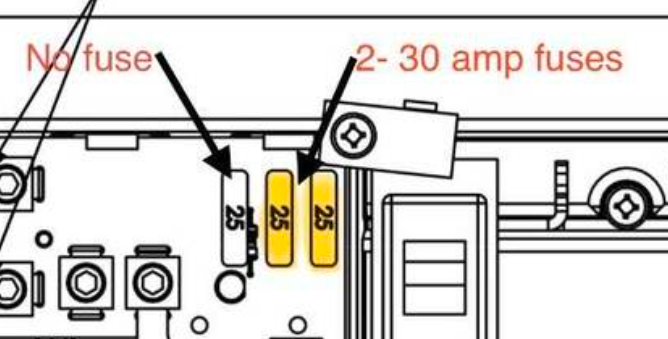
We know that most of the older PD's had two RP fuses, and likewise some had the Lithium switch. I suggest testing the unit amp output to definatively end the discussion. Just turn off the solar controller, turn off the Inverter (If installed) turn on the Converter, and either check the SOC reading at the SOC display (If available) or use a clamp-on-amp meter at the battery to measure voltage and amps. Hopefully you see higher voltage and amperage when you think the Converter is on. If not, cry.
-
Also the terminals appear that they could use a cleaning as well.
-
That is good. I'm sure you already have, but out of an abundance... Since this is taking some time, recommend you periodically monitor battery water and top off as necessary with distilled water. GJ
-
The manual I posted above is for our 2018 OE2 and his is older than ours. Our units do/did not have the lithum switch... unless it was upgraded by someone that bought 12V LA's.... not likely.... So if going Lithium, at a minimum, an updated master board would be needed. If purchasing one, and going lithium I suggest upgrading from the 4045 (45 amp converter) to the 4060 (60 amp converter). That extra 15 amps makes a nice reduction in charging time. Or if budget allows, an upgrade into the Victorn lines if you are into neat gizmology. DBL-R: Not necessarily. Without a smart charger, a trick simple test will tell you very clearly. Both tests are founded on Watt's Law: Watts = Volts xAmps?) It says for a given wattage, with in reason you can power up a load with various voltages and amperages so long as their product = the Watts of the load. If your battery is surface charged, it may flow the optimum amps and volts off the surface initially. But then seconds later the voltage drops, the load in watts does not change, so the amps must increase. In your case you are looking at a voltage that can change, a fixed load, and variable amps as a result. As the volts decrease, the amps must increase.... until the buse blows. Two ways to test your battery for load carrying ability and health: If you have an Inverter (Changes 12V DC battery power into 120V AC power): First, unplug from shore power, turn on the inverter and hook up your volt meter to your batteries. Have someone start your microwave while you monitor the voltage. If the microwave tries to run but shuts off quickly, you have a surface charge. Only hope is to try using a smart charger to desulfate as mentioned above. If you don't have an Inverter, just cycle the front jack. If the batteries can raise and lower a full cycle then you may just be the lucky guy of the day. But if it slows down and stops, or blows the 30 amp jack fuse.... Time to desulfate.... Also keep in mind that a fully charged deep-cycle LA battery typically tests at 12.7V to 13.0V (for 12V systems) after resting for several hours. So more charging is also needed. Just be careful not to boil the batteries with too much charging amps or time. GJ GJ
-

Battery Box Separation
Geronimo John replied to Mike and Carol's topic in Mechanical & Technical Tips
For David and Gail's case, you nailed that one! How? My guess is it was a long week and on Friday late the installer laid the bolts on the floor with a "I'll get it Monday". GJ -
WELL DONE! GJ
-
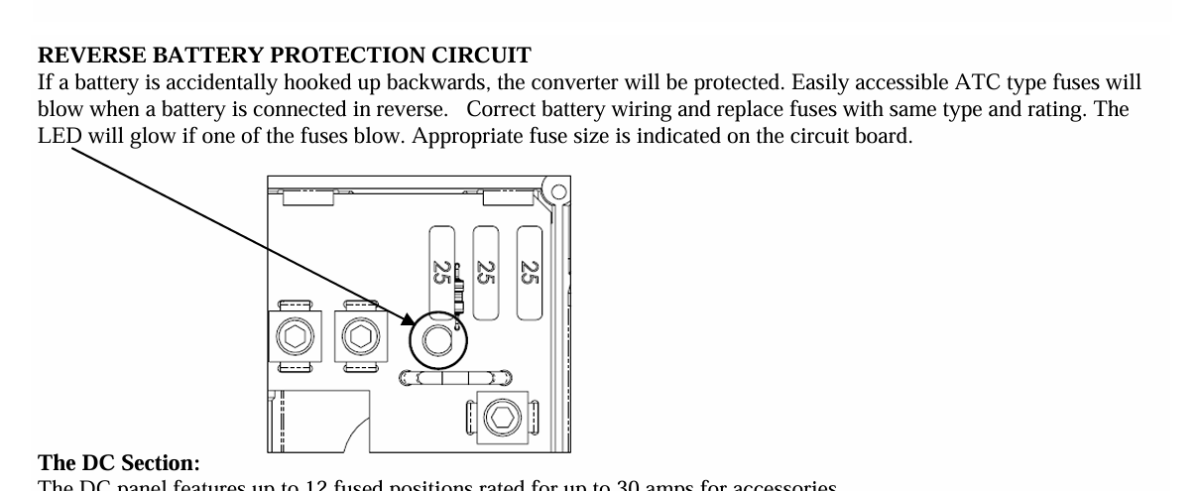
First, great news. Yes it does. From the OM: Copy of the manual is attached. Great news. GJ OM - Progressive Dynamics Converter Manual 4000.pdf
-
At 9 volts the diehard's have likely already died. Good news on having 120V, at least you are not totally toasted. The batteries appear to be 12V wired in parallel. I'm 90% sure they are gonners. Don't just replace them until you get a volt meter and can test the output of your battery charger. They are called Converters. You'll need a volt with clamp on amp meter or a friend who has one. Post back with what you find. GJ
-
Battery Box Separation
Geronimo John replied to Mike and Carol's topic in Mechanical & Technical Tips
JD: I suspect that the root cause is the slotted two piece stiff-leg that was utilized for installation & adjustment purposes. I am concerned by several aspects of the picture: All structural two-piece columns must utilize at least two GOOD bolt connections. Single Point of Failure Rule. There does not appear to be sufficient aluminum angle to angle overlap. A two piece structural column must have significant overlap to allow for both compression and angular deflections. The slot appears to have been hacked into the angle, not milled. Only having a single bolt. This allows the connection to act like an "elbow". Combined the above structural member could not effectively resist the battery and tray mass from moving out of the trailer. If it were mine, I would take a magic marker and physically strike the top of the lower angle for use as a witness mark. Then unload the batteries and determine at what height the support plate requires for proper elevation, flush alignment for the horizontal rivets, and to (hopefully) provide a slight slope to the outside for drainage. I would also add 1/8" in height for grins. Then of course add two bolts for permanent fitment. GJ
-
Battery Box Separation
Geronimo John replied to Mike and Carol's topic in Mechanical & Technical Tips
Physic's 101. The above includes airing down tires and running with light gray and black tanks when going off road. GJ -
Stabilizing versus leveling
Geronimo John replied to ripple963's topic in Mechanical & Technical Tips
Hate to admit this here on the forum.... but..... Me as well. I travel solo a LOT and the number of wasted trips back and forth does get a bit old. As in older than this RoF! GJ -
Stabilizing versus leveling
Geronimo John replied to ripple963's topic in Mechanical & Technical Tips
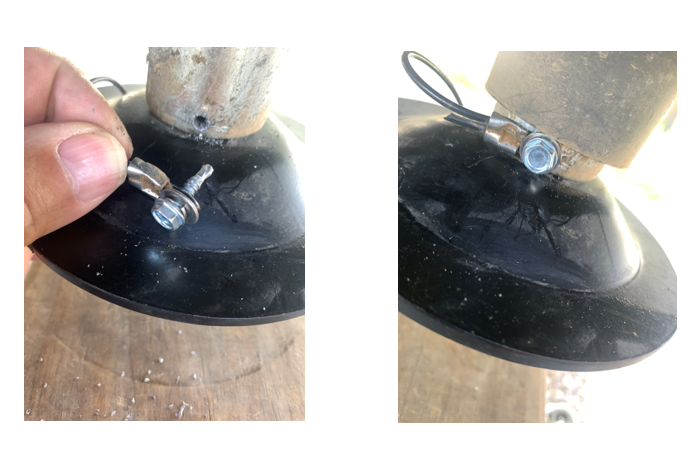
How wise you are. Been there and was suprised that my jack foot had taken a hike when I was not looking! Simple solution: Stainless Steel Cable (Really small) and a couple cable ferrules: Drill a hole in the jack foot and put a small loop and ferrule so it will not pull out of the jack foot. Another loop attached to the jack leg. Just enough room if you think small. In the event that the jack bolt leaves us, we should hear the tinkle tinkle of the foot being tortured by the pavement! Either way a spritz of black paint and a bolt and $35 saved. GJ
-
Stabilizing versus leveling
Geronimo John replied to ripple963's topic in Mechanical & Technical Tips
A short (by comparison for once) summmary: I concur with the "To Each Their Own" concept. That using hind-sight is an unfair approach to just about anything. That OTT has and still makes a product we all are proud to have, use and keep. That over time our requirements and circumstances will change. We will all end up modify, donating or selling our Olivers. We each exhibit moments of brilliance, and moments we wish we would have avoided. This forum is vibrant because we understand the above for ourselves and others. God bless Scott Oliver, his family and the OTT TEAM they have built. And all the participants of this forum. John Russell -
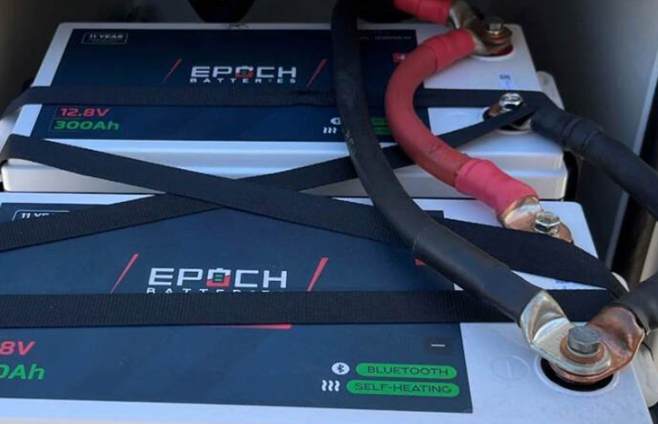
JD: your battery bay sure looks a lot simpler with your new batteries! Also like the cross strapping idea. GJ
-
Battery problem Or Other ?
Geronimo John replied to Alberta and Randy's topic in Mechanical & Technical Tips
Sorry folks, I just noted that the above is from 2022. So likely all of the below was a waste of your and my time. GJ ++++++++++++++++++++++++++++++++++++++++++++++++++++++++++++++++++++++++++++++ Scuba RX is spot on in that both cables coming into the battery bank need to be 4/0. Beyond the above statement, what you have is a serious problem that is unrelated to your poser loss. The 2,000 watt Inverter if loaded will easily pull over 2,000 watts. Recalling Watts = Volts * Amps or Amps = Watts/Volts For your inverter it can easily require the wire to carry 2000A/12.5V = 166 amps. The 10 AWG wire is rated only for 30 amps. THIS IS A SERIOUS FIRE SAFETY ISSUE. Please seek help in changing out those wires. They are NOT OEM. Now back to your phantom loss: The best way to stop all losses is to add a Master Power Shut Off Switch. Many posts on the forum about this. Here is info I borrowed from John Davies with my rationale for going with the Blue Seas 350 A rated disconnect. Since it is likely at some point down the road you'll be upgrading to Litho's, that would be the best time to add such a switch. In the meantime, just disconnect (DISCO) one of those big 4/0 wires to have no losses. GJ John Davies Master Battery Switch.docx Geronimo John -
New : Home Brewed Oliver song and video
Geronimo John replied to Galway Girl's topic in Campgrounds & Parks
Amazing. Just amazing. Have been to more than a few of the sites in the video, hope to do more. God willing. GJ -
BB Owners: The above thread has some safety precatutions to think about taking if still using your BB's. They appear to be: Individually inspect and test your BB's as presented by Will P. Also inspect the BB terminals and ALL 4/0 cable lugs with an IR gun or IR camers to visually as suggested above. Only charge your BB's if you are present and can check in on them periodically. Don't use excessively high charge currents. My limit is 60 amps for three BB's. Install the temperature sensor that came with your 712 Smart. Place a rate of heat rise detector in your battery box. From AI: For an RV lithium battery storage box, a Rate-of-Rise (ROR) Heat Detector is generally recommended over a standard smoke detector. Because lithium battery failures often involve rapid overheating (thermal runaway) rather than immediate, thick smoke, ROR detectors provide faster, more reliable alerts by triggering when the temperature spikes quickly, minimizing nuisance alarms from dust or minor temperature fluctuations GJ
-
Wow tough and good question. If the hand of GOD had them by a private part and they actually did as you suggested, then my answer would be back to Dragon Fly: Did they redesign their 100 AH BB's to address all the issues with the old design? What does Will P. have to say about their new design? 🙂 How's that for a sly response? GJ