SNY SD UP
-
Posts
352 -
Joined
-
Last visited
-
Days Won
2
Everything posted by SNY SD UP
-
We will be heading up to Saskatchewan, then east to the TQH & TLH then St. Barbie ferry over to Newfoundland. Has anyone done the TQH & TLH recently with their Oliver??? Except for a reminisce of a two-wheel motorbike trip, I was not able to find any information on the route experiences of other, with "the search function"...
-

Replacing the 6" Marine Hatch Access to the LP tanks
SNY SD UP replied to jd1923's topic in Ollie Modifications
One of the helps I 'found on this forum' with lineup & threading is to mark (small dot, or line) on both the base & cover to show where the threads begin to mate/match-up. The other is to open that hatch and wash out when you get home (if not when out and about). it seems to catch a lot of dust in the threads abrading them and make threading more difficult than it should be. B~Out -
RV Trip Wizard output for Google Maps Integration.
SNY SD UP replied to Galway Girl's topic in General Discussion
Craig, I really like what you have done here. I tried something similar (RVTW to GE Maps), and all I was able to show in GE Maps was 'straight-line' travel from stop-to-stop. I too had a discussion with RVTW and they were not interested in being accommodating or compatible with what it would take to more closely 'follow the road' as we travelled. The RVTW follows the roads in their software so why can they not export the same '.gpx' file with GPS Lat-Lon points to GE? It may be more data than they want to process for an export. i should find those replies, and send them to you to see how closely they match what you may have received form them. i.e. Copy paste a standard response. I have used the Garmin RV890 for a few years now; I believe I was able to get a '.gpx' file out of there either directly or by passing the RV890 export through Garmin’s Basecamp, then to GE Maps. I do not remember, but will fire it up in a week or two. As we plan for our 2025 outing, I will get back up to speed on this. I am going to meet with some people who are ‘GIS Professionals’, and see if it is some ‘Export’ option I need to set either in RVTW or the Garmin 890 or ‘Import’ option in GE, to see if I can get GE Maps to show the actual routing and not ‘Stop-to-Stop Straight-line’ routing. I really like the way you are documenting your routes. I am just not there yet. Are you able to show what your GE 'My Places Side Bar' looks like? Regards, Bryan -
@Olive2Roam What tire pressure are you running?
-
@topgun2 Bill, I tried searching to see if this 'Fuel Keg' could be threaded into the my 2 burner (modern) Coleman stove. This is the tube I 'use to' connect to the 'Green bottles'. It is where I 'now connect to' a hose that adapts to a 20# tank. I hate wrestling with the 20# tanks, which is why I would be interested in connecting in this 'Fuel Keg' tank.
-
At the time i was thinking about applying RED Loctite, i did not fully understand of its properties. Yes, it requires some 'Heat' to break its bond. At the time, i was thinking, "hey this part of the stove element gets really hot, so maybe i should try RED...". That's what i get for thinking without knowing. I discussed using RED, for this application with the Dometic Engineer, his reply was 'Blue is all this application needs, that is why we now do it this way." I also believe that by specifying 'using Blue Loctite', it is a QC measure to make sure they have 2 screws per element, hopefully tightened down. B~Out,
-
That is the 'million dollar' question. When it was assembled at the Dometic factory did it have two screws on each element or one. That would be a Dometic QC question. I am not sure what happened with the Gliddenwoods stove, I was just posting that their issue looked similar to ours, and what our involved. By the time the burner caps became loose, and then fell off, I fount one screw in the drawer below, and one was in the remaining element. I searched all over for the other two screws. The heat shield below the stove, may have helped those screws find a really good hiding place. Kind of like where socks hide in the washer or dryer... This D21 assembly 'Process Change' to add blue Loctite to the screws tell me, this was a re-occurring problem, and this is how they chose to address it. And I am good with that.
-
These are metric screws that come up from underneath to hold down the burner cap. “the bolts used to secure the burner caps are common M3x24mm socket head screws. Most RV appliances are going to have metric (screw, nut, and bolt) fasteners, to be compatible with the non-USA market. If you are going to ream/drill-out thru the burner cap and put in bolts... I would stay small, less than say 1/8-3/16"... At that point I would probably go with a small 'round-not-slotted-head', a slotted head is just one more place for food to catch and be difficult to keep clean. My problem was, with all the shaking (Campbell Hwy, roads to Mayo, Keno & Tuk) on our AK trip 'on roads less travelled', the threads on the underside of the burner cap had pulled/stripped away. Also not thinking "hey, could they be metric not SAE". So I caused some issue by trying to fit SAE into Metric. My Very Bad!!! If you have the D21 (ours was installed in mid-2020) and you remove it, and do not see blue Loctite on the screws, at that point, I would get some 'Blue', loosen up the screws just a bit and add a drop of Blue, retighten, and call it Preventative Maintenance time well spent. I am not sure when Dometic started adding the Blue Loctite to those screws. it was done sometime between 2020 & their 2023 email reply. This is not thread-drift, but I believe the root cause for a lot of our appliance & trailer problems were Blown Shocks, which I did not check before heading 'Off-to-Alaska'. That said, after we replaced shocks & leaf-springs, "yah we broke some of them too". This years R/T to Alaska was rather uneventful with regards to 'shaky-trailer-syndrome...'. We did had an issue with the 'Highpoint Convection Microwave' coming loose from the front panel, but fixed it (interesting screw choice in there) and we were good. However, getting it re-seated in the very back took quite a while. Thanks to all for the comments and feed-back. Gawd I love this forum. B~Out,
-
Claudia, There a number of threads out there on this MOD. In one, Mike (and probably Carol helping) added their Drip rail, and as they were applying it, on a warm day, used some Blue Painters Tape to hold it in place, as they worked along. I will let Mike tell you why he used 'Tape'. The next day (Mike commanded the SUN GOD to change its axis, so the other side of the trailer would be in the SUN. While he was waiting, Carol re-oriented the trailer so the other working side was in the sun, and they could continue in this life-time. Thus avoiding a Galactic Calamity... "my words, not their actions") I believe they removed the tape the next day after each application, and did not have any issues with it. I do not remember which vendor of the 'Drip Rail' they used. It was a very informative thread, with lots of comments as to the experiences of others. Sorry to hear of your unfortunate experience, we are almost in the part of the year, that projects like this will have to wait until warmer days. Kind Regards, As the CAMPING Season transitions. Bryan
-
My most inconvenient time to discuss 'Our Oliver" is when I am dumping/flushing. I was derailed in thought once, with a subsequent issue... Now I just ask if they would mind waiting until after I complete the dumping/rinsing process, they usually do not stick around. B~Out,
-
My Pins are correct. Whilst on one of our many 'Shake-Down Runs', for lack of a real explanation as to how we shattered our bathroom door mirror. Gorilla Tape was our friend for the remainder of the trip. Later when it came time to remove the door, I opted to remove it by unscrewing the channel where it attaches to the rear facing dinette wall, so I did not remove at the 'pins'. Removal & installation was quite easy. This might be a way that would be easy for you to make repairs. IDK. B~OUT
-
@DonnaDuane Are you following this? If you removed your door, were you aware of the orientation of the pins?
-
Now I have to physically re-inspect ours... Maybe some maint is needed. I will report back, as I have a special circumstance associated with ours.
-
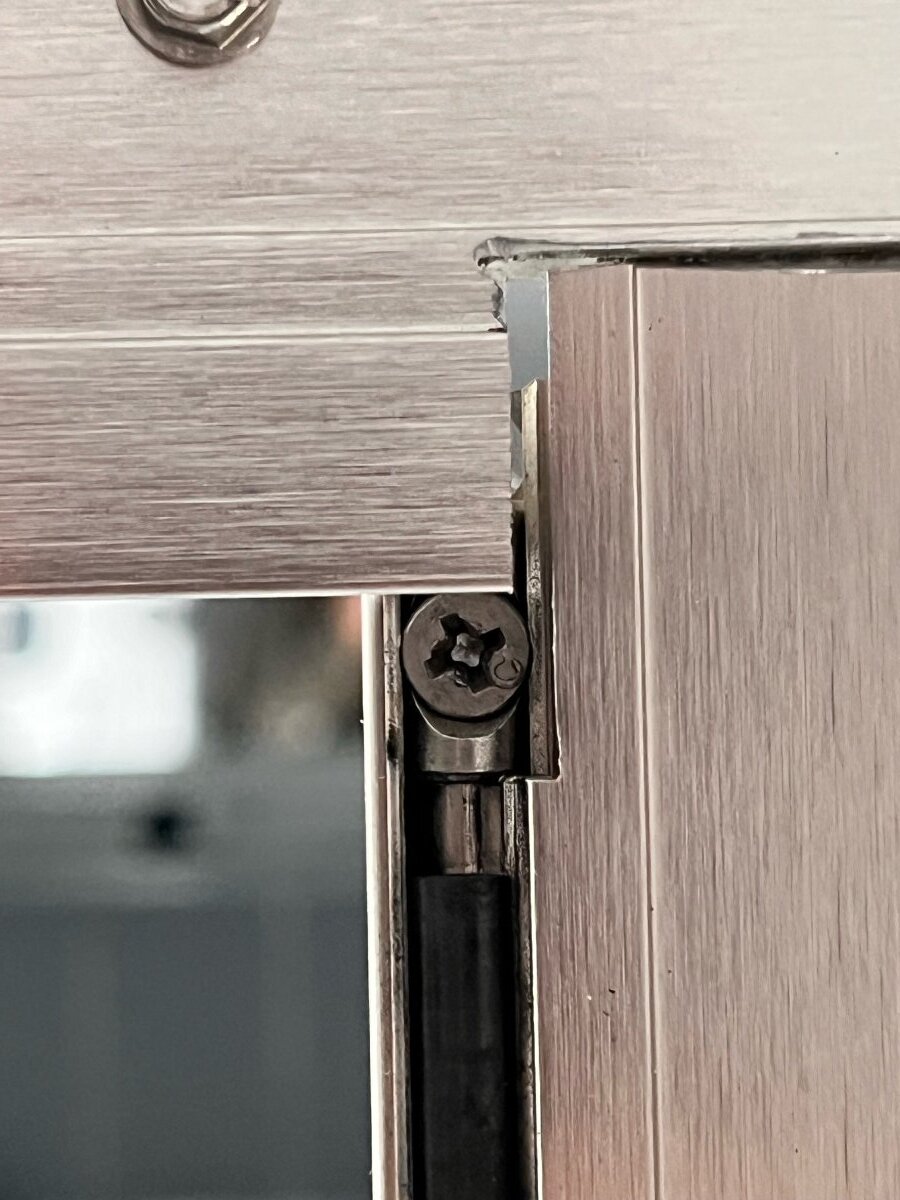
Yes, it appears so. Just added. It also appears in the pic's as though the Phillip's Head driver 'spun' in the screw head during the install...

-
Would you verify with Scott Oliver that what we are seeing on the 'Made in USA leaf springs' ref to 'The Beast' are in fact 5-leaf springs. It would be interesting to see if we could find a reference to the sourcing... Thnx B~Out
-
@Ronbrink do you have source info for those
-
Steve @ScubaRx I copied this pic from @topgun2 "Jim Oliver's The Beast" Post, are we seeing 4 or 5 leaves on Jim's Beast? Or do we not count the one that is rolled with the 'wet Bolts'??? Seriously asking for myself... B~OUT Link to Post for context,
-
Remembering to Plug the hole when 'not camping for extended periods' to prevent insects (i.e. mud daubers) from using it, is a good thing. Just add the step, to your winterization and de-winterization to remove the plug.
-
Turning on the rear camera automatically
SNY SD UP replied to Snackchaser's topic in Ollie Modifications
Geoff, this is a very interesting mod, and I can see others taking the “Engine-on Detector Switch” concept for other projects. For us at this time we are non-Lithium's so 'Turn On Rear View Camera' is on our 'Towing' checklist, just as 'Turn Off Rear View Camera' is on our 'setup' checklist. I also verify it is on when I get to 'check out' Maggie, whilst we are are running thru the Rear (running, signal, brake, bkup, flashers) Lights sequence just before we start towing. I will of course be following the feedback here. B~Out -
Craig & Rose, Congrats on your travels, adventures & accomplishments. You have documented them well for all of us to follow. So when are you going to do Hawaii? (Has anyone ever OTT camped in Hawaii?) Let me know what route you will be taking. Since Sept '20, We have only the 11 western states, Newfoundland, Labrador & Nunavut remaining. The last one will be the toughest... no roads at this time. B~Out
-
I am not an electrician or an engineer, so I sometimes struggle with all this electrical talk. But that does not stop me from trying to understand all that I read... If I understand this thread, we are discussing two different scenarios; #1) CLEAN POWER at the POST, vs. #2) Handling power significant spikes/drops or power cycles (brown-outs?) enough to do damage to our trailers. Both can occur after the initial 'CLEAN POWER' test. For #1, I too have a 30a to 15a adapter, with a W.A. Sperry tester (like @mountainoliver) plugged into the 15a side. I always plug that into the post before connecting my OTT shore line. Most of the time I get the 'circuit OK' and I continue. If not OK, I try to resolve with the CG staff. Like @Mike and Carol I also have a 4-prong 50A to 3-prong 30A adapter, and have used it when 30a was dirty & 50a was clean. For #2, I do not have anything as of yet... But have been giving it more & more thought. This is why; During our last camping season, we were at a CG that had a fueled 'CG' wide large generator that was, to put it in crude but understandable terms... undulating. Maggie & I were walking around and when I heard that, I hurried to our trailer heard clicks in the walls and saw lights on/off on Xantrex, I then disconnected our shore power. Later when I talked to the CG staff, they said the generator had governor (i.e. undulating) issues, another said the demand exceeded the output, so it would idle down for a moment. IDK enough to know what it was, however I do know enough that I did not like the clicking & lights show in or trailer.. So I am wondering if I need to look at getting something that handles #2 OR if #2 can be further split between (2a) power spikes/drops and (2b) power cycles (brown-out?). Still trying to understand all that I have read above... So keep the dialog coming, and I will re-read & watch video's. B~Out
-
Yes, we also 'Had those Shims', found some on the floor below cabinets. Kind of reminded me of paint stir sticks. I removed ours, not really knowing what they were... I thought maybe temp spacers during assembly, and were left in there. I did save them, now I cannot find them, not in TT, must be in garage. I figured out what they were months later. However, have not had issues with drawers or slide/glides. all staying put. I do see where Metal Slide hdwe, may have some issues in the future, but no issues yet, and we have had travelled some rough roads. B~Out
-
This is what I found, when the MW stopped working, and I had to remove it. (not working was another issue). We have the High Pointe (see pic) MW, the faceplate has good attachment to the fiberglass/cabinet, no issues there. However you have to slide the MW out to get access to where the shroud is attached to the sides of the MW. Shroud has SHARP EDGES... We had (1) screw on each side of shroud holding it to the MW, (1) on bottom of cabinet, (1) somewhere between OTT assembly and Valdez AK... IMHO, These (see pic) were not really good screws to attach the shroud to the MW, they were counter-sinks so they would not be snug. All were all loose, having worked their way out partway. The screws on the front of the shroud were basically holding the MW in place. Opened up MW, Repaired the MW, Closed up MW. I replaced existing screws with some short panhead sheet metal screws with fatter threads, and some appropriate external tooth washers. I should have used regular nuts/bolts/washers & bolted the shroud to the MW but I just wanted to finish and get on with vacation. We will see. Getting the MW back into the compartment, and lined up and under that cam attached to the bolt that holds it in place at the rear of the cabinet was not easy, maybe an hour & half...
-
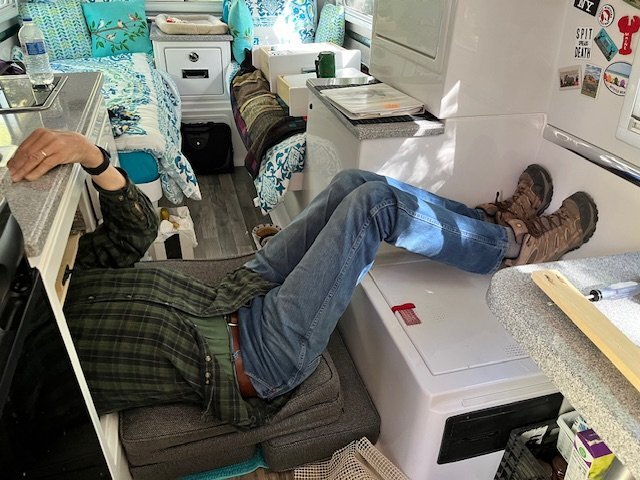
@routlaw you mean like this 'on the road repair' of drawer 'Rails & Slides' ??? A number of '(2) pre-drill holes' however 'with only (1) screw'... never did find the missing ones. The screws used should have been 1/4" longer. Not bad for a 76yo 6-5, I was further in before Maggie took the Pic, and of course Willis was right in there with me ‘Supervising’…
-
Tire Pressure and make sure your shocks are in good shape. I have found that most appliances in the OTT to be 'Metric threading', that is important when buying/replacing lost bolts/nuts. B~Out