MAX Burner
-
Posts
1,681 -
Joined
-
Last visited
-
Days Won
68
Everything posted by MAX Burner
-
 Our understanding of the SmartShunt's contribution to the overall charging/discharging system is to measure and report via the Victron Connect App or the Victron GSX what EMF (maybe not the correct technical term) or power is either being consumed or charged into the BBs. Don't think the SS regulates various incoming amperages... Pls correct if wrong. Just a dump fighter pilot as described above by @Geronimo John
 -
We're get'n there.... HA!
-
View from dining room window this morning: IMG_3522.MOV Magnus on back patio:

-
New Oliver Advertisement - Winter Camping Adventure
MAX Burner replied to Patriot's topic in General Discussion
Excellent call, Brother! -
New Oliver Advertisement - Winter Camping Adventure
MAX Burner replied to Patriot's topic in General Discussion
With full understanding of what "highjacking a post" means, and risking getting hammered for this post - but @Ronbrink reminded me of my old handmade meerschaum pirate pipe I acquired in Istanbul decades ago... Now I need some good tobacco to go with the Oliver!
-
We don't use the City Water port. That said, we typically use the adjacent Fresh Water port to fill the 32-gallon fresh water tank. Using an inline filter and flow meter (indicates how much water we've been using*), we'll fill the fresh tank until we notice water draining from the street side over-flow outlet. Someone please correct me if I'm wrong, but I don't believe this causes any dangerous over-pressure in the system. *Flow Meter: when the SeeLevel gauge shows single digit levels of water (5% is the lowest we've seen with zero water available in tank) the max onboarding water volume indicated on the meter is about 27 gallons. This verifies that the OTT 32-gallon tank provides only 27 gallons usable without the fresh water tank modification described in other posts.
-
New Oliver Advertisement - Winter Camping Adventure
MAX Burner replied to Patriot's topic in General Discussion
@Wandering Sagebrush: Time to break out your backcountry skis! -
@Ronbrink: Sweet set-up, Ron! Thanks for sharing... Cheers! 🍻
-
@Geronimo John - Hey, GJ; FYI, D found these from Amazon. They work out well for our needs. They fit through the street side garage hatch. We use them in the back of the SUV also. Cheers, Brother!
-
New Oliver Advertisement - Winter Camping Adventure
MAX Burner replied to Patriot's topic in General Discussion
Concur 100% w/ @Rivernerd, but hey, I'm really liking their dog! -
@Rivernerd's suggestion is spot-on. Renogy products are top-notch, IMO. Making the 4/0 (pronounced, "FOUR-Ought") and 6AWG (American Wire Gauge) cables for your new 12vDC battery bank is not difficult, if you've got the tools for it and your engineer grandson is experienced in such matters. Cable cutters, a crimper tool, terminals, cable material, and proper heat shrink material are available from Amazon (no surprise there). Custom-fit cables are efficient in terms of the space they'll occupy in the tight quarters of the battery box - plus, they make the array appear neat and tidy. Being the Christmas Season, these tools would be nice stocking stuffers (get a big sock) for your engineer grandson if he doesn't already have them! HO, Ho, ho! Cheers!
-
We just adopted Ollie hull #1147!
MAX Burner replied to Heather and Eric's topic in Introduce Yourself
Welcome to the Oliver family, @Heather and Eric! Congrats on your "new-to-you" Ollie, we just recently adopted our's as well. Y'all live in a beautiful region and we hope to take Casa Blanca (Hull #226) up there soon! We look forward to hearing about your new OTT adventures... See y'all down the road. Cheers, A & D (Magnus and Oscar, too - WOOF!) -
@JWalmsley: Hey, Jason - We're think'n it might be time for another "Oliver Hat"... HO, Ho, ho! Cheers, Brother!
-
...oh, please! Hurt me! HA! Enjoy!
-
"Starlink-Mobile" Project Proof of Concept...
MAX Burner replied to MAX Burner's topic in General Discussion
Totally get y'all's concerns. The key requirement for us was to get the Dishy off the ground and still be able to use it without the OTT. The EZ Pole and mount is robust - 4 nested aluminum tubes. High wind conditions would require striking the colors, lowering the dish to the 6.5-foot position and thus keeping it off the ground. FYI, in snowy conditions, the user can select the snow melt mode (more energy) via the SL app to keep accumulation at check and maintain high signal strength. There are flat mounts available for SL that we've studied - but once its flat-mounted on the roof, you're committed to that application - we wanted flexibility to use SL if we were tent camping, for example. As noted, we're also interested in a 12vDC conversion and shortening the proprietary CAT6 SL cable to save a bit of energy - but that's down the line. We want to log some more trips in the current mode first so we're better able to make an informed decision on what best meets our needs. Guys.... Beware, there are some scary rabbit holes one could fall into when researching the RV-applicable mods for SL kits... Many hours spent crawling through these tunnels. HA! -
"Starlink-Mobile" Project Proof of Concept...
MAX Burner replied to MAX Burner's topic in General Discussion
Thank you. Wall-to-Wall sunshine yesterday in the low 50's after a day of snowing on Saturday... Cheers! -
"Starlink-Mobile" Project Proof of Concept...
MAX Burner replied to MAX Burner's topic in General Discussion
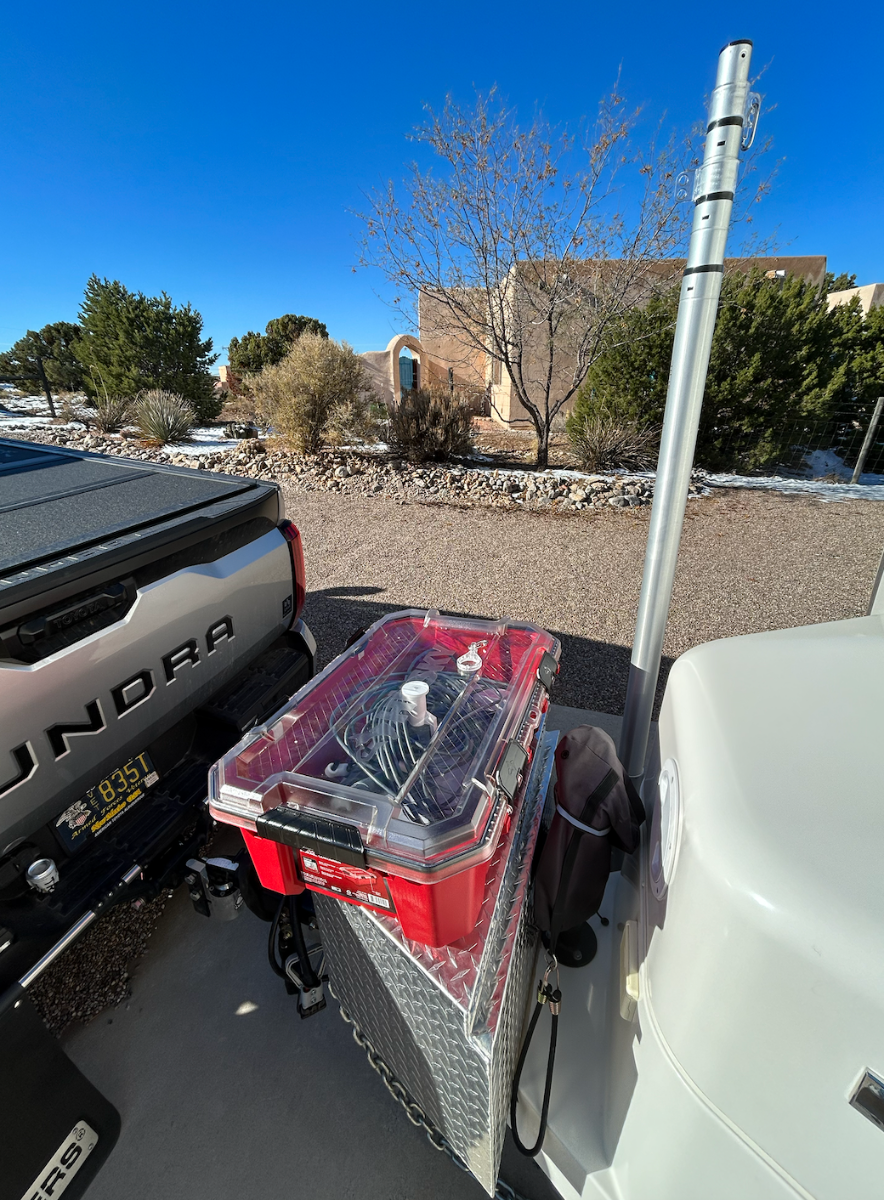
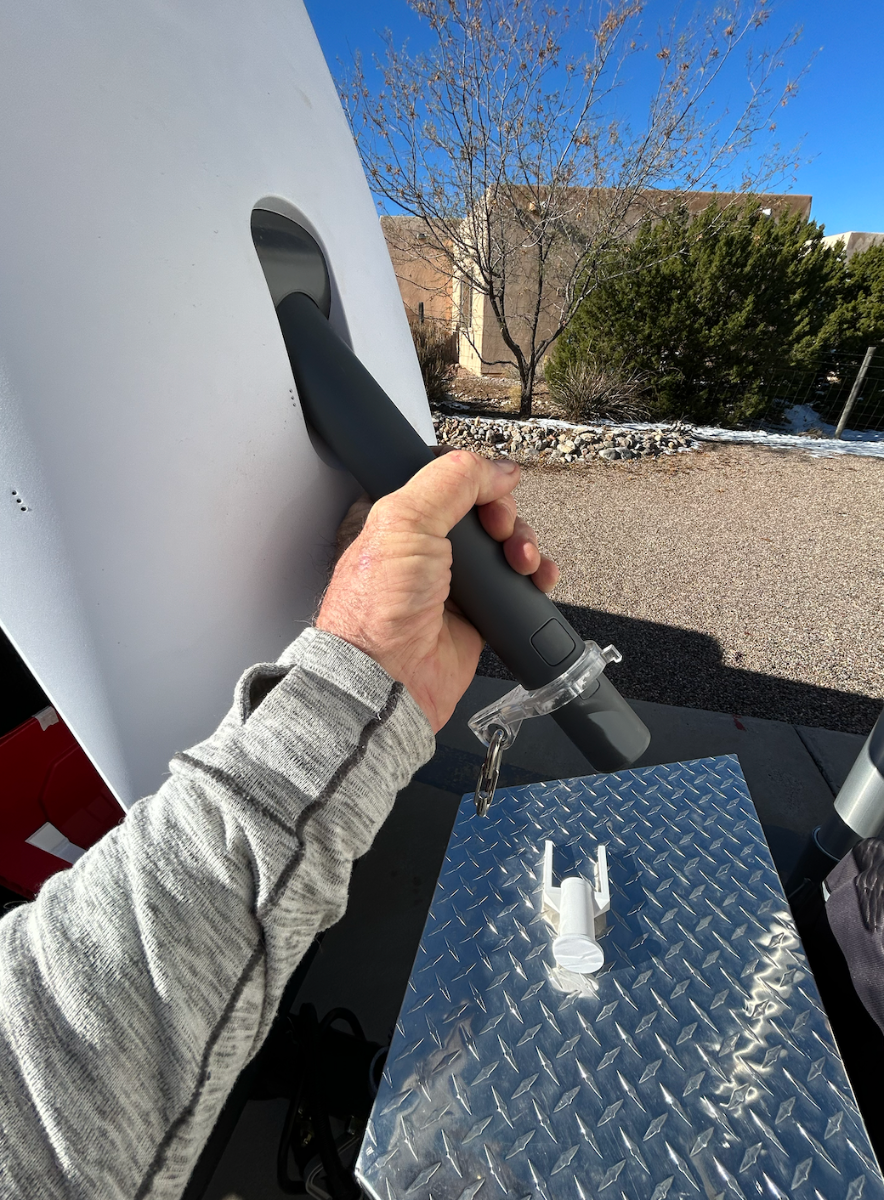
Hey, GJ! Thanks, brother... It's a work in progress for sure. Regarding your questions: 1. The E-Z Pole mast is designed with 4 nested aluminum sections with "twist-to-lock" fittings in each. To unlock, it takes about a 1/4 turn clockwise. Push the top section up first, lock, then 2nd, and 3rd. The pix show the mast at about 2/3 max height, FYI. The mast configuration gives us more use options - for example, we can use the quad-stand at the house should we lose our Xfinity/Comcast service. 2. I measured the speeds today in on the apron at 225mbs download; 28mbs upload. Basically faster than our Xfinity service. However, we've learned through some of the previously mentioned rabbit holes, that speeds vary depending on location. In some highly dense populated areas speeds can be slower, as Starlink "chokes down" speeds - same goes with remote locations. A subscriber can pay extra for guaranteed higher speeds. We've decided to try the basic plan for the time being. 3. The basic Starlink Mobile kit is $600. The Husky tote was $28 at Walmart. The custom fit packaging pieces were $50 from Etsy. The Esty pole adapter cost $15. We're planning to modify the kit (router) from AC to 12vDC. Switching to 12vDC drops power consumption by approximately 18%, FYI. I've already purchased the component parts to make the DC conversion for about $125. Parts needed are a PoI injector, 12-48vDC converter, and a standalone router. Easy peasy. 4. The Starlink Mobile monthly service is $150 - but, service is set up as "pay by the drink". If you're not planning to travel during a particular month, or your rig is in storage mode, you can access you account online and deactivate service. Only the "Mobile" option allows this feature, the "Residential" plan does not. Hope all is well on your side - best regards to June... Cheers! -
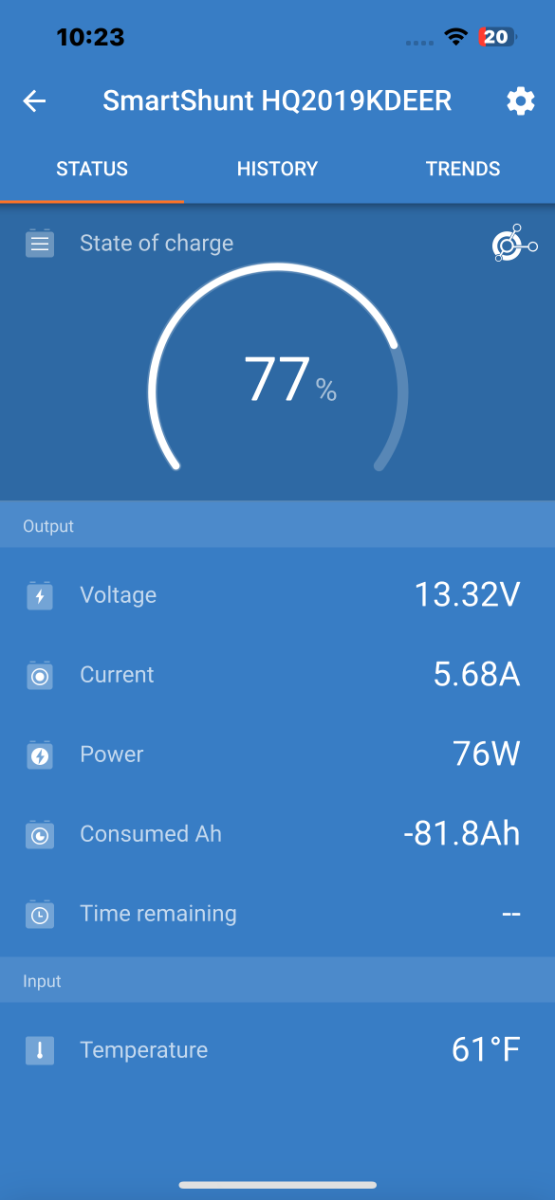
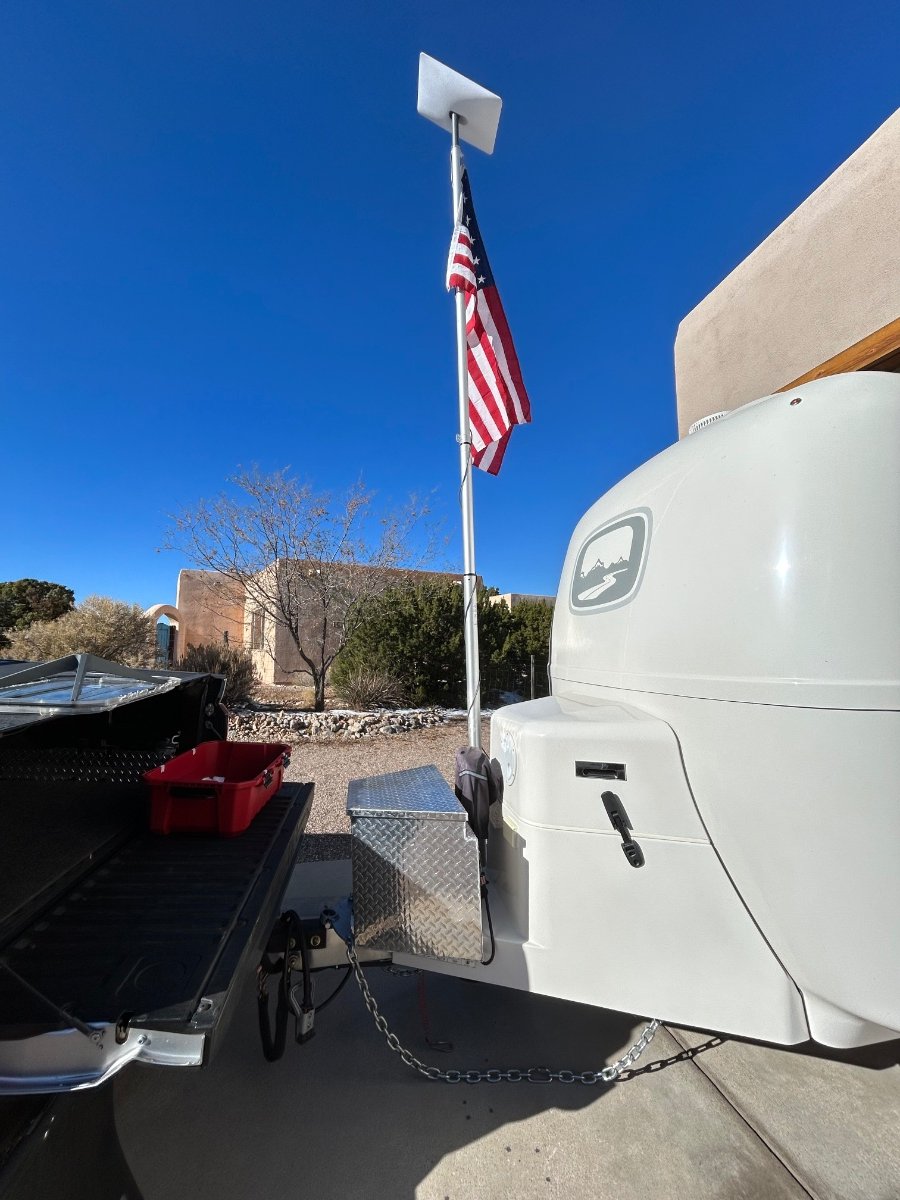
So, since D works from home and spends quite a bit of time on Zoom, Teams, etc., we decided to get into a Starlink-Mobile kit. The kit will allow her to work from Casa Blanca with Starlink's scorching fast internet connectivity and allow us to travel more often. Today we played around with a proof of concept for using Starlink in our Oliver - there are literally dozens of YouTube vids and deep rabbit holes for ideas of how to integrate Starlink with RVs. Here's how we'll be lugging is around: We're using a 12-gallon plastic Husky tote with custom-fit travel pieces from Etsy to keep components from bouncing around when towing. Its a neat and tidy mobile kit. Next, we didn't want to use the Starlink-supplied "quad stand" so we modified the top of our E-Z Flag Pole to accommodate the "Dishy" mount that would normally be inserted into the stand. We inserted an adapter (a 3D print from Etsy) into the top of the E-Z pole so the Dishy just snaps inside. By drilling-out the upper mostIMG_0441.HEIC flag connector with a step-bit, we're still able to fly the colors. We used the exterior curbside AC outlet for the Starlink router power connection. With the inverter energized, it took about 10 minutes for Starlink to connect to its satellite. Energy consumption varies between 60 and 80 watts according to our Victron Smart Shunt via the Cerbo GX. The solar modules are generating about 180watts at today's low sun angle, which more than makes up for the inverter/Starlink consumption. We'll likely put a through-hull connection using a modified waterproof Furrion capped connection (same one OTT uses for the satellite coax connection). The standard supplied cable is 75' and needs to be shortened anyway - so we'll do that when we install the modified Furrion. More later...
- 15 replies
-
- 11
-

-

-

-
Show us your furry traveling companions..............
MAX Burner replied to Ollie-Haus's topic in General Discussion
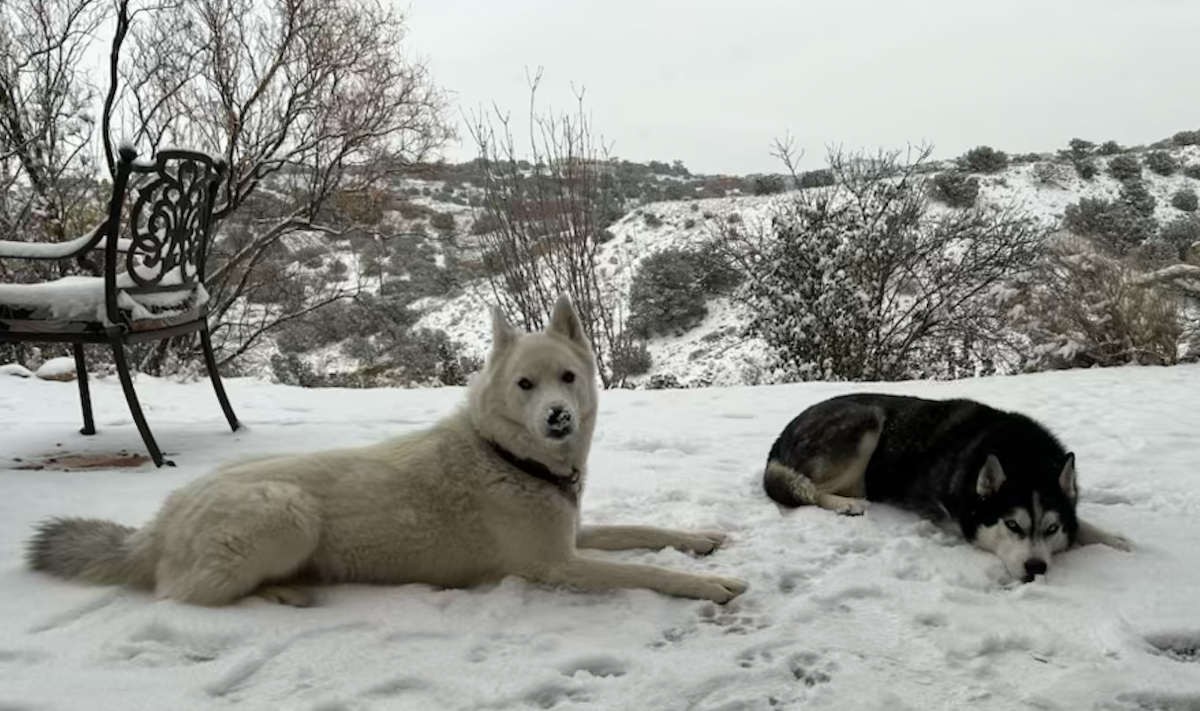
Happy Huskies: Magnus and Oscar are absolutely beside themselves with the light dusting and our first winter wonderland this morning....
-
Black Friday and Cyber Monday deals for campers
MAX Burner replied to SeaDawg's topic in General Discussion
Same here... We mounted the sending unit on the FWD bulkhead just below the closet door to the right of the main hatch... Works great! -
Happy Turkey Day "Week", Oliver owners! D and I will be staying home this year, too. We'll be deep frying a 12# free range Non-GMO bird on Thursday afternoon and smoking a heavily marinated 18# brisket in the BGE on Friday. Should have plenty of leftovers - so if y'all're in the AO; swing by! Gobble - gobble! HA!
-
Static Cling Vinyl on Frosted Upper Cabinet Doors
MAX Burner replied to Steve and MA's topic in Ollie Modifications
@Steve and MA: Very cool idea! Looks great... Thanks for sharing! -
Need to add EMS, none installed on older hulls?
MAX Burner replied to jd1923's topic in Mechanical & Technical Tips
Great move, Bill! Seem to remember reading about this mod. in previous posts - we'll definitely mount it high up inside the pantry... Another item for the "To Do" list; thanks! Cheers! -
We're using the 200W Renogy "suitcase" style portable solar modules - it's rigged with a 10ft 10AWG cable and we've got a 20ft extension cable, if need be. Granted, it would be more efficient to mount the Renogy solar charge controller inside the battery compartment to reduce the DC line loss especially when using the 20ft extension - this is on the "to do" list, for sure. But in the meantime, it's still a healthy supplement of DC energy into the BB bank - we'll take whatever we can get! The portable kit carries well even in the small Tundra truck bed - the downside is the weight of the unit, its not light at about 36#, but still 12# lighter than our Honda 2000! We installed an SAE connector to the battery bank hatch which is wired to the Victron smart shunt (neg) and main battery bus (pos). FYI: We've not brought along the Honda GENSET during our trips this summer/fall - seems that the 340W roof modules and the Renogy portable kit does the trick in topping off the batteries by mid-morning, at least in the SW USA. 😜 Cheers!
-
Definitely like the flexibility of front and rear mounts to avoid obstacles around the trailer... We'll likely add a mount to the bumper like you've shown - very clean. Thanks for posting... Cheers!