Leaderboard


Popular Content
Showing content with the highest reputation on 04/13/2018 in all areas
-
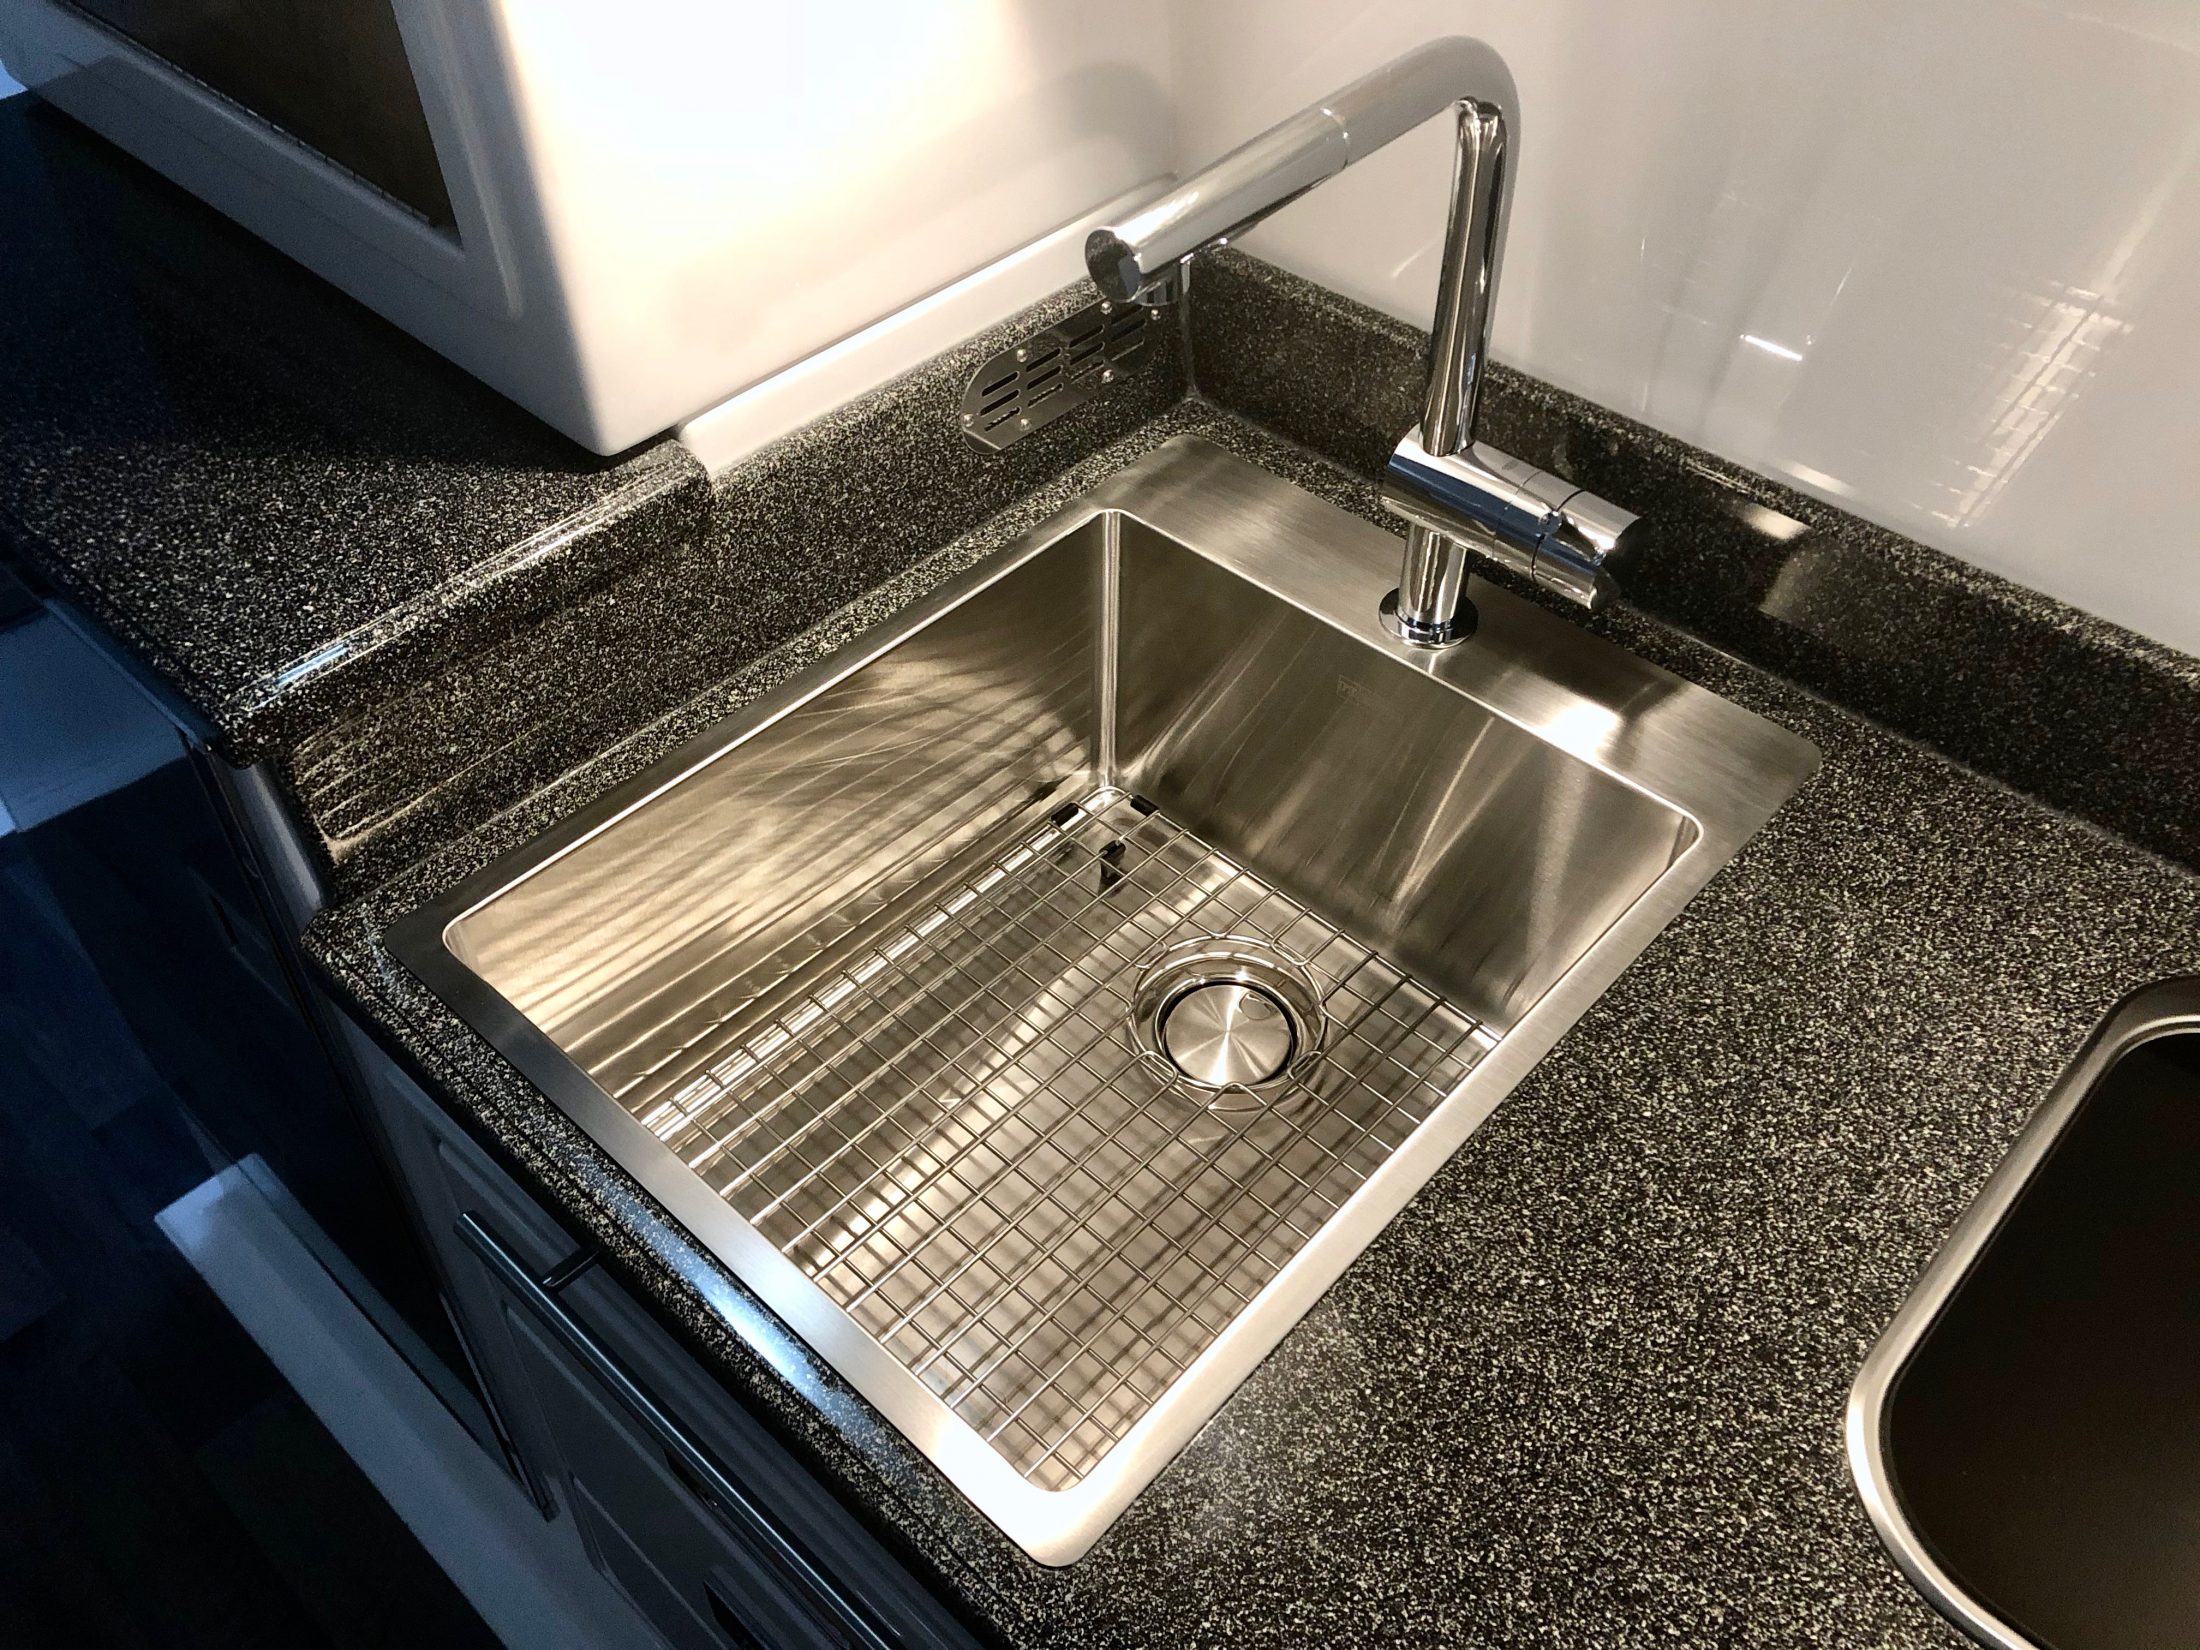
This, I like - I never cared much for Oliver's sink and faucet choices and I'd actually planned to supply them a sink and faucet to get installed on the line. Unfortunately the one I wanted wouldn't work and I was having trouble getting the proper dimensions from Oliver, so I just let it go and figured I'd replace it later. Well, that was a good idea until I realized that the cutout Oliver made for the sink was way too big for any of the bar sized sinks that I could find. And all of the full sized kitchen sinks were too big to fit. But finally I stumbled across this oversized bar sink from Franke. It's the 17" Franke Vector. Overall, it's the same width as the existing sink, but the lip is narrower, so the bowl itself is a bit wider. Mainly the sink is much longer and deeper. In overall volume, it's over twice as large as the original sink, but takes up no more counter space. Can't beat that. And because it's farther forward and 3" deeper, it doesn't splash all over the place like the original. In fact, I can even turn the faucet up all the way without it splashing over the front of the sink, which is novel. I like the Franke sinks in that they have the straight sides and look of a modern zero radius sink, but they do add a slight radius to the corners so that you can actually keep them clean. Installation wasn't too hard. I'd rate it 7/10. The difficulty was that I had to modify the base cabinet for it to fit. There's a wood brace running across the top front that is screwed to the fiberglass beneath the drawer trim, which had to be cut out, and also a portion of the left side of the cabinet. That sounds like a lot of structural support to remove, but the cabinets are mainly tied in at the bottom and I ran it past Jason beforehand to make sure I wasn't looking at it wrong. I have to say that the cabinets are stoutly built, and I'm not at all worried about it. The second problem I ran into was that my countertop wasn't perfectly flat. It bowed down in the middle slightly which wasn't apparent until I installed the sink. But I was able to temporarily shim the counter against the top of the cabinet while the silicone seal dried and then I glued PVC blocks around the perimeter of the sink to both hold it in place and to level the counter. The Franke sinks have an odd installation clip that wasn't designed with hollow core fiberglass in mind, so the blocks were necessary anyway. It's not going anywhere now. Of course I lost use of the flip out drawer but I hated that thing anyway. I glued a few ½" blocks to the front of the sink and then fixed the drawer front to the blocks with heavy duty velcro, just in case I ever need to remove it for some reason. The sink depth worked out perfectly with the existing cutout on the back of the middle drawer to clear the drain. I thought I was going to have to get a Hepvo trap to make it all clear but Oliver actually places the trap behind the cabinet, so no problem. I did have to get the narrowest profile elbow I could find to attach to the drain basket, so I had to go with cheap plastic rather than PVC, but such is life. At the end of the day, however, I decided to use a different drain basket that was a bit deeper, so I had to make the drawer cutout about a half inch deeper after all. The faucet is a Grohe that I found on sale at Home Depot for about half price, so that was a nice find. It has a really nice feel to it and unlike the sink, was a cinch to install. Grohe has a trick installation method that allows you to work from above so that one person can do it without crawling under the counter a hundred times. Oliver's hot and cold lines are convenient to get to and there's an access panel in the back of the cabinet that can be removed if you need more room to work. The only issue I ran into was that the counterweight for the sprayer was getting caught up on everything that's packed in the back of the cabinet. To fix it, I made a tube from some flexible plastic sheeting that I had lying around and just slid that over the sprayer hose. Now the hose slides easily inside the tube and as a benefit, the weight won't bang around inside the cabinet while traveling. So that's about it. I've learned that I don't have the patience or foresight to take progress pictures Like John does, so my description will have to do. But I'm happy to answer any questions.
 11 points
 -
Thought I'd update this thread. The trailer, as of last week, is I think officially finished, at least from Oliver's standpoint. Oliver took it back after our Holiday trip to finish a few things they hadn't gotten to before our October deadline and trip, and to tweak several things that weren't quite right- mainly the brakes which were pretty flaky. Turned out they weren't grounded properly. Anyway, I told them to keep the trailer for as long as they wanted, and they did, but it all seems to have come together and we're pretty happy campers. Anyway, she's in the driveway now and I've spent all my spare time over the past week cutting random holes in the fiberglass. Hopefully, I'll get those logos finished up this weekend and get them cut next week. I came up with a side decal that I'm happy with but I need to get it finished. My project this past weekend was to replace the sink and faucet. I'll put up a thread and a pic. I'm super happy with it. I also had time a few days ago to mount a lamp on the nightstand. I just need to wire it up and mount a small switch to the nightstand as well. And finally I ordered a Lagun table mount and folding tabletop today so that will be an upcoming project. And I've got a pressure tank for the water system sitting here that needs to be installed also. Busy couple of weeks ahead.2 points
-
Yes, that's the one. Sorry that it won't work. Here's some more detailed, I hesitate to call them instructions, but... The existing cutout on mine was actually slightly wider due to the mounting hardware on the original Elkay sink, but I had to cut out in front and back. I started by taping down the template and marking both cuts. I located the sink in really about the only location it would go. I needed to leave enough space at the rear to turn the faucet handle, and at the front I was about as close to the fiberglass face of the cabinet as I could get. But basically, I tried to match the side and front reveal and that worked out pretty well. I tried using a Bosch T130 grit blade to cut the fiberglass, but though it made a nice cut, it was too short in a couple of spots so I had to switch to a longer T141. That one actually worked well, though the cut was rougher and it did chip in a couple of spots, but only slightly and not nearly so much as would show past the flange. I taped around the cut with masking tape to keep from scratching the countertop. After that, you'll need to remove the drawer trim using a razor blade to cut the caulk, then remove the screws where the sink will go (I think there were 4, 3 across the top and one on the left side), and then cut out the wooden brace working underneath. I used the jigsaw and cut the right side, then marked the left side of the cabinet to the depth of the sink. Then I cut the left side out from the front corner to the back of the sink. I think I did two cuts working toward each end. You could go ahead and cut all the way to the back if you wanted, since you'll just end up with a corner of the cabinet sticking out. You can then remove the brace and side piece together. The fiberglass on the front is fairly thick, and when you put the trim back, it will cover most of where you cut, so there's little risk of doing real damage. But work carefully nonetheless. I would test the flatness of your counter before trying to place the sink, and if it's bowed like mine, go ahead and shim it flat before doing what I did and having to scramble to fix it before the silicone on the sink set. The center of the cabinet has a little platform, maybe 2" wide that you can use to set whatever shims you use. I used a couple of pieces of the wood I had just cut out. Also before you set the sink permanently, just rest it in place and mark where you will need to cut the drain, since the drain on the new sink is at the rear. I think I cut it at about the halfway point. Perfect precision isn't necessary. You should have plenty of play at the trap to twist the drain to the correct angle. Once it's all flat, just run a bead of silicone around the sink and set it in place. Mine set in pretty flat and just a couple of taps with a wooden block pushed it flush to the counter. Next you'll need to trim the drawer trim so it will fit around the sink. It's soft enough to cut with a utility knife. The cut will be hidden by the drawer front so you only have to be as careful as your conscience allows. Then clean up the old caulk - I went around it carefully with a razor blade, then cleaned up the rest with minimal spirits. I actually only removed the caulk around the top and left side and pulled it out to work, but I think it would have been easier to just remove the whole piece. I taped it back to the inside of the cabinet to set it in place and then went around painstakingly with caulk. I'm a terrible caulker, and since I was going to use the same caulk to glue in the blocks around the sink, I was using the 3M 4200 which is a real bear to work with. But I managed. I noticed this morning that I need to go back in one spot that was a little thin. Since I had some 1x2 pvc left over from another project, I cut that into 4" lengths and used four of those to block around the sink on the right side where the counter wasn't level. I had a few blocks of oak that were about 3x3x2 that I used on the back. The sink has a flange on each side that I glued to. On the front, I ended up with about ½" between the face of the sink and the inside of the counter, so I cut a few strips of ½" plywood to block there. I made those strips the full depth of the sink since I used those to secure the drawer front back in place. That's not necessary, since the drawer overlaps the trim enough that you could secure the drawer with a bead of caulk around the top and sides. But I had in mind to use the velcro, so I needed a few blocks for that. I taped all of the blocks in place so they wouldn't move and left them overnight. The next morning I removed the tape and the temporary shims I had for the countertop. And that's pretty much it. The rest is just following the instructions for the faucet and sink drain. If there are any plumbers reading, stop now because I have to confess that I used silicone on the drain basket and fittings. But I figured with all the bumps and vibration that silicone would be better in the long run than plumber's putty. If you use the basket that comes with the sink, then everything should clear the existing drawer cut, or at least it did on mine. I did get a low profile elbow, which as I said is cheapy plastic, but it works and since it slips inside the old drain I didn't have to worry about measuring and cutting. You'll need to glue a PVC-plastic compression adapter to the old drain. It's called something else, but you get the idea. Just spend several minutes staring blankly at the plumbing fittings at Home Depot and eventually you'll figure it out. That's my approach, at least. The only other thing I did special was to zip tie the existing plumbing lines as secure as possible while I was in there. I don't like that Oliver just lays a lot of the plumbing in place without securing it and I've already had one fitting crack due to vibration, so whenever I'm anywhere near a water line, I zip tie.1 point
-
I like what you did with the sink and faucet. Looking forward to more projects and pictures! Mike1 point
-
That pressure tank thing is a snap once you figure out exactly where it will be placed (read that - where it will fit in). It will make your sink project look huge in comparison. I can feel the excitement in your words - After two years, I still like "tinkering around" in Twist. Just trying to think of little ways to make things work better or be more convenient. For me, it is all part of the joy of owning one of these things. Bill1 point
-
Overland - Nice job! And, it looks good too. I've just never had an eye for these kind of things. Yes, I think that I know when I see something that looks tasteful but usually trying to design it myself doesn't turn out very good. Obviously you can do both - design and make it look good. Bill1 point
-
I love the sink and faucet you installed. Very clean lines and modern as you say. I would have Oliver install the same in ours except I do not want to lose the drawer space. We converted our flip down drawer to a real drawer last year. Do you think the faucet you used would help with the original sink/faucet combo splash issue? I have never liked the Oliver’s kitchen faucet. It is too tall and seems over sized for the sink to me.1 point
-
That looks fantastic, nice job. Thanks for the info, I had never looked at FRANKE before, I have all Grohe fixtures in my house and we love the quality of their products. FRANKE Quantum line looks interesting too...1 point
-
That’s the upper vent for the isotherm fridge. The lower one is the same but on the opposite side near the floor.1 point
-
Nice install. That is a pretty sink. What is the stainless grill on the left side backsplash?1 point
-
Very nice installation and write up. And it looks great to boot.1 point
-
Yeah, well I used the trailer jacks anyway. :-) I used the spare and 1 tire. Had those 2 done and then took the other 2. I had to make 2 trips to the tire shop which took a little longer but that way I left the trailer with at least one wheel on the ground and the jack not holding as much weignt.1 point
-
The photos certainly look like they've improved it a lot over the last year they've been toying with it. The angles and perspective certainly make it "look" spacious. Thanks for the updated information on it, I wonder if this means they're actually going to release it now? https://www.airstream.com/travel-trailers/nest/1 point
-
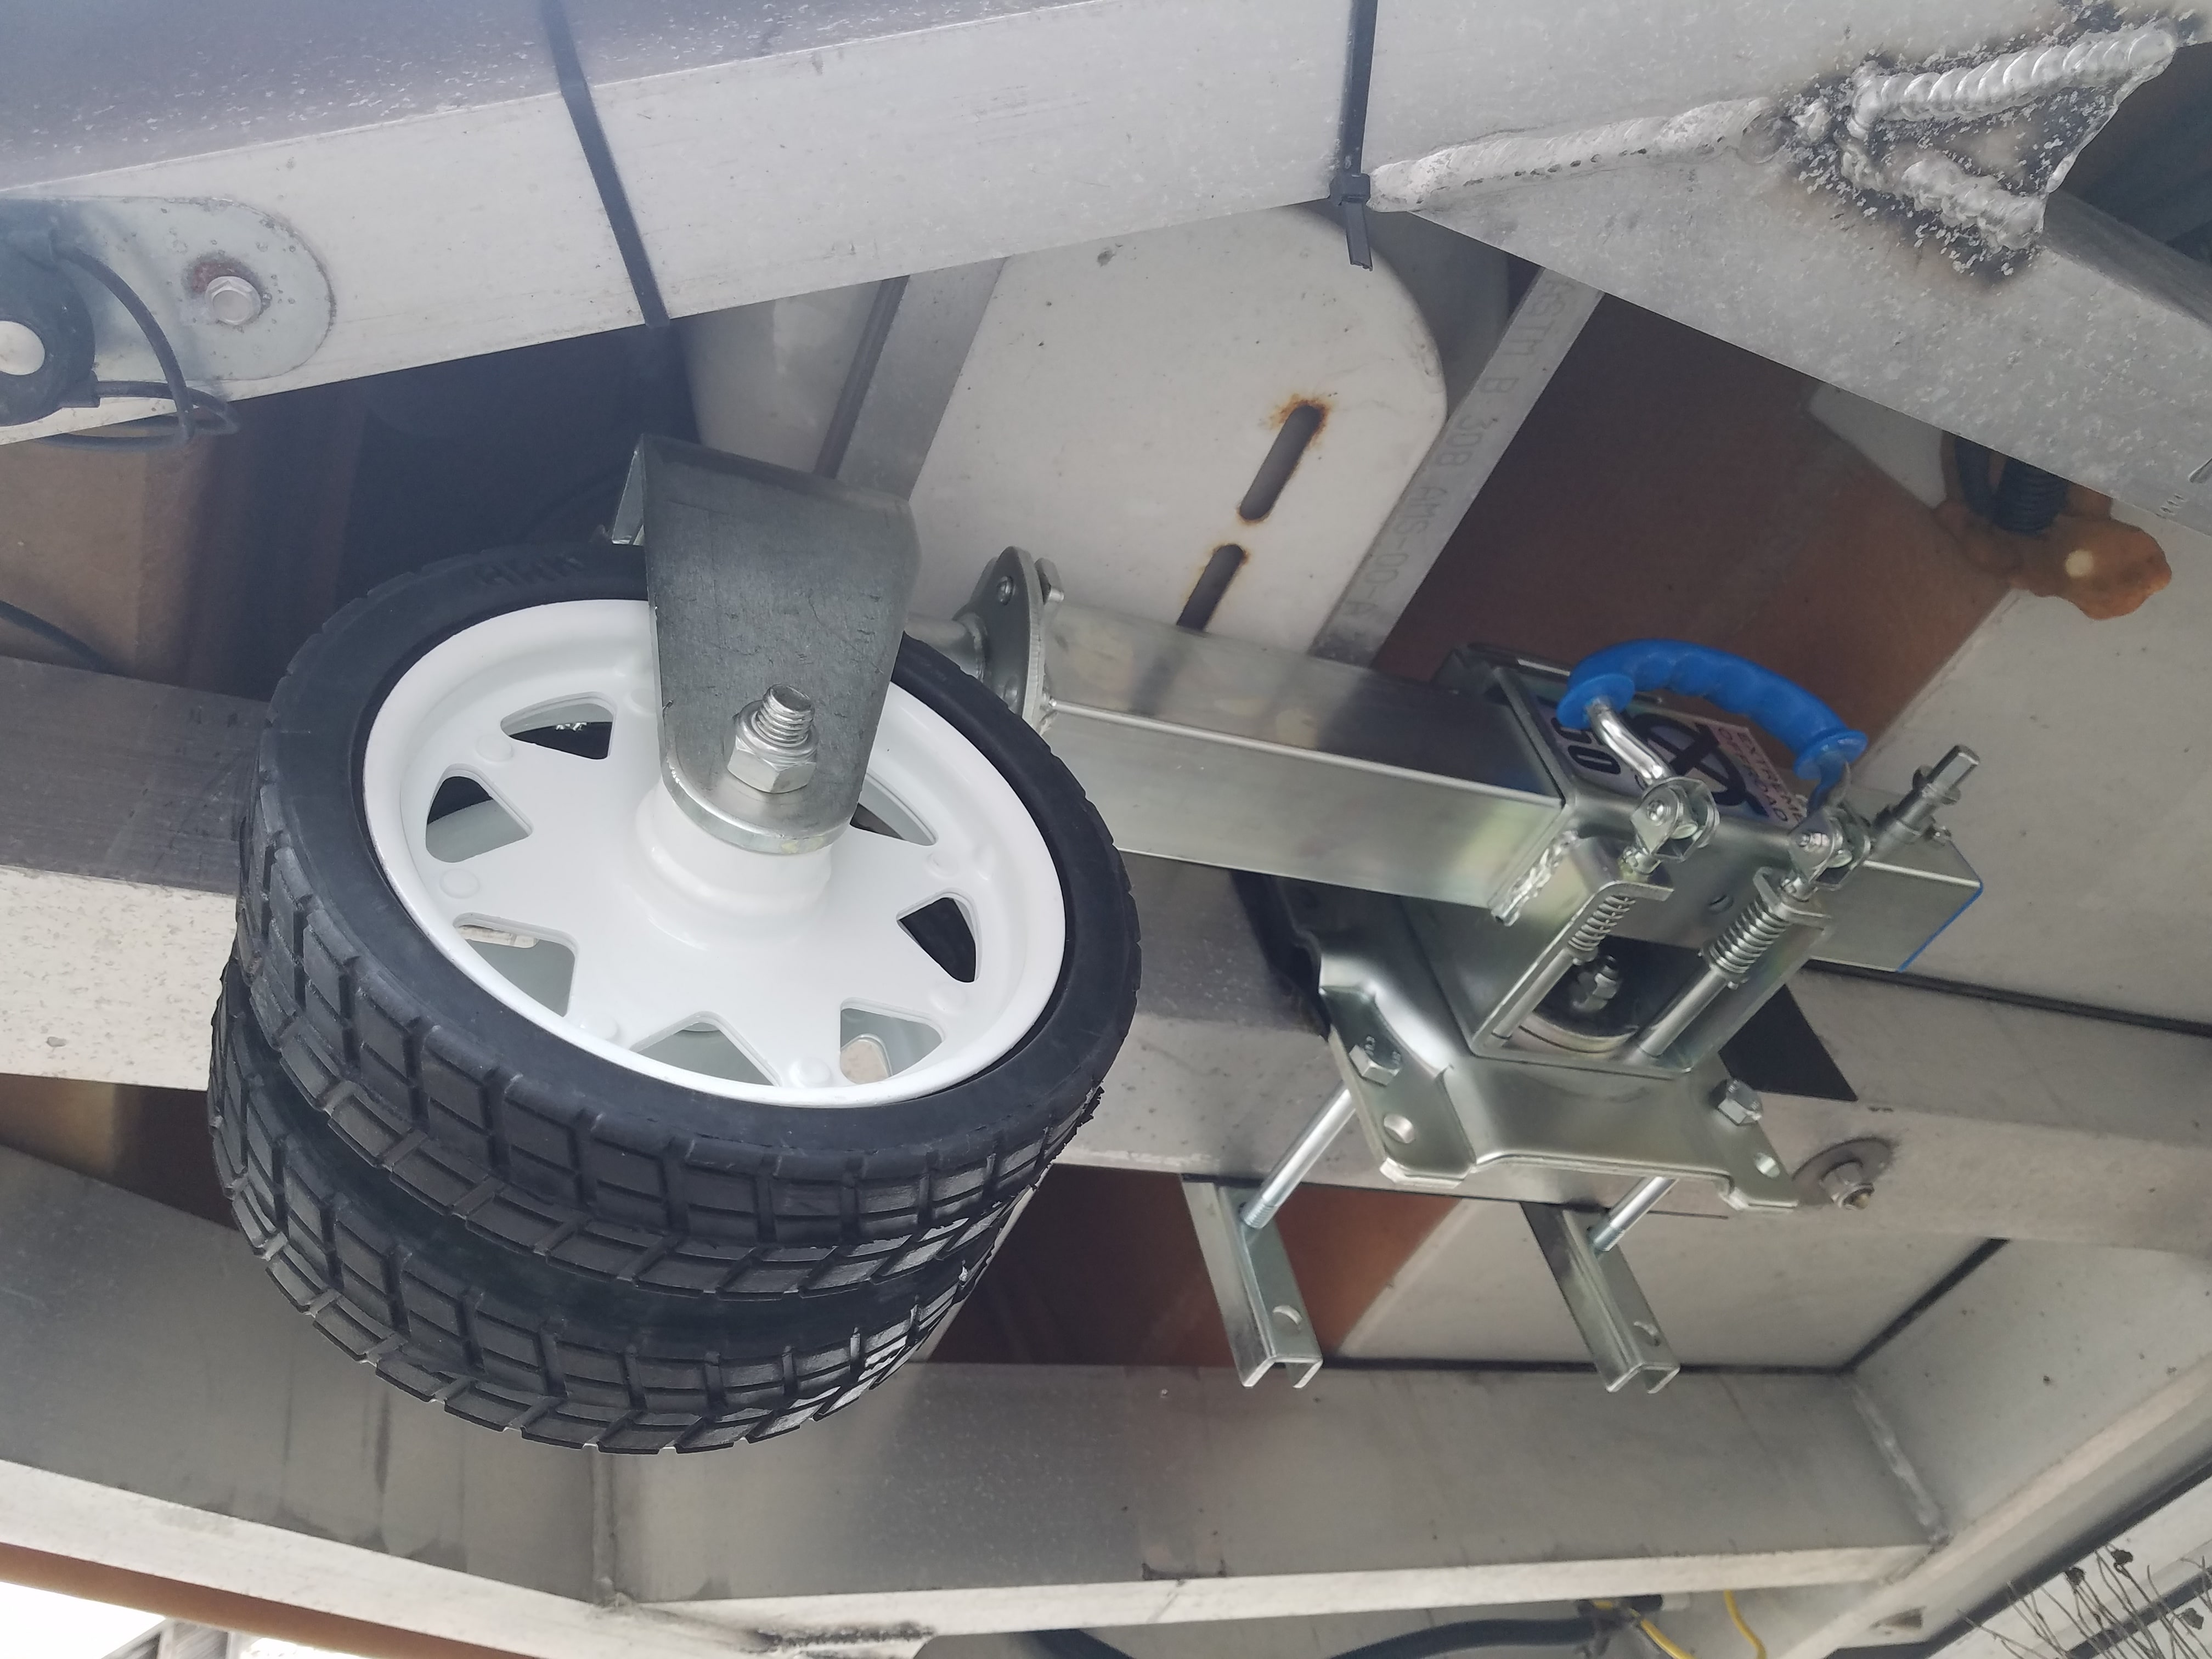
The XO has been received and mostly installed. There is no room on the old frame, in the outside area, which was fine as I planned to install it out of the way anyways. This thing is seriously robust and will add some tongue weight. The only real drawback to this location is the extension crank handle won't work, the mechanism is smoooth enough working though that I can turn it with my fingers at this point, I will come up with something that will work with it though. The only adjustment I had to make was to move the propane tank mount about ¾" forward so it could rotate cleanly. Now I'm just waiting for a piece of aluminum stock to come in to fill the gap between the frame and bolts. The unit has 3 or 4 different frame fits and the old frames are 3½" square which fell between two fits, this is clear in the last photo. The bolts it comes with are also too short, so I upgraded to class 10.9 and 210mm length with all metal lock nuts.
1 point
-
OK, once again - there are obviously those of us that do not like Andersen products and those of us that do like them. The Blaylock's are better? Maybe and maybe not. I will do my utmost to treat ANY attendee at our OWNER'S RALLY with the same courtesy and respect as I give to any other. Bill1 point
-
Inserted into content: It took a couple of tries but this worked. I had to edit the picture but it posted well. Thanks again John, Bill
1 point
-
Looking at glaciers from a distance and going inside are 2 different things. If you get the chance to take a guided tour on or inside a glacier, then do it. I was the guide many years ago for a few groups in to different glaciers around the Anchorage area. Being surrounded by the Blue ice is one of the most incredible feelings that you will ever experience.
1 point


-
Recent Achievements
-


")


")


")


