Leaderboard


Popular Content
Showing content with the highest reputation on 08/10/2018 in all areas
-
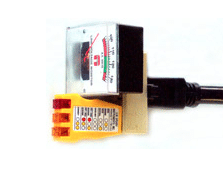
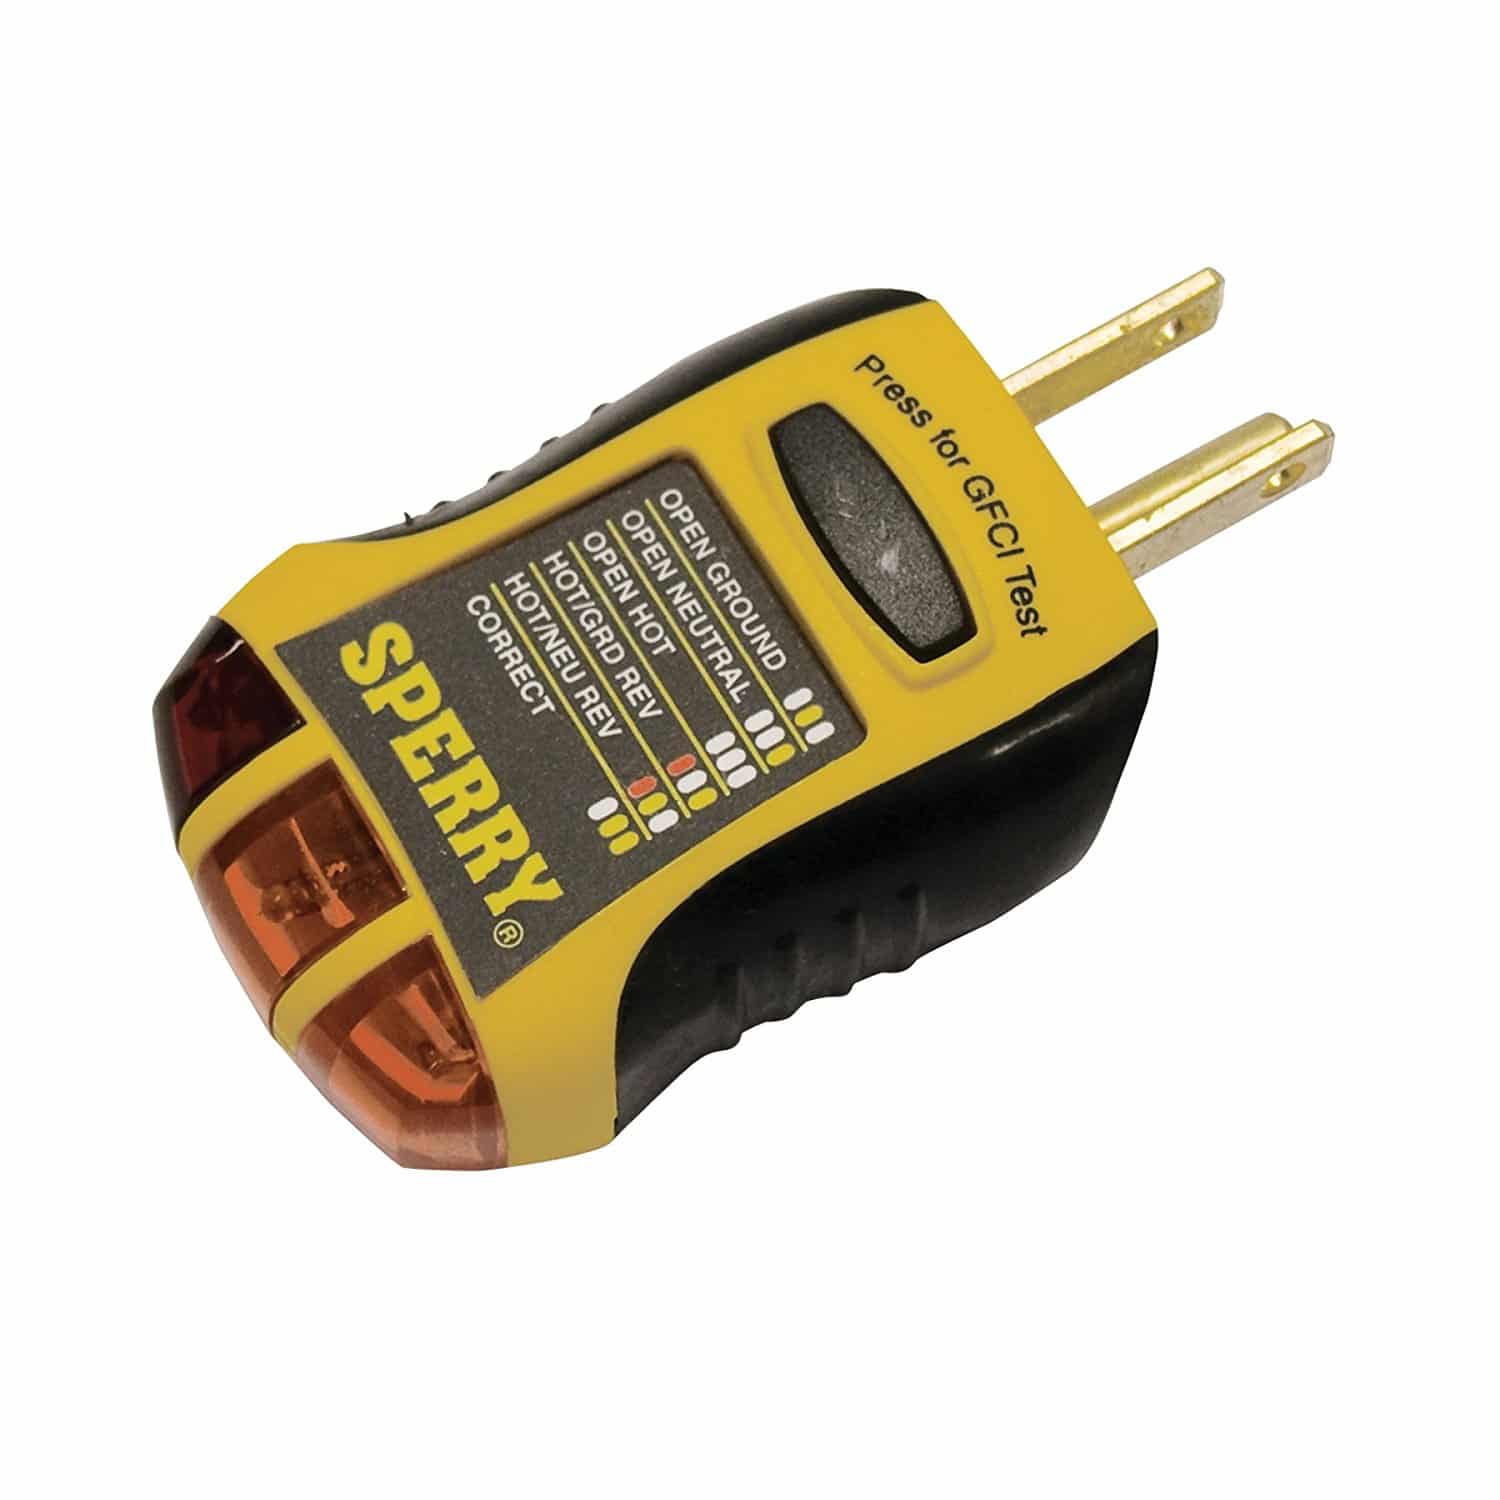
I posted about a simple and cheap setup to check both the circuit and the voltage of a 30 amp outlet HERE. Simple and easy. I use it every time, before I hook up. I found two campgrounds where there was a problem with the 30 amp outlet.
 4 points
 -
Issue 1: Fan inoperative Issue 2: Fruit Flies or Gnats in toilet Models Impacted: All models delivered before 8/8/2018 Information: Nature's Head recommends using a 2-5 amp fuse for the composting toilet fan. Many models may have been produced with a 1 amp fuse in the converter for the fan and may result in it blowing. Fruit flies and/or Gnats may become a problem in the composting toilet gaining access via the top roof plumbing vent. Resolution 1: Replace the 1 amp fuse with a 5 amp fuse. You can use a 2, 3, or 4 amp fuse as well just as long as it is within Nature's Head recommended size of 2-5amps. Resolution 2: *Place a mesh screen, like the material used in the window screens, over the top plumbing vent pipe. You can also use products such as Diatomaceous Earth or Gnatrol as well. You would need to refer to the Nature's Head Compost Toilet manual for the recommended process for adding these products to your toilet. Please see attached manual. *By placing a mesh screen over the vent pipe you will need to periodically clean this to keep it from becoming clogged and causing a plumbing issue. Natures-Head-Composting-Toilet-Manual.pdf3 points
-
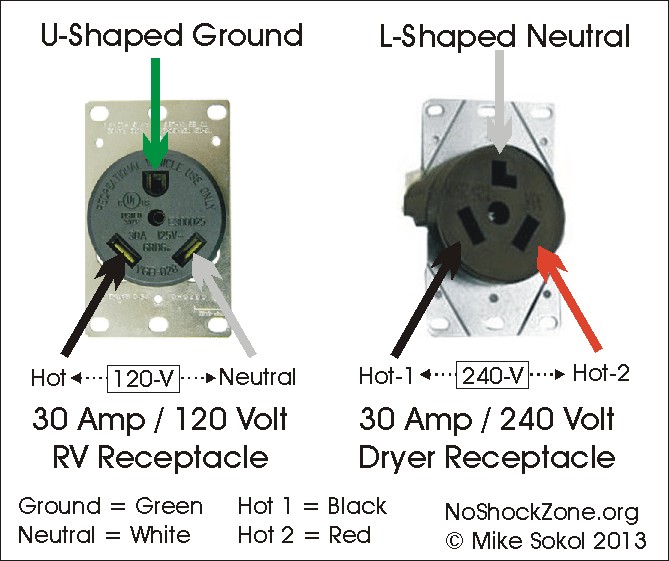
Thanks for the story, you are lucky. You cannot assume a professional electrician will do it right, always check! Your problem is not unusual! BTW: White is NEVER hot in residential AC wiring, I am not sure where you came up with that idea. I ordered a 30A 120V RV outlet for my RV bay, aka "The Hanger Deck" and I provided the electrician and builder each a printout of the wiring, a PHOTO, and also a link to the RV receptacle. I knew he might get it wrong.... especially if he did the job late in the day when he was tired and unfocussed. Everything was fine but I did check it with a voltmeter and VISUALLY before plugging in for the first time. I also made sure it had a dedicated 30A breaker. Since I have an Air Command air conditioner (low amp draw), I rarely use it, I normally have a 10 AWG extension cord plugged into a regular 20A socket, and that is fine unless I need to run other heavy loads on that circuit. http://noshockzone.org/accidentally-plugging-into-240-volt-outlet/ John Davies Spokane WA
3 points
-
I finally got time to hitch up my EII to my new truck, and headed out to the local Cat Scale for a weigh in. It was about a 100 mile round trip, which quite nicely included 10 miles of I-24 through one of the worst thunderstorms I've had the pleasure of entertaining in some time. Winds were sideways to my direction, and rain hard enough that vision was extremely difficult above 20-30 mph. I must admit there was no discernable sway/shake, and the truck/trailer combo handled better than I had imagined. I have the Anderson hitch attached, although I initially purchased it due to my former truck's lower tow capacities. Not sure it makes much difference in the current set up, but the ride was very good overall at all speeds. Performance was also pleasing, with 65 mph very un-interesting, relaxing really, and getting up to Interstate speed took little effort. The Duramax is really impressive mated to the Allison transmission - Tow haul mode works very cool when off the throttle and coasting to slow. For those so inclined, the certified Cat Scale numbers are as follows: Steer axle: 4660lbs Drive axle: 3960lbs Trailer axle: 5200lbs Gross weight: 13820lbs The truck with full tank, no people, scales at approx. 7800 lbs. Trailer had a full fresh water tank, and I'm 190 or so. Not sure what tongue weight is, but the bed barely moves when dropping the Ollie onto the ball. The 2018 GMC 2500 4wd, crew cab max numbers are as follows - GCWR-25300, trailer - 13500, payload - 2226. For towing with this set up, the Ollie is not an issue - full or otherwise. Hope some find this helpful, or at least interesting.2 points
-
Hi All, Just wanted to share our experience getting a 30A power pedestal installed at home. Wanted a hookup to run everything at home to check all systems, cool down the fridge, and run the AC while working and prepping to leave for trips from home. Electrician came out and installed 2 RV style boxes with the correct receptacles. BUT, wired them @ 240V! We did not realize this, and upon connecting the Ollie to power and starting the AC.... POP! Very loud, breakers tripped on both ends. It took us a while to realize, and we feared the worst. The Progressive Industries surge protector absolutely saved us... that was the pop we heard. Upon rewiring the hookup to 120V, all systems functioned properly... except the tank monitor. Was not getting anything out of that. Felt lucky that was the only thing we blew up, but upon taking the monitor off and unplugging and plugging back in the connector, it lit right back up. There's some kind of reset on it. Not even any fuses blown... we got lucky. Moral of the story is, if you're thinking about getting hooked up at home, be sure you walk the electrician through the specs- 30A, 120V ONLY. The oversight almost cost us the whole electrical system, or at least all of the devices attached to it. This is not how most electricians would wire this hookup, they are thinking of it like a dryer hookup, which is 240V. Also be sure the polarity is correct. The Oliver wants to see white as the hot wire, not black. Most electricians will wire it the other way around. The polarity will not hurt anything, but you will get an error code on your surge protector.2 points
-
I think you have it backwards about the 12 V system wiring color code. According to the drawings that came with our Oliver, black is the 12 V positive wire and white is the negative wire. And that is how our trailer is wired.2 points
-
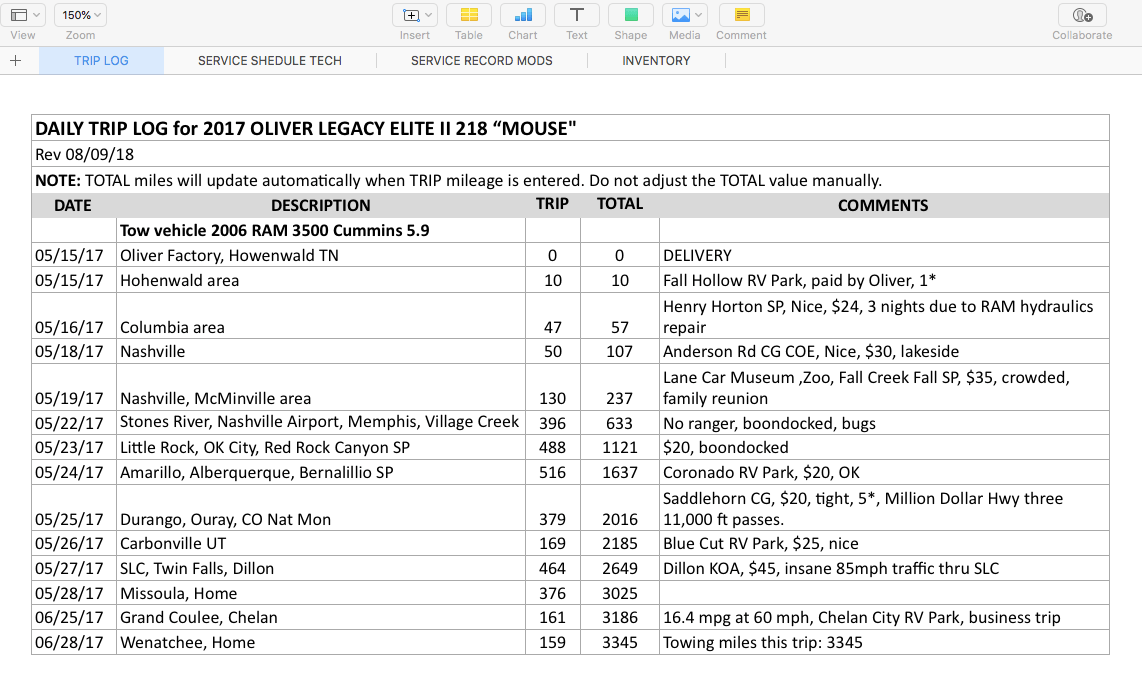
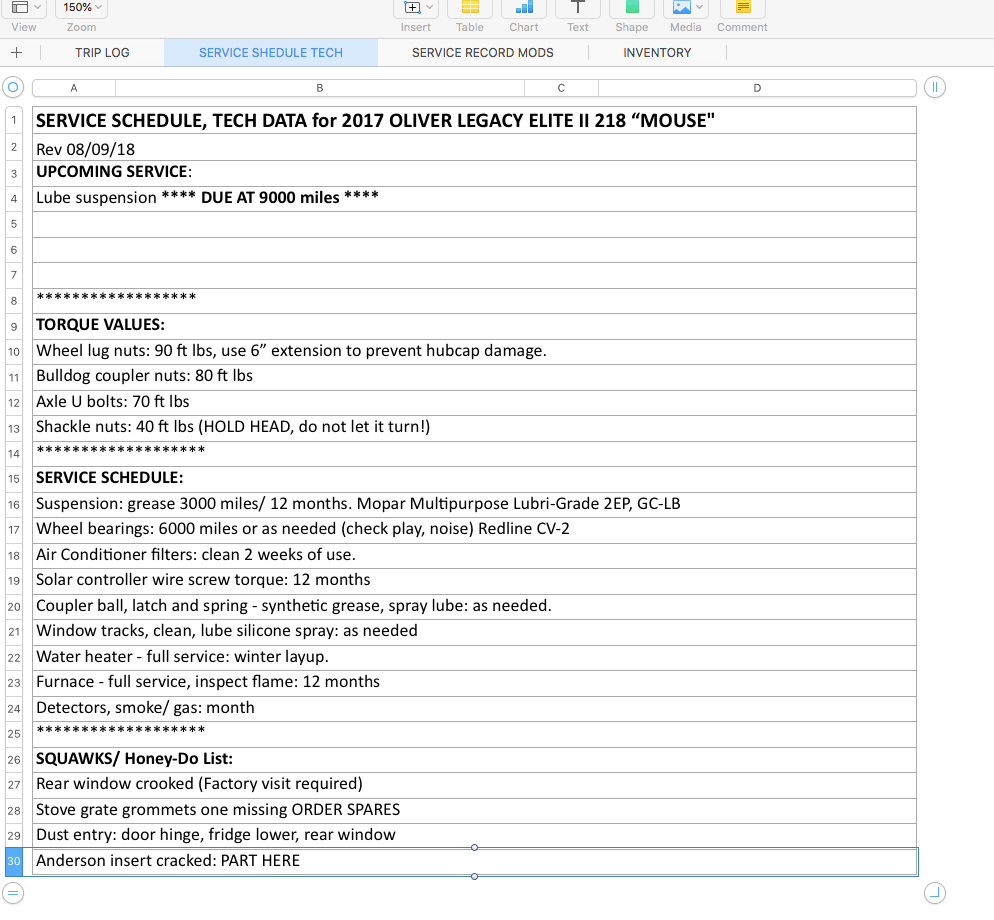
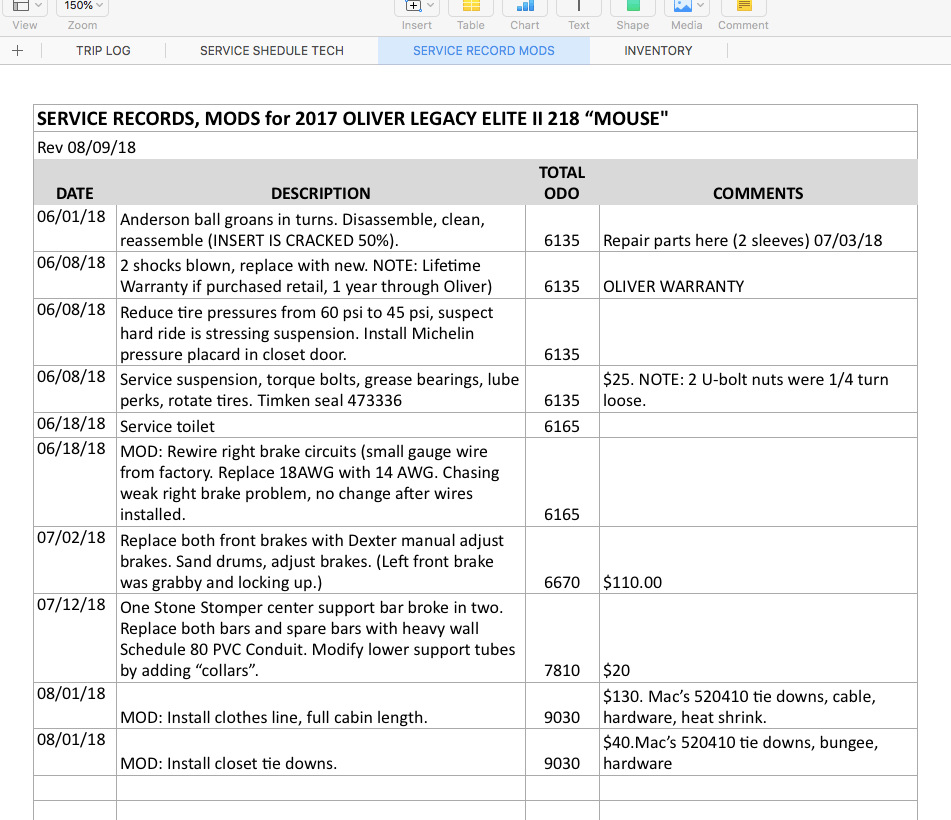
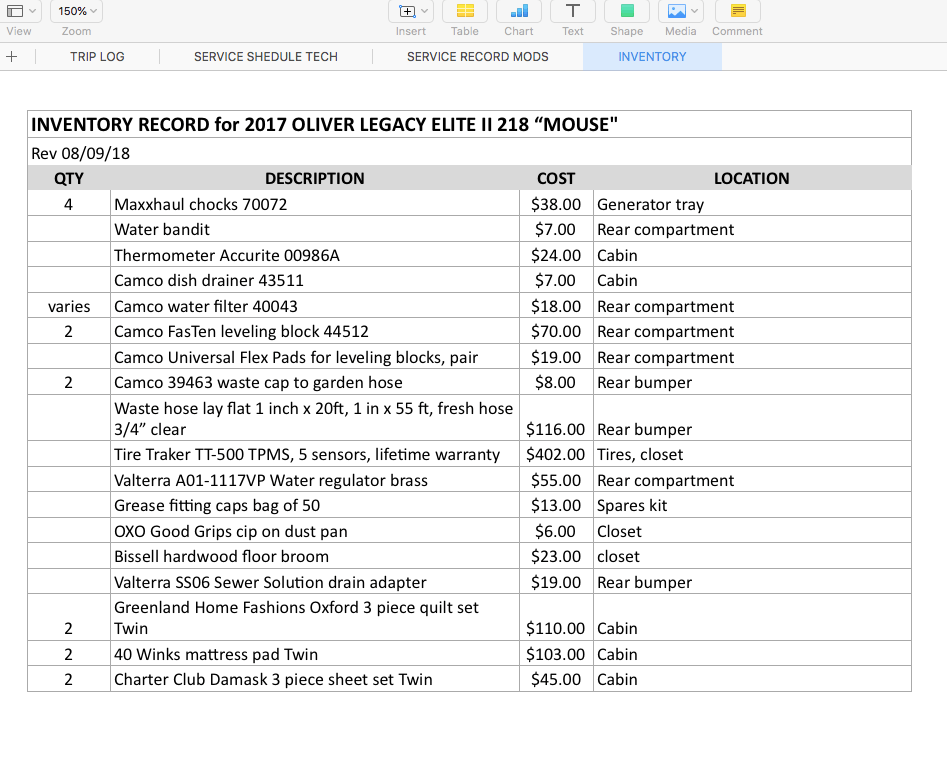
EDIT 08/11/18 Uploaded a (corrected) Numbers Revision 01 file and a (new) Excel Revision 01 file. Note: I will keep any future major updates or important comments in this first post. I do not want for them get lost in subsequent replies. If you are at all familiar with Excel or Numbers, this may be helpful. I was keeping my records in a variety of forms, and the data was getting increasingly messy and hard to interpret, so with the help of my wife I now have an all-in-one spreadsheet that I can update on-the-fly, as long as I have an internet connection. I back it up in the Cloud, so I can do data entry from my iPad at a campsite as easily as I can from my iMac at home. It has four tabs or sections. The first is the Trip log. The Date column "self-formats" so all the dates look alike. The Total column automatically updates when you enter the Trip (daily) number of miles. Don't mess with the figures in the TOTAL column. [attachment file=Trip log capture.png] The second tab is the Service Schedule/ Tech page. I have service reminders (stuff I need to do soon), torque values, service info and my Squawk List (aka the "Honey-Do List") - stuff I either want to or need to address, eventually. [attachment file=Service Tech Capture.png] The third tab is the actual Service Record, which includes all routine work, repairs, and mods. I did not include extra columns for cost and detailed lists - I summarized since a future owner would only need that rough data. The paper records are there if I need to get down to small part costs. [attachment file=Service Record capture.png] The last tab is an Inventory section, for me to keep track of loose stuff that is carried in the trailer, in case of loss. [attachment file=Inventory Capture.png] The sample file, which includes the data shown in the screen captures above, but not all my history, can be found at my Dropbox page. Follow this link for the NUMBERS file: https://www.dropbox.com/s/u4fmo7ko7oxde6y/DAVIES%20SAMPLE%20RV%20LOG%20Serv%20Rec%20Inv%20REV01%20%20NUMBERS.numbers?dl=0 Follow this link for the EXCEL file: https://www.dropbox.com/s/07kvpx7u1d9l7bc/DAVIES%20SAMPLE%20RV%20LOG%20Serv%20Rec%20Inv%20REV01%20%20EXCEL.xlsx?dl=0 I strongly suggest that you save your file as a Master, duplicate it and work with the copy in case you mess up some how. Change all the entries and headers as you see fit. I hope it is useful to some of you. The first and third tabs print very nicely in Landscape, the other two work in Portrait. Use the "Fit to Page" option, print one tab at a time, and they will all stay on one printed page, so they are easy to read. Please let me know if there are any problems downloading or opening the file. I know very little about spreadsheets, but way more than I used to ;) John Davies Spokane WA
1 point
-
I really like what you guys did with the graphics.1 point
-
Going from memory, I think the power-in cables on mine (battery & solar) are red, and then it switches to black for distribution. The negatives are all yellow, except the solar which is black (probably because they couldn’t get yellow in the higher gauge). The 120v side is standard black hot, white neutral, green ground.1 point
-
Kudos to Mrs. Davies! I have a bit of a spreadsheet aesthetics OCD problem and your spreadsheet is not only functional, it is visually appealing. Thank you for sharing! Chris1 point
-
White is the color of the positive wire in a 12 V system. Black is the color of the negative wire in a 12 V system. This may lead to confusion on many levels, by many people.1 point
-
I had a 30amp RV plug installed on the side of my garage a couple of years ago. I mentioned 120V and my electrician immediately said “of course, I don’t know of many RV’s that are 240V”. Mike1 point
-
Wow, you are fortunate, the Progressive Industries surge protector was worth its weight in gold. Glad to know it works as designed. Your experience, unfortunately, is not a one off, it happens more than folks expect. As has been stated, RV park power should not be trusted until proven correct. Not only incorrect construction, but low voltage will cause RV electrical system failure, not to mention personal harm in some situations. I just completed my own home 30 AMP outside power enclosure. Many, many years ago, I made a living as an Electrician, and even with the training and experience you have as a professional, you always verify voltage, grounding, wire and plug amperage capacities, and in this case GFCI protection. If you hire the work out, you must tell the installer it is 120 volt, 30 amp, single phase. John's diagram is a good reference, but not infallible - some people can screw up anything. RB1 point
-
I'm glad you sustained no damage to the trailer. From what I've read this is a common problem...electricians see the plug you want installed, think it's a 240V dryer connection and wire it accordingly. I would recommend printing out the diagram that John posted whether doing this yourself or hiring someone. Then once installed probe the two blade connectors and ensure you get 120 and not 240.1 point
-
Not sure about that white being the “hot” line thing. That’s not the way it’s supposed to be. This is precisely why I never hire anybody to do this kind of work. I just do it myself, then I know it’s right.1 point
-
Hull number 366 aka: Nomads’ Nest was picked up last week after what felt like an eternity of waiting during it’s production. We absolutely LOVE her!!! We spent 6 nights camping (1000 Trails/ Natchez Trace and Cumberland Mountain State Park) getting to know all the new systems and procedures and putting the beginnings of our personal touch in place. She is home now in Waynesville NC. May the adventures begin! Again, many thanks to all that share their experience and knowledge on this forum and on the Oliver Trailer Owners FB Page - both have been treasures of information and support for us already. Finally, I just have to give a big shout out to Phil, Anita and Rodney in sales - their customer service excels! Kim and David Thompson
1 point
-
The Dexter EZ Flex system adds another layer of protection to your camper. The EZ Flex equalizer comes with a rubber dampener to lower the impact from cracks, potholes and other imperfections in the roads from causing unwanted stress on the camper shell. This system also replaces the standard bolt & plastic bushings inside each leaf spring eye with wet bolts and bronze bushings allowing you to keep them greased for longevity and less noise from heat and resistance. For this system to operate properly it is recommended that the bushings are greased every 3 months or 3,000 miles with a good high quality Hi-Temp grease. We use Citgo Mystik Hi-Temp at the factory but there are several other approved greases from Dexter. *2018 Elite I models utilize bronze bushings and wet bolts but does not have the equalizer as it is used on the dual axle only. The Dexter Axles used on the Oliver Elite and Elite II models are the 5,000 lb and 3500 lb axles. The Elite models have a single 5,000 lb axle with 12” brakes while the Elite II models have dual 3500 lb. axles with 10” braking. These axles and brakes do have a break-in period as they are Nev-R-Adjust braking and adjust automatically as you brake while pulling forward or backwards. The break-in period may vary slightly but usually adjusts to 100% somewhere between *50 brake applications from the brake controller only or over a period of about 500-700 miles with normal vehicle braking. *Please make sure that you do not overheat your brakes by trying to achieve the break-in too quickly. If you do choose to utilize the brake controller over 50 braking applications it should be done over a 75 mile trip at low speeds allowing the brakes to cool in between and not putting too much stress at high speeds on the trailer brakes to stop the tow vehicle. Both the 3500lb. and 5,000lb axles have serviceable bearings that require maintenance every 12 months or 12,000 miles. The same grease that is used for the EZ Flex will work with the bearings. Both the inner and outer bearings should be cleaned thoroughly and inspected for any imperfections or improper wear. This is also a great time to inspect your trailer brake components as well. These maintenances can be performed by most RV service centers or if you prefer, you can perform your own maintenance. For more information on how to repack your wheel bearings see the Dexter Bearing Maintenance Video.1 point
-
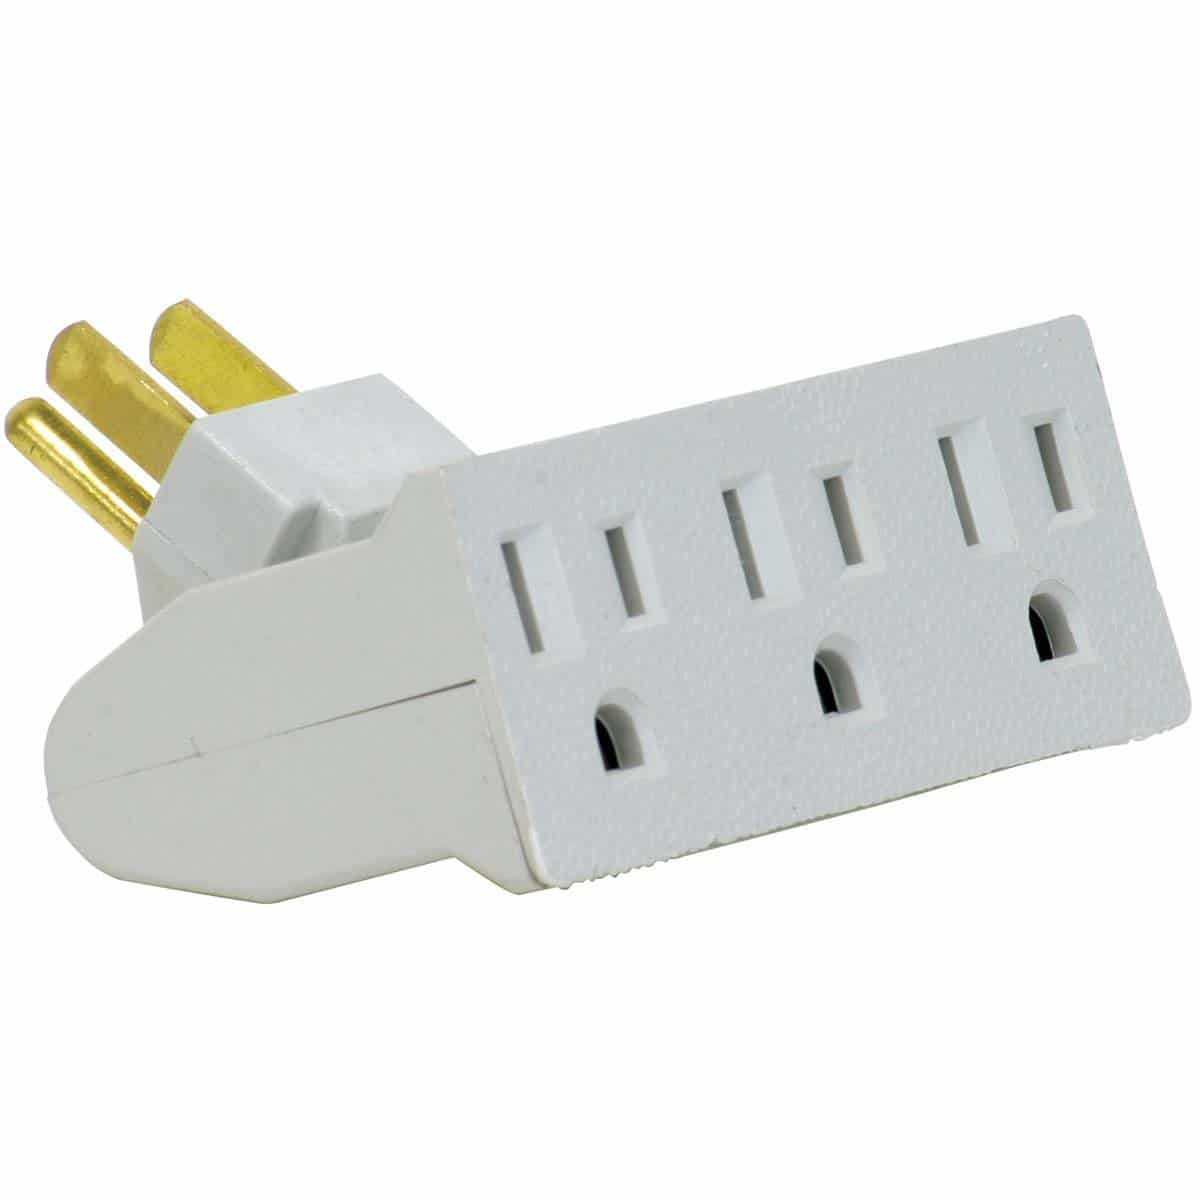
Before I hook up to shore power I test both the voltage and the circuit wiring. This website describes a simple device to do this http://www.myrv.us/electric/Pg/tester_30amp.htm I ordered all the parts for this device from Amazon for about $25. https://www.amazon.com/Camco-55233-Electrical-PowerGrip-Adapter/dp/B00192QB3I https://www.amazon.com/Globe-Electric-46505-Single-Tap-Grounded/dp/B007XQORTO https://www.amazon.com/Prime-Products-12-4055-Voltage-Meter/dp/B002P48KLK https://www.amazon.com/Sperry-Instruments-GFI6302-Outlet-Tester/dp/B000RUL2UU I keep the testing device in the box with by 30Amp connector cable, and use it each time. David
1 point


-
Recent Achievements
-


")


")