Leaderboard


Popular Content
Showing content with the highest reputation on 11/14/2018 in all areas
-
jhorton, We had the same problem. Probably better tools available than what I used. Used a wood paint stir stick sharpened to a dull point on one end to remove the sealant without damaging lens or gel-coat. Took my time being very careful. After digging out all of the sealant possible with the lens in place, used the same wood paint stir stick sharpened on one end to lightly pry the lens out placing plenty of cloth padding between the wood stick and gel-coat to prevent damage to the gel-coat/lens. Removed the lens twice because of leaks. Sealant used by Oliver leaked the first two times. Recommend contacting Oliver, they may be using different sealant on the Lens than sealant used during 2015. Last time used white Marine Silicone adhesive/sealant to stop the leak. Taped the lens and gel-coat with painters tape where I did not want the adhesive/sealant to contact. Placed the tape so it could be pulled off in one direction while applying the adhesive/sealant. Have not had any leaks since sealing lens last year accumulating over 12,000 miles on Ollie during that time. This is where the water dripped from the LED lens housing in the upper rear cabinet: Resealed lens:3 points
-
Hi everyone, Introducing Dave, Debbie and Mikayla from Bellingham, MA. Our Ollie will be going into production in a few days. We are scheduled to pick it up in April 2019. I have been enjoying the forum, looking forward to contributing and getting excited about our new camper. Does anyone know if there is an existing thread on Step by step DIY Solar add-on? I added my own system in my recently sold Casita and wanted to do the same in the Ollie. I asked about Solar ready and was informed that all the wiring already will be in place for any options including Solar, just wasn't exactly sure what that means. So far most of our buying anxiety has come from trying to decide on the color option combinations. A thread devoted to owners posting their color combinations would be awesome for Ollie shoppers. I managed to find quite a few pictures of different combination looking through the threads but having them consolidated would be very helpful. Thanks, David
 2 points
 -
Could not have said it better. I am happy with the factory solar set up, although there is more advanced componentry, better systems, overall the Oliver installed system is fairly simple to use, relatively worry free, and trouble free. The techies among us would like to have more control, more features, etc., but then, as I stated somewhere else, I need to think more about where I am - camping, enjoying myself, and less about what I'm doing it in..... given time and budget - I could end up with a EII mounted on a Unimog chassis, and ….. and still be at home, dreaming up new stupid human tricks.... Dave, Debbie and Mikayla, enjoy your new Oliver, welcome to the clan. Hope to meet you in the near future.2 points
-
Let me add my WELCOME to you guys! April will be great for picking up your new Ollie. Hopefully you will have a good initial trip planned in order to test and learn all about your new Oliver. I would add my encouragement to you to start a new thread concerning color, upholstery, flooring, and counter top combinations. Be warned though that while basic color combinations do not change, the Factory does add and delete certain fabrics, floors and colors of counter tops from time to time. In the past, customers could even bring their own fabrics and/or flooring materials to Oliver for installation. In the present day, only those that are "standard" can be ordered and this fact should make the selection and or combination issues somewhat easier - unless, of course, one simply can not get the combination that they want. Still, it would be interesting to see what others (most of whom have better "eye" for these things than I do) think make great combinations. If you are "dead set" on doing your own solar (for whatever reason) I'd recommend that very early on you have in depth discussions with Jason and/or Richie in the Service Department. Depending on what you have in mind, they could be of great help in having holes pre-drilled or at least marked such that the drilling of holes for wiring and/or the setting of your own panels would be much easier and safer for you. You might also want to contact both ScubaRx (Steve) on this Forum and "Technomadia" for help along these lines since both were instrumental in the original design. If you decide to go the self install route, I do hope that you will start a thread on "how its done". Good luck and, again, welcome! Bill2 points
-
3M specifically warns agains using alcohol for prep. Right there on the back lable. It inhibits the cure. For other brands, read and follow the manufacturer’s directions. It would be very bad to spend hours on a job, only to have the sealant not kick off due to a stupid senior moment brain fart in the prep work. If I were doing this repair I would certainly use 3M 4000. It is a great product, though expensive. It is suitable for semi permanent repairs, where you hope never to have to do it again, but it would be possible to get the part loose. John Davies Spokane WA1 point
-
What should be a simple task, RV'ing that is, seems I have the ability to make it so much harder than necessary. The shear number of things I think I need, coupled with the "things" I dream up to improve the Ollie, it must be some sort of RV related mental condition. A clam shell, fine, But, certainly I could do better, wait, what about one of theses, and one of thoses, ohhh, look, a cool widget, get two. Please refrain from posting cool, attractive, must have, like to have, what about this - items --- with a whole winter ahead of me, I'll never make it, my wallet not with standing, figuring out how to haul it to and froe will be to daunting a task. Stress reduction - please. :-)1 point
-
Use a PLASTIC scraper and you will not scratch the gel coat. If you can find a piece of thick plexiglass, that works extremely well. I used this method for many years while working on aircraft. I used pieces of a busted windshield, but you may not be able to find that product ;) .... You can sharpen it with a belt sander or file and it cuts very well but does not damage soft surface. Tip for finding a leak: use a blue paper shop towel folded up under the area. When a drop falls on it, the paper turns dark blue and it is super easy to see that the area is wet. Much much more visible than a cloth rag. This is a great method for finding plumbing leaks, you can leave the towel in place indefinitely and see any water seepage at a glance. Follow the directions on the tube closely if you use a 3M 4000 type sealer. You must use MEK, toluene or a similar solvent to clean, NOT isopropyl alcohol, which will prevent the stuff from setting properly. That would ruin your day. Since you are doing this outside, try to pick a mild dryer day, use a fast set product and allow a few hours at least. If you like, you can secure a piece of plastic over the area before you leave, AFTER the sealant is no longer tacky to the touch and the blue masking tape is removed. If you have access to a canopy, you might be able to rig it close to the trailer and tape a tarp to the Ollie (across the gap) to provide a dry work space. Tip up the nose up if needed to get the top a little lower. Be patient, do it right the first time. Take pictures! Good luck. John Davies1 point
-
Ours did the same, it dripped down between the hulls, around the rear window dripping out of the window frame on the curbside bed. As far as time to do the job, it takes me 4 times longer than other folks, I would give myself a day so not to hurry and to do the job right. Once the sealant is removed, follow directions on the adhesive/sealant tube cleaning/prepping area before installing.1 point
-
We used a simple test once to determine if the leak was from the third light... Ugly white duct tape around the third light told us that was, indeed, our leak source. Now, resealing that spot is a check point... if the third light leaks, you will usually have water in the overhead cabinets, but not always. Somet, it will just run straight down the hull, as it did for us, and look like a window leak. Hope that helps. Sherry1 point
-
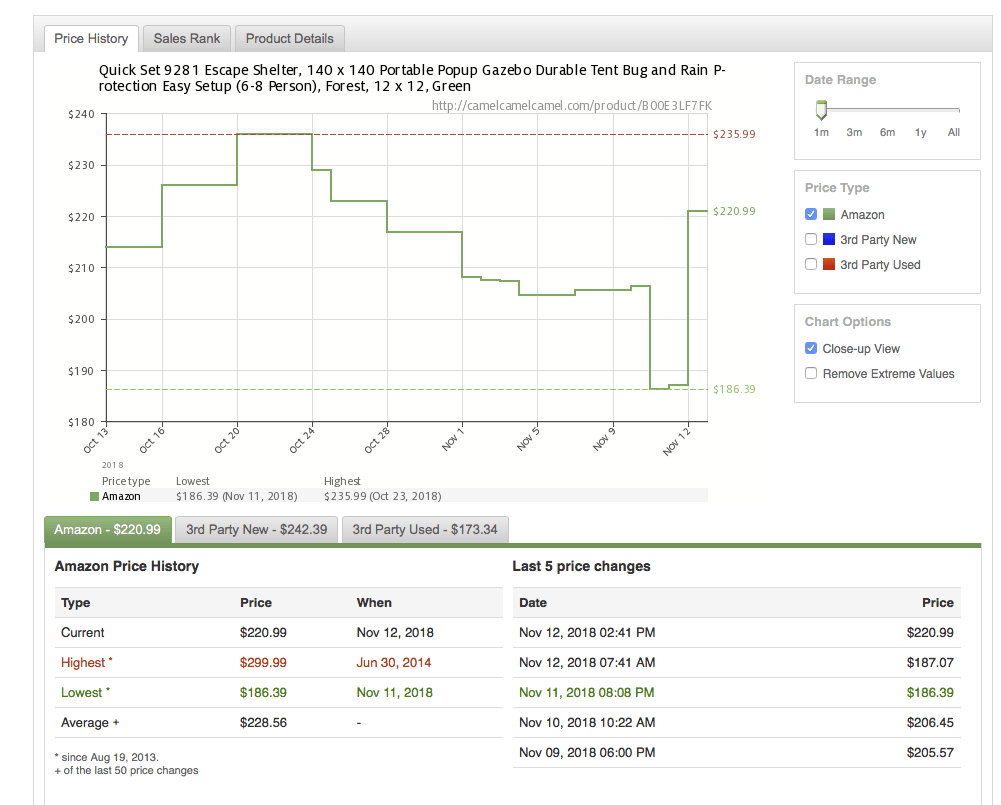
I don't either, but I expect the inventory level may have something to do with it. When the shelves are overflowing with one particular version (the green one in this case), they drop the price way down and clear them out, then raise the price back to average. It's also a way to drag the buyer to that page, then he sees that there are other colors available. He didn't really like the green, so he orders brown for a higher price. Just guessing. This is interesting: Amazon only uses data from the Amazon platform to establish product relevancy. It does not consider data points such as off-page SEO that other search engines like Google does. The goal of the A9 algorithm is to maximise that amount of money each customer spends on Amazon. To achieve this, Amazon records all customer data from searches, to clicks, to purchases to establish product relevancy. Long complicated technical article here: ... https://www.repricerexpress.com/product-ranking-on-amazon/ Camelx3 is definitely a good way to watch for bargains, IF you are patient and do not need an item immediately. Sometimes I just get tired of waiting for that super deal and just buy at the regular price, or off-site if the Amazon price is not so good. The Honey browser app is great for finding better prices, or for reassuring you that you got the very best deal. Amazon is not always the best choice. https://help.joinhoney.com/article/39-what-is-honey-and-how-do-i-get-it John Davies Spokane WA1 point
-
It looks like I posted about an hour and forty minutes after the price dropped, and the price went up about 17 hours after I posted. Sorry you were not able to get the bargain price. I don't understand the logic behind Amazon price changes, and that is why I like setting up camel alerts. [attachment file=Screen Shot 2018-11-13 at 8.10.07 AM.png]
1 point
-
Hey 404, I think the bane of Oliver owners is that you feel like an idiot and a sage in alternating waves.... Fortunately we have each other and usually everyone is not on the idiot wave at the same time. :-) Welcome and hope our paths cross soon. Scotty1 point
-
Bill, I weighed the Ollie I with full water and supplies for a multi month excursion and came up with 3900 pounds. It was pulled 111,000 miles with a 2008 Tacoma Prerunner which had a V6 4.0L engine. Although it was not a 4x4, I put an Eaton Industries limited slip differential in and it was great on steep gravel roads when needed. I allowed the rig to slow down a bit going up the mountains so the engine wouldn't be screaming, and enjoyed being able to manually shift into lower gears while heading down the backside. The truck now has 240,000 miles on it and is running perfectly. But . . . it pulled the Ollie from Florida to Washington and California to Newfoundland and has earned its retirement to become a local driver and eventually go to a grandkid. I decided to go with an F150 FX4, for a bit more storage space and better mountain performance. It maintained the posted speed limit effortlessly while going uphill on this year's trip to Alaska. The bells and whistles are pretty cool, as well. My trailer's fresh water tank is usually full, to lower the center of gravity and give me more options of where to stop for camping. One other reason I swapped from Toyota to Ford, was the new Tacomas have a smaller displacement engine, a 3.5L, and has more torque than my 2008 4.0L. Because I tend to keep my vehicles a very long time, I wasn't sure how the smaller engine would do with the very large towing requirement I would be putting on it. The F150 5.0L suits my needs very well and it got the same, or slightly better mileage than the Taco on this year's trip. Pete1 point
-
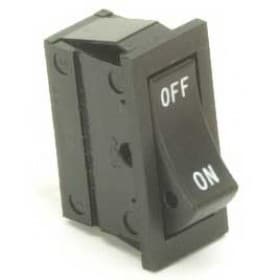
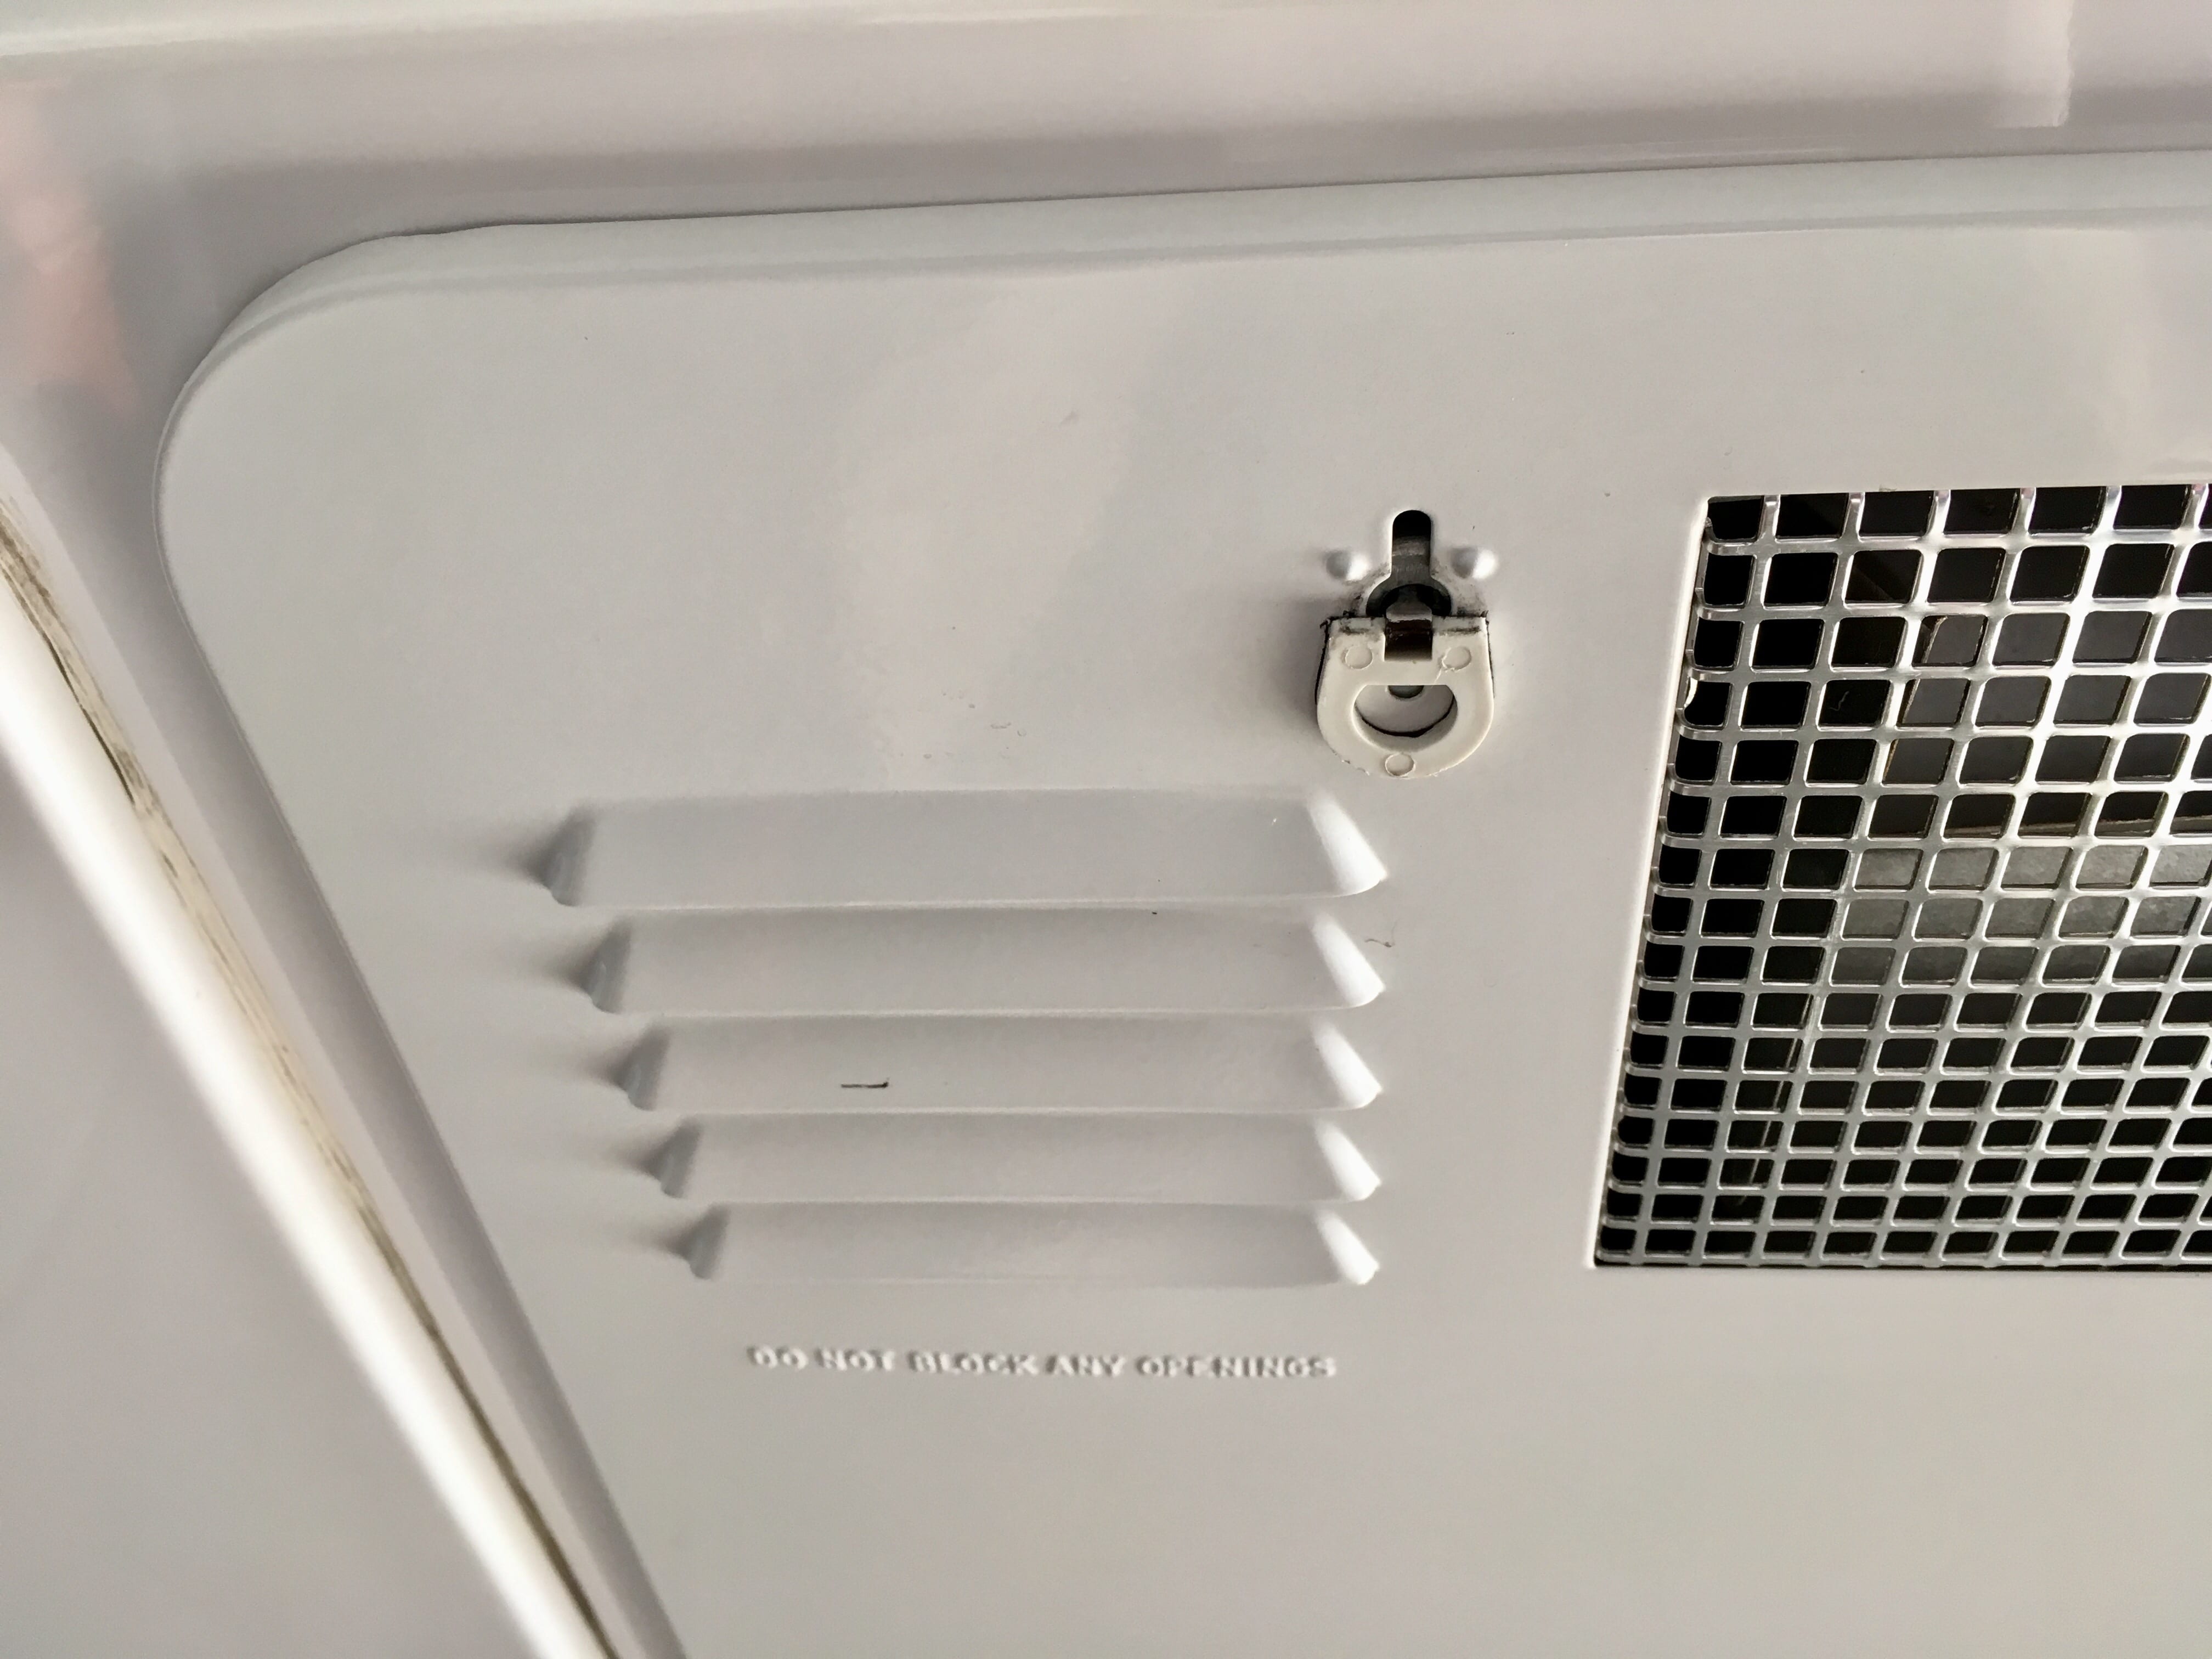
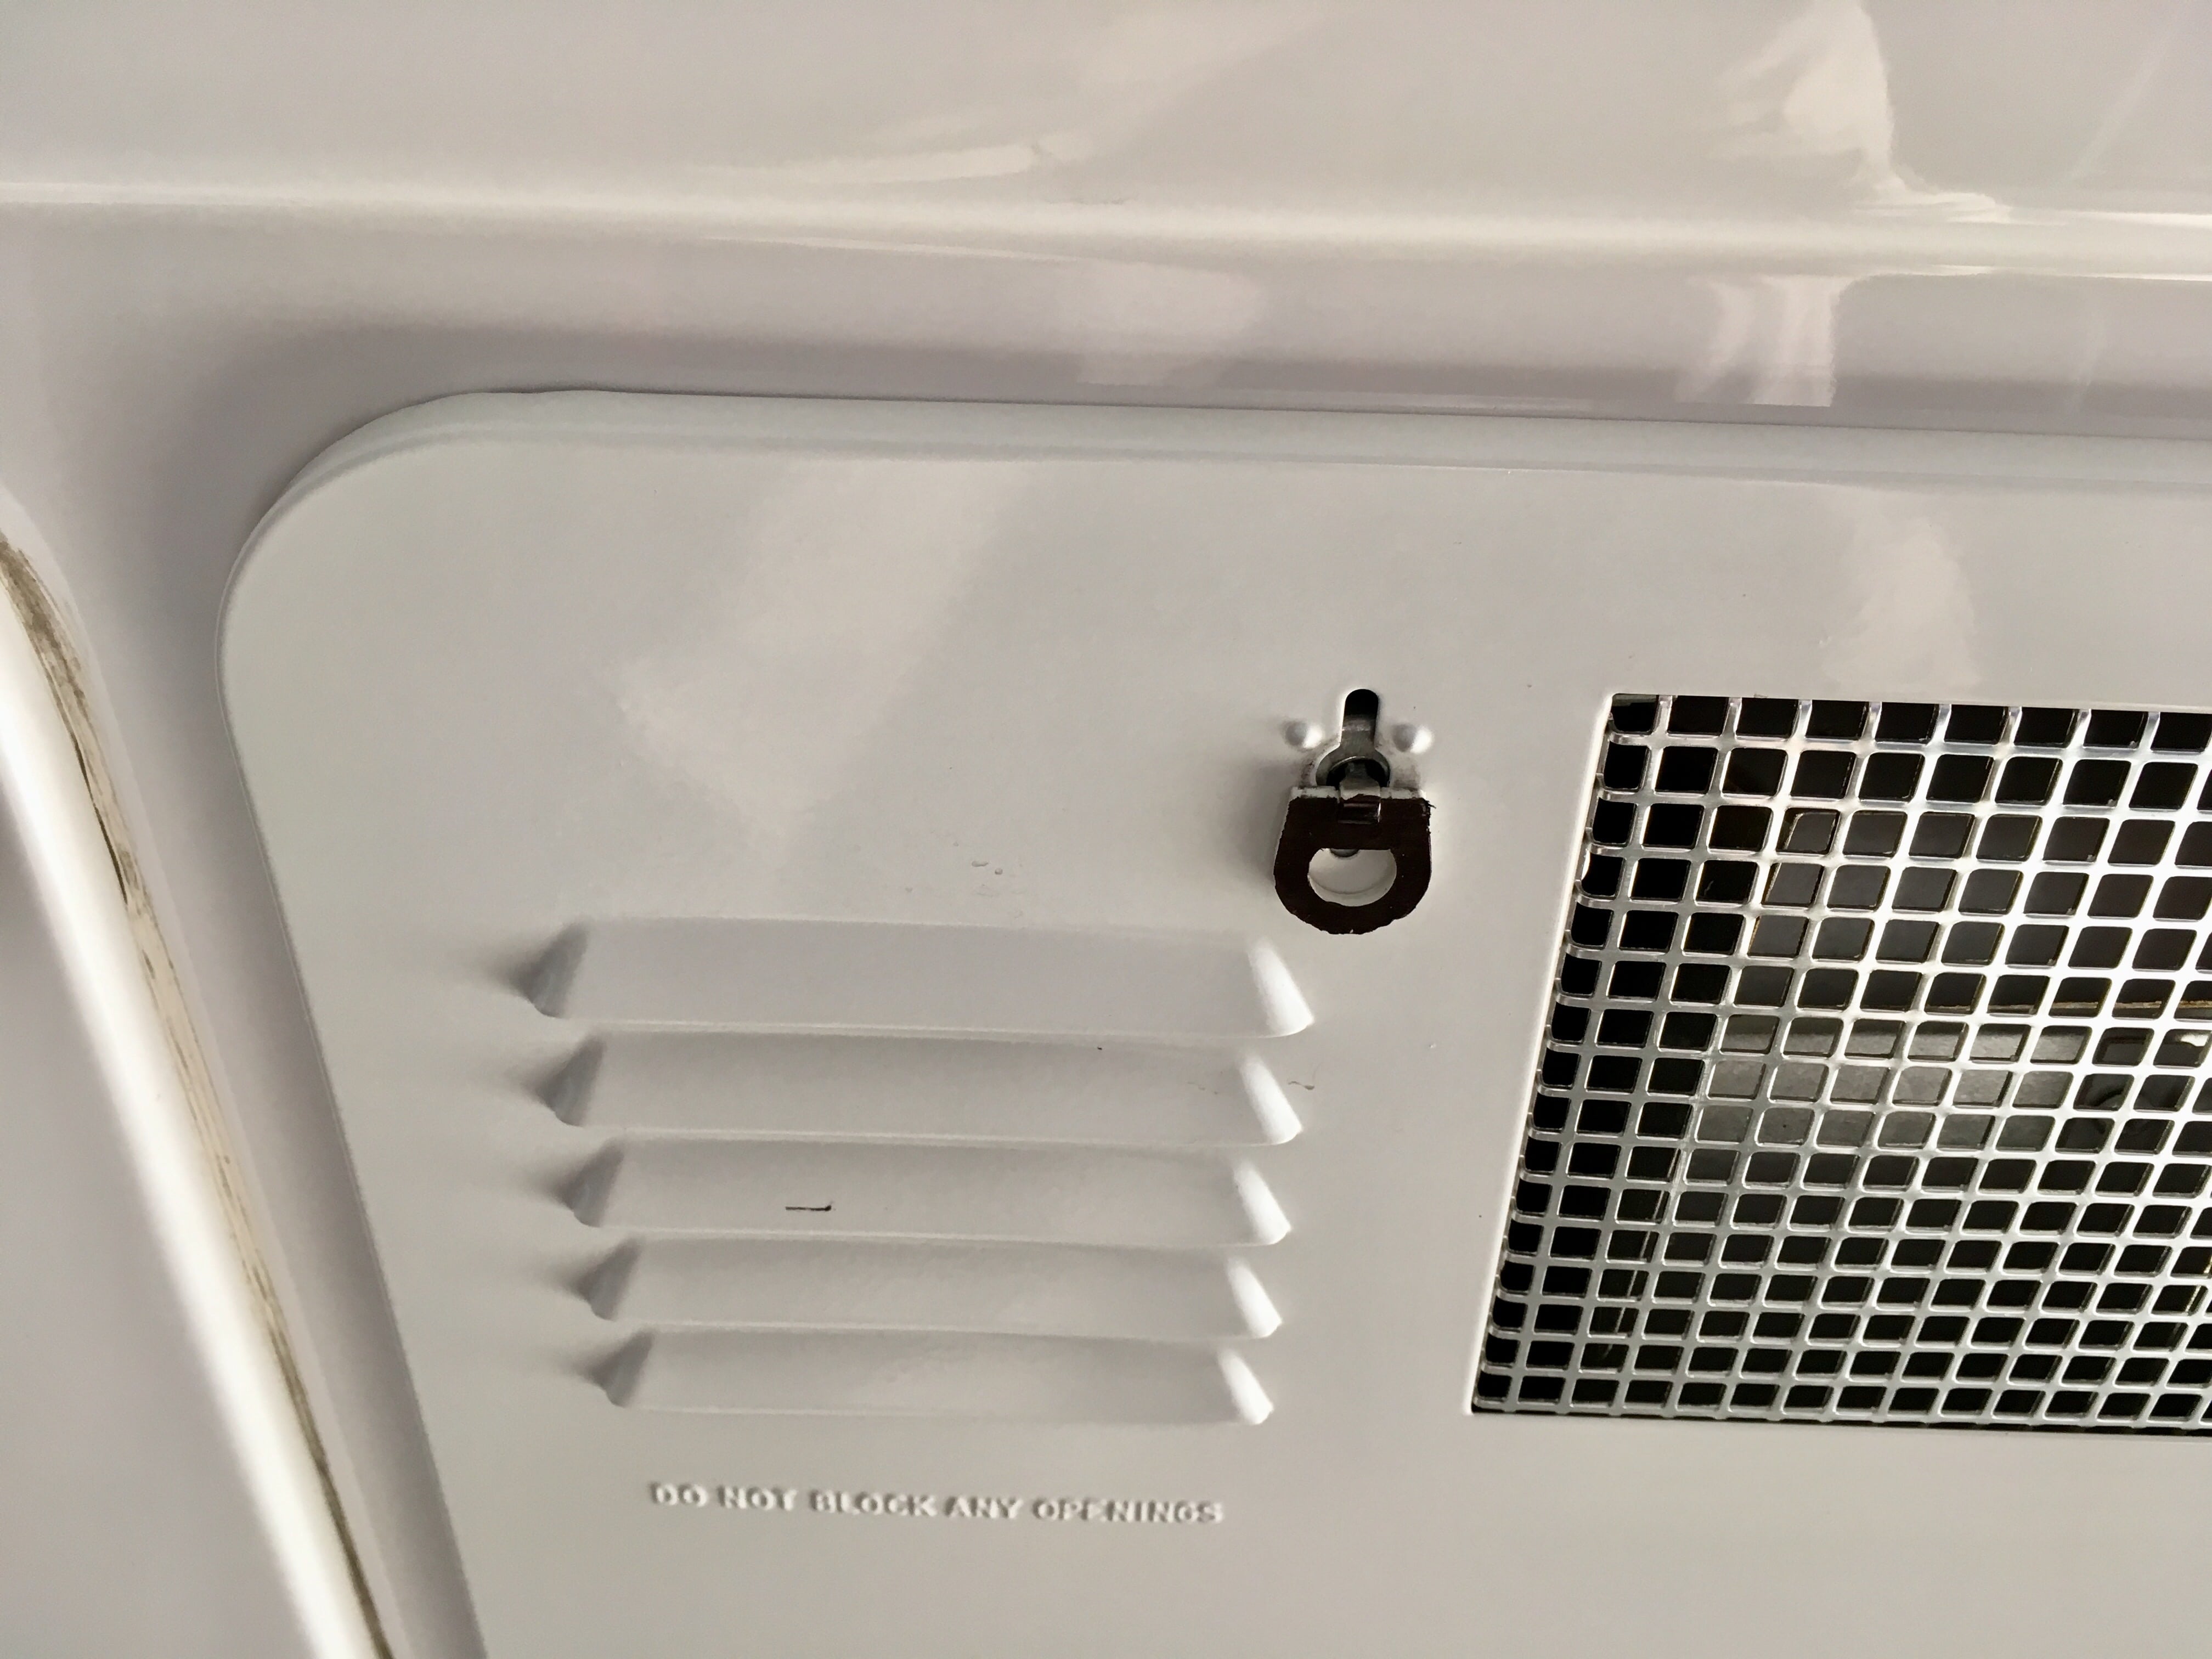
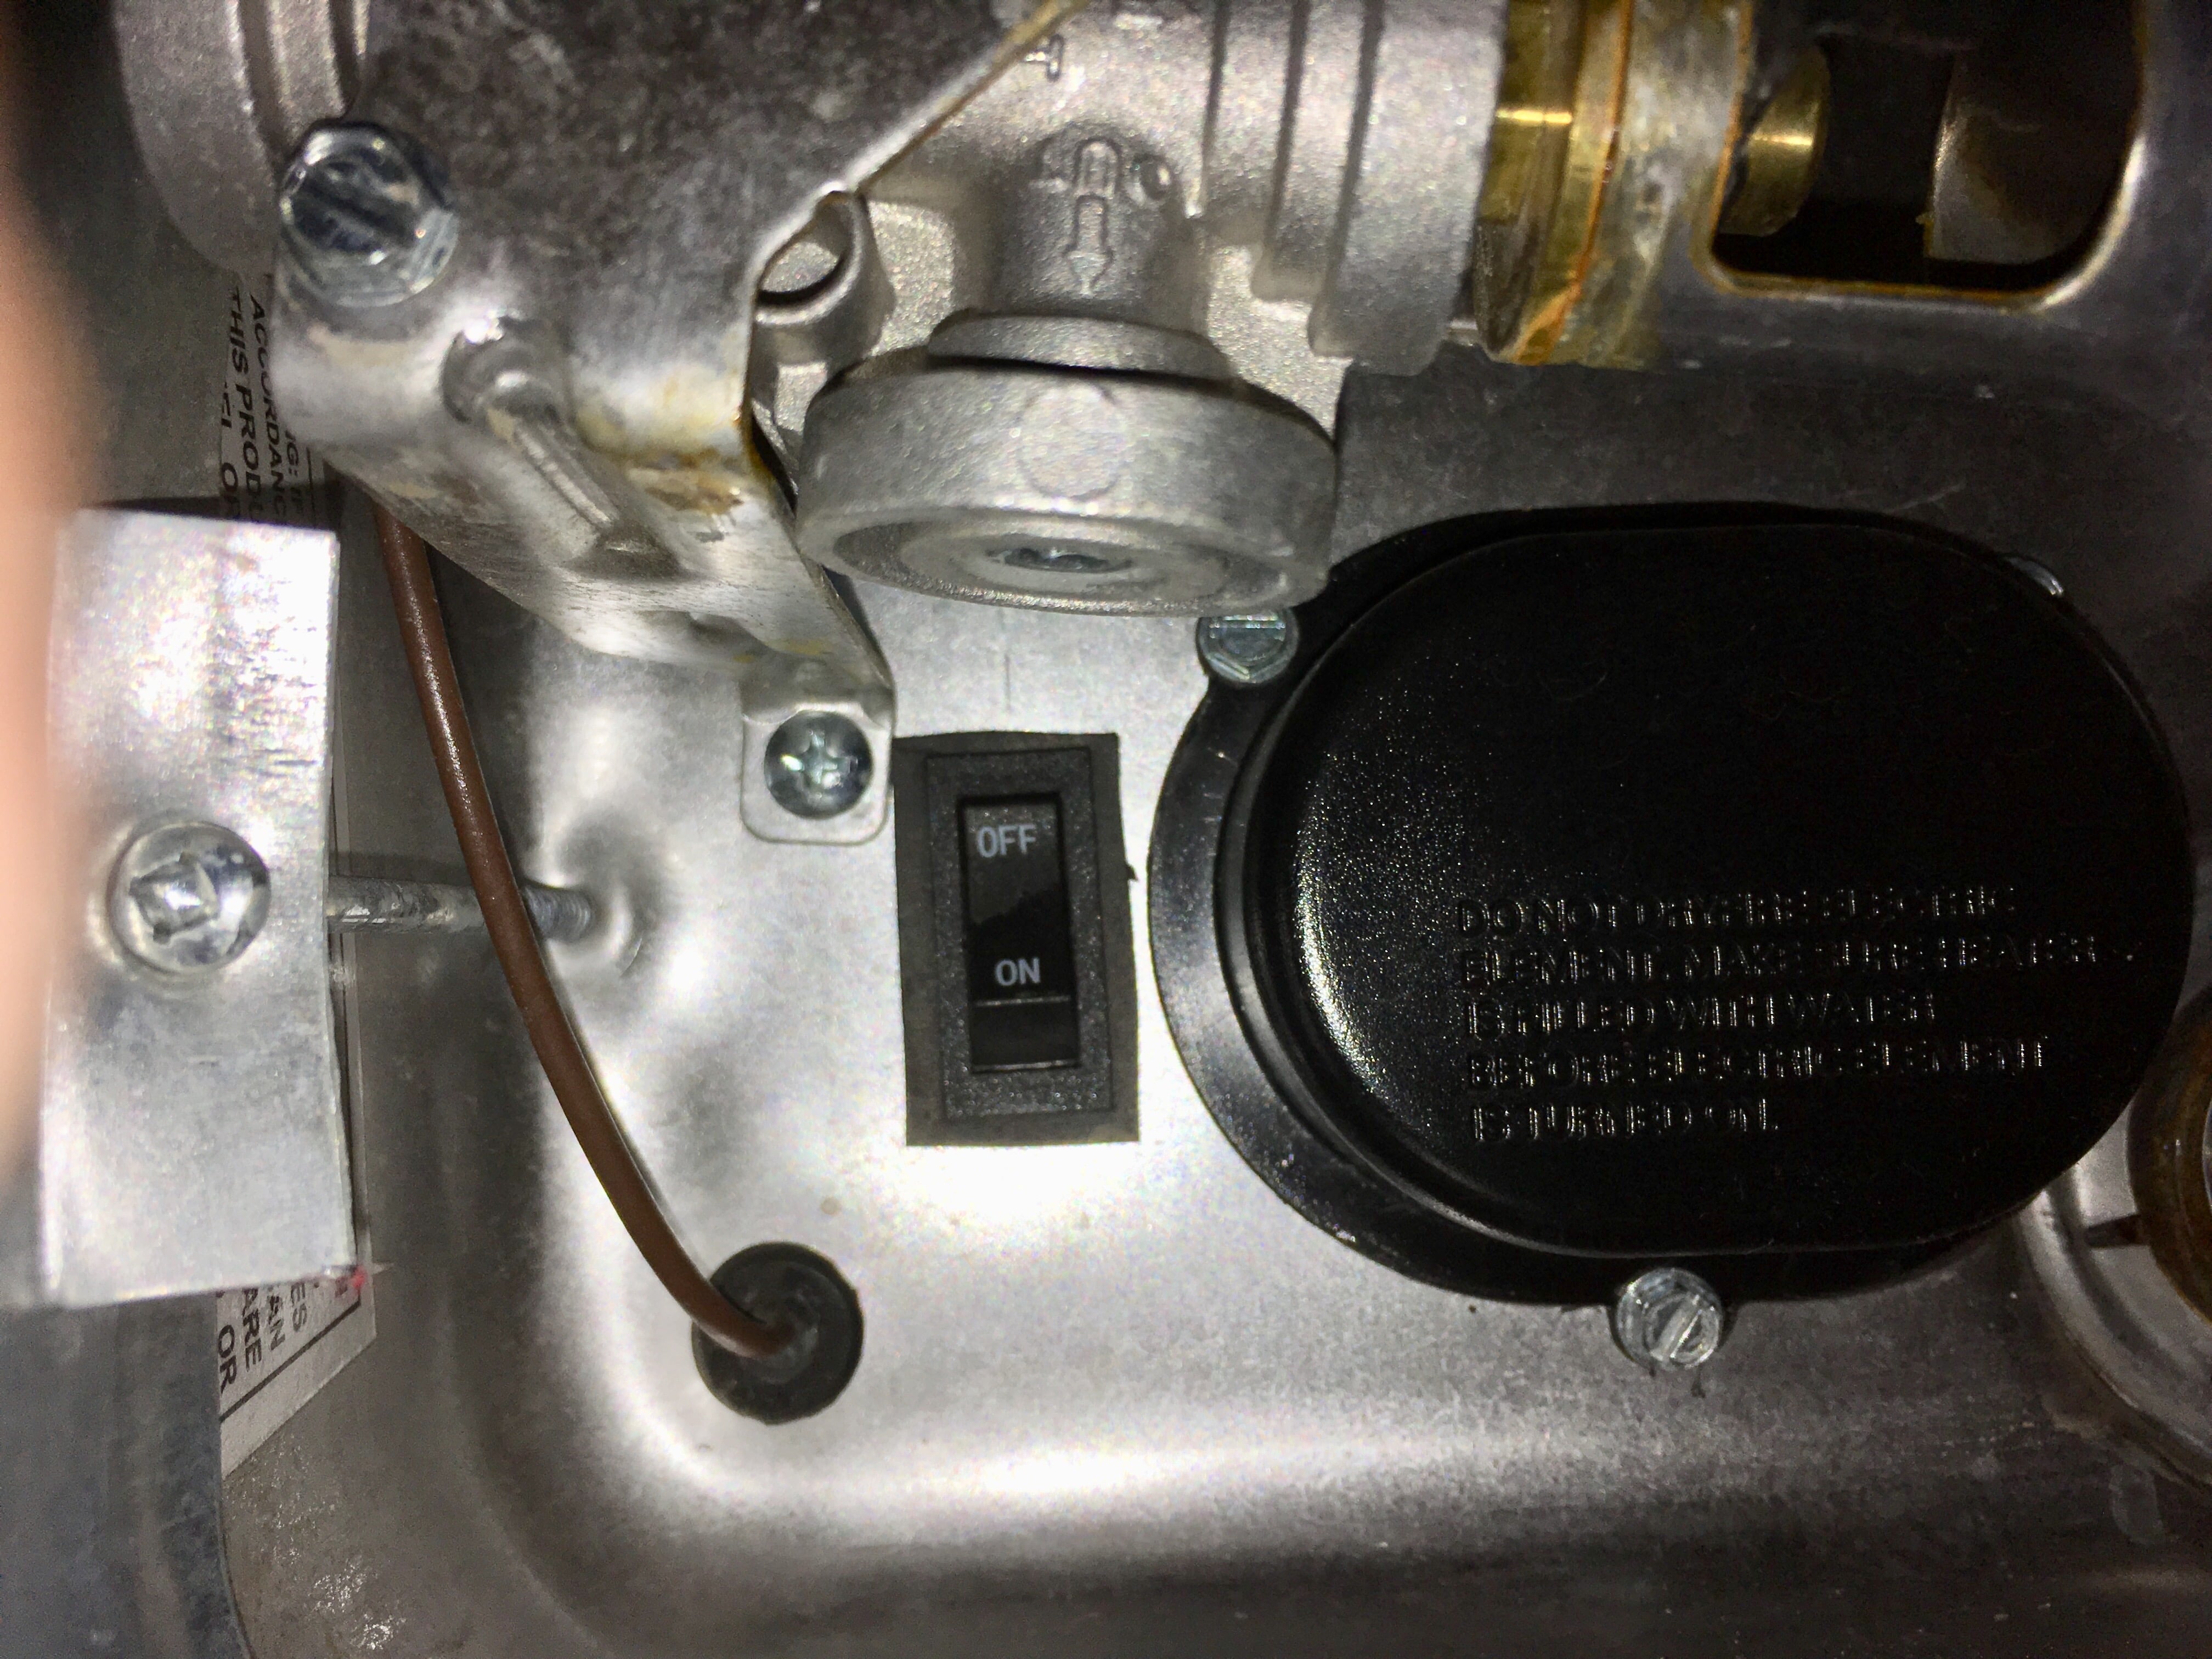
My Suburban heater has the hidden electric element switch ... not really hidden, but really hard to see since it is buried up and out of sight, unless you squat down low. The normal convention for all Single Pole switches (in this country) is for UP to be ON. The Suburban switches are backwards. It is important to leave the outside heater switch turned OFF when you have drained the tank, so that somebody cannot inadvertently close the inside circuit breaker (where ON is UP) and burn out the element when you are hooked to shore power. Without water in the tank, the element will burn out in a minute less than no time, as Mr Rodgers said. [attachment file=HWH label annotated.jpg] [attachment file=HWH Switch location.jpg] This way I can feel with my finger and verify it is switched off. A replacement element is less than $20 so it isn't a disaster if you do screw up. Just frustrating. It would be nice if this switch was visible and oriented correctly. I suppose you could rotate it 180 degrees, but that would cause problems if you took it to a shop and they were used to the wrong "normal" orientation. I got this following tip from another member: color the door latch! Switch turned OFF: [attachment file=HWH Switch OFF.jpg] Switch turned ON: [attachment file=HWH Switch ON.jpg] I used a black Sharpie instead of red. I figured the red would turn pink quickly. Interesting side note. I found this comment on an electrical forum about switch orientation (in a circuit breaker panel): "The reason that "down for off" is correct is for when you are being electrocuted whilst working on the fusebox, you can pull down on the switch by so doing cut the power as you slide down the wall..." LOL. John Davies Spokane WA
1 point


-
Recent Achievements
-


")


")