Leaderboard


Popular Content
Showing content with the highest reputation on 03/12/2019 in all areas
-
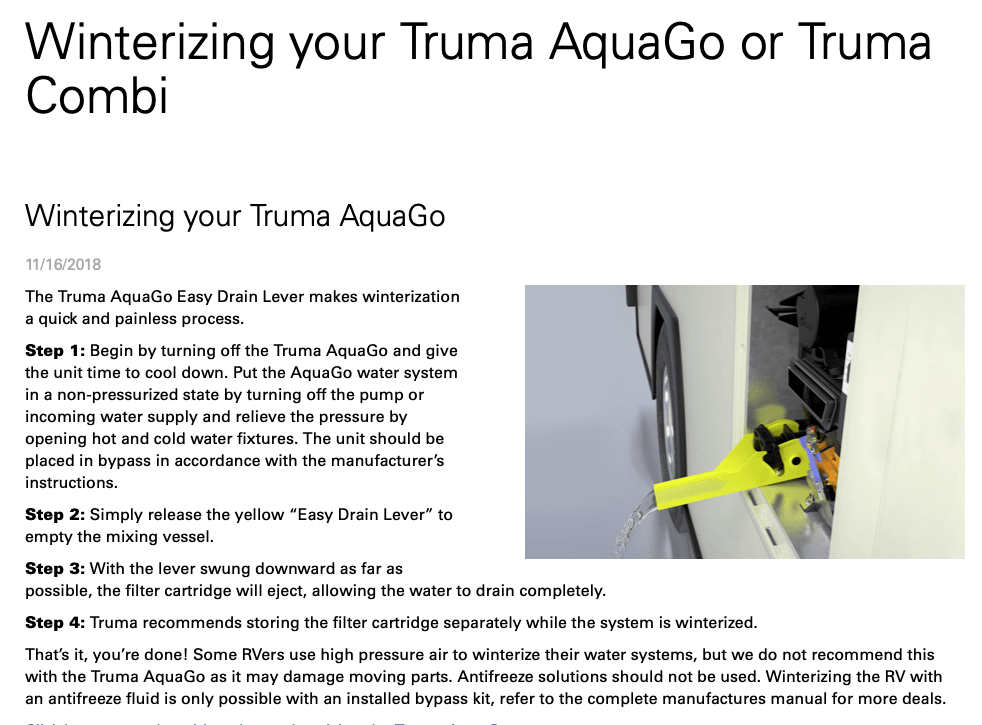
I don't have a dog in the hunt, as our water heater is a Girard, but I also found the info David S. found, plus the (also) 11/18 winterizing video from Truma. What I do remember from a few years ago, when we were looking for an instantaneous water heater, was the Truma claim of simple winterization. Pull the lever... and done. I poked around today, as I feel really bad for Corcomi. I found two videos on the Truma site, still talking about just draining... nothing about removing filter. The kolbe segment. Start watching at 10:30 And. The zagami segment I also found this, still on the website: And this
 3 points
 -
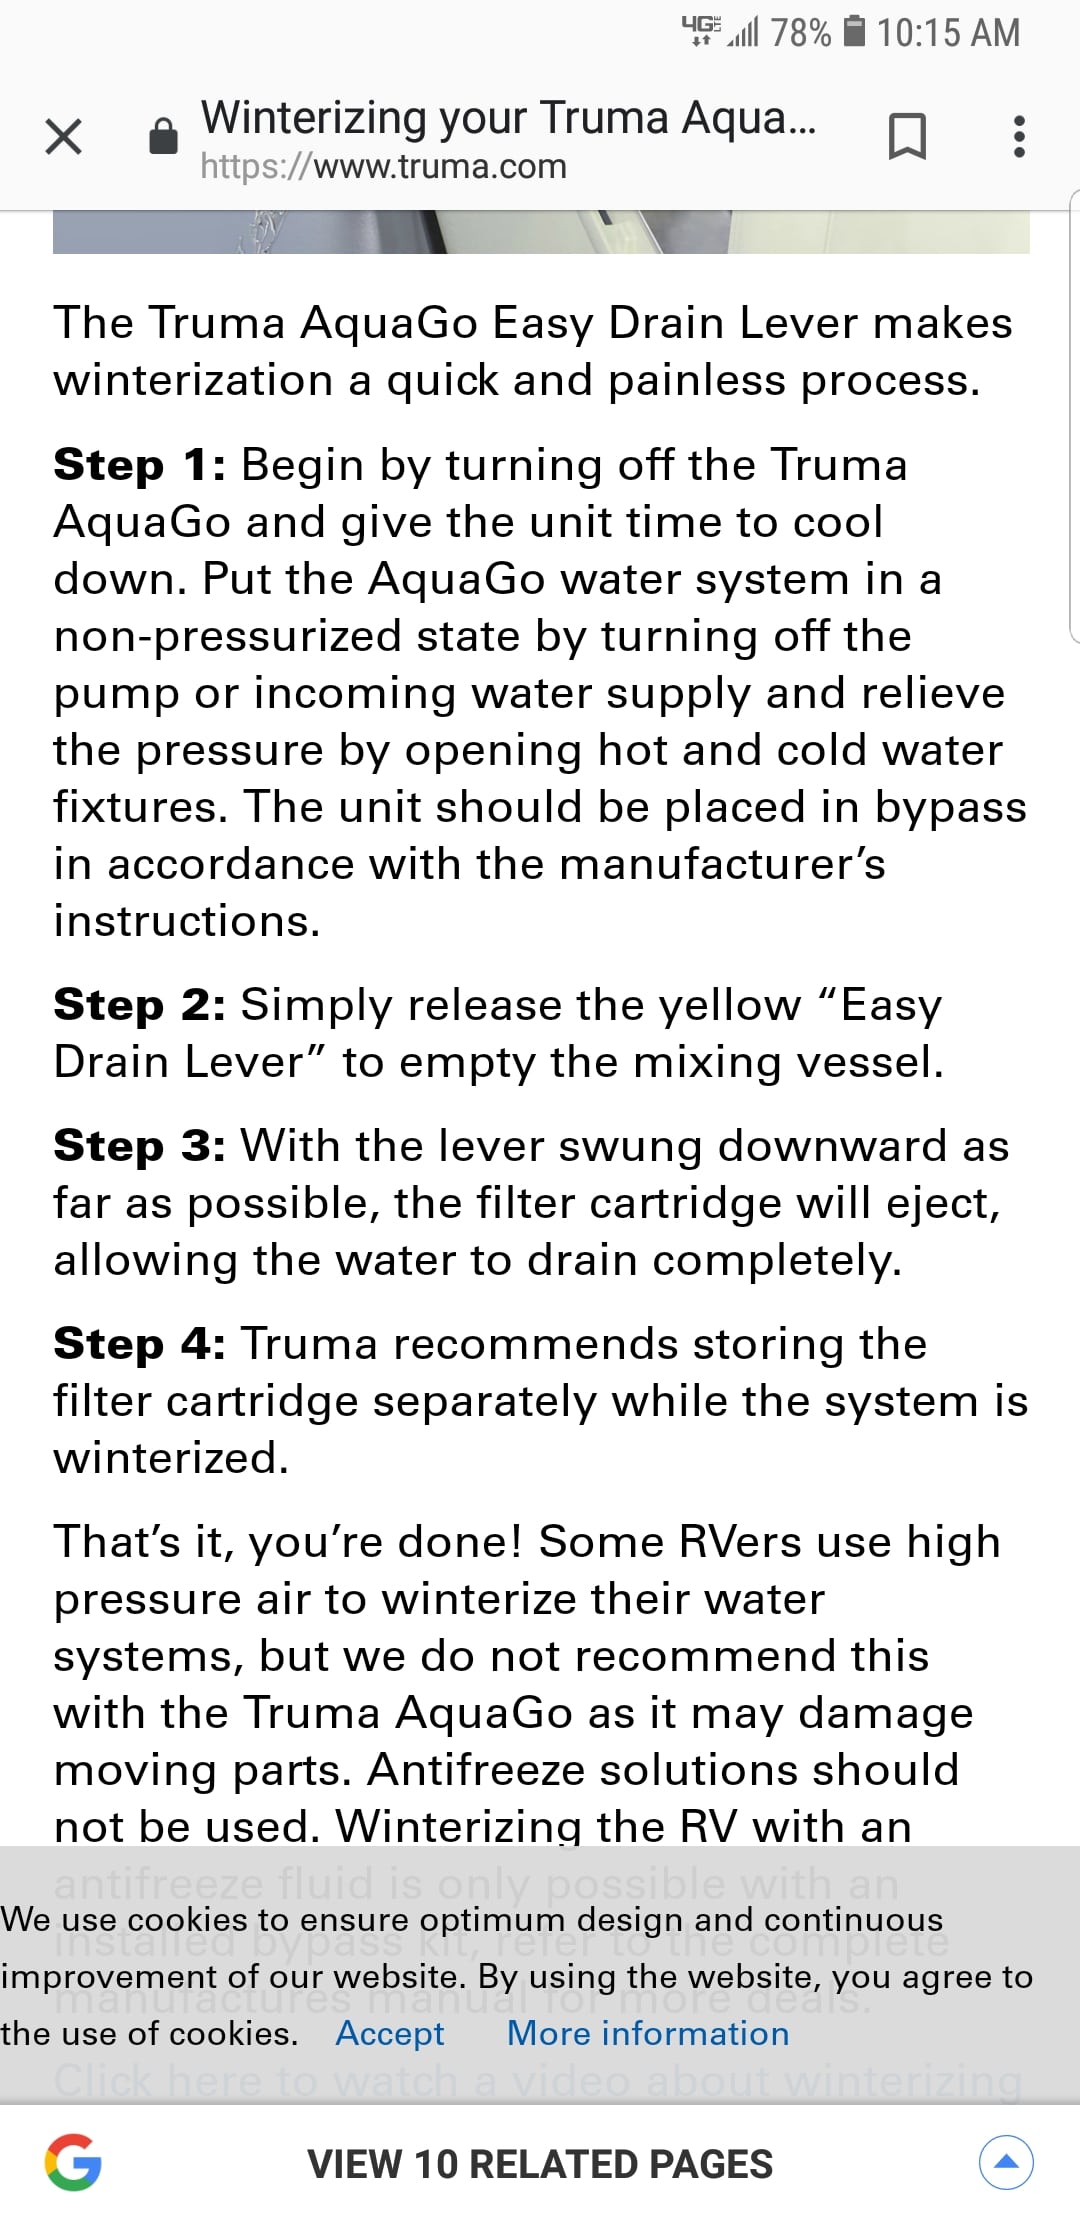
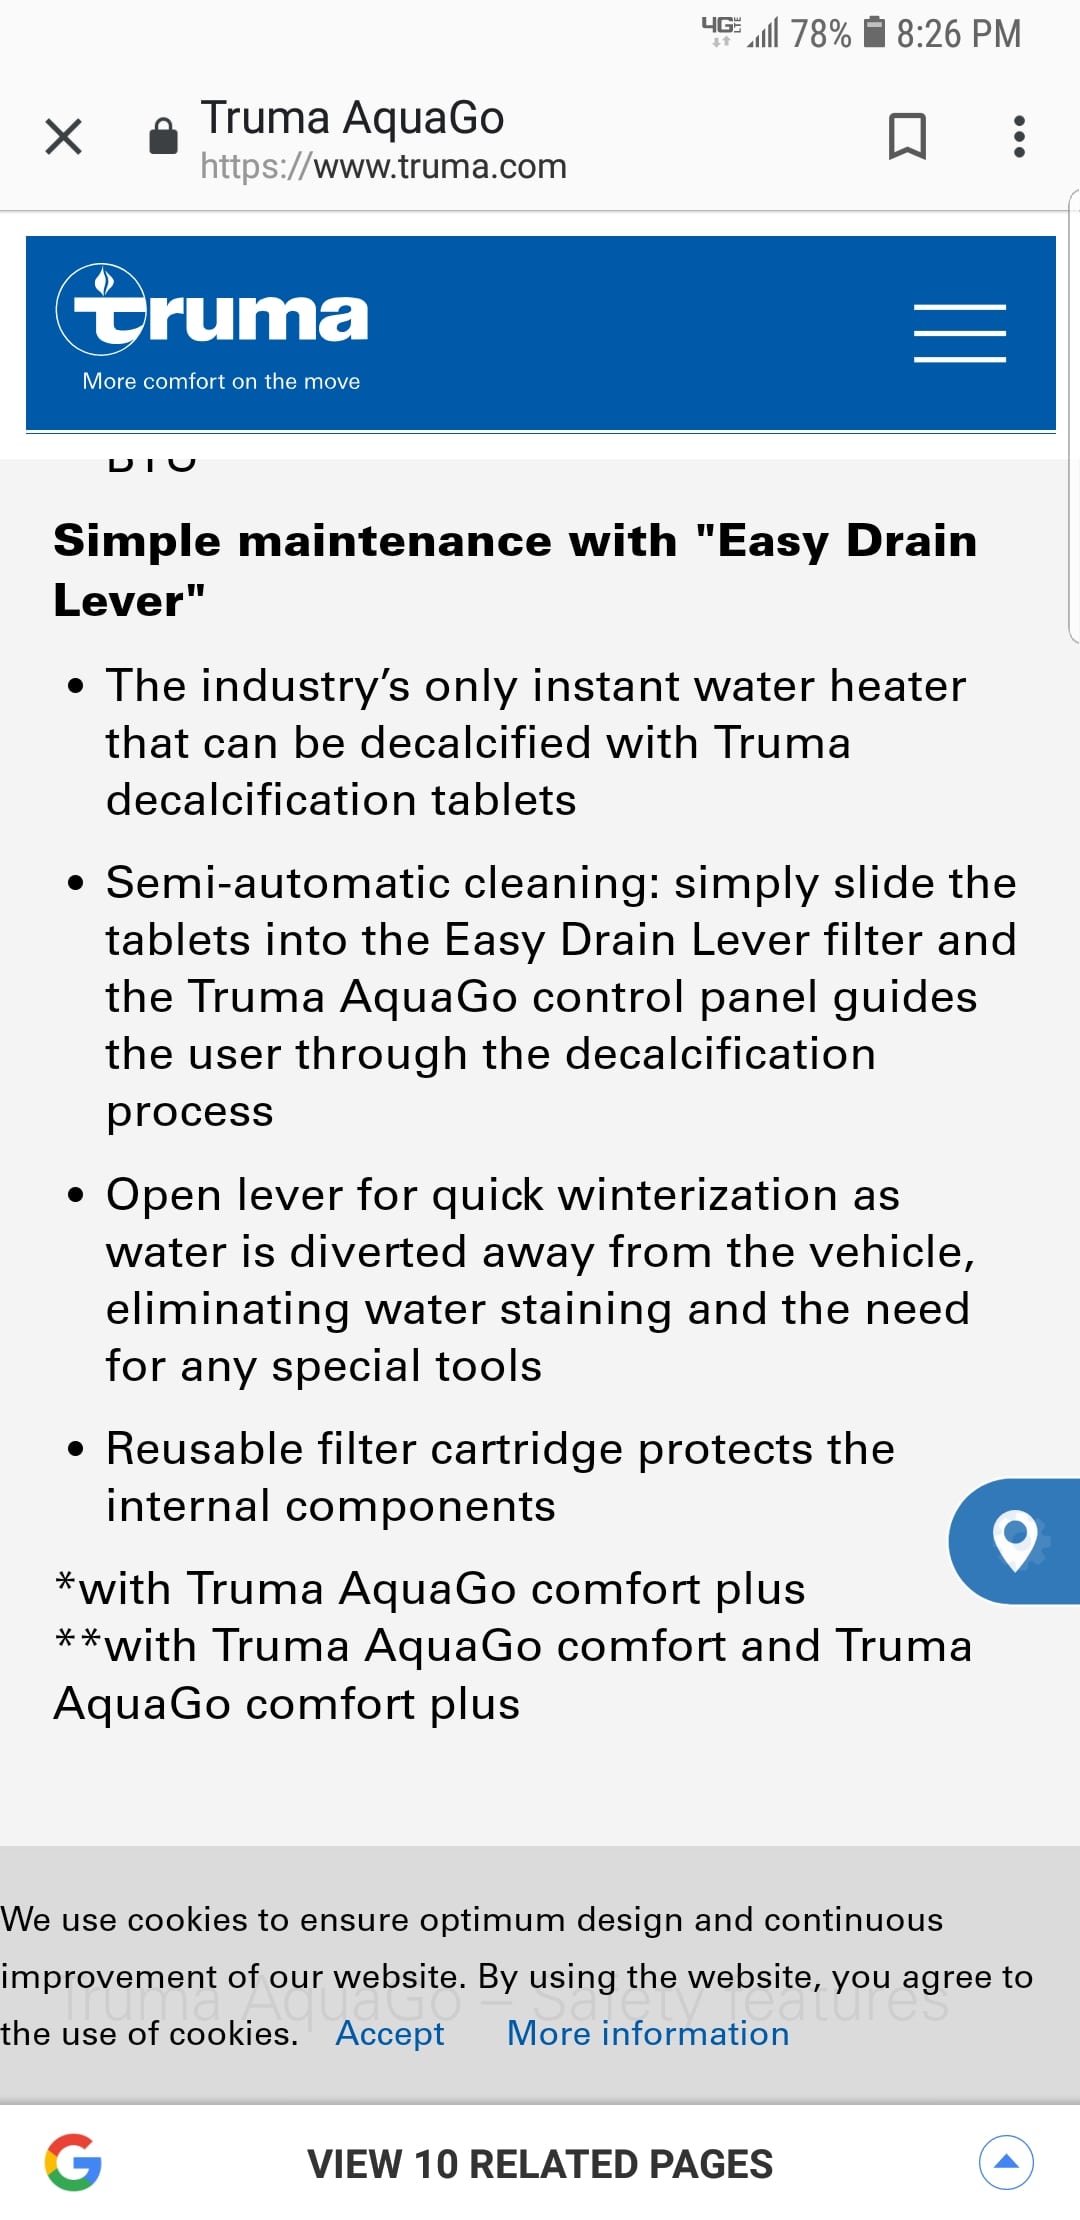
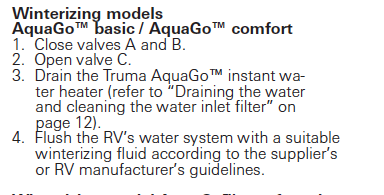
Corcomi, I am sorry to hear about your troubles. First, is your Truma still in warranty? See my post about my Truma repair, and the extended warranty. I would fight them if they claim that your warranty is void because you did not remove the filter when you winterized. I do, at least when it is relevant. Before winterizing, I did read the friggin manual, and as Overland pointed out, the Instruction Manual we were provided did NOT say to remove the filter. So you did follow their instructions. This is the Instruction Manual that Truma provided to Oliver, and that Oliver provided to us. If their instructions were incorrect, then they screwed up. This is from the Instruction Manual: [attachment file=Truma Instructions.png] I don’t know where that Truma document on Oliver University came from. When I google the title of the document (AG_Maintenance_and_Winterization Truma) or the first sentence of the document, my only hit is at Oliver University. When I go to the Truma US website and search for Winterization, I only find this page, which states "Step 4: Truma recommends storing the filter cartridge separately while the system is winterized." [attachment file=Truma Web site.png] Notice the language? Recommends. Not You Must. I called Truma when my AquaGo had problems. Again, see my post here. Once they found out I was under warranty they suggested shipping a new unit, and having a local service person install it. I didn’t like the sound of that plan, as it is reflective of our throw-away society. I would rather try to repair something before replacing it. So instead, I had the local service person open up the unit and try to fix it. If it could not be repaired, then Truma would send me a new unit, and I might be liable for the cost of the service tech's time on the repair attempt. But he was able to repair it. I am telling you all of this because of the amount of time it took for the repair, and how the guy you talked to on the phone may look at the situation. It took time to remove the AquaGo, to open up the unit, to repair it, and to reinstall it. Opening up the unit took the most time, repairing it took the least time. It would have taken much less service time to simply replace the unit. I am sorry, but I don't trust this guy. It sounds to me that he does not want to bother trying to repair it, but would rather just install a new one. Probably gets a sizable commission on the sale of the new unit, too. I would talk to Truma headquarters, or a different service rep. I have winterized my trailer three times without removing the filter, and for two of the winterizations I have not had “a broken water line that cannot be repaired.” (I don't know about this past winter, as I will be taking Ollie out of storage soon for a trip to Moab.) It sounds like Overland’s experience is similar, and if you have Hull 275 you have probably winterized at least once without this problem. Probably others on the forum, as well. Good luck with it!
2 points
-
Several years ago, one of our single axle Elite owners, JR Birdman / Aubrey, traveled through Mexico with a well organized, large caravan. He said it was a wonderful trip that went down the eastern states of Mexico all the way to Belize and then returned on a more central Mexico route. Aubrey said the numerous large speed bumps were brutal on some of the caravaners' equipment. His Ollie stayed together much better than most of the larger units he travelled with. He was also very happy to have his sophisticated water filtration system along. I believe the key to a trip like that is joining a well established RV caravan group that has experienced leaders who have made the trip before. It may be expensive, but you get the benefit of their in-depth planning and knowledge of how to "grease the system" when needed. Safety-in-numbers is a real benefit should you decide to go there. It would not be advisable to embark on a solo journey through much of that area.1 point
-
I used to have a Nash stick and staple travel trailer and the TV was a 1984 Suburban 7.4 liter 3/4T. I wired it up with o gauge welding cable from the alternator, through a marine battery selector switch, straight back to the rear bumper to a 150 (?) amp Andersen connector. I also ran a matching ground wire, direct from battery to the connector. I wired a similar charging cable on the trailer with an Andersen connector, straight to the trailer batteries. I forgot completely about fuses, I am so very lucky I did not burn something up. I was not always so careful as I am now.... I could start the truck and select the trailer and send full alternator output to it, while running the TV off its battery. Worked pretty good, I never put an ammeter on it but it would charge up the two batteries pretty fast. The big cables meant just about zero voltage drop. After a while I would turn the selector to both and keep driving to top them up and keep the Sub’s battery from dying. I like solar panels a whole lot better..... John Davies Spokane WA1 point
-
I seem to remember the Lukens charging their batteries with their tow vehicle when they were in a bind. I think they said they wouldn’t bother with a generator any more. But then again, my hard drive might be full and I’m just making stuff up.1 point
-
Specs can be found on this site http://olivertraveltrailers.com/travel-trailers/legacy-elite/specifications/1 point
-
John Davies, thats a great link. Thanks. Our Honda 1000 ran our daughter's refrigerator for a week, plus a small fan and at night, two led lights, after Irma knocked out power in much of our county a year and a half ago... Our yamaha 3000 ran our refrigerator, plus our next door neighbor's, and a few lights and fans in both homes. And, most importantly, it powered the igniter for our instantaneous home gas water heater, so everyone in thr neighborhood could shower.:) The little honda is awesome as a charger, but it won't power a lot. Sherry1 point
-
Geronimo, I'm not convinced a castellated nut is the answer. And remember, the shackle bolts in the Dexter system are specific to that design. They are shoulder bolts where the shackle plate is pinched between the shoulder and the nut. They are also serrated to lock into the other shackle plate next to the bolt head. If you try to use them with cotter pins, you'll have to cross drill all of the hardened steel bolts. Those nuts should be torqued properly, not just lined up with holes for cotter pins. You'll never get the right torque at the same time the holes line up. Without proper torque you'll get wear on the shackles and bolts. Axle nuts holding wheel bearings work well with cotter pins because they are not very tight and can be a little off without problems. Lock-Tite is the answer for the shackle nuts. Easy to do, and can be properly torqued.1 point
-
The "inverter" means it is a solid state power converter, changing pulsating DC current to a very smooth and clean AC current, clean enough to be completely safe for electronics like your computer. The cheap generators do not use this technology and they supply dirty power, which is acceptable but will make you worry. So get one with an inverter. An EU1000i "suitcase" is a great choice, use only ethanol free gas and a fuel stabilizer and you won't need to worry about a propane kit. https://www.amazon.com/Honda-EU1000i-Inverter-Generator-Eco-Throttle/dp/B00P9ONS74 Having had Honda and Yamaha generators, I now lean toward the Yamaha, mostly because they are such a pretty blue. Either brand will be wonderful, buy another brand at your own risk after much research. If you have plenty of storage room at home and in your TV get a larger one, you will be able to also use it at home during power outages. A 1000 is pretty darned marginal for that application. Something like this would be only slightly bigger and heavier, but much more versatile. (I have and love the big 2400 version.) https://www.amazon.com/Yamaha-EF2000iSv2-Starting-Portable-Inverter/dp/B002RWK9N2/ref=sr_1_2?keywords=yamaha+1000+generator&qid=1552349615&s=lawn-garden&sr=1-2 Whatever you get, never run it unattended without installing a good lock or chain, or it will walk away by itself. It is so quiet in Eco Mode (auto-throttle) that you mighty not hear it stop. I don't use a generator in summer months except for air conditioning, but I do have to use it for an hour in dim rainy tree covered conditions. It doesn't take long to bring up your batteries. In conditions like that try to avoid using your onboard inverter to run the microwave AKA "Battery Killer". Read me: ... https://www.greengearglobal.com/generator-sizing/ Note that a 1000 "might" start and run a single regular home refrigerator, but it will be borderline and you wouldn't be able to have anything else powered at the same time. More watts are always welcome. John Davies Spokane WA1 point
-
I've wondered about the reliability of those nuts too. The best solution is to clean the threads thoroughly with Brake-Clean or equivalent spray, and a brush, to get all of the grease off the threads. Then apply Lock-Tite, screw on the nut, and re-torque to specs. With that, they will not come off, but at some point, you can still remove them many miles down the road, if needed. I'm just about to grease the bearings and was planning to do this before our trip to the rally. If you happen to break a spring some day and have to get it apart on the road, you can heat the nuts with a propane torch to soften the Lock-Tite.1 point
-
1. Your Progressive Dynamics charger will only charge at a maximum of 45 amps DC, or 540 watts, so anything over that won't go to the batteries, though having some overhead would be useful if you're using the trailer while charging. So yes, 1000 watts will work. 2. Maybe. I know that there are propane conversion kits, and a few companies will sell you an already converted generator, and they do use quick connects. What I don't know is if anyone makes a kit for anything smaller than the 2000 watt models. 3. You do need the inverter, since you're going to plug the trailer's 120 into it. 4. Personal choice. 5. Some generators have a 30 amp plug just like you'd plug into at an RV park, but most just have a standard 20 amp plug. Just use your adapter. 6. This time of year is the worst for solar. So the biggest question is if this is the first and only time you've needed a generator, is it really worth the money and hassle of carrying it around? It might be 3 more years until you need it again. We had the same thing happen to us in November in the Smokies - solid week of shady campsites and cloudy days. So we paid our $30 and spent a night at a KOA. It was rough, but we survived.1 point
-
I am not sure I would trust regular drilled bolts with castle nuts..... The point of the splines near the head is to lock the bolt solidly to the mount so it doesn't turn and subsequently wallow out the shackle support holes. All the motion should be between the moving parts and the bolts, the bolts themselves should remain completely motionless. The rational is probably that it is a lot easier and cheaper to replace worn parts than to weld on new mounts. Before I did this I would DEFINITELY check with Dexter engineering. Speak to an actual real engineer, not some drone far far over the ocean. If cotter pins and castle nuts were better I think they would already be on a gazillion trailers. If you decide to go this route, have a good shop spot-weld each bolt head in two places so it cannot move. Again, my suspicion is a bad lot of hardware, not bad design. However, leaf springs belong in the 19th Century. Here is the real fix: https://cruisemaster.com.au/cruisemaster-xt/ John Davies Spokane WA
1 point
-
We have used a Honda 1000 for eleven years, for just that purpose... a series of rainy cloudy days. We use only nonethanol gas. Not that it uses much, and, it's rarely used. A gallon goes for days, running it a few hours a day. Can't help with the propane idea...1 point
-
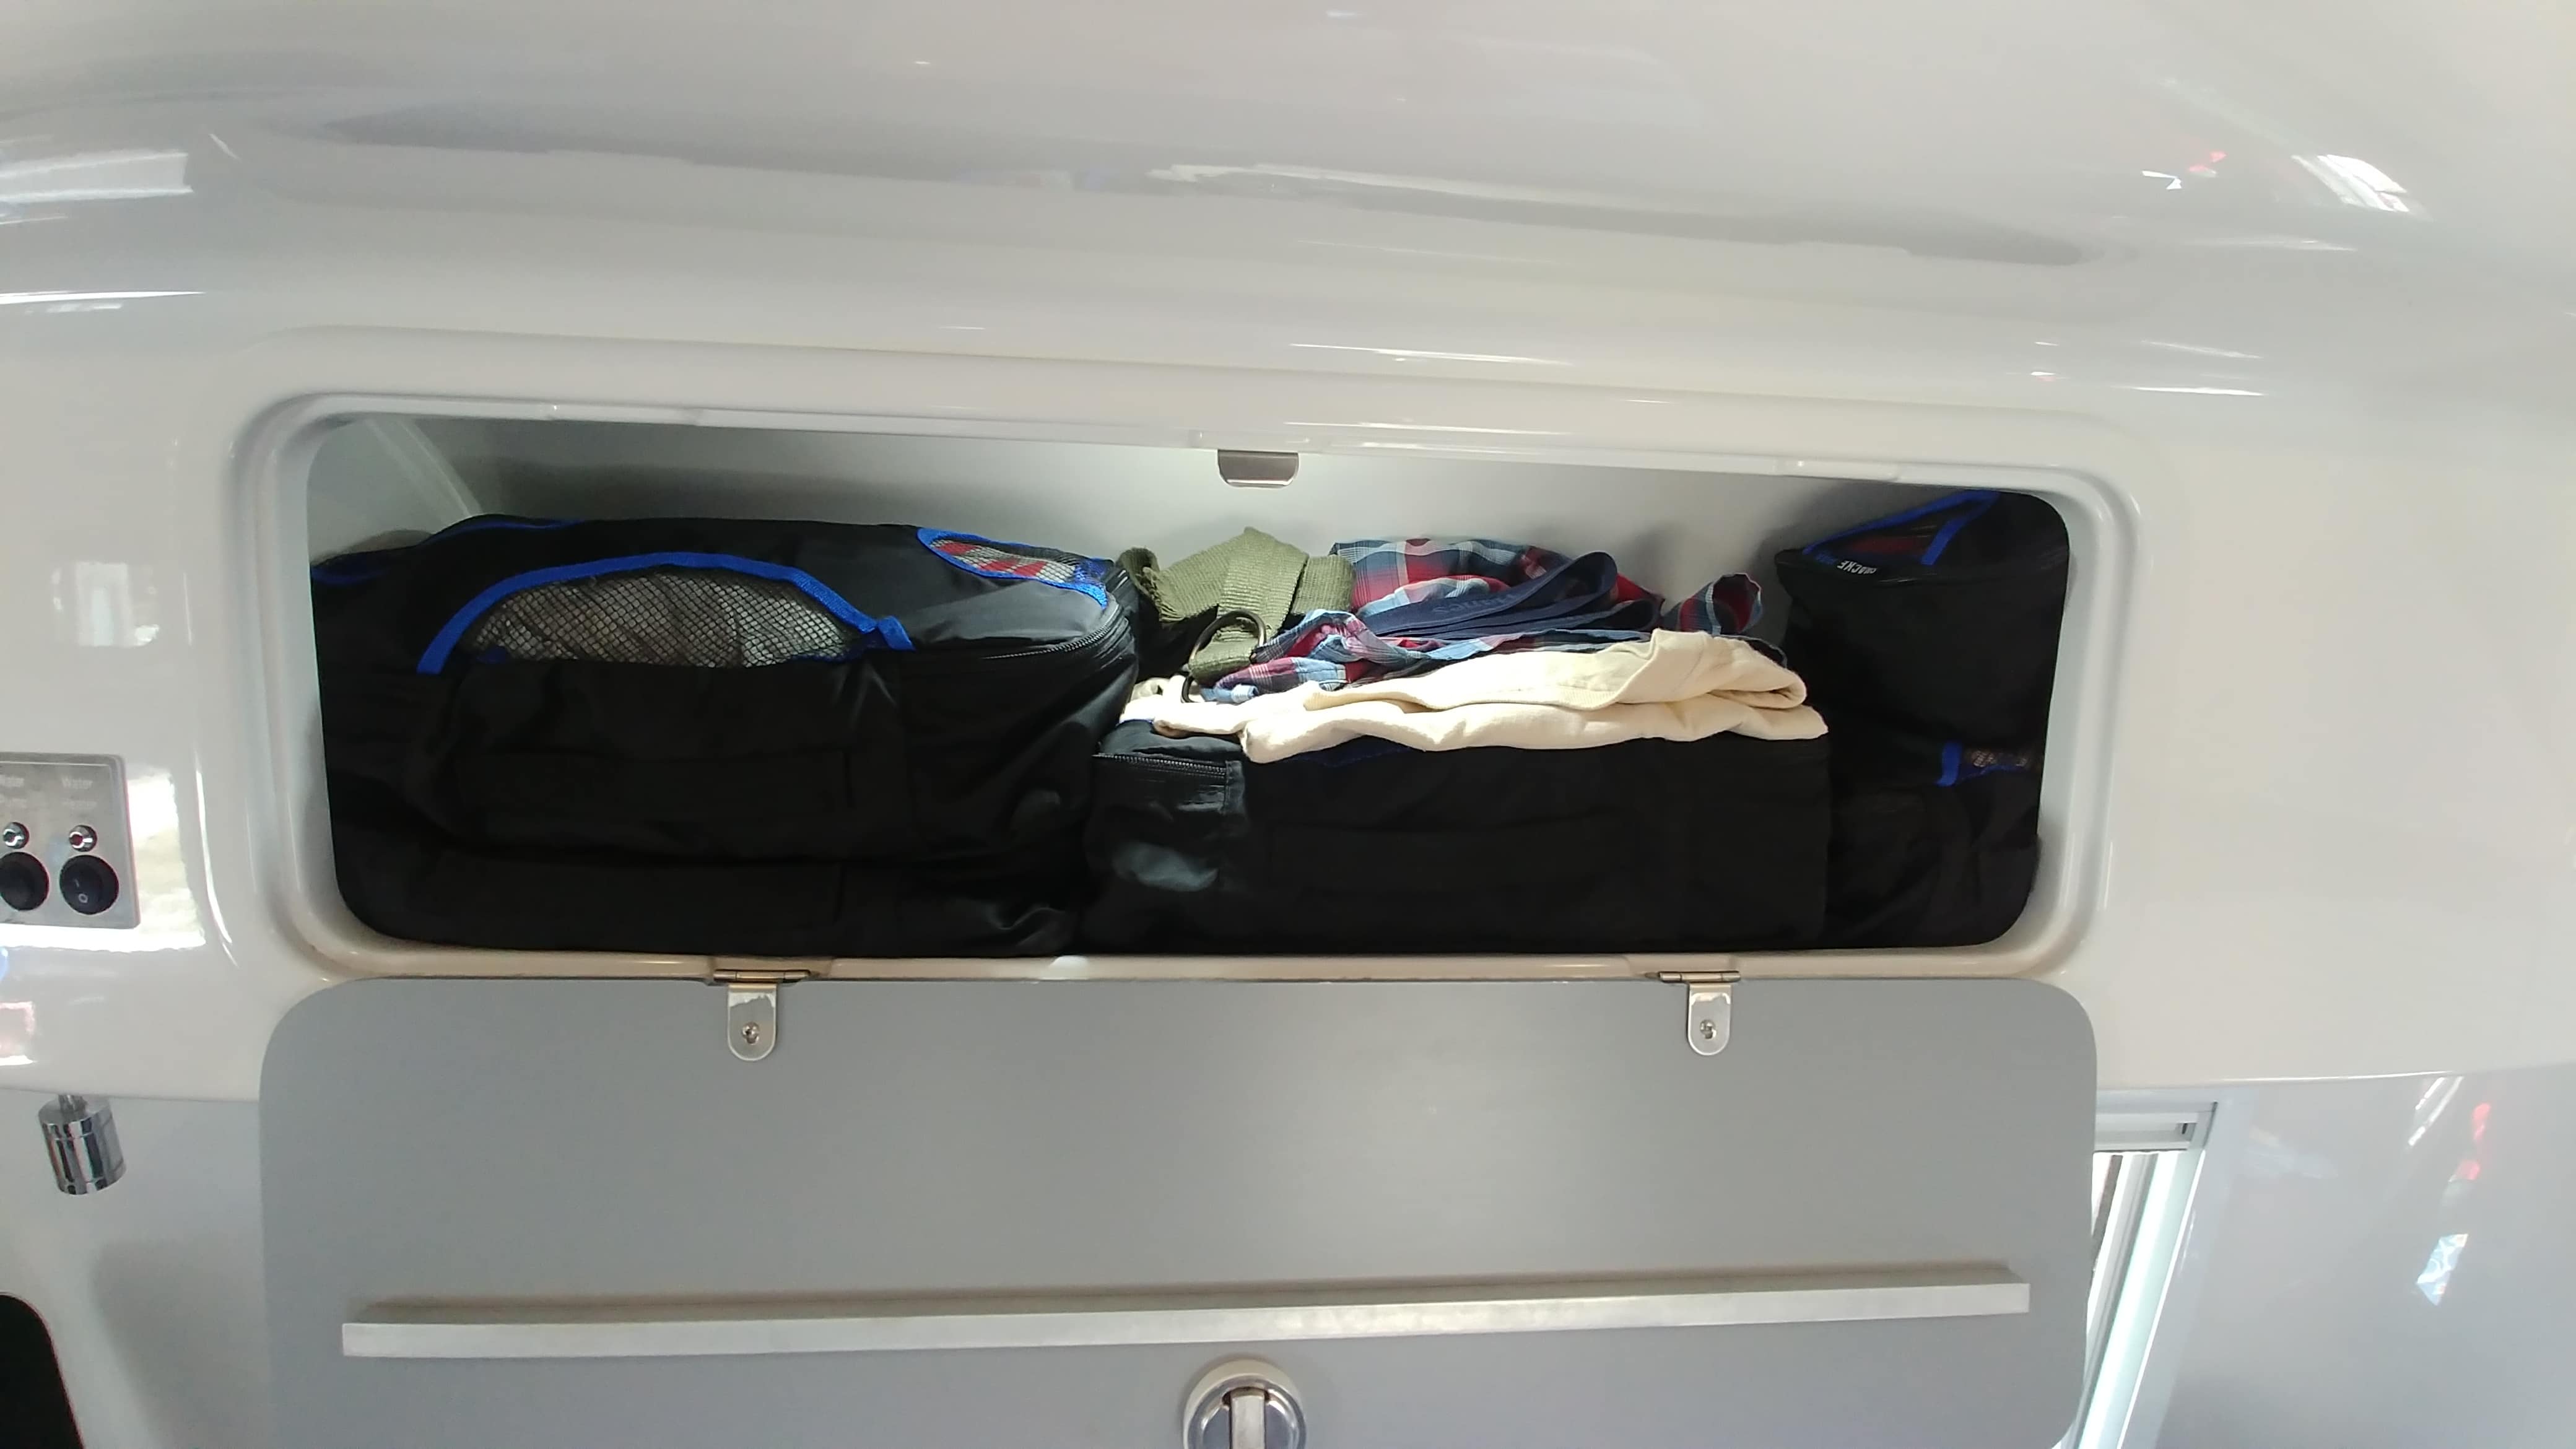
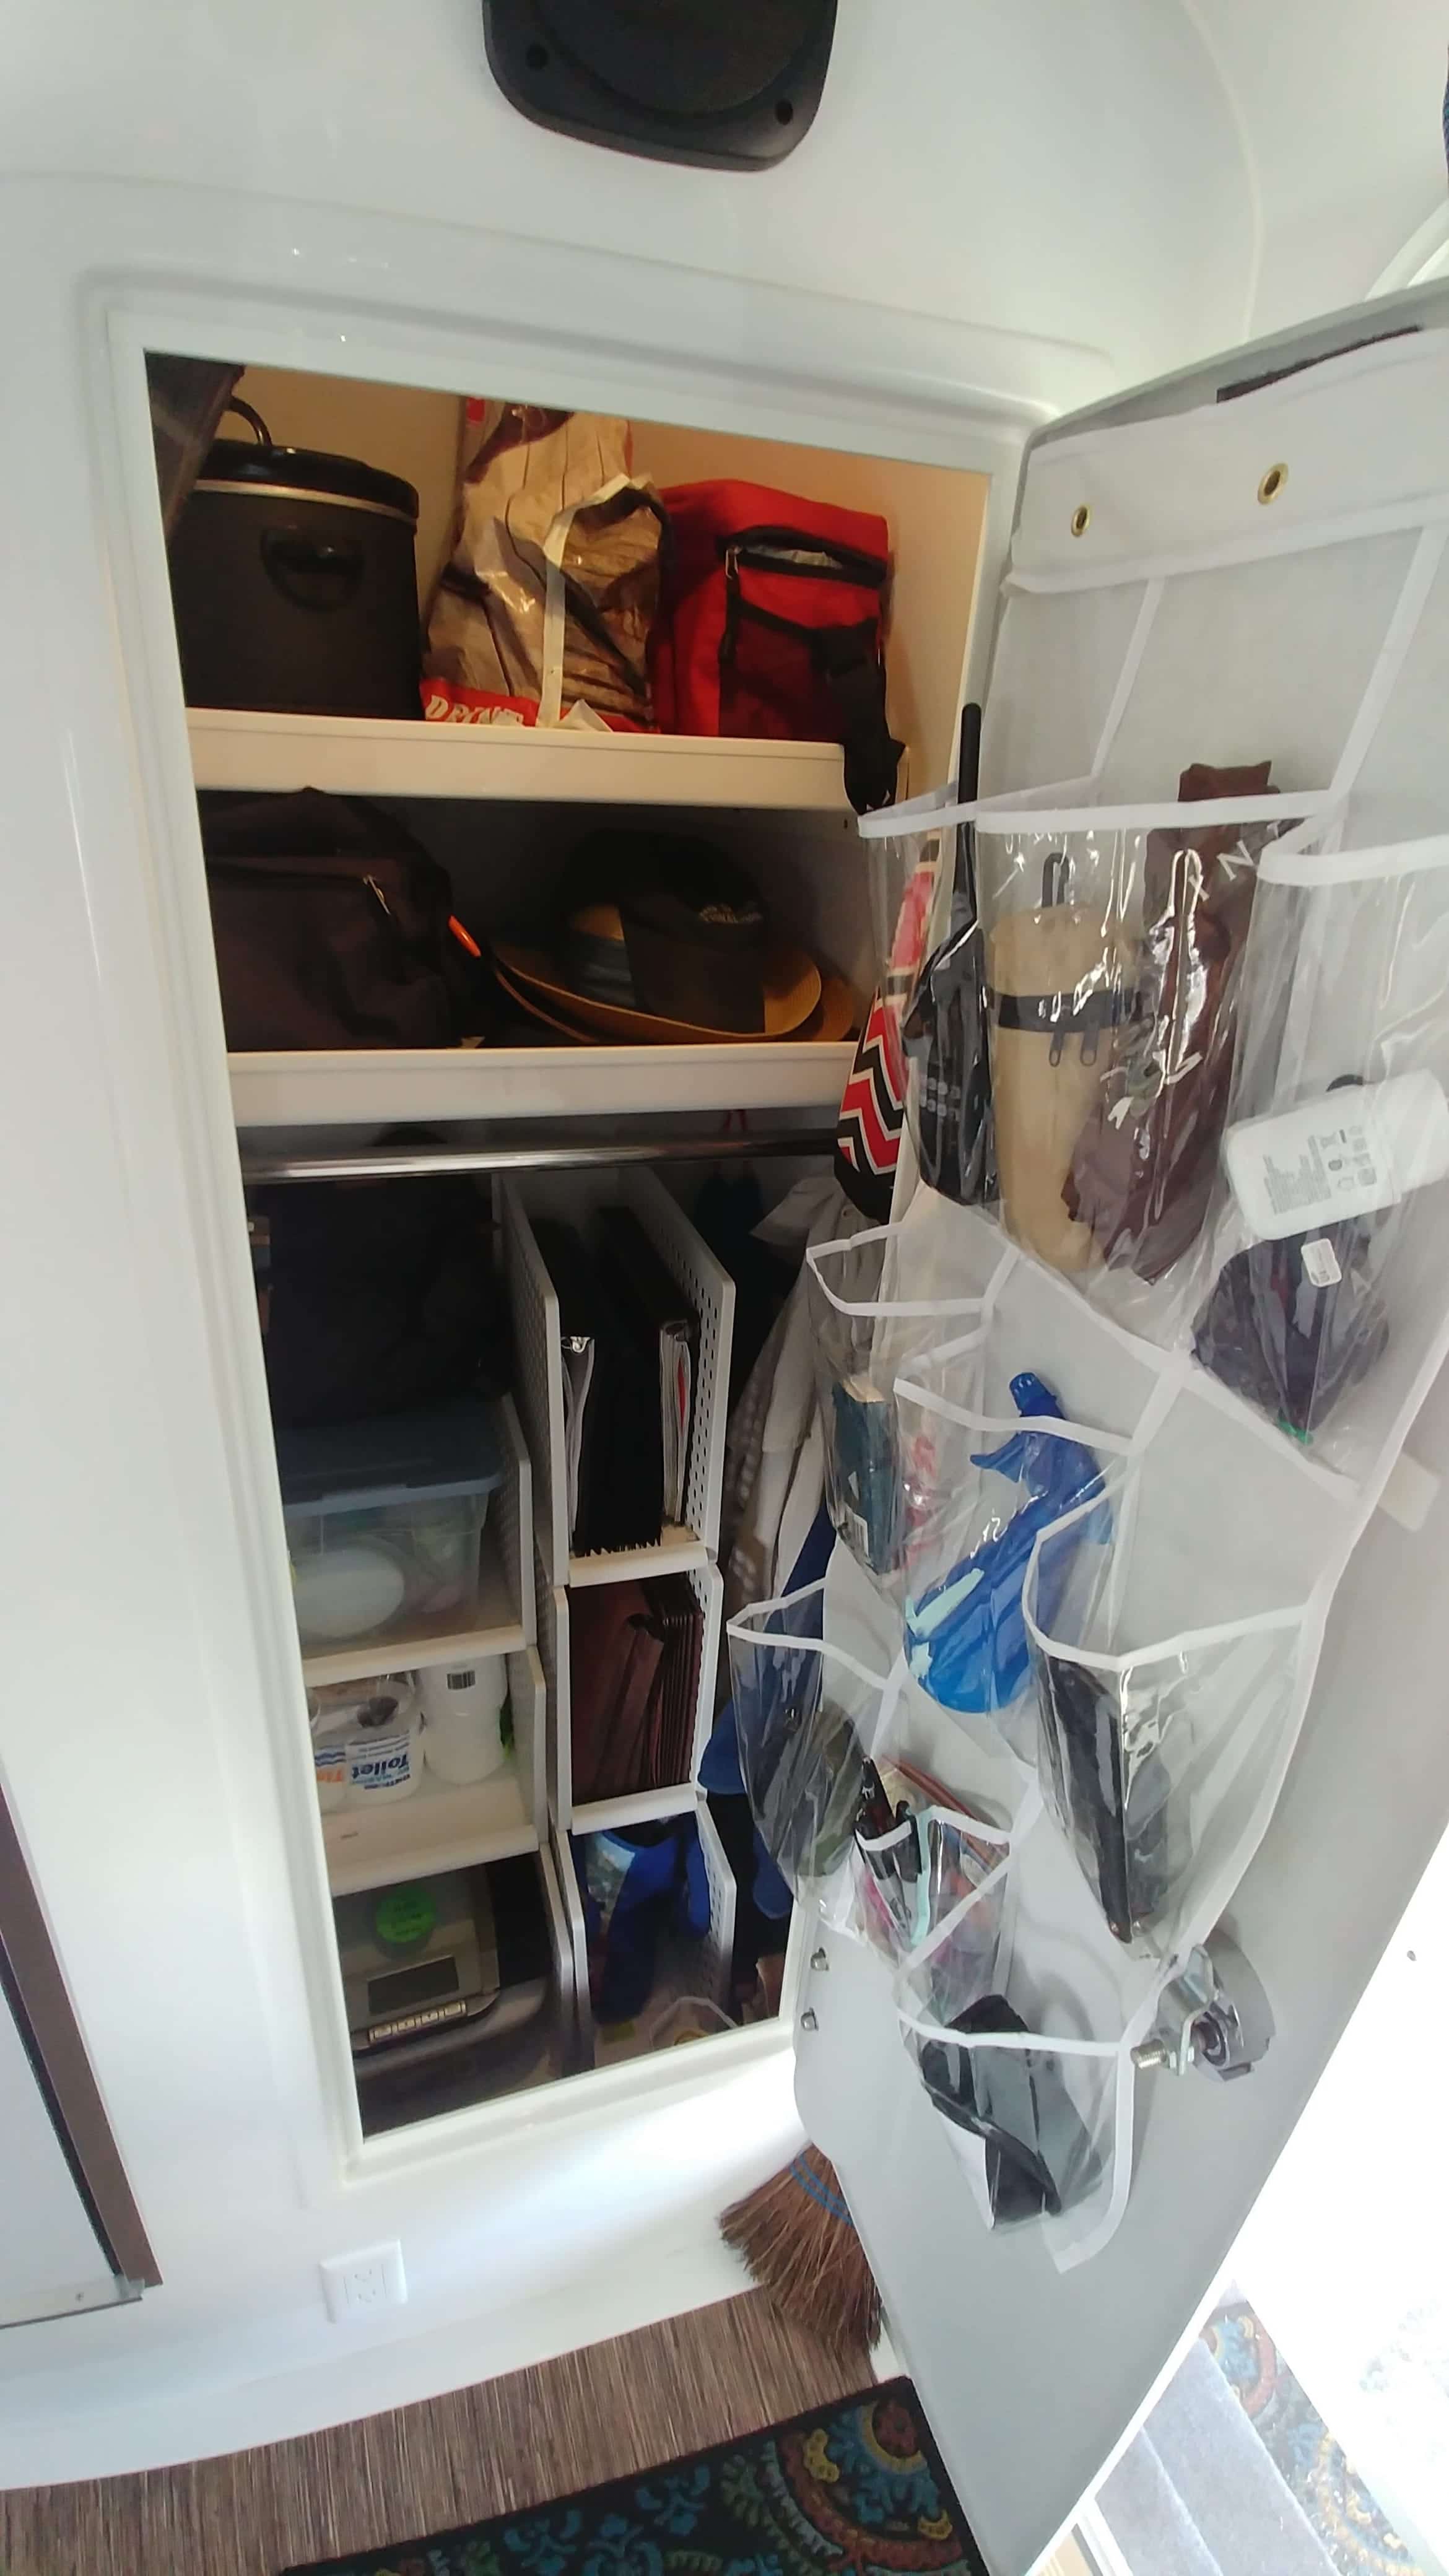
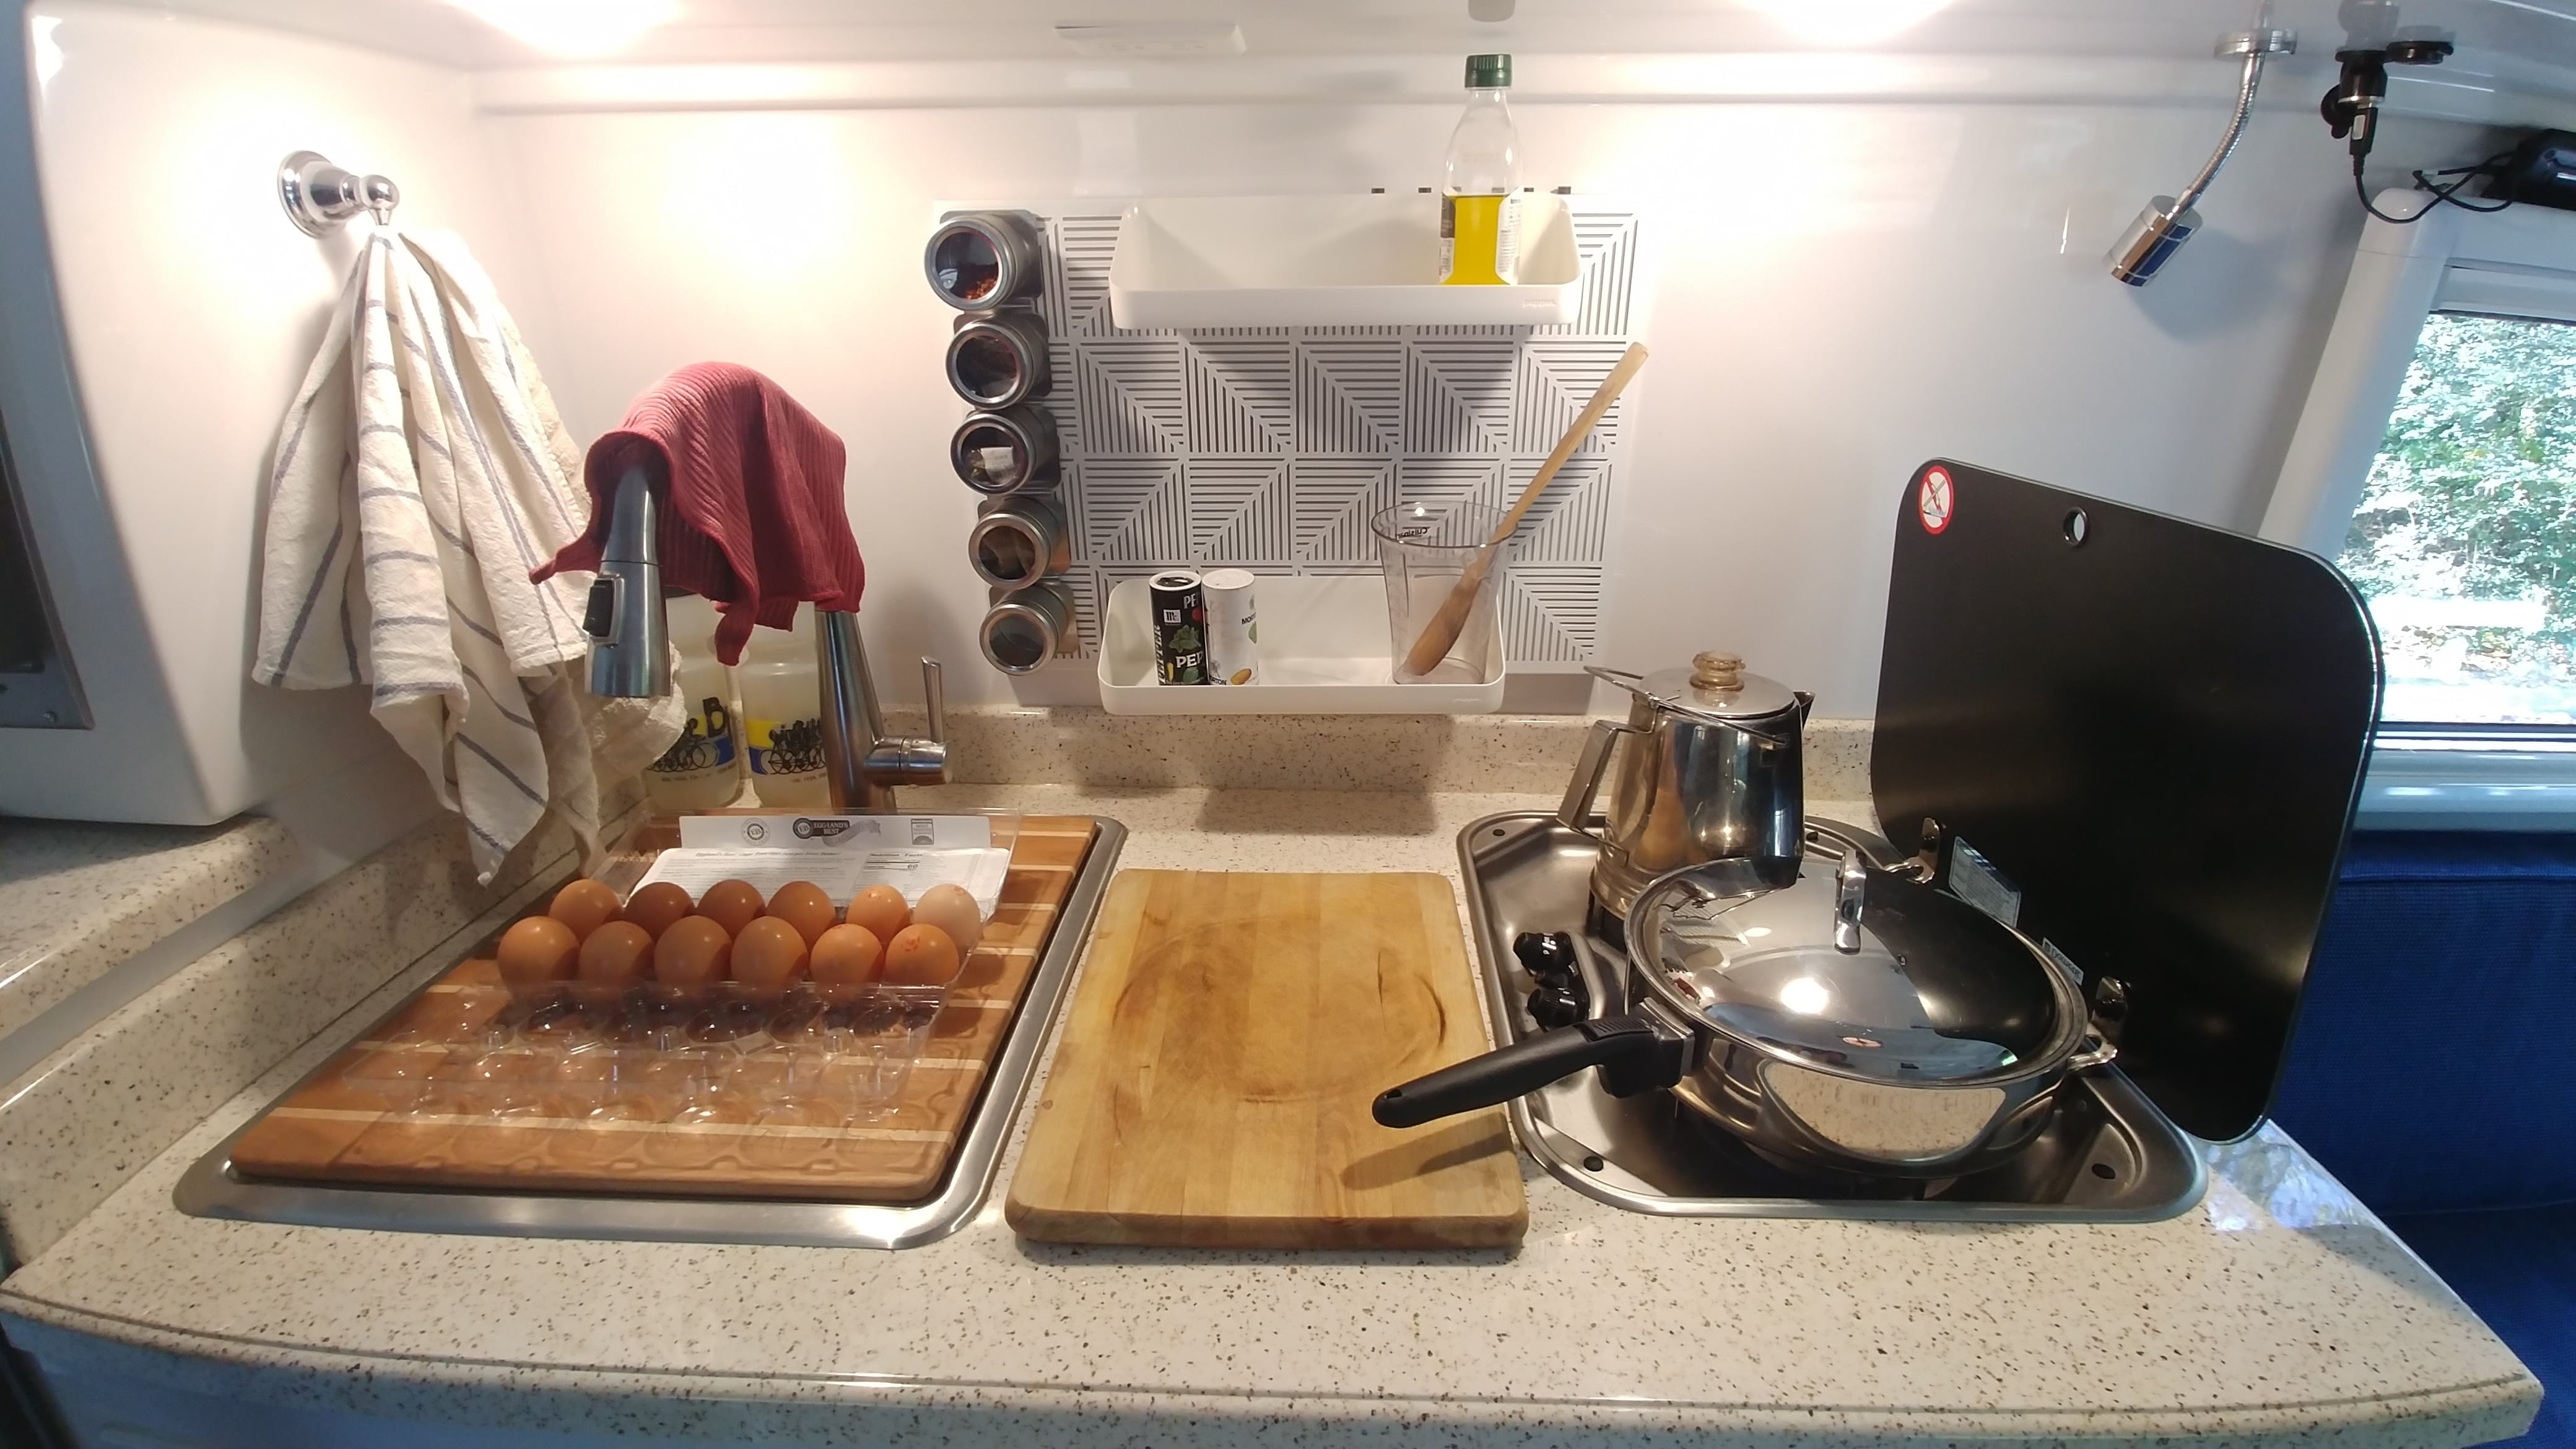
We've been full timing in our Oliver since Nov of 2017. Here are some pics of storage solutions that work for us. It took a while living in the Ollie to really determine how we would use the space so I would caution you to give yourself some time. [attachment file=0311191047.jpg] [attachment file=163145] [attachment file=163148]
1 point
-
Kathi, if you look on Oliver University (the last menu item under Travel Trailers on the website) you’ll find several downloadable PDFs for various dimensions for your trailer. Here's a direct link to the main measurement index.1 point
-
So, I remeasured and it's actually 12" from the bottom lip of the counter. I've edited the post. On ours, that leaves about 6.5" for a mattress. Our current mattresses have pillow tops that put them over that, but the extension will still scoot past them. We're swapping out for cushions now that were doing the Lagun Table (next project). I'm having them made 5" thick so no problem for us, but I knew it would be for others. In the closed position, it takes up right at 2" of bed space. I suppose there's nothing stopping someone from putting the extension from Oliver on a table saw and cutting it down to whatever size worked. It would just leave a rough edge that you'd have to sand down and polish. A lot of work, but not impossible.1 point


-
Recent Achievements
-


")


")


")


