Leaderboard


Popular Content
Showing content with the highest reputation on 03/22/2019 in all areas
-
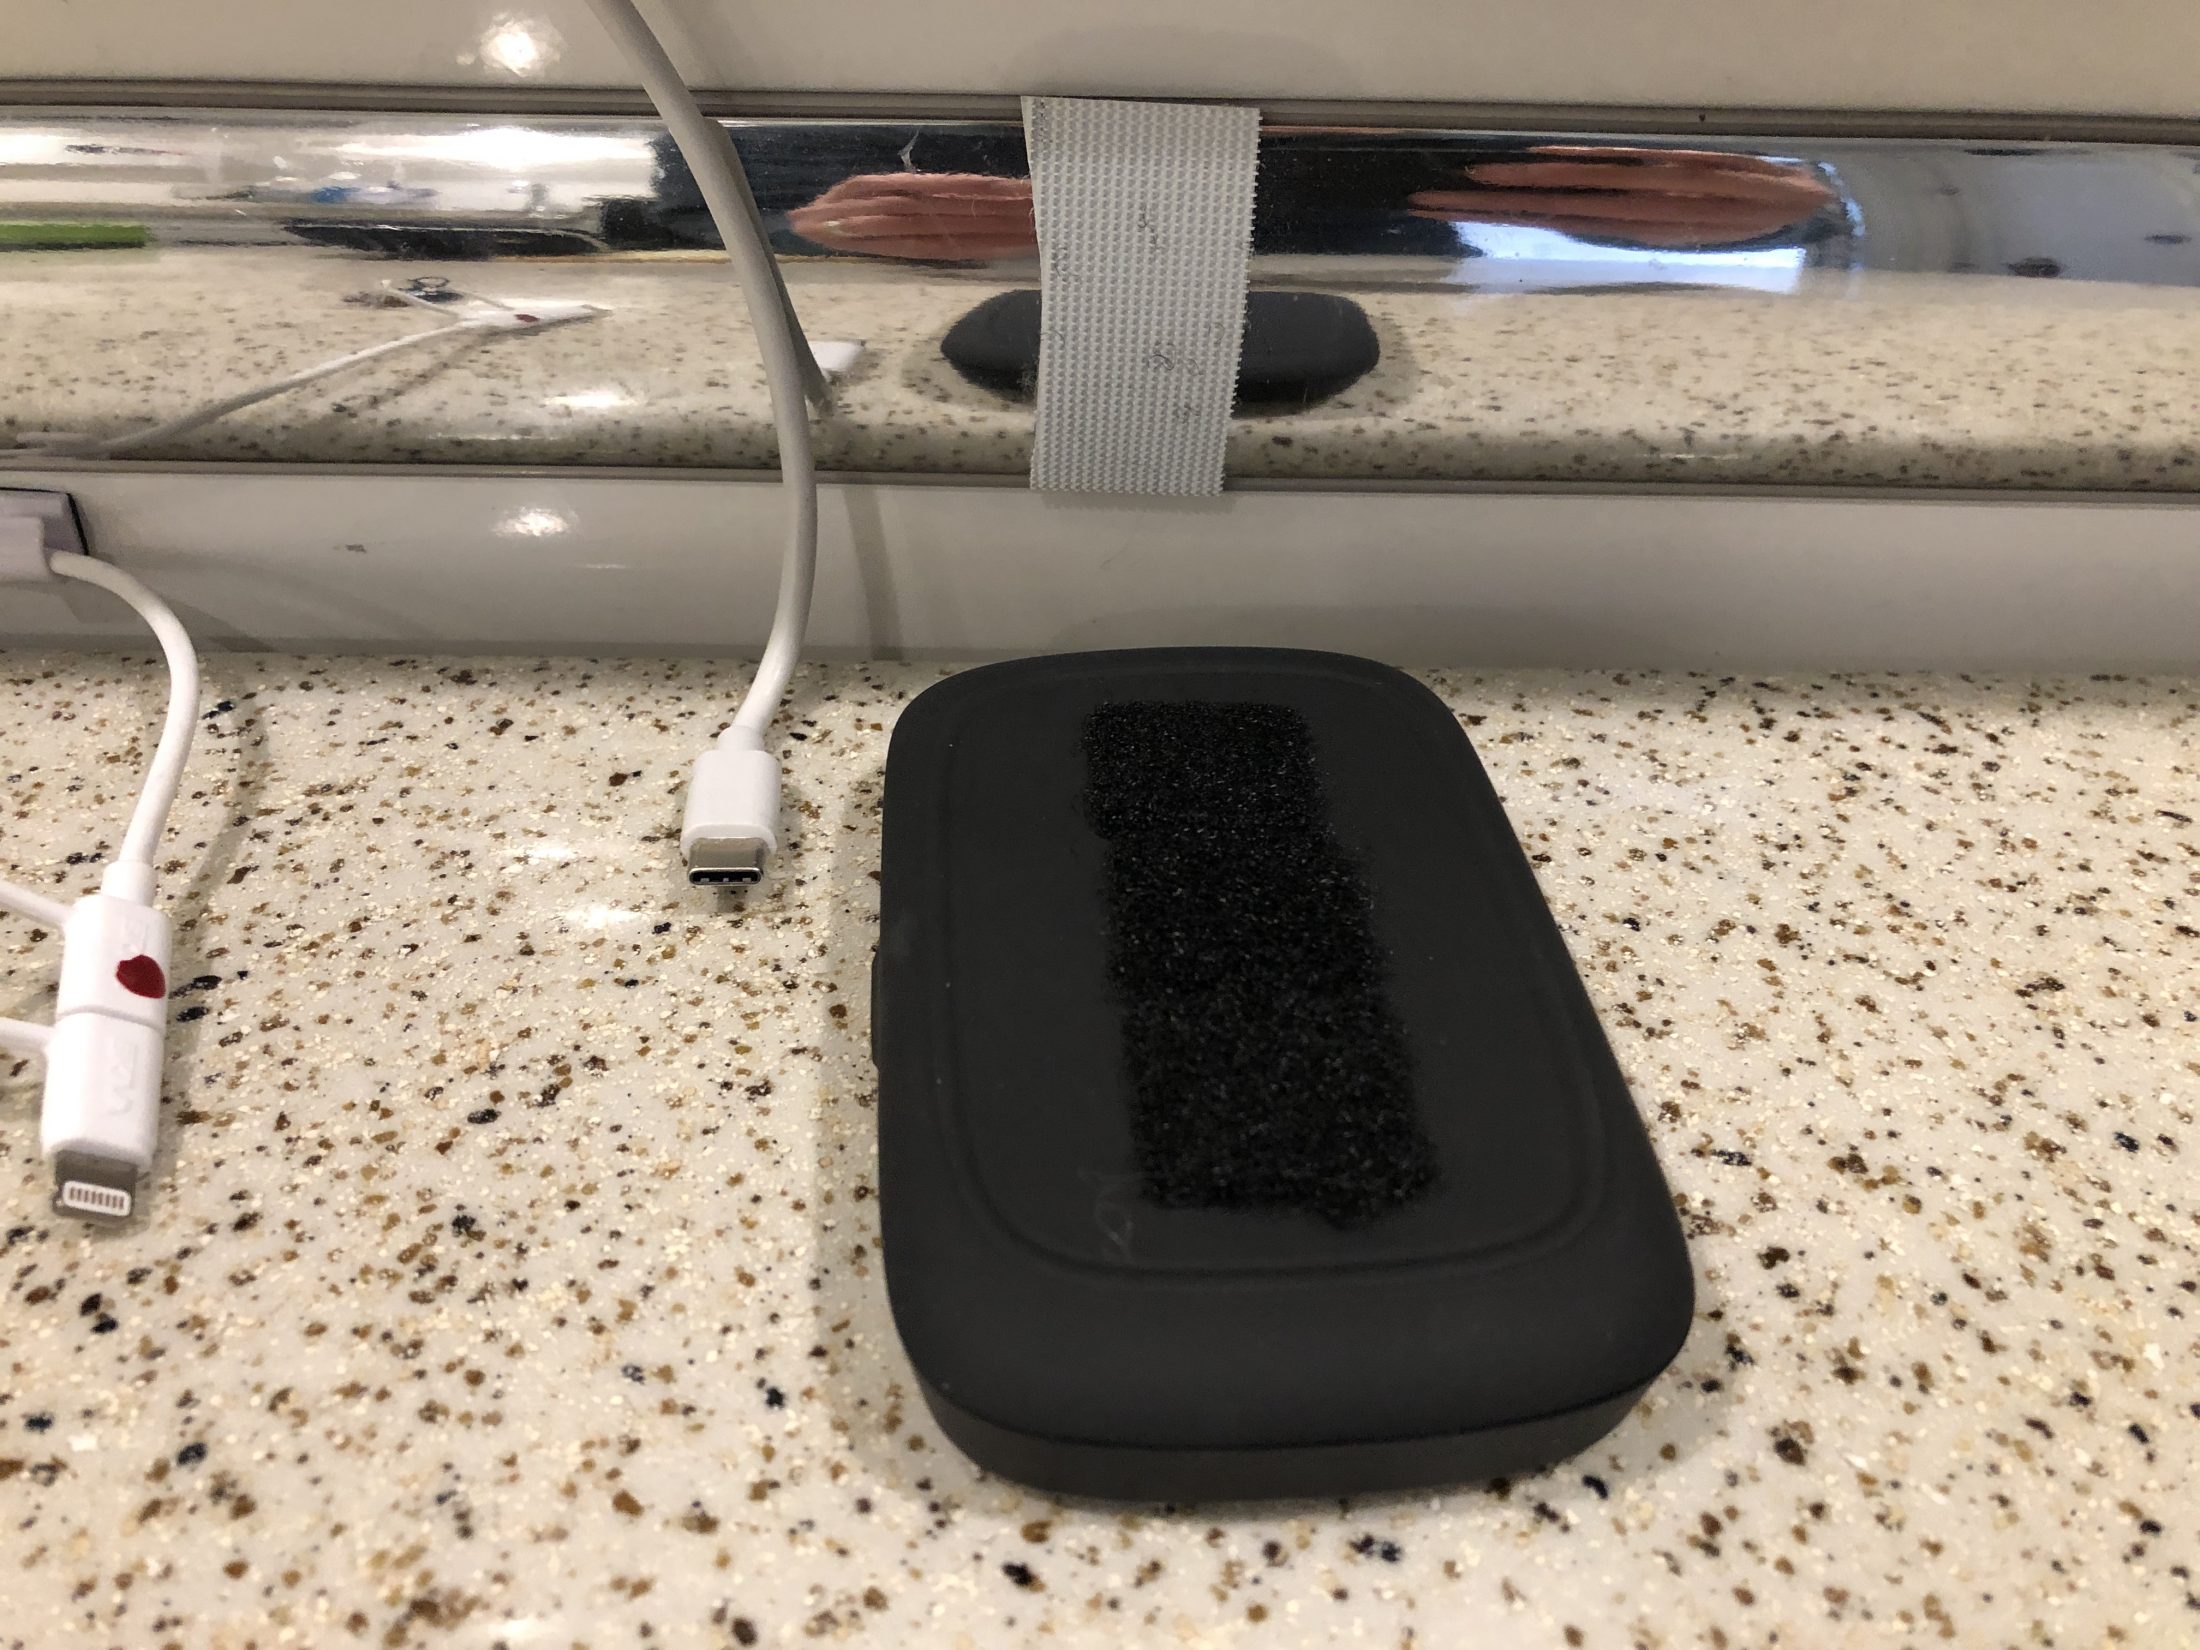
Oliver offers the WeBoost Drive 4G-M Cellular Signal Booster and the WiFi Ranger Sky Pack as options. The WeBoost Cellular Booster will improve the signal on your phones if you use it correctly (see below). The WiFi Ranger has two inter-connected routers, the Sky router on the roof and the Go2 in the cabinet above the dinette, and it provides a number of useful features. First, it creates your own local network, which is especially useful if you have multiple devices. Logging in to your network is easy, as your devices can remember the password to your local network. Second, the rooftop antenna can boost the WiFi signal from a campground, a Starbucks, or a truck stop, from as much as a mile away (see post by RVGeeks). If your device (phone, tablet or laptop) is connected to the WiFi Ranger, you would have a much stronger signal and faster speeds than if you connected your device directly to the WiFi source. Third, the Sky router on the roof allows you to access your WiFi signal outside the trailer, as much as 1000 feet away. This allows you to surf the web at the picnic table or by the river. When inside the trailer you should connect to the interior Go2 router. The interior antenna for the WeBoost Cellular Booster is mounted beneath the cabinets, above the dinette table. It is important that phones or hotspots be close to this antenna, about 18-36 inches. The signal strength decreases if you are too far away. A lot of users use the WeBoost Cellular Booster and the WiFi Ranger together, along with a mobile hotspot. Verizon seems to have the best cellular coverage in rural America, and we purchased a Verizon 7730L Jetpack as our hotspot. In the past, we placed the hotspot on the dinette table, a good distance from the WeBoost interior antenna. After setting up camp, I would turn on the WeBoost, the WiFi Ranger, and the Verizon Jetpack. Next, I would have the WiFi Ranger connect to the Jetpack. The WiFi Ranger has a USB port, and the instruction manual says that one can use a cable to directly tether the WiFi Ranger to a mobile hotspot or phone. This post describes how I did that; it was pretty easy. I wish I had done it sooner. First, why bother? There are a number of good reasons to tether the mobile hotspot with a cable. (1) The signal between the hotspot and the WiFi Ranger is much faster and stronger over a cable than through the air via Wi-Fi. (2) WiFi connections break periodically. We all see this with our devices, where they have lost connection to WiFi, and we have to re-connect. This happens in the trailer, where the WiFi connection between the hotspot and the WiFi Ranger breaks. I find this out because my devices can no longer see the internet, and I need to use the WiFi Ranger Control Panel to reconnect them. These breaks in connectivity do not occur with a wired connection. (3) The WiFi Ranger, when powered on, automatically connects to the hotspot. I no longer have to log on to the Control Panel to do this. (4) The WiFi Ranger has something called Multi-WAN Dynamic Mode (support page and YouTube video). This allows you to connect to a local WiFi network, perhaps the campground WiFi, and the WiFi Ranger can use both the local WiFi and your mobile hotspot, deciding which to use depending upon which is currently faster. Campground WiFi can be notoriously slow, but at some times of the day it might be faster than your hotspot. This can save on the amount of data you use on your hotspot. (5) The battery on my Jetpack is getting charged whenever the WiFi Ranger is powered on, albeit a minor benefit. WiFi Ranger has a support web page and YouTube videos. I have found their customer support very responsive to email inquiries. To tether my Jetpack to the WiFi Ranger, I bought a white 10-foot USB-A to USB-C cable from Amazon. USB-A is the common USB connection that has been around for years. USB-C is a newer type connector, and I need that because my Jetpack has a USB-C port for both data transfer and for charging. Your hotspot or phone could have a different connection port, and you would need a different cable. I plugged the USB-A end into the side of theWiFi Ranger Go2 router, which is in the cabinet above the dinette. I ran the cable along the back of the cupboard until the center of the cabinet, then under the rubber mat in the cabinet and out the grommet that has the cable for the WeBoost interior antenna. I then wrapped the cable around the window, behind the frame that holds the window shades. The 10-foot cable was the perfect length to reach the center of the dinette table. I decided I did not want the cable dangling from the grommet above the dinette. Although this is not necessary, I bought some white adhesive clips from Amazon to secure the cables. It gives it a neat appearance. Finally, I put white Velcro on the belly band above the dinette, and black Velcro on the back of my Jetpack. That way I can keep the Jetpack off of the table, as other things often need this space. Best practices for using the cellular booster. Some advice on properly using the cellular booster. After you turn on the WeBoost you should briefly put the phone in airplane mode, and then turn off airplane mode. This forces the phone to let go of the distant cell tower with the weak signal and to now look for the closest “cell tower,” which is the WeBoost. Similarly, if you were using the JetPack in the tow vehicle, you should power it off and then back on after starting the WeBoost. If you have been out hiking all day, your phone will remain connected to the distant cell tower, and you can get it to connect to the WeBoost by cycling into and out of airplane mode. I tend to make very few phone calls when camping, but if you are camped at a location with very poor cell signal the booster works well when seated at the dinette. To improve your ability to make and receive phone calls I suggest you set your phone to use Calling Over WiFi. I think most phones and providers can do this. At my work, the cell signal is very bad, but with calling over WiFi I can get calls. In your trailer, if you have the WiFi Ranger connected to the cellular booster you can get calls throughout the trailer as well as outside. WiFi Ranger Control Panel. You should make it easy to connect to the WiFi Ranger Control Panel via a web browser. On a laptop, you can save it as a bookmark for quick access. On a phone or tablet, you can use the Add to Home Screen method to save a Shortcut Icon to your device.
 9 points
 -
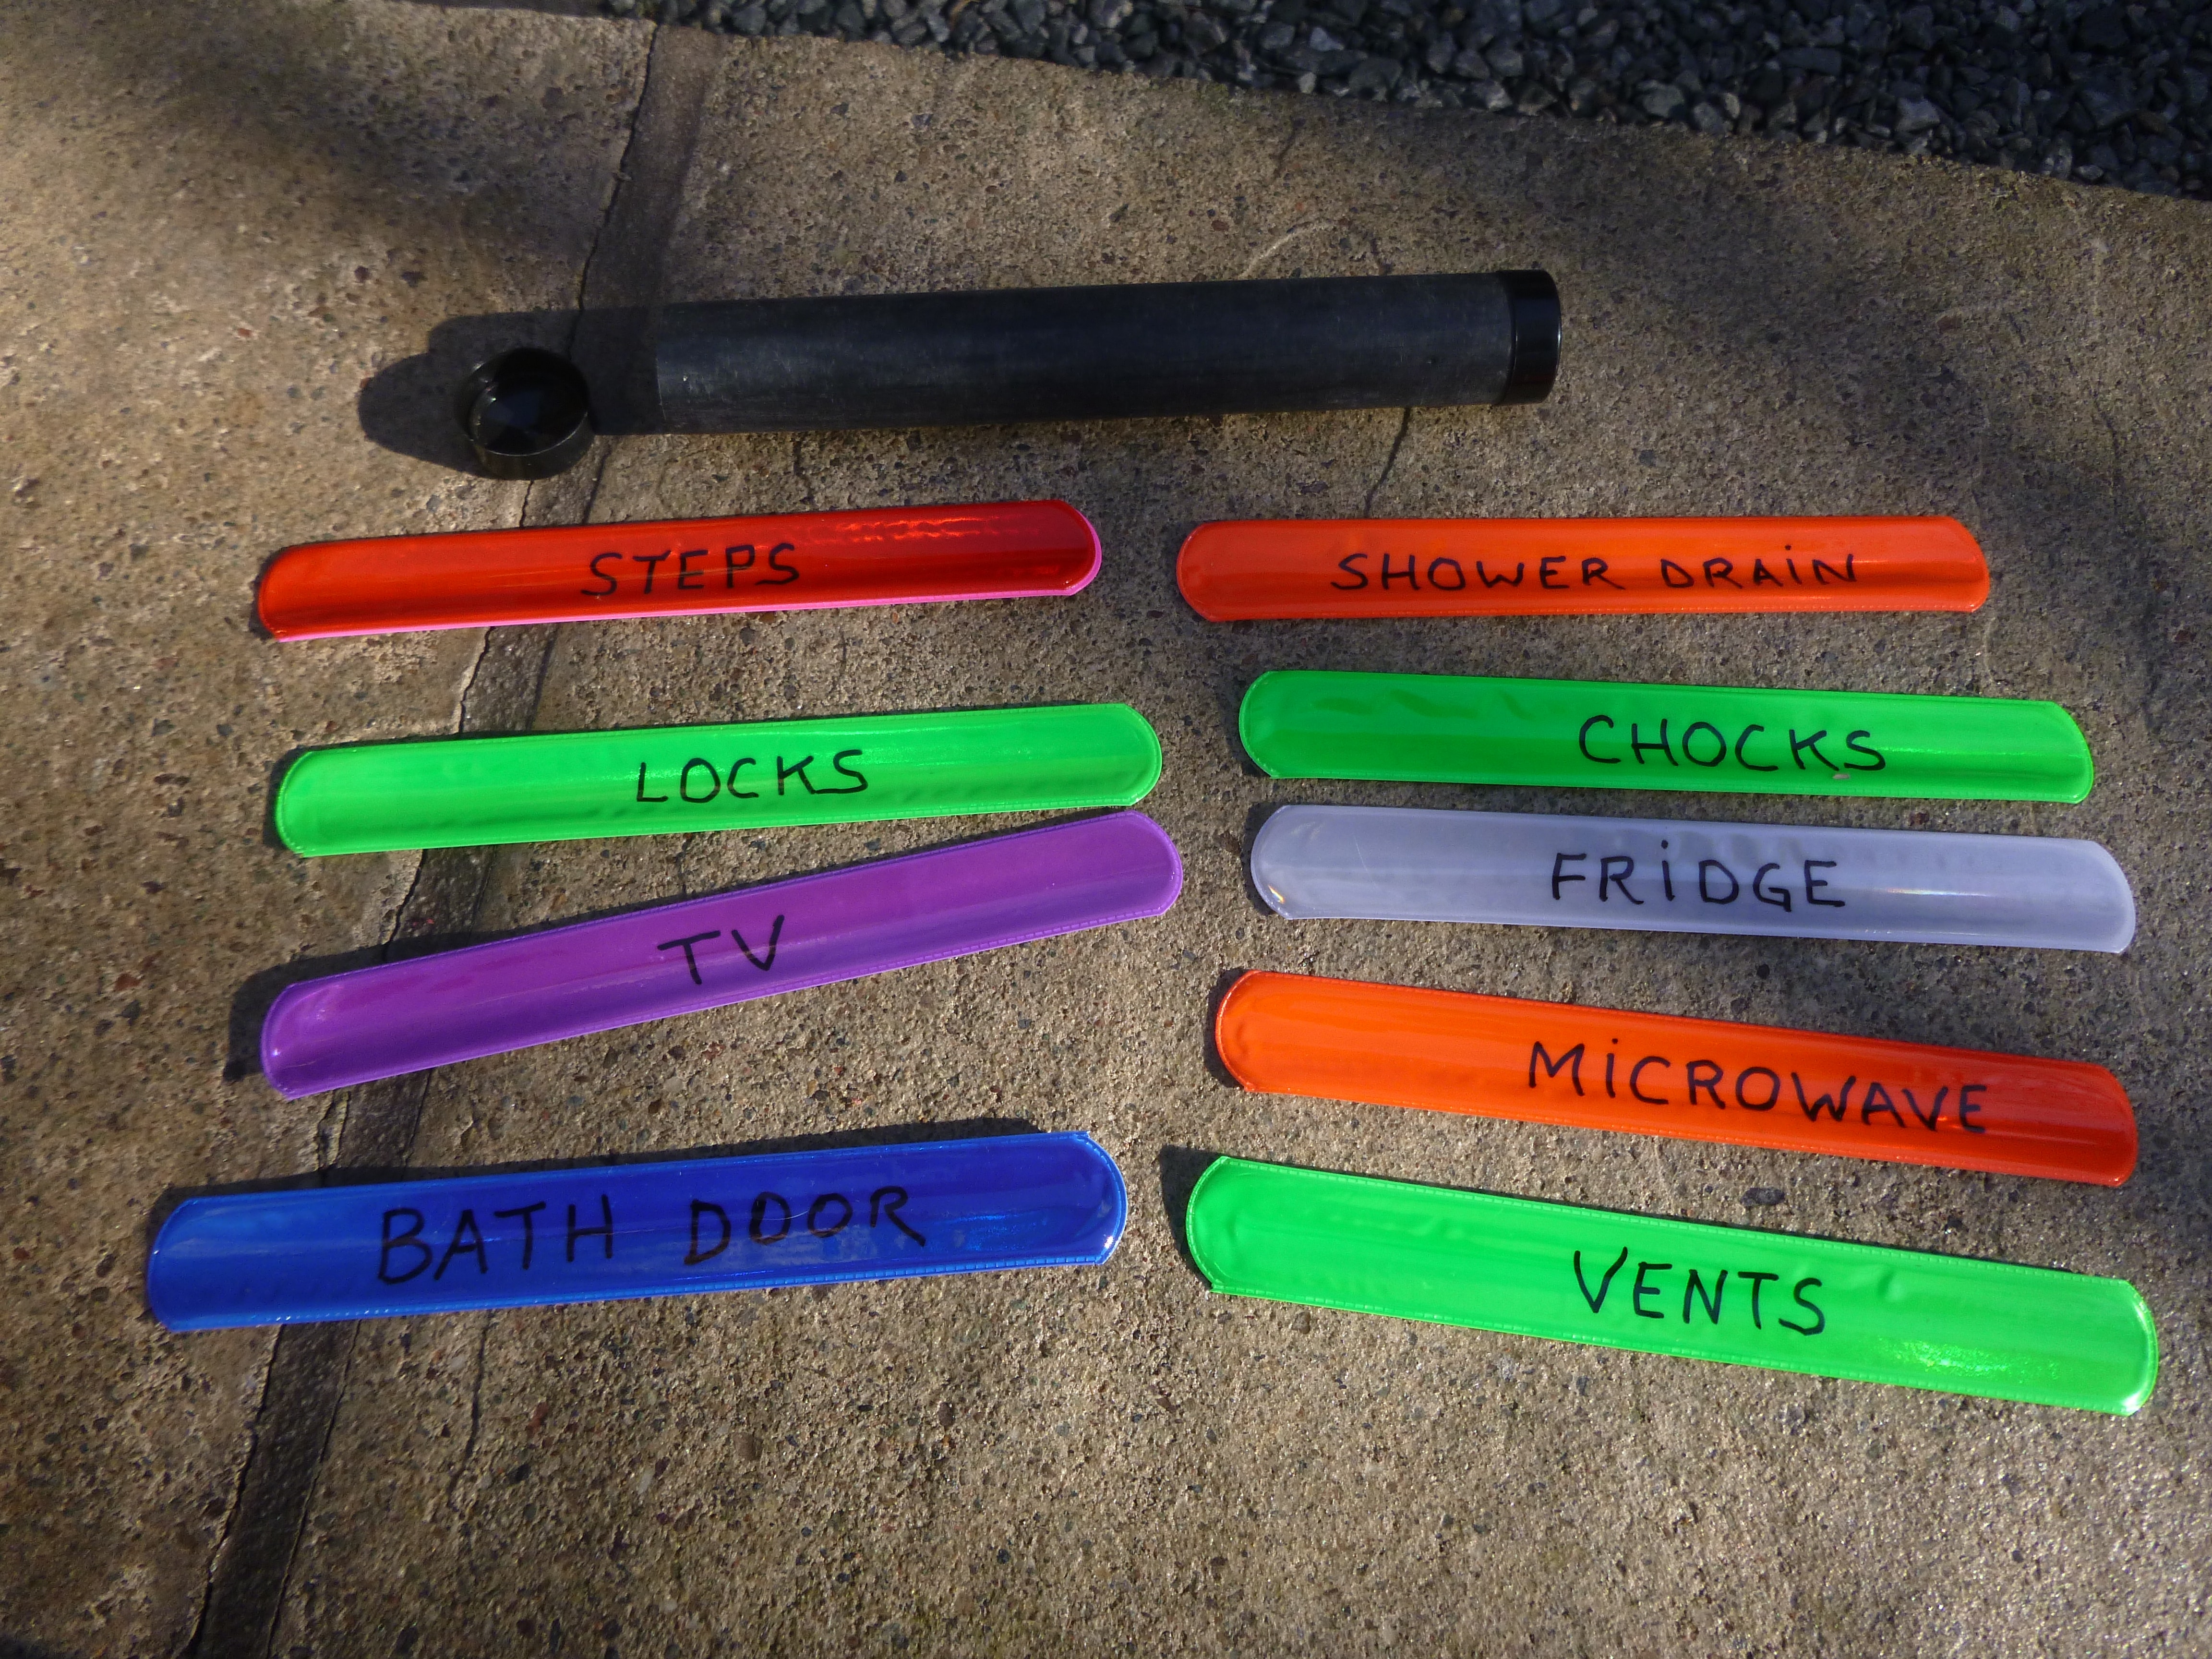
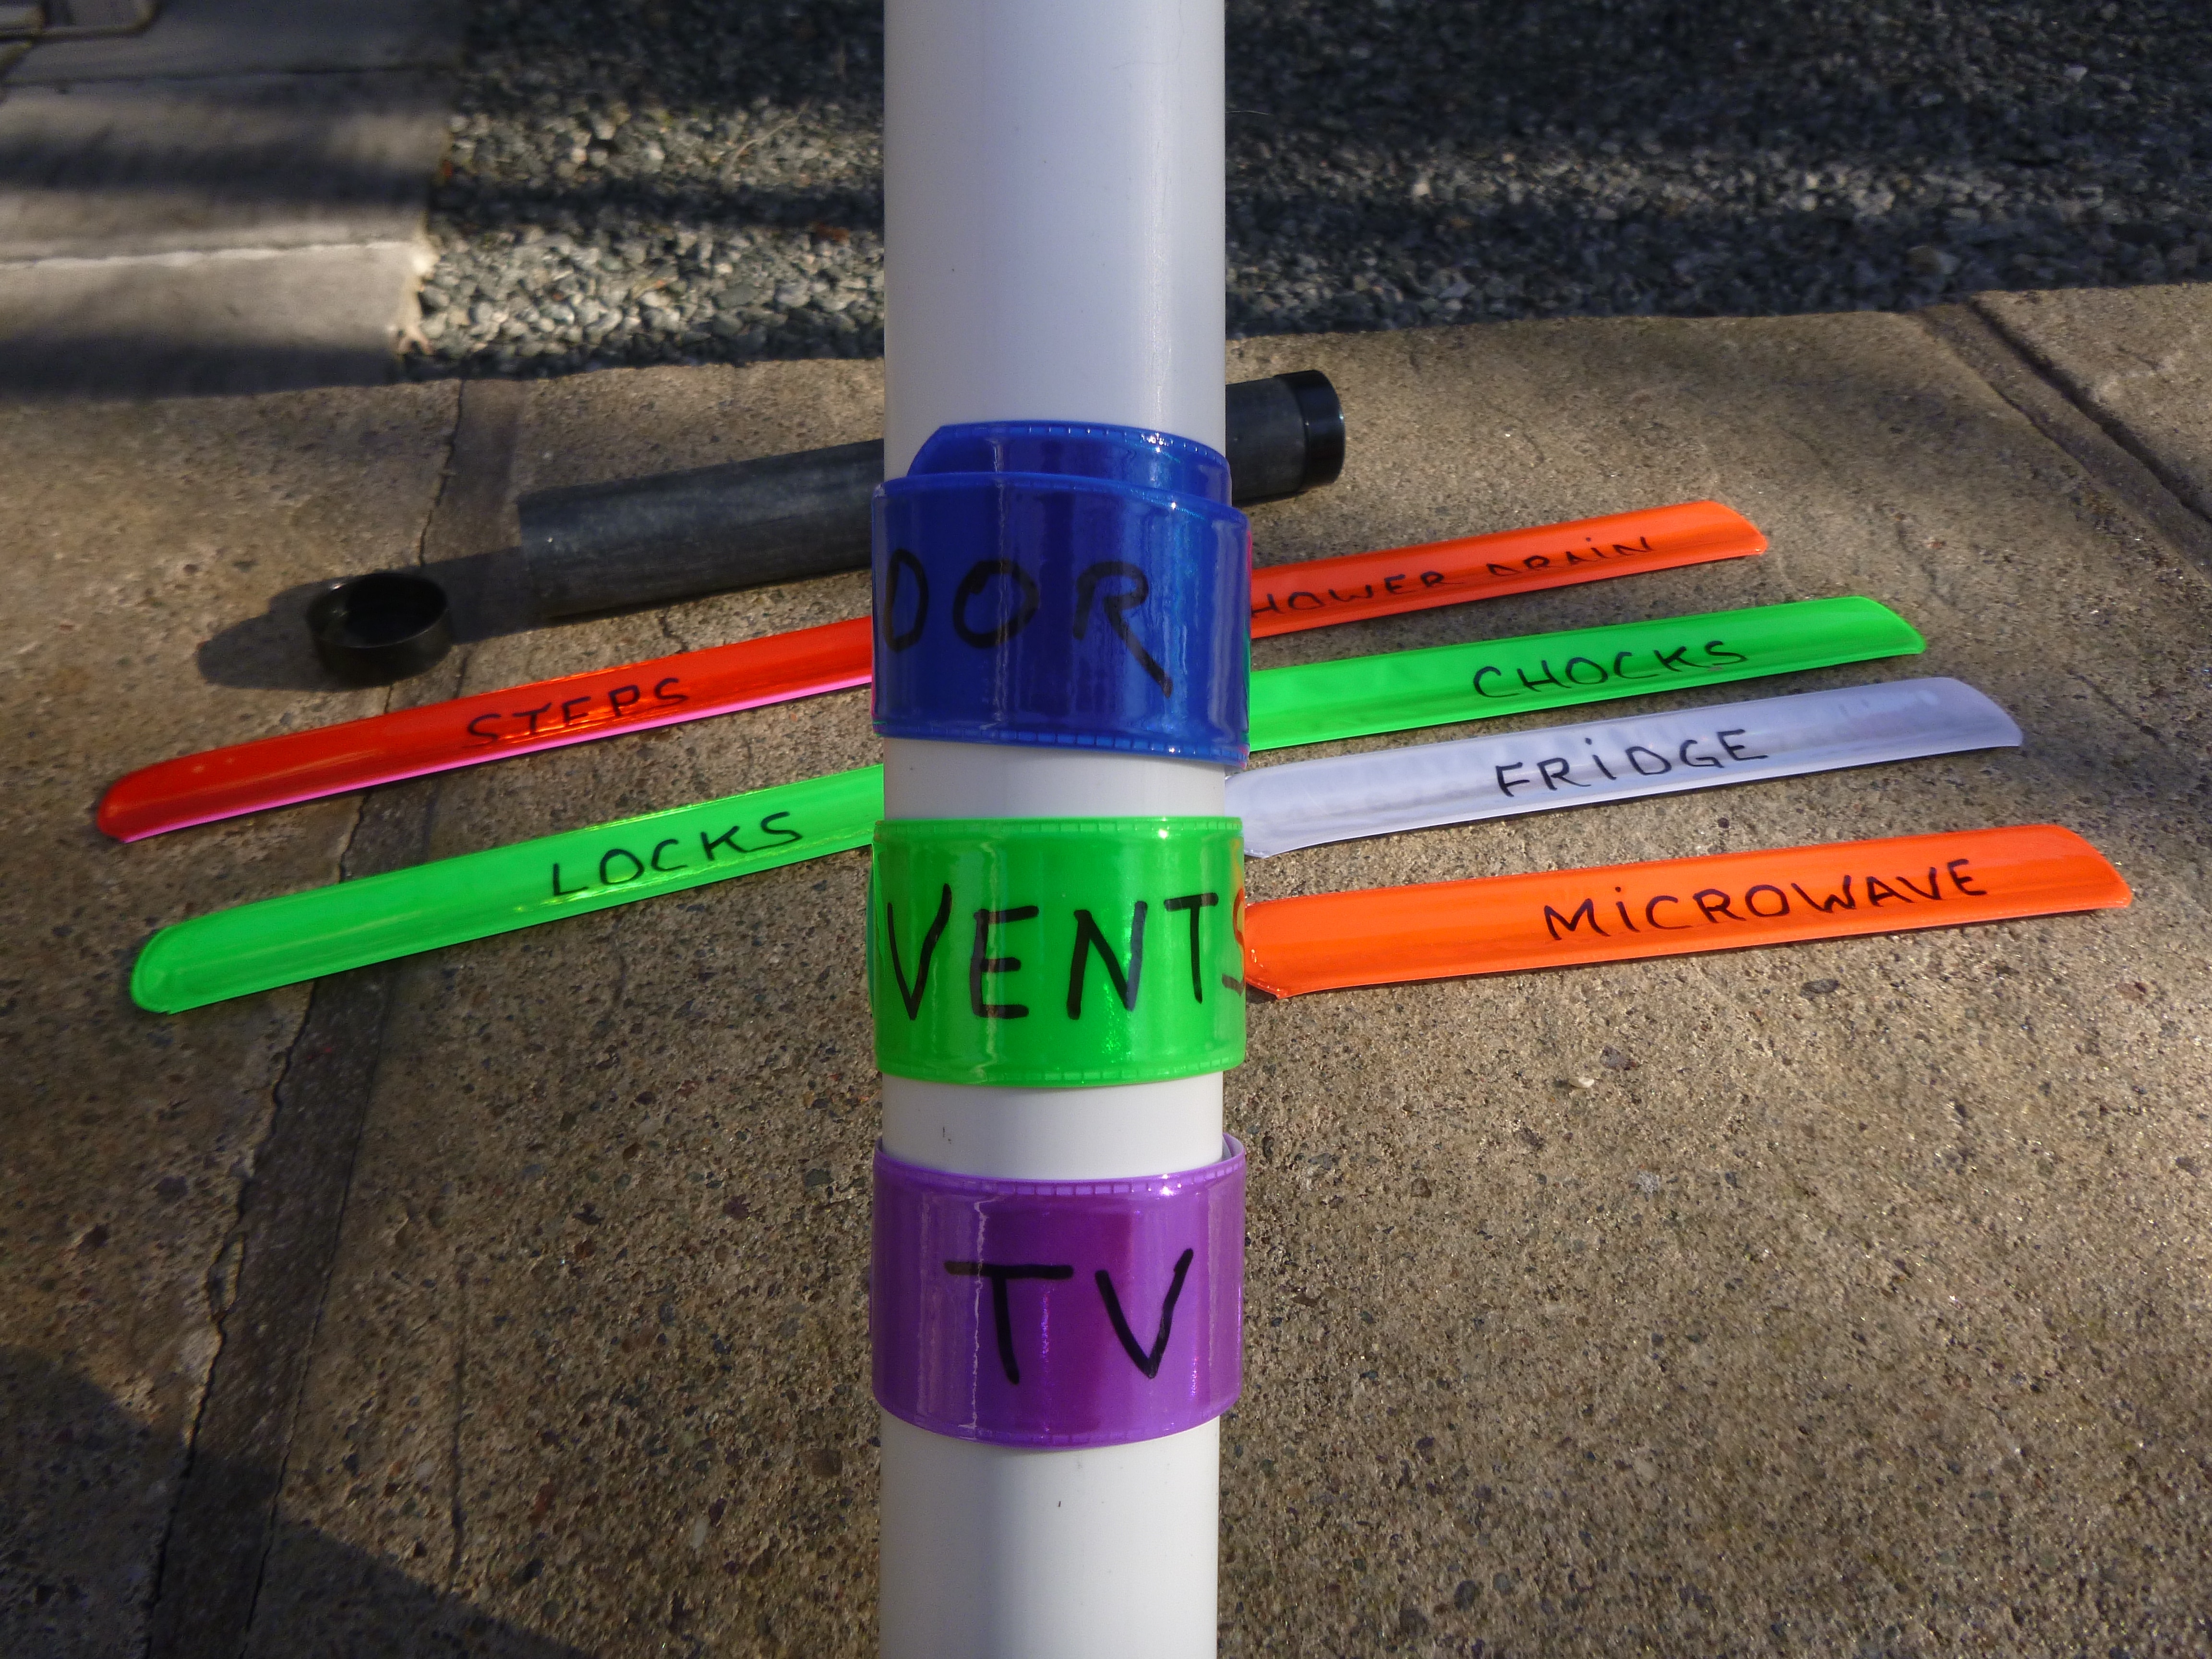
I've tried checklists but I've never found them to be as easy as they should be. Carrying around a clip board or dry erase board just doesn't do it for me and, somehow, I'd miss things even though I could swear that I checked it. So, I tried to just get into a routine and do the same tasks the same way every time - that way certainly I would not forget something. Yep, that didn't work all the time either. I tried "sticky notes" - what a disaster that was - think rain and surfaces that those little buggers don't stick to let alone ALL of those bits of paper laying around on everything. Here is a new idea I'm trying - "slap straps". Get a bunch of these, write the thing that should be checked on one, and attach it to either the steering wheel of the truck or the screen door grab handle. As I take care of the item noted on the strap, I simply remove it from the steering wheel (or screen door grab bar). When I set up camp I place the strap back on the wheel or door when I take care of that chore. Sorry that I don't currently have access to my Oliver to show the straps in action, but here are what these things look like: The black storage tube was made out of an old golf club storage sleeve and a couple of caps from used small tubes of grease. I got the slap straps from Amazon: https://www.amazon.com/gp/product/B011DFG4W8/ref=ppx_yo_dt_b_asin_title_o04_s00?ie=UTF8&psc=1 I originally got the idea from You, Me & the RV on YouTube.
3 points
-
Dear Owners, On March 11th, we stated that we were looking into this and here's what we have come up with so far and there will be more to follow: First of all, we’d like to express how much we appreciate any owner who voluntarily shows their travel trailer to others who show an interest. We acknowledge your contribution as being a large part of our success. However, this is a voluntary program and if at anytime an owner feels there is too much risk, they should withdraw from the program. Regardless of whether you take part or not, we appreciate you. Both our attorney and our insurance agent have indicated to us that since we do not have any control over the owner, their trailer or their premises it is not a risk we can insure against. We are working to create a “hold harmless” agreement that we can put into the terms and conditions that folks agree to on our website when they request a field visit. The value of such an agreement will be limited in terms of how much protection it may provide due to the fact that there are so many variables in the potential circumstances and the laws governing liability vary from state to state. Once we have the hold harmless in place, we will post it here. Commercial insurance, which we carry, covers our employees and products but not our customers. We did ask if there was a rider available and were told not at this time. Regarding your personal liability there has already been a lot of discussion here so it doesn’t need repeating. You should check with your carrier to see what coverage you have if this is a concern as people come and go from your property every day for any number of reasons. Again, thank you for all of your contributions, we are looking forward to seeing you at the rally and we can discuss this further there if anyone comes up with anything else.3 points
-
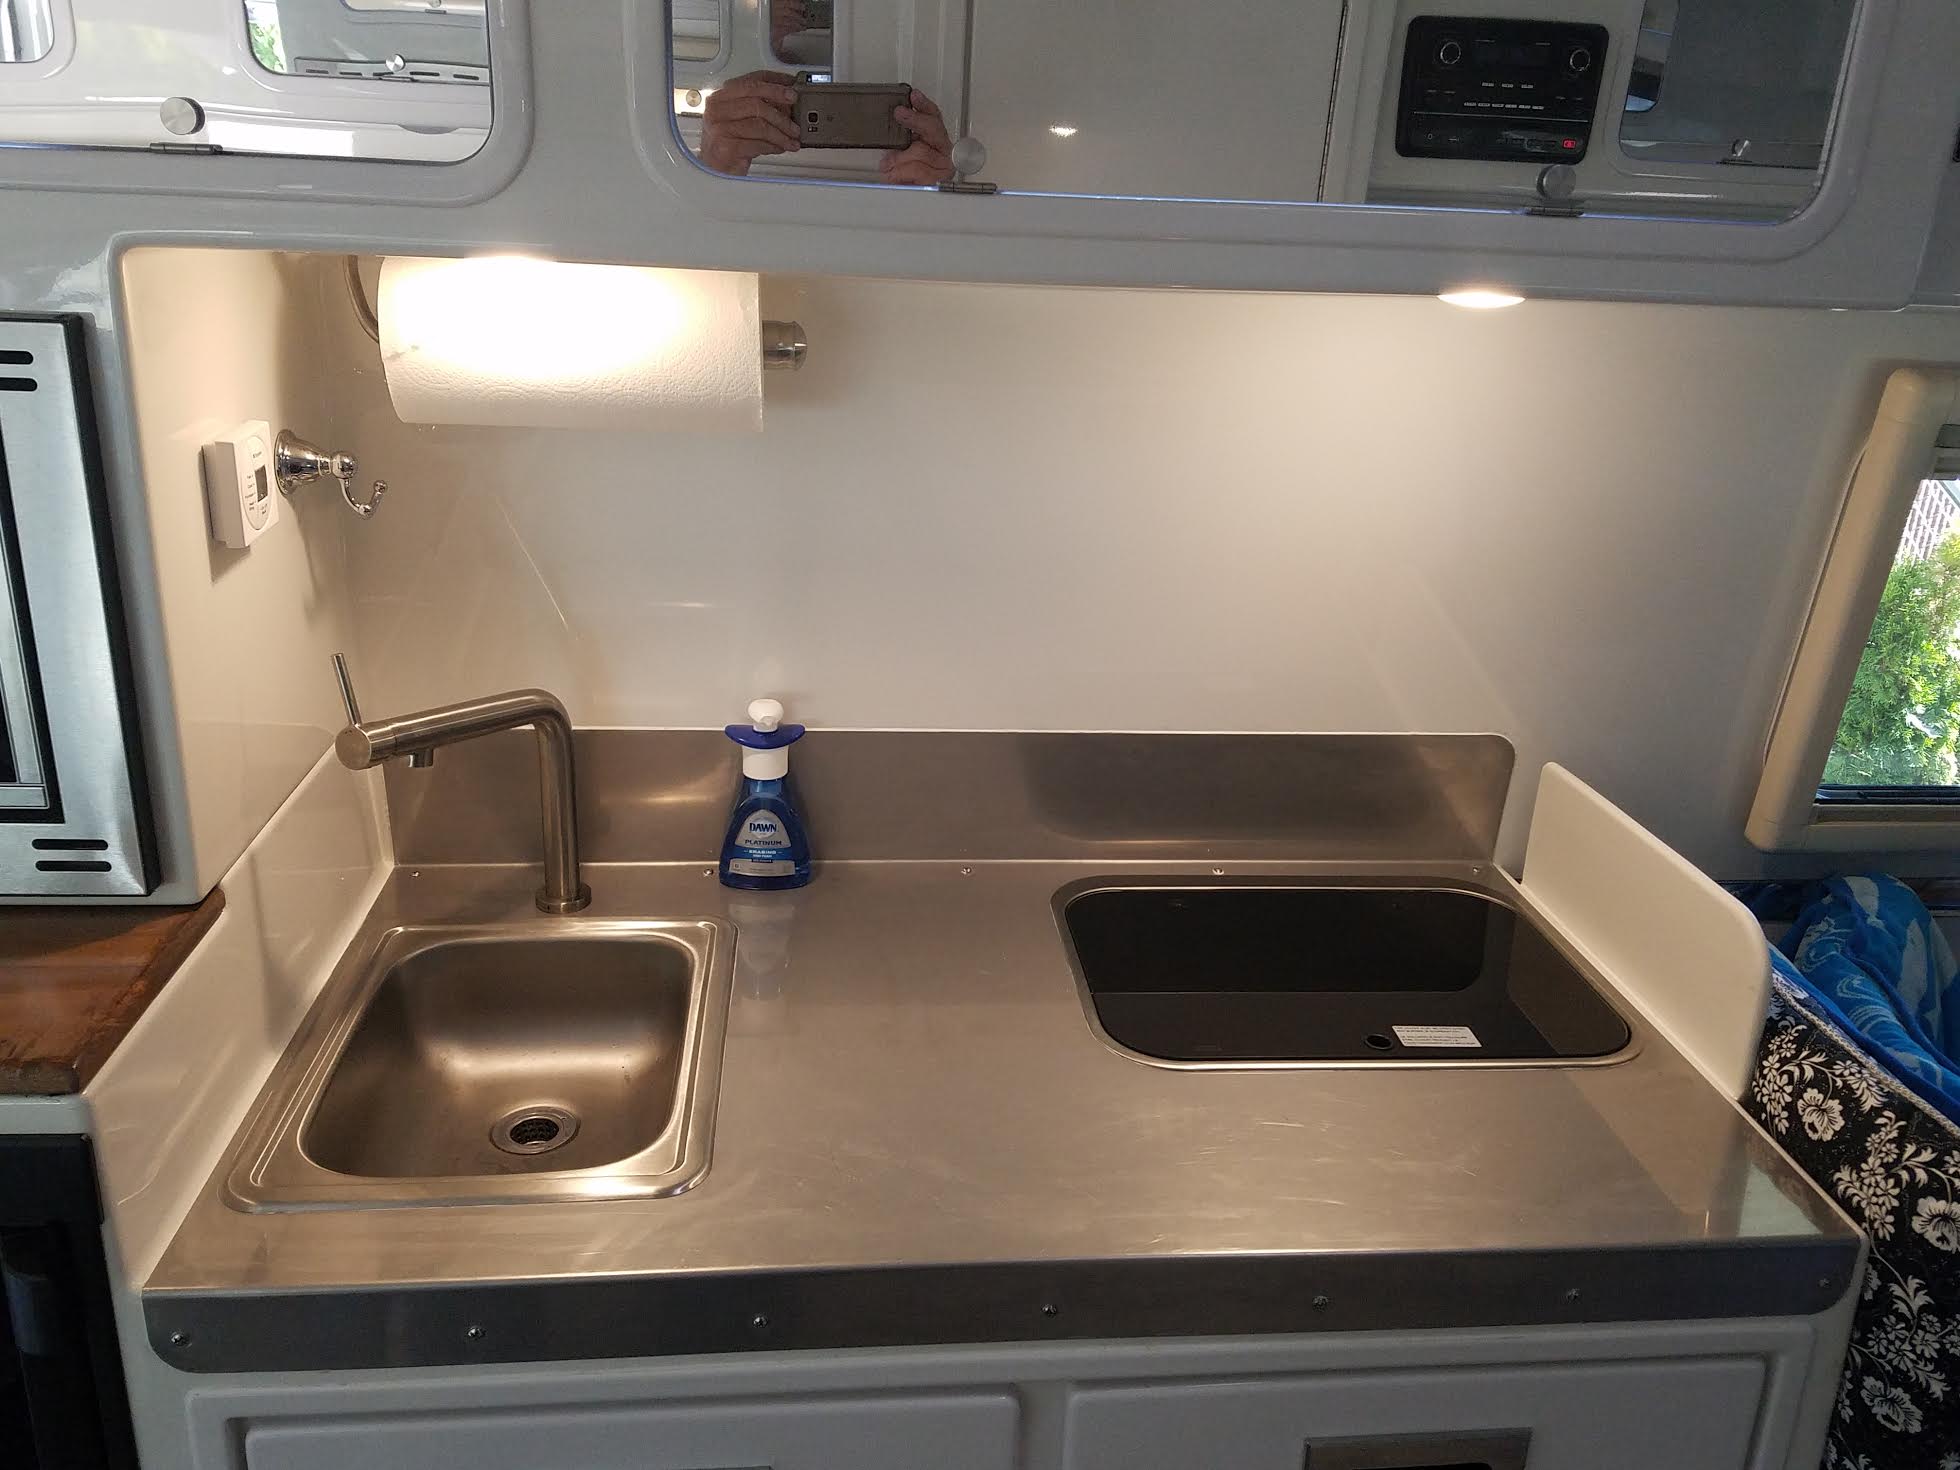
The dimensions of the stainless countertop are: 14 gauge, 304 stainless. Polished on one side. This usually comes with a plastic protective film on one side. It should be easy to find at a good scrap yard. Get a piece of about 48" X 36" or bigger to allow proper shearing and squaring up. Thicker would be fine, but not thinner. 18-8 stainless would probably be fine too, as thata is used in commercial kitchens, I think, and silverware. 316 stainless is also good and even more corrosion resistant, but not needed and more expensive. 44 3/4" wide 24 3/4" deep (over all) 6" backsplash 2 1/2" front flange (5) "10 screws in the front flange and (7) in the rear. I can give those exact positions too, later. Notes: The actual counter surface is quite square, so these measurements assume square corners with equal diagonal measurements. The dimensions qiven are slightly less overall than the depth of the surface. This so you can slide to stainless back to where the front flange is tight against the front of the counter. In the rear, the wall slopes inward as it goes up. This allows you to force the stainless into place and have the backsplash tight against the rear wall. In give you a tolerance that allows everything to fit perfectly when pushed int place. You can dry fit the top and install a few screws, then reach under to scribe the openings on the bottom of the stainless. Then cut those out from behind with the 4 1/2" grinder and a metal cutoff wheel. Use a hole saw to cut out the faucet hole. Dress up any raged edges with a fine flap wheel of about 120 grit. Carefully round the corners by rough cutting with the cutoff wheel and then smoothing with the flap disk. Be careful not to make the cutouts too big because the flange on the sink and stove are small. Use white silicone to glue it down. Install the screws, and use lots of blocks and clamps to hold it until set. It will be trying to slide forward because the backsplash is pushing against the rear wall. Use stripes of silcone about 2" apart so it can spread out and expel the air without forming bubbles. When dry fitting, install masking tape all around to limit how far the silicone will spread. Once clamped and screwed in place, wipe off the excess silicone and make the edges look nice. Then leave it alone for 24 hours. Then re-install the sink and stove. Before installing the sink, you have good access to make any changes needed under the counter. I installed shutoff valves on the pigtails feeding the faucet. Then I made a Corian side splash to prevent coffee or other spills onto anyone sitting next to the stove. If your stove it turned sideways, this is not needed. I also changed to a different style faucet If more details are needed, I'll provide them. On the front flange, I asked the metal shop to make a slightly larger bend radius of about 1/4" radius ot match the outer corner of the fiberglass surface. The thickness of the fiberglass is about 1/2". so this means screws of about 1 1/2 in length t allow for thicker areas underneath. The counter is cored construction, so overtightening of the screws. Prep the fiberglass surface by wiping thoroughly with alcohol to remove any mold release wax or oil. This project is not too hard. Just take your time and be mindfull of the details. It is a modification that I thank myself for doing everyday while out camping. Very very nice, durable and clean. We'll be at the Rally so come by and measure it up. Hope to see you there. John
3 points
-
For those shopping, if you're interested, there's an article on passenger-side crash tests. https://www.marketwatch.com/story/some-pickup-trucks-perform-poorly-in-recent-crash-tests-2019-03-21 "Several pickup trucks sold in the U.S. performed poorly in a passenger-side crash test, with an influential safety group saying the vehicle style as a whole “has a lot of work to do.” Nonprofit Insurance Institute for Highway Safety, the research arm of the insurance industry, said Thursday it recently put pickups through a passenger-side small overlap front test, and that most struggled to maintain their structure. Two trucks, Ford Motor Co.’s F, -1.61% F-150, the No. 1 best-selling vehicle in the U.S. for decades, and Nissan Motor Co. Ltd. 7201, +0.62% Titan earned a good rating. The two join Fiat Chrysler Automobiles NV’s FCAU, -3.33% Dodge Ram 1500, which earned a good rating in the test late last year. See also: Used cars are selling at fast clip as ‘overstretched’ buyers are priced out of new cars Honda Motor Co. Ltd.’s 7267, -1.17% Ridgeline was the only pickup to qualify for the IIHS’s top safety pick award. That was thanks to its good-rated headlights, which the other models lack, and superior-rated front crash prevention, but it qualifies only when equipped with those features, the IIHS said."2 points
-
I have come close to that same error several times. I have now adopted a preventative solution. I put my hose wraps on the pressure regulator. When I coil the hose and grab the hose wraps and remember “Oh yeah, the pressure regulator.” The consensus from this post is that it is okay, even desirable in hot weather, to drive with the Max Air vent open.2 points
-
They all have rubber stems. In my discussions with the tech guy at EEZ he told me that metal stems were not necessary for use with their transmitters. However, I intend to replace my rubber stems with metal ones AND have the tires re-balanced at the same time when I get the new TPMS. Bill2 points
-
Nice thing with the 2500, you can put a snow plow on it. I know, looks funny in January, heading down 95 with a plow on front and an Ollie on back...heading for someplace warm...2 points
-
Paula and I appreciate everyone’s comments. We have made progress too. We are favoring the Ram 1500 or 2500 depending on how much weight we will have in the bed or the GMC 1/2 ton or 3/4 ton. The GMC 1/2 ton would require the Anderson hitch. The third choice would be the Toyota Tundra. The ride on the Rams and GMC w/o trailer are better than the Tundra. We will take a break for a week or so and then begin working with the dealers to see who will give us the best deal on the vehicle that has the most features we feel are required. We have learned a lot about each vehicle as we have completed our research and appreciated the help everyone has provided. David2 points
-
Vector, Here is the solution to breaking zerk fittings. The Lock N Lube fitting. https://locknlube.com2 points
-
I would say, do your homework and not rely on the sales person for your towing needs. Remember sales personal are there to sell vehicles, but I will say that dealers that are on the outskirts of the larger city type dealers are much more knowledgeable for towing needs. I live in Ft. Worth, Texas where many trucks are setup for towing, but I purchase my new Ram from a dealer that was 35 north of the metroplex and just about every truck they had in stock was setup for towing, it's a farming and cattle area where these type of vehicles are needed for daily use, and the sales personal is very well informed on what works and what doesn't. trainman1 point
-
Mainiac, Gotta say we never thought of that! Paula1 point
-
I just had my Oliver II professionally weighed at the FMCA rv convention in Perry , Georgia. According to the trailer weight loaded for travel which in my case is with empty gray and black tanks the ideal tire pressure should be 50 psi. The Michelin tire rep at the convention also confirmed that as a good number.1 point
-
I think it was 8" long. Trailer is in Hohenwald for service otherwise I would measure it for you.1 point


-
Recent Achievements
-


")


")


")


