Leaderboard


Popular Content
Showing content with the highest reputation on 05/07/2020 in all areas
-
I will replace mine today - will measure what I take off - and post - I don't remember how much I ordered. Update: Each window took 58 inches +/- a touch. 14.5 will do it, I ordered 17' got about 17'. I like the look much better.3 points
-
I don’t believe that the 10% minimum TW applies to the LEII. (I would not go too light on the single axle trailer.) I reduced the TW from 720 lbs to about 480 and the trailer tows wonderfully, with only a small amount of chain tension needed on the Andersen to control pitching on choppy pavement. There are no signs at all of lateral instability. The added payload and reduced stress on the suspension of the truck are a welcome plus. Trailer towing weight is approximately 6000 pounds (not scale weighed). The 10% figure is an accepted RV industry standard for a “worst case” scenario. It allows for poor engineering (including battery and tank location), a flexy frame, worn out suspension, no shock absorbers and really horrible aerodynamics. An Ollie LEII with its double axles and a tight suspension won’t cause problems. There are lots of LEIIs with no front tray and a loaded rear rack, and I have never seen a single report of stability problems. If I am wrong about this, I would love to hear some comments. Your hitch selection plays a factor, a simple dead weight ball doesn’t have any sway control, so it would be prudent to have a little more TW. BUT, as always, the responsibility lies entirely in the driver of the tow vehicle, do what makes you feel comfortable, and always be aware of how the trailer behaves. A TW scale is quite helpful, it shows exactly what happens when you shift weight around. John Davies Spokane WA2 points
-
I agree that looks like a pretty heavy box, but then others tow with a good bit of weight on the back, including JED, and I'm curious if over time we'll get a better picture of how much that affects the dynamics of an Ollie. I wonder if you've towed with and without the box and if you notice much difference. I've towed with a rack on the back that was maybe only 50-75 lbs total, and subjectively I felt like it towed a bit better, possibly due to reduced tongue weight. Since I don't use a WD hitch, it makes sense that I might see an improvement there vs the negative effects of adding more yaw inertia to the trailer.2 points
-
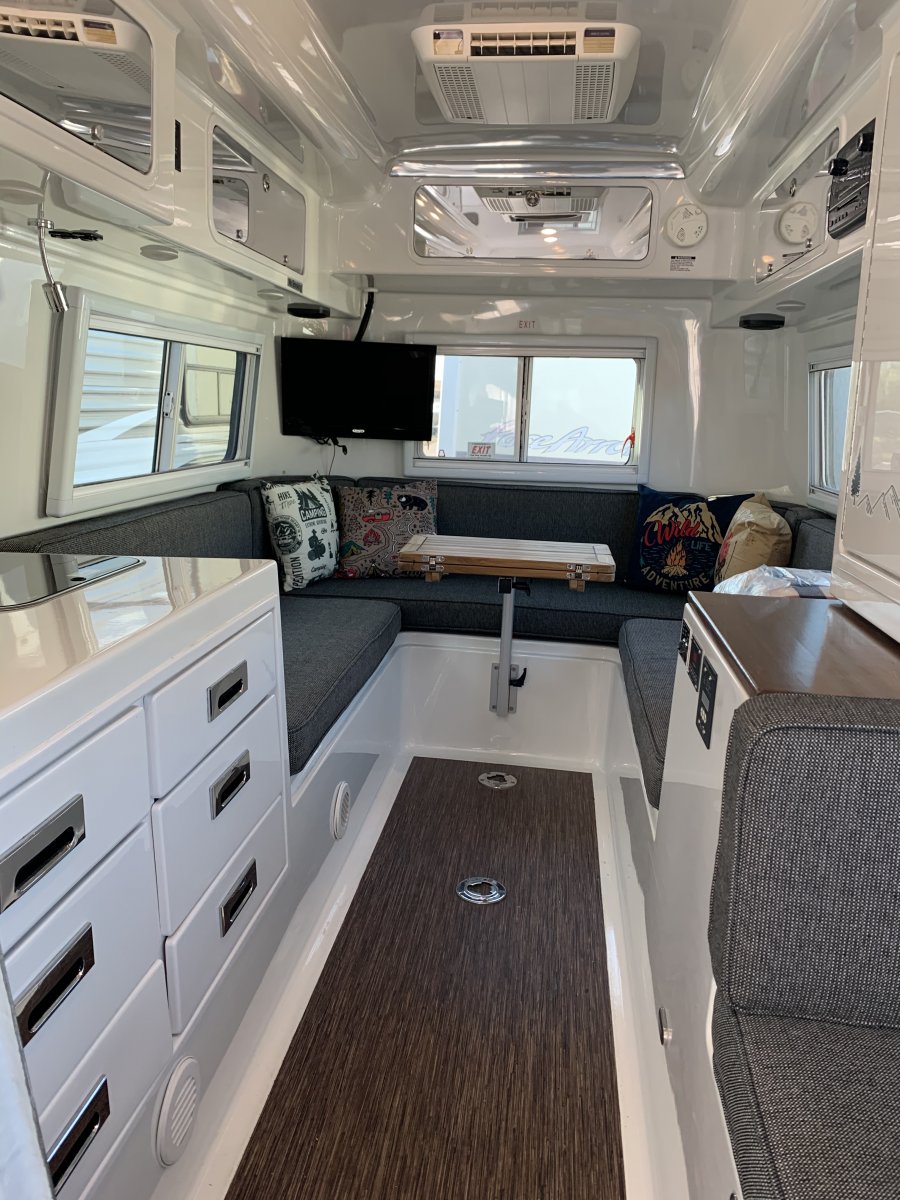
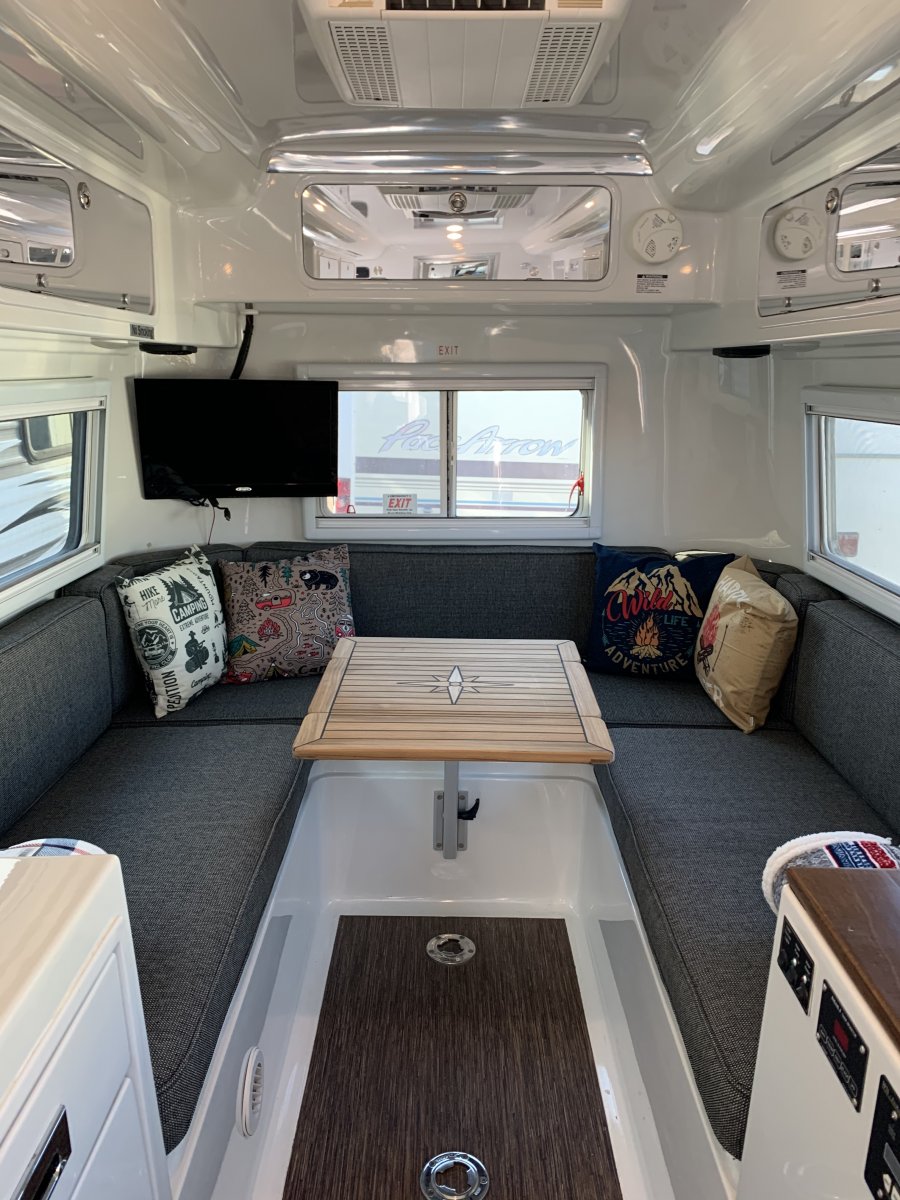
Sharing pics of a lagun table installed in our Oliver. If we were ordering new (or select in our used purchase) we would have looked for a twin bed model, but we have the standard floor plan. We’re not a fan of leaving the queen bed made or leaving the large dinning table up, as it consumes so much space and feels more open without. Therefore we installed a lagun table. If my to-do list wasn’t so long I would have made the table top, but opted for the manufactures tabletop (beautiful, but pricey).
 1 point
 -
DJPANIZ: Thanks for the pics - The setup is similar to what I plan to do , except I will have a front load box, and mount a single bike rack on top. Based on what I've already put back there, the planned weight works fine. I plan to limit it to <150lbs. Will relocate the lic plate/light.1 point
-
Whenever I sanitize my tanks, I tilt the trailer up and to the street side when I fill, so that I can limit any air that gets trapped to the front curbside corner, closest to the overflow. Then after a while I'll tilt the trailer down and to the curb side to make sure that the sanitizing solution gets into that same corner. I do the same after running that water into the grey tank. I've also found the the grey tank needs to be 'burped' when it's almost full, by tilting the trailer back and forth. There's a corner in there somewhere that doesn't vent properly and it will trap air, essentially reducing the volume of the tank. Also, like Mike says, 'level' is relative. Most people level to their floor or countertops. I always level so that the bathroom door doesn't swing either way on it's own. I don't think that in either of those cases are my grey or fresh tanks truly level.1 point
-
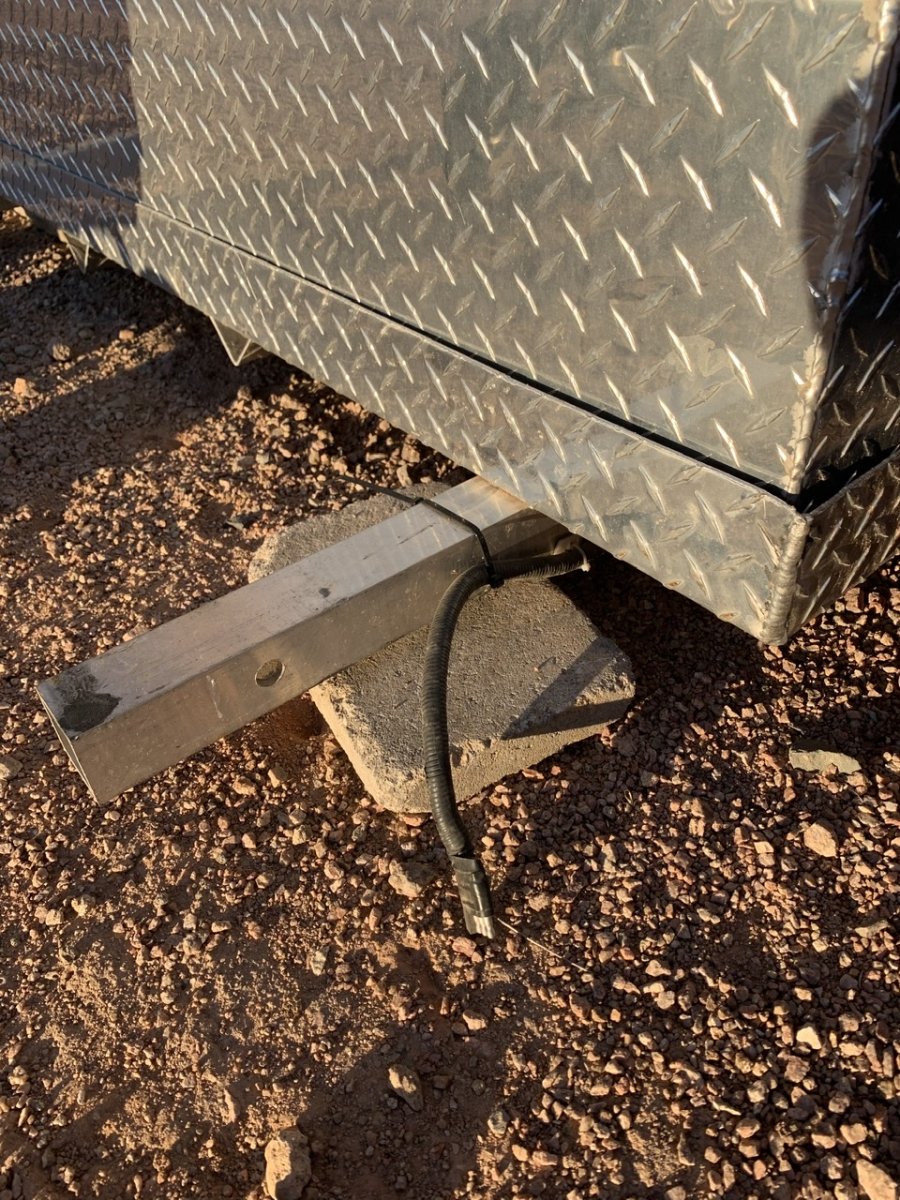
Thanks John. The box is bolted to the supports so using them would be a good option. I’ll see what I can find that would work. I didn’t weigh it but based on a sticker inside it’s a box from Tractor Supply and a similar box that came up in a search of the model number it weighs 40#. I would guess that seems right based on my moving it. It’s actually a handy size and when I’m not camping I store a majority of the items we put in the bed of the truck in it. For example I store 3 camping chairs, a portable grill, gas fire pit, a box of kindling and newspaper, propane hoses, etc. The previous owner also did a good job of integrating brake/turn lights along the rear of the box which connect with a 4-pin connector between the box and trailer as well as between the trailer and TV. My concern with using it was the forces you mentioned as well as the affect on tongue weight. I think we’re at the low end, if not under, what the tongue weight should be as a percentage (10% if not less). Although I haven’t traveled with both 30# propane tanks full so that could help offset. However, then we’re pushing up the overall weight. Until/unless we get a more stout towing vehicle I look to keep the weights down. A couple additional pics attached.
1 point
-
WhatDA We bought a 2019 2500 Duramax, and looked at several hitches. We settled on the B&W. This hitch has performed flawlessly and I lam beyond happy with it. I have the triple and have a use for all 3 balls, it has saved my shins lots of times in fold away mode. I also wanted to use Rock Tamers and not all hitches will have enough length on the receiver to mount them. We do not have the WDH and do not feel it is necessary on a 3/4 ton truck, we have never had the Ollie sway an inch. The 5 inch drop is all you should need.1 point
-
If you are only using the bubble level on the front jack that may be part of the problem. It needs periodic adjustment. If you have a level, any size really, that you can set on the floor inside, or up against the seam around the middle of the trailer on the outside you will get a pretty good idea of how level you are. Then check the bubble on the front jack. If it is off, as mine frequently is, just take a Phillips screwdriver and turn the screws around the bubble until you get it centered. I have a small 8” level I keep in the trailer to check after set up to see if I’m really level. Mike1 point
-
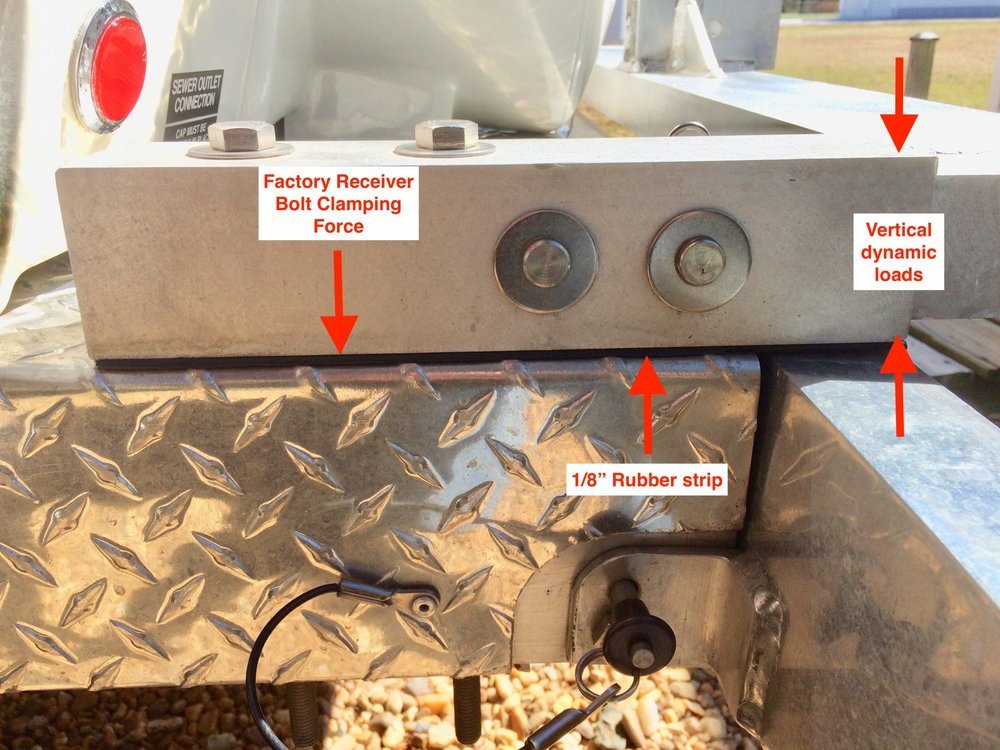
Your custom box looks very stout, but the receivers are positioned well inboard of where the Ollie rack attaches directly over the big frame rails. That center to center distance is about 51.5”. Here is an Oliver factory receiver (bike) mount. There have been several variations, I am not sure which generation this one is: A fabrication shop that is skilled in welding aluminum can easily make you a flat platform that will plug into those strong receivers. Or... can you simply unbolt the box from its supports, or is it all welded together? Post a few more pics. Then you could bolt down a pair of high quality bike rack trays of your choice onto that platform. The reason I say high quality is that that part of the trailer is a rather violent location to carry bikes and they need a very strong mounting system and also anchor points so you can add stabilizing straps to control the sway. Something from 1Up-USA would be perfect. This thread might give you some ideas.... https://olivertraveltrailers.com/forums/topic/3263-how-to-move-the-factory-cargo-tray-to-a-rear-rack/ Have you weighed the cargo box that goes there? I am curious. I personally wouldn’t be comfortable with more than about 150 to 200 pounds (total, including racks) bouncing around in that spot. John Davies Spokane WA
1 point
-
I put the saw on the bench with a bright light and set up the jig according to the video. No issues other than while I was getting used to the feel of the carbide as it cuts, I removed too much metal from one side or set of teeth. The saw cuts a crooked kerf if both sets of teeth aren’t even. Now that I know what to look for I can sharpen both sets of teeth evenly and the saw always cuts straight. I threw one chain away as I was learning because I couldn’t get it to cut straight again. Watch the instruction/promotion videos, read the FAQ, read the directions, and get in a little bit of practice. That’s pretty much it. It does what it says it will. No real tricks other than paying attention to how the taper on the carbide enters the tooth. Keep it’s engagement point with the dull teeth consistent and the sharpened teeth will come out consistent. Ken1 point
-
Ken, please expand on your experience with this tool. I've had my eye on it for a while, as it seems after 45 years of filing experience, my ability to hand file a chain manually has diminished with age and failing eye sight (to be accurate-likely lack of patience). I've recently relied on the local shop to file my chains on their industrial Stihl provided chain grinder but requires extra chains (which I have) to get through a season and the dreaded trip to the big city. Other than purchasing a good Oregon bench top grinder, this tool reviews well and looks solid. Thanks, Mark1 point
-
I think if you held down the trigger, put the chain to wood, and never let up, you’d probably get 10-15 minutes. If you’re cutting, repositioning, moving, it seems more like 30-40 minutes. The battery that comes with the chainsaw is 80V peak, 72V nominal, 2 Ah. Charge time is 30-40 minutes depending on how hard you worked the battery and how much it needs to cool down before accepting a charge. There are battery sizes ranging from 2.0 Ah for $129 to 6.0 Ah for $359. Not inexpensive, but powerful. I’ve been sharpening the chain on the bar without flipping it. When I replace the chain I’ll flip the bar. This is the sharpener I’ve been using. Very nice. https://www.timberlinesharpener.com/ Wood cutting is something I only do when wood falls in my lap. It’s good exercise. Though there are several pieces of property in the family where I could cut as much as I want, I don’t go out of my way looking for it. It just appears. People hear you burn wood and they call to get rid of a yard tree that is already cut up or to get rid of a stack of split wood because they converted their fireplace to gas. It’s nice to have friends. Ken1 point
-
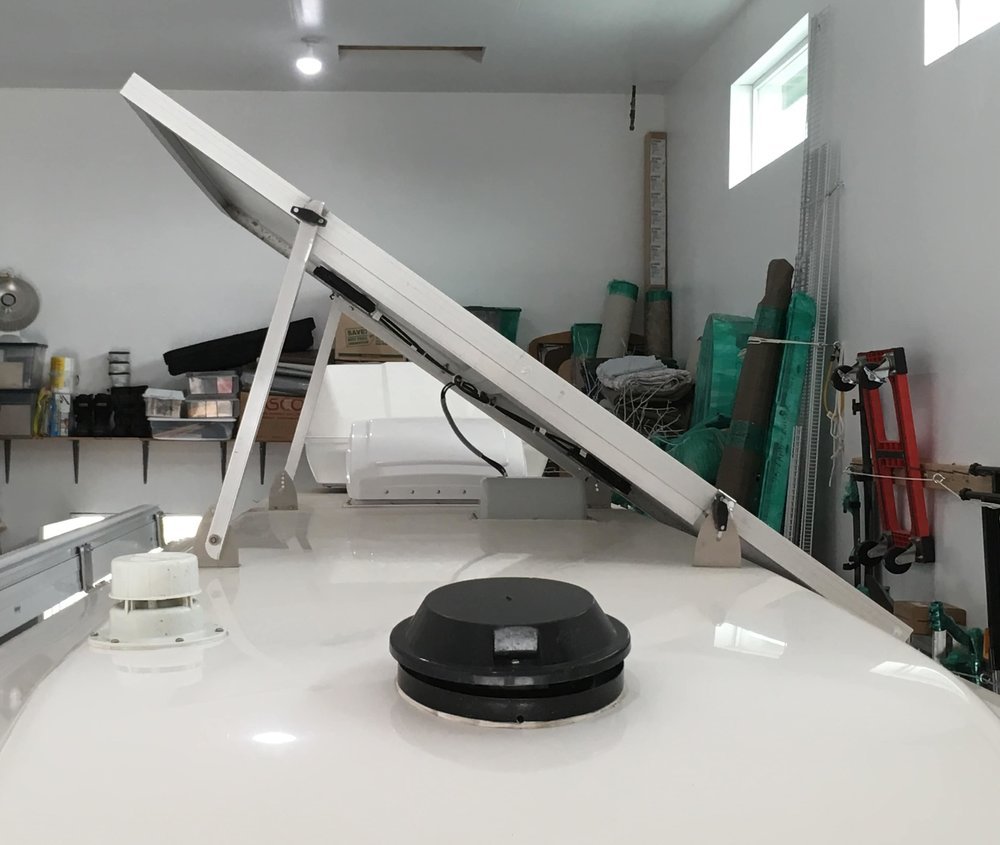
If you have solar, it makes access to the roof sooooo much easier if you make some panel extension arms, so you can tilt it way up and then slide yourself around on a soft foam camping pad..... https://olivertraveltrailers.com/forums/topic/2791-how-to-solar-panel-extension-arms/ John Davies Spokane WA
1 point
-
I’m on the roof at least several times a year, if I’m washing I start with the roof. Like Sherry, the roof is waxed when the trailer is waxed, a couple of times a year. I wash with the maxxfan cover open to get the area that is covered when it is closed. I check the AC to ensure no varmints have taken up residence up there. I also check the caulking around the fans and vent pipe. Washing includes under the solar panels. I like to raise the front so the rinse water flows off the roof and solar panels. Mike1 point
-
GJ - Apparently you are not the only one that feels this way about the F150. It hasn't been #1 for 40 years without some reason or the other. I had never owned a Ford product prior to my first F150 in 2011 (and then my second in 2017). Actually I was a Toyota fan after a great experience with a Tacoma. But, finding that the Tundra interior was not to my liking and the dated mechanics I went looking at Dodges. While I understand that the current year's interiors are very nice, in 2017 I was not impressed and reviews of their transmissions were not glowing. I also briefly considered GM (1/2 ton) products and really liked the exterior but I remembered that when I see a truck coming toward me, for the past ten years or so, with one front light out it will be a GM product 9 times out of 10. If they can't fix that then what is the point? Anyway, as I've said many times before on this Forum - there really isn't a "bad" 1/2 ton truck on the market these days and I'm sure virtually any one of them will do the job (equipped properly of course) but I'm still very happy with my purchase of the F150, 3.5 ecoboost, FX4 with tow package. I have never had a hint of an issue on the flats, in the mountains, paved or unpaved roads. Certainly I agree with your (GJ's) grading. Bill1 point
-
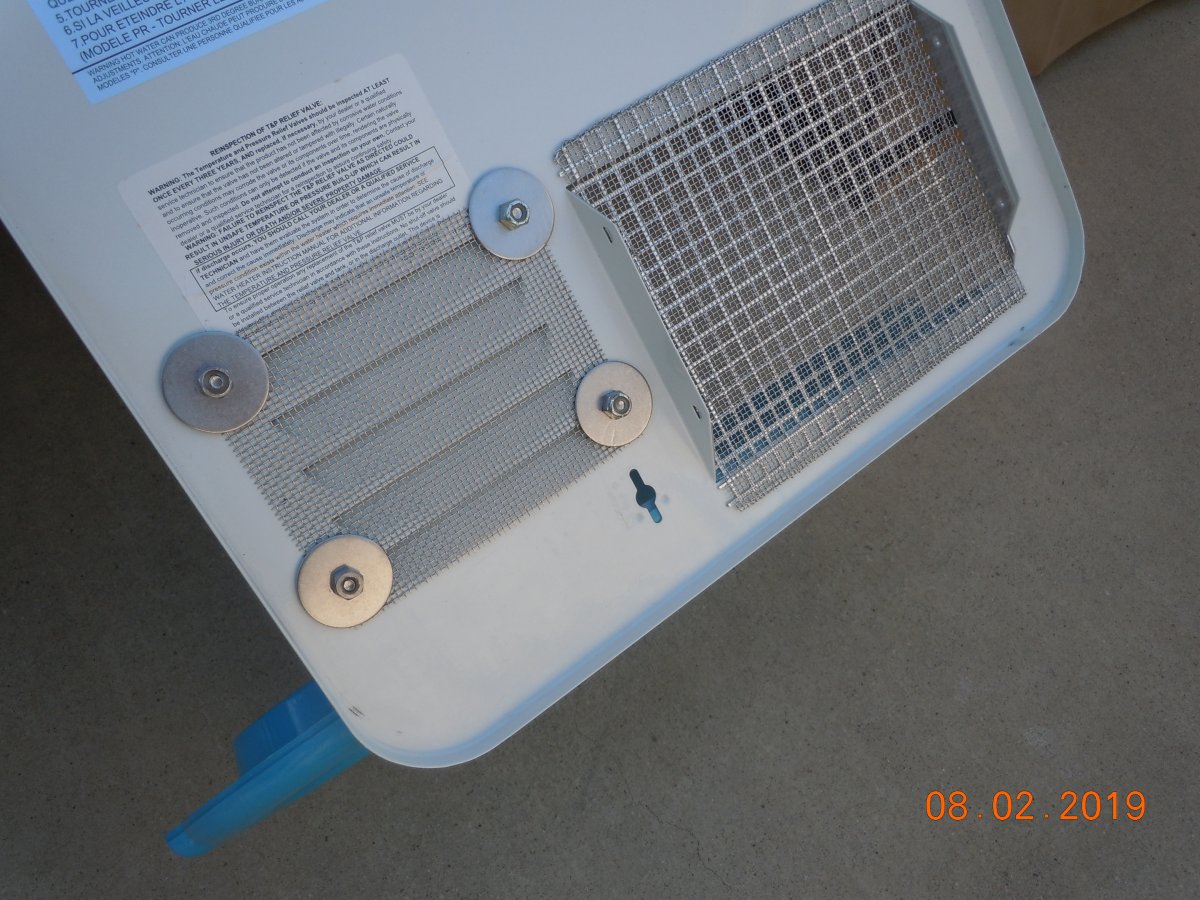
John, I couldn't find the exact item I purchased on Amazon, it was two years ago, it was a two pack, 22"x22" and 12 holes per inch, stainless, nice stiffness to work with and I cut it with tin snips. This is as close as I could find, https://www.amazon.com/Woven-X60cm-Coarse-gauze-Stainless/dp/B01N4RCHFU/ref=sxbs_sxwds-stvp?crid=2TB5WP8VAGXPQ&cv_ct_cx=stainless+wire+mesh&dchild=1&keywords=stainless+wire+mesh&pd_rd_i=B01N4RCHFU&pd_rd_r=0747b075-0572-49a2-b5ac-03427d1b9482&pd_rd_w=3kc4Q&pd_rd_wg=HcgJq&pf_rd_p=183579a1-f0e6-4556-8e39-8fe08e8f8141&pf_rd_r=Z1JE72FRXHZTFB9QNK7T&psc=1&qid=1587303256&sprefix=stanless+wire+mesh%2Caps%2C179&sr=1-131-dd5817a1-1ba7-46c2-8996-f96e7b0f409c due note here this material is 10 holes per inch, but I did measure mine and the hole openings are right at 2mm. Make sure you get material that is long enough to cover the longest opening on your refrigerator vents, I didn't want to piece mine together. I did think about using an adhesive on the heater screens, but just went with the stainless NBW's as I have a good selection of them. I did also make a totally different system to attach the Camco screen to the furnace, I just didn't like dealing with those springs, and went with my own design which will screw on and off. trainman1 point
-
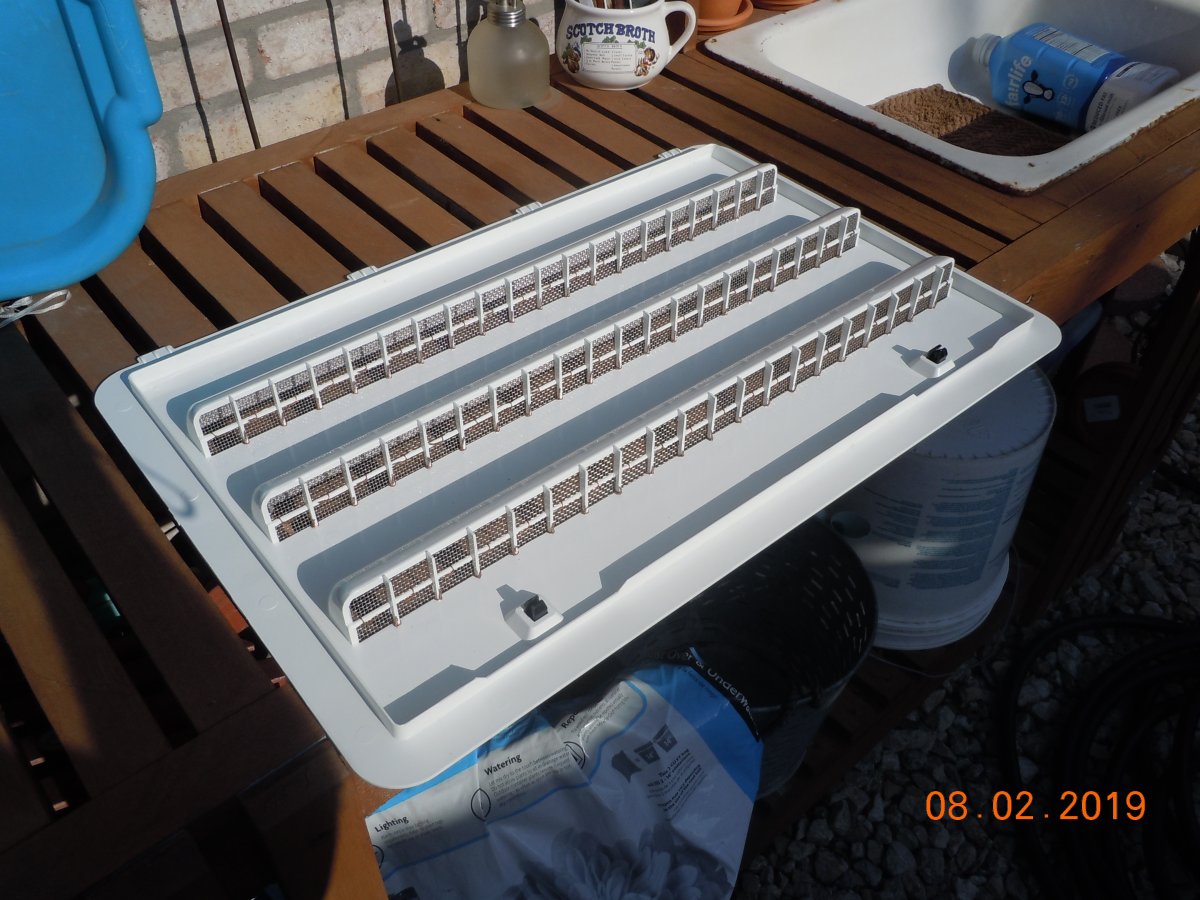
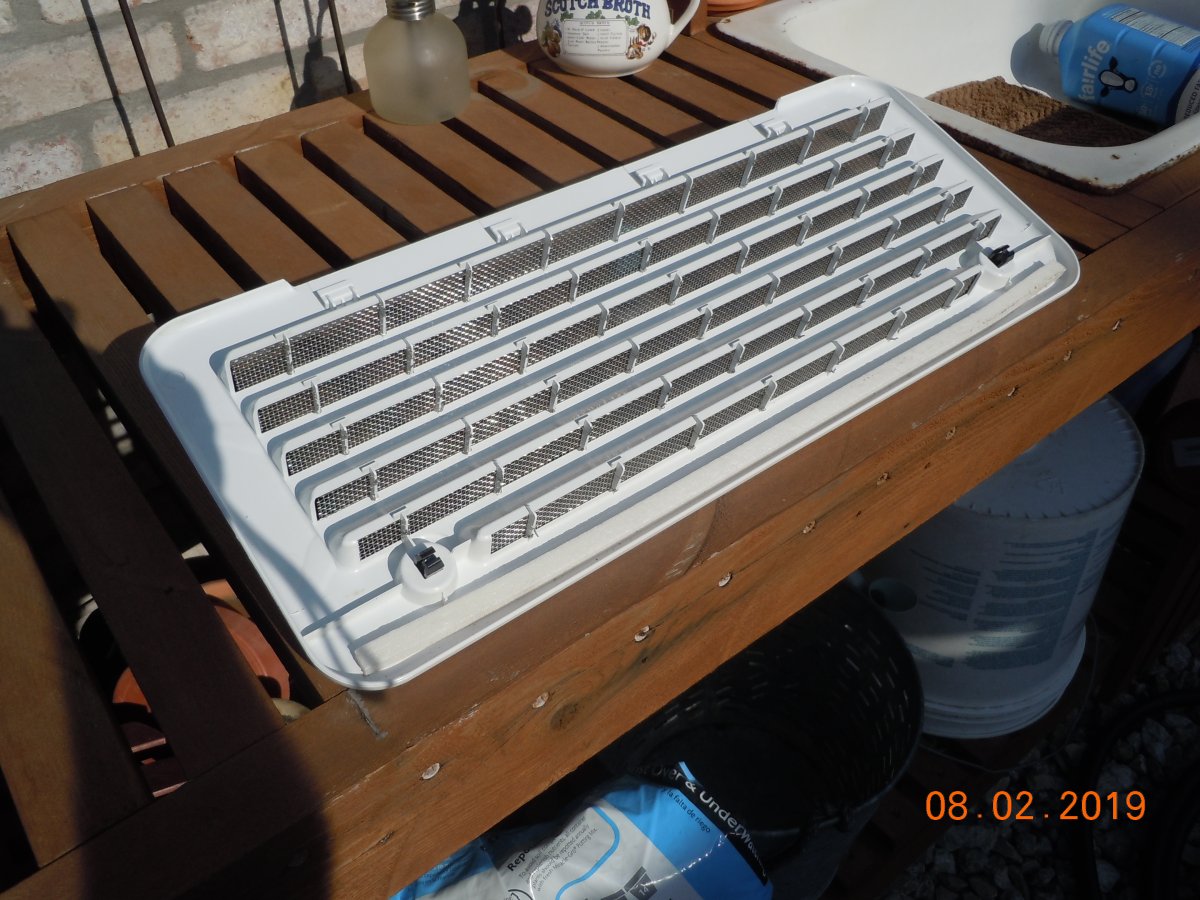
Pics of my bug screens that is made, I purchases a mesh screen from Amazon and cut it to fit where it was needed, then I took stainless steel wire and wired the screens in place on the refrigerator vents, the water heater vents screens were installed with stainless steel nuts and bolts. The furnace screen was purchased from Camco. Due note here that window screen material may work, but I found it to be too flexible and I used a stiffer wire mesh for a much better material to work with. It took me a day to do this and I had already done this before on our Casita, so I had some experience in doing this, cutting and fitting will take time to do the job correctly and with a professional look. trainman
1 point
-
After purchasing a standard floor plan new, we decided converting from a bed to seating and back again was going to be just more that we wanted to do everyday so, I converted it to a modified twin bed myself. A little expense and a little effort and we love it! I needed the extra width at the head of the bed so we added a 18" x 36" "fill in" mattress between the two twins. Before and After pictures. Andrew
1 point


-
Recent Achievements
-


")


")


