Leaderboard


Popular Content
Showing content with the highest reputation on 06/11/2022 in Posts
-
We just wanted to give a shout out to the Team at Oliver Service regarding our June 2 service/maintenance visit. A big thank you to Crystal the front office administrator who set us up at the Service Center Campsite. What a really nice quiet place to overnight when having service work done. Each site has water and electric and there is a dump station located as you exit. We also wish to especially Thank Jason, Ryder, and Tucker for their attention to detail and excellent work attending to a few minor maintenance items we needed addressed on our Oliver. This service team was 💯thorough, listened carefully and totally went the extra mile to address any and all concerns. 🌟🌟🌟🌟🌟
 8 points
 -
We were returning from camping and wile driving on a two lane blacktop I had to make a big swerve (running 55 MPH) to miss a turtle crossing the road. I would say it was a 5-6 foot swerve and guess what happened to the trailer in the swerve, nothing. After the swerve I thought to myself I didn't even notice the trailer being there, nor did I ever felt I was out of control. Sure makes me think what would have happened with a lessor trailer and my RAM 1500 4x4 if all wasn't equipped as it should be for towing. trainman6 points
-
Being a retired Body Ship Mgr. for over 35 years I personally wouldn't use an Orbital Buffer for buffing my trailer. It's not that the orbital will not work, but an rotary auto buffer will do a much easier and faster job, it is a little more difficult to use, but its all in the way you hold and move the buffer in its operation. I use Maguire's 67 Compound Buffing/Polish which does a good job of buffing and leaves a nice shine and applying a wax, or polish is optional. I purchased a buffer for around $65.00 from Harbor Freight and my wool buffer pads (2) from Amazon for around $30.00, I wouldn't use the foam pads for buffing, the wool pads work the best. https://www.amazon.com/Meguiars-M6732-Marine-Step-Compound/dp/B00029CYRG/ref=sr_1_2?crid=3VANI3ZZ56A47&keywords=meguiars+one+step+67&qid=1654973125&sprefix=meguire's+67%2Caps%2C112&sr=8-2 trainman4 points
-
Both my 2011 and the current 2017 F-150's had this feature. The truck will also keep track of several different "trailers" as long as I tell it which one I'm towing since it can't tell the difference between one 7 pin and another. Bill4 points
-
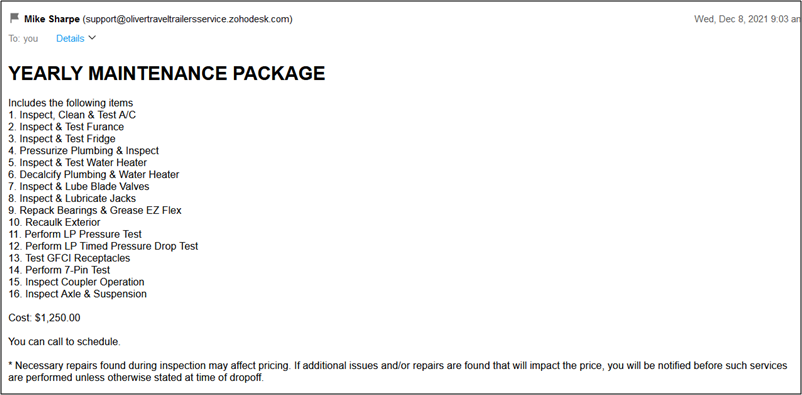
Annual Maintenance Cost: Below is the quote I received last December.... 2021 LE2. The maintenance was scheduled and completed in April. I provided them with Timken bearings instead of re-greasing the China bearings. They also completed a number of minor repairs under warranty. You should discuss any work additional to the maintenance package ahead of time so they allocate their schedule accurately. They will not let extra undiscussed work impact another owners schedule. It was a two day appointment. We camped at Oliver the first night and stayed at a local hotel the second night. This was the beginning of a 6 week trip out west. My out the door cost was $1,244.24 No problems were detected that needed extra work/cost. YMMV
3 points
-
Griot’s Garage seems to have nice wax/polish setups. I use their foaming wash and wax products with good results.3 points
-
Thanks for posting! That will definitely save fussing around, recording trip lengths and missing some! But you still have to keep a basic mileage log for the maintenance items. I quite like the new style spoked wheels, they would really show off a set of disk brakes with stainless calipers and rotors! Unmmmm good! John Davies Spokane WA3 points
-
On our third trip after pick up in the summer of 2016 one of my back jacks would not come down. I was pretty green and called ScubaRX (I think he was dining with Tally at a restaurant) and he quickly explained how to use the manual wrench on the jack under the bed. It worked, the jack was not engaging the gear. From that time on I have never run the jacks up until they do the click-click-click. I stop before that point on all three jacks. On the back jacks I have some white pin stripe tape (Amazon) at the point where I want to stop. If raising by myself I do have to stop and look a couple of times. If Carol is helping she tells me when to stop. We’ve never had an issue since. Before we left this morning I checked the bolts on all my jacks and everything was nice and tight. Mike3 points
-
Your shiny new Oliver is not the place to learn how to use an orbital polisher, imo. Practice on something else, first. Learn how to handle the speeds and products. Just a cautionary advice. There are some great articles available online from practical sailor, basically the consumer reports of the marine fiberglass world. (BTW, they have recommended the dewalt and shurhold many times.) Just like anything else, it's not just the tool you own, and the products you use, it's the proper application that gets the job done with best results. The gelcoat Oliver uses is marine grade, and a good layer, but it's still gelcoat. Don't abuse it, and it will give you a long lasting, beautiful life. Our motto is, take care of your stuff, and it will take care of you. Our sailboat is 40+ years, powerboat 20+ years, trailer 14+ years. (We do love fiberglass...)3 points
-
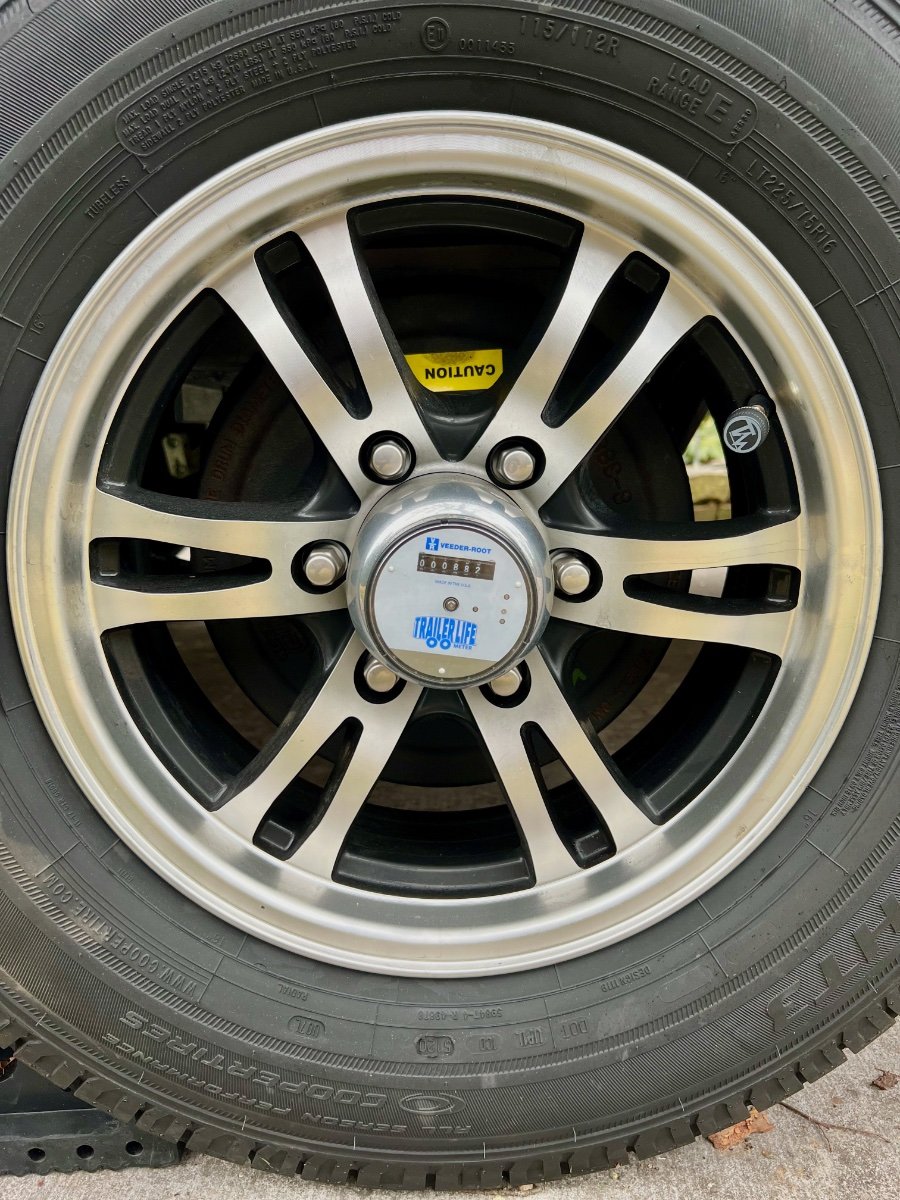
Prior to delivery of our 2022 LEII in mid-February, I posed a question on the OTTO forum asking how many owners had installed odometers on their trailers, and if they had, what brand they had selected. I was surprised to learn almost no one had installed a hub odometer, with most relying on manual logs for mileage tracking I did not want to be bothered with keeping a manual log, knowing I would inevitably forget to enter tow vehicle mileage when towing our LEII. Undaunted, I began to search for a suitable hub odometer. I found few offerings for travel trailers, but did come across the TrailerLife Odometer line. On their website is a Ratio Selection Guide for determining which model odometer best matches the outside circumference of the tires on the trailer. I checked with Oliver Travel Trailers to confirm the tires to be installed on our LEII were 225/75R16 Cooper Discoverer HT3. On the Cooper Tire website I found these tires have a diameter of 29.21", a width of 8.5", mount on a 16" rim and make 710 revolutions per mile. The calculated rolling circumference= 29.21" x 3.1416= 91.73" I contacted Veeder-Root, the manufacturer of the TrailerLife odometer product line, where their tech support recommended using Model 714. They also recommended using one of their wheel center caps for a 4.25" wheel center hole for a 6 lug wheel. Otherwise, a hole must be drilled in the center of the standard Oliver hub cap to accept the mounting stud of the odometer, I placed an order for the Model 714 odometer, $84.99, and the wheel center cap, $15.99. The total was $104.56, including $3.58 for shipping. Front View Profile View The TrailerLife odometer and wheel center cap were delivered one month after I placed the order. A week or 10 days after placing the order, I called to inquire of the expected delivery date. Only then was I told the item was backordered and could be six weeks for delivery. Fortunately, I received the odometer and hubcap in time to take it with us for the LEII delivery date. On our LEII delivery date, the weather in Hohenwald was miserable, with pouring rain and cold, with temperatures in the low 20s at night. I asked Oliver to install the hub odometer, which they did during the delivery process for $20. I thought this was reasonable and was glad to have the odometer installed at the time of delivery. I asked to have the odometer installed on the street side rear wheel, since this is closest to the primary service connections and storage.. I don't believe it matters which wheel the odometer is installed on. The hub odometer now shows we have covered over 3,000 miles since delivery. I am sure the miles reported by the hub odometer are far more accurate than I would have manually recorded. Being a first time RV owner, I was (and still am) focused on learning the systems on our trailer and the procedures for using it safely. Manually recording the mileage traveled was not high on my list of priorities. I am keeping a log of our travel destinations, maintenance, modifications, etc. Don
2 points
-
Trainman, Glad to hear it as I have a similar set-up (dual cab as the crew won't fit in our garage.) 🙂 Charlie2 points
-
I've been through most - if not all - of the production facility and there aren't any "lifts" over there either. The only Oliver that I'm aware of that has had "major" frame work is hull #50 (ScubaRx) where the entire "tub" was lifted off the frame. All wheel bearing maintenance, brake maintenance, etc. is done by jacking up the frame and then supporting the frame in numerous spots while the service is being carried out. Bill2 points
-
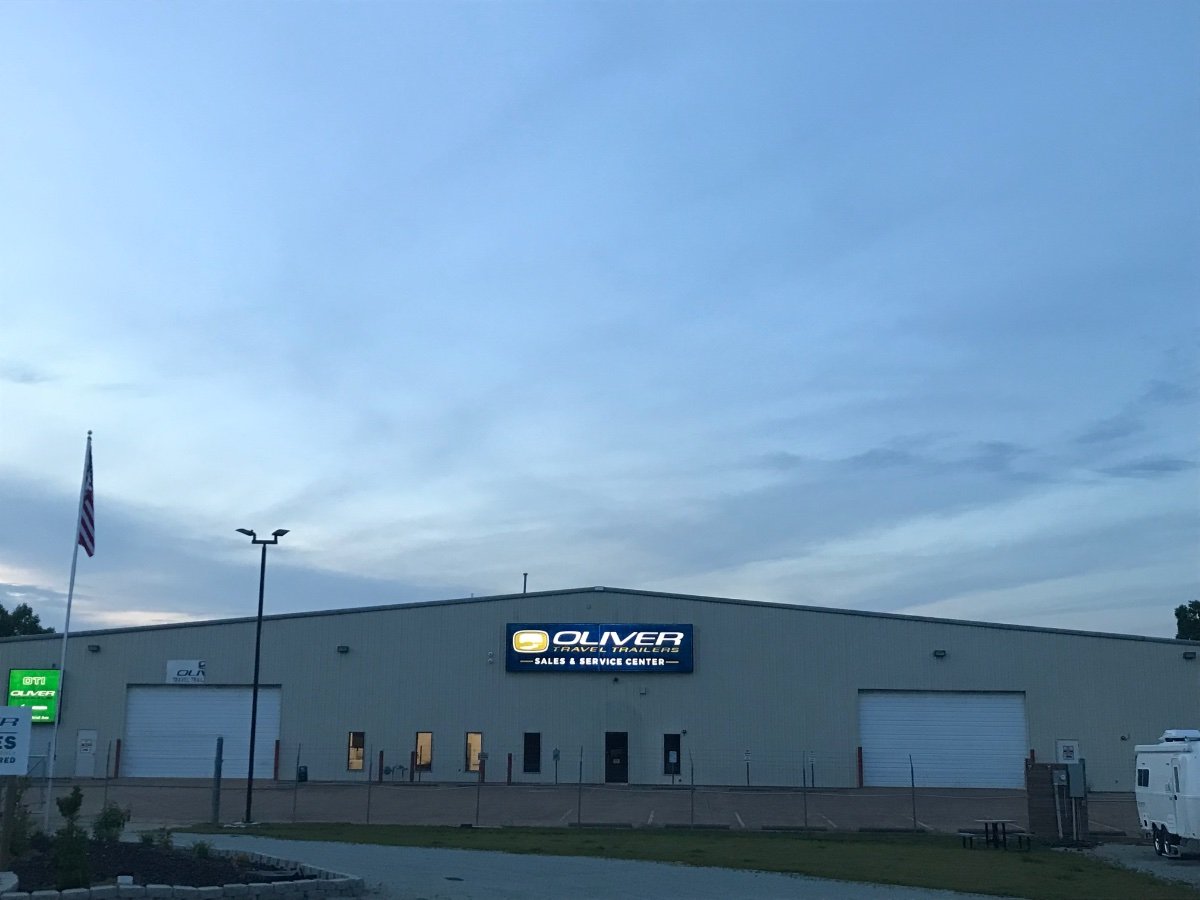
Sorry I do not presently have pictures, but, as you might imagine, this is a fairly large building. In Patriot's last picture the entrance door - roughly at the center of the building - is the approximate dividing line between Sales and Service. Both Sales and Service areas run about 2/3 of the way back where there is a wall separating both from another part of Oliver Technologies. For the most part, the Service area is simply an open floor - there is a small section at the front left corner of their area for a "store" that has items an owner can purchase for their Ollie (sewer hoses, toilet paper, filters, hoses, wax, etc.) and a small counter for billing, service records and the like. Basically - no. There are no "lifts" either. I do know that there have been occasions where the Service area has buffed out a camper but those have been due to reasons other than a simple wash, wax and detail. Given the lack of staff and the demand for regular service appointments, I think that they do not offer detailing but I'm not certain. Bill2 points
-
Thanks for posting. Do you have any inside-the-building pics that you can share? Do they let you come inside the service area to, for example, look underneath your frame while it is up on a lift? What is the hourly rate and what does a typical annual service cost, do you know? Do they provide detailing services? John Davies Spokane WA2 points
-
I agree with most post and I do understand that most would not go with the Gladiator diesel as a tow vehicle, not that it can't do it, but there are many other tow vehicle in the same price range and will do a better job. My RAM 5.7 4X4 does a great job and the Gladiator diesel will not equal it in any way. All being said, this is just something that came up and I may, or may not give it a shot. trainman2 points
-
So this happens with the gearbox installed? It seems like a very major design flaw. I had to modify my handle so it would function with the gearbox removed, but the tool does work fine with it in place. Maybe you could figure out an alternative setup, the part that fits over the jack gearbox needs a 1/2” square female drive. It could be made by buying a pair of cheap Harbor Freight extensions and welding the female ends together. Use a regular 1/2 drive ratchet handle to operate it. https://olivertraveltrailers.com/forums/topic/6811-how-to-lengthen-your-emergency-jack-handle-so-it-will-fit-the-rear-jacks-with-the-gearbox-removed/ John Davies Spokane WA2 points
-
I mounted my signal booster inside the bathroom vanity attached to the front wall. I drew power from the switch that turns the camera on. Our new truck monitors the trailer tires as well as its own so I removed it all and sold it to a new owner2 points
-
Good point Chris, I am looking at a lighter weight cordless polisher. Thanks for your input. 👍🏻2 points
-
Yup, spreadsheets work for us, @Mike and Carol. I think my husband could run a total of every part and enhancement we've done since picking up #12, in February 2008, from our spreadsheets . Me?. I don't really want to know. Fun and friends and our adventures outweigh those $$$ , every time. Yolo.2 points
-
My last 3 Rams recorded towing miles. When the 7 pin was connected the towing miles are recorded. I look at it occasionally, but there’s nothing like a good spreadsheet. Old School Mike2 points
-
Let's tiptoe a bit, and keep this non-political? Please. And, stay on topic? Op is asking only for opinions on gladiator, gas vs diesel, as an appropriate TV for his le2.2 points
-
@Mike and Carol, we painted stripes on our jacks back in 2008. Great advice!2 points
-
We had a problem with the curbside jack, recently, in our 2008. It would come up, but not down. Operating the manual alternative is a pita, to say the least. Tear up the bed, the handle only goes about 90 degrees, you get the picture. Since it would work one direction, we hesitated to tear out the switch, which we suspected to be the culprit, and have it work then in no directions. I contacted service, and @JWalmsley with his great memory, directed me to a replacement switch on Amazon. 5 minute replacement. Full operation. Thanks, Jason! You are the best, even for 15th season trailers.
2 points
-
Advice appreciated! My first project to learn on will be our 2003 Toyota Tacoma with fiberglass shell, next will be the Tundra, and last will be Ollie. 🙂2 points
-
😊 you are welcome rideandfly, gotta keep our Ollies gelcoat looking great!2 points
-
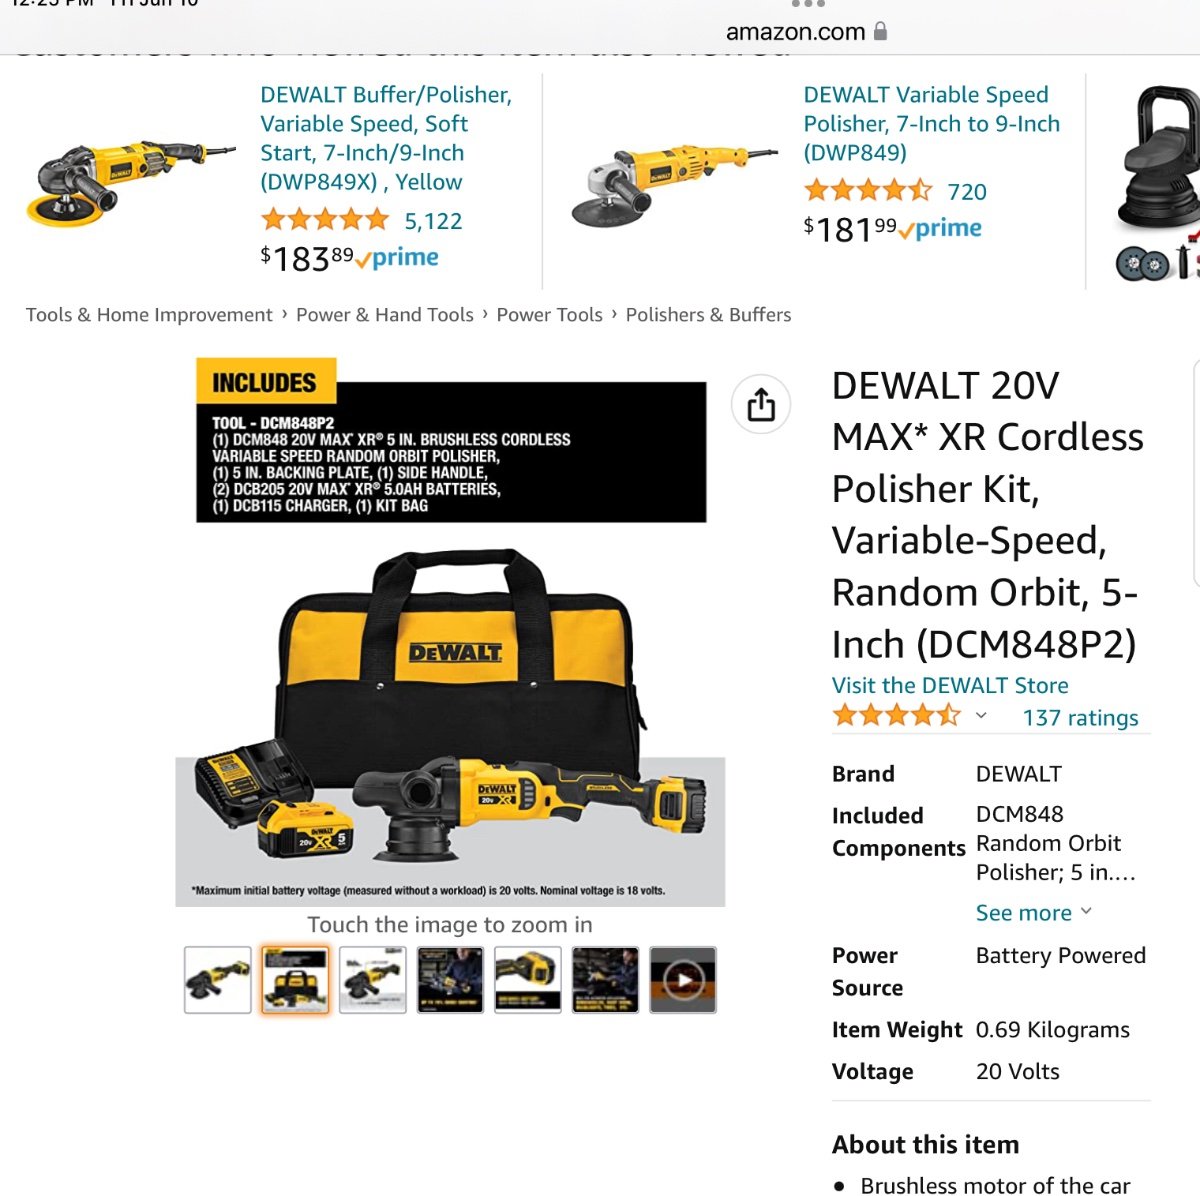
I just bought a Dewalt polisher, mainly because I used to have a nice Porter Cable one with cord, and I just hated dealing with that; tripping over it, pulling the plug out of the socket, and dragging it across my freshly polished paint (!) And I have about six other Dewalt tools and lots of batteries. I haven’t used it yet, but I need to do my truck since the sides are all brush striped from fire roads. I got a killer deal on an open box one on eBay for $375, free shipping. It was in perfect condition. Griots Garage sells great care products, I bought a bunch of pads, polishes and tools from them for the Dewalt. It doesn’t come with any. https://www.griotsgarage.com/buffers-pads/ John Davies Spokane WA
2 points
-
Having answered that question hundreds of times to people I delivered boats to over 20 years, I always said buy the one offered by Shur Hold marine products, They are light, do a great job for the weekend buffer. If you want to step up and work your arm use what the pros use Dewalt or Makota . If your hull looks good try Buff Magic by the company or 3M finesse.2 points
-
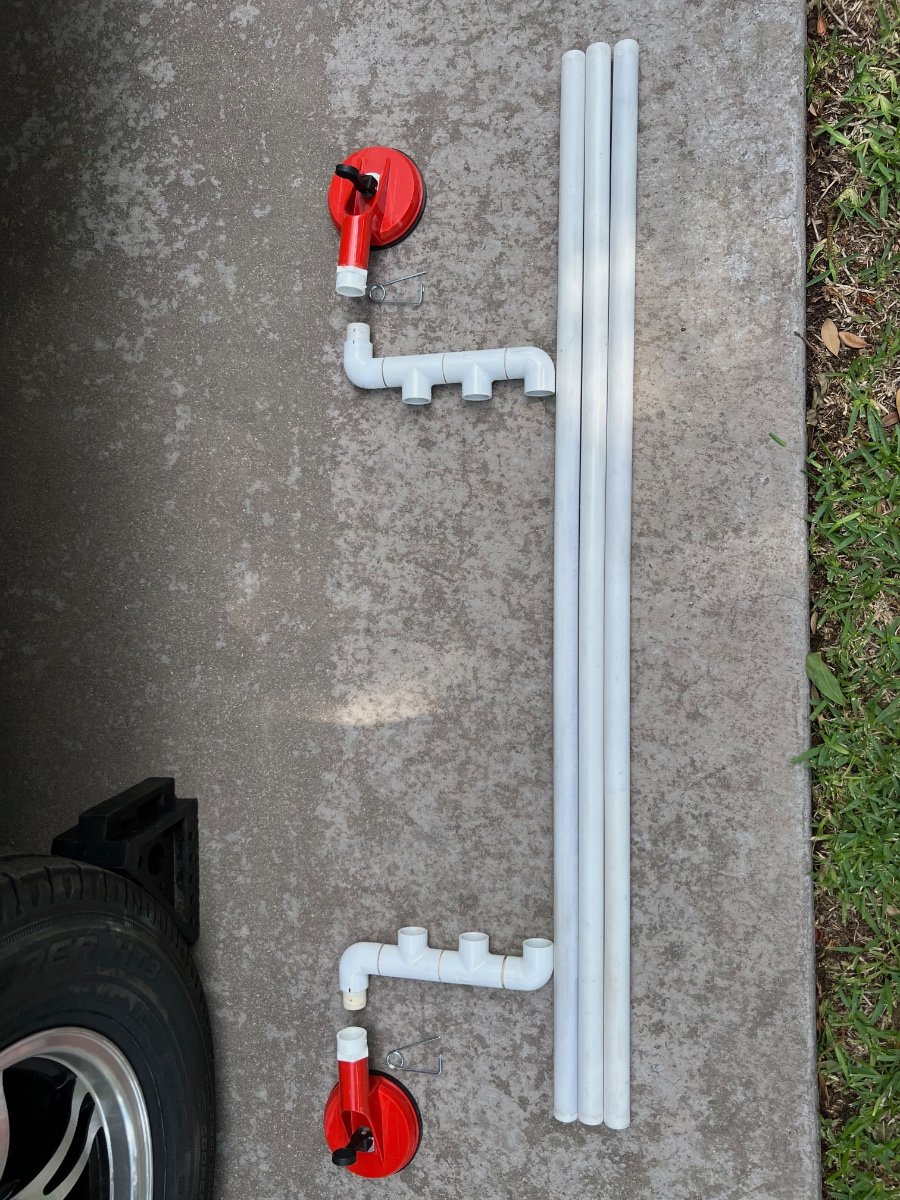
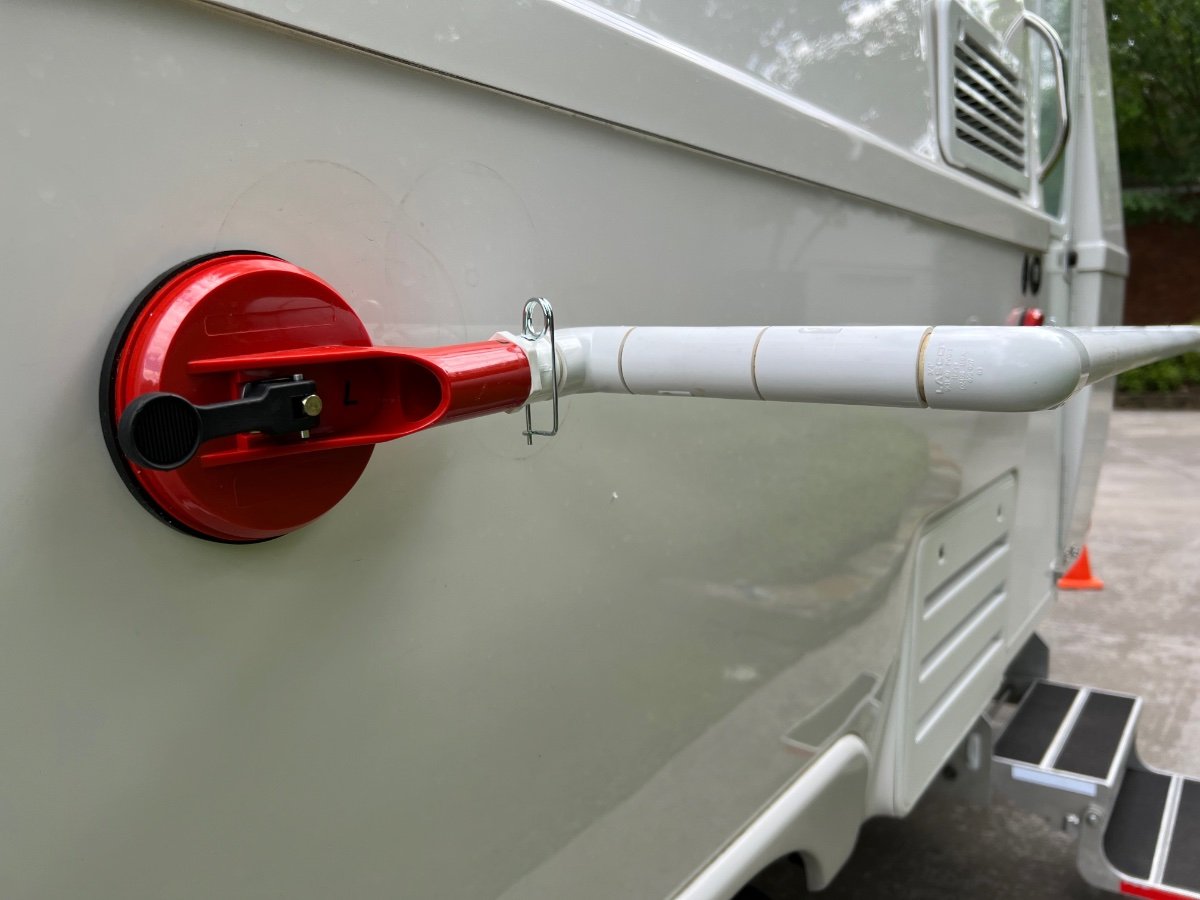
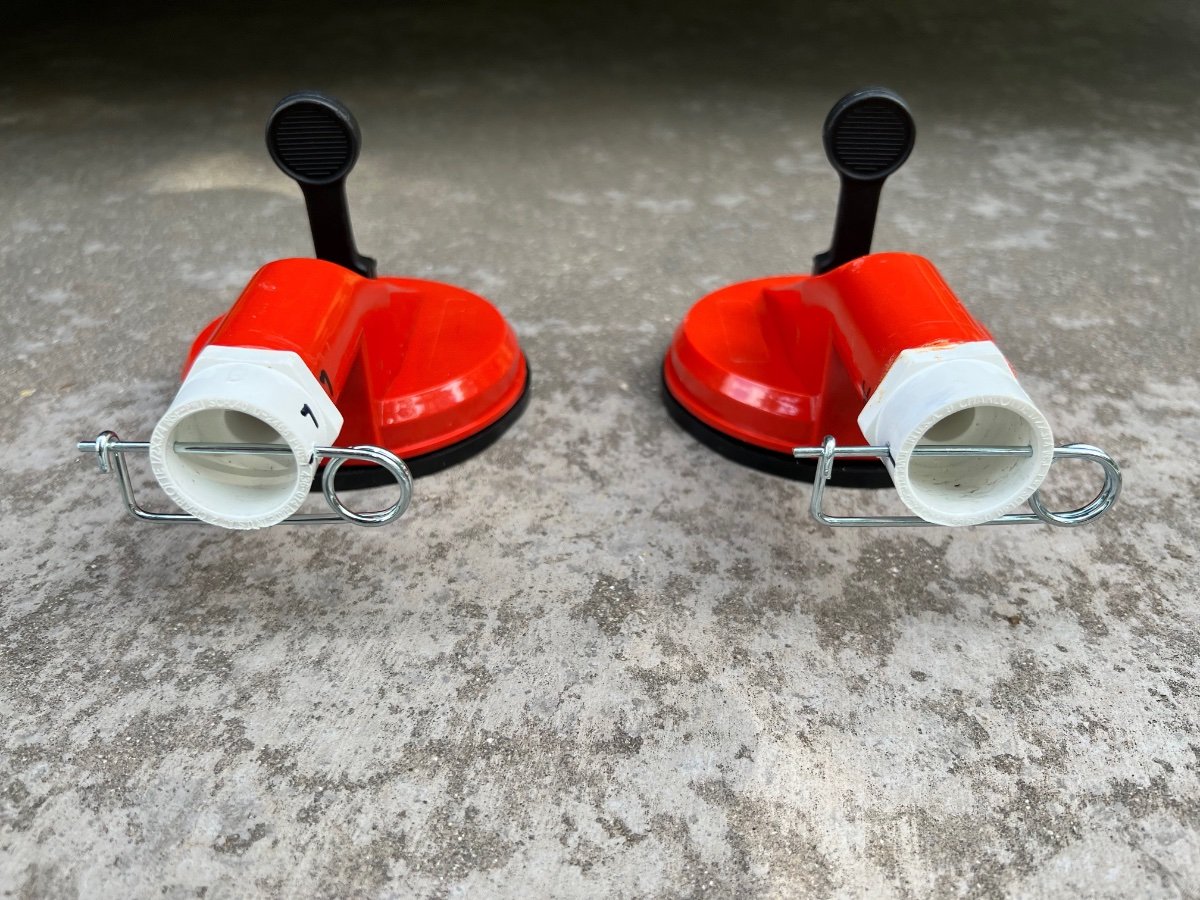
I had seen the posting on 4/22/21 by @Calypso showing an externally mounted towel bar on the side of Hull #520. The towel bar was made from a suction cup lifter and a piece of ¾" PVC tubing. I thought this a great idea and made one for our LEII picked up on 2/17/22. Due to nearly constant downpours in central TN the week we picked up Hull #990, we had immediate need for an external towel bar. We recently returned from a two week trip during which we also encountered several downpours. We used the towel bar nearly every day, often not having enough space to hang damp items. Upon our return I was about to make a second towel bar. I was thinking of adding an improvement to offset the bar/tube further from the hull of our LEII, to avoid having towels in contact with dirt on the hull. After mulling over a design for several days, I had an Aha! moment. I could modify my existing PVC towel bar assembly and add additional tubes for greater capacity, while also moving the tubes further away from the hull. Below are photos and a description of the result. Materials (Quantity, Description, Source, Cost, URL) 1- 4-2/3 In., 125 Lb. Dual Suction Cup Lifter (Harbor Freight, $8.99, https://www.harborfreight.com/4-23-in-125-lb-dual-suction-cup-lifter-57501.html?_br_psugg_q=suction+cup+lifters) 2- 3/4 in. PVC Schedule 40 MPT x S Male Adapter (Home Depot,$0.71/each, https://www.homedepot.com/p/Charlotte-Pipe-3-4-in-PVC-Schedule-40-MPT-x-S-Male-Adapter-PVC021090800HD/203811638 4- 3/4 in. PVC Schedule. 40 90° S x S Elbow Fitting (Home Depot, $0.75/each, https://www.homedepot.com/p/Charlotte-Pipe-3-4-in-PVC-Schedule-40-90-S-x-S-Elbow-Fitting-PVC023000800HD/203812123) 4- 3/4 in. Schedule 40 S x S x S Tee (Home Depot. $0.85, https://www.homedepot.com/p/Charlotte-Pipe-3-4-in-Schedule-40-S-x-S-x-S-Tee-PVC024000800HD/203812197) 2- 3/4 in. x 10 ft. PVC Schedule 40 Plain-End Pipe (Home Depot, $6.98/each, https://www.homedepot.com/p/Charlotte-Pipe-3-4-in-x-10-ft-PVC-Schedule-40-Plain-End-Pipe-PVC-04007-0600/100348472) 1- 0.091 in. x 2-3/4 in. Zinc-Plated Safety Pin (2-Piece) (Home Depot, $2.31, https://www.homedepot.com/p/Everbilt-0-091-in-x-2-3-4-in-Zinc-Plated-Safety-Pin-2-Piece-815408/204276312#overlay) The finished towel bar/drying rack shown in place below. The disassembled parts are shown below: I chose NOT to cement the entire assembly, since it would be much harder to store when in transit. Construction Cut the handle of the HF Dual Suction Cup Lifter in half transversely. A hack saw or bandsaw is recommended. File/sand the cut edges to remove burrs. Use PVC primer and cement to fasten the threaded end of each 3/4 in. PVC Schedule 40 MPT x S Male Adapters to each of the cut ends of the handles of the Dual Suction Cup Lifter. Cut the ¾" PVC tubing for the hanging tubes I chose to make 3 hanging tubes, each 45" long. This length easily fits in our rear cargo carrier and sags very little Adjust length to suit yourself. Cut 8 pieces of ¾" PVC tube to 1-½" in length. These short pieces serve to couple the elbows, tees and adapter together. Using a belt sander I slightly beveled the cut ends of the hanging tubes and the connector tubes so they would more easily slide into the tee and elbow sockets. Assemble the two "manifolds" as shown above, each having: 2 elbows, 2 tees and 4 of the 1-½" connector tubes. Use PVC primer and regular PVC cement to assemble one joint at a time. Be sure to align the open sockets of the tees and elbows. Hold each joint until cement prevents movement of components. The manifolds should be identical. NOTE: do not put PVC primer or cement on the short connector tubes which will be inserted into the adapters cemented onto each handle of the Dual Suction Cup Lifter. When the manifolds are assembled insert the hanging tubes into the three open sockets on each manifold. Again, I chose not to glue the hanging tubes to the manifolds for ease of storage. Insert the connector tube on each manifold into the adapters cemented to each half of the Dual Suction Cup handle. Again, do not use PVC primer or glue. With all components assembled, do a test fitting on the hull of your Oliver. Slightly dampening the suction cups significantly improves their grip on the hull. The hanging tubes and manifolds assembled should largely support themselves horizontally. I had leveled my trailer and used a level to also level the towel bar/rack. When the towel bar/rack is level drill a 7/64" hole vertically through the adapter coupling joining each half of the Dual Suction Cup Lifter to the short connector tube of each manifold. The purpose of the hole is to permit insertion of the zinc plated safety pin which will prevent the towel bar/rack from sagging, while still permitting the rack to be disassembled. Insert the zinc plated safety pins through the holes drilled into the adapter couplings to maintain the towel bar/rack in a horizontal position extending from the hull. I marked the suction cups and manifolds Left and Right to avoid difficulty later inserting the pins through the connectors. I also put an index mark on the adapters and manifold connectors for easier alignment. I have not yet tested this assembly in the field, but am confident it is strong enough to hold as many towels and clothes as will fit. I expect it could also support wet shoes or hiking boots. I hope this is useful to other owners. I welcome suggestions for improvements. As a final note, update your departure checklists to include removing and stowing the towel bar/rack.
1 point
-
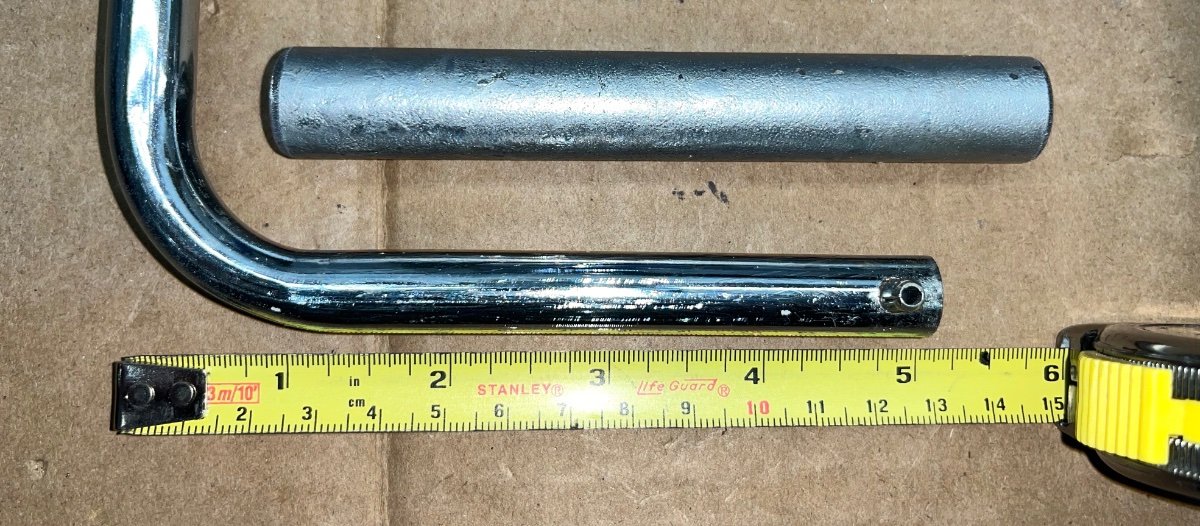
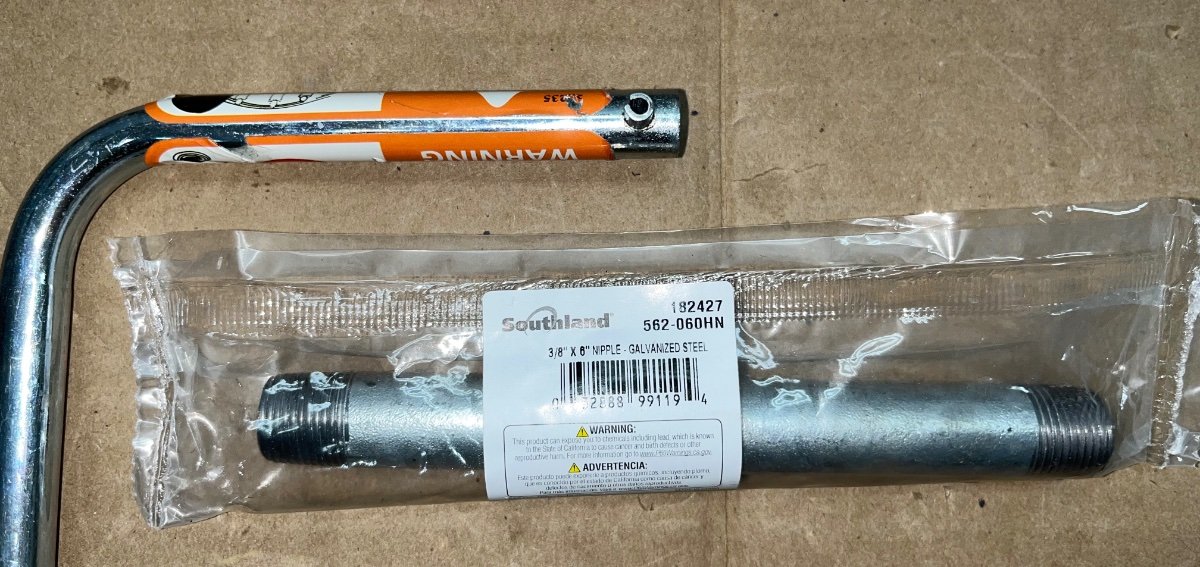
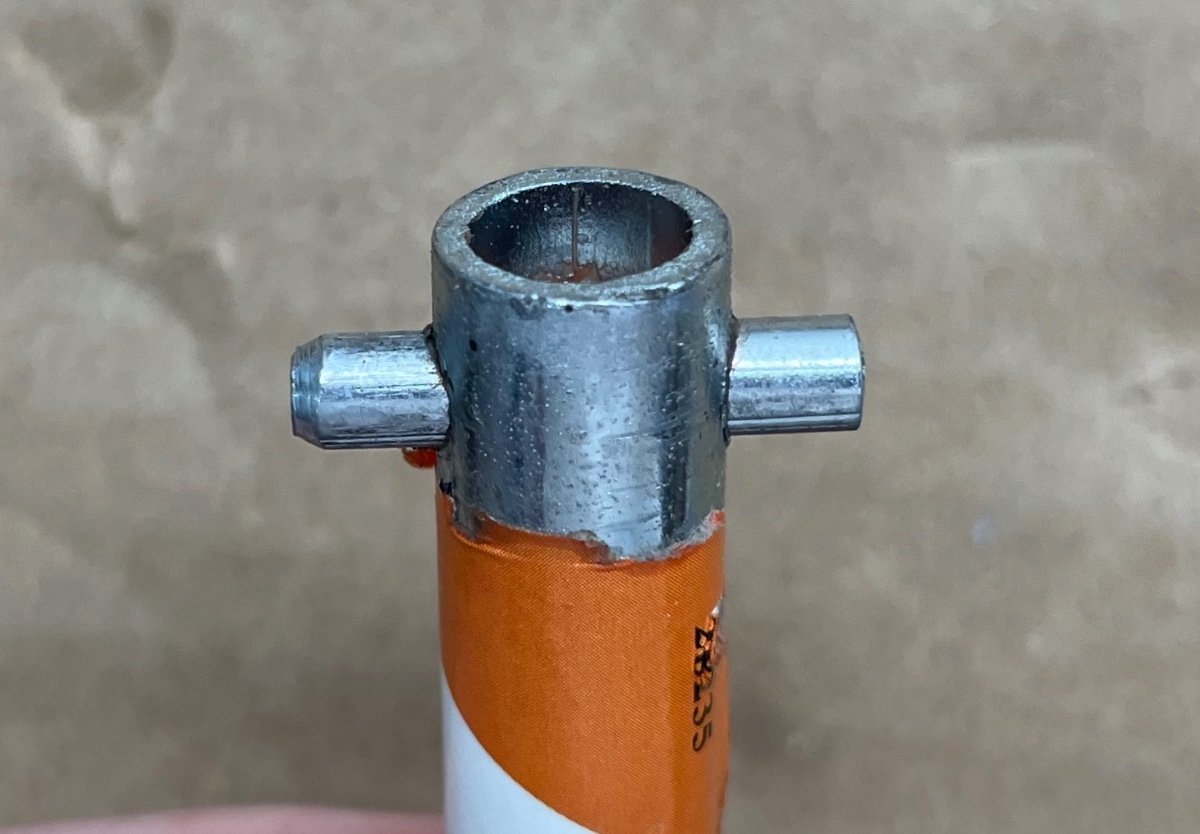
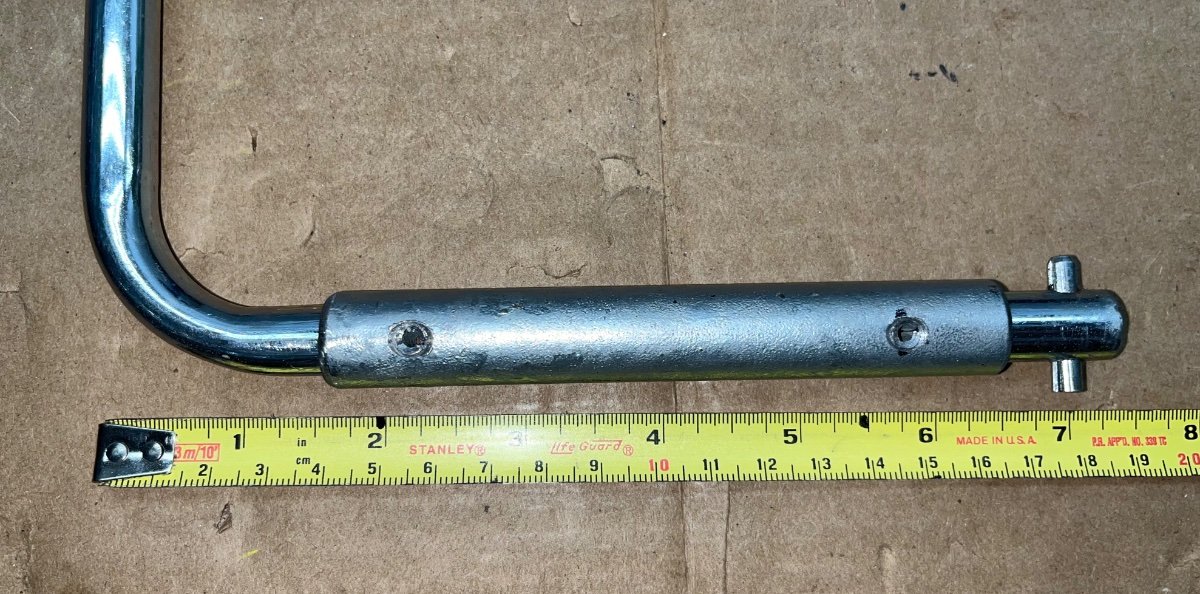
EDIT: see related thread - https://olivertraveltrailers.com/forums/topic/6812-check-your-rear-jack-mount-hardware-bottom-frame-bolts-were-1-turn-loose/ I serviced the two rear gearboxes and then to my dismay the right one refused to go up or down under a load - STUCK. I use the emergency crank tool to see what was going on, using the square shaft on top of the gearbox, and it was really really tight, something was binding for sure, so I removed the three Allen screws and lifted off the gearbox. And tried to turn the lower screw part using the other end of the tool. FAIL - it is too short to clear the surrounding fiberglass bed support, it would only move about 170 degrees. I said some very bad words, and I am glad I did not have to deal with a failed gearbox in the boonies, I would have been stuck. I needed a short length of heavy steel tubing with a 1/2” inside diameter so I could make an extension. I found that a 3/8” MPT pipe nipple works perfectly. Unfortunately that size is hard to find and about double the price of a more common 1/2” MPT nipple. Here is what the end of the tool looks like, the part that drives the lower jackscrew, under the motor unit. I used a 3/8” MPT x 6” nipple, the longest I could find at Home Depot. Drill out the internal burrs and the long seam weld using a 1/2” drill bit and cut off the threaded ends. Cut the tool in the center of the straight part and insert each piece into the nipple 1”. Drill and install two 5/16” roll pins and trm any excess material so you don’t cut yourself using the modified tool. It is a very snug fit, I considered adding epoxy but that isn’t needed. NOTE I turned the end 90 degrees from the original orientation, so the tool will lie completely flat in a galley drawer without gouging the drawer bottom. I was able to free up the lower part by turning it back and forth to get the jack working properly. THEN I found the true cause, the support bolts that go through the trailer frame were super loose. I turned all four (two per side) one full turn before they tightened to 43 ft lbs. Now both jacks run much better under a load. I started a service ticket and will make a new thread about the loose bolts. I hope a few owners will look at their tool and measure the part with the pin in it. If it is 5 inches, it will be useless in an emergency. I am curious to know if everybody has a disfunctional tool like mine. John Davies Spokane WA
1 point
-
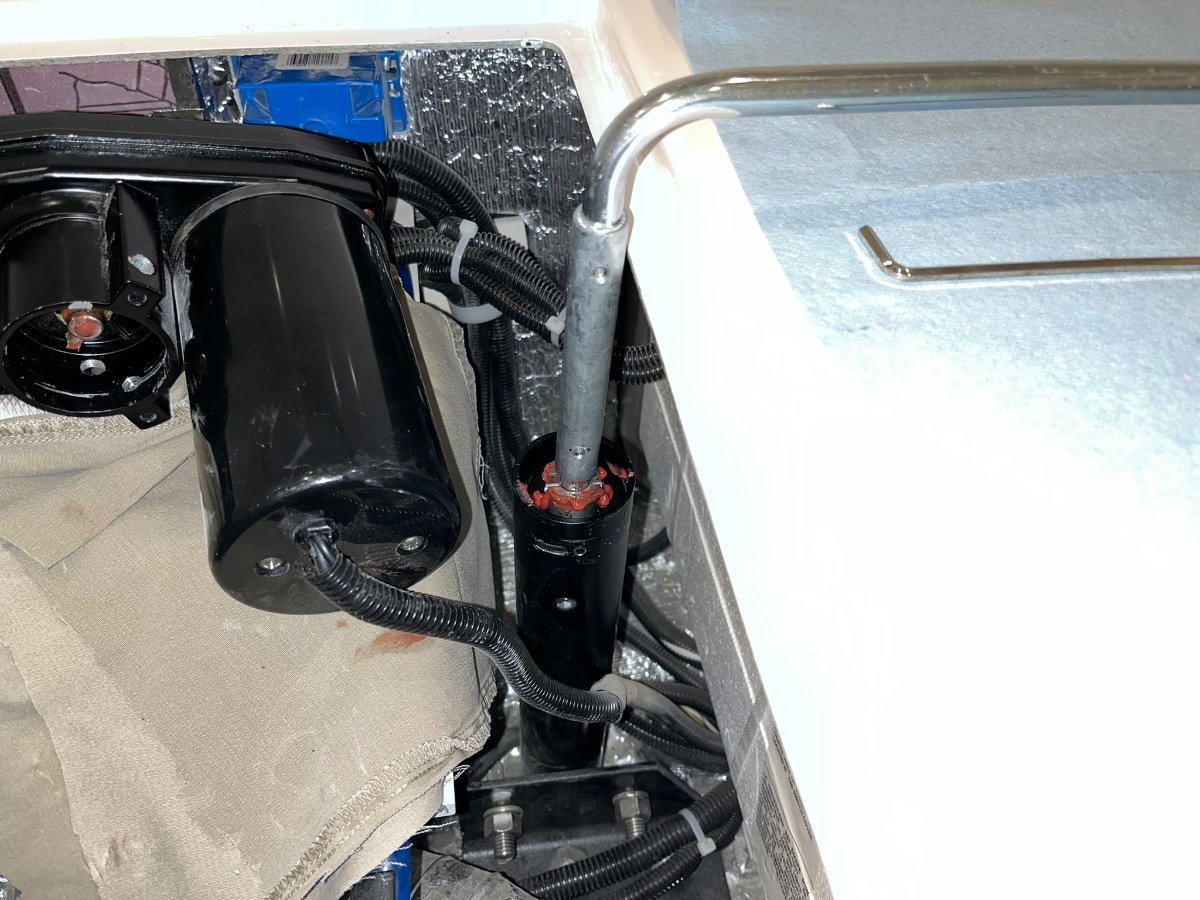
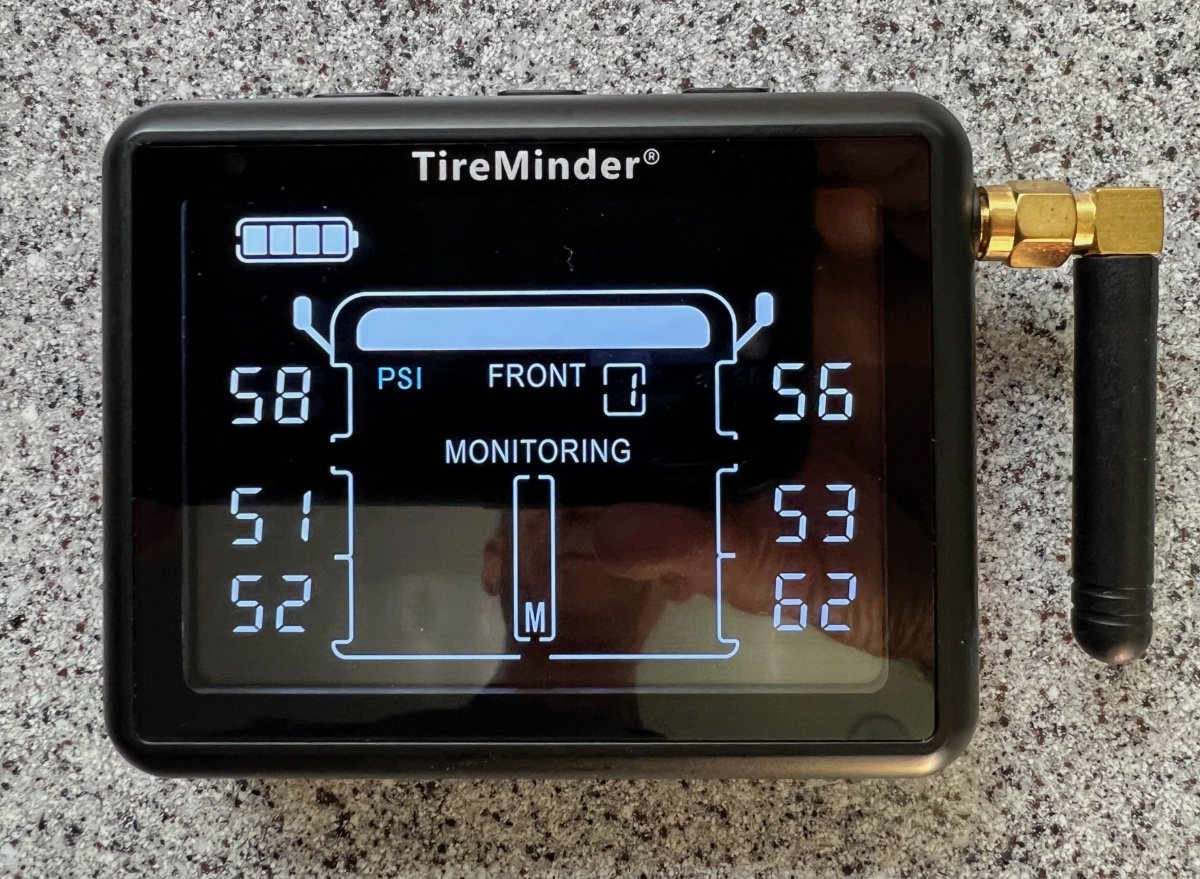
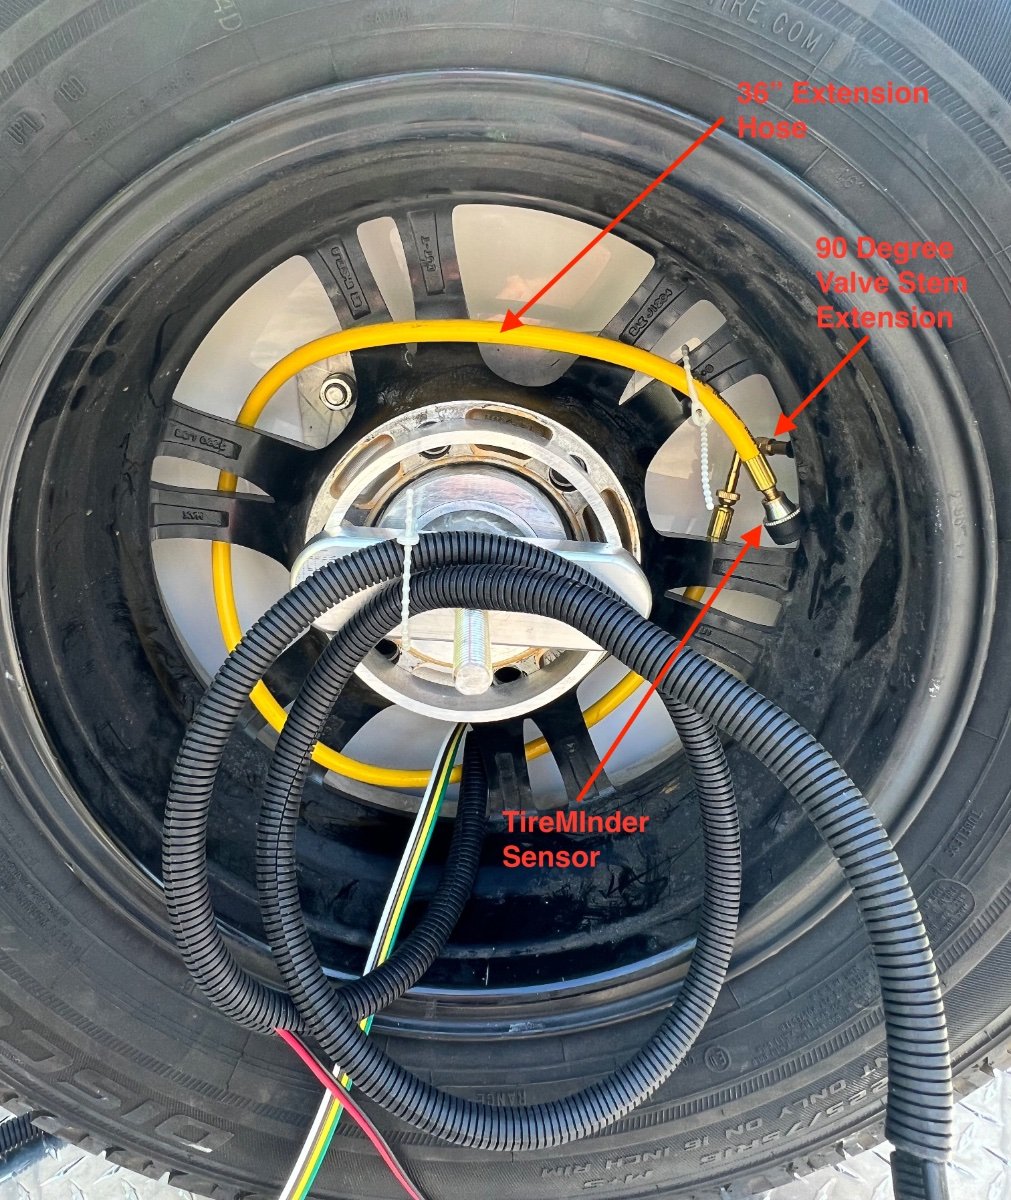
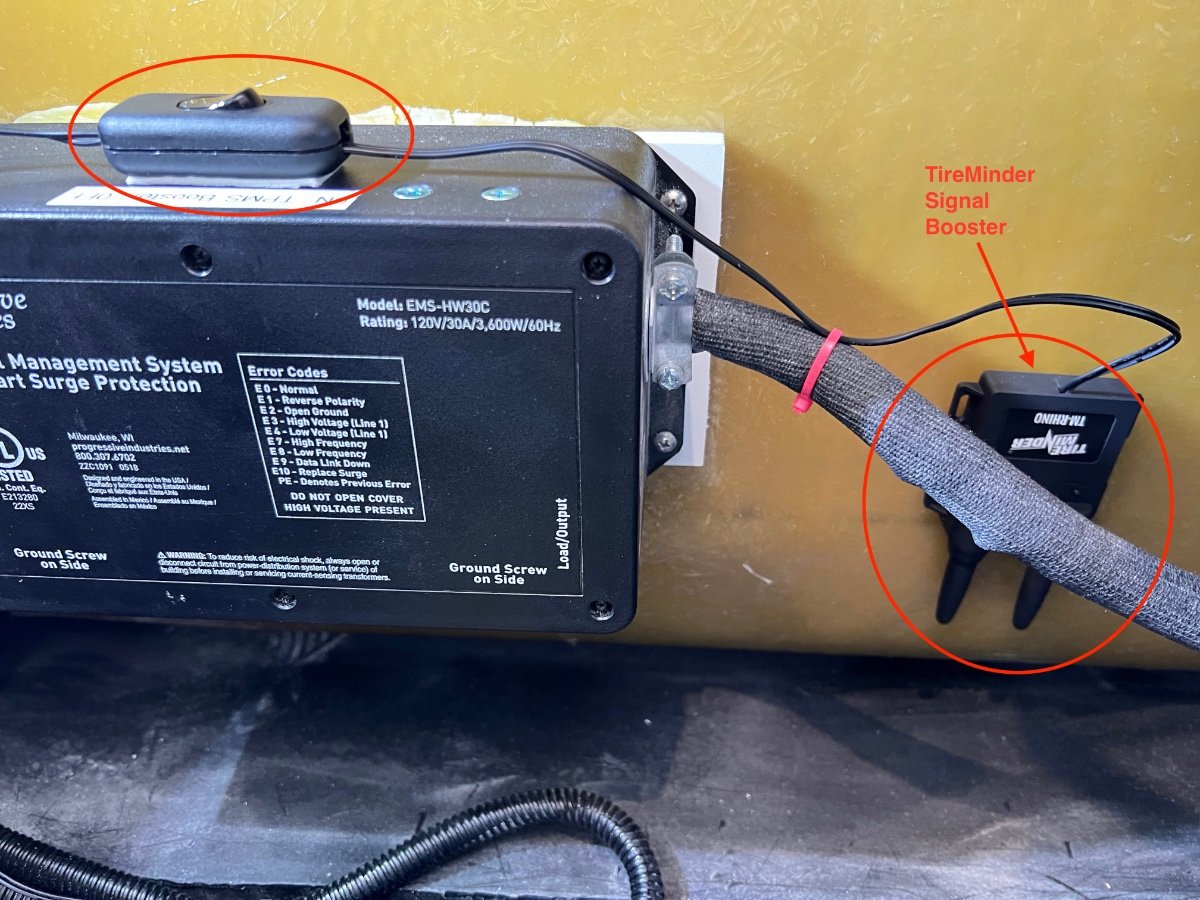
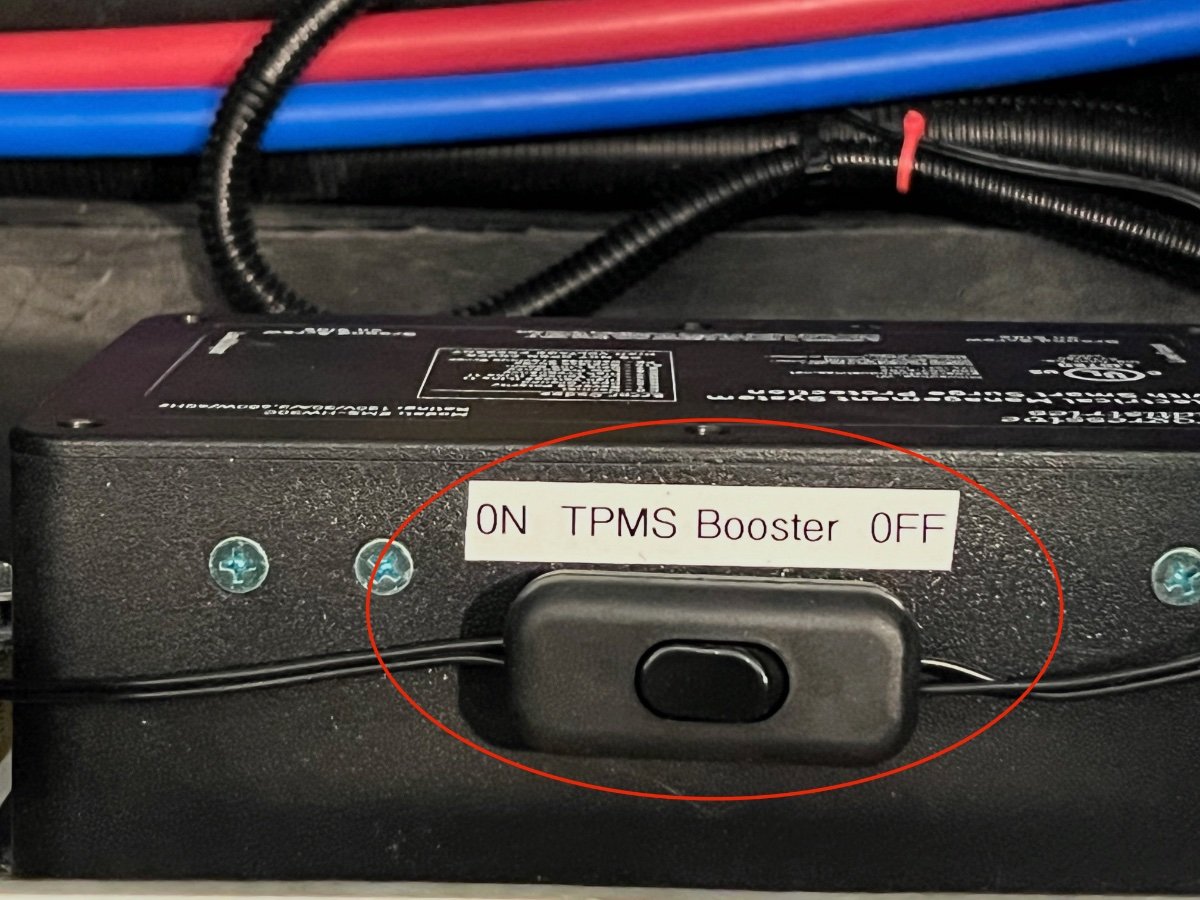
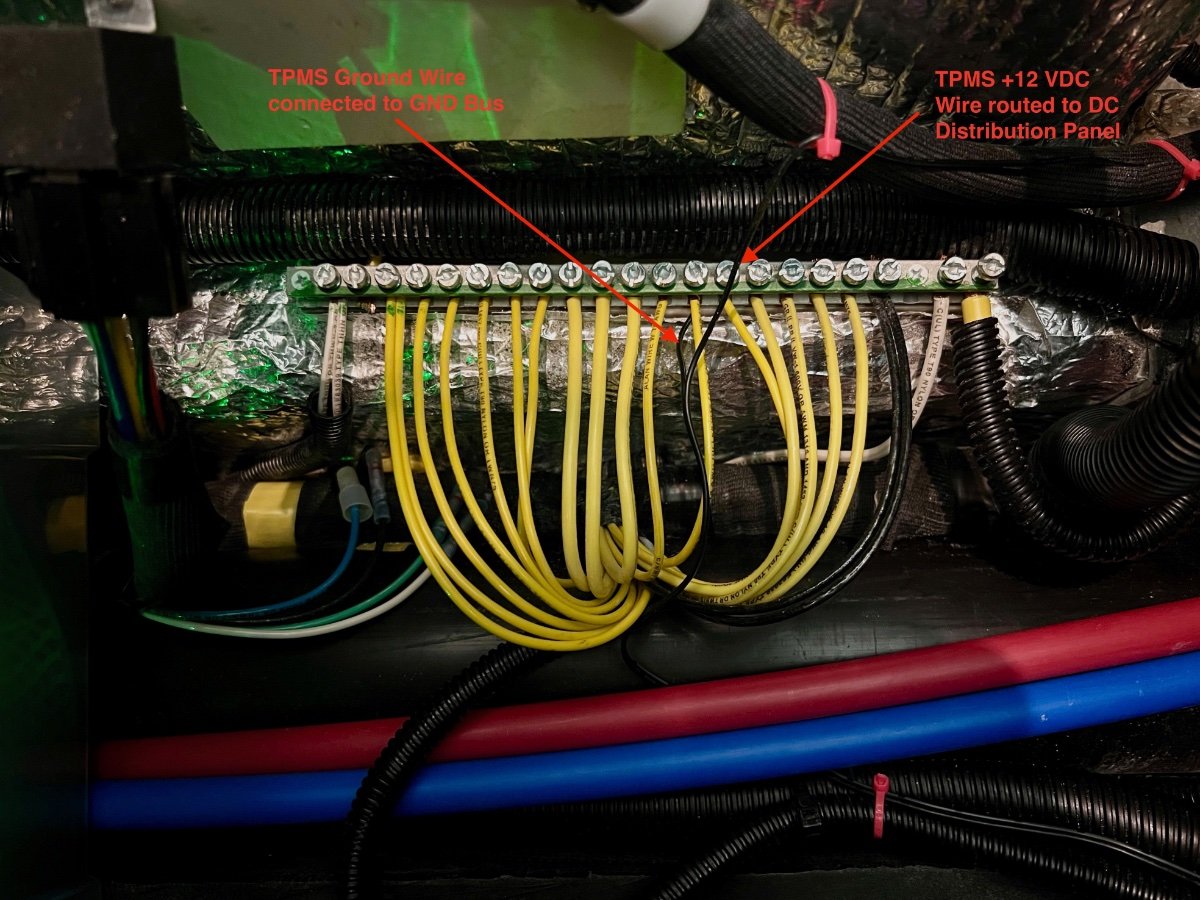
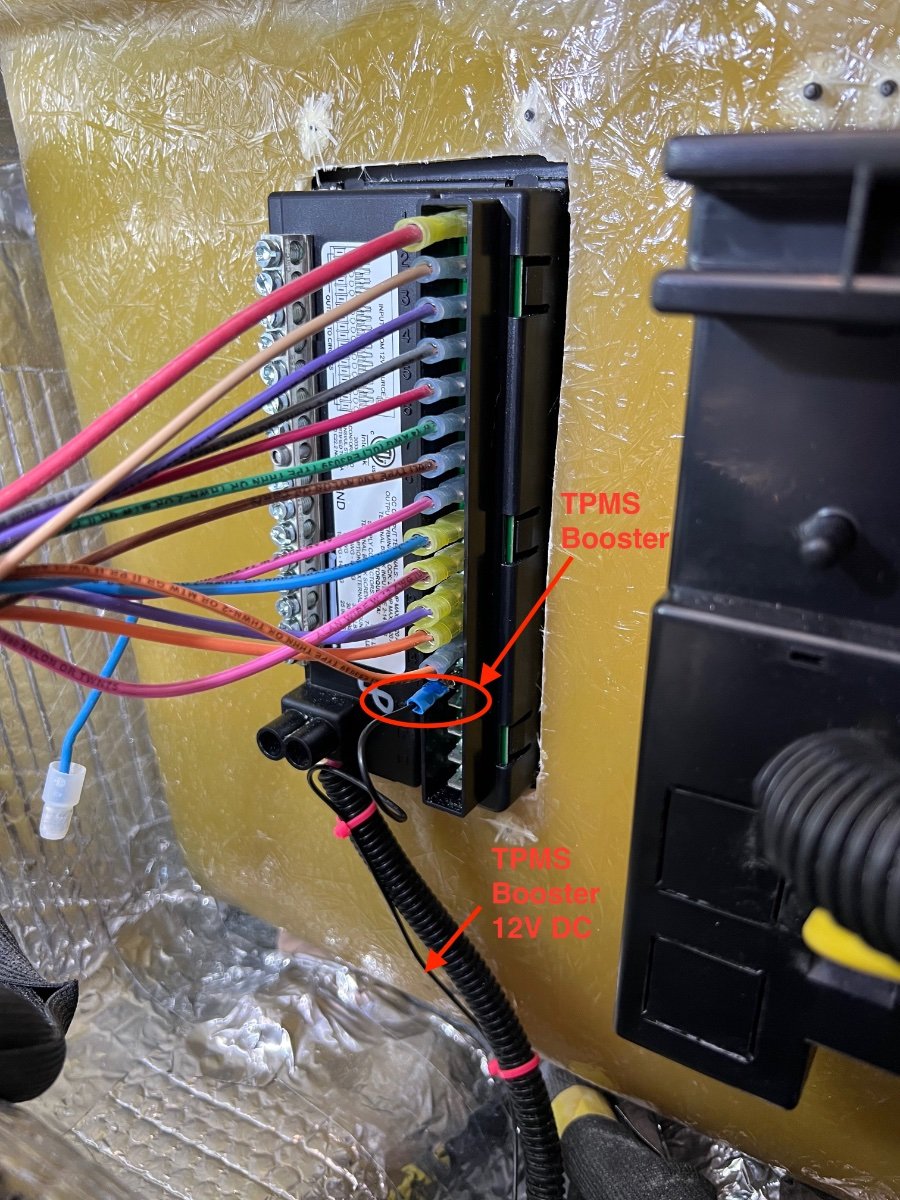
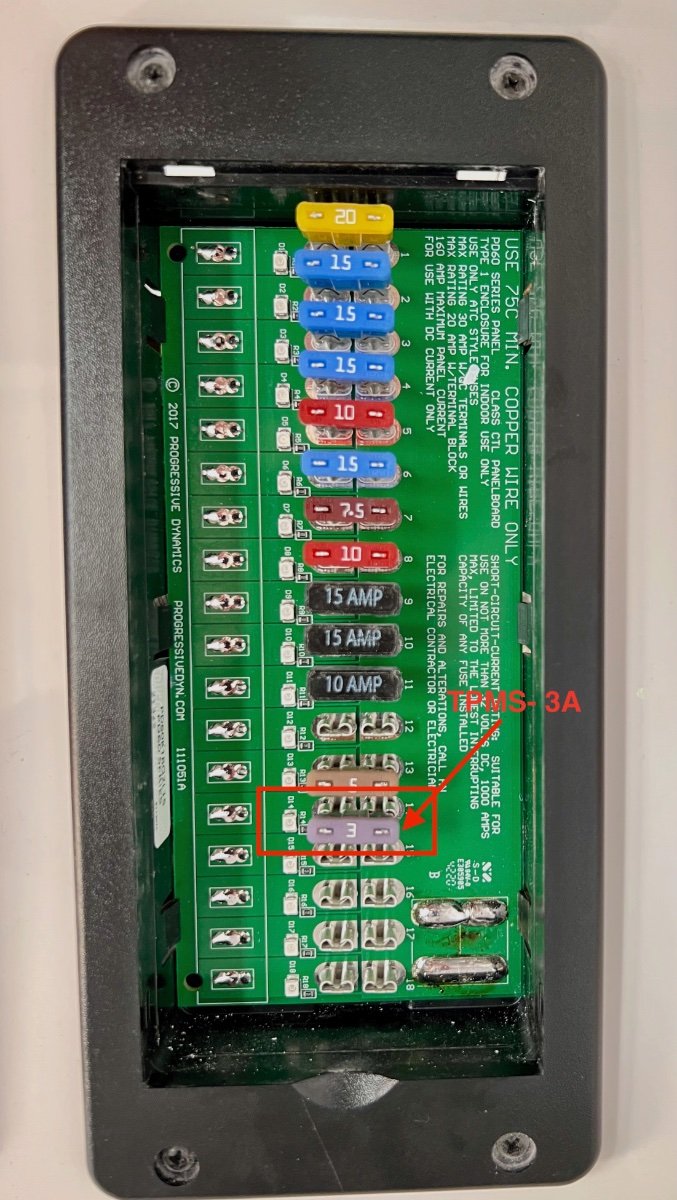
Shortly after arriving home from our delivery trip to Hohenwald, I installed a TireMinder i10 Tire Pressure Management System (TPMS), with six sensors, a monitor and a signal booster (installed later). Four of the sensors were fitted to the valve stems of the four trailer wheels on the ground, one on the trailer spare and one to the tow vehicle spare. The sensors transmit tire pressure and tire temperature status continuously to the small monitor in the tow vehicle. The 433 MHz RF signal booster is to ensure the signals from the sensors reach the monitor. The TPMS is quite configurable and can support up to 10 sensors simultaneously. Thresholds can be user specified and the system is preconfigured to create alerts for slow leaks or catastrophic loss of tire pressure. I first mounted the sensors to all the six wheels. The sensors appeared to have no problem communicating with the monitor in the tow vehicle. I deferred about a month installing the signal booster. Mounting the sensors is quite straightforward, requiring only insertion of provided disc batteries to the sensors, then screwing the sensors onto the valve stems. I like the inclusion of a lock nut to secure the sensors to the valve stems, using a provided small wrench. TireMinder Air Pressure & Temperature Sensor TireMinder i10 Monitor On each spare wheel I added 36" long extension hoses ($11 each) and 90 degree valve stem extensions ($7/pair), based on a recommendation from @John E Davies. The TireMinder sensors are mounted to the end of the extension hoses, which are routed through the wheel spokes to the accessible side of the spares. The valve stem extensions allow the hoses to be attached to the valve stems with no danger of kinking. These accessories eliminate a huge PITA- both spares are stored with their valve stems inaccessible. The trailer spare mounts with the valve stem facing the rear wall of the trailer. The tow vehicle spare is stowed valve stem down in a well under the cargo area at the rear of the vehicle. Now the TPMS reports the tire pressure with no hassle. Even if the spares require addition of air, the access is easy, without removing the spares from their storage positions. I always intended to install the signal booster, but had not settled on the best location. The installation instructions recommend locating the signal booster on the undercarriage, toward the front of travel trailers, with the antennas pointed toward the ground. The signal booster requires 12 volts DC for operation. I searched the OTTO forum seeking information on locations chosen by Oliver LEII owners for mounting such signal boosters. I found references to mounting signal boosters within the doghouse or in one of the upper storage compartments, neither of which appeared to offer ease of connection to a 12 VDC supply. Other owners indicated they had not installed the signal booster, since the monitor seemed to reliably provide tire pressure and temperature information. While vacuuming fiberglass dust from all areas accessible under the interior access hatches, I found what appeared to be an ideal location for the TPMS signal booster. The hatch under the rear dinette seat is the location of the Progressive Industries Surge Protector, mounted to the wall on the aisle side of the compartment. Adjacent to that location is a large area of unobstructed wall. Just below the surge protector is a ground bus and on the forward wall is the rear of the DC distribution panel. I believe this is a very desirable location for the signal booster. It is located low, slightly forward of the axles, in a protected space near the needed power supply. TPMS Signal Booster Location The TireMinder Signal Booster is attached to the fiberglass wall using an Industrial Velcro Coin, which enables easy removal. TPMS 12 VDC Power Switch I chose the top of the Progress Industries Surge Protector to mount a switch to turn the 12 VDC power supply to the TireMinder Signal Booster ON/OFF. The signal booster has a green light to indicate the power is ON. The wires from the signal booster are very thin and are both black (despite the instruction manual indicating one to be red and the other black). I don't believe it matters which is +12 VDC and which is Ground (GND). I routed the wires along cables in the compartment. The pink zip ties appearing in the photos provide clues to the routing. I arbitrarily selected a position on the Ground Bus to mount one of the wires to be Ground. The other wire was routed to the rear of the DC Distribution Panel, mounted on the forward wall of the compartment. Fuse position 14 was unused, so I selected it and connected the second wire from the TireMinder Signal Booster, using a crimp-on connector. Finally, I inserted a 3 amp fuse to the front side of the DC Distribution Panel, position 14. DC Ground Bus DC Distribution Panel (Rear) DC Distribution Panel (Front) Summary Although I had encountered no problems with the communication between the tire pressure/temperature sensors and the TireMinder Monitor, I believe having the signal booster installed reduces the risk of loss of communication between the sensors and the monitor. I have been leaving the signal booster on while traveling and turning power OFF when in storage. The signal booster draws only 75mA (Transmitting) to 14mA (Inactive). I tested the range with the signal booster installed and powered ON. I was able to walk over 300 feet from the trailer with the monitor receiving signals. I have been impressed with the TireMinder TPMS system. I have not mounted the monitor in the tow vehicle, but keep it on the center console, where I can view it as desired, and also hear any alarms which may occur. I purchased the TireMinder i10 and six sensors from TechnoRV (https://www.technorv.com/) for $279.65 (no shipping and no sales tax).
1 point
-
Being a Jeep Wrangler person and have owned one in the past I keep thinking I should buy another one. My biggest reason for not just buying another one is it will just set around and get very little use, the last one I keep 3 years and put 3500 miles on it, it was at best very little used as a TOY. I have been watching all the YouTube videos that I can find on the Jeep Gladiator EcoDiesel and this looks like it would work to satisfy my Jeep wants and will meet the requirements to pull our Oliver Elite II. The max towing is 6700 lbs. with the diesel which is less them the 3.6 gas engine at 7200 lbs., but you get 445 pound of torque which will do the job. This engine is also used in the RAM 1500 with good results for its size and is proven itself over time. Owners are averaging 28-30 mpg, that's not towing, just city and highway driving, personally fuel prices are not really a concern, but I would like to see them stay reasonable at best. Also let me say here, we are not what you would call campers that travel a long way from home and camp more then say 8-10 times per year, so camping is somewhat not mainly what we do. I know all the pros and cons of Jeep ownership, so that's not what I asking here, just want to know what you think of a Gladiator towing the Oliver with the EcoDiesel. trainman1 point
-
@Cameron Just a follow up on this minor repair. I received the new frame and vent today from Oliver - wow fast shipping. Removed the old vent and frame, cleaned off caulk and applied 3m tape to the inside of the frame (pic) and reinstalled the frame (tip- do not tighten the S/S screws so tight that it tweaks or warps the frame, just snug them down do not over tighten. The old frame may have been tighten down to tight on the assembly line which resulted in the warp on the original vent door and frame just not matching up.) Now no more bow in the vent door. Reinstalled the insect screens and done. Thank you to Oliver parts department for the super fast shipping.
1 point
-
137.3 inches. Almost 18 inches longer than the Land Cruiser 200 (120 inches). It should be fairly stable with the Andersen. OTH the LE would be a better match in terms of tongue weight and off road ability, but that last part was not part of the question. There are some important frontal area and TW limitations, the LE2 would need to be kept tongue light. For example, keep the generator in the front of the bed, not on the tongue. https://offroading.com/the-2022-jeep-gladiator-towing-capacity-an-in-depth-comparison/ John Davies Spokane WA1 point
-
What's the wheelbase on the Gladiator? Shorter wheelbases are less stable tow vehicles, regardless of the tow rating.1 point
-
Sorry KP, I was just baiting you and everyone else. We all know what happened 18 months ago. I don’t like it either.1 point
-
Gladiator as a tow for Elite II 👎🏼1 point
-
And to think 18 months ago we were energy independent…. wow, not a happy camper.1 point
-
I’ll be interested in how it works out long term. It is much more accurate than doing it manually! I still keep a spreadsheet with mileage, name of where we stop and number of nights. There was a time when spreadsheets were cutting edge, now I guess they are old school! If anything describes me it’s “old school”. 🤪1 point
-
Jim, Thank you for your post. I am trying to decide which one would be the best choice for work on our Oliver. The video is really helpful. https://shurhold.com/blogs/all-blogs/choose-the-right-polisher-for-you1 point
-
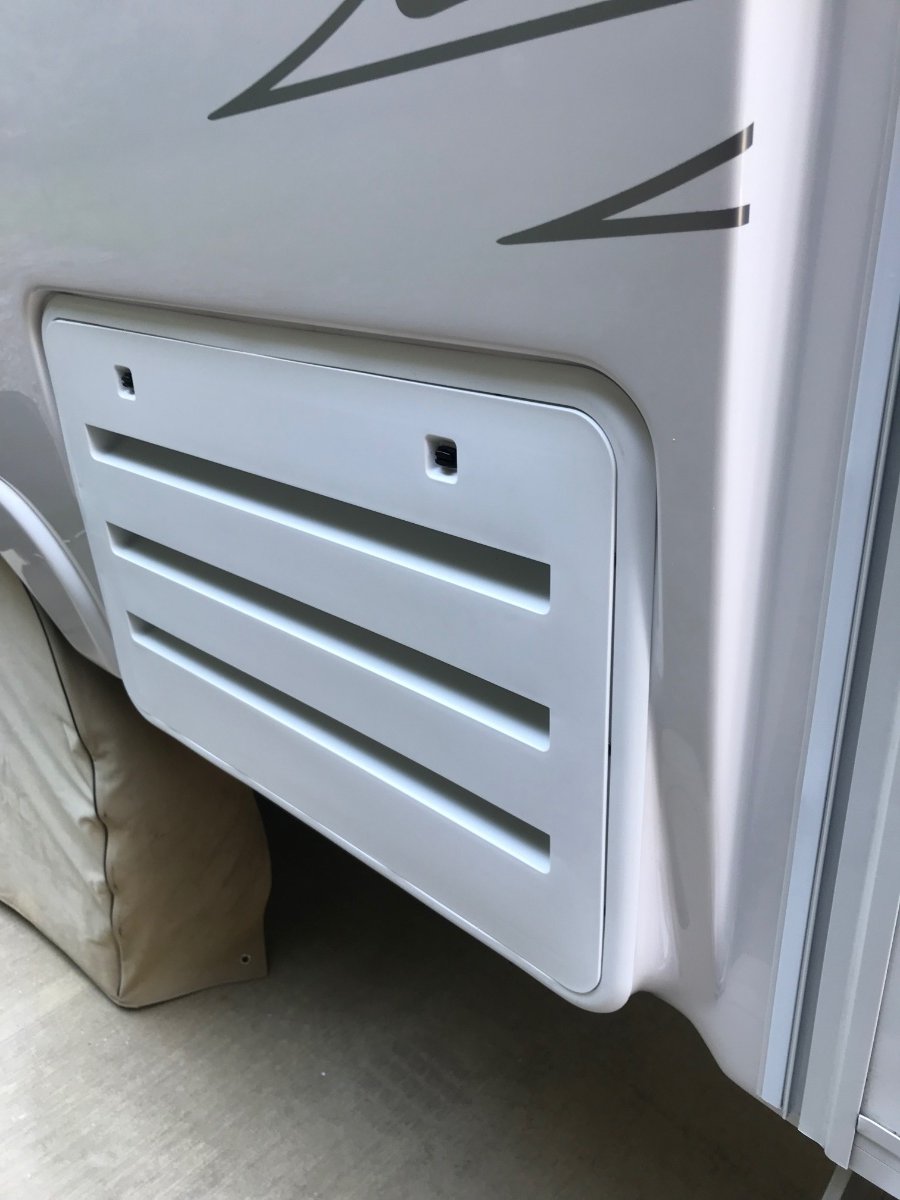
On my Hull 218 the AC condensation drain line comes out at the left rear (street side) corner near the cable TV connector, stick a flexible rod of some kind up inside, most likely a bug or mud dawber has taken up residence. Mine is a 1/2” PEX plastic pipe, you won’t hurt it unless you get carried away with something hard and sharp. That line runs up the back side of the cargo area (toward the roof) you can also access it from there. Consider adding some coarse bronze wool to allow the water to come out, but keep the bigger bugs out. I think you can get it way cheaper at Walmart. https://www.amazon.com/Rogue-River-Tools-Bronze-Wool/dp/B079Y1QTY1/ref=sr_1_4?crid=1DFLZT60X80V1&keywords=bronze+wool+coarse&qid=1654821202&sprefix=bronze+wool+coarse%2Caps%2C159&sr=8-4 John Davies Spokane Wa1 point
-
No need to reverse the switches..... Just think differently. When you want the ass end of the trailer to go up.... push the switch UP. When you want the trailer to go down.. push the switch DOWN. Easy peasy.1 point
-
My 2019 Elite II the switches are on the front of the trailer under the LP cover, my biggest grip is they are upside-down, that is you push the switch on the top to go down and on the bottom to go up. One of these days I'm going to reverse the wires, or the switches, which ever will be the easiest way to do it. I also tighten my jacks till there smug and then bump the switch just a little to give it a stable feeling, no need to jack the wheels off the ground as some think is needed for stability. trainman1 point
-
I always describe pulling a trailer as moving a 6.0 earthquake through a Cat 1 hurricane. Screws and nuts will loosen over time. You could spend days trying to check them all. Usually I just fix things if they break, hopefully ending up with a better fix than original. There is one item I encourage everyone to check now. IF you trailer has an additional electrical port (for a generator hookup) you will have a transfer switch located underneath the left dinette seat. Unplug the trailer from power, take the top off the transfer switch box and check every screw in the terminal block. If a screw becomes loose, the resistance in that wire goes up and the result will be, at the least, a cooked wire and terminal block. Or it will catch fire a burn the trailer (and possibly any occupants) up. I repaired this problem on a trailer at the rally and it was very nearly at the point of combustion.1 point
-
John, Well, it was a good thing that you had me check the mounting bolts. 3 of the 4 internal bolts were loose and needed to be tightened. 1 of the 2 external bolts (underneath) also needed tightening. I only have 7K miles on the trailer. I guess I am going to have to add checking these bolts and screws on a more regular basis. I'm so glad this was a relatively easy fix. I will update the factory and cancel the ticket. Thanks again for all of your help and experience. Carl1 point
-
I discovered that both of my rear jacks were missing two of their three set screws. No wonder my jacks would no longer lift the side of the trailer! I replaced them and now the jacks will lift the full weight of the trailer again. Those rear jacks are made special for Oliver by Barker. There is a side plate welded to the outer tube for mounting purposes and there is no control head. I think the screws will eventually loosen and fall out. I know that’s what happened in my case. I’ve had the jacks in and out too many times for rebuilding and I think I would have noticed them being missing.1 point
-
You still need to check those mounting bolts! John Davies Spokane WA1 point
-
I have found it is fairly easy to back off the nuts on the trailer, get slack in the chain, remove whales tail. Do the reverse when hooking up. Count the threads on the bolt so they are even. Actualy really easy1 point
-
Wonder how these bolts could have got backed out? Did you add a lock washer or lock tight to prevent this from happening again? Thanks for the update. Will be adding this to my annual logbook💯 PerryG1 point
-
We just had a similar situation with our 2008 Elite. Streetwise jack would raise, but not lower. We had to reset many times, as the supplied tool was too big. Used a socket for awhile. Added a few blocks, dealt with it, with the manual jack adjustment. I think our issue is in the switch and wiring.. We'll see . Here for awhile. Project for another day. Thank @John E Davies for another timely and informative post.1 point
-
Thanks Bill and Seadawg for getting a name that I can now publicly call these things. The language that I've historically used is not really suitable for mixed company!😇 Given the distance that my Oliver is parked away from the mulch beds I can attest to the fact that these little buggers are packing some pretty powerful ammo! Bill1 point


-
Recent Achievements
-


")


