Leaderboard


Popular Content
Showing content with the highest reputation on 09/13/2022 in Posts
-
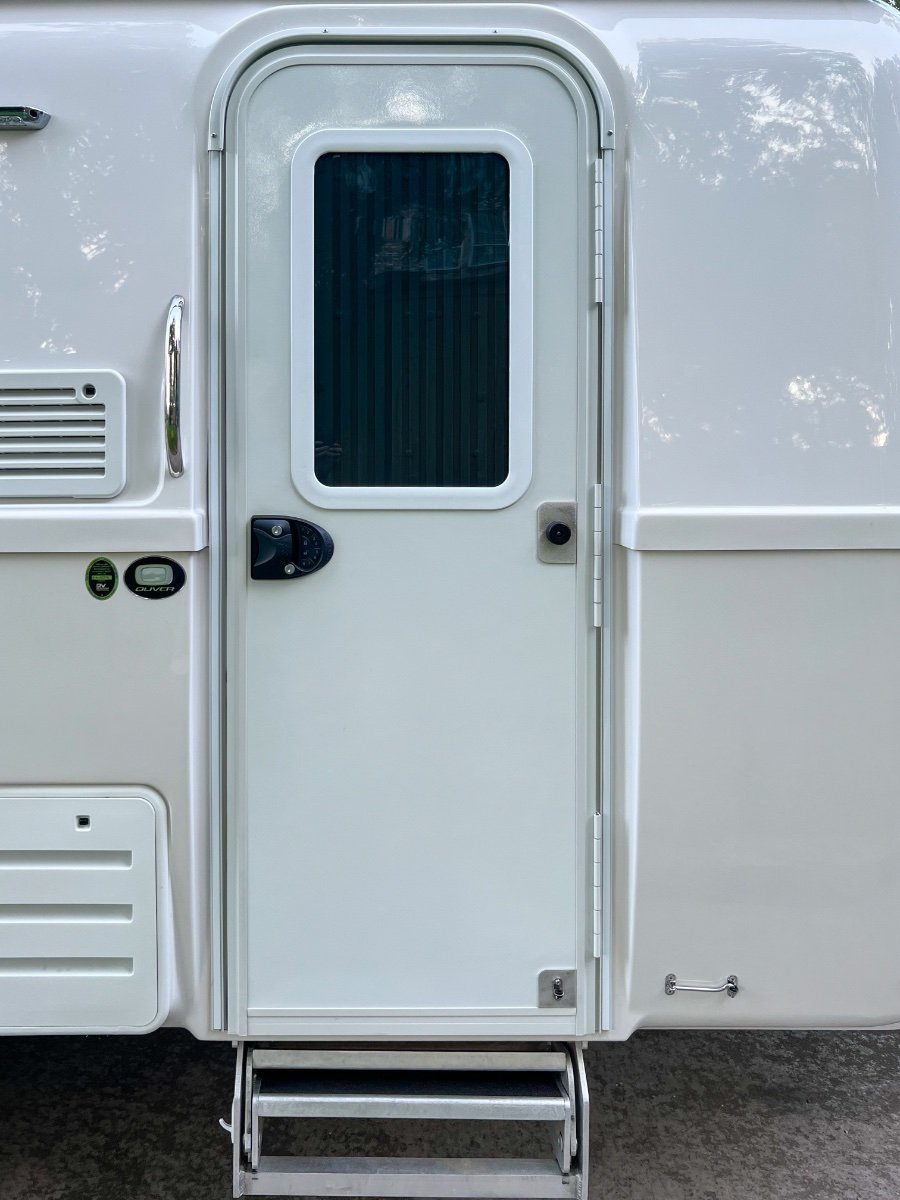
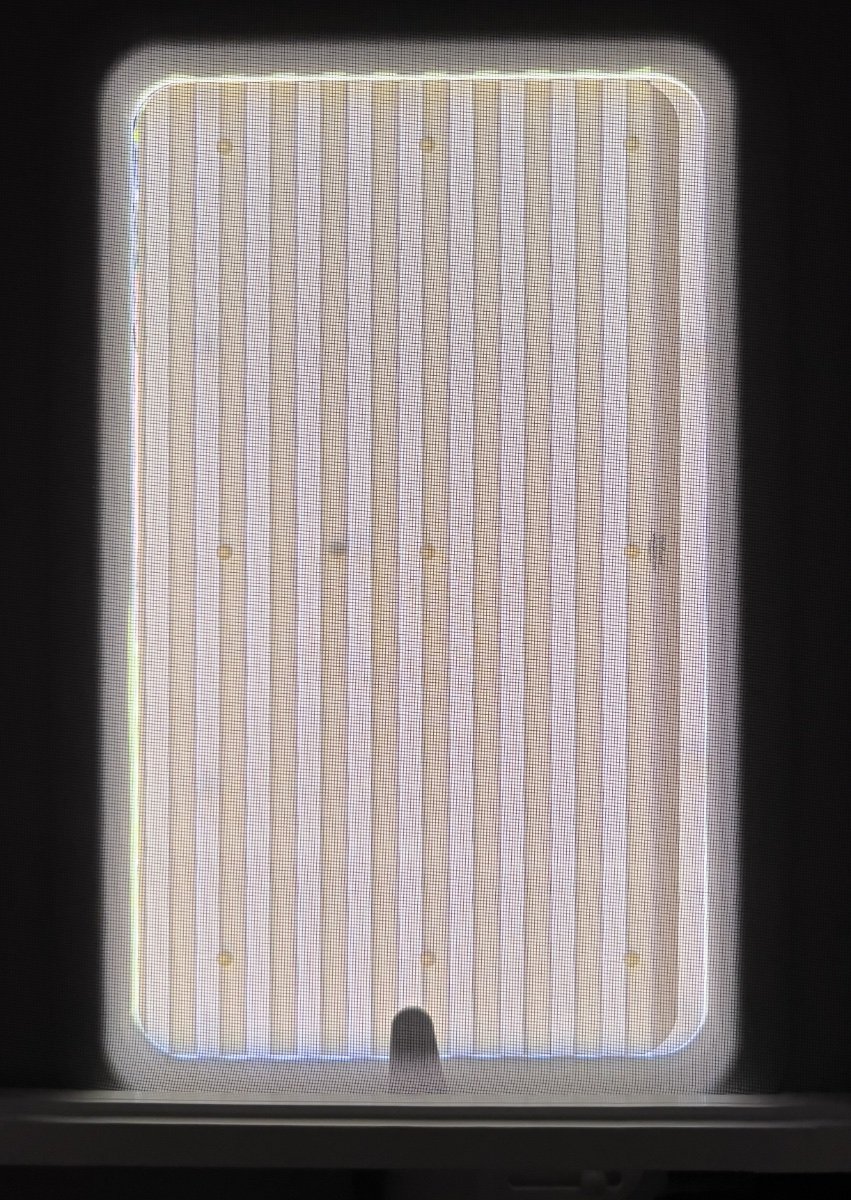
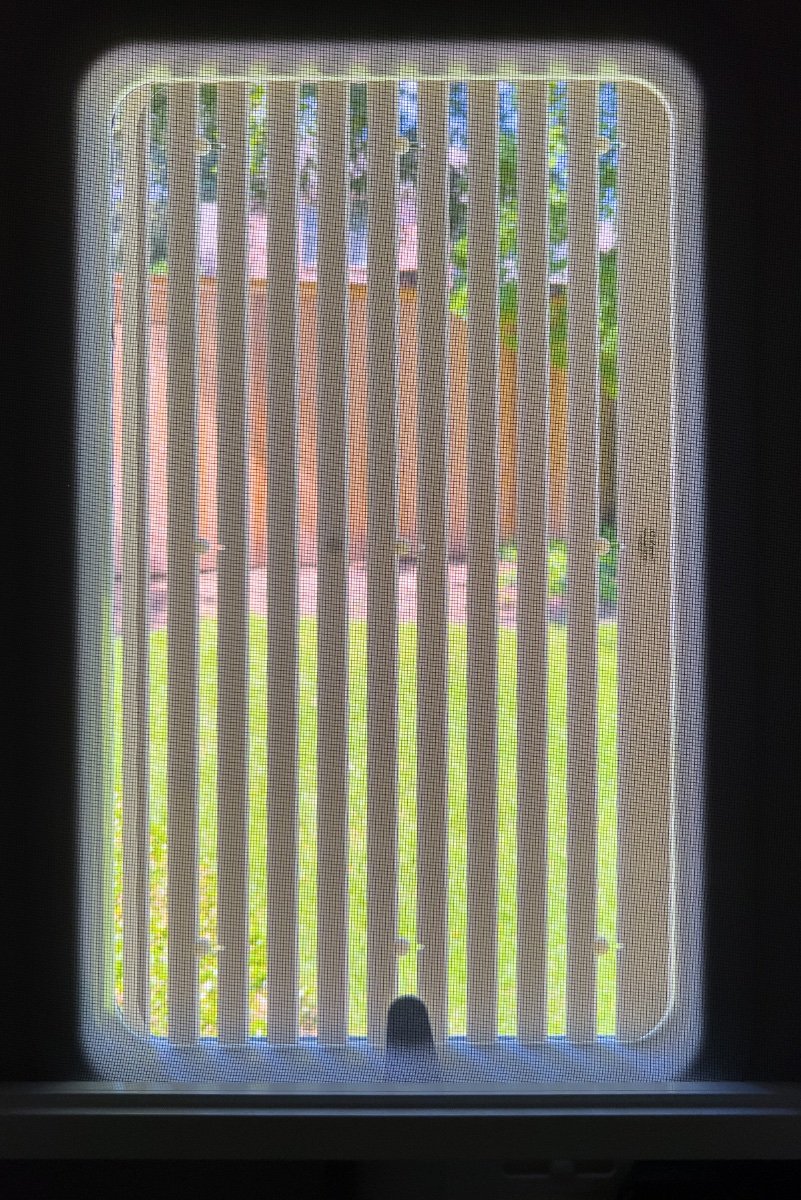
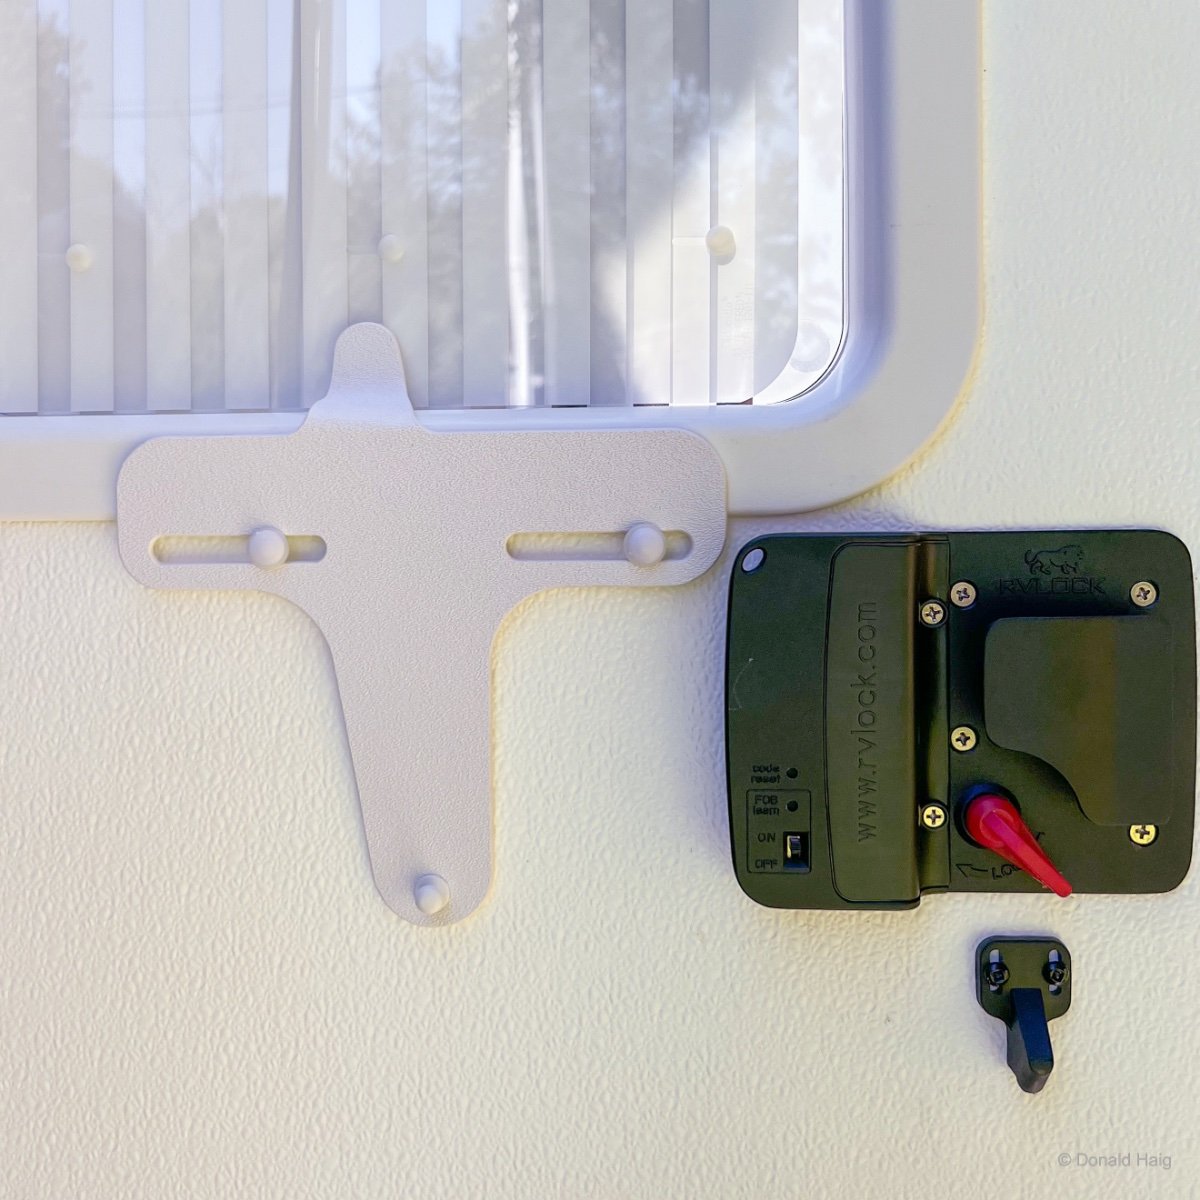
On Friday, I took our LEII to the Zarcor Solutions facility in Addison, TX (a burb north of Dallas) for installation of a tinted window for our entry door and Zarcor's Closures Shutter Blind and the video recording of the installation. John Harder, President of Zarcor, had previously sent me a sales receipt showing the cost of the parts as $149.00 and installation labor of $120.00, for a total of $269.00. The sales receipts also showed a discount of $269.00 for allowing Zarcor to use our trailer to make an installation and sales video. Thus the cost to me was $0.00. John's team demonstrated their experience by carefully removing the inner trim from our entry door to remove the standard textured glass. I had previously seen photos posted on the OTT Forum where the fastener tabs which retain the inner trim had been broken during removal. Javier, the primary installer, carefully inserted the plastic release tabs into the slots around the inner trim. Several fastener locations could not immediately be released. Javier's experience became evident as he continued to work the release tabs until all of the fasteners released, undamaged. The RVLock 4.0 which I had installed post delivery had to be removed to permit access to the slots to free the fasteners on the lower right corner. Once the inner trim was removed, the textured glass was easily removed and the new clear, tinted glass inserted, with new sealing caulk around inside of the frame. The outer window trim was not removed, retaining its factory seal. Once the tinted glass was in place the Clozure Shutter blind, consisting of two sheets of acrylic, was fastened to the inside of the glass with small Velcro disks. Each acrylic sheet is coated with vertical white stripes approximately 3/4" wide, alternating with clear stripes. The acrylic sheet against the glass is fixed, while the other sheet slides approximately 3/4" left/right to open/close the shutter. Moving the acrylic sheet causes its white stripes to cover the clear areas of the fixed acrylic sheet, preventing light from entering. A plastic handle attaches to the movable acrylic sheet and rides on two screw mounted glides to move left and right. The two acrylic sheets which form the shutter are easily removed for cleaning. A minor interference problem was encountered, with the open/close handle not able to move fully due to the position of the RVLock. Zarcor will modify the handle slightly to eliminate the interference issue and provide a replacement handle. The entire installation, with video recording, took approximately one and a half hours. We are pleased with the new window and the operable shutter. We now have visibility through the window in the entry door and a means of controlling entry of light to the cabin. The tinted window closely matches the other windows in the trailer. During the day there is little or no visibility into the cabin through the new tinted glass. At night, with lights on in the cabin, there is some visibility from the outside. With the shutter closed there is no visibility into the trailer and nearly all light is blocked. Although we have owned the trailer a short time, we quickly learned the textured window admitted a lot of light from the early morning sun. It also admitted light at night from nearby campground lighting. These problems are solved by the Clozures Shutter Blind. The Zarcor team indicated the processing of the installation video would take a couple of weeks before it is posted to the Zarcor website. I will post an update when the installation video is available. Below are photos from the completed installation. Exterior view of door with shutter blind open Interior view of closed shutter blind Interior view of open shutter blind Handle to slide shutter blind open/shut (RVLock 4.0 on right) Regards, Don
 5 points
 -
Thank you! Just what I was looking for. Yes, there is a tube coming out the bottom of the hull under the vent, and it appears to snake up thorough the vent cavity and disappears somewhere inside the back of fridge. I'll have to get in two fixes on this ticket. I spent the entire weekend collecting temperature sensor data to prove that the LP mode just does not cool well at all.4 points
-
Glad this worked out for you. John and Zarcor are first class. Hobo3 points
-
Isn’t that what our parents said to us when we were young…? Brian3 points
-
No, I would not clear coat it. Given the wear and tear the hitch gets you are probably going to need to give it a shot of paint every couple of years anyway. Having said this, I would not paint the hitch black in the first place. A black hitch is difficult to see when using those rear cameras in most vehicles today. This is particularly true if the road surface is dark. For the past several years I've used Rust Oleum hammered silver on the front part of the hitch and Krylon satin black on the rear portion. Bill2 points
-
Just saw a FB post about Oliver’s plan to be at Overland Expo East in Virginia. Oliver must have been encouraged by the positive experience at Overland Expo Mountain West.2 points
-
I wanted to update this thread with some additional information that a couple of us have uncovered. I got a call from Richard Weare earlier this summer when he was having trouble connecting the WiFiranger units to his home WiFi. This was an Oliver that he purchased used from someone who hadn't use the WiFiranger at all. He and I worked through the basics, but he was having issues with connecting to his internet provider. After resolving that issue he was able to upgrade to a newer version of the firmware, but not the latest. Winegard's support org indicated that he had an older version of the SkyPro and it would not support their newer version of the firmware. I had already upgraded my SkyPro 2 to the very latest. The SkyPro is really the most important piece of the solution for extending the range to a campground's Wi-Fi. The latest version of firmware is 7.1.0b12.1 point
-
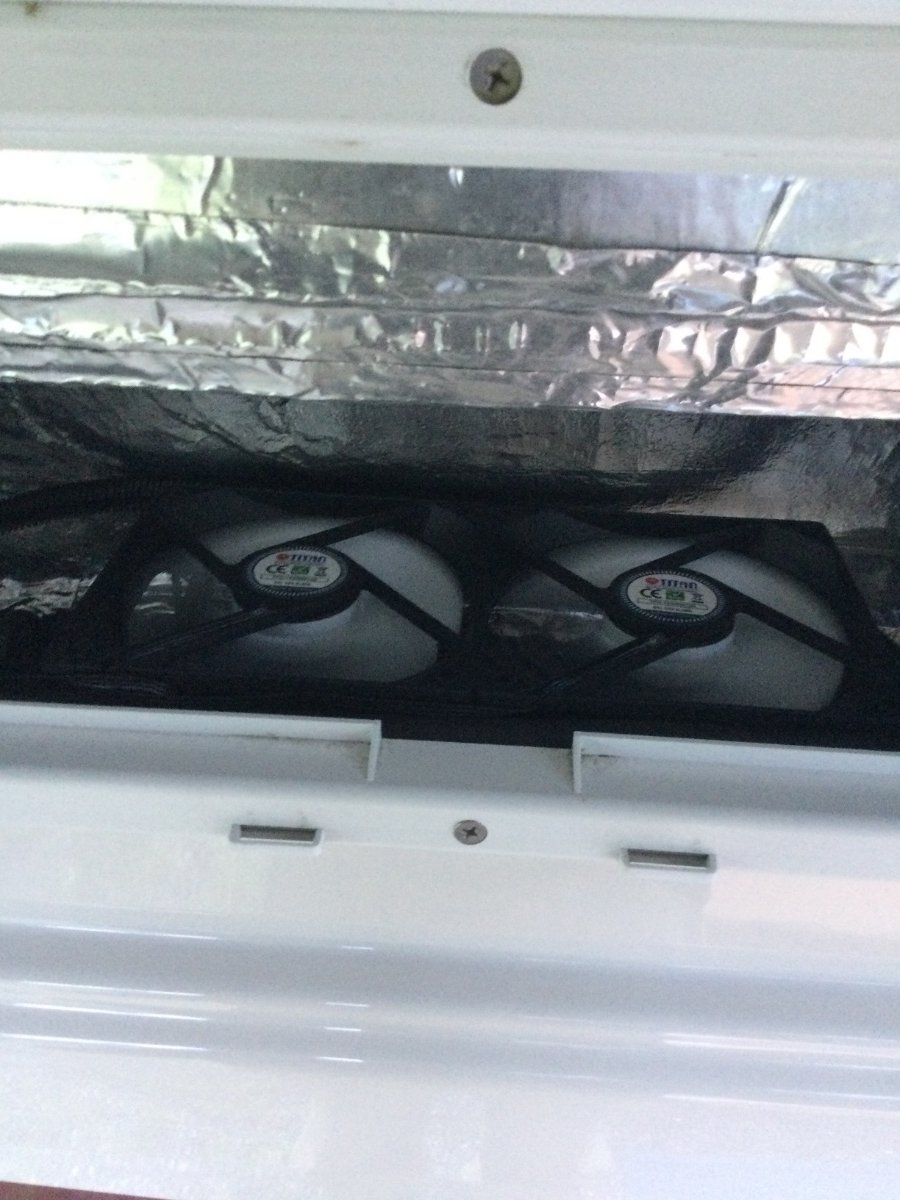
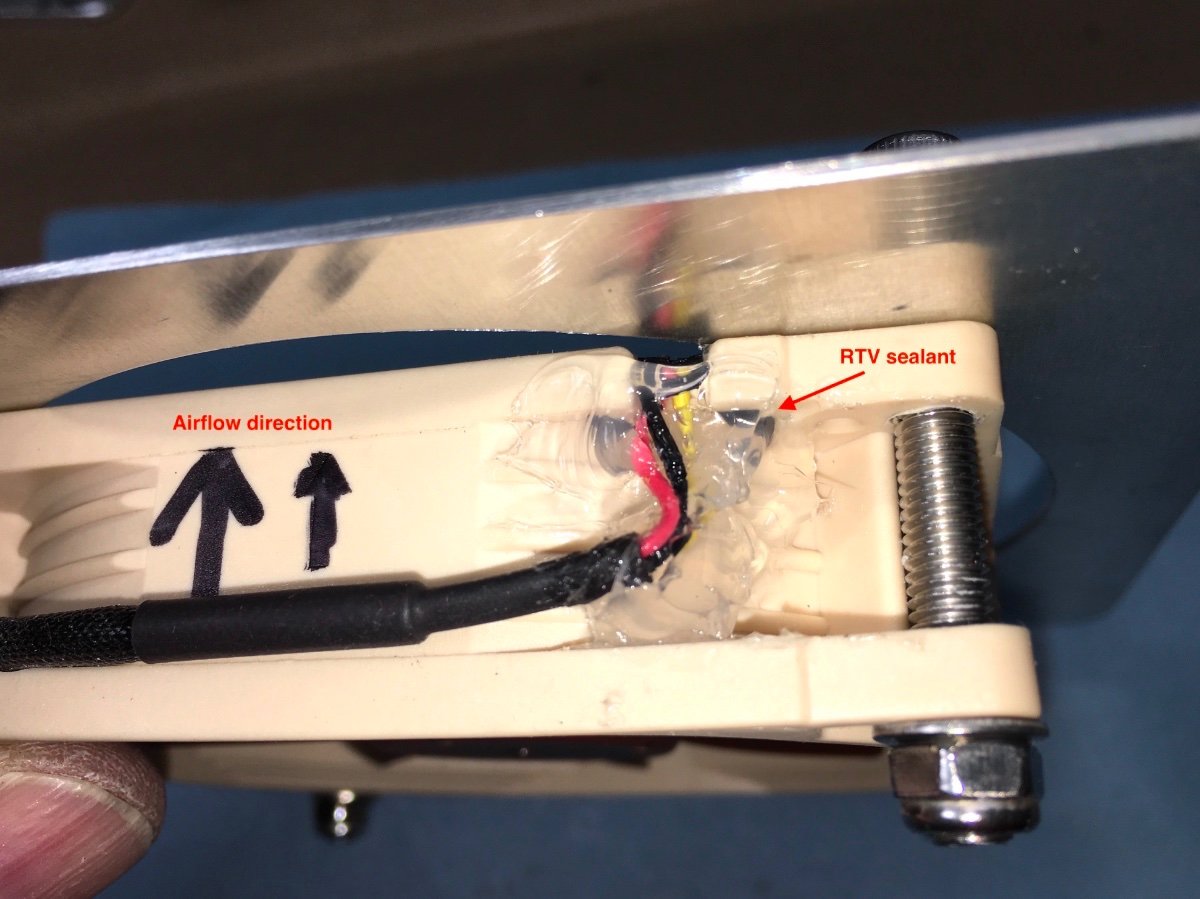
Great post, John. I will factor these suggestions into my final install. I am running these fans for the next 6 days. Sensor is set for automatic so the fans won’t run when temp is 68F or lower. Attaching picture.
1 point
-
Looks exactly like ours. 😎1 point
-
The other possibility is that the hose is there but it got pulled through the hole during installation of the fridge. Do you have a small section of hose exiting the lower hull under the fridge just behind the entry door?1 point
-
It should have been installed during installation. Submit a service request to Oliver and have them send you one. It’s a special hose with a filter screen on the outside end for bugs. Is there a hole through the hull for it? It is typically centered just inside the lower vent?1 point
-
Yes, it looks like you are missing a drain hose. Here’s a photo of our Norcold. The little plastic nipple on the tray fits into a hose protruding through the inner rear wall of the fridge.
1 point
-
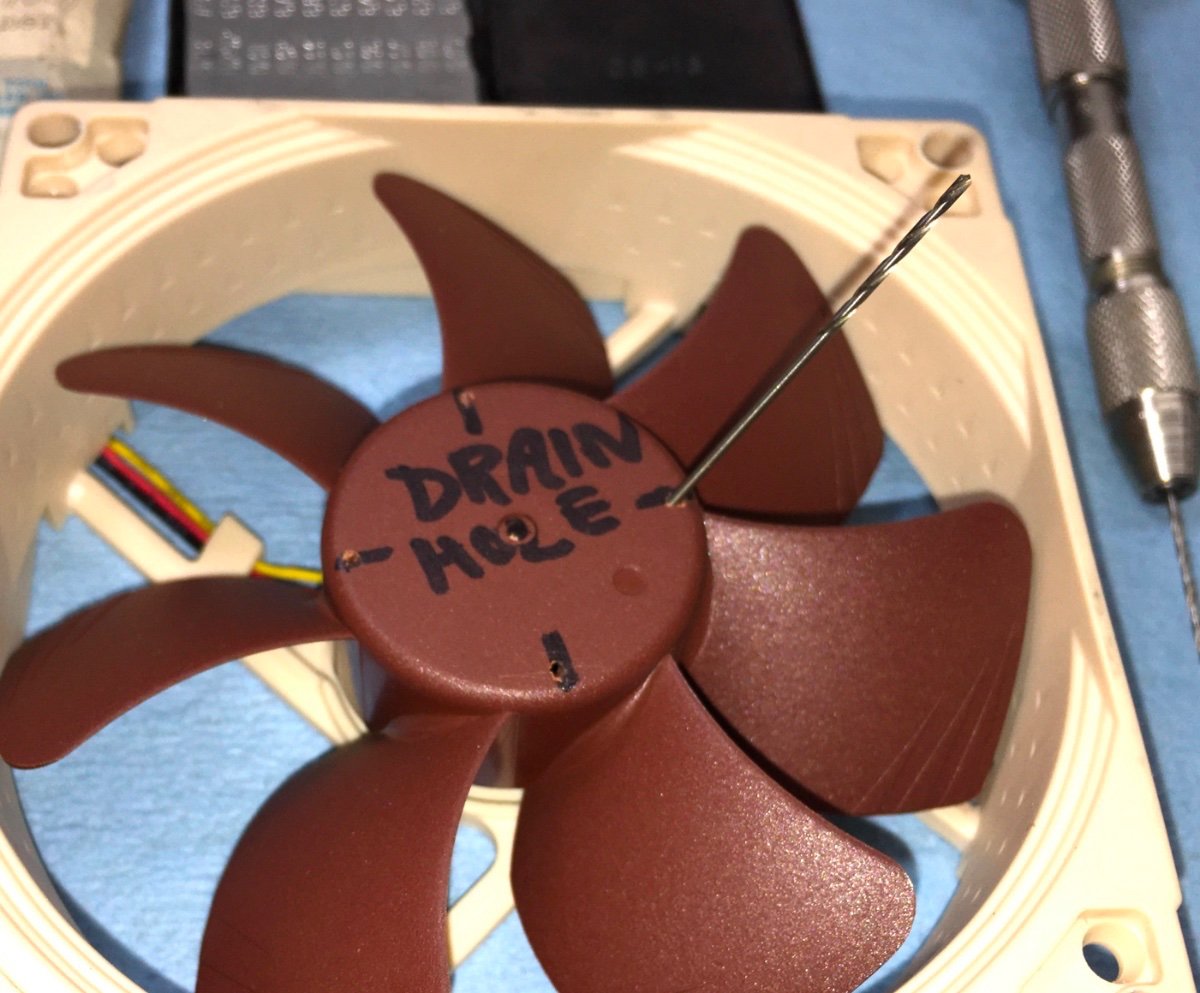
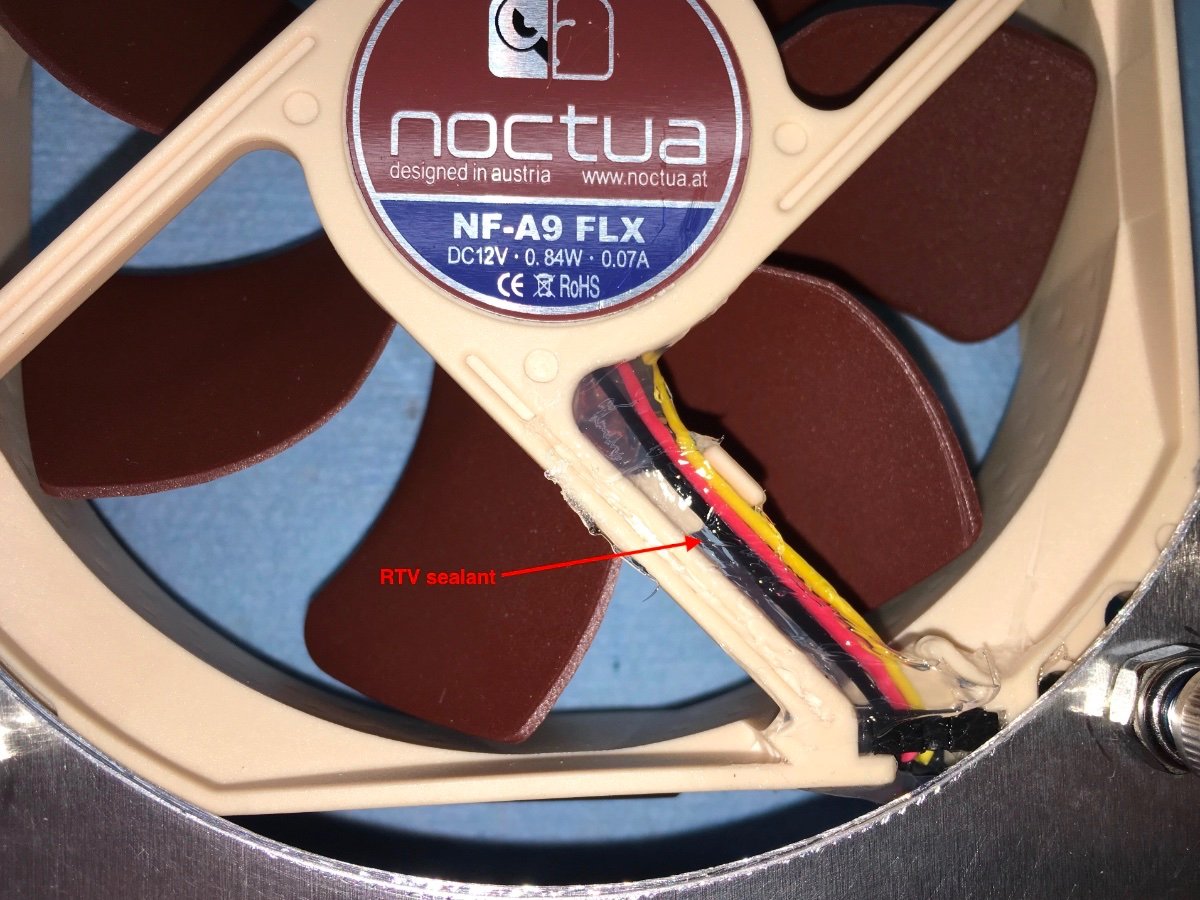
Those are terrific (and high quality) fans but they most likely won't last very long, they were never intended for a wet environment. I used one in the bottom of my battery box for cross ventilation, I added drain holes to the hub, so water won’t pool inside and screw up the bearings or freeze, and sealed the wires. The Fridge Defend fans are moisture resistant and have proven to hold up well in this exposed location. https://olivertraveltrailers.com/forums/topic/5301-how-to-lithium-battery-powered-vent-system/ John Davies Spokane WA
1 point
-
And, what i catch myself saying to our daughter, now. Sometimes, she brings it up. In a very good, thoughtful way.1 point
-
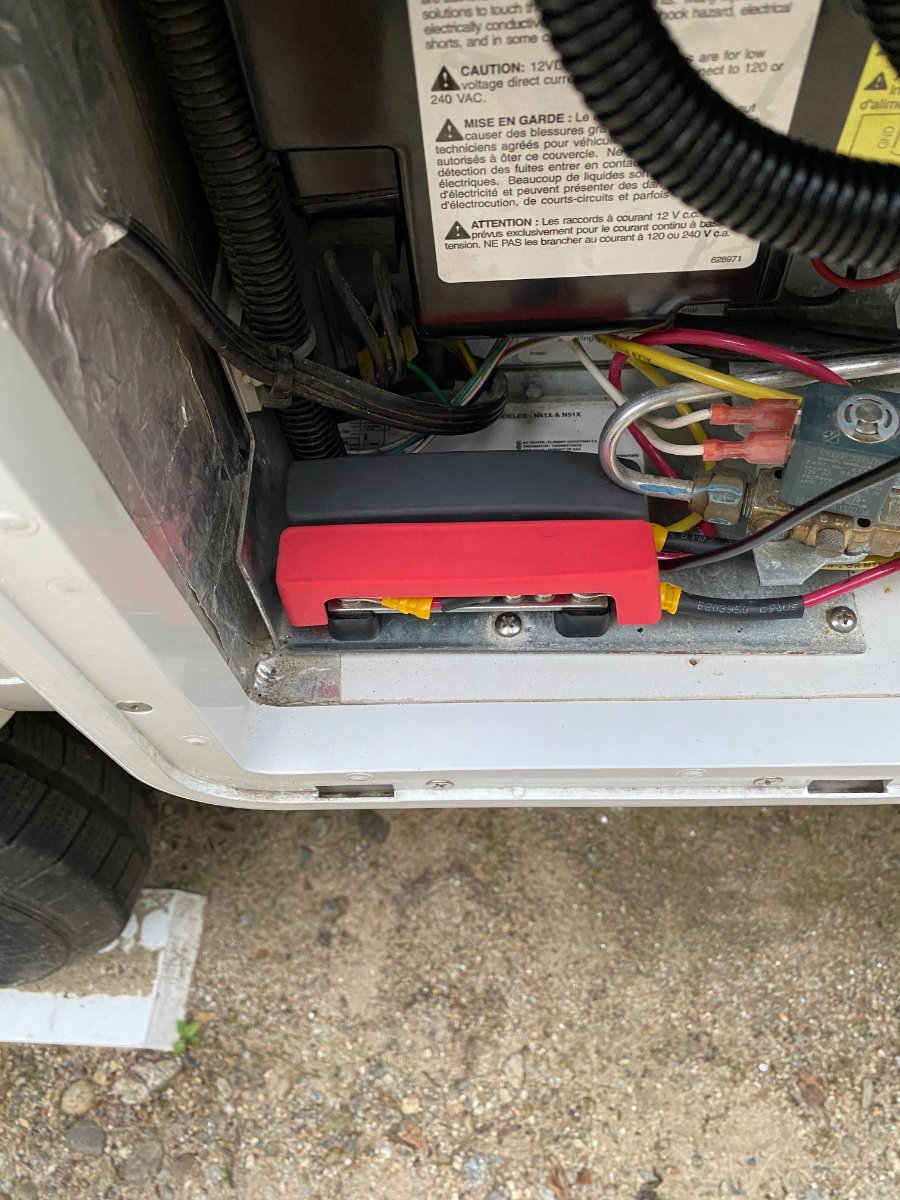
I impressed with some of the posts about this issue. I did open a ticket with Oliver asking about what they would recommend. The discouraged me from trying to run the wiring and power from the cabinet access panel adjacent to the entry door and suggested using power from the 12V DC supply that powers the fridge. I decided to use a new bus bar and split the negative and positive 12V power cable and allow for connection of the fan to the bus bar. I have attached a picture.
1 point
-
@John E Davies John - I forgot you lived in the area before. LBL is great. We really like Piney Campground. We were over there on Saturday getting my Military Annual Pass renewed (FREE). They just signed legislation to make the military passes LIFETIME FREE. Will be getting that one after the first of the year. It’s an inter-agency pass for seven different agencies, NPS, COE, BLM, etc. Brian1 point
-
Maybe the younger ones should pay attention to the mostly retired... I find the Ollie 2 a very good boondocker with great road clearance. Just saying... Charlie.1 point
-
Our trailer has what I would call the base systems, like I said in a previous post you need to be a plumber, electrician, etc. to own a travel trailer. Now I'm none of those, but do have a good knowledge of mechanical operation of things and what goes where and why. Like all RV's things are always going to go wrong, but for me the fewer things you have to go wrong is a plus. I see after reading on this forum that many have not only the factory base system, but other systems to backup those systems which for me just adds another thing to go wrong and thus makes diagnosing the problem that much more complex. I'm a believer in the KISS system and with what is manufactured in todays world you should find yourself giving it a try, buying the latest greatest gadgets for your RV might just drive you to become less likely to enjoy you camping experiences. trainman1 point
-
As I have stated before, chaining two surge protectors, one at either end of you power cord is not necessarily bad (although, I suspect there’s still a potential for gremlins) it is not without drawbacks. Mainly, there’s the expense and trouble of dealing with two. I think you’ve made a wise choice.1 point
-
Try - mduncan@olivertraveltrailers.com Bill1 point
-
I agree, the glossy photos and perfect camp ads are very deceptive! It’s actually overwhelming when you are new. We had a voltage issue right from the get go however we learned a LOT while trying to pin point that issue. The key is having patience, there’s nothing that can’t be learned.1 point
-
Amen. Just like overloading your tow vehicle, failure to use a WDH when your TV owner's manual says it is "required" is negligence per se. Make sure both your tow vehicle and your travel trailer are well insured!1 point
-
It would be pretty easy to add an inline switch on the cord, which I guess would make it slightly easier to turn off. I'm like you though, why bother if you can just pull the plug.1 point
-
I'll unplug it when we put the trailer in storage. After emptying and cleaning the toilet of course.1 point
-
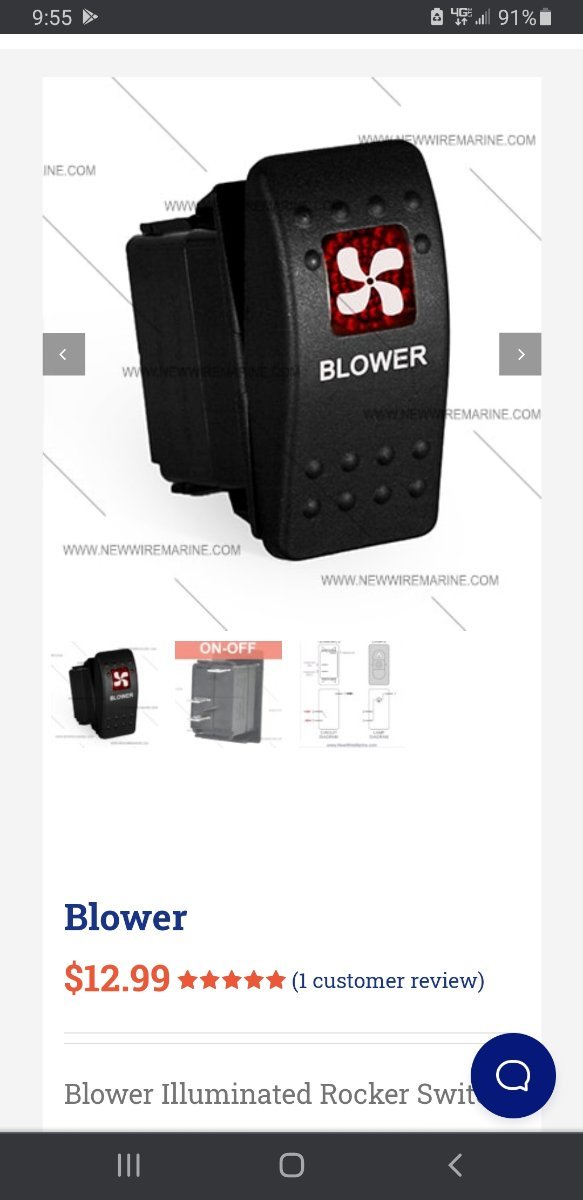
The original Elites, like our 2008, don't have a pump switch in the bathroom. It has never bothered me, as it's one step in our small trailer to reach the switch by the SeeLevel. A few original owners added a switch in the bath, and Oliver adopted the idea. (Pretty sure Scubarx and dckiefer added the switches early on.) You should able to find a similar weatherresistant switch and boot at NAPA, but if it were me, I'd spend a few dollars more and buy a weatherproof labeled blower rocker switch at a marine supply. I'd be less likely to accidentally turn off the fan. Do the new Olivers still have the little low light that illuminates the floor? If so, I'd borrow that circuit instead. We never use that light, and you'd still be able to run the blower if you turned off the main pump switch, as we do every time we leave the trailer.
1 point


-
Recent Achievements
-


")


")


")


