Leaderboard


Popular Content
Showing content with the highest reputation on 08/26/2024 in Posts
-
We just finished an amazing four week trip, camping in Tennessee, North Carolina, Virginia, and Pennsylvania. The last week was devoted to family events in NY and CT, followed by a beeline drive home to meet family coming to visit us in Florida. We drove the parts of the Blue Ridge that we hadn't driven before. Although we encountered some hazy and sometimes rainy days, we had a wonderful time. The scenery is incredible... never knowing what amazing vista will open up around the next curve or when you exit the next tunnel. A few shots before the camera tumbled and broke.... We replaced it in Front Royal at the end of Skyline Drive Linville River Bridge View The mountain laurel in bloom Grandview Overlook I only have about two or three hundred more to share.... We loved this trip so much we're thinking about doing it again in the fall to see the leaves change... Maybe starting at the top this time and working our way down. We had hoped to meet up with Tom and Karen (Meanderthal and SheBoss) but timing didn't work out this time... Hopefully, the fall trip will work! Campgrounds on the Blue Ridge are very simple affairs, but quite pretty and inexpensive. No hookups, but each has a dumpstation and water fill station. Bathrooms range from ok to downright basic, but all of them had flush toilets. (One didn't have lights... just a hook to hang your lantern.) No showers. Cold water only in the sinks. All are open seasonally. Check the "Camping on the Blue Ridge" website before you go for more information and postings on which sections of the road are closed. Campgrounds on Skyline are more varied... some almost resort style, some quite primitive. I'll try to post more on them later.2 points
-
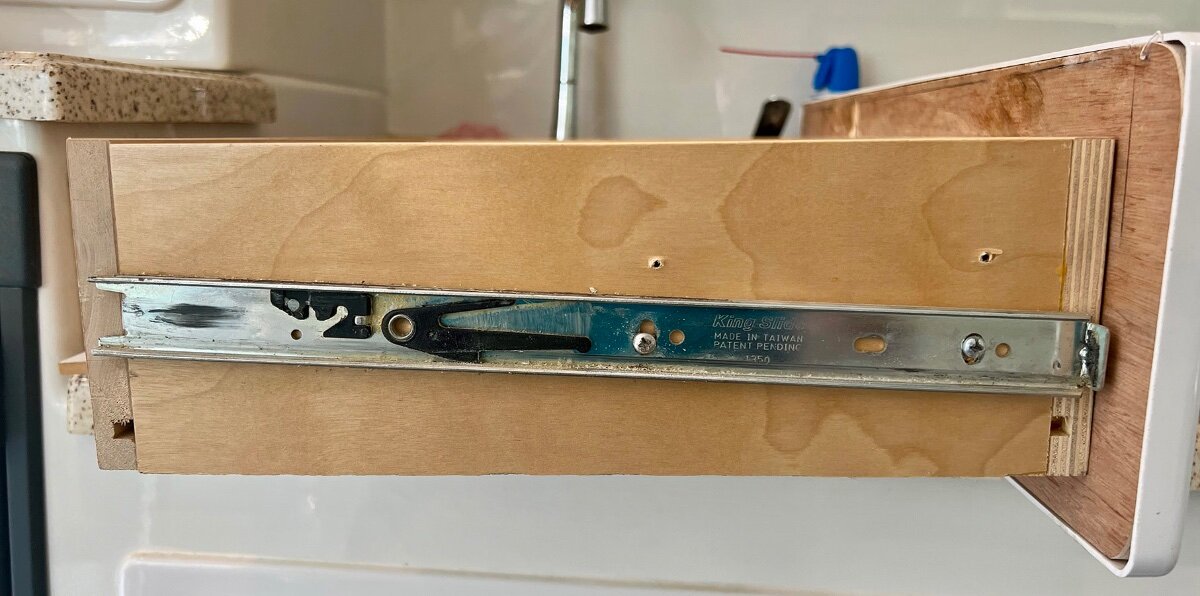
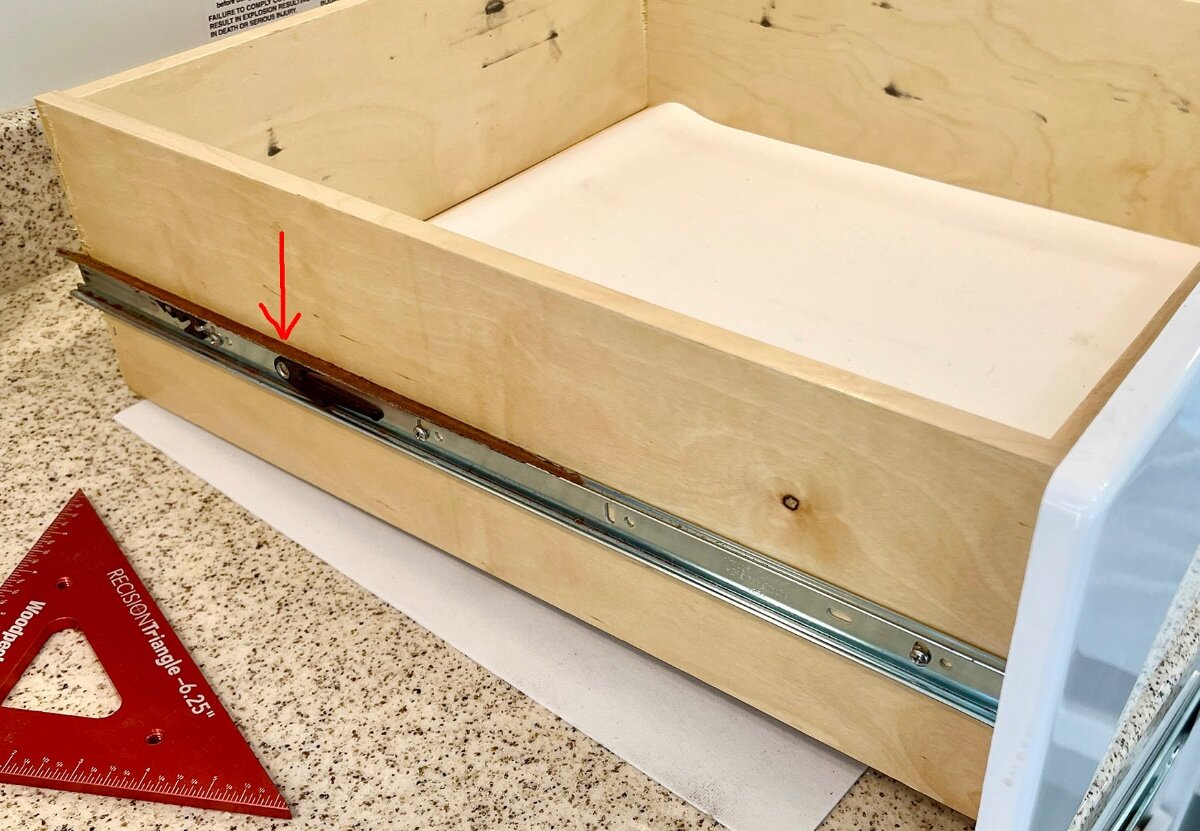
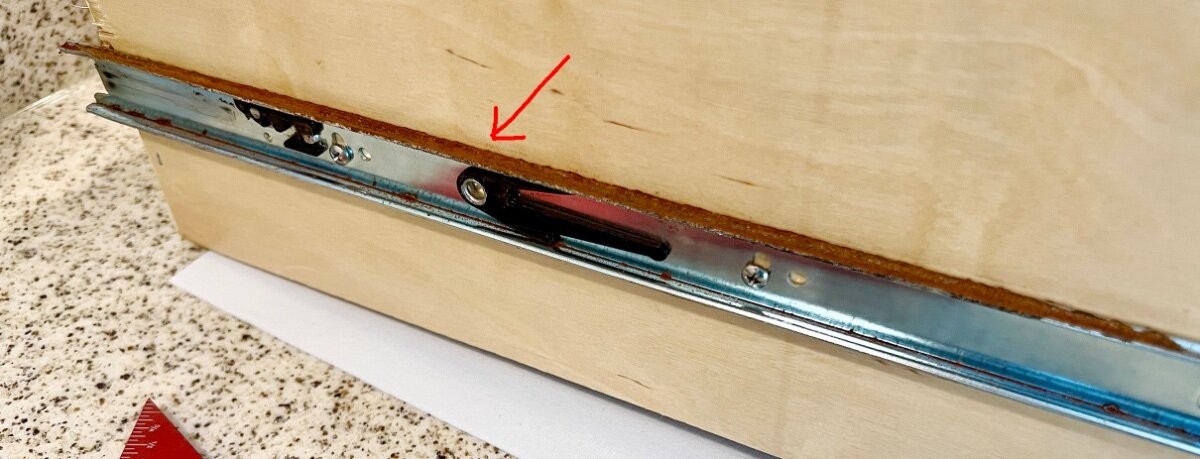
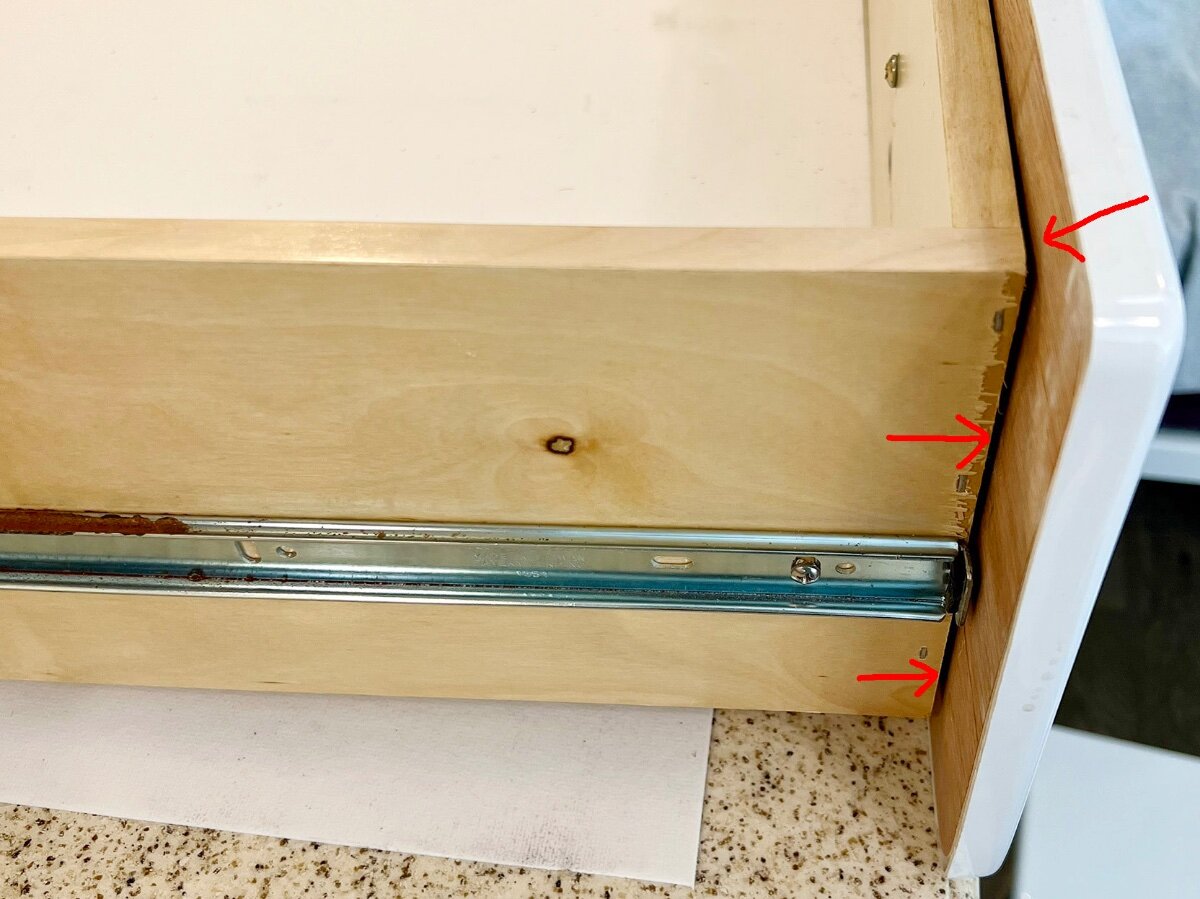
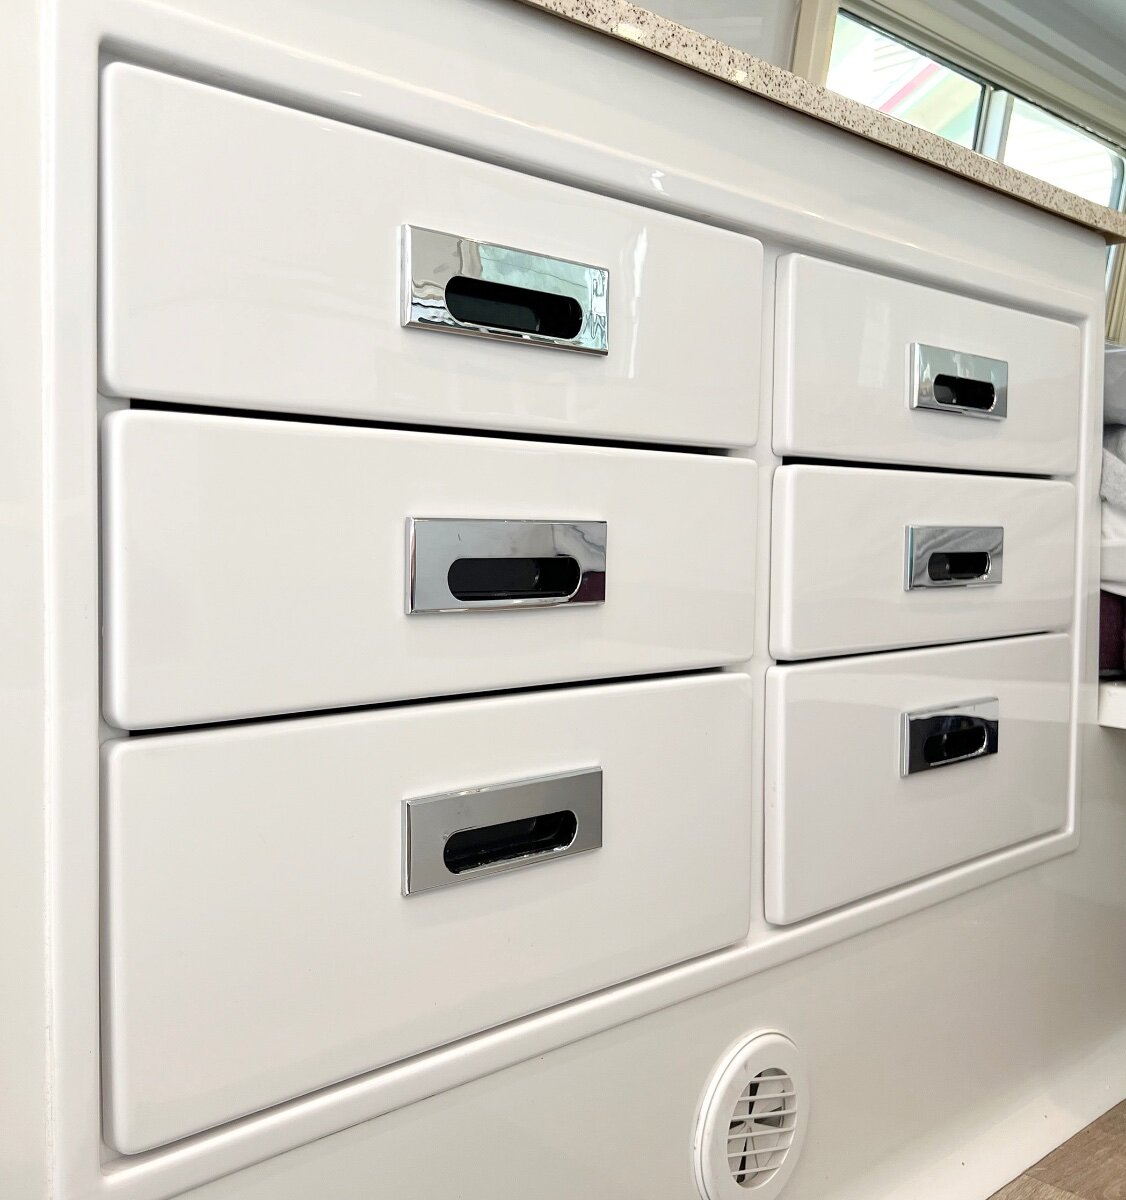
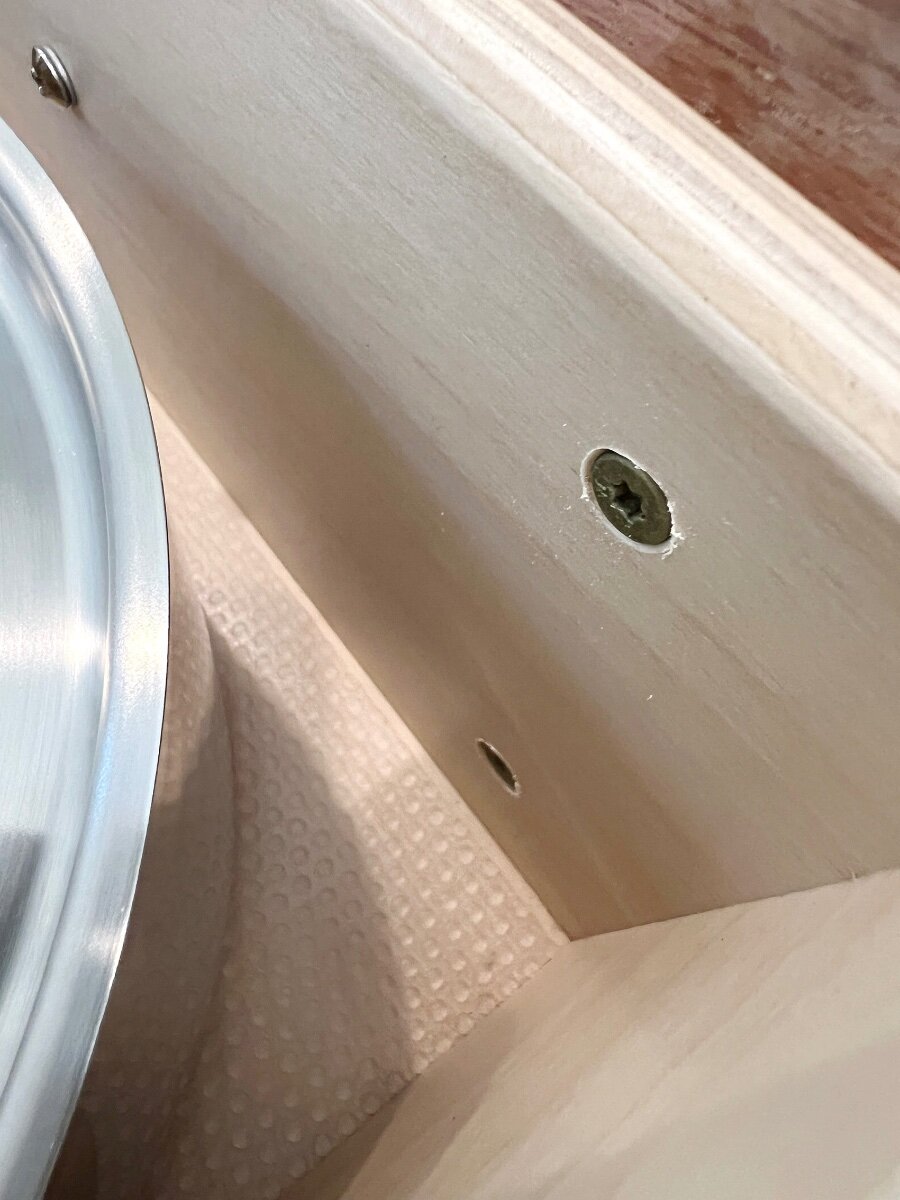
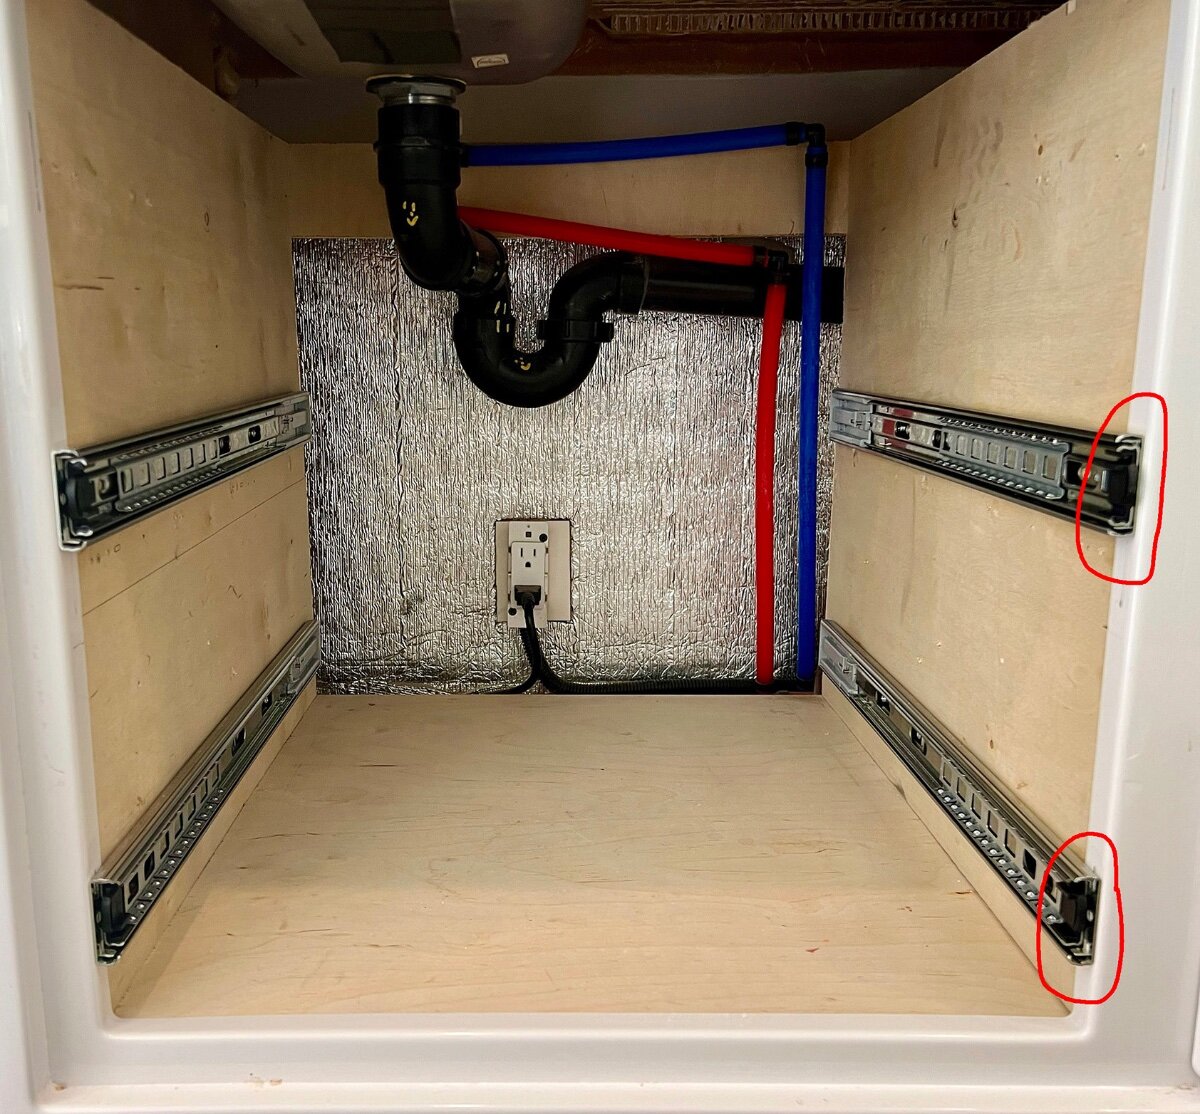
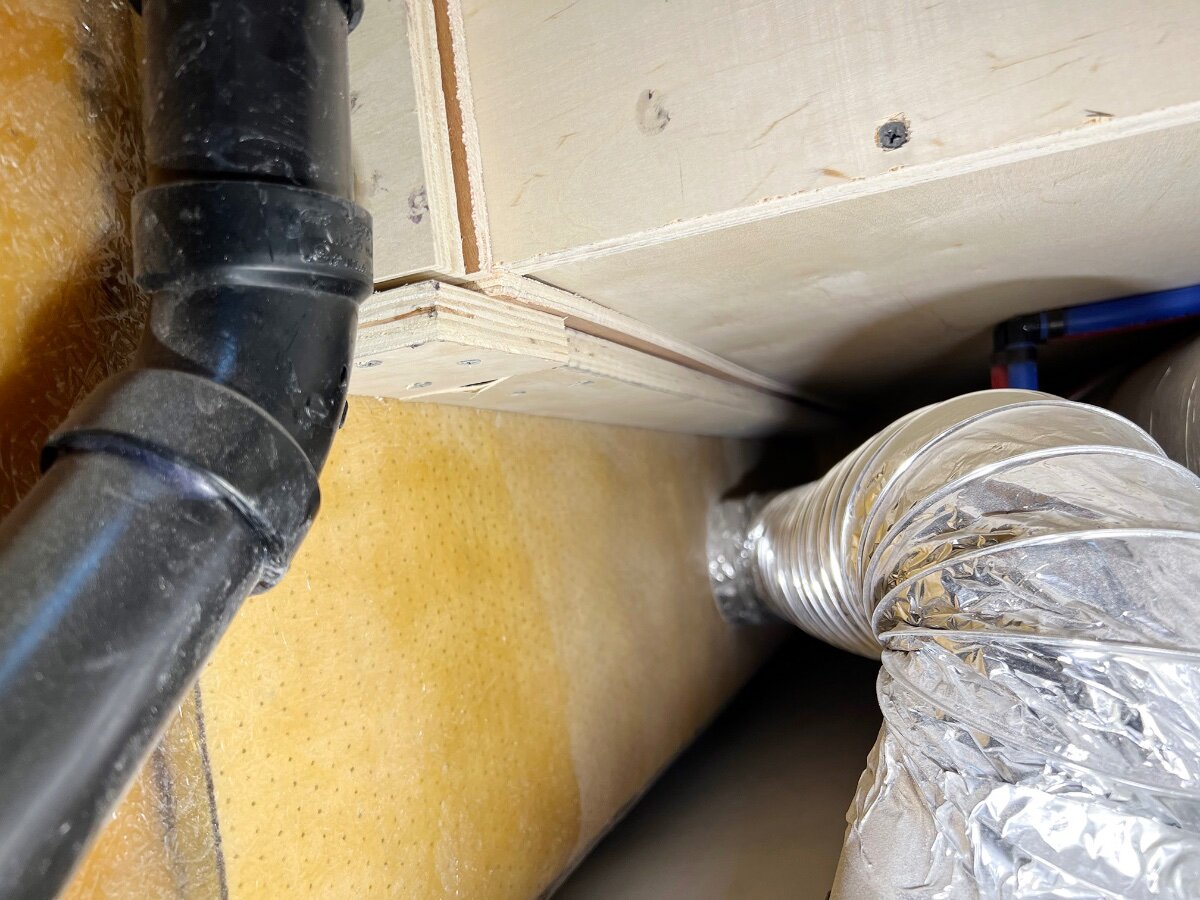
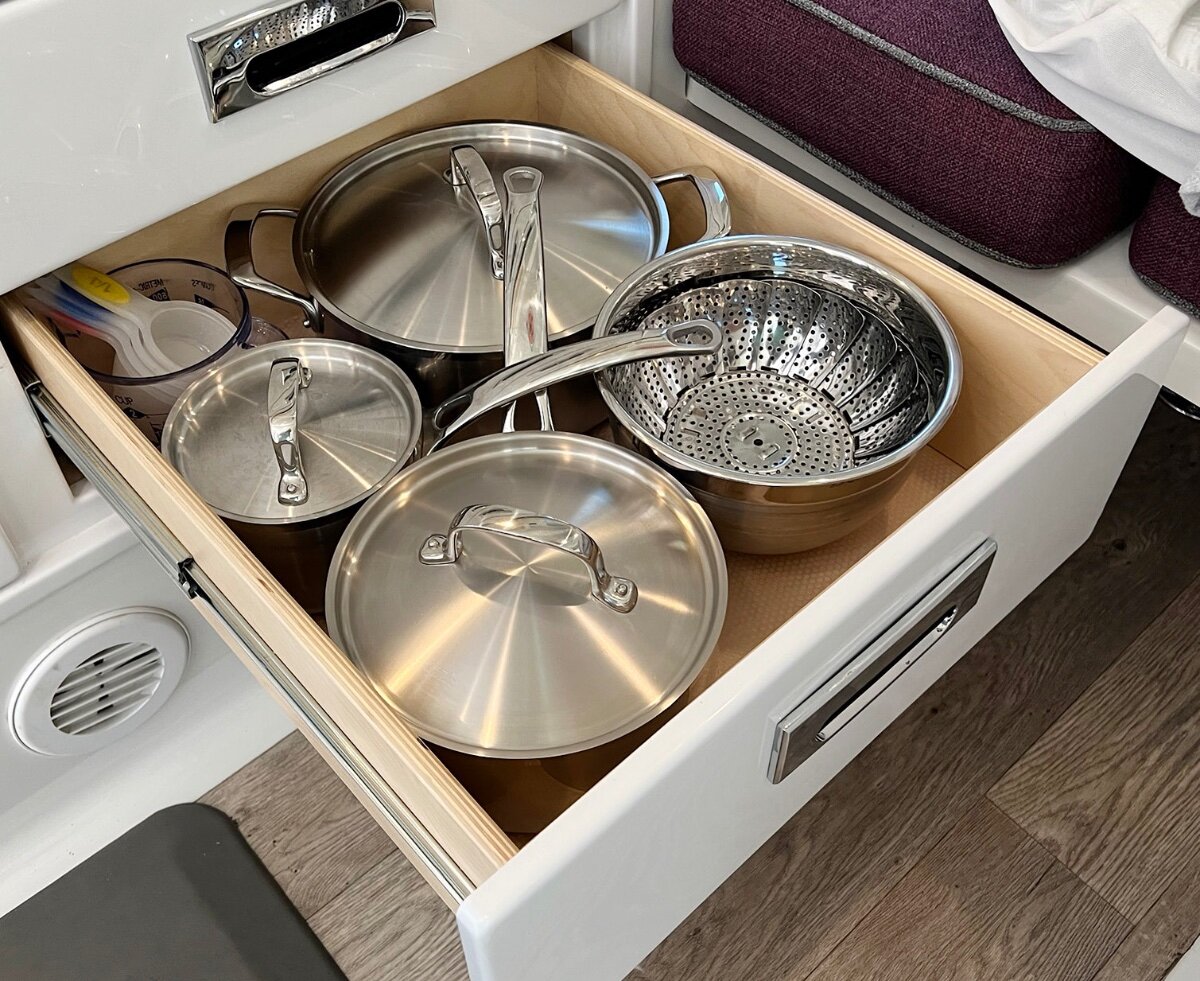
Some of you might have seen my recent post on another thread, Shake Rattle and Roll, regarding items including screws etc coming loose while towing. My situation had become considerably worse as previously stated in regards to the entire set of drawers and associated hardware with the kitchen cabinet drawers. Cutting to the chase I had to replace all of the soft close glides for a litany of reasons which I will detail below then rebuild and redesign the entire drawer setup and arrangement. Some of the glides had corroded severely preventing their ease of use, and in other cases the boxes themselves were made in what can only be described as sloppy construction, inconsistent sizes, and most of them considerably too small for their respective cabinet openings allowing for the glides to come completely out of, or off their rails. If this isn't enough the cabinets themselves were built out of square, out of plumb, and not parallel from front to back or side to side. Hopefully this will provide help to those who might be having some of the same issues. Let me know if you have any questions be glad to help if I can. For starters attached are some photos of the errant issues we were having. Image below illustrates how poorly this set of drawer glides were installed which of course imposed a closed drawer that pointed downward, top portion closed while the bottom tilted outward. The red arrow on this drawer points to the corroded glide rail. This is the worst example in all fairness. closer detail that illustrates the above perhaps better. In the photo below you can see where these drawers were only stapled together and with no glue anywhere. To make matters worse the cheap plywood used for the plastic face frame inserts was never treated for moisture and thus over a period of time would expand contract then warp and pull away from the drawer box itself. The only method for installing these drawer faces was nothing more than caulk, no screws nothing to hold them in place over a period of time in different weather or humidity patterns. Effectively each of the faces had warped convexly as seen in this photo. This is an example of the old drawer boxes once the plastic fronts were removed with scrapers, pry bars and chisels. Note how the 4 inch drawer is 1 inch longer than the 6 inch drawer, and this was consistent throughout for no discernible reason that I could determine. All of my new drawers are a full 20 inches long with the exception of the 12 inch drawer that mounts under the kitchen sink otherwise it would collide with the sink drain, probably not a good idea. Most but not all of these plastic face mounts to the drawers are cracked severely or in some cases mild cracks as illustrated below. Eventually I will replace all of the drawer faces with something else in the future and just be done with the cheap 1/2 inch plywood glued/caulked into these plastic cavities. Now for the rebuild. Below you can see where the drawer positioning is much different. Rather than the 4 inch depth drawer to 6 inch depth drawer, then back to the 4 inch on the bottom row it seemed to make much more sense to do two rows of 4 inch drawers (with 6 inch face fronts) then install the 6 inch drawer with 8 inch front on the bottom row. In addition the upper right drawer as originally installed was only 12 inches deep much like the drawer that mounts underneath the sink. This made no sense to me because there was plenty of room for a full 20 inch drawer to easily slide beneath the cooktop stove. In order to make sure there would not be an overheating issue I ran the both burners for a period of time with my hand touching the bottom of the stove. Never even got warm. It is important to note this stove is built with a second dead air space layer. This allows for much better usage of kitchen tools and storage. Details from the rebuild. Basically I used Kreg Pocket Hole jigs and screws to build the boxes but also used reinforcements below with right angle corner hardware and ran a bead of hot wax glue across all of the underside of the boxes/drawers. Materials were half inch baltic birch plywood, with 1/4 inch birch plywood bottoms dado'ed into the sides and fronts. Closeup detail of hardware and messy hot wax glue. I also used a small painters palette knife to spatula the glue while still hot and pliable further into each joint. It was fairly easy to run the heat gun for 6-8 inches of glue line then press the glue further into position, then start on the next 6-8 inches. Pocket holes can be seen in the photo below. To mount the face fronts back onto each drawer I used 3/4 inch Big Timber screws that are self tapping, however in order make sure they were solid each drawer front was clamped to its respective drawer during installation of screws. As you can see each screw is counter sunk as well allowing for a deeper bite. Note didn't want to glue them on in addition to screws knowing I would eventually replace the fronts with completely new materials. The photo below shows two sets of new drawer glides installed properly that being with front of the glide recessed approximately 1/16th of an inch as illustrated by the red circles, not the full 1 inch as originally installed by Oliver. By installing the glides so far back into the cavity of the cabinet boxes the glides would never fully come to their closed positions. Not sure why the water hoses to the kitchen faucet were installed to the front of the rear cabinet brace at the back as seen in this photo. There was plenty of room to route those blue and red lines between the hull and cabinet which I just might do the future. It is also worth pointing out the opening space on the plastic trim for the cabinets is about 1/4 to 3/8 th's different from right to left side which translates into building each side with different width drawers. The space allowed for this type of drawer glide accommodates 1/2 inch on either side for a total of 1 full inch smaller width drawer compared to the cabinet opening. This is and always has been a tight specification. The original drawers were off by at least 1/4 inch or more. View from the basement. Honestly I have no idea how the entire assembly of the kitchen cabinet drawers even stay in place going down the road. Boxes are screwed together with 3 drywall screws and sort of situated into these pockets made of 2-3 inch depth plywood. I have no idea how those pockets are held in place and it doesn't appear there is any support at the back of the cabinets as they set hovering over the wheel wells by perhaps half an inch. Would love to hear a more informed opinion about this. A few finished results installed. Some of you might see that instead of implementing 4 drawers at 4 inches I ended up building 4 inch on top, 5 inch in the middle, then the standard 6 inch for the bottom drawer. Increasing the middle 4 inch to 5 inch depth provides a bit better depth of space while still allowing plenty of adequate space between each drawer.
 2 points
 -
So, 2020 models, hulls 579 and 628 have all 12/2 Romex for AC circuits, and you can see from my pic that our older 2016 hull 113 does not. We run a few appliances on the 110V outlets (never at the same time), An 1100W tea kettle, a 700W small pressure cooker, and the worst culprit Chris' 1875 Conair blow dryer. From what I can tell, you can't find a blow dryer at lower wattage. Ran this test and been running the A/C this weekend on the MP2. It handles the Air or the blow dryer no problem. Believe it or not, they blow dryer takes 5A/60W more than the Dometic Penguin II 13.5K BTU A/C. But you only use a blow dryer for a few minutes on and off. We replaced our OEM microwave with an Emeril Air Fryer. The small model rated at 1500W. I ran it yesterday on the MP2. Set it at 400F for 15 minutes in air fry mode. It used 23AH according to the Victron SmartShunt, brought the 600AH Epoch LiFePO4 batteries from 99% to 95%. Got to love that! Cook our morning hashbrown cakes, cook a pizza, while boondocking np. Since the microwave circuit is now on its own breaker that helps but still it's on 14/2 Romex. After 15 minutes on 400F the Romex was to the touch the same room temp as the other feeds, so 14 AWG looks to be doing it. My insulated oven cabinet stayed cool enough as well, only the aluminum of the upper bezel got a little hot but nowhere else.2 points
-
As you are the fourth owner, that may well be the case. I have pictures of yours and another being built for Jim Oliver in 2009. Jim was adamant about there being no such thing as overkill and I know he put 5200 pound axles and the larger five leaf springs under his. Being as all the current models were Elites (at that time) and the only axles and springs they would have had on hand would have been the HD's, I just assumed that yours were too. Jim named that trailer "The Beast" and it had full extension drawers mounted under the hull between the steps and the front axle. Edit: @CRM has located a photo of the underside of Jim's "The Beast." It had four leaf spring packs rather than five so now I wonder if the axles were 5200 pounds when originally built.2 points
-
43 pound/feet. The shoulder of the bolt will bottom out on the hanger, make sure it has done that then tighten. DO NOT attempt to use the nut to pull the bolt into place. It will strip the nut and ruin the wet bolt.2 points
-
I'm interested in these, as I will be in that area this fall.1 point
-
This subject is of great interest to me as I am located in in Western Washington State. Hohenwald is a l-o-n-g way from me, and I am having some issues with a recent swap of the Penguin to FreshJet3 A/C's. For those who have an interest, Bretz RV in Liberty Lake, Washington still does not have a functional service department. Their Missoula, MT location does have a service department, but it has NO ONE there who has been trained by Oliver (on site or back at Hohenwald). Due to distance, I decided not to call Bretz at Nampa/Boise, ID. The whole concept of "distributed Oliver sales and service" will eventually depend on Oliver owners having confidence in the ability of their local "Joe's RV" not only being able to sell them an Oliver, but also be qualified to maintain it. (For a $110K trailer, that confidence will make or break a sales decision.) At this point, those of us in Washington State are seeing little reason to be confident of any of that.1 point
-
My grease gun, assorted accessories, extra tubes of grease, paper towels and disposable gloves are neatly stowed in a kitchen garbage bag (flat) in a plastic crate in the bed of the truck, because I could imagine the mess. My trips are long distance (partly because I live so far south) so I will always carry my grease gun along. I will look at these when I get home (another 2 months!) and I appreciate the suggestions from everyone here.1 point
-
Check to see if any of the heating ports are blocked and also check the ductwork under the curb side access area for kinked ductwork. You shouldn't be getting any error codes. It's worth a call to Oliver if everything looks ok. You might also check to see that there isn't anything blocking the exhaust port on the outside of the trailer.1 point
-
$52 was for greasing zerks. As far as costs for installing Alcan Springs and shocks, I don't know those costs until I talk to the service guy that would be doing the work. Several Owners have installed Bulldog shocks, but there seems to a report supply issue. I'm watching carefully. Keep everyone posted on the install and what you were doing for the 50, 50, 500 mile torquing of the new bolts. Find out what you can on those shocks. I may also consider having Alcan do the work also.1 point
-
That's why (IMHO) it's best to install the EPO/EMS right before your breaker box. If not, you can have a wiring issue between the pedestal and the breakers causing a voltage drop that won't be seen by the EPO if installed at the pedestal.1 point
-
I found WD40 works well to remove VHB adhesive residue.1 point
-
Thanks @Patriot!! Yes good point we will try the hair dryer, and maybe some soap water and wax after that.1 point
-
Look for a truck service place. We have one 5 minutes away They grease our zerks, inspect the suspension, etc. I will have a discussion about switching out the springs, when we pick up the trailer and stop to get the zerks greased for our trip. I pay $52 for greasing the zerks.1 point
-
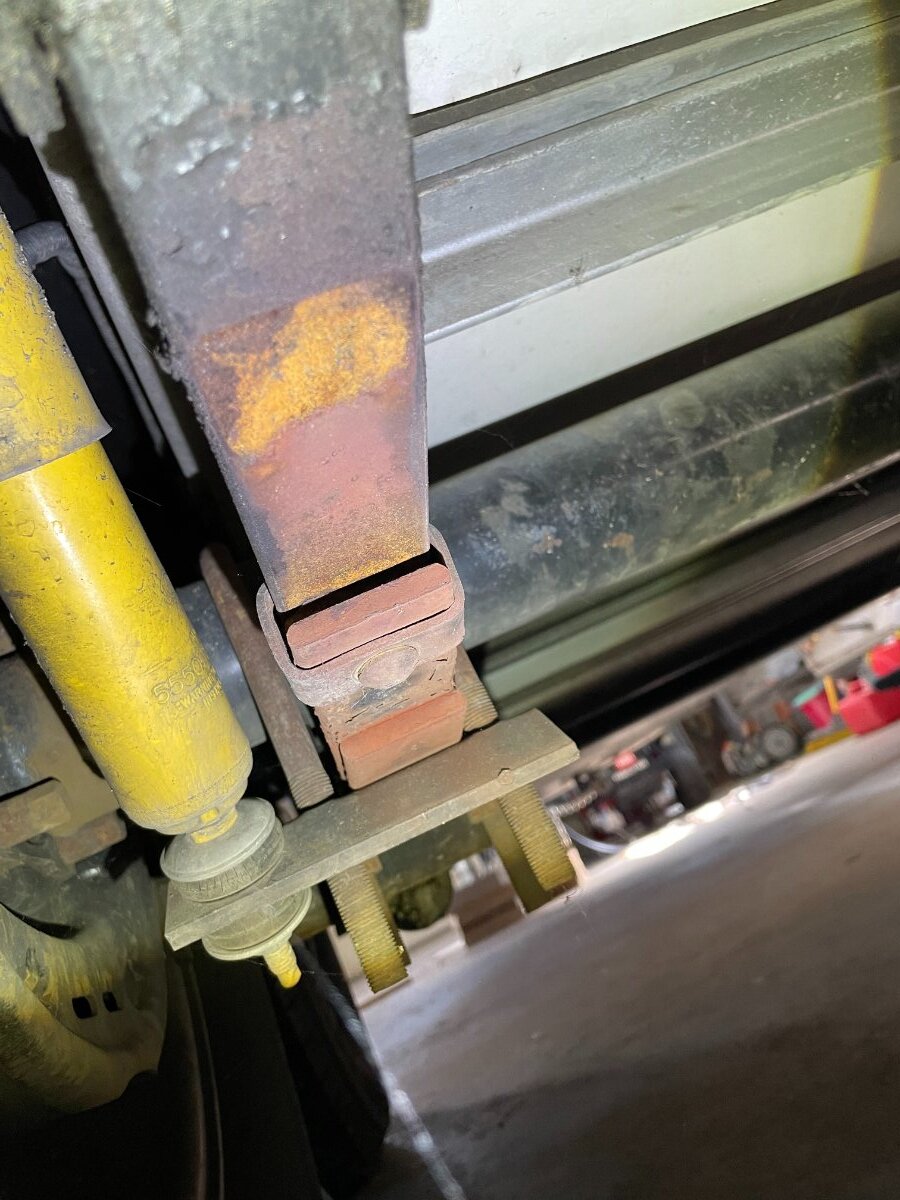
WOW! We have been sidelined this summer since the aborted eclipse trip and have been attending to other more important issues... So, no camping for us. But now we are looking at a short trip in October, so I thought it would be a good time to freshen up on recent issues. And WOW! What a thread. Yes.... I read it all. So, THANK YOU to the brain trust. It's nice having talented, knowledgeable, articulate, and kind owners to collaborate with. Really... you guys are awesome. So, I figured I should get my butt under the trailer for a look see. First spring looks good... no flattening. Same for second and third. Fourth looks good too...... Wait a minute.... The second longest leaf is shorter than it's supposed to be. Better take a closer look. See the picture. The second leaf broke about a half inch shorter than the third leaf. Guess it's time for a call to ALCAN. (Sorry GJ) Thanks to you all I have almost all the info I need. Except for someone to do the work after I get the springs from Alcan. We live just north of Asheville NC. Bumgarner in Lenoir NC is an Oliver dealer about 91 miles out. Camping World in Hendersonville is 35 miles out. I would like to minimize my travel and risk of breakage on the road. Are there any other type of shops that could do this work? Any personal recommendations to be made? Thanks again for all the help. Scotty
1 point
-
@jd1923 I recently used AWG 6 ferrules when installing the Victron 30A charger in my Oliver, very handy tool and end terminals to have!1 point
-
In residential wiring 14/2 Romex is used for 110V outlets, or 14/3 for light switches, all 15A circuits. For commercial where 20A outlets are standard they use 12/2 Romex. Commercial will also use stranded 10 and 12 AWG THHN wire where conduit is run. Our Oliver #113 has 12/2 Romex (yellow jacketed) for the A/C and HWH circuits. Everywhere else 14/2 (white jacketed) is used which is fine for the GFCI 110 outlets, but they also use it for the microwave, and the fridge too, where they really should have gone 12/2. In fact, if you look closely at the picture showing the breaker panel, our fridge is marked as a 20A breaker but instead they installed a 15A breaker with 14/2 Romex. You will see the HWH breaker is tripped, so I can turn it on/off from the panel instead of opening the exterior HWH cover for that switch. Ron, it's great that yours has all 12/2. I would not mind at all if they used 14/3 for 110V outlets, but all appliances, microwave and fridge should sit on 20A breakers with 12/2 AWG wiring. On our hull they also wired the microwave and the 110V outlets to the same 15A breaker. I was able to find the individual 14/2 Romex run for the microwave, and it is now wired to the breaker that was the PD converter that is no longer in use with the Victron MP2 inverter/charger. In the first picture you can also see the house 120VAC wiring where I used 10/2 UF-B. I wired this to the MP2 when it was sitting on the bed platform and because the UF-B is relatively stiff it fed nicely across the basement floor as I lowered the MP2 in place. @katanapilot given you are using fine-stranded 10/2 cable, you should certainly wire it first before your mechanical installation and you must use wire FERRULES so that the wire can be pushed into the MP2 AC terminals. The ferrules will be large and not real easy to insert. The thinner solid core wire pushed in nicely.
1 point
-
We lived in Sierra Vista, AZ for many years and this time of year is always interesting! Hot and sunny one minute and epic downpours the next! Mike1 point
-
1 point
-
Love you, Steve! No wonder your 3500HD and Oliver are upgraded to carry 18,000+ combined GVWR! 🤣1 point
-
@Boudicca908 I invested in a Milwaukee a M12 drill/driver about 6 years ago and I have added about 6 additional tools from the M12 family. I usually just buy the bare tools because I don’t need any more chargers. I buy from who ever has the best price which is typically Home Depot around Black Friday when they usually have the best prices on tools and batteries. I will admit that when I see the battery powered grease gun sitting on the shelf, I think that it was a waste of money! When I get on a creeper and scoot under the Ollie and grease the zerks, I think that it maybe the best tool I ever invested in. Mossey1 point
-
I have been away from my trailer since this post but just returned and the first thing I did was inspect the shackles both to measure as well as inspect the gap between the second leaf of the Alcan springs and the dexter equalizer arms. Here is what I found: -Hull #898 came stock with 2.25” shackles (see pic) -there was plenty of space between the equalizer arm and the second leaf of the springs (see pic) -there were no witness marks on the equalizer arms where the springs had made contact My experience does not mean that every trailer has 2.25” shackles (it appears that at least one E2 had 2” shackles)
1 point
-
Jumping from a pop-up truck camper to the Oliver was one of the best decisions we have made. A bad inverter breaker right after pick-up and the AC heating element on the Norcold fridge are the 2 things we dealt with. Oliver sent a replacement breaker, and the fridge heating element was covered by Norcold and replaced by a local RV place. The build quality is second to none.1 point
-
Agree, Ollie is the best decision we made when buying a camper! We camped mostly in tents and then later in campers. Camping with Ollie has given the best camping experiences Debbie and I have had since being married over 50 years.1 point
-
1 point
-
Episode 10: and Episode 11:1 point
-
Loveland/Fort Collins Colorado We have twice used Nathan RV Service and Repair. He moved from Fort Collins to Weldona. Oliver recommended him. He has twice done maintainence on our Oliver.The first time he replaced the flooring. This time he replace the Automatic Transfer Switch which had failed. He is thorough and price was quite reasonable. He took plenty of time when we picked it up to answer our questions. He loves working on Olivers.. he said they make the best campers! Hope this helps someone. Linda OEII #1111 point
-
We spent alot of years working to restore fish passage for Alewives in Maine, and still get home every spring In time to do it all over again.
1 point
-
Awesome report, JD! Very much looking forward to our 2000w inverter going Tango Uniform so we can upgrade to the MP II!0 points


.thumb.jpg.e34bf01ef7f7d5e99ad31856d45afbeb.jpg)


-
Recent Achievements
-


")


")


")


