Leaderboard


Popular Content
Showing content with the highest reputation on 03/27/2025 in Posts
-
Why not just use the city water connection to flush all the lines? Then all the flush water will go into the gray tank. Also you don’t have to run your pump. Some folks (myself included) will sometimes overthink a simple issue. Oliver dropped the ball on this one.5 points
-
Gary, aH stands for Amperes Hour, the number of amps a battery can provide in one hour. 100aH means the battery can provide 100 amps in one hour. There might be a more technical explanation that some of our techies can provide. We’ve found that our 300aH has been plenty and when we had 200aH for over a year we never had an issue. There is more useable power in a lithium than in an AGM. When we had our 400aH AGMs we got very near our limit while camping in cool cloudy weather at Glacier NP and Grand Teton NP. I had to run the generator because the solar was unable to keep up. Because you can take lithiums down lower than AGMs I don’t think we would have had the same problem. I will add that we don’t use the AC on battery power, run the fridge on propane, and are generally pretty conservative in our electricity use. Occasional microwave and blow dryer are the big loads. Mike4 points
-
I'm currently in process with "option 2" and my "friends" have been @jd1923 and @Derek B here on the Oliver forum 🙂 Today I removed my 4 6v AGMs and installed 2 Epoch Essential 300aH lithium batteries. I happen to be 6'5" and strong enough to lift the batteries so the weight was not an issue for me..but it certainly could be for others (Each AGM battery is 66lbs. Each 300aH Lithium is 58lbs). I still have some work to do on the spacers in the tray but will post pics of my finished upgrade soon in the thread that I started in "Ollie Modifications." The info and photos from JD and Derek were super helpful and encouraged me to give it a go myself. Big thanks! I reused existing cables. It did require a bit of modification/McGuivering so I would say you need to be at least C+ category like me for using tools and thinking through projects. I took advantage of the recent Epoch sale and paid $1698 total for the 2 300aH batteries plus $25 for the BlueSky disconnnect switch on Amazon. Then I needed one longer battery bolt so $2 at the hardware store and some scrap wood I already had in the garage for spacers in the tray. $1725 total for 600aH of lithuim power and no other new equipment needed! Epoch batteries checked all the boxes for me -- self-heated as I camp in CO/UT/WY, built in BMS with Bluetooth App that shows SOC and all data, highly rated by folks here on the Oliver form with expeirence as well as 3rd party experts. They are not the cheapest option but they are far from most expensive. It's only day 1 but I'm impressed so far... Hope you find what will work best for you!4 points
-
@Imelda, to begin with you only need 2 (or even one) 12v lifepo4 batteries to replace x4 6v batteries. Your 6v batteries were wired to create 12v power.(first in series, then parallel.) If you don't understand this, and many don't. , I'd highly suggest that you a) go to the rally, and enlist the help of the many who have volunteered above or b) hire a local rv tech to install new battery(ies) and create additional important wiring connections. Imo, there is no real thing that is a "drop in" lifepo4 battery. Especially in your case, wired for 4 x 6 v batteries. You have done so many great projects on your own. But, this is critical. Loose, or improperly sized, or small wire diameter can cause a fire. Improper settings, or incorrect charging equipment can shorten the life, or disable new batteries, at the most inconvenient time. We have a lot of people on the forum who have "done their own" with lithium, but they have some extensive study and engineering and/or electrical background, including us. I've never heard of the second battety you posted. Imo, battleborn is great, and highly overpriced, but great customer service.. Please take some time, and continue to discuss here.4 points
-
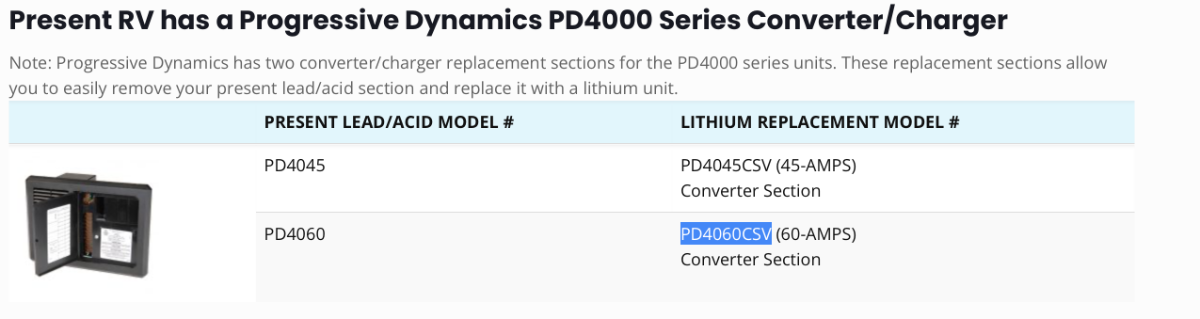
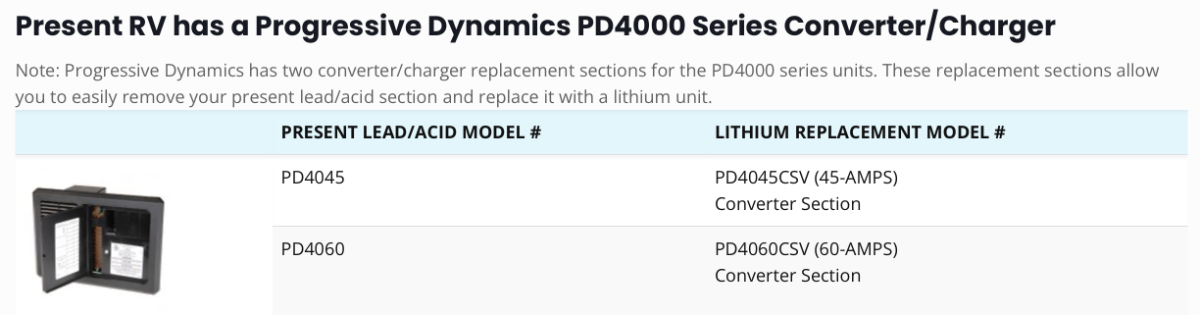
If your current PD4000 Charging board does not have the AGM/Lithium Jumper setting, the PD4000 Series Lithium converter upgrade board is available via E-Trailer. Please check which original converter board you have....60Amp or 45 Amp. (ours was 60Amp) To upgrade your trailer if you have a 45Amp board, stick with the 45AMP LI plug in...if you have 60Amp board, then use 60amp LI version. (Safety for wires is important.) This upgrade only takes about 30 minutes to complete. Here's the overview link to the Progressive dynamics site that shows the lithium replacement part number. https://www.progressivedyn.com/lithium-converter-replacement-units/ Snip from that page: E-Trailer has both boards available. 45 Amp Version https://www.etrailer.com/Accessories-and-Parts/Progressive-Dynamics/PD4045CSV.html?feed=npn&gad_source=1&gbraid=0AAAAAD_vMtnZsg_-Is9SAt6Ew5v33GB0V&gclid=EAIaIQobChMIpem7gN-qjAMVpiytBh3oeBfeEAQYASABEgLqC_D_BwE 60 Amp Version https://www.etrailer.com/Accessories-and-Parts/Progressive-Dynamics/PD4060CSV.html?feed=npn&gad_source=1&gbraid=0AAAAAD_vMtnZsg_-Is9SAt6Ew5v33GB0V&gclid=EAIaIQobChMIi-LJ9N-qjAMVY83CBB3qGQb2EAQYASABEgK0DvD_BwE One big difference between the bigger victron or xantrex charger/inverters is that they charge the batteries at >120Amp output...so faster charging. But you spend a lot more for functions you already have in your trailer. Often the simple path is often the best....with a simple plug in board upgrade and new LI batteries you'll be served for many years. Craig
 3 points
 -
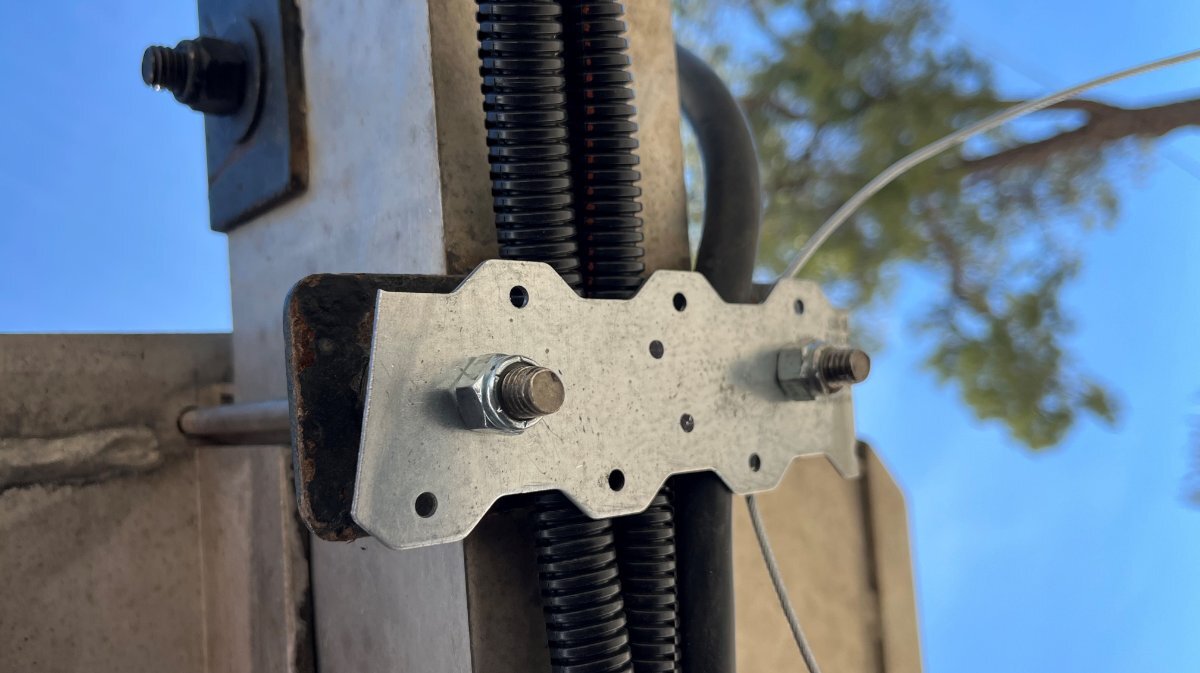
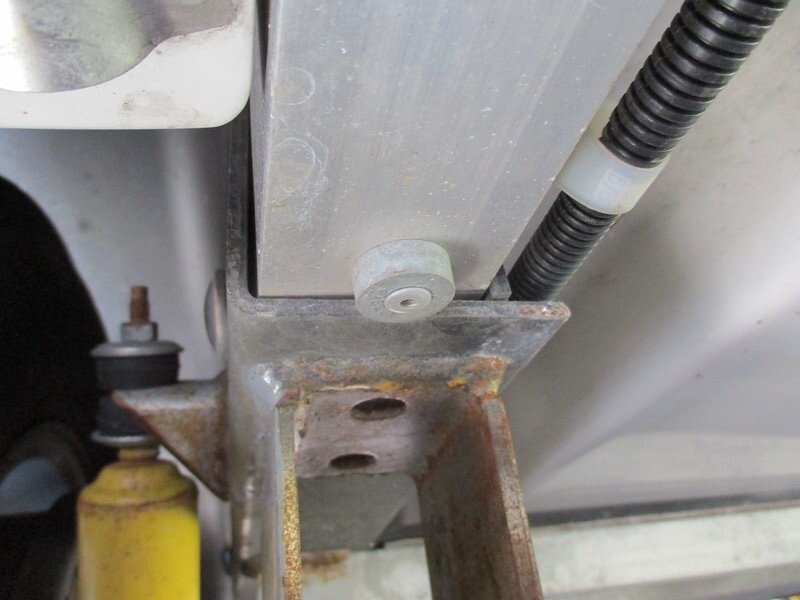
The reason they are installed is that Oliver's main frame is Aluminum, but the axles are mounted with a reinforced steel frame. Where those two metals meet there could be corrosion unless some other "sacrificial" item is added touching both steel and aluminum. Due to electrolysis, the zincs dissolve away and will look ratty and crumbled so you see it when it's time to replace them. That can take a very long time on the Oliver hull unless you are driving in wet/salty conditions. (Like maybe 10 years or more.) They are available at most boating supply stores or online as "round sacrificial zinc". $3 each. The factory service center also has them in stock and can mail you them if needed. The round ones shown are often used on outboard motors which are in salt water and fresh water...thus available at marine suppliers. Take a look at the 1:35 mark in this video on the chassis construction to see the actual installed anode. Hope that helps. CS3 points
-
Gary, To help you get a range let's think of it like this: Option 1: Factory Upgrade: $10K + If you upgrade at the factory you can get an accurate quote by contacting service via email. My guess is around $10K to add 3 Lithionics batteries and a new 3000 Xantrex Inv/Charger. One reason for the high price is uprading to a new 3000 Xantrex Inverter Charger would also likely have them change around some wiring in your trailer to enable it to run your AC off of your new batteries. The other thing you discussed was a fridge replacement with a compressor fridge. Those are a very time consuming upgrade and costly. A real quote for time and cost can be had via email to Oliver Service. Option 2: Self Upgrade with help from friends: $1-2K About the lowest cost would be to drop in (1) Epoch Essentials 300AH Heated with Bluetooth battery for $999 (SKU: 12300A-H) and charge it with the existing charging circuits. You would likely be able to reuse all the big battery cables you have now. If you dropped in 2 (about $2K including cables) then you would have 600AH capacity about 3x what you have now...and that would enable you to switch to a new fridge. Hope that helps. Craig3 points
-
JD, that settles it. No Xantrex install at Rally. Thanks2 points
-
Here's my case. We will likely need to replace our 2 x group 31 12v batteries this year. They are at least 7 years old, still holding a charge, but , hey. We have no inverter. No microwave. None of that high powered draw. We may, not sure, just replace both 12v agms (105 ah) with a single lifepo4 battety. Maybe x 2. We will see. For us, 105 ah is "enough." But, we don't camp in high temps, usually stay east of the Mississippi. If we actually need ac, we camp with power. (6 times in 17 years.) Everyone had different needs and wants.v2 points
-
No specific experience with the VIP3500 but both models should be standard for replacement on ANY trailer. The upgrade it likely a good idea. It would be great if the VIP 3500 was stronger and faster! I would check the manuals for both and compare measurements. It should be 3 bolts and one wire to replace! 😂2 points
-
Back in 2020 Battleborn was a favored alternative. They have good product quality and many loyal followers. Over the last few years, they market their quality position hard but have not reduced prices relative to other manufacturers. Want an inexpensive solution, what Ron showed above is great (nice installation also)! The 460AH of LiTime batteries should cost about $900 about the list price of only one 100AH Battleborn. If I remember correctly, Bill @topgun2 did a similar install more recently. A 300AH Epoch Essential battery lists for $999 (sorry last week it pwas 15% OFF). On sale, you'd need to spend $2,250 in Battleborn batteries (and a lot more space) to get the same 300AH. https://battlebornbatteries.com/shop/applications/towable-rv/2 points
-
@Imelda If you decide to replae the btteries yourself, make sure you cover the solar collectors so they are not sending power down to the battery compartment. Also take a picture of the existing battery cable placements so you can hook up new similiar batteries (if you chose) the same way.2 points
-
We replaced our 4 AGM 6V batteries with two Battle Born 12V 100aH lithiums in 2020. We had the configuration for over a year with no issues, we’re about 50% dry camping. We did add a third Battle Born when they went on sale. 300aH of lithium has been plenty. Mike2 points
-
Steve has a reasonable question about why there is any liquid in the fresh tank at all. Best to have no fluids there at all . . . nothing to freeze. About the slow drainage, well yeah, you do have a tiny drain pipe exiting the trailer from the fresh water tank. The tank is many feet long, but only several inches tall. Not a lot of pressure in the line is available from this configuration, resulting in a puny discharge rate when the trailer is perfectly level. To fix this, raise the nose of the trailer as high as possible, thus giving more depth to the column of water and resulting in a higher pressure at the discharge port and a higher flow rate. It will still take a bit of time, but not as bad as a perfectly level unit. As Steve states, opening the drain while driving is a good tactic, but be prepared for all of the folks passing you, honking and pointing to the back of your trailer as the tank empties. Ha! Good luck.2 points
-
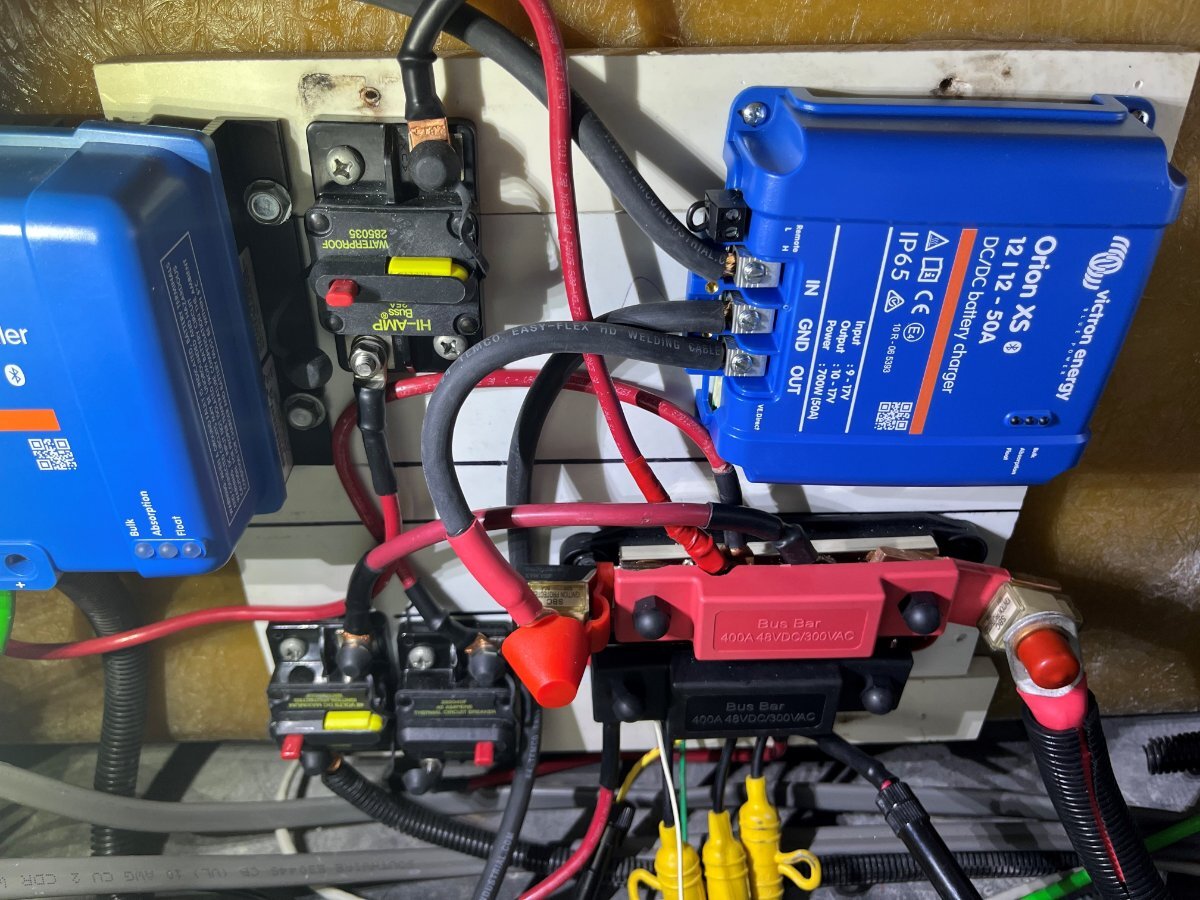
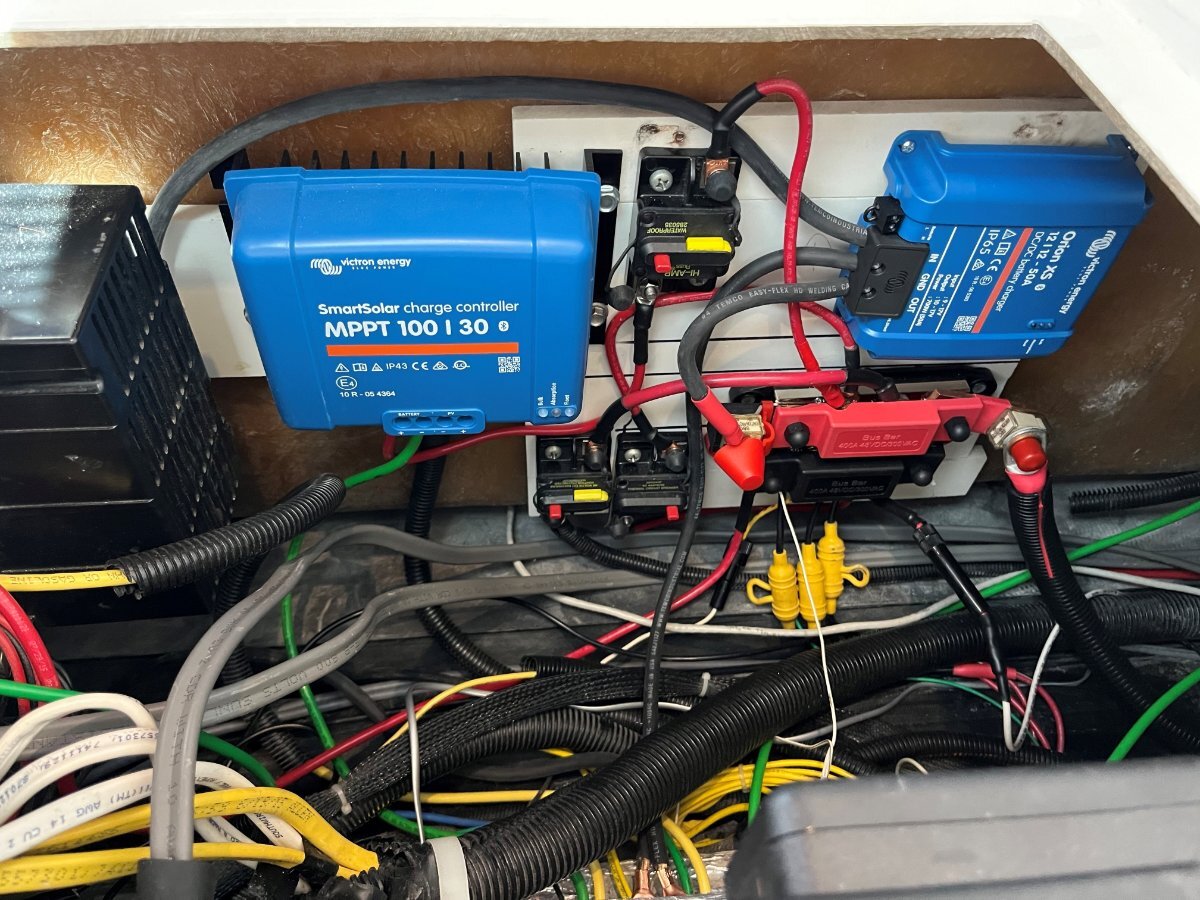
I’ve had the parts forever and between work and some travel, a list of injuries (that made it extremely difficult to kneel in the basement or crawl under the truck) I finally have this done, fully installed and performance tested! The bottom line is, “this charger is awesome!” A month ago, I was working on waste valves under the front dinette seat when it occurred to me to run the charger cabling in the Oliver since I had everything opened. I always drill the smallest hole possible, no fancy cable glands for me. Two 3/8” holes would been enough, but I had grommets in a parts box 1/2" OD and 3/8” ID which were the perfect size. I glued them in place and afterwards caulked all of the cable openings front of hull (no pics taken). It makes sense to wire the charger before mounting the board (pic1). The wiring is rather simple but the 4 AWG wire barely fits into the terminals. The 4 AWG wire will not fit into the Oliver ground/neutral bus, so I crimped on a lug and cut it to fit the opening. I installed the two grounds side-by-side (the other coming from the tow vehicle) (pic2). When I worked my earlier inverter upgrade and rewiring projects, I had saved room for the new Orion DC-to-DC charger (pic3 close-up and pic4). The main + bus (in red) is protected by a 90A Marine Rated Battery Fuse (MRBF) that connects by 4/0 cable directly to the Victron Inverter-Charger bus and then through a 400A ANL fuse connected to the batteries (400A Victron Mulitplus spec). All major circuits are connected to the main bus; the 40A breaker OTT installed for all the Oliver 12VDC circuits, two solar chargers (OEM Blue Sky for rooftop panels and a Victron 30A MPPT charger for a Renogy 400W suitcase) and the new DC-DC charger circuit which is connected through a 60A MRBF (see center of pic3). The secondary +bus (in black because I purchased a set) is protected by the OEM 40A breaker which connects to the 12VDC panel, the 3 jack fuses, etc. These are 8mm thick solid copper buses for minimal resistance. A considerable upgrade compared to the original OEM installation. I attached the Anderson connection, front of trailer, and then got under it to see all the many zip ties that OTT installed. OMG, they should have better cable management! I replaced a lot of these because of age, but I did not want to merely zip tie this new heavy dual cable harness! Instead, I used the u-bolts that hold the front basket and cut brackets to support the cables including the trailer harness in two places, in front and rear of the basket. The picture shows the front bracket (pic5). And after taking this picture I hammered both ends of the bracket to curve them up almost touching the upper bracket to create a D-shape. I could have purchased pretty brackets, but these were on hand, fully functional and can only be seen while lying on the ground! The trailer side installation was then done! When I finished and reconnected the house batteries, the blue light on the Orion started blinking and it was listed as a device on the Victron Connect app. So before even working on the tow vehicle installation, I was able to update the firmware and configure the Orion charger. I reduced the output charge to 30A for safety concerns and initial testing. The battery settings were close enough, within 0.1V of the specs for Epoch LiFePO4 batteries.
1 point
-
This is another GREAT example of me reading this and feeling like a Monkey trying to do calculus. With that said, wonderful info. If it took you doing all this for your changes/upgrade, then, I do not think it makes sense to do it at the rally. I got great advice to look at getting the Lithium replacement Model # PD4045SCV 45 amp for the Progressive Dynamics Power Converter System, what I call the fuse box. It allows the proper Lithium charging. It’s $180.29 on ETrailer. I think, I could be wrong, if I put in the new Lithium Batteries, add this part, I will be ok with my current Xantrex ProWatt SW 2000 for now. Also was told I had to change the solar charger for the 180 Portable Solar Panel I have. Will now research that. Thanks for letting me know if I’m on the right path. I really do appreciate it. I also hope another Ollie Owner who shares my lack of knowledge will get good info from all the great advice others are giving on this thread.1 point
-
First, I would say it would be easy to get help from friends at the rally for replacing batteries. A full inverter mod, the custom work of mounting the very LARGE Victron Multiplus II, stripping our all Xantrex parts (ATS and junction box) and related wiring changes may be a lot to accomplish at a campsite! I ran in and out of my garage/workshop 100 times while doing mine for tools and 4-5 trips to Depot or Lowes for hardware over a two-week period of time. If you study the mod threads, plan really well in purchasing parts, get very ready, have a lot of patience (new friends too), maybe, good luck! 🤣 You want the 12V inverter and do not need the UL-certified model (required by code for home installations only). I went with Inverter Supply for these parts for free shipping and no sales tax (see picture). You NEED the VE.bus to configure the Victron for charger/battery spec settings. There are two models (I purchased the USB-C model and there is also USB, depends on the laptop you would use to setup). You need an Ethernet cable also to connect the VE.bus to the Victron MP2. There are YouTube videos showing the configuration steps. You also posted pictures showing the Progressive Industries ATS (Automatic Transfer Switch) and the display which shows the readout of shore power stats. The ATS switches between the two shore power sources (side outlet and front outlet usually for generator in front basket). This will not change but the power coming out of the ATS, connecting to the 120VAC breaker panel has to be replaced with new 10-3 AWG cables to go to the inverter and back to the breaker panel (buy 15 ft to be safe, I used about 12 ft, it runs from streetside bed basement where our new inverter was installed up to the breaker panel under the rear dinette). The Victron MP2 has dual terminal bolts on both + and - sides. I ran the 4/0 battery cables, from batteries directly to the Victron MP2, removed from the 2KW Xantrex (I had the same older model) and all secondary 6 AWG cables that OTT had on the batteries, I also bolted to the Victron bus vs. out to the batteries. If you get this all done at the rally, that will be a great story! Take pictures and post...
1 point
-
Been watching the RedoDo tear downs and from what they see based on BMS stickers the same company makes LiTime, Power Queen, and RedoDo. I can fit 3 140amp batteries where the 4 AGMs are now. I posted pics in this thread of what I think are all the components of what I have now. I have no idea how to reprogram my solar charger. Will get on You Tube to figure that out. My current Xantrex is the ProWatt SW. Can I program it for 420 watts of Lithium? I’m willing to upgrade to the newer Xantrex 3000 Watt, there are 3 on Amazon and not sure which one to get. Will research that too. Will also look at the Progressive Dynamics charger. Have Portable Suitcase solar now, and would worry about that till I get to the Rally in April. Saw some great. Posts on where to order custom cables with the lugs on the forum. Solar Experts put the solar on our house and did a GREAT job. Will reach out to them and see if they could help with install in Tampa. Was also told a lot of Boat Companies install Xantrex and I should also reach out to them. JD, thanks again for your reply and thanks for all your great posts on this forum.1 point
-
You are right. But, the odds of such a fire spreading to your neighbor's trailer, and therefore creating liability exposure, are slim. Doing your own modifications would more likely just limit your ability to make a claim against Oliver or Truma for the loss of your trailer.1 point
-
Good to know Mike. I’m looking at 300 to 420ah. Is aH amps?1 point
-
We did the same thing. I wouldn't want to modify the burner assembly on my own even if I knew how to do the welding. You're a former attorney. I would think that if a person did that and if there was a fire, you would not have a legal leg to stand on. Correct me if I am wrong. John1 point
-
Love a front-end loader! Miss the Kubota tractor I had to sell when we left VA! I would not buy ANY brand on Amazon. Check out these: https://www.amazon.com/Litime-LiFePO4-Battery-Lithium-Phosphate/dp/B0BYH8J176/ Check out this post, same issue as you have. Check out @Ronbrink's post, 5th post on this thread. He and @topgun2 have had these batteries installed for some time without issues. This is the cheapest solution and the "Spring Deal" price today is AMAZING! Ron shows a picture of his clean installation in this link:1 point
-
If you look in the wheel wells you see them where the steel reinforced frame touches the aluminum frame. They are about the diameter of a quarter.
1 point
-
For those questioning the casing "broken" like the pictures show, it was intentional! IF the set screws are seized, there is no other option. I was merely showing how I was able to remove. Thanks1 point
-
Your burner assembly will then be "better than new." We submitted our replacement request to Oliver promptly after receiving the recall notice, but still we wait for a properly crimped burner assembly...1 point
-
You are correct in that OTT video says two gallons as well. I use 2.5+ gallons. Just a matter of how long your stroke is! 🙂 GJ1 point
-
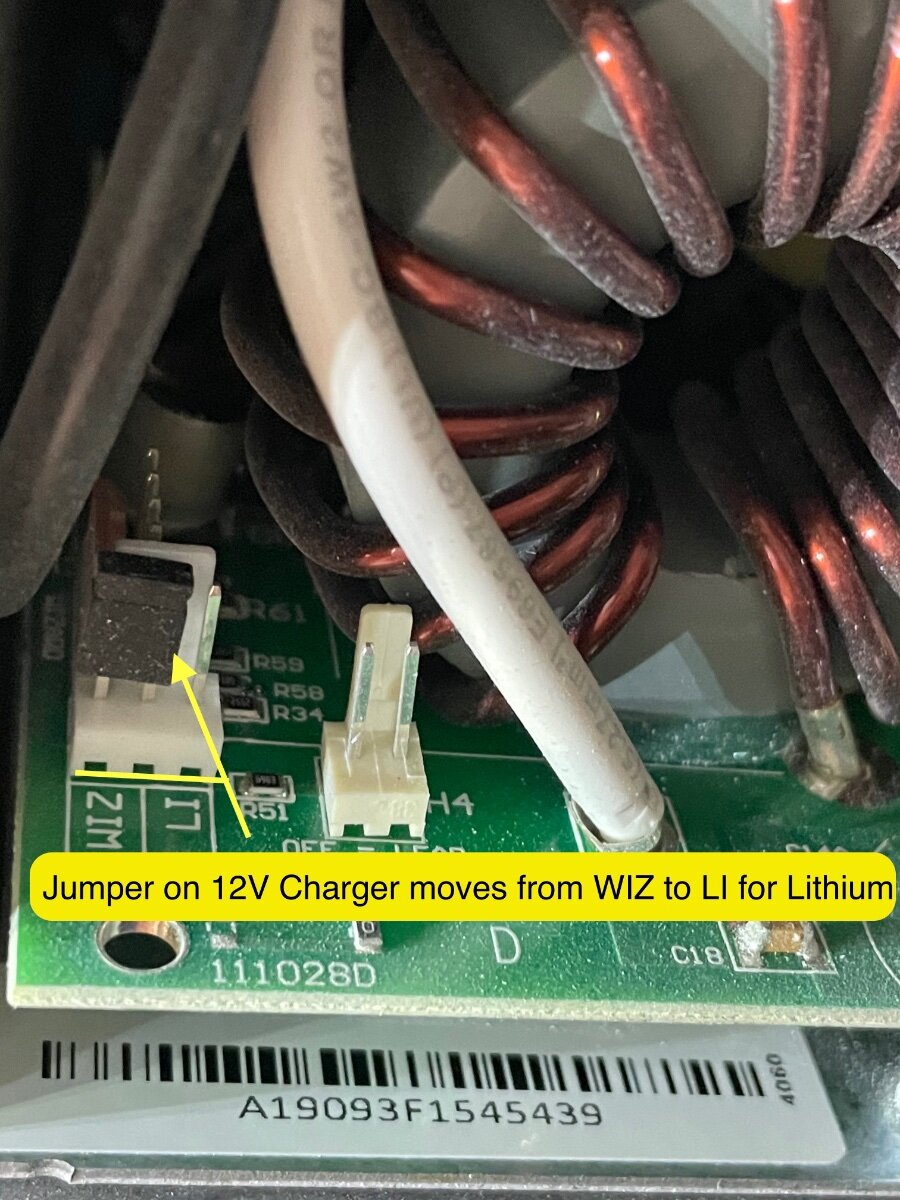
Imelda: For unit 642 (maybe a 2020 or 2021 model year) first step is determined if your Xantrex is an INVERTER only function or if it's a combo inverter charger. If your system has a 2000w xantrex inverter/charger then the battery swap is simple. If not, then you'll currently be using an progressive dynamics charger which is located in the black breaker box (under the dinette seat). The pix below is the breaker box with the cover removed. The 12v Charger is in the upper left with the white wire connected to the charging board. Some folks with the Progressive Dynamics charger see a jumper switch on the charger unit (upper left in overview) for charging lithium. In the pix below I've zoomed in on the charging board jumpers. The issue with that LI setting is it's not the "best" way to charge lithiums as it's simply a constant 14.6V voltage...not a ramped profile. The WIZ setting of the jumper is a PROFILE for AGM or LEAD Acid. The LI Setting is just 14.6V (no ramp/no profile). Some battery manufacturers (including Lithionics) won't warrant their battery in presence of the constant 14.6V no profile setting. Whichever lithium battery manufacturer you select, LI Time, Epoch, etc....be sure to check what they need as a charging profile. If a constant 14.6V works for them, then you might be able to a drop in maintaining your existing Inverter and existing charging system. I know that battle born did warranty their batteries with the Progressive Dynamics chargers. Also, there are new "Lithium compatible" plug in boards for the progressive dynamics load center that offer a lithium profile wizard. So just upgrading the charging board in your Progressive Dynamics energy center is a possibility. Upgrading requires unscrewing that charging board, disconnecting the white wire and sliding in and securing the new charger for LI. In our case (2019 model hull 505) we swapped out the Xantrex 2000W Inverter (only) for a newer Xantrex 2000 inverter charger before installing new Lithiums. My full upgrade article is here. This may be too much of an effort for what you want to accomplish but hopefully my explanations help. Craig https://4-ever-hitched.com/ggs-blog/f/lithium-battery-upgrade?blogcategory=Electrical+Upgrades
1 point
-
@LeeC Did you talk to OTT about signing into the Rewards site? What did they tell you? I think the reason you can not register is because OTT no longer has a rewards point system (with dollars put on a credit card) like they use to. Not sure if still offered, but they used to have a program of paying you if you show show your Ollive to a prospective buyer who than buys a new Oliver. You had to agree to show your OTT by signing up on the web site.1 point
-
If you can get the old batteries out of the Oliver - then - you can certainly get the new lithiums back into the Oliver. One of the nice advantages to lithiums is that they weigh much less than a conventional battery of the same size. Bill1 point
-
I assume in 2018 model, your xantrex is the INVERTER only function, and for 12V charging you're using the internal progressive dynamics charger (under the dinette seat). Some folks with the Progressive Dynamics charger see a jumper switch for charging lithium. The issue with that setting is it's not the "best" way to charge lithiums as it's simply a constant 14.6V voltage...not a ramped profile. The WIZ setting is a PROFILE for AGM or LEAD Acid. The LI Setting is just 14.6V (no ramp/no profile). Some battery manufacturers (including Lithionics) won't warrant their battery in presence of the constant 14.6V no profile setting. Whichever battery manufacturer you select, LI Time, Epoch, etc....be sure to check what they need as a charging profile. If a constant 14.6V works for them, then you might be able to a drop in maintaining your existing Inverter and existing charging system. I know that battle born did warranty their batteries with the Progressive Dynamics chargers. Also, there are new "Lithium compatible" plug in boards for progressive dynamics that now offer a lithium profile wizard. So just upgrading the charging board in your Progressive Dynamics energy center is a possibility. In our case (2019 model) we swapped out the Xantrex 2000W Inverter (only) for a newer Xantrex 2000 inverter charger before installing new Lithiums. My full upgrade article is here. This may be too much of an effort for what you want to accomplish. https://4-ever-hitched.com/ggs-blog/f/lithium-battery-upgrade?blogcategory=Electrical+Upgrades
1 point
-
1 point
-
Open the drain while driving to your destination. But why does your fresh water tank have any water in it if it’s supposed to be winterized?1 point
-
I needed to verify numbers showing for the Orion Charger are relative to what the Victron Smart Shunt was reading at the batteries. The screenprints (Orion vs. Shunt) were as follows (pic1). Why does the Smart Shunt showing 10A more? Because the Blue Sky solar (pic2) was adding +12A and the remainder -2.3A is used for inverter standby overhead, exterior Courtesy Lights (always on) and some parasitic. These numbers add up nicely!
1 point
-
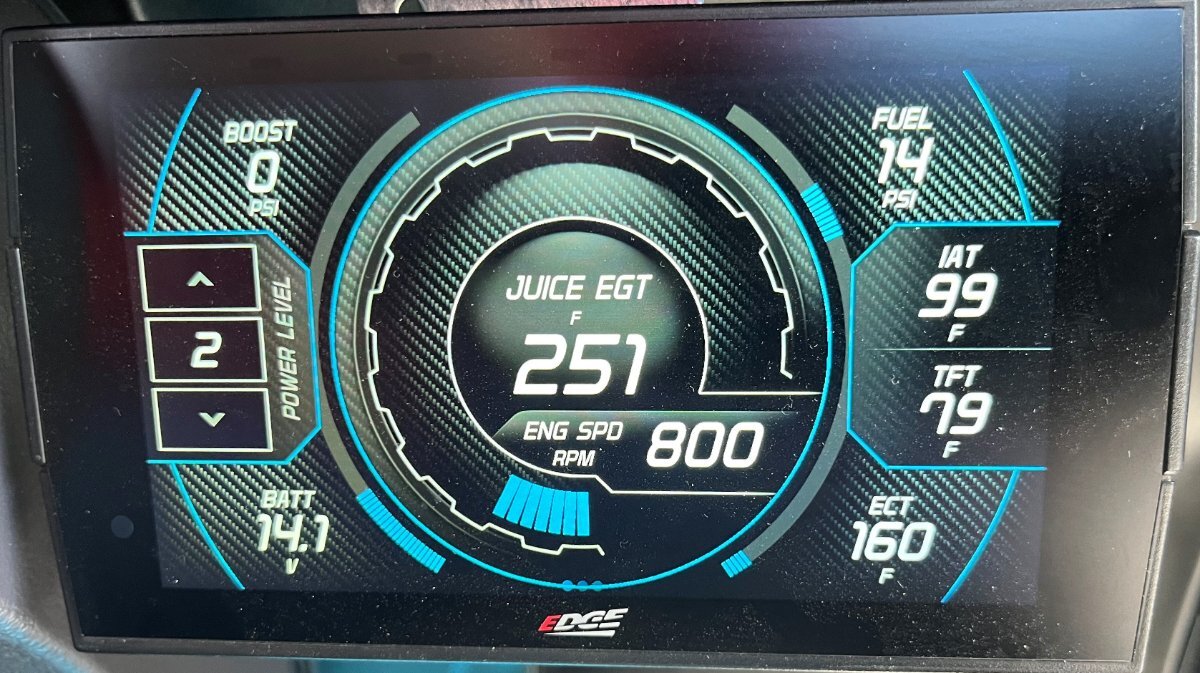
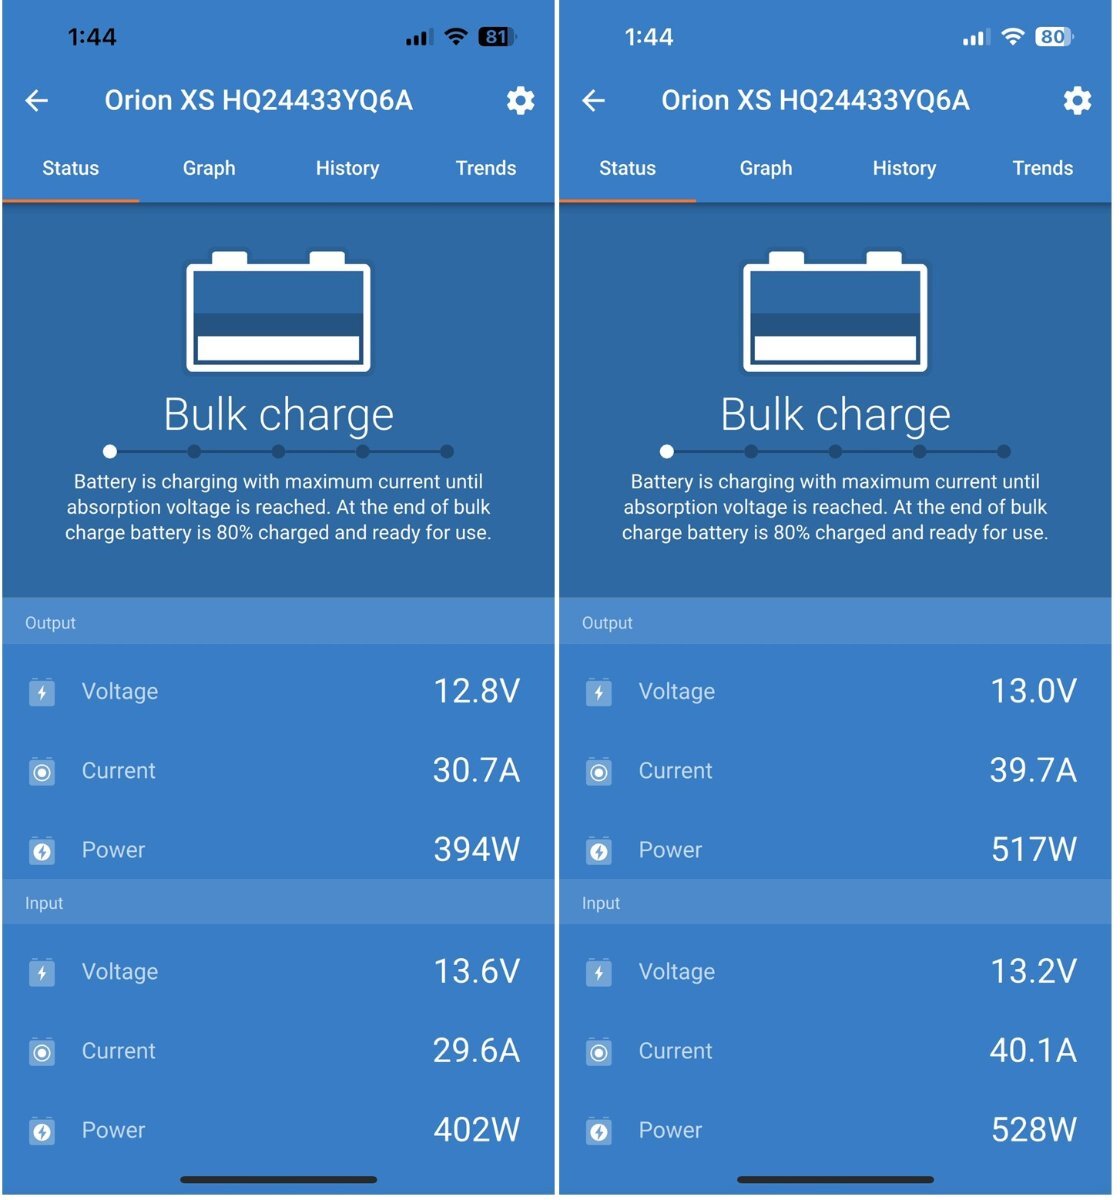
At start of the performance test, the 600AH Epoch Essentials LiFePO4 batteries were at 100%, rooftop solar sitting in the midday Arizona sun. So, I started the A/C on inverter. It was a mild day low 60s. I set the thermostat down to 55F, opened the windows so no cold air would collect inside and just 34 minutes later SOC was down to 86%, with the old compressor of the noisy Dometic PII running continuously. I also warmed up the tow vehicle and after 25 minutes idling the gauges looked like this (pic1). Engine Coolant Temp (ECT) was up to 160F (190F is fully warmed up). The idle engine speed at 800 RPM and battery voltage held steady at 14.1V. I did not take a second picture but when the truck was connected to the DC-DC charger, voltage read 13.8V on this gauge. At first I had configured MAX charge to 30A and took a reading and quickly reconfigured it to the default 50A max charge. Below are the two screenprints, shown left to right (pic2). Set at 30A MAX, 30A was received and 30A also in output. Set at 50A max, the charger output was 40A. This must be due to the 800 RPM idle speed. At highway speeds, the Cummins is generally about +/- 1900 RPM so the HD alternator should produce both higher voltage and amperage. Again, voltage measured at the truck was 13.8V and when the charger was set for a 30A it read incoming voltage at 13.6V, a -0.2V voltage drop. When producing 40A, the Orion read 13.2V, a -0.6V drop. Is this voltage drop along the wiring? And I do not understand the lower voltages produced on the output side, as I would think the Orion charger would output higher voltage in the range of 13.6V to 14.2V to the batteries. Maybe Geoff @Snackchaser knows, how does this makes sense? The 30A charge looks fully efficient. Set at 50A I got 40A idling at 800 RPM. The final test, I will run start of your next trip, will be to test the 50A charge setting at highway speeds. All this was done sitting at idle in my driveway. More to come…
1 point
-
Excellent write-ups on your DC-DC install! Looks like you have it dialed in for peak efficiency, waiting to learn more on its awesomeness! I too ‘home shop’ for spare parts and materials to complete any given project, definitely saves time and money. When I did the alternator upgrade on my former TV (Mechman 320 Amp High Output Alternator) I installed the Big 3 wire upgrade, which substantially improves grounding at the alternator, engine and frame using 1/0 cables. However, I have since stripped said alternator and cables from the Silverado 1500 for future install on the Savana 2500, which has a 150 Amp stock alternator that will suffice for now. I’ve already done the same with the formerly installed DC-DC cables on the Silverado and the Savana is now readied with the rear bumper Anderson SB120 connector and Source Side Environmental Boot/Cover.1 point
-
Love the fox! It was the perfect snow, snowing while we were sleeping. It only stuck to soft surfaces since two days ago it was 60F and the streets and sidewalks were well above freezing. This never happened when we lived in the Midwest, LOL! We did shovel the decks to keep the redwood in good shape and we took a truly enjoyable late afternoon walk! 😂1 point
-
I appreciate your sentiment. I simply cannot repair or have the mental acuity I had when I was 80 year of age. I purchase those repairs and maintenance until they will no longer fit my budget. Then I must no longer enjoy the Oliver and the joy it brings to my quality of life. I had to make the same decision when I no longer could sail as a result of manual dexterity. Thank God I have the where-with-all to cover maintenance and other costs associated with my Oliver..1 point
-
Curious how that worked out….. We opted for the Oliver after deciding upon a fiberglass trailer, discovering that the Casita was too small, and not wanting to venture to the PNW or BC to look at the other FRP trailers. We had looked at cheap “Coleman” trailers (like $12,000 at the time) but we’d had bad experiences with typical “built-up” motor homes that that shake themselves apart and leak after 3 weeks. (The last one we literally had to give away.) I am and remain impressed by the construction of the Oliver over the stick-built, aluminum covered trailers. Anyway - we heard that Oliver resale values were “high” or “great”. Salesman even said you could sell it used for most of what you paid for it. That said - just curious what people have seen used Olivers going for and/or how much people bought (or sold) their used ones for. BTW - saw my first “Bowlus” trailer today. I looked them up and they’re gosh-awful expensive. I don’t care for the looks, and that pointy back and and flimsy bumper look like they’re inviting a rear-end collision by one of the many tailgating drivers out there…..
1 point
-
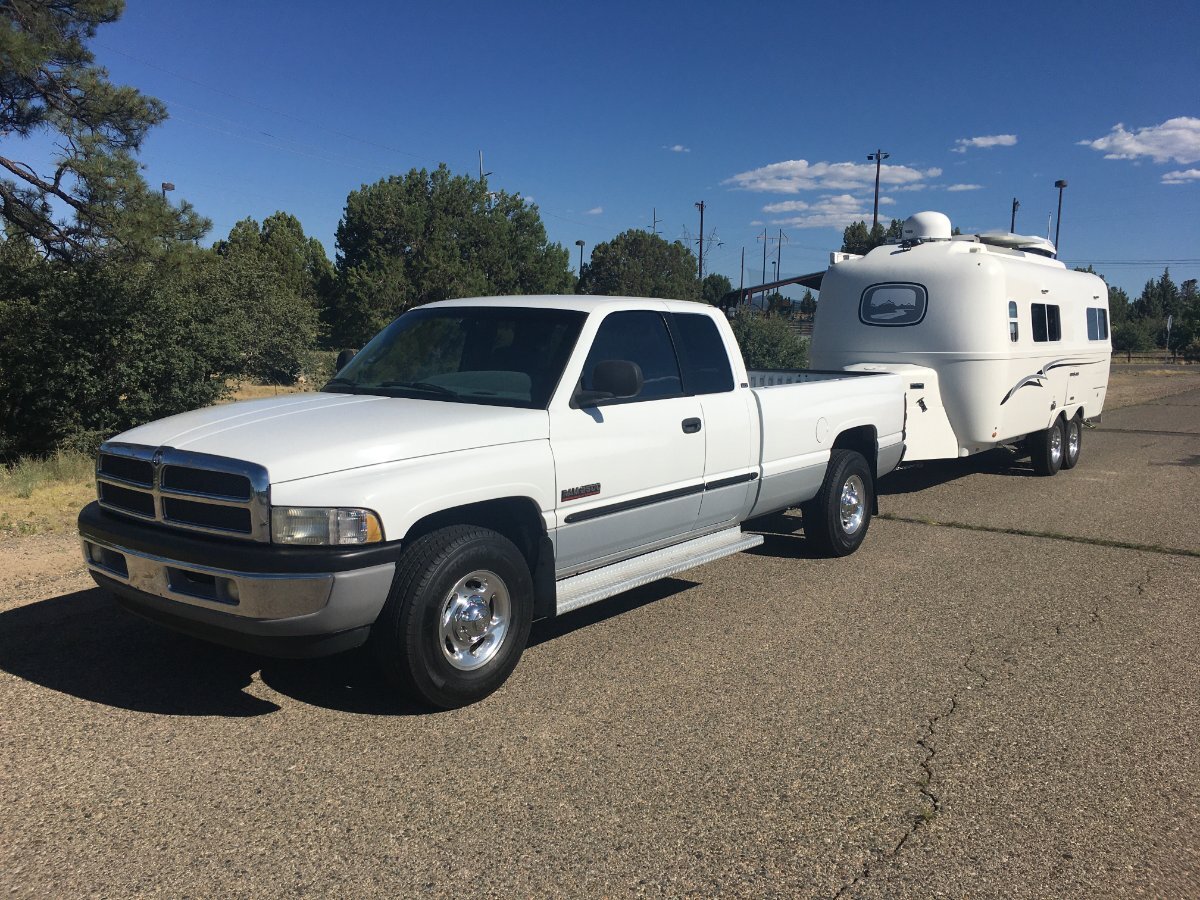
Thanks again, GJ. Love the PITA factor! 🤣 I went into Oliver ownership thinking I could pay about half the cost of a new hull with the used one I found locally, and then add $10K in component upgrades (plus my labor). I then purchased a truck at 20% of the cost of a new 2500 diesel truck (both were great finds!) and again invest another $10K in parts for TV restoration and upgrades. The plan has worked well except that I have added $12K in parts to the 2016 Oliver and another $12K to our 2001 Dodge Ram, so I'm $4K over budget and several hundred hours into maintenance and restoration labor. But as you can tell, I certainly enjoy this work! I would like to upgrade the A/C spending $1,650 plus labor and our Oliver does not need much more except for perhaps a Starlink Mini at some point. The Ram is in great shape today except I may spend on a stage II transmission rebuild someday which would certainly be WAY over budget. I like the classic look of our 2016 Oliver pulled by a matching 2001 TV. It suites our style! These pictures were taken about a month after our purchase in July of 2023, without new wheels and tires and all the Oliver mods! 😂 Oh, and I do use the Anderson regularly. Not for sway but for leveling. The TT and TV become one with the Anderson, otherwise it would be bouncy at the hitch (not enough tongue weight).
1 point
-
Thank you GJ, and yes, please swing by Prescott when you travel the mainland this year! I installed this pump Jan 2024 after earlier trying a Seaflo pump that did not work out to my expectations. I wrote up a mod post on this and the motorized valves installation here: https://olivertraveltrailers.com/forums/topic/9771-water-system-upgrade-for-better-water-flow-pressure OK, so y'all are going to love this! This guy, me, installation guru guy, I can be dumb, and yes dumber than the next guy! 🤣 I FOUND THE LEAK! Why did it leak on Day 2 of our trip but not during Day 1? As Chris has told me often, when I loose something, "retrace your steps." I started thinking in this way. Then realized, I used the outdoor shower at the campsite to rinse something our first day out. I left the cold water valve on. The only thing holding the water from flowing out fully was the water control lever in the shower head. I fixed this by merely closing the valve, OMG! I was hoping it would be easy to see and correct and it was. So, we're back to NO failures since we took possession of our Oliver, lucky number Hull 113 on June 7 2023. I'm knocking on WOOD now, three times, since saying this. That large block of WOOD, up top and center, often referred to as the NOGGIN!1 point
-
I've lived, worked or played in 51 countries. Wish I could do it all over again! GJ1 point
-
Hit a deer with my ‘84 Goldwing Standard, coming home one night in Georgetown TX. Saw her coming and kept it up on two wheels as she glanced off the side of my bike. Heck, the raccoons in suburban Chicagoland are larger than the deer in Texas! 🤣1 point
-
Yeah, I’d say you called that one right. I just mentioned that I like to keeping things OEM - and it spiraled from there. 😋 Hopefully, people looking for info on Andersen Hitch will have sensed the (major) drift and stopped reading long ago. It’s kinda the nature of conversation though, right. You’re right of course - I never cared for Belgian beer until I tried DeKoninck at the brewery.1 point
-
Lots of great information, I’m trying to digest it all, my map is getting a workout. It’s quite a drive to the PNW from south Texas and we want to plan enough time do make the most of that long drive. Thanks to all for your insights! Mike1 point
-
I totally agree with all the recommendations above, except I'd also skip the WA coast past the Oregon border! If you want to continue North toward Canada, and see the area around Port Townsend, then that's worth it and little more complicated for a short discussion. I was glad to see that Lassen Volcanic Park is already on your list, it’s one of our favorite National Parks with lots to do and see in the area. Lassen’s Manzanita Lake campground, surrounded by snow capped mountains, is spectacular. If your a fisherman, there is premier fly fishing in the lake, and nearby Hat Creek. And since you will be that far south, then come 4 hours West to Eureka! South of Eureka is the famous Avenue of the Giants (Redwoods) and many great campgrounds. North of Eureka, Hwy 101 goes all the way up the CA and OR coast with lots more redwoods mostly on the CA side. As mentioned, most of the state parks are typically booked six months in advance during the summer, and it’s best to reserve if you can. But we travel the coast every summer without reservations, which is doable if you're willing to hit a few different places and shop around while exploring. Many of the local camps are still first come first serve, and there are always last minute cancelations and private campgrounds. Some parks have un-reserved ADA sites, and you can usually stay there after 5:00. We like the flexibility of not being on a reservation schedule because sometimes the rain totally sucks, and other times it's gorgeous. Patrick's Point, recently renamed Sue-Meg, is another of our favorite spots just minutes north of Eureka. There is whale and seal watching from the cliffs, a Sumac Indian village, Agate Beach, scenic Trinidad Harbor, nearby Elk herds, and great walking trails. Jedediah Smith Redwoods State Park is another great spot just east of Crescent City. It's a lessor known park on the beautiful and sparkling clear Smith River. There is a recently discovered ancient redwood groove within a short walk that is protected with elevated walkways. Yes, it’s true! We also recommend taking a scenic jet boat tour up either the Klamath or Rouge rivers. Oh, and stop at the giant Paul Bunyan and Oxen attraction near Orrick, CA. It looks like a kids place, but it’s well worth stopping for the museum and the gondola ride above the old growth redwood canopy. If you get in a pinch near Eureka, give us a shout. You can alway hook-up in our yard under the redwoods, next to a massive 1500 year old stump. There might be some bears around, and there might definitely be snacks! Cheers! Geoff1 point
-
I have lived in Oregon my whole life. You have planned an awesome trip. I second the recommendation to visit the Olympic National Park in Washington with a day trip to Victoria (and Butchart gardens) via passenger ferry. As for the Oregon coast, I would seriously consider the incredibly scenic Southern Oregon Coast instead of the much more crowded central Oregon coast. Since you are planning to visit the redwoods, afterwords you can just continue north on Highway 101 from Crescent City California through Brookings, OR and north to Reedsport where you could loop back east to interstate 5 if you wanted to. Some of the nicest coastal State Parks in Oregon are in the remote south coast stretch and there is less tourist pressure. The other thing I would share is that if you only see the western part of Oregon and Crater Lake, you will miss some of the best of the state. Over half of Oregon lies east of Crater Lake and is high dessert and canyonland country. Much of it is very remote with few lodging opportunities and only the lucky folks with a good trailer can easily take advantage of it. If you have time, one of the most remote and spectacular places in Oregon is Steens Mountain. Should you decide to make just one stop in Eastern Oregon along the way, I would suggest making it Steens Mountain and surroundings. (Steens Mountain is the first place I went after I brought my Ollie home from Hohenwald). You can reach Steens Mountain by traveling west from Interstate 84 at Ontario, OR, or west on Interstate 80 out of Salt Lake City and cutting north at Winnemucca on highway 140 to Steens Mountain (Frenchglen, OR). There is a wonderful BLM campground outside tiny Frenchglen called Page Springs, and it is close to the start of a gravel road that allows you to drive to the top of spectacular Steens Mountain itself at over 9.000 feet. Your timing will be good for a visit to Steens Mountain as it is only accessible a few months out of the year due to late snow melt (July) and closure when the first snow falls in late September or October. (bring insect repellent) The surrounding area is rich in history, much of which dates back to the mid-1800's, the Oregon Trail, Cattle Barons and gold and silver mining. From Steens Mountain, you can continue on to Crater Lake via Bend, OR and then south down to Lassen and then west over to the Redwoods. Something to consider if you have the time.1 point
-
We lived in Washington state for 26 years before moving to Colorado. I also agree with EurekaJ's comments. There is so much to see and do in the PNW! I hope you are allowing lots of time. If you have flexibility, I might suggest you plan for September as the crowds are a little less and the weather is still spectacular. After Labor Day, you may find it a little easier to find availability and a little more elbow room. The Oregon coast is really special with amazing places I would put on your list (from South to North) - (these are just a few) Cape Kiwanda - hike up the sand dunes on the North side of Pacific Beach for unbelievable views, especially at sunset. Cape Mears Lighthouse Oswald West State Park - from the parking lot, take the paved trail under 101 highway to Short Sand Beach Cannon Beach/Haystack Rock - great beach town, Haystack Rock is an Oregon icon. Ecola State Park - Drive all the way out to Indian Beach for fantastic views and scenery As a side-note, the coast of Washington is really not worth visiting except from Klaloch north into the NP. I might follow EurekaJs suggestion of visiting Fort Steven's at the mouth of the Columbia River and then heading east back to I-5 and from there up to Rainier NP. While in Olympic NP, make sure to take the drive up to Hurricane Ridge. I would plan to do this in the evening. All the tourists head down the mountain around 5pm but it's still light until almost 10pm that time of year. When the crowds are gone in the evening, the wildlife comes out. I've seen marmot, bears, fox and deer. Drive along the ridge to the end parking lot and take the short hiking trail for incredible views across to Mt. Olympus and the whole Olympic range. Go early or late for Rainier NP as well. It can be an absolute zoo around the visitor centers and nearby trails mid-day. Mt. Rainier is considerably more stunning in the early morning light or at sunset. I would recommend the Paradise visitor center area on the South side over the Sunrise visitor center on the North side. If you are a hiker, one of my very favorite hikes, ever, is Pinnacle Saddle. https://www.wta.org/go-hiking/hikes/pinnacle-saddle If you are going all the way up to North Cascades NP, you might also consider a side trip out to the San Juan Islands. You could leave your trailer and take the ferry across from Anacortes. The ferry ride is beautiful and you could get lucky and see the resident Orca whales or take a whale watching boat from San Juan Island. I've rambeled on enough. Hope this is of some help and happy answer questions if I can...1 point
-
I just thought of another…. If you are transiting Central Oregon (near Bend) along your route, I suggest you look into the Newberry National Volcanic Monument. The campgrounds near Paulina Lake are beautiful. It is a remarkably diverse geologic region - the monument is quite large, it is just not substantial enough to be a NP. This has the added advantage of being slightly off the beaten path away from the many other popular Pacific Northwest destinations.1 point
-
We lived in the Seattle area for 35 years. It is much cooler than Texas during August and September! It is also one of the driest places in the USA during July and August, believe it or not. The Northwest does not get the Southwest monsoons that time of year. But, by mid-September, the cloudy/drizzly weather moves back in. I concur with EurekaJ's recommendations above. While you are north of Seattle, I also recommend a night or two at Deception Pass State Park near Anacortes, Washington. And, if you are history buffs, a visit to Lewis and Clark's Fort Clatsop south of Astoria in Oregon is worth a stop. Plus, I recommend a few days exploring the Oregon Coast. I would book an RV site at Beverly Beach State Park (one of the nicer state parks we have been to) and do day trips from there, both north and south, to explore the many spectacular beaches and coastal rock formations.1 point
-
@MAX Burner, Maybe it’s time to try making espresso shots with your favorite Black Rifle coffee and really make that half-cup of Joe work a little harder. Mossey1 point


.jpeg.4632db6af0b004f82ea58c8212cf4f5e.jpeg)


-
Recent Achievements
-


")


")


")


