Leaderboard


Popular Content
Showing content with the highest reputation on 06/25/2025 in Posts
-
Is there any knowledge or do our forum members have opinions on this subject? After 26 pages of comment re leaf springs I’m disappointed not a word here! This is equally important. I read the entire 5-page link GJ provided, when he posted a few weeks ago. I could not see on that forum that they achieved consensus. Maybe somebody can show how Nev-R Lube lives up to their claim. Keep in mind it’s Dexter. Some have seen failures in 1 year, others 5 max, it cannot be never! I will be at Alcan Spring today. I will purchase their HD springs, shackles and wet bolts. I cannot have 5200 lb axles installed since I need 50” and they stock 50.5” that most later hulls need. I will ask why +/- 0.5” matters. I will ask their opinion on new EZ or Nev-R bearings a why they decided to stock kind. Maybe they can drop-ship me the correct axles. Or maybe I can get a good used set of 5200 lb axles, with tried and true conical bearings, any length and have them cut and welded to size, bolt on new bearing/brake assemblies. We’ll see. I don’t believe in annual bearing service anyway. Annual inspection yes, but when bearings are cleaned and packed correctly they will last 3-5 years with average mileage. I replaced bearings with Timken 2 years ago. I’ll open one up to see next summer and will post pics. If anybody wants to learn the correct method, let me know and I will start a new post. Most of you will prefer the claim of EZ or Nev-R when you don’t work this service yourself. I didn’t want Alcan to work my installation anyway. That would take all the fun out of it! 🤣6 points
-
Hi Mark, There could be a number of reasons why the 25 amp Inverter breaker is tripping. However, assuming that the Air Conditioning and Charger are otherwise working fine, then the most likely reasons are the inverter settings, the breaker, or the generator. It’s helpful to understand that all AC loads (except the refrigerator) pass-through the inverter, and it automatically prioritizes current to the AC loads over charging. So when the 20 amp Air Conditioner is passing through, it throttles down the charger amps to prevent overcurrent. The inverter charge current demand is highest when the battery is discharged, so it might just be overworking the inverter enough to trip the breaker’s thermo element when running the Air Conditioner with a discharged battery. If the battery is not fully discharged, and it’s still tripping, then read on. BTW, if the inverter is turned-on while using shore or generator power, it only means that it will automatically transfer to battery power if shore power fails. Also, the generator neutral bonding will not impact the current or breaker, but it’s required by code. I have 4 troubleshooting suggestions. Items 3 and 4 will require some experimentation with the inverter settings and this is best done using the Xantrex phone app. These settings will not harm anything, but they will reduce inverter output to match the capacity of your generator. It’s a low probability that the 25 amp breaker is bad, but it is a possibility because the inverter should warn you and shut down when it nears it maximum output… before the breaker trips. A quick assessment can be made without an amp meter. If it’s tripping instantly, it means the magnetic short circuit trip function is probably bad and the breaker should be replaced. If it trips’s after some time, and it can easily re-set after cooldown, then it’s tripping on the thermo function and it’s probably okay. The generator is big enough to handle your loads, but it could be that the regulator is not working properly. Verify that it’s increasing RPMs when the load increases. You can also check the input voltage on the Xantrex display, it should be close to 120 volts. The inverter’s charger current setting is too high (Setting 24.) The default setting is 150 amps, but it’s not an amp to amp conversion. I’d set it to 30 amps and if the breaker no longer trips, then dial it up in 20 amp increments until you find a trip-less value. I had to change this setting on my inverter because it was drawing more current than my 2000 watt generator could supply, and I was getting low voltage brown outs. It would have probably tripped the breaker eventually, but the generator tripped first. I think I finally set it to 60 amps. The inverter’s AC input breaker setting is too high (Setting 28.) This impacts the load prioritization ratio. The default setting is 50 amps so you can start by setting it to 25 amps to see if that works. If so, then dial it up in 5 amp increments until you find a value below the breaker trip value. Note: I’d change settings 24 and 28 at the same time, then dial them up until you find a an acceptable value where the breaker does not trip. I hope that helps! Cheers, Geoff4 points
-
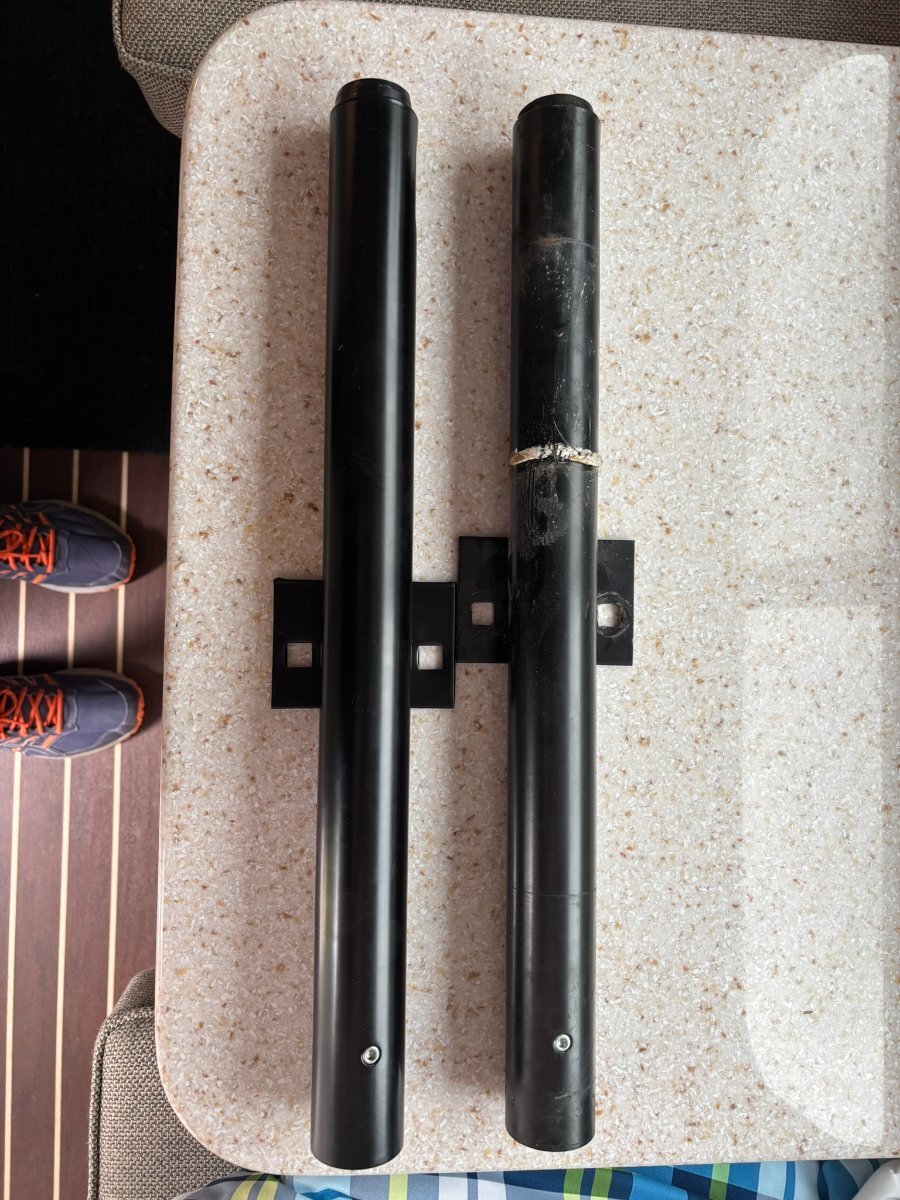
Alright, time to close this out. I received the replacment jack post assembly from Barker which they shipped to me at no cost. The picture below shows the new unit next to the old unit. As I knew, the mounting bracket on my existing jack sleeve was welded the the incorrect location by about one inch. The swap out was easier than I expected and I now have plenty of clearance under the hatch as it should be. I want to thank Bob Asher at Barker for his help with the free replacement and with swap/install instructions! Great customer service! I also want to thank everyone who responded in this thread in a effort to help! The collective knowledge and experience of this group is really valuable.
 4 points
 -
Here is how I remember it: The Inverter's job is to Invert your power. It takes DC from the batteries and turns in in to AC via a transformer an turns it upside down again and a gain to create 60 hertz Alternating Current for your 120 V systems. The Converter takes 120 volt power and Chargers your batteries. Normally the Auto Transfer Switch causes the Inverter to not be energized at the same time as the C. nThis is because the inverter is not needed when you have A/C power from a shore power source. But it is possible and desirable to charge your batteries using the C and also power it up by your generator providing the energy to do so. This can be a high draw and "sucks up" much of what the main breaker will allow. Since I don't have clue what systems you have in a wonderful 2024, I can only suggest that if you have the ability to change your C charge rate, it may be pulling a lot of power that overloads the breaker. Hence some folks have dialed down the charge rate to leave more power available for other uses. You can check this by flipping the C's breaker off and see if you are still tripping the main breaker when on generator. OH one more hint. Many generators require us to use a bonded neutral plug. Like Honda's for example. I would start with that topic on the forum. The Progressive Industries EMS will no allow power from an unbonded neutrall for such generators. But failing to do so has not tripped a main that I am aware of. It willl however preclude shore power from getting you to your 120V loads. Hope this helps out a little bit. GJ3 points
-
We're back home now. We did a Salida, Gunnison, Montrose, Grand Junction, Moab, Telluride, Durango loop in May and early June. Riverbend was on my list but we stayed at Black Canyon of the Gunnison instead. It was great...I'm sure you'll enjoy the park!3 points
-
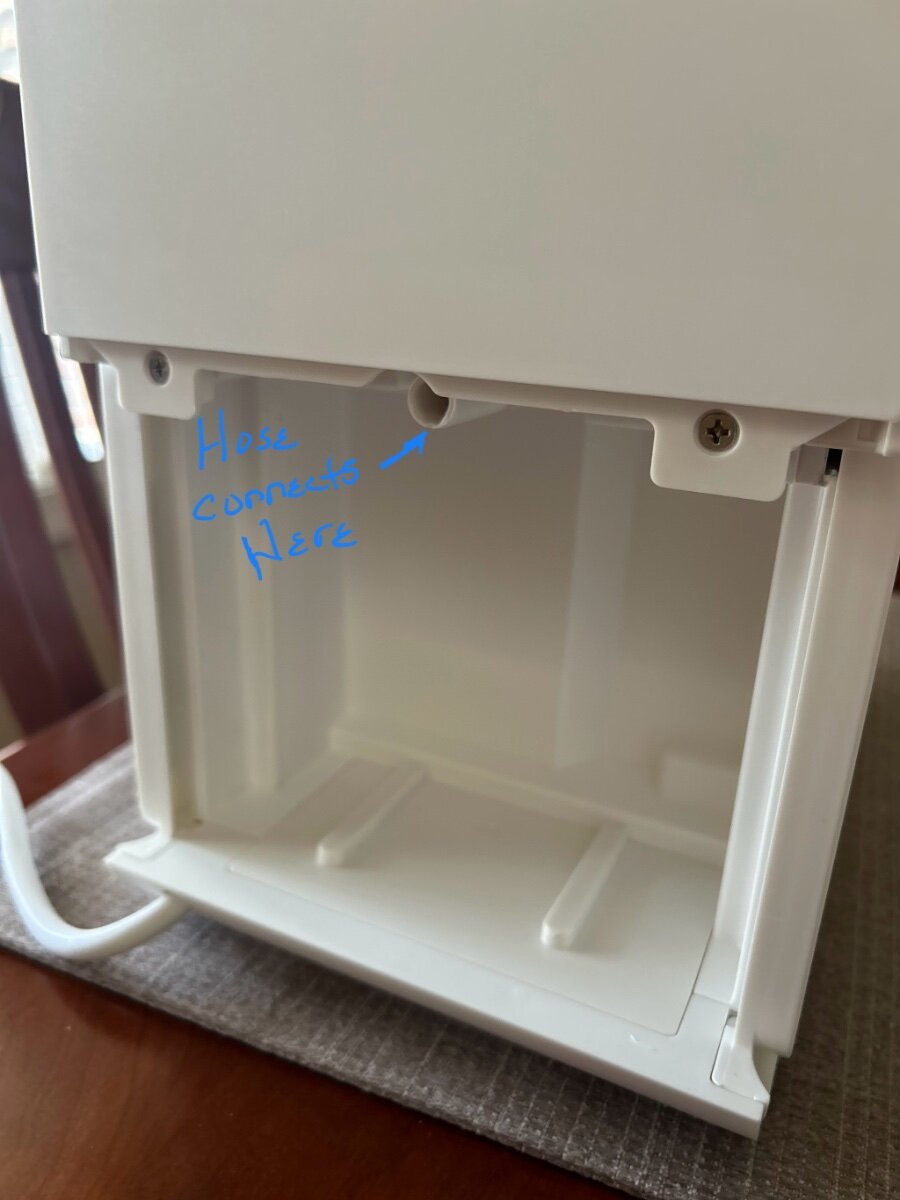
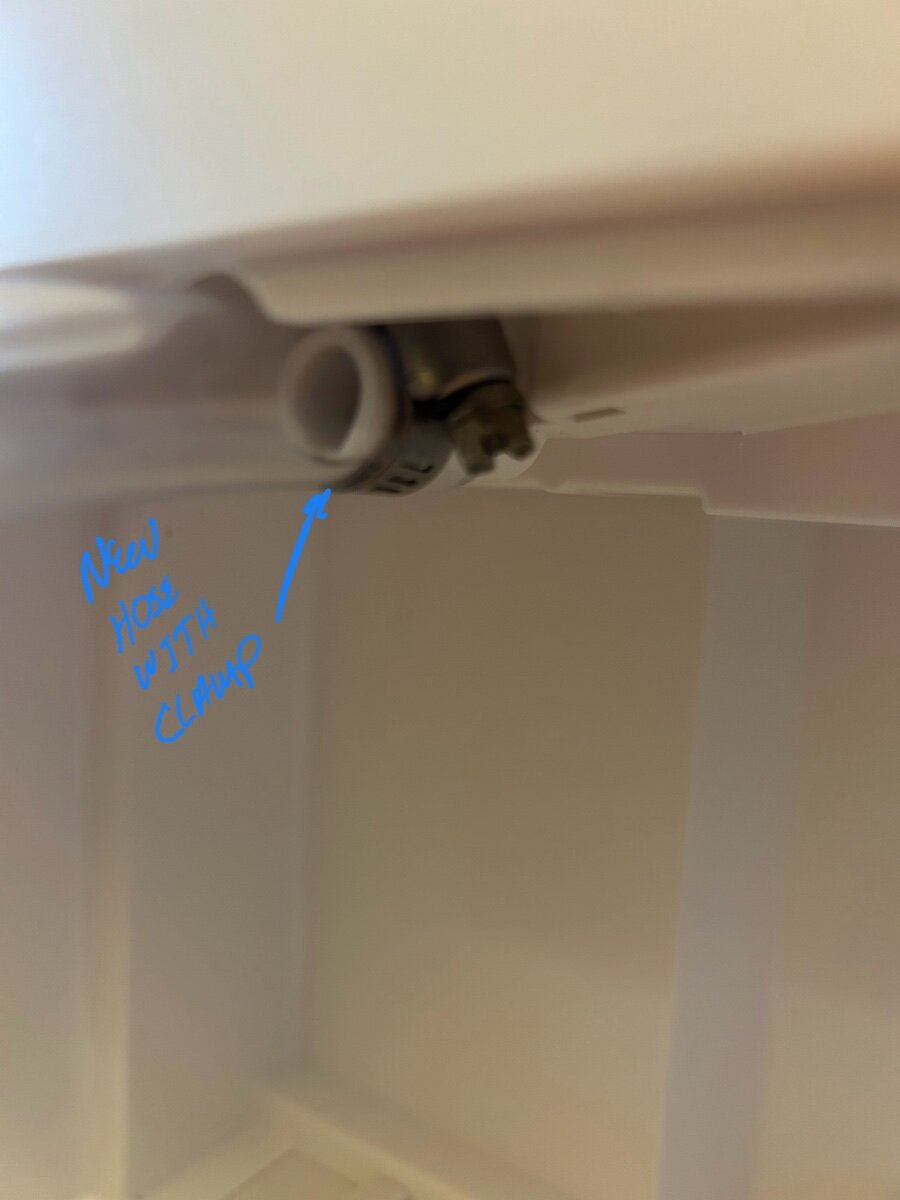
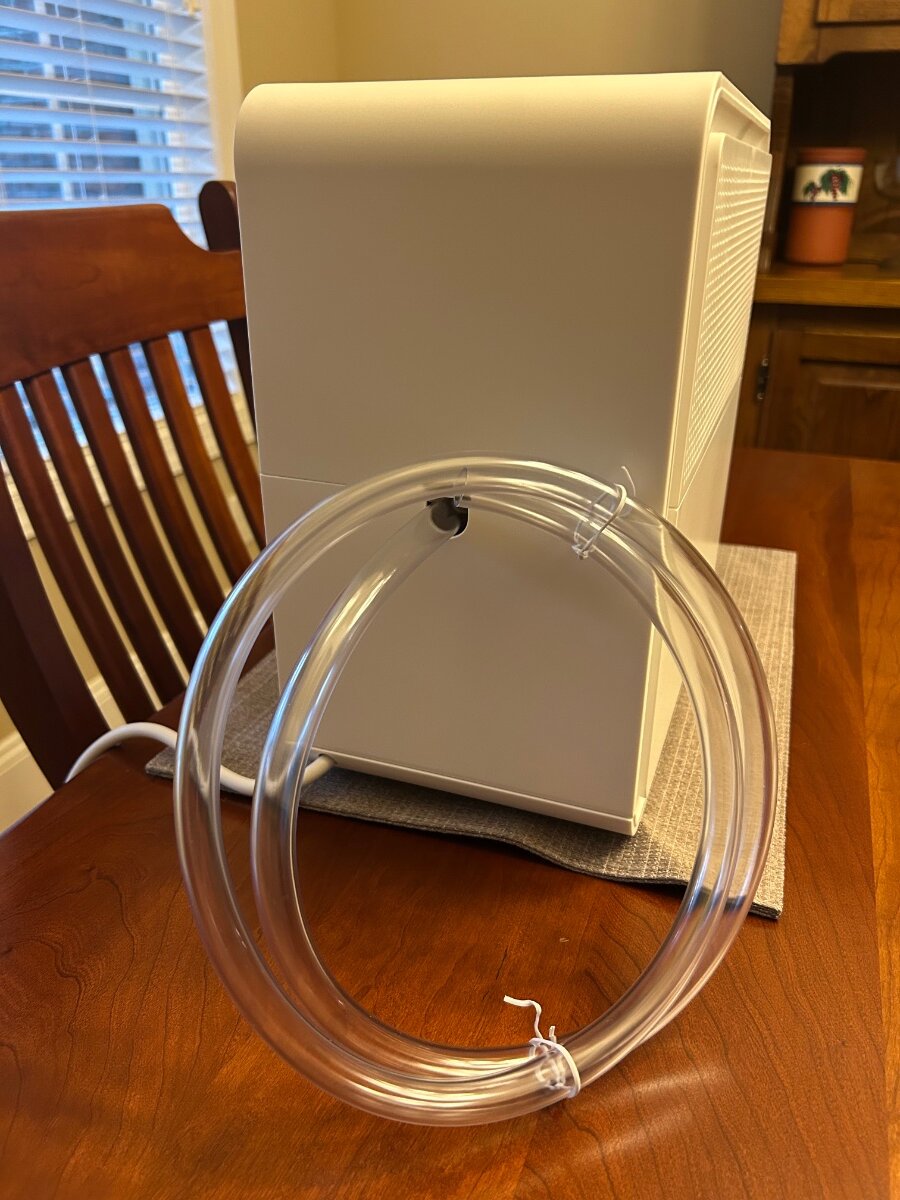
I quickly discovered after opening the box that no condensate hose was packed with the above dehumidifier. So I shot a quick txt to @Ollie-Haus who confirmed I should have received one. A quick run over to Lowe’s and I found a piece of tubing that would work to drain the condensate into our gray tank. This hose eliminates having to drain the tank every 4 or 5 days. Here is my fix and the hose part # if you should receive this unit with no condensation drain hose. This new tubing fit snug, but I still opted to add the small radiator clamp. Caution no need to over tighten just snug the clamp up. After tightening the clamp, maybe give the hose a little tug to be sure it’s tight enough that it won’t pull off. Here is the unit buttoned up after the new hose install. I cut the hose length to 4’ so I can use it either on galley counter top or on the shower floor. My bride/copilot already has a storage spot in the closet ready to transport this while underway.
3 points
-
Alcan leaf kit has been ordered. Something I didn't know. They can ship to a UPS outlet using USP or FED Ex. THey're be here in a couple of days.2 points
-
We have the upgraded 5200 lb. axel and Never Lube on our 2022 and so far so good2 points
-
Actually not! I FINALLY got both sides done but the U bolts on one side took hours and then there were the hours of making mistakes...Thanks for the plywood idea I carry several traction mats which have helped out a lot with jacking at times - and in fact came in handy with this job.2 points
-
I don't know if this referred to me or someone else. In my case the Oliver I ended up buying did not have rust issues and the roads I was driving on were not washboard with deep chuck holes - just very rocky. I guess you can break these springs in many different ways.2 points
-
Thanks, Rich! Will do after we return home in a couple weeks.2 points
-
I have the EZ lube 5200 axles but never use the EZ lube feature. I could be wrong, but I don't think they're any different than the old school axles other that the grease fitting on the end the drilled section to allow the grease to flow to the bearings. If I were forced to use a Nev-R-Lube axle I would pull the factory bearings from the get-go and replace them with high quality Timken bearings. The bearings used the Nev-R-Lube hubs are the same used in some production cars and I would expect them to go at least 80-100k without any issues. Could be wrong there too though since a loaded LE2 weighs a lot more than production cars do...2 points
-
John, I’m a fan of your handiwork/DUI projects, so yeees please go ahead and start a new post. Thanks!2 points
-
We drove portions of the 101 in Oregon in April. Stunning area. We camped at Beverly Beach State Park. A nice campground with lots of shade. This campground has direct access to the beach and dogs are allowed to play off leash. Depoe Bay has a whale watching center. Fresh seafood in Newport and Yaquina Lighthouse is cool to see. There were some stretches that had erosion issues on the 101. We found they were well marked but you'll want to slow down considerably for these. Enjoy. Beautiful country.2 points
-
Sure hope you plan lots of extra time for stops! I used to live in Vancouver, WA and went to the Oregon coast many times with my family. Here is a quick list that I put together for a freind a while back that I copied here in case it would be of value. It's in South to North order so just reverse the list for your trip... Some good stuff working your way North... 1. Depoe Bay. Cool little town. Whales are frequently spotted here in the bay from shore. 2. Cascade Head Trail. I never did do this but understand it's great if you are up for a longer hike. 3. Neskowin is a nice little town and beach 4. Pacific City beach is great! Cape Kiwanda State Natural Area is just to the north of Pacifc City Beach and is outstanding. Park your truck in the parkting lot of Pacific City Beach and hike up the giant sand dune to your right (North). At the top of the dune you can then hike along the cliffs and the views are superb. It's a steep but short hike up the big sand slope with no "trail". Most folks don't realize how great the landscape and view are if you go up and hike around. This is amazing at sunset! Must do. 5. Cape Lookout Trail. Excellent easy hike out to the point on high cliff. Highly recommend! 6. Cape Mears Lighthouse. Short walk to historic lighthouse. beautiful. 7. Tillimook Cheese Factory. This is a tourist trap but it is the original main cheese production of Tillimook cheeses and ice cream. Worth putting up with the crowds to go in. Can do a factory tour if you want. Get ice cream cones. Try the cheese curd - my favorite! 8. Highway 101 from Manzanita to Cannon Beach is the most scenic stretch by far. Great views from the cliffs above the ocean 9. Oswald West State Park. Park at the trailhead for Short Sand Beach. Take the easy trail down under the highway and through a valley to a secluded stretch of sand and surf that is pinched between cliffs on each end. Great beach and popular spot for surfers. 10. Hug Point. Cool beach. Walk along the beach going North to a small waterfall and shallow caves in the cliff that are on the beach. 11. Cannon Beach. This is a very popular and busy beach town. The main street has lots of shops and restaurants. Expensive, more high-end little town on the coast an easy drive from Portland. Great beach with the famous Haystack Rock. 12. Ecola State Park. You can spend all day just exploring here. Hikes and views and beaches. Drive through the park out to Indian Beach Day Use Area. Beautiful area.2 points
-
Amazon delivered this today. As soon as my bride/copilot saw it she said “that will get it done. We store our Oliver here at home plugged in 24/7. Instructions say allow the unit to sit upright for 2 hrs. Not being in a rush, and taking solid advice from @Ollie-Haus. It arrived really well packaged and in its original box in side another Amazon box. It did not arrive upright in the box. (pic) I will let this “humidity eater beast” sit overnight upright to allow the all fluids to drain back properly. We are looking forward to firing this up and giving it a shake down right here at home and then afield. Let’s just say the humidity level is what we call “swampy high” right now with this heatwave. Thanks Chris for the recommendation! 👍🏻
2 points
-
GJ - Would lowering tire pressure a few lbs work to get you parked in storage? 🤔2 points
-
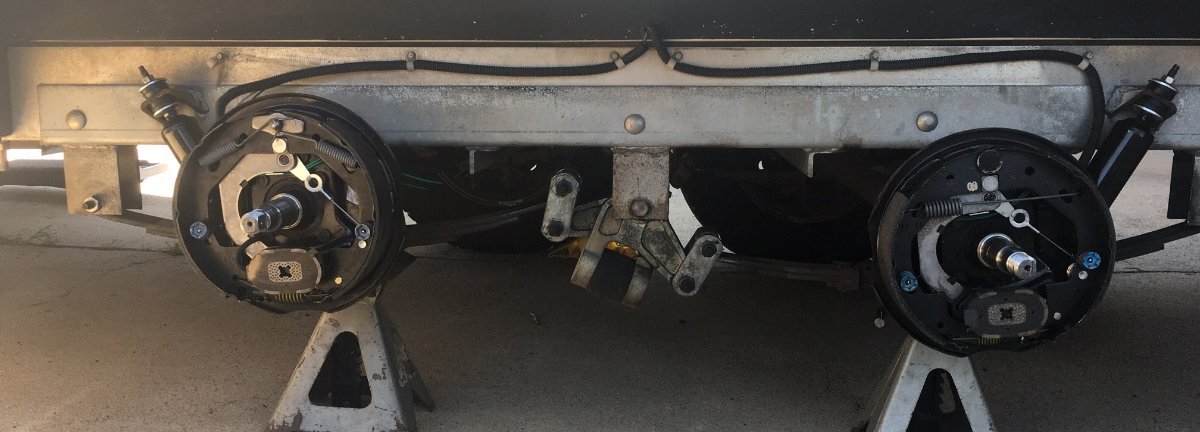
This is not the official answer, but the easiest way to change a tire or service bearings. You will not need a jack, instead only jacks stand(s). BTW, it's extremely difficult to get any kind of jack on the steel sub-frame, so if using an external jack you would have to lift the aluminum frame which is not a good idea. Use the onboard leveler jacks to get your Oliver up on one side, wheels off the ground. Then place the jack stand(s) supporting the axles (not the frame) at the point just inside where they are u-bolted to the leaf springs. In this manner, you are not contacting the frame at all. The axles are designed to support the weight of the trailer. If you are changing one tire to fix a flat, one jack stand on that axle point is sufficient. If you are doing brake and bearing service, put stands under both axles as pictured, If you want to service all four with 4 jack stands you can then do the other side. If you tear apart all 4 brake assemblies for servicing, make sure you take good pictures before doing so.
2 points
-
Hello kids, I have been having trouble with my Honda genset and am thinking about going to a Predator 5000 wat dual fuel, now 1099 at Harbor Chinese Freight. Does anyone have experience with one of these units, and does it require a bonding plug? Thanks!1 point
-
🙂 It turned out to be very simple. We were working on the wrong bolt ends. I was misguided by a YouTube video which described securing the nuts on the back and working on the bolts on the front. Steve informed me, though, that we would have been working on the nuts on the back of the shackle.. Once I did that, they came off easily (lol) It is not going to be a linear departure. Ray was kind in saying the trailer was in a bit of a difficult spot. After a long and exhausting day I walked ahead to check out a meadow ahead. I thought the coast was clear but later I had missed the narrowed path directly ahead of the van (Lol). It'll just take some maneuvering.1 point
-
Did you try pulling the idle jet out and cleaning it with a small wire and carb cleaner? Edit to add link to video. Helped a friend with this and it worked out great. Simple Fix for a Surging Honda Generator1 point
-
Cort and I discussed several options at his remote campsite. He is going to be an Excellent Mechanic after working on these two leaf springs. #1 Removing the nuts from the bolts on the center connections... Even with two of us attempting... removing a nut was not cooperating. The nut on the bracket on the frame, Cort had already removed, using a 24"+ breaker bar. One of us holding the head of the bolt from rotating and breaker bar... no luck at all. Someone may have a technique to offer, as the nut was not going to cooperate. That got our attention immediately. Cort is a master navigator getting into tough areas. With the forward Axle firmly attached... Getting OUT is opposite everything. Easy IN, can be a Difficult OUT. #2. We discussed "Backing Out", but needed prep time to get everything ready would take some reversing the Forward 'getting into this space' to Backward 'reversing to get out without some extra eyes or in and out of the tow vehicle'. The broken leaf spring could be tied up for clearance, shocks removed. Sounds easy... but not a linear departure and possble shoveling to make additional space 'more attractive'. Angles going IN are not the same as getting OUT. (2) Replacing the Leaf Springs need these 'four stubborn nuts from the bolts', removed. Replaced with Six new greased replacement nuts and bolts. (3) Have a mechanic with equipment to Remove and Replace with the Replacement Leaf Springs and nuts. Also guide the Master Boondocker Cort backing out. Cort is very patient. Methodical is the word and he likes to consider all options. (4) When getting to our campsite leaving the next day, I thought about contacting the Forest 'Service'. They have resources and people to help citizens. This could be #1, there were hundreds of campers in this large area and certainly had USFS patrolling the area. (5) Cort's tow vehicle was detached and could drive into Flagstaff for supplies and leaf spring pickup. The City was swarming with a massive number of tourists, including lots of campers in the forested areas, as we drove out. Narrow hard pack dirt roads and lots of wide RV's... But, lots of possible access for help and getting his Leaf Springs ordered and picked up. Our third day in the Gila National Forest... the weather bureau predicted heavy showers... we broke camp. Once out of the Gila National Forest, heading north to Highway 40... heavy rain for an hour and a FREE washing. We arrived back home around midnight. Exhausted but out of the back country. Cort will have a more interesting story to tell. I also would like to know how the nuts were removed. They are also Metric... Learn something every day.1 point
-
Mark, I think you got better recommendations here. Hopefully you get things sorted out.1 point
-
Once again, I have learned so much! I hardly knew what an axle or leaf spring was prior to this (let along a compact wrench, which I didn't need). I hit them again and again with silicone lubricant - I don't know how much good this brand did and if there's a better one I will get it. I am going to get a wire brush to try to clean down those rusted nuts.1 point
-
Steve mentioned that as well + a less well-balanced trailer. I have the leaf strings off both sides - as I noted, the u-bolts were a challenge on one side. They started off very easy and got torturously more difficult as they got closer to the end. I was afraid I was going to break them or the breaker bar 🙂 but they're off. I'm going to try to find a way to get the 4 Alcan springs to Flagstaff. At some point, I expect to do the 3500-5200 upgrade. I will check with Alcan to see if the same springs can be used for both axles. First, though, I'm checking with the National Forest Service to make sure this area is not going to be closed down. The other side of 180 was. Thanks for everyone's help.1 point
-
Certainly for many folks not towing a 6,000 pound OE2 with a full size TV. For the OE2 Team, I suspect that the weights are actually quite close between the total Ollie Weight (Loaded, unhitched) and the weight of our loaded TV's. I think you are spot on with the design of the EZ lube axles. For me the jury is still out. But my engineering mind says (Without a preponderance of evidence to the contrary) that I would lean towards the EZ. Then continue my full service to something like every other year if nothing else than to check in on the brakes. As I have at least another year on our existing 3500's, I am looking forward to JD's post on this thread about what he learns at ALCAN. GJ1 point
-
Even though the Predators are well-regarded I would be reluctant to replace a Honda with one. Honda is the gold standard for portable generators. (We're still using our 16 year old Eu2000i.) Can your Honda be repaired, or is this a capacity problem?1 point
-
I wonder if it would be possible for them to relocate the center alignment hole on the spring 1/4 inch on each side to make up the difference?1 point
-
Excellent info! I’ll see what Alcan reps say about this.1 point
-
Yes of course. But with my Houghton I gained about an inch or so.1 point
-
I do so annually for bearing and brake service. I also think it a good idea to stack up your dunnage under the jack you are using. That shortens the amount of jacking you need to do, and and also the lever arm against the jack should there be a problem. In this case leverage is bad. GJ1 point
-
Mike, I'm quite glad it was sunny the day we drove that pass...it was enough of an experience without all that haha. Joe is always ready to eject me from the passenger seat when driving in the mountains! 😏1 point
-
I did mention the method I use was not the official OTT position, but so many of us the Oliver stabilizer jacks for quick jobs like changing a tire. Another thing, I did not state to jack the axle. That would be wrong, as stated in the instructions @Patriot cited. They do so because someone inexperienced could use a floor jack and jack up the middle of the axle. If doing so, it would likely bend, throwing off the alignment of the wheels attached to that axle. It's good practice to put a jack stand under axles when working on a truck or trailer, period. I've been doing it for 50 years and all professional mechanics would agree. People have literally died, crushed under vehicles 100s of times since the model-T. You jack by other means and place the jack stand for safety. It has a rounded top holder that the axle fits into nicely and you place it as close to the wheel as possible. In the case of a trailer, adjacent to where it is u-bolted to the leaf springs. I promise, any axle is strong enough regardless or 3500 or 5200 lb. ratings. You can go without for a tire change, but be careful, and you certainly should for maintenance work like packing wheel bearings on a trailer. I have one jack stand and a bottle jack in my TV toolbox and if I did not already have these tools for decades, I strongly recommend the combo unit that Patriot linked. That tool must be awesome, great idea! Get one. OK, so what I found today is going to be revealing! These instructions are quoted from the 2016-OTT-Owners-Manual.pdf: Loosen the lug nuts on the tire you want to remove. Check for a stable footing under the jack and place an ABS footing pad or block of wood about 4” in height below the jack foot plate. Raise the jack until the tire clears the ground, then finish loosening and removing them. Pull off the old tire, slide the hubcap out backwards and insert it on spare. Set spare tire evenly on the lug nuts and hand tighten lug nuts. Retract jack back to travel position. Now tighten lug nuts completely. Lug nuts should be torqued to 90 ft lbs. Place the flat tire in the spare location. From at least 10 years ago, OTT knew and put in writing that you could, should use the stabilizer jacks to change a flat tire when on the road. Then they hired lawyers who got in the way of physics and the basic common sense of good mechanics. I rest my case. 😎1 point
-
@Tony and Rhonda Tony, no apology needed brother, we are all in this together and passing info forward is what it’s all about. Forum thread searches are not always seamless, don’t ask me how I know 😄. Many times I just open source google a specific topic of interest regarding Oliver TT and it pops right up on Google. Thank you for posting this up!1 point
-
I was mostly concerned about changing a flat, so it sounds like the on-board jacks are the best route if that is necessary. A previous owner installed the 5200lb Never lube axles so I think we have the longer steel sub-frame to lift on if needed. Thanks for the links @Patriot, I read the old jack thread with interest and I've not seen a bottle-jack-stand combo before. I should have searched the forum before posting this thread. Sorry.1 point
-
The best ice cream I have ever enjoyed! 🤪😋1 point
-
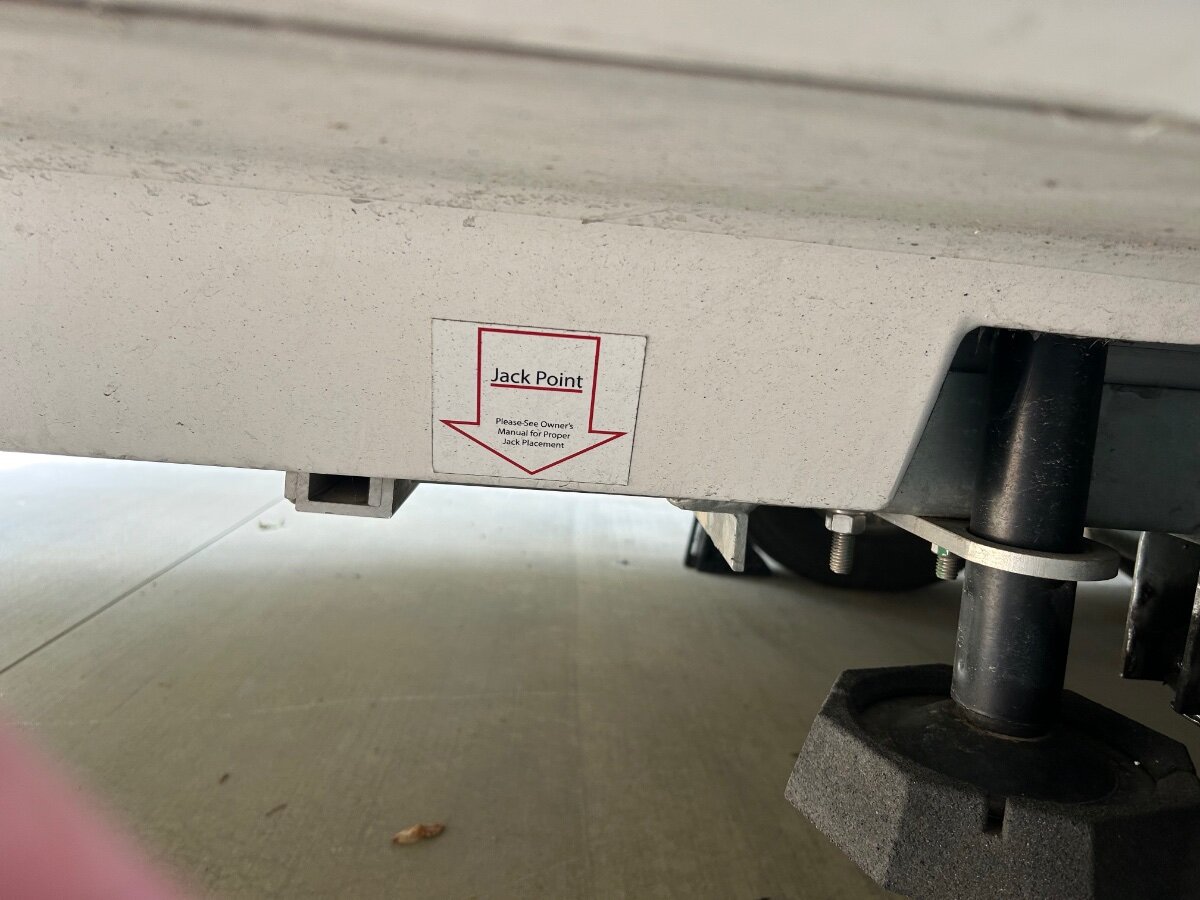
@Tony and Rhonda I cannot speak for early model Olivers, but our Hull #634 has labels for all jack points on the frame. I clearly remember being told by Oliver Service to use these jack points (pic) and NEVER the axle as a jack point as you risk possibly damaging the axle. So per Olivers advise, I never use the axle as a jack point or place jack stands supporting the axle. Some owners will use the levelers as a jack to change a tire. Again not recommended by Oliver likely and most wisely for liability reasons especially if the leveler should fail. But what could possibly go wrong? 🤷♂️ Rather than go down the 🐰rabbit hole, here is an old thread talking about all things jacking up your Oliver. You may find it interesting and entertaining. According to the link below earlier models had a shorter frame and as a result no jack point marker/decals. Stating the obvious here, it’s a good idea to always keep your tow vehicle coupled to the trailer when lifting it. Here is the jack that lives in my TV and for our Oliver. It has strong reviews and it happens to be on sale now. -https://www.amazon.com/Powerbuilt-620471-6000Lb-Unijack/dp/B00GJJZ5NI/ref=srj
1 point
-
I agree with JD. However, I solely rely on the Oliver’s stabilizer jacks when traveling. These jacks can easily lift wheels and it would take a lot more force than just lifting the wheels to torque the frame or damage the jacks. Even though they don't recommend it, the trailer jacks will never slip-off, or fold-over, which has been the cause of countless injuries.1 point
-
Rode my bike for a long stretch of that road a few years back during the Trans America Bike Race. Beautiful views and fairly light traffic.1 point
-
Manti - La Sal National Forest, Devils Canyon CG, Utah...45 degrees this AM (furnace on) woohoo! Spending the night in a hotel in Moab for 41st wedding anniversary and doing the tourist thing. We tackled some awfully wicked hiking trails today in Canyonlands NP and will need some time to recover tonight. John
1 point
-
June 1996 we stayed in a cabin at 10K ft on the Salida side. Chris and I had headaches the whole week not being used to altitude at the time. Drove to Gunnison one morning, fog on the pass, was quite scary. Would not want to be there during winter like Mike! We didn’t make it as far as the Black Canyon, but should make up for that Thursday of this week! 😂 Joe & Mindy, not sure which direction you’re traveling, but there will be two Olivers at Riverbend RV Montrose Wed-Thu this week. One will be there much longer, the retired guy with his better half!1 point
-
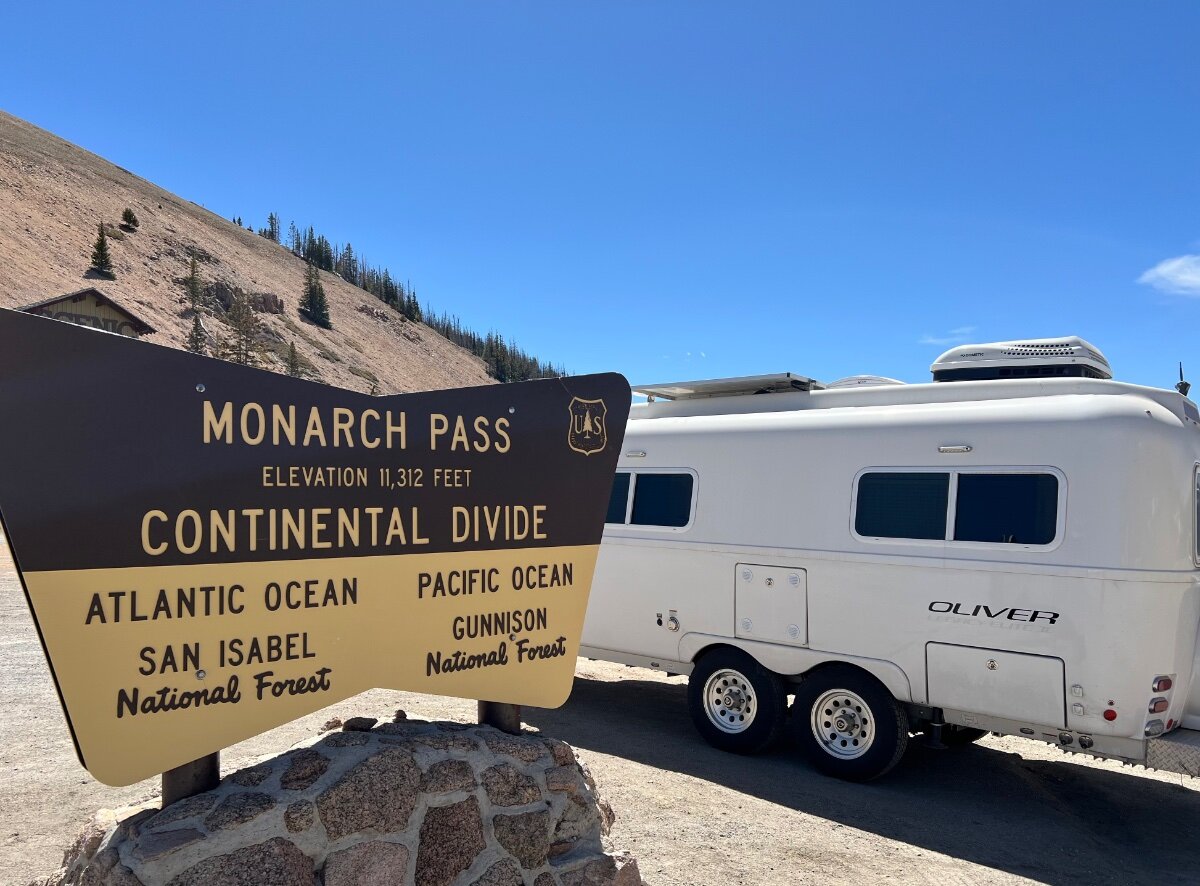
Just happened to pull in right next to the sign for the Continental Divide on our most recent trip. Kind of a cool random photo.
1 point
-
FYI for @DaveK and @Patriot, when you receive the dehumidifier from Amazon, take it out of the box and set it upright on the counter and let it rest unplugged for 24 hours before you turn it on the first time. Like all refrigeration based appliances, if it’s turned on it’s side during shipping, it must be allowed to set in the upright position for 24 hours to make sure the liquified freon and the oils inside drain back to where they normally are during normal operation. This of course applies any time the unit is allowed to lay on its side or upside down. It will certainly be handled like any other package during shipping so don’t forget to perform this procedure to safeguard the internal systems. 👍1 point
-
I wish it were that simple. At the mower shop, I don't know what they did - they just said it needed a new carb. (OK. But I was too stupid to ask for the old one. Never again!) I had a new carb put in, and I put in a new fuel valve/filter. Tank strainer, fuel filter, debris cup, fuel inlet filter, and spark arrestor are clean. I pulled the jet on the new carb. Didn't need cleaning but I cleaned it. No joy. I have removed the blocking tabs from the carb with a Dremel and can now turn the mixture screw while the genset is running. Like you are supposed to be able to do. I backed it out 3/4 turn. Some improvement. It DOES work fine under a load, and with ECO throttle.0 points


.thumb.jpg.e34bf01ef7f7d5e99ad31856d45afbeb.jpg)


-
Recent Achievements
-

")
")


.thumb.png.eff4d7fbcbf1eb34d62e5c88cf70a0ee.png)


