Leaderboard


.thumb.jpg.e34bf01ef7f7d5e99ad31856d45afbeb.jpg)

Popular Content
Showing content with the highest reputation on 12/03/2025 in all areas
-
Cave Creek Regional Park, our 3rd visit! Site #9 is the best spot in the park! Better yet, @ChristianD will stop by soon to meet. They live only 15 min away. 😂
 4 points
 -
Over Thanksgiving week, my wife, daughter, dog and I drove out to Yosemite and Sequoia National parks. I let the dog do most of the driving 🙂 Camped at Yosemite Pines RV park, which was very nice, but a bit far from Yosemite. Made for some long morning and evening drives. Spend about 4 days there. My daughter worked from the RV one day via Starlink. That was our first experience with it and it went really good. Sequoia we stayed at Lemon Cove RV park. Decent place and much closer to the NP gates. Saw a bear on Bear Hill one morning, so we decided not to hike that area that morning. Had lunch with some deer then drove up to Kings Canyon, which was better, in our opinion, than Sequoia. All beautiful places though. The Oli towed great the entire trip and was nice to have some of the updates I had done previous to this trip. The new axels and Alcan springs felt great. The new Tosot AC/heater worked well for night time when I ran it for heat since I was plugged in to campsite power. No reason to burn through the propane while hooked to electrical. New Truma water heater worked perfect too. Overall, a great trip and no issues with the Oliver. It was also nice to have our daughter fly in from Denver and spend the week with us.
3 points
-
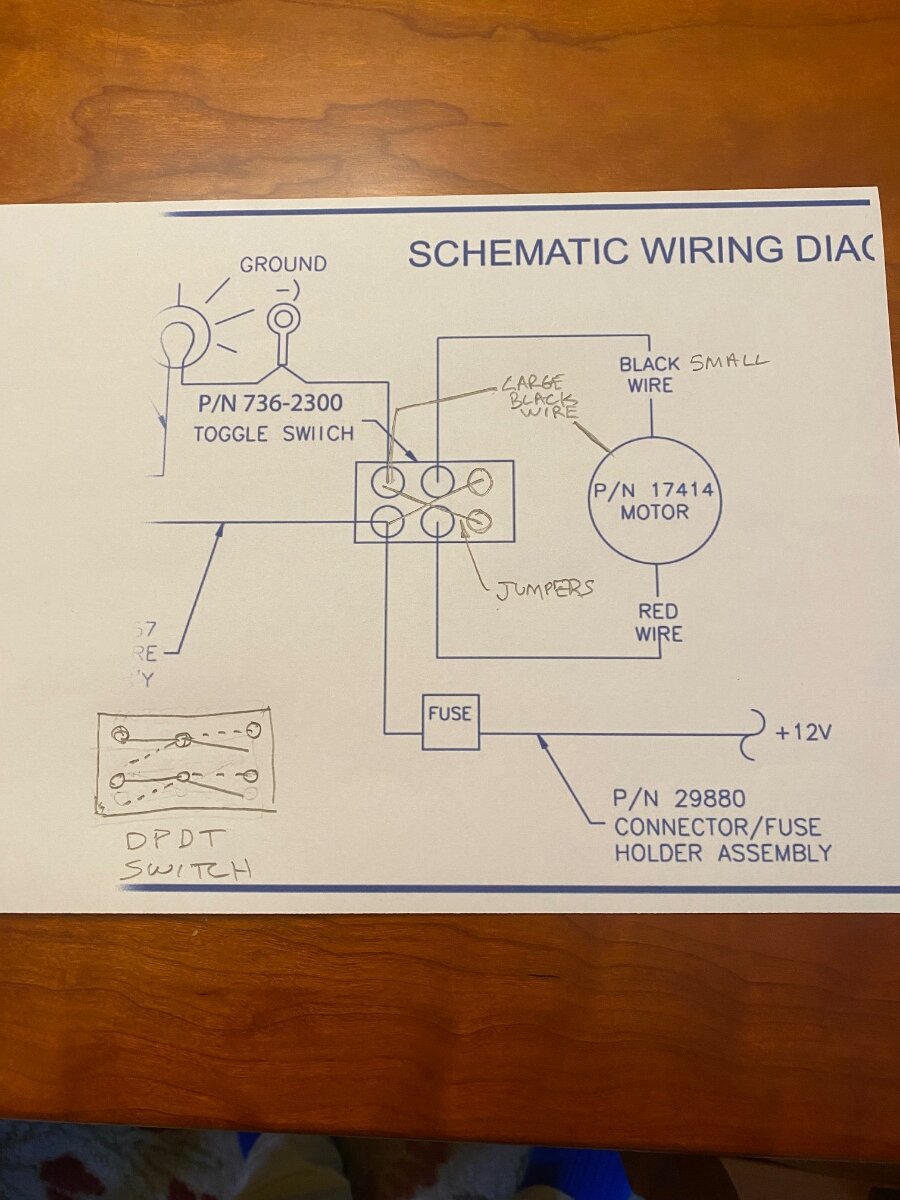
Hi Chris, I’m sorry to read about your jack issues on the road! I’m a little late to the party, but I can offer some switching information and a troubleshooting procedure. Or I could swing by your house if you still need help when you return. I read back on this thread and noticed that the question of why the motor has 3 wires was never answered. Per the Barker schematic, it looks like the jack motor should have only two wires, so the third wire creates confusion. The smaller gauge black (-) and red (+) wires are the motor leads, the larger black wire is a second ground to ensure good grounding of the motor. The toggle switch is wired to reverse the polarity of the motors leads, which reverses the motor for up-down travel. I’ve never actually looked at the jack’s toggle switches, but a reasonable guess is that they are DPDT (Double Pole, Double Throw) switches with a spring-back neutral (off) center position. They would have external jumpers that are’t seen in the Barker schematic. I filled-in the “likely” missing detail in the Barker schematic and included a sketch of the internal switching of a DPDT switch, the center row of terminals are common. Your rear jack doesn't include the head unit with the light, but the toggle switch should be the same. The fuse will be on the + feed wire, and the - ground terminates on the main ground bus with all the yellow wires. Oliver choose yellow for ground wires, but I don’t know if that holds true on older models too. Test across the two center (common) terminals with a multimeter in the dc volts setting. Use pointed probes being carful not to short across the switch terminals. You will need a second person to operate the switch: With the switch in center off position - 0 volts With switch down - around 12 volts With the switch up - around 12 volts (FYI - the polarity will be reversed). This will tell you if the switch is working, and if there is voltage to the switch. If the switch works, then the trouble is in the wiring between the switch and motor, or the motor itself. If there is no voltage on steps 2 or 3, then recheck the fuse and /or the wiring between the fuse and power source, or look for an open ground wire. Hope this helps ! Cheers! Geoff
3 points
-
Great pictures!2 points
-
Not that I know of (assuming that you mean "authorized/recommended by Oliver". However, if it were me, I'd start by asking any friends in the area, the campground hosts/owners and/or other campers in the area. Bill2 points
-
Finally got around to picking up a Greenland Turbro Inverter AC/heat pump to replace the original Coleman that came with Hull 45 back in 2009. Been wanting to do this for a while now and couldn't resist once @jd1923 posted the about the anniversary sale going on that knocked the price down from a list of 1,499 to 1,099 with free shipping. Install was a breeze. The hardest part of the job was cleaning the gunk off the roof after the Coleman was removed. The seal for the Turbro is preinstalled so it's just a matter of getting the unit centered over the opening and bolting it down through the inside mounting plate. Since it doesn't have a wired thermostat, electrical connections were simple too. Just the 120v power and connecting the wiring between the rooftop unit and the inside cover panel was all that was needed. I have separate thermostats for AC and heat which made it easy but if you have a single thermostat for both AC and heat additional steps may be required. The Turbro comes with a remote with a wall mount and it also has a phone app available. Once fully installed, I connected our power cord to a voltage/amps/watts meter and used an adapter to plug into a standard 15amp outlet. I also turned off all other breakers to insure I was getting only the draw from the Turbro during startup and running. There were two main reasons I purchased the Turbro unit- One, because it uses the same extremely efficient "inverter" compressor technology used in mini-split systems and two, because of this technology the system is able to "ramp down" once set temp is reached and continue to run at a lower capacity instead of powering down and cycling like a standard single speed compressor does. Running in this manner reduces or eliminates the humidity spikes common with standard compressor systems and is very important to those of us who live and travel in hot/humid locations. Added benefit is that no soft start reuired and it can be easily run off the Honda EU2000 that we have as a backup. Since my brother is using our Ollie for temp housing while his house is being finished I didn't have much time for testing after the install, but here are some of my finding and opinions for the short time I had. The good- Power efficiency is right about what I expected, which is excellent. The unit slowly ramps up starting around 120 watts and peaks just under 1000 watts. As it gets closer to setpoint, it begins ramping down and settles in around the 500-700 watt range. At set temp I was seeing watts in the 120-200 range but couldn't tell if the compressor was running or not at those watts. The compressor is so quiet that it was impossible for me to tell. The air output continued to be cool so I assume the compressor was still running. Cooling and humidity control were both excellent too. Cabin cooled quickly after which I changed the setting on the remote to "dry" mode which locks the fan on low speed with compressor running. No humidity spikes seen at all. Outside sound level is about the best I've encountered. You will not annoy anyone around you running this unit at night, even if they're in a tent right next to you. LED strips built into the inside panel can be left off or set to white, blue or yellow. I think this feature will come in handy for us at night when getting up to go the bathroom. The not so good- While not close to Dometic level loud, and quieter than our old Coleman, it's not the quietest unit out there. Quiet enough for us for sure, but if sound level is the most important feature you're looking for then you should probably look somewhere else. On the bright side, I think the sound issue could be improved with an updated interior cover panel alone. I loosened the cover and dropped it a couple of inches down and the sound dropped dramatically. Another issue that makes me think the cover panel is the problem is that the airflow only can be felt across about 1/3 of the vent openings on both front and back vents. The ability to adjust the airflow between front and back vents with a damper would be another nice feature... Temperature control... Wasn't happy here. It seems to be about 4-5 degrees off from actual cabin temp. Hoping that this can be solved with the addition of the external Cielo wireless thermostat that @Ronbrinkturned us on to and has had great success with. I wish I had more time to test and give better feedback, but I most certainly will update this post once I'm able to. I want to see how it performs in different environments, how the phone app works, and how it interfaces with the Cielo thermostat before I make a final judgement. For now I'll give it an overall rating of A-. On power efficiency alone, an A++
1 point
-
You’d need the smaller snap-ring pliers, a 1 7/16” socket and breaker bar to service the brakes. Then a torque wrench at 150# to reinstall. Dexter via Alcan replied the spindle nuts are reusable. Easy job, no grease to mess with! 😎1 point
-
Some of what is necessary depends on what solar controller you have. We have Bluesky, so I had to do some reprogramming which was fairly simple to do. We replaced our four AGM batteries with three BattleBorn 100Ah batteries. We did do some wire/cable cleanup, but it was not difficult. 300Ah has been plenty for us when we’re camping without shore power. As Bill suggests, do a search, there’s been a lot of information posted on lithium upgrades. Mike1 point
-
Gene - There are a bunch of posts here on the Forum about anything ranging from minimal (me) to substantial Li overhauls that were done by anything ranging from rank novices (me) to certified professional outfits. Have fun reading! Bill1 point
-
John, my good friend! I’ve been away from this forum and very busy! Like my new theme? (grey accents to match our graphics and tow vehicle). Found a local guy. He brought back our pasty 10-year-old hull to looking factory fresh again! Didn’t cost near the CGI advertised price. 😎 I was cleaning and painting parts while it was in the shop and it took me 2 long days to install everything including the new A/C (I removed the old unit, temporarily patched the 14x14” opening so the detailer could clean everything up top!).
1 point
-
@Gene G. Most here have gone to Epoch (15% OFF ended yesterday! 🙃) or LiTime. Search for these keywords. Install new batteries, get rid of extra wires in bay in preference of new internal busses. Change charger configuration or replace charger for LiFePO4 type. That’s all. I installed 600 Ah Epoch summer of 2024. Just purchased on sale another 300 Ah Epoch Essential and soon we will have 900 Ah snug in the bay! 😎1 point
-
1 point
-
I find it works fairly well if you keep the phone close to the internal antenna mounted in the cabin. Usually adds 2, sometimes 3 bars for us. .1 point
-
You might want to ask Spectrum for a "coverage map of the USA" and see what it tells you. Or, simply go straight to the horse like I just did at: https://www.spectrum.com/mobile/coverage-map. Bill1 point
-
Yes, sequence is turn off solar, turn off that 30 amp breaker, then each individual battery, reverse to turn back on1 point
-
Oh, I have no doubt it will work with my Turbro, I just don't think it will have the ability to override functions programed into the control board of the unit itself.1 point
-
Regardless of where you buy, be sure the valve stems are compatible with the internal tire pressure sensors on your TV to ensure proper fitment. I purchased mine at tpmsdirect.com. Took them to Discount Tire and they installed them free, probably since I’ve done business with them for years.1 point
-
In a perfect world, it would work just as you describe. With the Turbro/Pioneer inverter units, at least, this doesn't seem to be the case. Yes, the compressor does ramp up and down as needed but the internal supply fan works no differently than standard compressor units do. The fan has low/med/hi settings and is not a variable speed ECM motor like residential mini-splits have. Probably a money saving move and feature they thought people wouldn't miss in an RV. I sure miss it... especially in heat mode where the fan locks on high speed and doesn't allow any adjustment. Looking forward to testing with a Cielo thermostat soon to see if it can override this feature but my hopes are not high...1 point
-
in case the OP doesn’t reply I will chime in his Signature shows 2022 year model hull pretty sure that the 2022 year models got Coopers My foggy memory thinks that Michelin tires were the Oliver spec but Coopers were substituted due to supply chain issues ………Covid our 2022 has Coopers as many others have1 point
-
Your hull #124 was built before that buss modification was added. All of the early models were fused at the jacks, just like the front jack. You should find an inline fuse in the power wire near the rear jack heads.1 point
-
Our rear streetside jack stopped working during a trip a couple of years ago. First checked the fuse as Ron suggested above, but it was not blown. Next, checked the wires at the switch. It turned out one of the spade connectors had come apart. Reinserted the connector and checked the others. Haven't had a problem since.1 point
-
Here is my solution. If CGI would come to my area I would add a ceramic coating.
1 point
-
I had 10 mil XPEL PPF installed on our Oliver a few years ago, it’s holding up great. It’s worth the money spent if you want to protect the gelcoat. Also a good set of rear flaps is worth the investment. Here is a link to a thread on my PPF install. I also had my entire tow vehicle covered in 8 mil XPEL PPF.
1 point
-
You owe Mossemi a pop or two. These photos were taken while camped in some forsaken campground where (I'm sure) they had mosquitos as big as 747's and alligators and all things of that nature. 🤣 Bill1 point
-
Thanks Mossemi. I appreciate the response. I did see this and there were a couple inconsistencies between the drawing and my "as built". For example I have 3 wires coming out of motor (4th and last photo), not 2 as shown on drawing. Also, there is a double terminal on the toggle that controls the jack with connection for 2 wires one of which is shown on second pic. This is not indicated on drawing. This will teach me to take plenty of pics before removing stuff. Lesson learned....again. I think what would be most useful is if someone could send a couple pics of their jack showing the terminals and which wires go where. Thanks again.0 points


-
Recent Achievements
-


")


")


")

