Leaderboard


Popular Content
Showing content with the highest reputation on 01/26/2026 in all areas
-
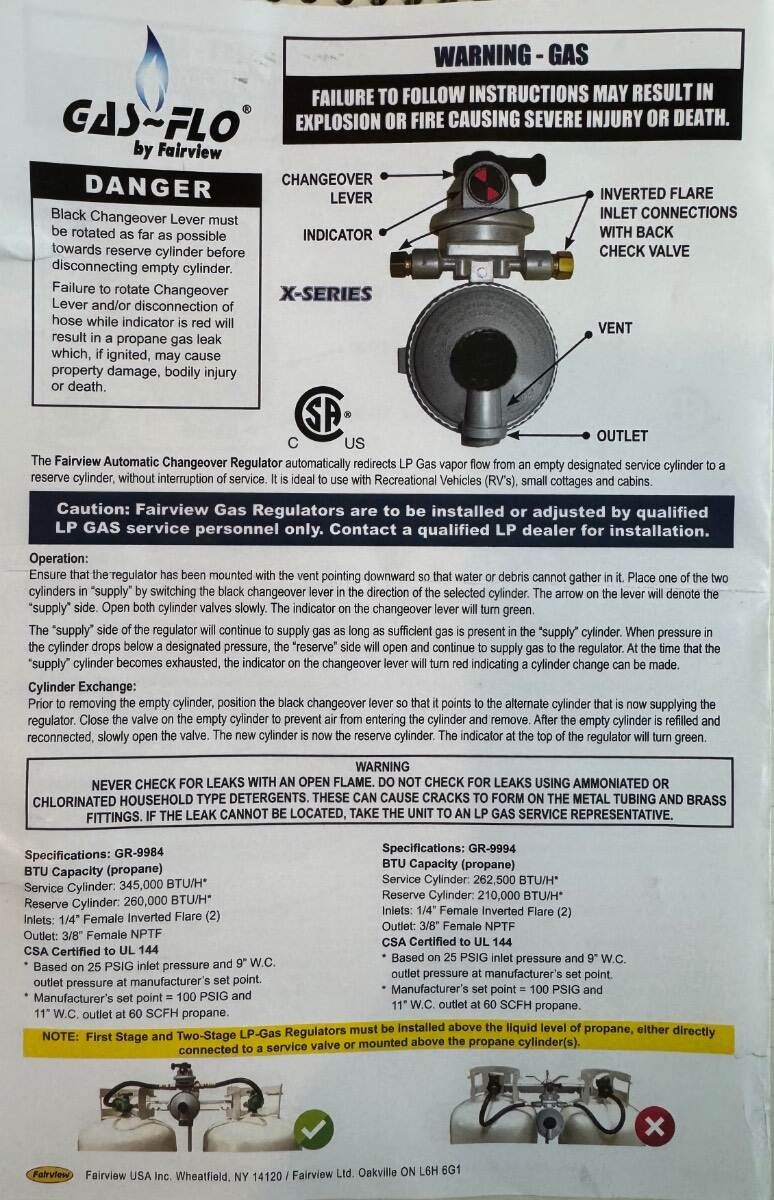
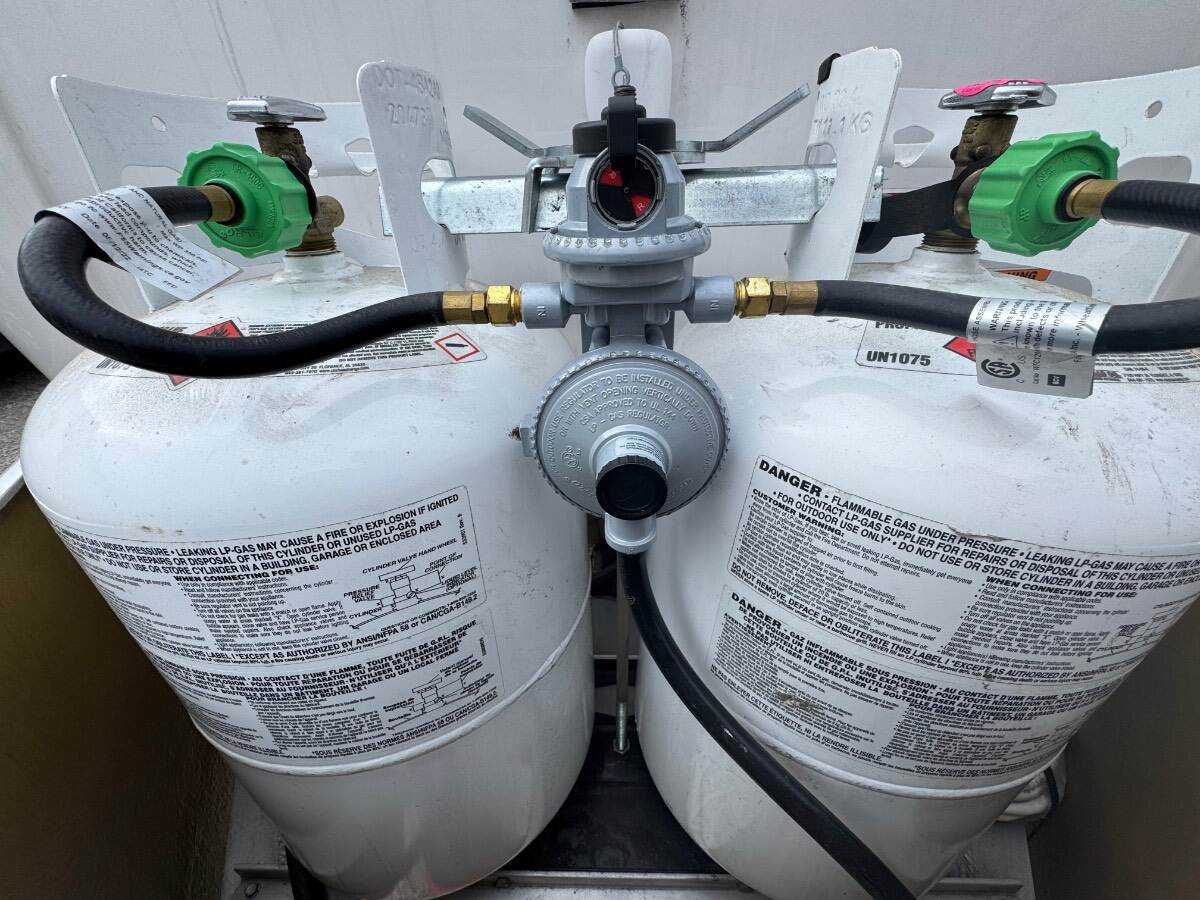
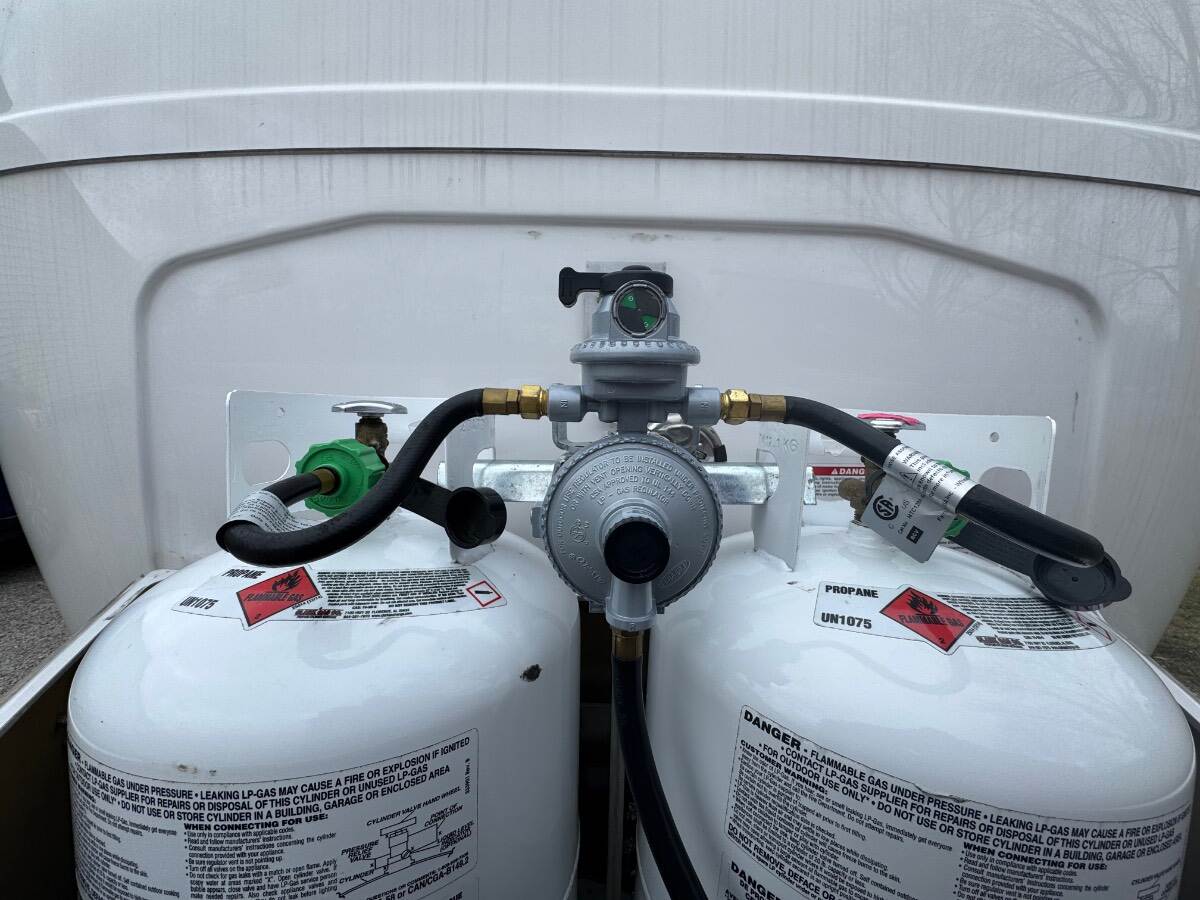
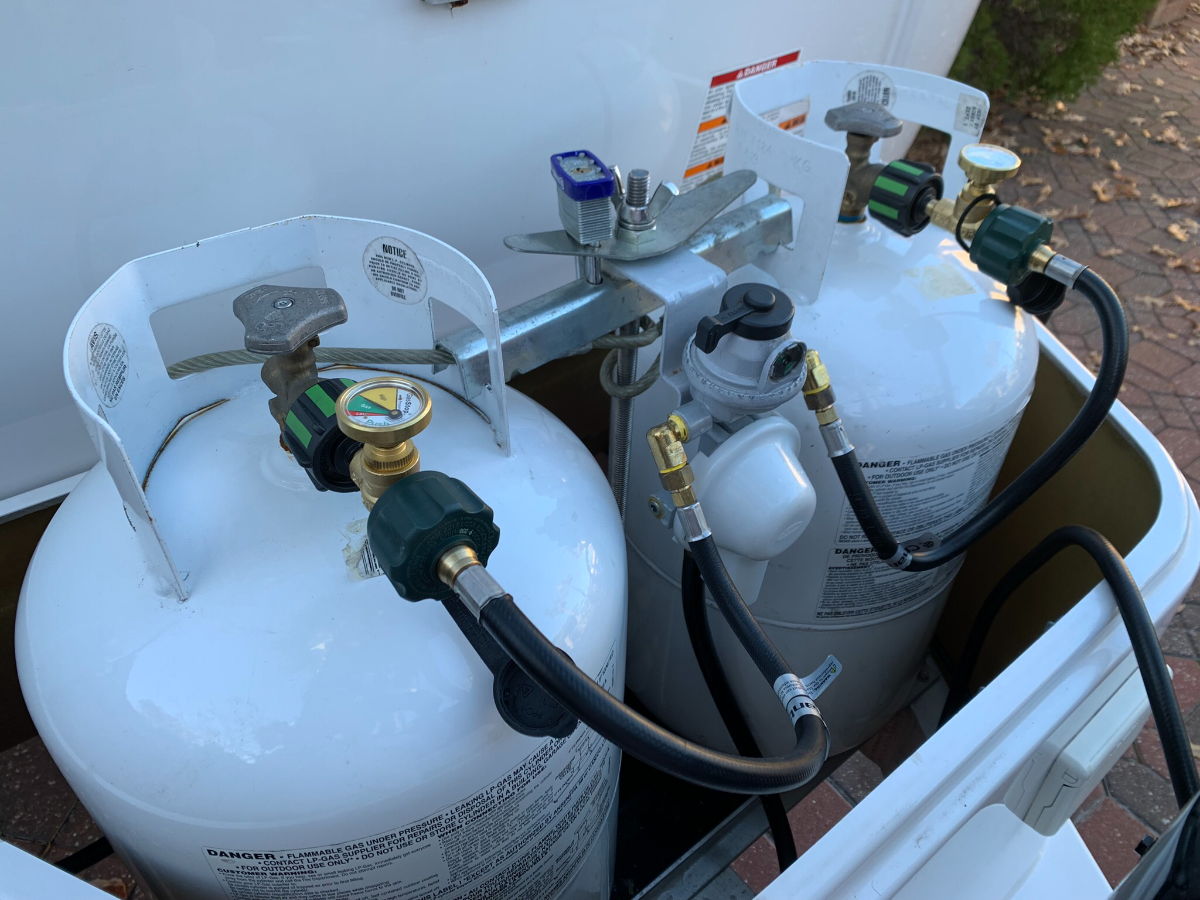
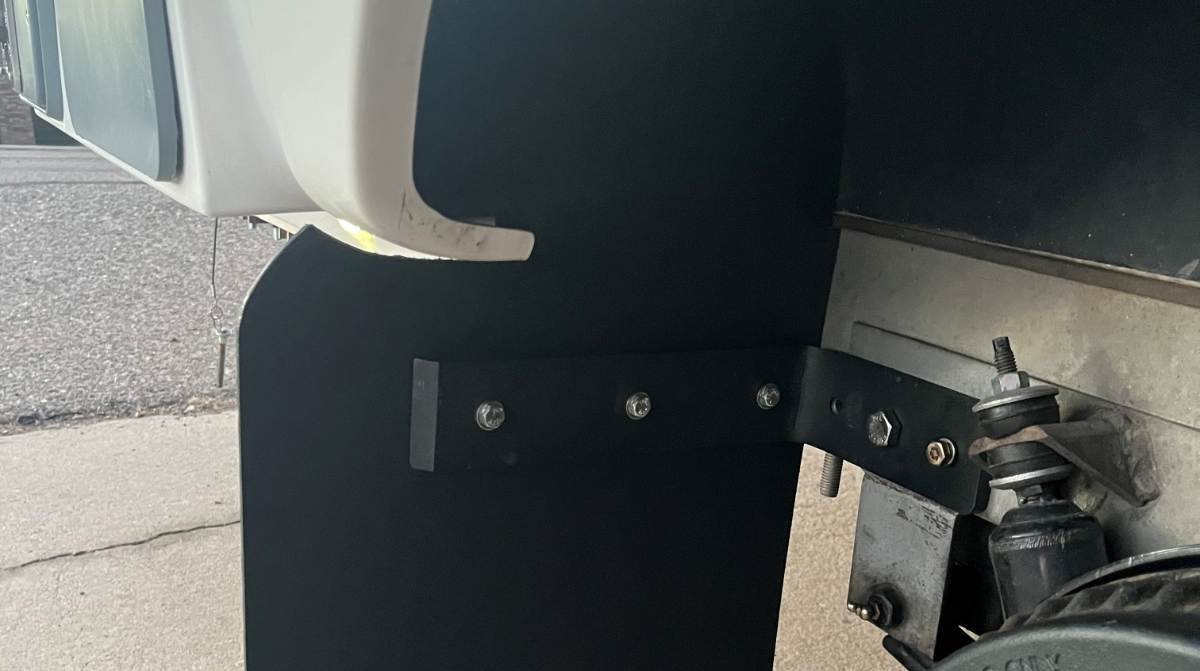
As @Chris Scarff mentioned above, I experienced a regulator failure on our 2023 LE2 and it was not allowing gas to flow at a high enough rate for the Truma furnace to run properly. Rather than making an appointment and going to the trouble of hauling the camper to a local dealer for troubleshooting, I decided to just replace the regulator with an identical model. Currently Oliver is using the Fairview GR-9984. Long story short, the regulator was the problem. When I received the regulator it came with very specific installation instructions, which clearly indicated that the regulator was not installed correctly from the factory. I have no way of knowing if this had anything to do with the failure, and I doubt that it did or you would likely hear about others experiencing this same problem. Nevertheless I chose to install the new regulator according to the instructions. I do believe this is an important detail or Fairview would not explicitly detail these instructions. Below is the instruction sheet that came with my replacement regulator. Notice at the bottom of the page are the highlighted instructions for correct installation and incorrect installation. The next two pictures are my as found installation, followed by my updated installation with the new regulator. Note: I have ordered a set street 90 fittings to reduce stress on the hoses as others have mentioned in their comments As found Updated installation required mounting the bracket to the lower set of holes in the regulator, effectively raising it ~3-4 inches. There is still about 4 inches of clearance between the top of the regulator and the propane cover and the valve selector is still easily accessible for switching.
 6 points
 -
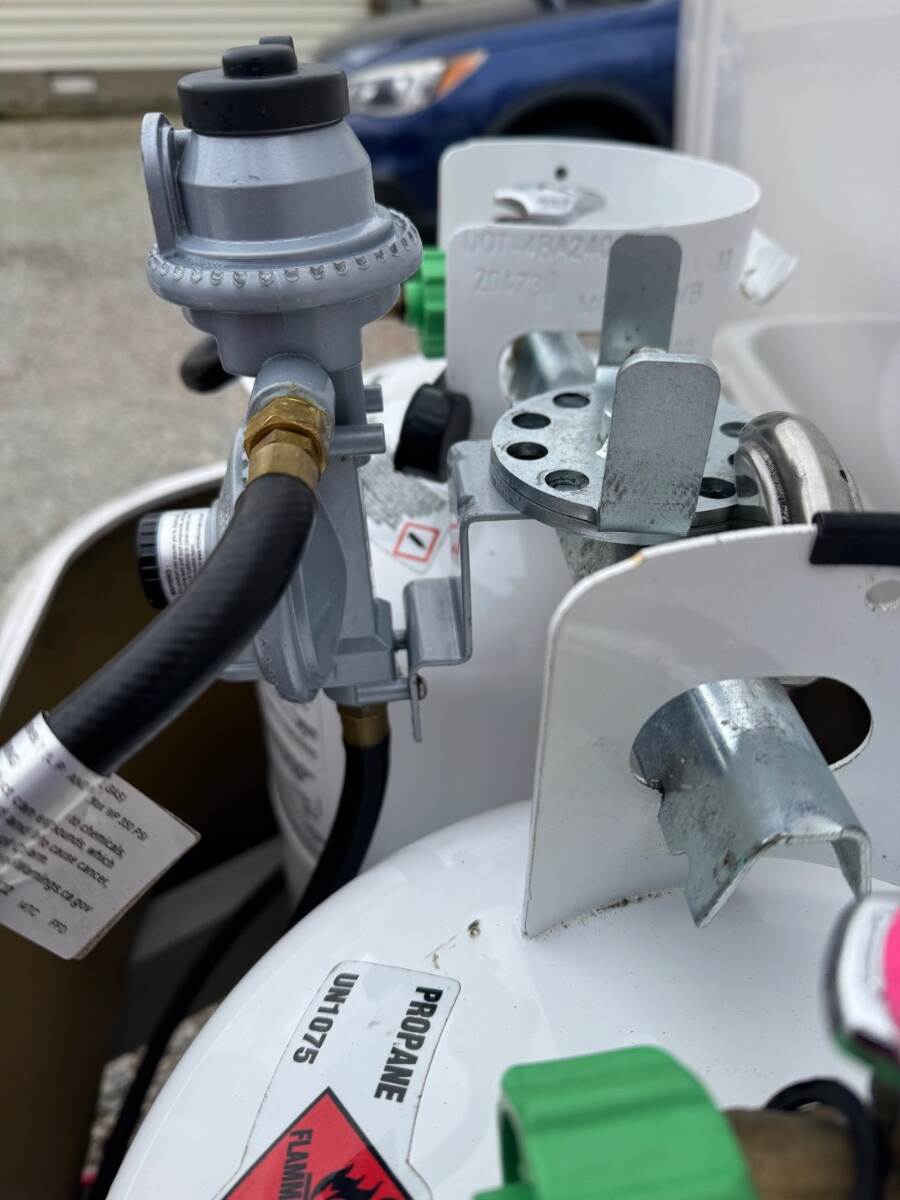
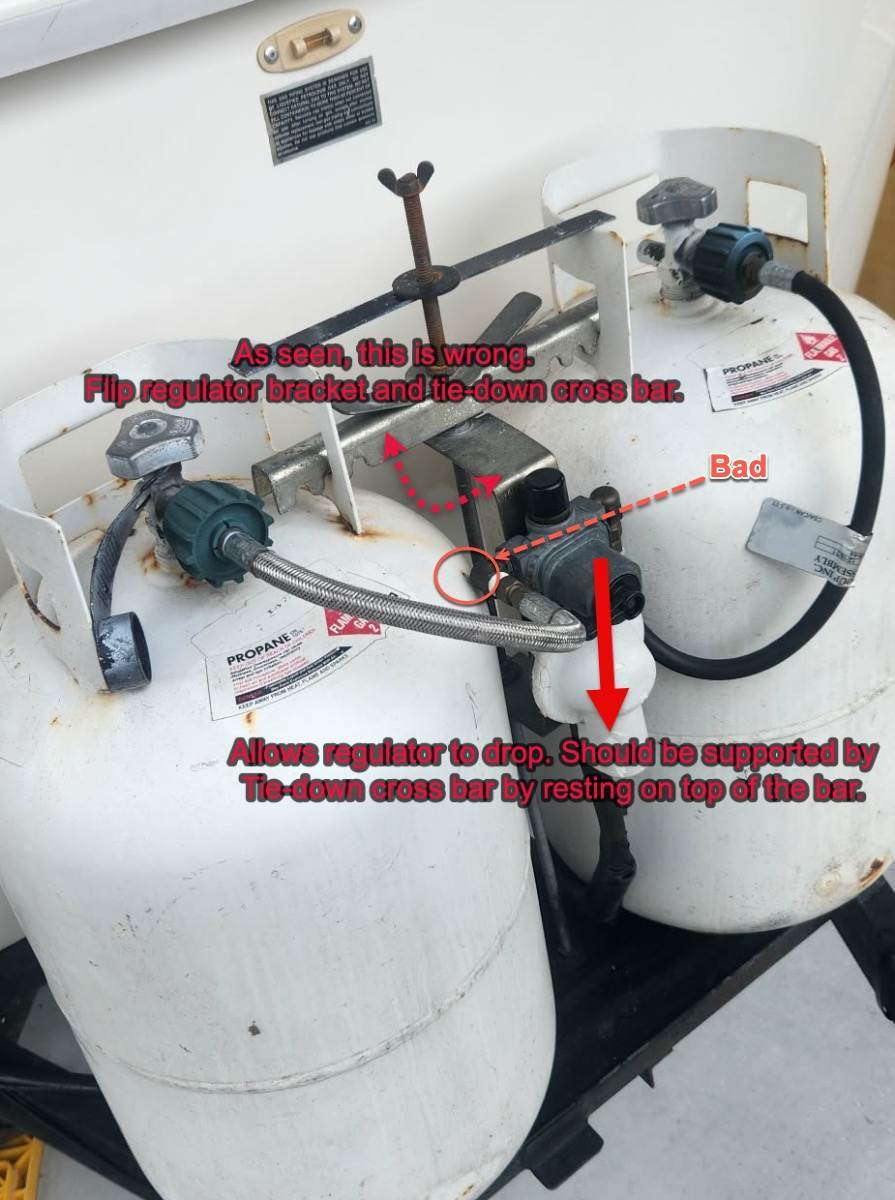
While helping my girlfriend with her 2002 Casita to down-size her propane tanks to new 20 lbs tanks, we found that the propane regulator bracket and the hold-down/tank retainer bar were flipped and allowed the regulator, and hence hose/lines, to drop too far down. This can easily happen to any camper with a dual propane tank system like this. After anyone works on your rig, or you purchase a used travel trailer, ensure things are in order in the propane area. Hope this helps. UPDATE: If you look close at her picture, you can also see that the right-angle LP connector off the regulator has now rubbed into the passenger-side tank. That's not good in any way shape or form - truly bad. I'm sure these have very strict rules by the DOT. Also, in some rare cases, having certain regulators lower than the tops of the LP tanks, may cause certain LP appliances to fail to operate properly.
4 points
-
Very well done Ron! Gotta love a neat and clean install! 👍🏻4 points
-
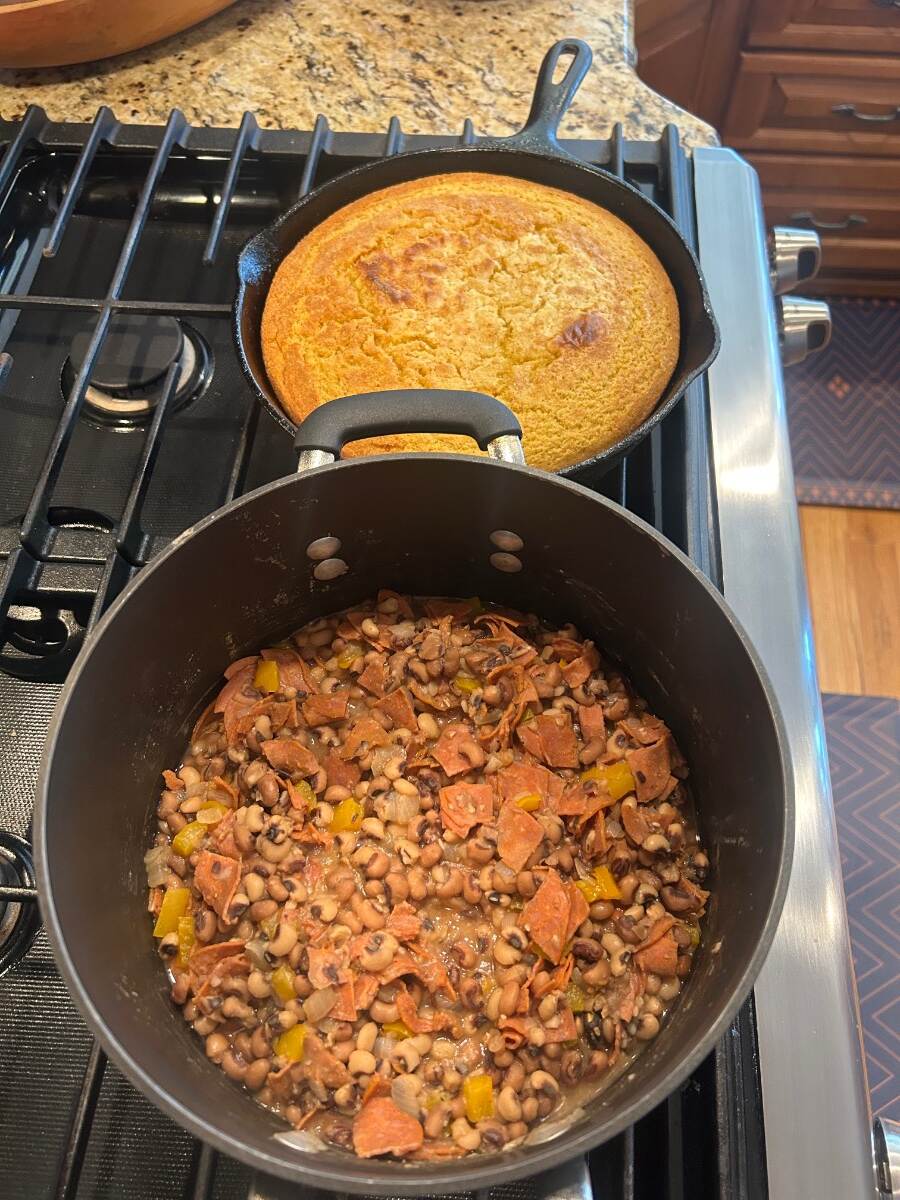
My bride has been fairly busy this morning crafting up more winter comfort food! A nice size pot of spicy black eyed peas and iron skillet corn bread with local crafted mountain molasses. I think we need to make this a staple when camping. 🤔 Very grateful for home cooking and taking time to just “pause” and give thanks. Our friends never leave hungry, if they do it’s their fault. 😄
4 points
-
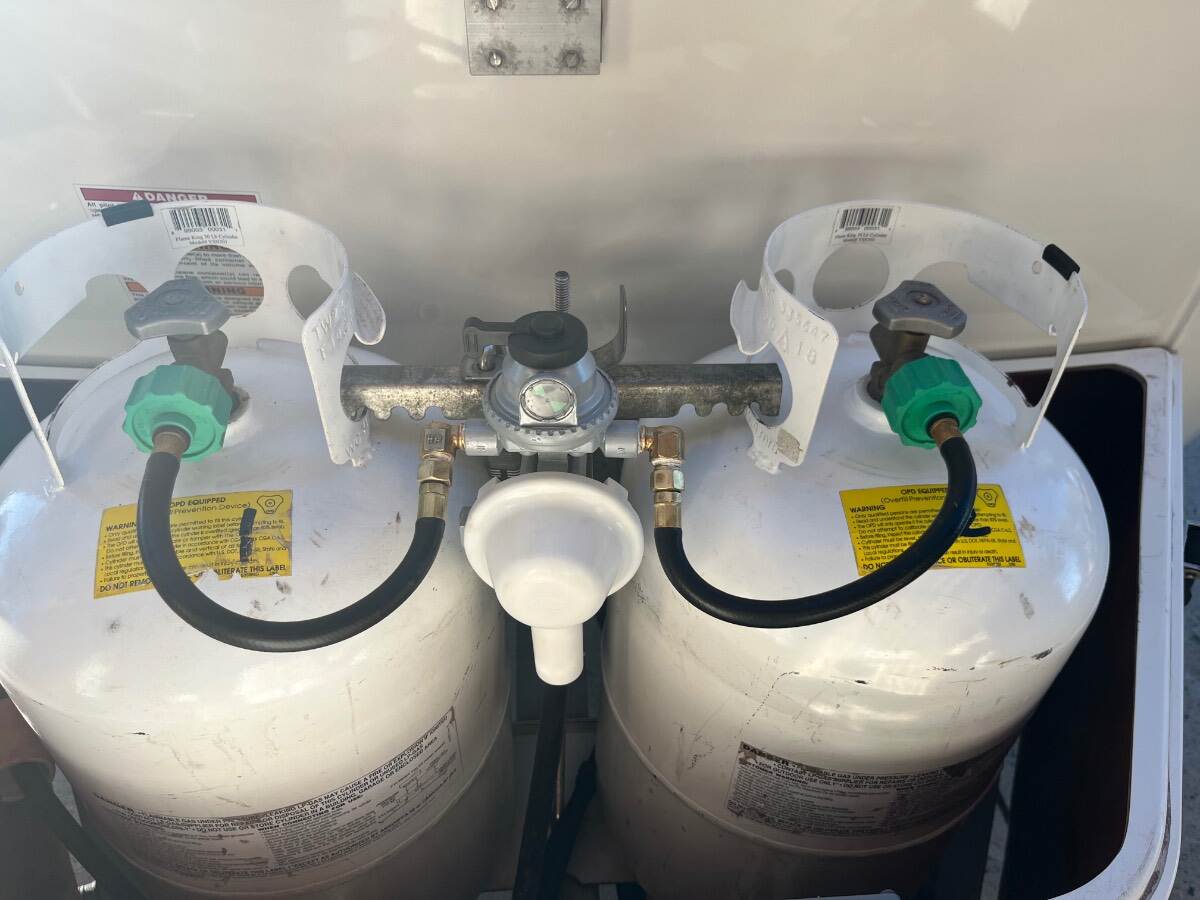
I believe it’s designed to sit above. Works for me. It drops down when detached/filling tanks and lift up and it sits nice and close when mounted and locked. I renewed the regulator and lines a couple months ago. 😎 I used your idea of using street elbows so 12” lines would fit nicely! Also, the new regulator came with a mounting bracket exactly like Ron’s (single mount). I reused the original bracket that mounts to the threaded post above and below for better support (can’t be seen in photo).
4 points
-
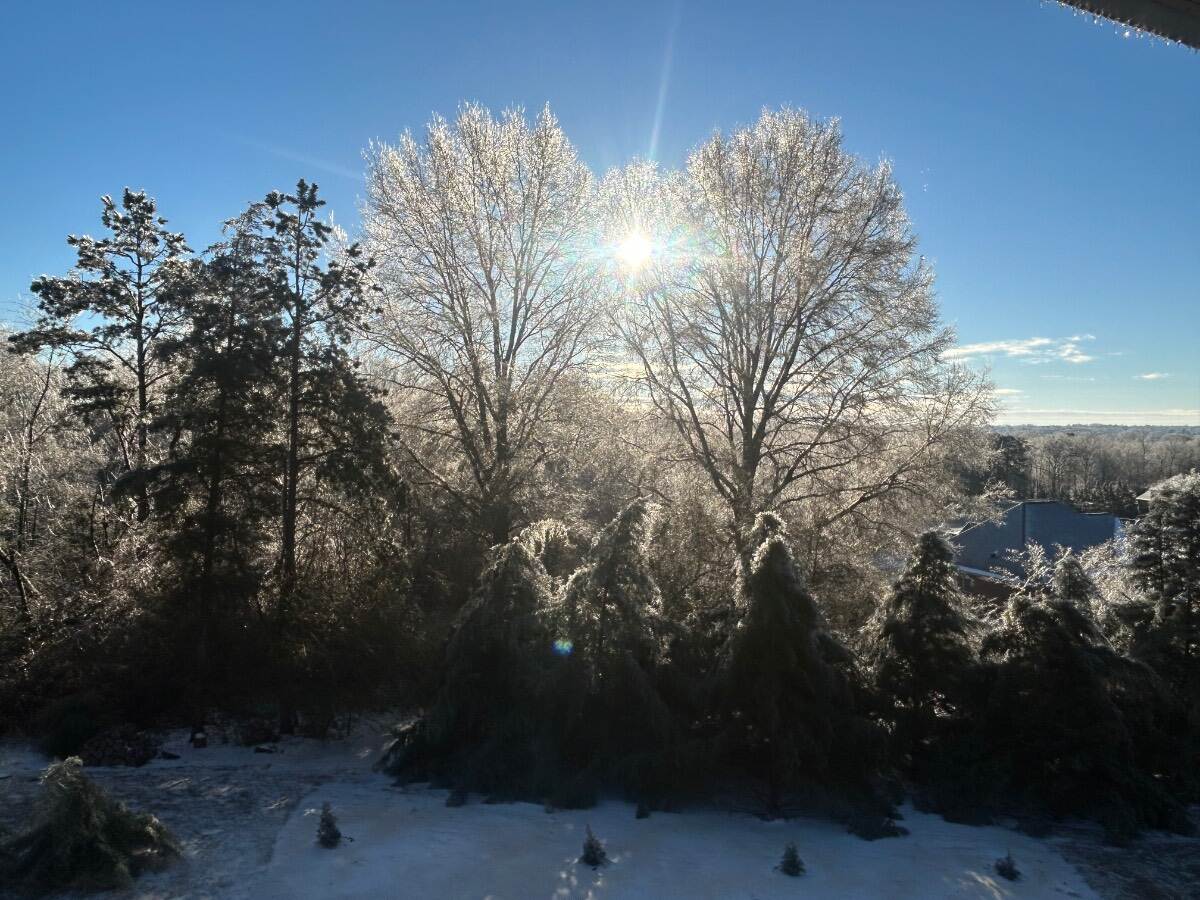
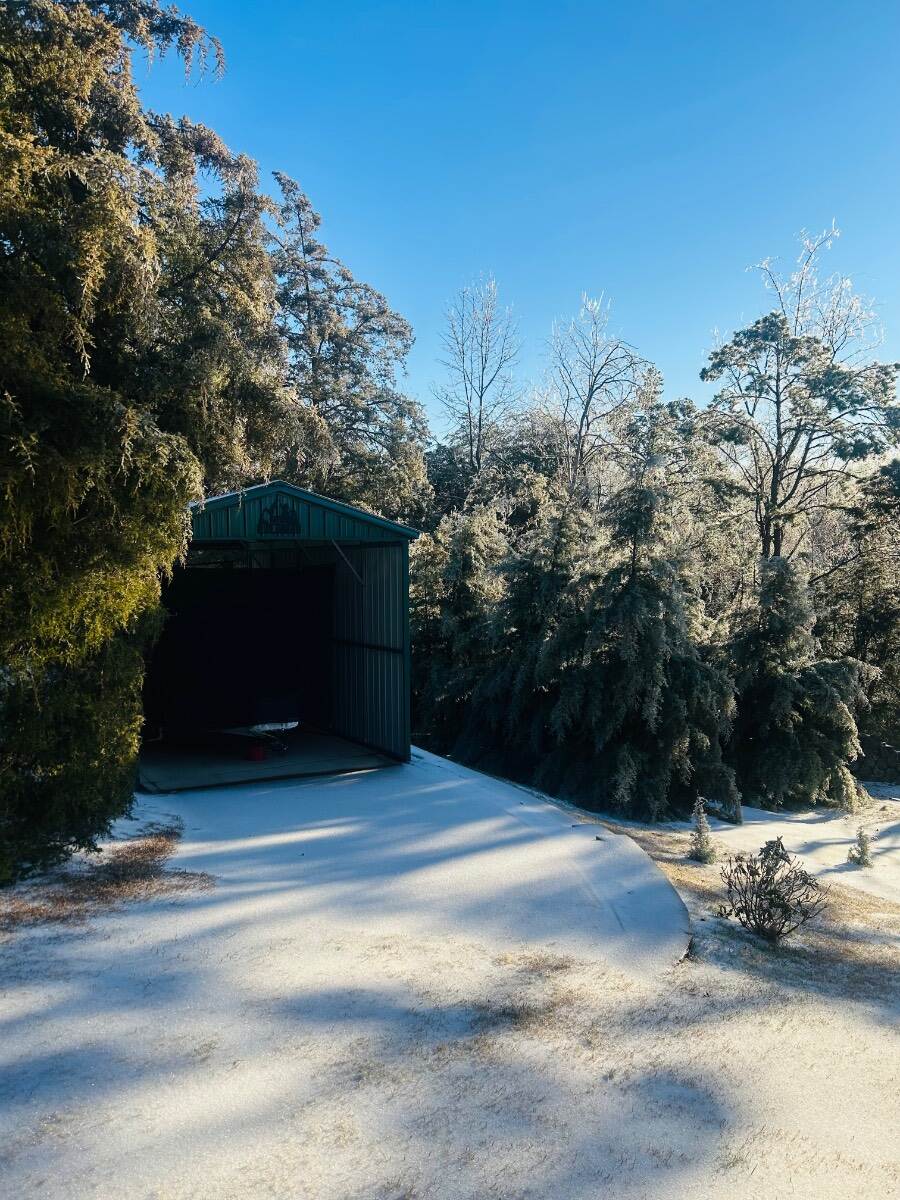
Please to report we had very little snow and mostly sleet and freezing rain. Grateful this is all we had. Our “Ollie Hangar” did exactly what it’s designed to do. Today we woke up to a gorgeous sunrise and Carolina blue sky off our back deck. Can’t ask for more than that! Our Carolina Sapphires will bounce back, after taking a bow in today’s bright sun shine. 👍🏻 XPLOR in deep hibernation in the “Ollie Hangar”.
4 points
-
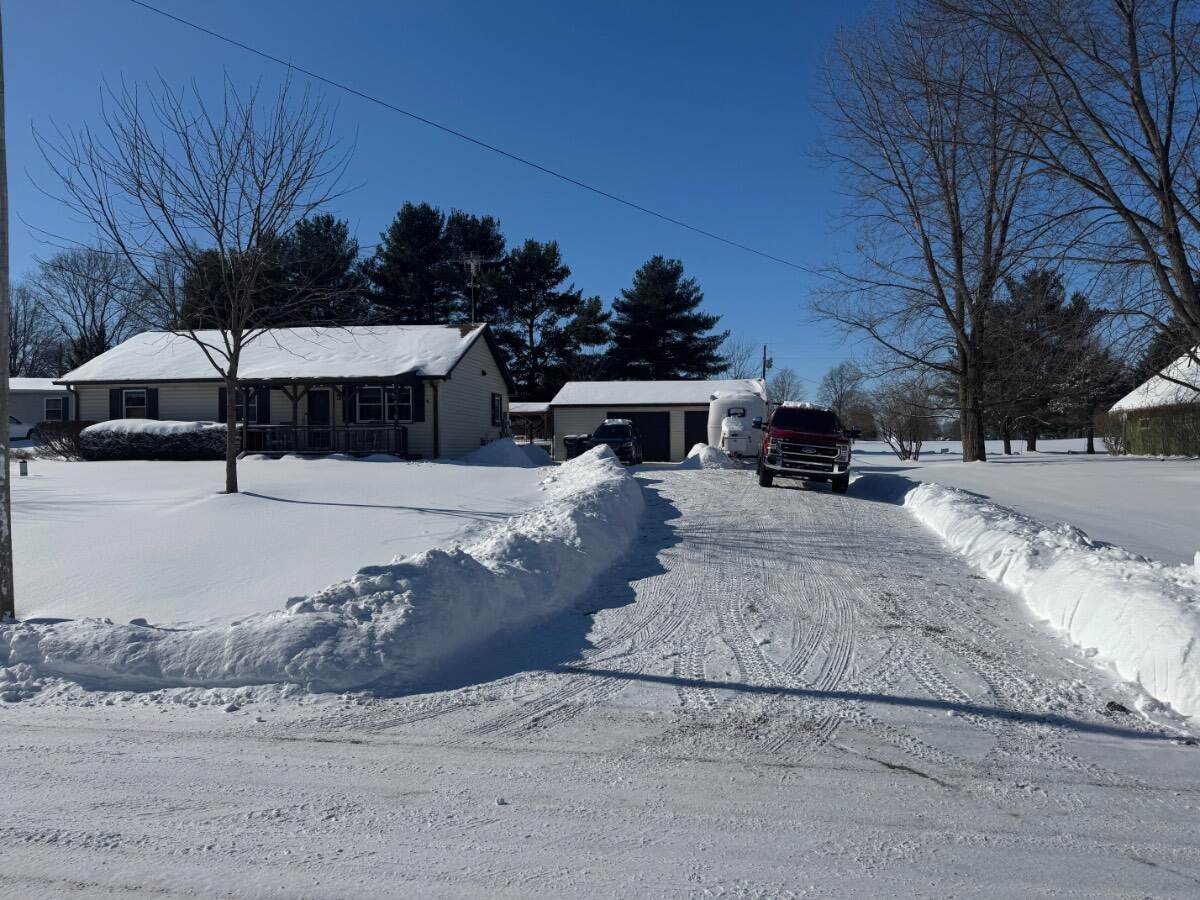
About 10 inches east of Indianapolis. The drifting is the only problem now. The snow won’t be melting any time soon so hopefully the wind will stay calm. Now for the real fun with sub zero temperatures expected at night for the next few days.
3 points
-
I have no experience traveling with our Norcold in below freezing temperatures. Our Oliver has never seen winter or salted roads and never will as long as we own it for so many reasons. Mainly safety, we don’t pull XPLOR in the winter and we avoid the corrosive salt used on the roads. Here is a quick open source AI answer that may help with your question on the Norcold three way fridge. Hope this helps! Travel Safe! Norcold 3-way RV refrigerators generally struggle to operate properly in extreme cold (below 32∘F 32∘F or 0∘C 0∘C ), often failing to maintain safe temperatures because the absorption cooling system requires a specific heat balance to function. While they may not break, their performance will likely degrade, leading to warmer internal temperatures as the outside ambient temperature drops, often requiring intervention to work properly in freezing weather. Key Considerations and Tips for Cold Weather Operation: Performance Drop: Below 25∘F 25∘F , cooling performance declines significantly, as the mechanism that circulates the ammonia mixture is less efficient. Propane Advantage: Using LP gas (propane) mode is often recommended over electric, as the heat generated by the flame helps keep the boiler/cooling unit operating better in cold temperatures. Ventilation Management: In extreme cold, it is often helpful to block off roughly 75% of the outside refrigerator vents to trap heat, though manufacturers often advise against this for safety reasons. Cold Weather Kit: Some models, such as the Norcold NA7LX, come with or are compatible with a "cold weather kit" (a heating element for the boiler) that allows operation down to 0∘F 0∘F . Preventive Measures: Ensure the fridge is not in direct wind, and keep the interior, especially the freezer, relatively full to help maintain temperatures.3 points
-
The key is to have enough slack in the hoses to enable lifting the regulator off the threaded stock when removing the propane tanks. This is my preferred setup, as the tank valves and changeover switch are all easily reachable via the housing screw port; and the regulator can be moved out of the way for more clearance when handling the tanks. Note the cable routed through the cross bar, around each tank handle the loop ends on the threaded stock seen behind the regulator, as well as the padlock for securement.
3 points
-
Thank you. I love listening Andrea, and also his duets. One of my favorite is this.3 points
-
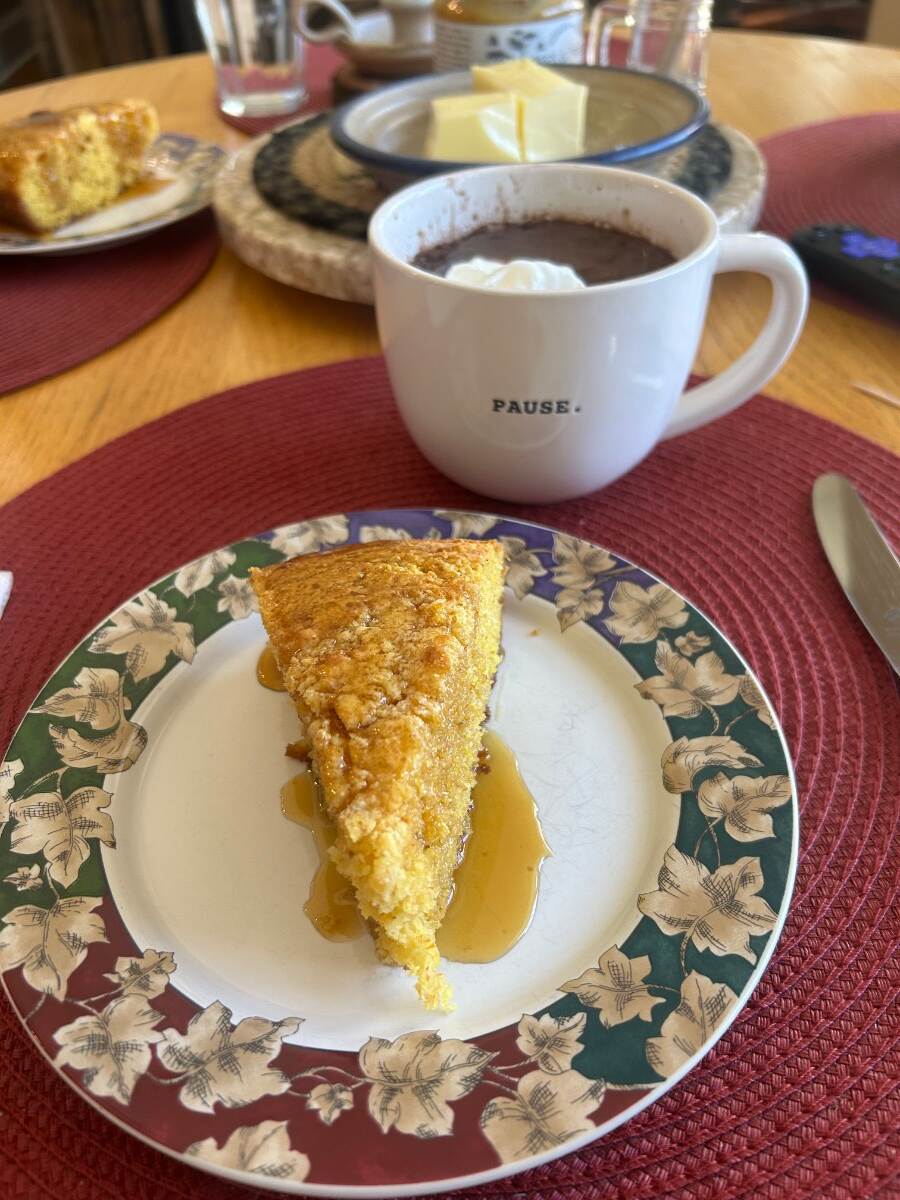
💯The best and only corn bread is in a piping hot skillet, gotta have that light crunch! 😋😄2 points
-
The BEST corn bread is made in piping hot cast iron.2 points
-
How fast can you both get here? We love sharing food! 😄2 points
-
Wow that looks yummy!!🤩2 points
-
I actually love your idea. It seems that in some cases that would be a bit less work. However, as @Ollie-Haus recently found out with his current regulator, he ended up having to raise up his regulator on the bracket to be a bit higher compared to the top of his tanks. We had an exhaustive conversation about it. This was because his Truma (I think) was having issues igniting, he can verify. I then read through a bunch of different regulator instructions while at a local hardware store, and found out that some regulators (few) did mention the height/elevation recommendation compared to the tanks. That was a surprise to me, but I'm a computer guy and have never gotten out of the house much. LOL Since I received only this one picture from my girlfriend, I had also noted that it's time to replace both hoses so she has good data on age. I still love the idea of an easier removal process, no matter what. Some of you guys are really good with metal-work. So get to work on ideas. 🫠 PS: If you look close at her picture, you can also see that the right-angle LP connector off the regulator has now rubbed into the passenger-side tank. That's not good in any way shape or form - truly bad. I'm sure these have very strict rules by the DOT and other agencies.2 points
-
And, this.2 points
-
Looking really good Chris, way to go staying ahead of it. Your home looks really festive brother! Regards to Stacie and you guys stay safe and warm. 🇺🇸🇺🇸🇺🇸👍🏻👍🏻1 point
-
John, ‘That’s a fair amount of snow. So sorry to see your mail box was damaged. I would hope that your neighbor would step up and cover the entire replacement including install. The right thing to do. Hello to Susan and a big “woof’ to Fiona your gorgeous brown lab. 🐾. Stay safe!1 point
-
PS: It appears that one of your hoses is relatively new and the other is likely a 2016 OEM. May want to update the older one. GJ1 point
-
Chris: Many of us fully remove the tank hold down bar when filling our propane tanks. I would prefer not to have the regulator support angle above the tank hold down bar. Doing so would subject the hoses to additional stress at every tank fill. That said, I appreciate your warning. I think that I will add two jamb nuts below the tank hold down bar (One on each side of the regulator support angle) to "fix" the location of the regulator thereby reducing stress on the hoses during survice. Do you think that would solve the concern? GJ1 point
-
I like your taste in music SeaDawg1 point
-
I like chilling in the evenings, usually instrumentals, but I could not pass this up with Andrea Bocelli & Brain may:1 point
-
I keep it simple and fast: 6" torpedo level, slap it on the entry door threashold for fore/aft. For starboard/port move the level 12" into the entrance. 1/4 bubble is close enough for us. If the refer decides not to work at 1/4 bubble, then it will be my excuse to get an inverter one. Gizmology is great, but can be a PITA too. My torpedo has yet to sink our Ollie! GJ1 point
-
Ha! Good morning, Bill! Nope just me and a knucklehead wandering about in the dark. It’s 41F here now - quite a bit warmer than your location! Best regards, Art & Oscar (woof!)1 point
-
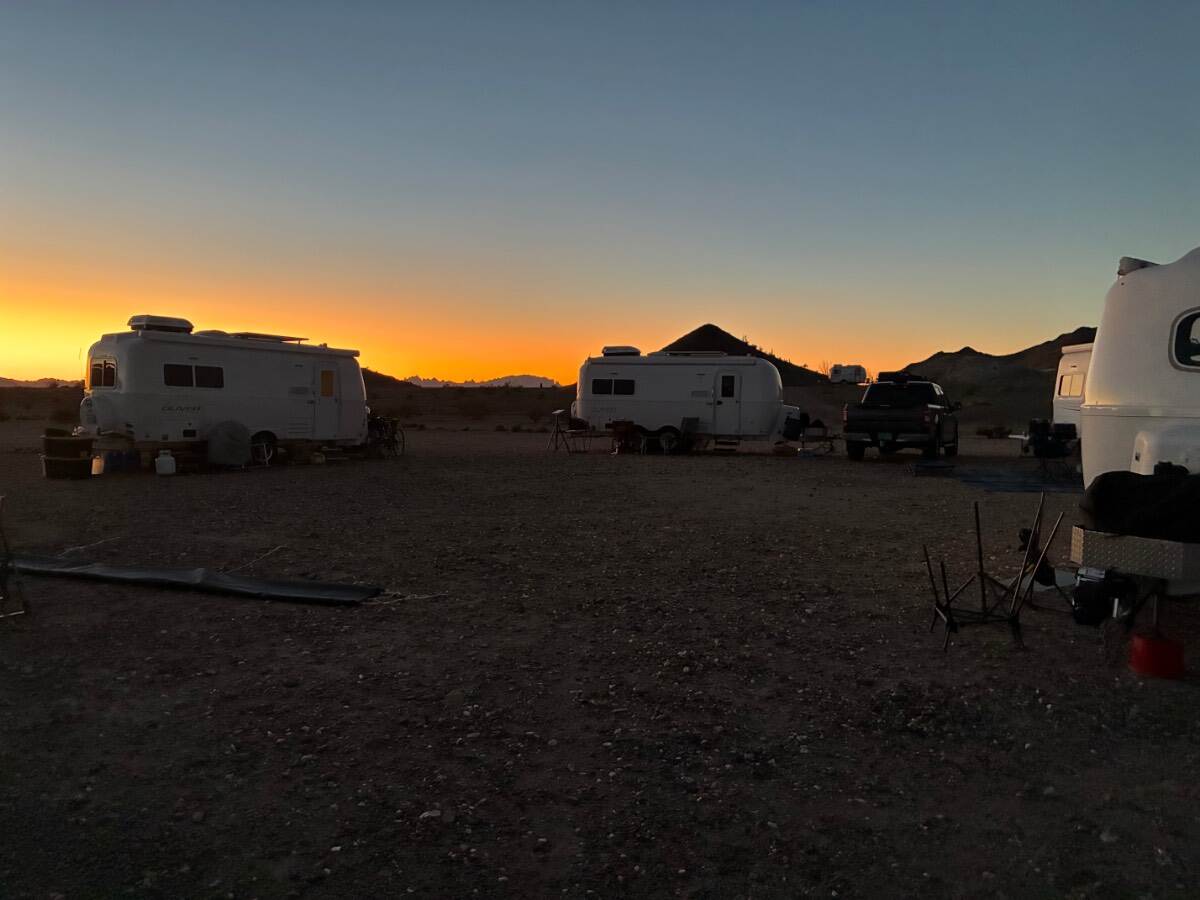
A beautiful Quartzite sunrise with 6 Oliver LEIIs….
1 point
-
No way was that caused by a ply failure. You can tell by the wear pattern and the melted rubber buildup on one side that it was caused by a lockup.1 point
-
Tire pressure is independent. Something jammed your wheel temporarily, reasons unknown or TBD. Keep an eye out…1 point
-
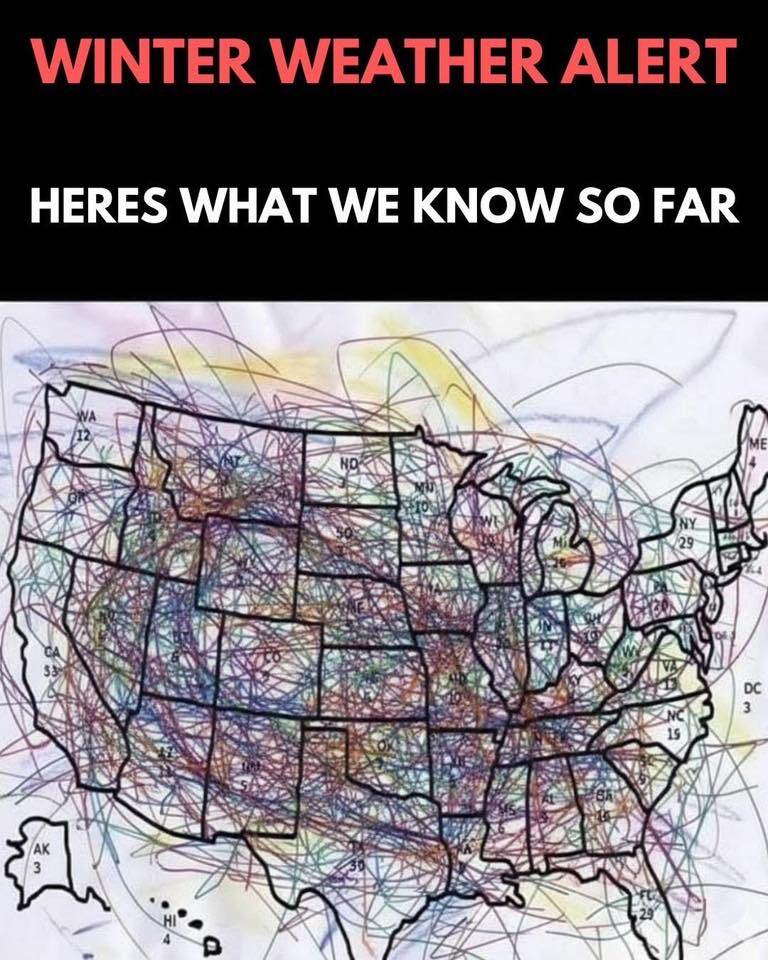
After having more than my fill of the latest “state of the art” weather forecasters, here is what we know so far. 🙄 😂
1 point
-
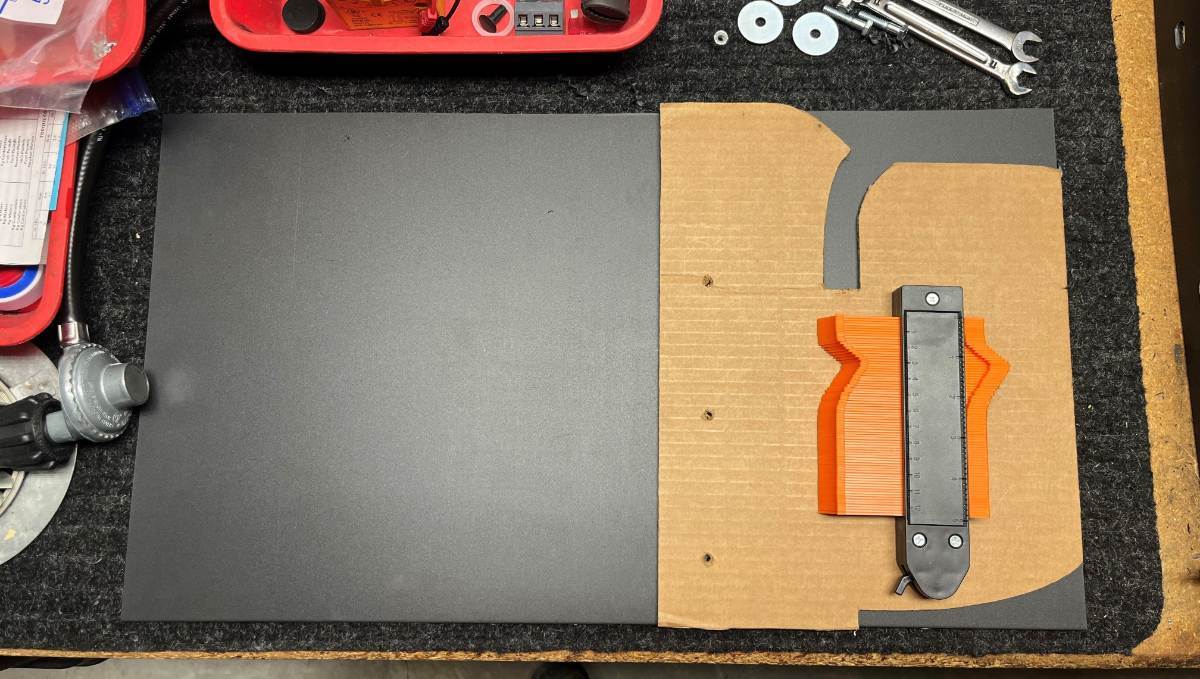
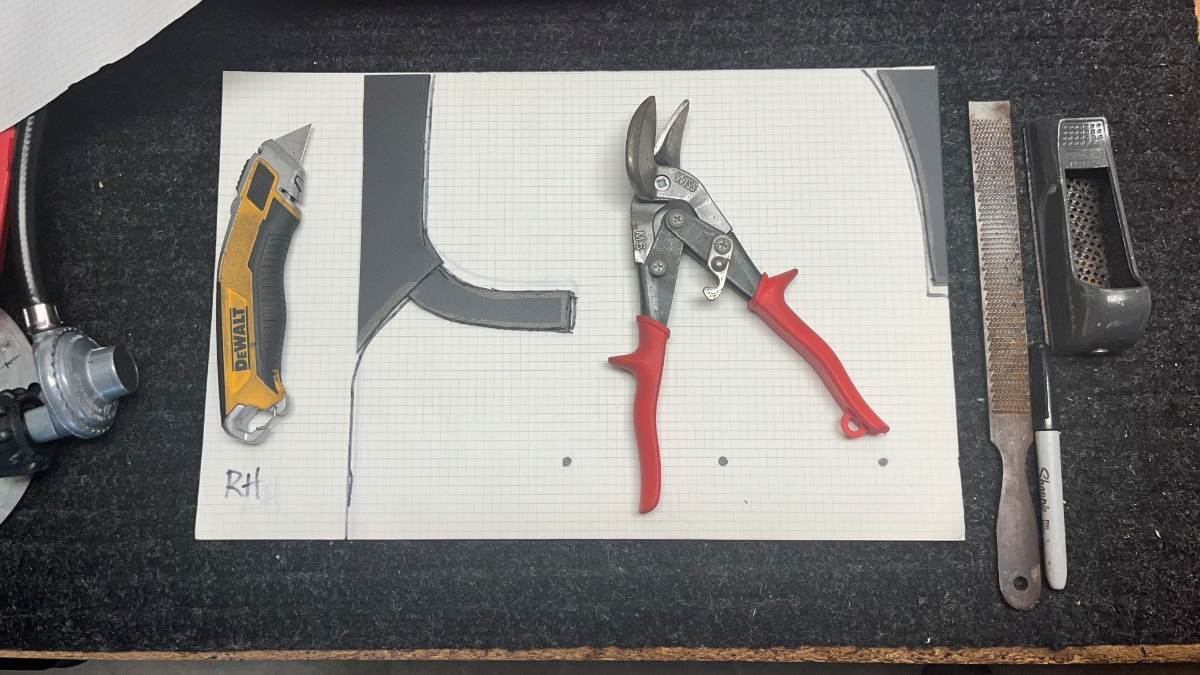
Next step; cut stock for the Oliver flaps. The stock was 24x36" so I cut every flap sideways making them all 24" long to start. I cut the Oliver 13 1/2" wide to stick out 1" beyond the tires and I made the area under the mounting bracket a 13 1/2" square which made the mud flaps sit 4" off the ground. It's too difficult to work with the full length of stock when cutting a pattern to fit around the curved body of the Oliver. So I cut a piece of cardboard 13 1/2" wide like the flap and 10 1/2" tall, the measurement from bottom of bracket to the top. I drilled the 3 mounting holes into the cardboard for alignment. I used the little curvy tool (stocking stuffer from Chris a few years back), took a few measurements and started to cut away at the cardboard making the opening longer and wider. I wanted at least 1/4" clearance above the fender and 1/2" below, so not to touch and to allow for cleaning the fiberglass. Another cut to follow the pattern of the inside wall until the cardboard was perfect. Then traced it onto the poly stock and cut some with a razor-knife and the sideways tin snips worked very well. Used razor blades, a grater block and files to clean up the edges, and voila! 😎 Afterwards, I traced the finished mud flap onto graph paper so I can share my template with our Oliver friends who would like to copy the design!
1 point
-
For those interested in Alfred Burt carols, this should give you a few of them:1 point
-
Greetings, All! Well D and I went over to the "dark side" and sold Casa Blanca to a great guy from near Kerrville, TX, David Knight. Please welcome aboard @Kpaladin David into the Oliver family. We're now into our next chapter of RV'ing and starting new adventures with our 2026 Brinkley I 235. It's totally "Victron'ed" out and includes 600A-Hrs of Epoch LiFePO4s and 800W of solar modules. We'll stay in touch! MAX Burner
1 point
-
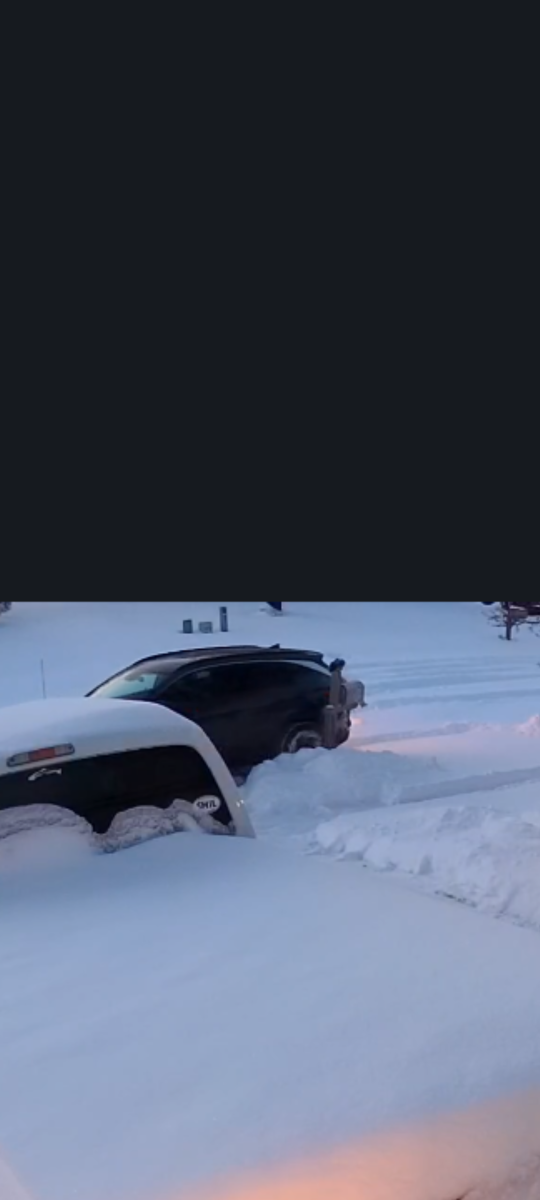
We had 11" of snow. Our street has yet to be plowed. Schools cancelled. Red Level Warning still in affect. Emergency responders, and plows only. Then I have a neighbor who decided not to obey the law. Went out, couldn't get up his driveway. He then backed down the street to get a running, backed up on to the grass and through our mailbox, destroying the pole and damaging the mailbox. Caught on our other neighbors and our security camera. He did come over when I was inspecting damage. He said he would pay, so we will see when the price is $500+ Have to use a certain company to comply with homeowners assoc. for post style and mailbox color requirements.
0 points


.thumb.jpg.e34bf01ef7f7d5e99ad31856d45afbeb.jpg)


-
Recent Achievements
-


")


")


