Leaderboard


Popular Content
Showing content with the highest reputation on 06/15/2026 in all areas
-
Having the condensate collect in pans in the DPll and drain via the inner hull tube Oliver installs is not without issue. Many have experienced, self included, condensate water dripping inside the cabin either from drain line blockage, improper leveling on setup or excessive humidity conditions. I have no regrets abandoning the tube drain with my chosen a/c replacement and no further worry of internal leakage. Just say’n!3 points
-
There has been several threads on the shock bushings being over compressed. Following is one of them, with good pics on how it should look when the nut is tightened correctly. My suggestion is to take the dished washers from the old Monroe’s and insert them between the metal frame and the new bushing on each shock on top and bottom. This will better support the bushing to help keep it from hanging over and getting stress cracks. On mine, I had to grind off a bit of the upper dished washer to get it to fit snugly. No need to replace the bushings, they are still good, just loosen them up. Easy to do. https://olivertraveltrailers.com/forums/topic/7138-any-tips-for-leaf-spring-maintenance/#comment-771183 points
-
Scotty (or Greg), you may know I’m the only one here with the Chill Cube installed on an Oliver. So you may say I’m biased! I just ran a test which I’ll post soon on my Chill Cube thread. Ran it for one full week on batteries, set at 80F (it’s parked at home). Daily high temps low 90s! Without A/C with the AZ sun the cabin would be high 90s or more. Not a drop of condensate down the hull. The Chill Cube has a condensate trough that the condenser fan runs through, picking up the water like a water wheel. But can’t promise there wouldn’t be any in humid climates. There would be much less. Ran it for 7 days using on average 96 Ah per day ONLY! We have 320W rooftop solar which adds power in addition to the 96. Your Oliver and ours are both 2016 models. Maybe you have the same solar. Without solar say it adds to 240 Ah per 24 hours. That’s about 10A per hour average. On full blast, it pulls 60A but not for long. Our Dometic P2 took 150A minimum and would take forever to cool down. I'm starting another test this week with set temp at 74F. 80F is a good summer storage temp and at 74F it will be very comfortable inside. I'll bet I can run it 3-4 days at 74F in 90F+ heat. I cold never imagine this when we had LA batteries and the awful Dometic. BTW, I’m talking DC amps that can be read with Bluetooth connection to a shunt. We do everything on 900 Ah batteries, usually un-plugged (600 Ah is a good number). I now know for a fact the Chill cube takes 30-50% of the power compared to ANY RV A/C in the market today that is not an inverter or variable speed compressor! If there is a little drip, level front and curbside jacks up 1/2” and the excess will run down the back corner. It’s basically distilled water, so will not stain the fiberglass like rain water catching all the chems they put in our skies. The Chill Cube will run on batteries twice as long as the Freshjet and it’s also quieter than any other model out there, no compressor bang like the Truma, Houghton, Tosot or any US market Dometic product. And if you’re dead set on the condensate issue, the Freshjet is your only choice. You couldn’t pay me to own anything else now that we’ve experience the Chill Cube (a non-paid advertisement)! 😎3 points
-
Digging into document metadata, classic. Don’t mess with geeks.3 points
-
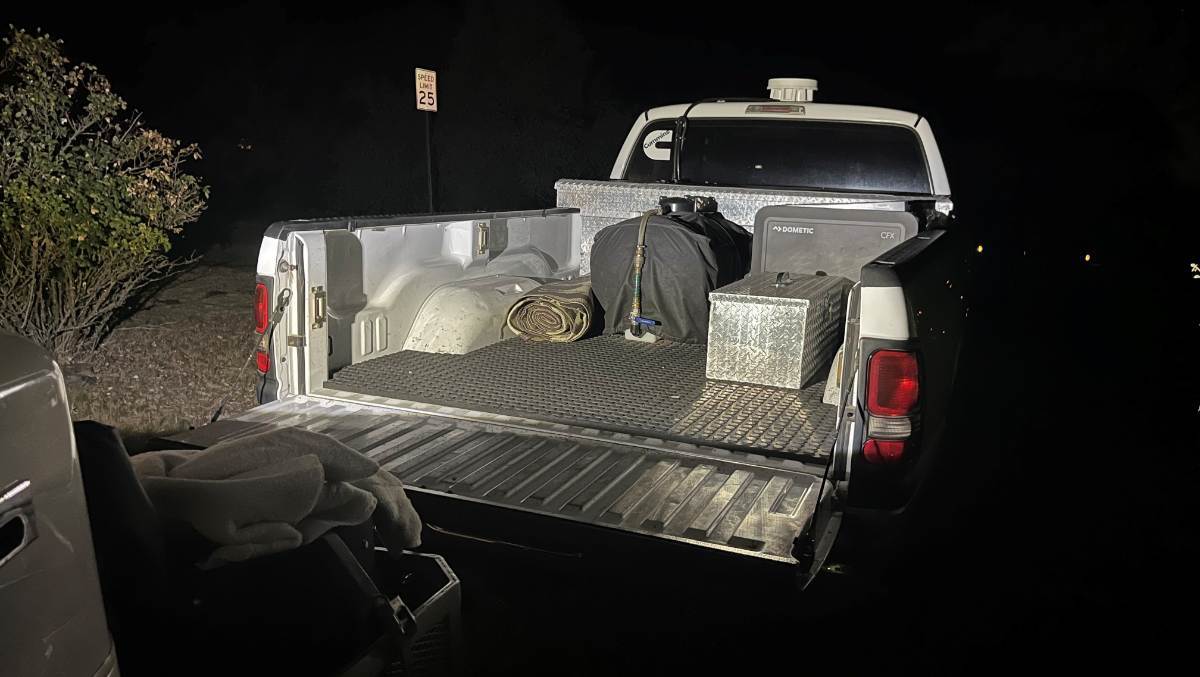
Let me first revise this statement a bit. Love the Rear Porch Light installation, which copies the design and same product used for the Entry and Side Porch Lights! 😎 Not as much love for my new front light, but it's finished and it's not bad. I made a new mounting bracket for the front light from a simple flat bracket. I chose this part since 6" is a good total length and it's 2mm thick. Many SS brackets are thicker which would make it more difficult to form into a U-shaped bracket. Amazon.com: 4 Pieces Stainless Steel Straight Brace (6.1 x 0.7 inch,156 x 18 mm) Flat Straight Braces, Straight Brackets, 24 Pieces Screws Included : Industrial & Scientific Not easy working stainless steel which is a hard steel. I measured the required 2 3/4" width at center. After applying rings of black tape to keep the SS from being marred, I clamped the bracket tightly into a vise at the marked point. I used a jigsaw to cut the groove, running the moving blade right against the vise to keep it in place. I'm not a metal fab guy, so this is the best I could do. I used a "heavy metal" blade, but it wore out after one cut, needing a second blade for the other side. The grooves I cut positioned the correct location and space for the bend. I also believe the heat from sawing helped in hammering a clean angle. Then the bracket was too wide, so I used a bench grinder to cut down the width in the upper portion where it connects to the light. Filed the edges and used steel wool to shine up all sides of the bracket. Sounds like a lot of work but was done in about 30 minutes, (after days of thinking it over)! 🤣 It looks much better now. It's shorter than my previous install and I moved it forward a little. It's visually more pleasing since it doesn't conflict with the lines of the belly bar. It lights up the truck bed fully without shadow. You can see shadow only on the tailgate, but when it's closed the light reflects down to see the trailer hitch and cables if needed. We're good now! But these LED lights are BRIGHT! Maybe later a mini hood attached to the light, so it doesn't hit your eyes when standing to the side. There's always something in the minds of engineers! 😎
 2 points
 -
Thanks Rich, his frank language is funny too! 🤣2 points
-
Especially this geek! If you haven’t checked out Louis Rossmann’s channel, you should. He’s now siding with Will Prowse, and I think BB is toast! Here’s another good video from him to watch.2 points
-
In humid climates there will be more than just a little drip, but being slightly off level as you suggest will divert any runoff to a rear corner. Even though condensate is like distilled water, be assured there will be some staining from contaminants it picks up as it leaves the condenser and drains outward. Maintaining adequate wax on the gelcoat will help reduce said staining and further cleanup of any resulting streaks.2 points
-
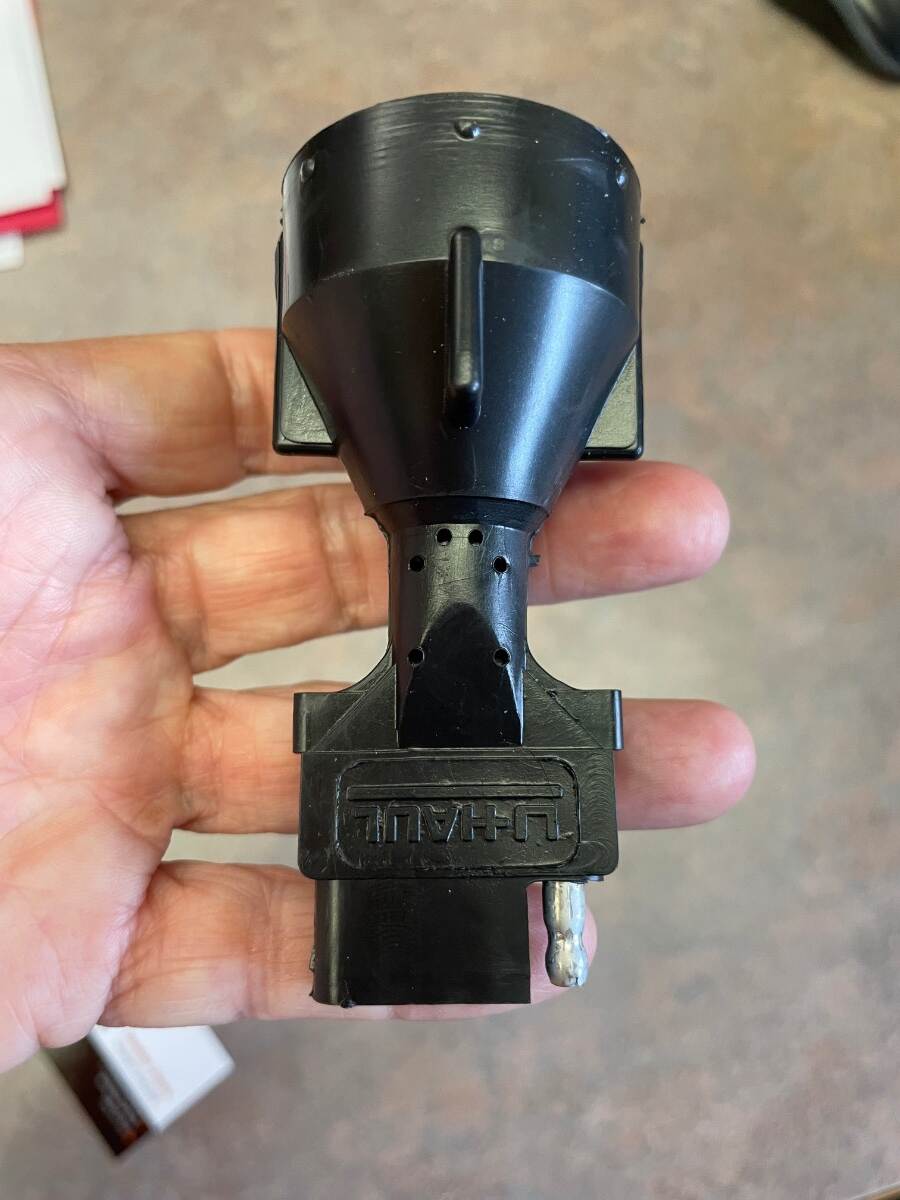
Most U-Haul trailers have a 4-pin cable since they have surge brakes rather than electric brakes. Will that matter in the pull test you are suggesting?2 points
-
Just two years old and squeak!!! 🤣 RE the gain on your brakes. My take is the old 1750 LB leaf springs were quite forgiving! The 2750 LB Alcans not so much. The old suspension would allow the hull to porpoise when the brakes contacted. The new suspension will not, so brake contact to road is immediate! More so because your springs have not had break-in time. Put your gain higher when you get back on steep mountain roads, maybe up to 6. And maybe you don't need 7 anymore. My older truck does not have a factory brake controller. The default gain on the Tekonsha is 6.0. I bring it up to 6.2 in the mountains and sometimes down to 5.8 around town. Looking forward to what you see from you inspection tomorrow!2 points
-
Will now has much better equipment for testing. It’s perfectly fine to like a product, but it’s also okay to discover it’s actually terrible through testing and share your honest opinion. Some unscrupulous scumbag individuals at Dragonfly Energy are hoping to profit before the company fails, but I suspect their plan will backfire, and the company will still collapse. It’s unfortunate for the hardworking people who work there.2 points
-
Looks great John!1 point
-
My friend Ron, of course you know! Our son Adam played a USTA Tennis Tournament in the very nice Houston suburb of Clear Lake 15 years ago. I remember sitting outdoors, large-brimmed hat on for the sun, I was drippin' wet just watching! 😎 The 16-year-old boys had drenched shirts before the first set was won. Traveling the west vs. the gulf states is night and day. Wish we had a forum member in the east with a Chill Cube for comparison. The Chill Cube condenser fan wets the condenser by design. To my knowledge, no other A/C unit has this feature (perhaps Furrion has a patent). The water-cooled condenser increases the overall cooling efficiency. In very dry climates (the spring is our windy dry season), the little bit of condensate it pulls out of the dry air quickly returns to the air (evaporates). I have yet to see any condensate drip on our hull. When greater cooling is needed and it's humid, the fan should create a visible mist blowing from the condenser coils. More mist means less drip. But when the volume of condensate gets large it would overflow the condensate trough and run down the hull.1 point
-
Another Chill Cube customer here however I've not installed it yet. I waited until the heat pump version came out to make my purchase. I didn't see the no drain system as a problem. I have a small window unit at my vacation home that uses the same method of throwing condensate on the condensing coil for additional evaporative cooling. It sounds like a waterfall when it starts but has never dripped. Now, I realize I'm making a big leap of faith the Cube will work the same but I'm not too worried if a little condensate flows off the trailer. We're still rocking lead acid batteries and don't have an inverter. My goal wasn't energy conservation as we're usually plugged in or occasionally on a small generator at lunch stops. My goal was quiet and humidity control in the trailer. My hope is when the Cube ramps down to a constant run state, it will achieve both. Fingers crossed1 point
-
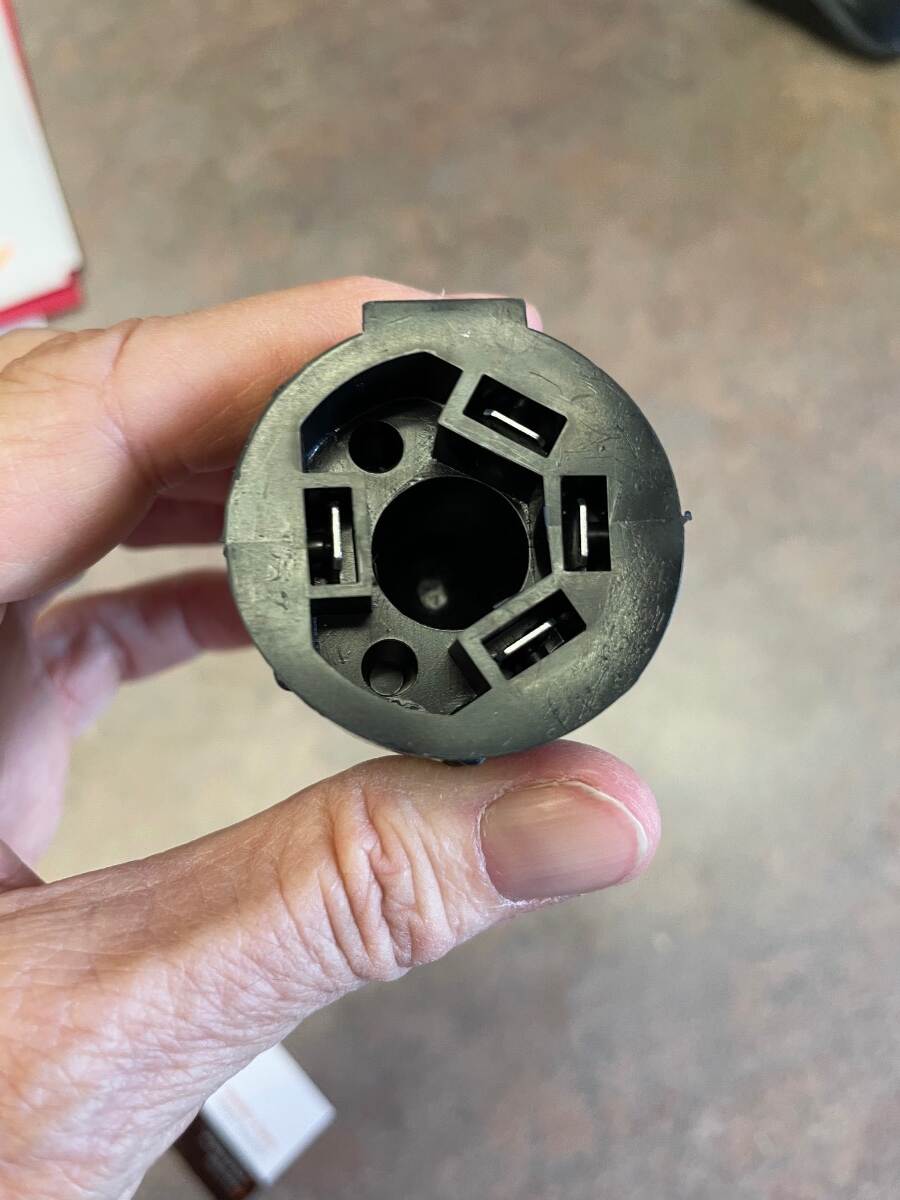
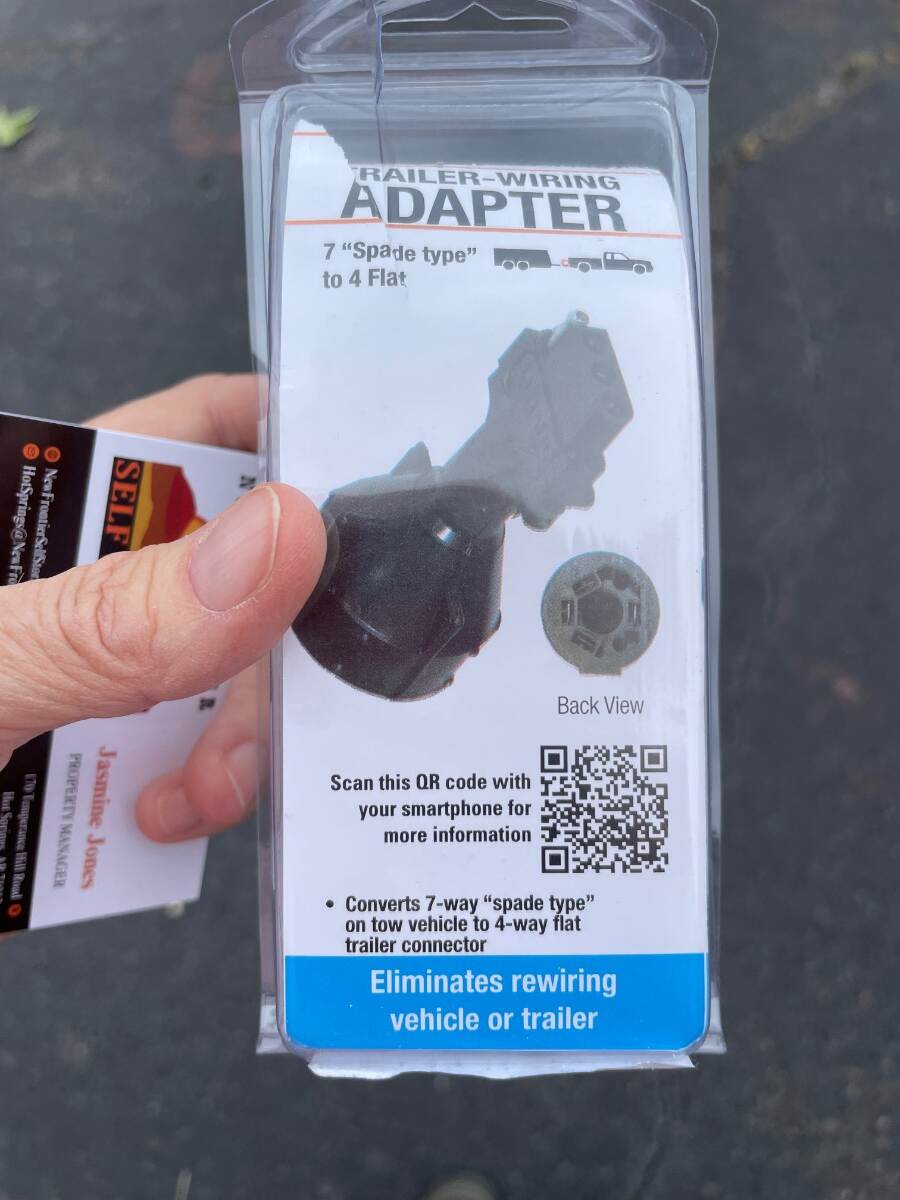
And indeed — though I specifically requested confirmation of 7 pin they only have 4 pin and wiring seems to include no brakes. Of course they sell an adapter, but I don’t think this will tell me anything. I’m on hold…
1 point
-
Good advice. Just be careful not to have any of the four individual trailer tires lock up when doing a panic stop. Apparently my curb rear brake on Ollie locked up last season and a flat spot was the result on the tire. Found it during routine pre-trip annal inspection. I plan on replacing my 2018 Michelin's next season so just put the unused never on the ground spare tire on that location and am good to use the slightly damaged one as a spare for this season. Very happy that OTT gives is a full size matching spare! GJ1 point
-
Yeah - me trying to be privacy sensitive to the previous owners since their names are on the full receipt and also finish the post before Rebecca finished cooking dinner. I'm on my (home) mac not my (work) win11 machine and the screenshot works differently. I copied the date and did not paste it. 6/18/2024 is the date of the work order. Sending you the unredacted workorder privately. Will open a ticket at Oliver. Will double check when I do the "pulse test" in the morning. I just had the tires pulled and TPMS units installed (pared with the Ford truck displays) and Discount Tire did not note any issues - and that's money to them 🙂 One note - part of the launch procedure for every launch is to do a rolling at idle trailer brake stop check using the manual traler brake on the Ford integrated brake contoller. I have been running at 7.0 - after picking up from Alcan the brakes seemed stronger so I reduced to 5.0 and achieved the same performace on the idle rolling brake check. All relative numbers, but want to make sure to put in all the data.1 point
-
Excellent - You'll know more tomorrow! Not sure if we should be routing for the error to show with the U-Haul trailer or not! If it shows, then the issue is with your truck, and 4 GM dealers already couldn't figure it out. If you do not get a trailer error, make sure you give it a fair test. Pull it out, down the road. Turn your truck on and off several time. Pull the 7-blade plug in and out a few times. Still no error? Then we must conclude wiring on the Oliver side is bad.1 point
-
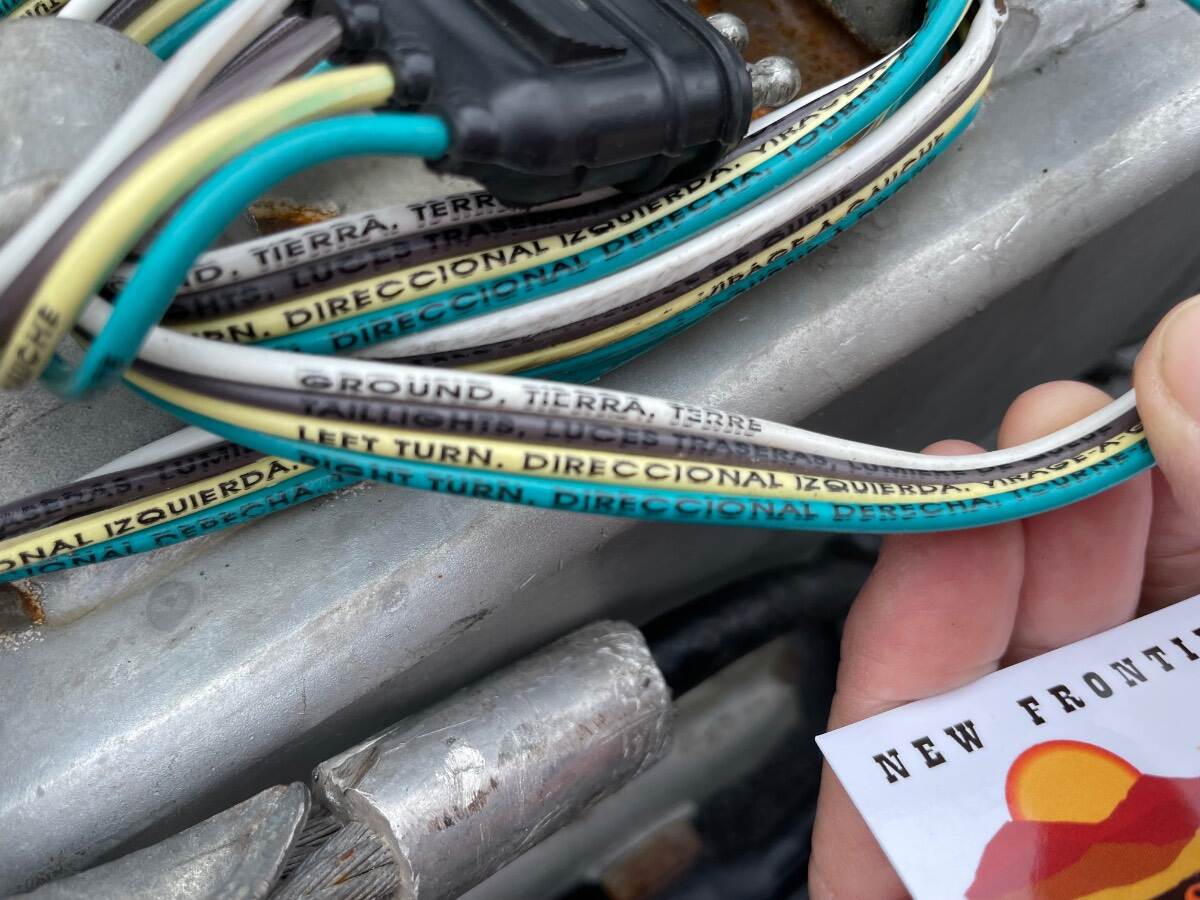
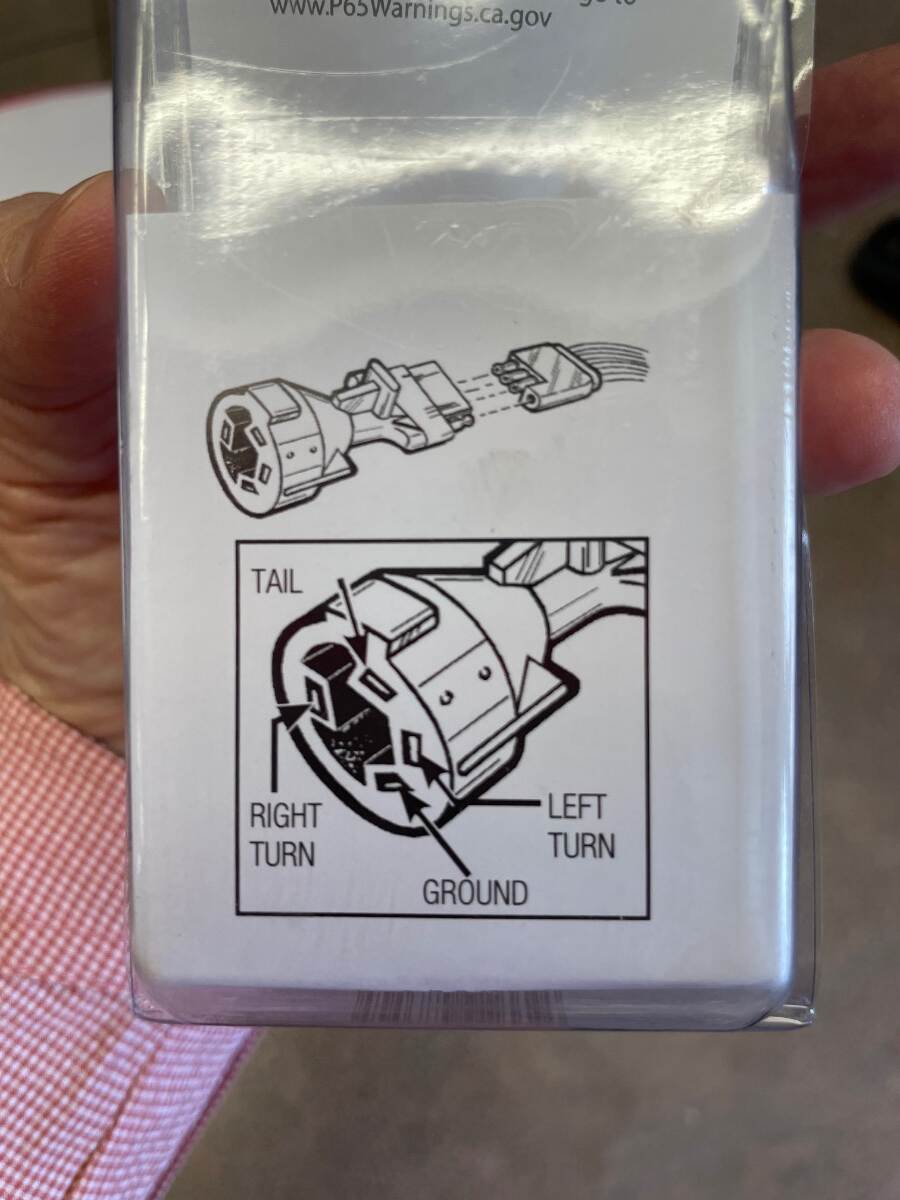
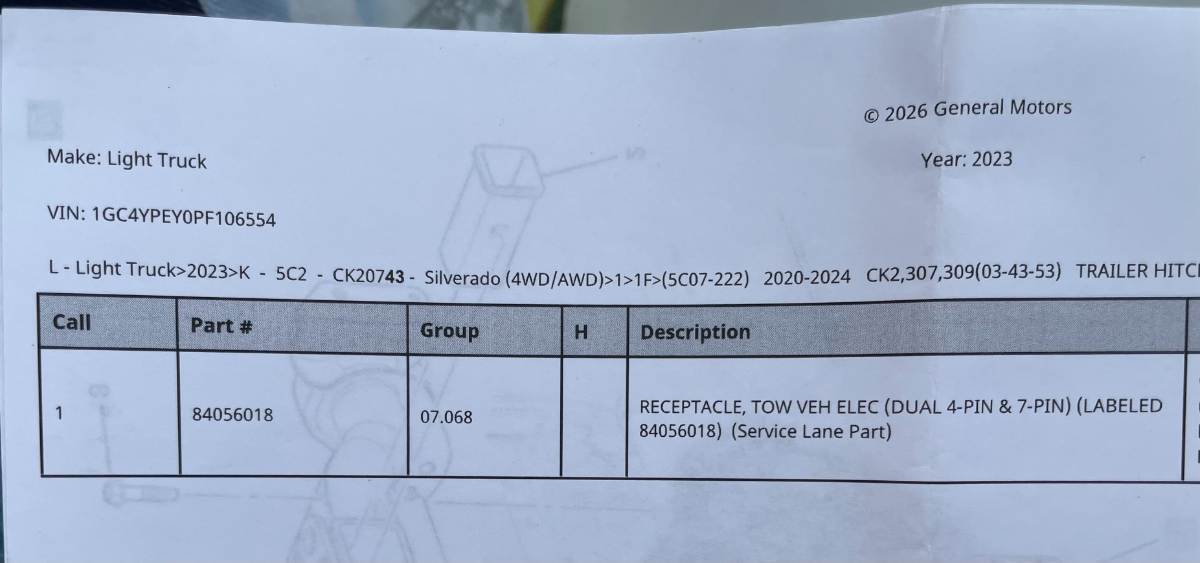
Doesn't matter. Your mechanic thought this was the correct junction box and all the right colors are there for a trailer wire harness. This is referring to my comment on the black wire. The black provides constant 12V positive. In a cargo trailer that has no batteries it's used to power interior lights from the TV battery. In the Oliver and perhaps other travel trailers it uses the truck batteries to charge the house batteries. OTT disconnects it when installing LiFePO4 batteries. I believe it's a dumb and perhaps dangerous practice since a light gauge wire should never be used for this purpose. Anyway, this is not your issue. The only thing that connects power from your TV brake controller to your TT brakes is the blue wire. Just check to see if the blue wire connection tight. No, the Amazon link you provided has both male and female ends, its listyed as an extension cord. If you want to replace the male end, head only, get something like this. If the issue is at the truck to trailer connection only then this is the easiest route. Only takes an hour to replace this, Amazon.com: MECMO RV 7 Pin Trailer Plug Splice-in Replacement Trailer Side Male End 7 Way Round RV-Style Trailer Light Wiring Harness Connector, Heavy Duty 7 Prong Trailer Wiring Tow Plug for RV Boat Trailer : Automotive I like the idea of this one since it has a waterproof cable gland built into it, but it would be too long to fit on my truck. Amazon.com: Oyviny RV 7 Pin Trailer Plug with IP68 Waterproof Seal, Detachable 7 Way Round RV-Style Trailer Side Connector 7 Point Trailer Wiring Plug : Automotive If you need to replace the entire cable from the male 7-blade connector all the way back to your junction box under the vanity, you need something like this: Amazon.com: CheeMuii 7 Way Trailer Cord Heavy Duty 8 FT Trailer Wiring Harness Kit 7 Pin Trailer Plug Inline Wire Harness Cable for Trailers RVs Campers : Automotive Amazon links are to show examples. I'm not suggested these products specifically. No way you need a GM part and the picture of a part description you showed above is a combo 7-pin and 4-pin unit (4-pin for little trailers without brakes). You asked RE the clamp ammeter? I purchased a more expensive Klein product, their rugged version, but any will do just as long as it reads AC/DC, for the 120VAC systems and 12VDC systems we have on the Oliver. This one looks decent. Amazon.com: Klein Tools CL120 Digital Clamp Meter, Auto-Ranging 400 Amp AC, AC/DC Voltage, Resistance, Continuity, Non-Contact Voltage Tester Detection : Industrial & Scientific1 point
-
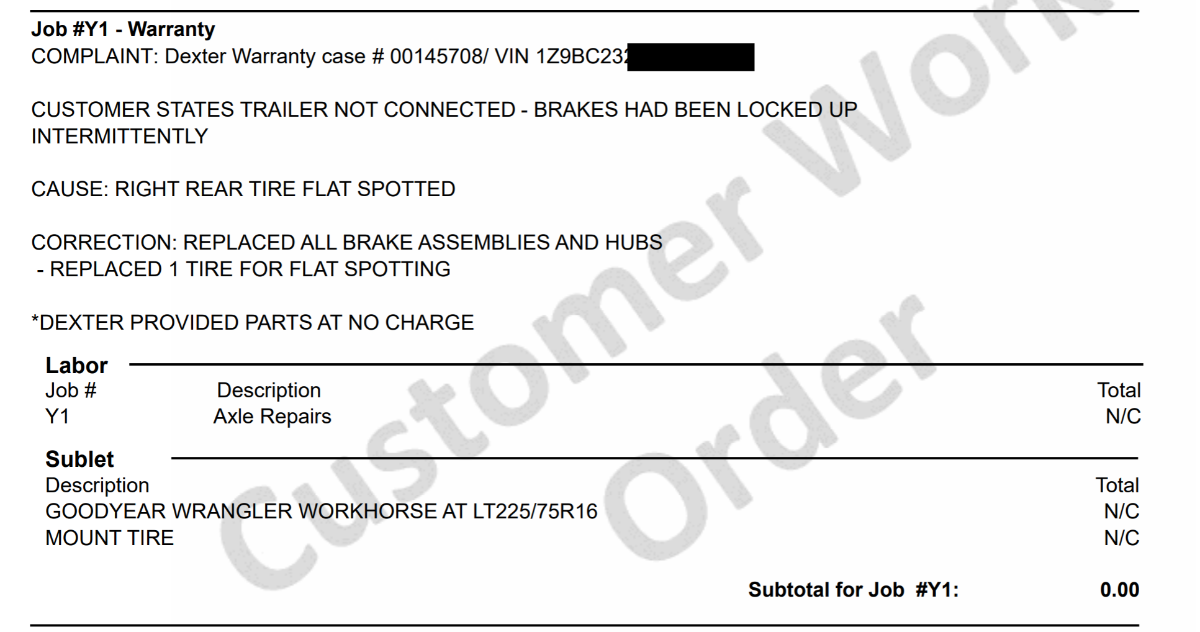
Good find, Detective Columbo! 🤣 First time I heard the terms curbside and streetside was on this forum. The automotive industry uses left and right from the driver's point of view in the driver's seat. Whether I'm working on my Dodge truck, one of our Toyota products, or any vehicle if an auto part is unique left to right, you will see an L or R printed on it or in the part#. Go figure the wheel you are having an issue with is one that had a prior issue, also the one OTT replaced! Now you must enter a Service Ticket since OTT is already involved. Strange no date on this receipt. Maybe you have a larger picture showing it. Looks like they replaced everything on your right rear. They usually remove the entire braking plate and replace it with a new one that has the shoes, springs and everything. This is the way these are serviced. Nobody just replaces shoes on trailers anymore. The full assemblies are not very expensive (the drum/hubs with bearings are). It states ALL BRAKE ASSEMBLIES AND HUBS which means more than one but above it does state RIGHT REAR. The "HUBS" are integrated to the drums and the bearing is in the hub. This means regardless of where your squeaking is coming from it's coming from a part replaced already under warranty. When you spin your tire tomorrow, inspect the tire carefully for any bald spots or even scuffs on the tread surface. The tire was also replaced since it was "flat spotted" due to the brakes locking. Question is WHY? Why is squeaking occurring at the same RR location? The brakes locked last time but we cannot conclude it's the same cause today unless you find some flat spotting which would indicate brakes. Everything was replaced with new parts. I sure would like to know when. Maybe you can determine the date from related paperwork you have. Back to work, Columbo! 😎1 point
-
@jd1923 @Tom and Doreen not trying to columbo here - but this conversation made me think about the one thing we did get when we purchased the trailer - the service records. I went back and reviewed them (yay for cloud storage and scanning in all documents) and the plot thickens. There was this notation - and the sellers mentioned that Oliver had done axle work under warranty and replaced tires. See image below. I'm trying to figure out if right means curb, and if they mean all brakes and hubs? Is there possibly a link since it's the rear curb wheel that's having the problem, and that definitely rear regardless or left or right.
1 point
-
Thank you very much! On my way to UHaul place. Update: I called before driving. Oh well… No trailers available today, but reserved for tomorrow. I think I’ll take a walk. Lake Catherine SP is gorgeous.1 point
-
@Boudicca908 Check out this YouTube video by "The Trailer Smith". It's 1 of about 5 that he has put up. Then check out his other trailer video's, for instance, search for "brakes". All of his videos that I have seen have been very informative. Mossey1 point
-
I need to hit the road so don't have a lot of time to respond here, but will try to answer some of your questions. My photo of the junction box was made in a hurry, leaning over the mechanic's shoulder; didn't see exactly what he did to fix it (wishing I had inspected before he buttoned it up). When I open it back up (likely at Lake Catherine SP) I will take more photos. I don't know what that means. Many times, I have checked my lights by jumping in and out of the vehicle. Then I discovered the "Test Lights" function on the TV center console (how convenient!) and all lights function. A few times I have had someone around to just walk behind while I engage breaks, backup, running and signals and all lights seem to work all the time. I haven't seen any malfunction of the lights on TV or TT *** EXCEPT!! Shoot -- Did I fail to mention that when the TT is connected by 7-pin cable, even when the TV is turned off, the trailer lights SOMETIMES flicker? I made a video of that; sorry if I failed to mention it before. It stops when I use the key fob and LOCK the truck. One guy said it's just low power to features (like the lights for seeing the ground at night), other guys said it was something wrong. I described it as looking like a SHORT IN THE WIRING. *** ... so besides that detail, the only malfunction I have experienced (beyond the warning lights on dash) has been intermittent NO BRAKES -- I test this using the Brake Gain Control on the center console at low speed; it also brings up information on the driver dash location that shows +2.5 or +3.0 etc -- when the brakes are not functioning that information show dashed lines in lieu of the moving blue bar on the indicator (brought to us by human factors engineering, right? so we humans can trust that something is happening there, but not actually connected in any mechanical way). I am learning to feel whether the brakes are working or not. Quite a few times, they start out not working and then they kick in. It seems to be related to vibration; a lot of times the warning lights begin after I have come to a full stop (traffic light, railroad crossing) and then I start out again and they start dinging away. I have spare wago connectors (recommended for my tool kit by Mothership) but no butt connectors, on crimping tool. I will order a new 7 pin connector. ** somewhere online Chevy says to "be certain to use the correct 7 pin connector" for this vehicle. When I asked the dealership, they kept telling me they don't sell those. I said, I want the part number of the one installed by factory on my truck so I can find correct matching end; it took them 10 minutes to understand me. I don't know how important that is -- Non-Chevy people (including OTT) say it doesn't matter, but I wonder about the control modules and how persnickety they are ** HOWEVER, since my Oliver operated without a hitch for three years, I figure whatever OTT installed was fine. (haha pun intended) I agree. Nothing worse than a ghost. I plan to do the U-Haul test. Might not even need to leave their parking lot, but I hope to get some sightseeing in while there (if I can manage working around the deluge that is coming). I will also look for an ammeter; it might also be useful to me for radio work. There seem to be quite a few different types, so if you can, recommend some minimum qualities (clamp-on, I see). Will order this. I can ship to my friend (fellow Oliver owner) in Cimarron. Gotta go. Thanks to all for the continuing help.
1 point
-
……and here. What a shitty company!1 point


-
Recent Achievements
-


")


")


