Leaderboard


Popular Content
Showing content with the highest reputation on 07/14/2018 in all areas
-
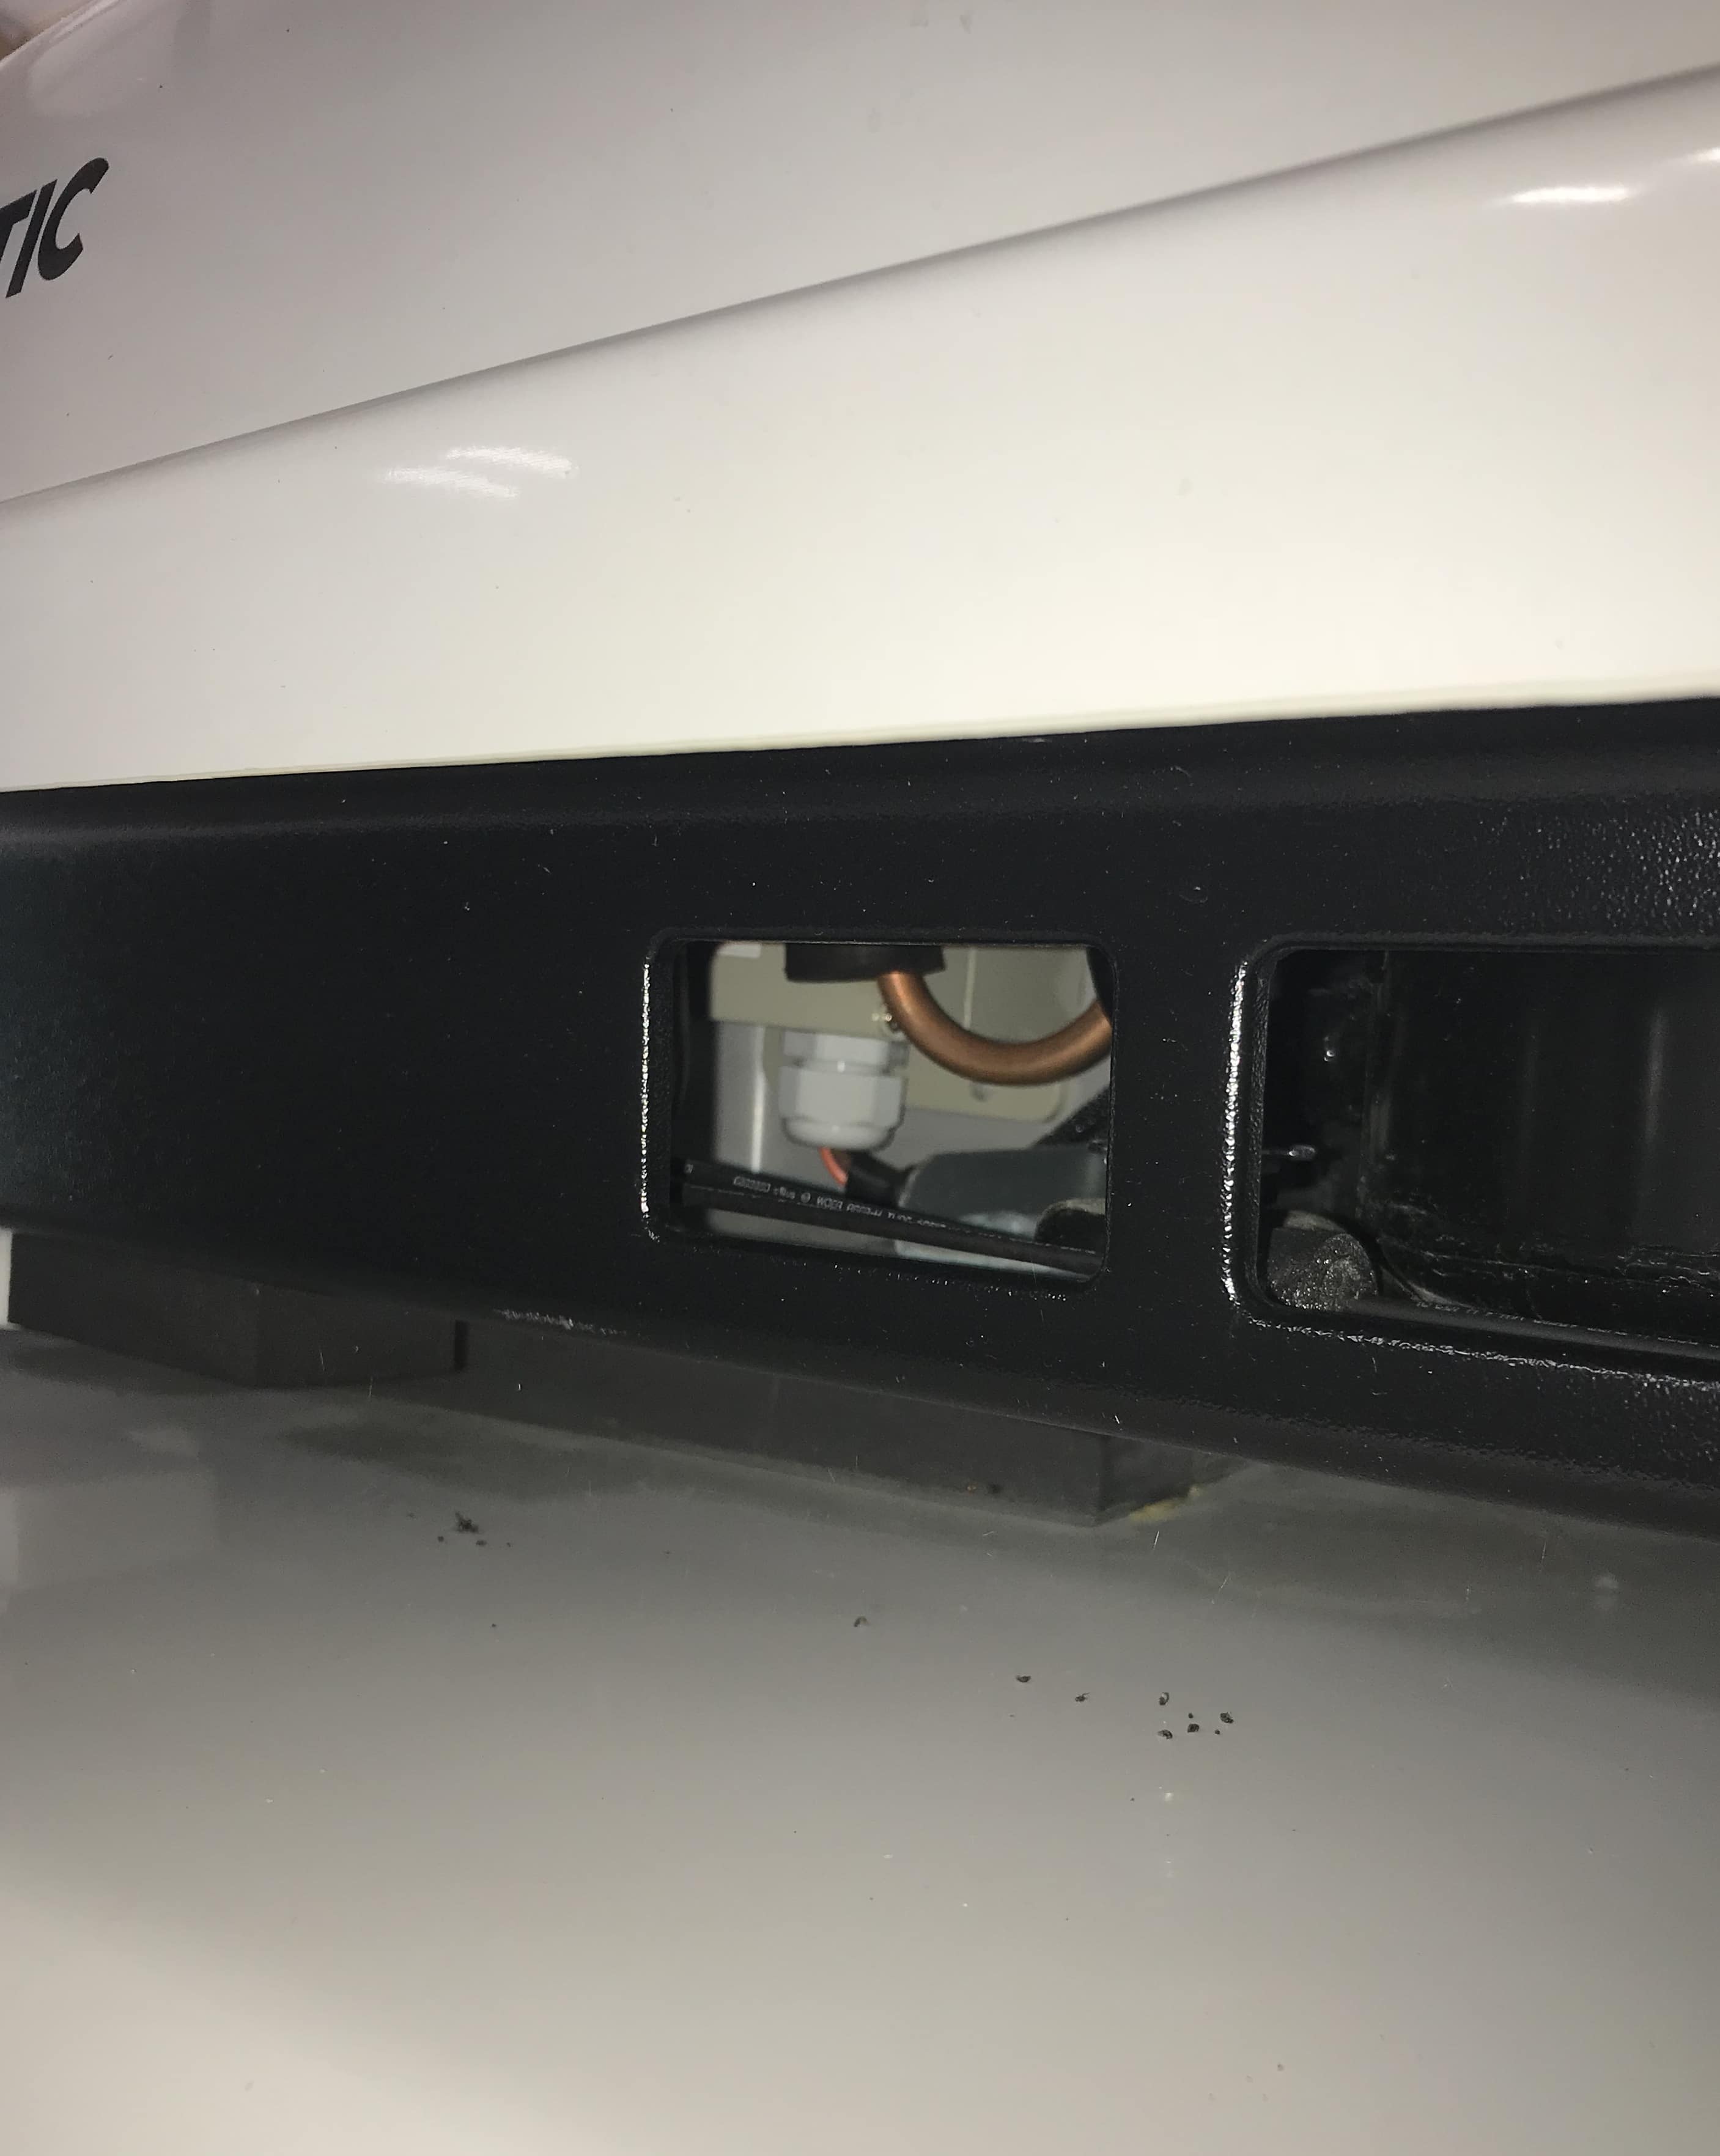
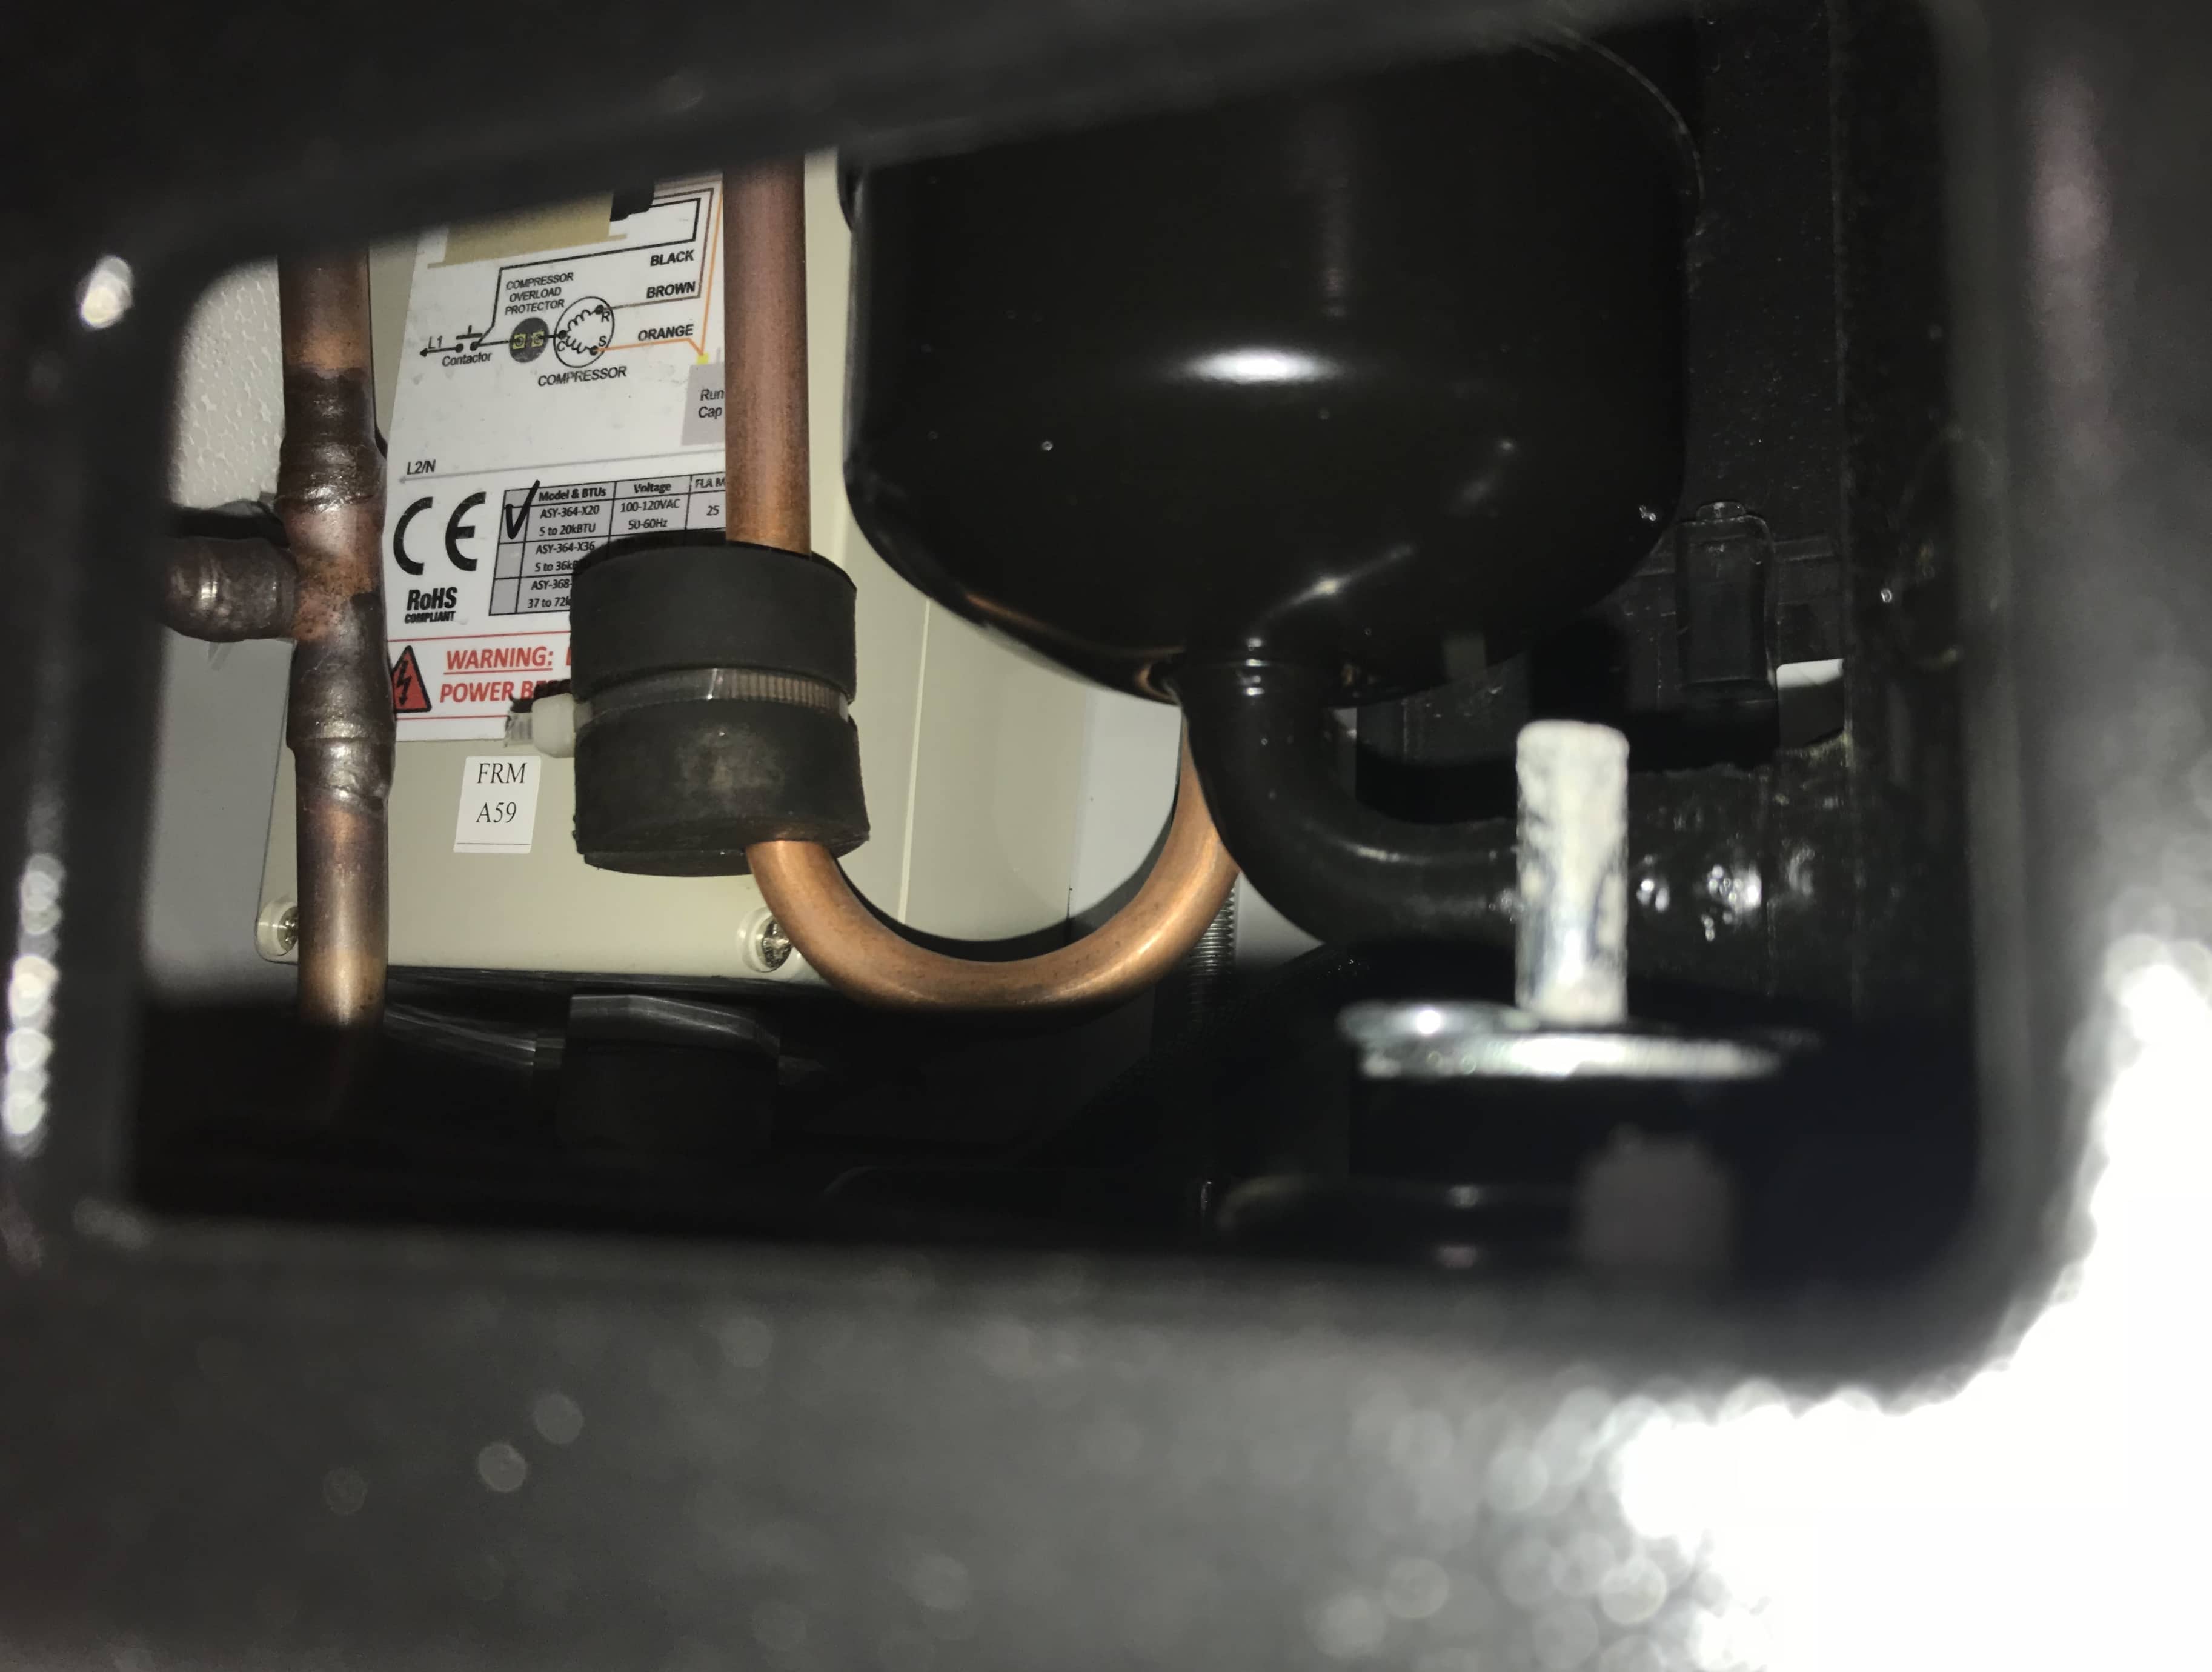
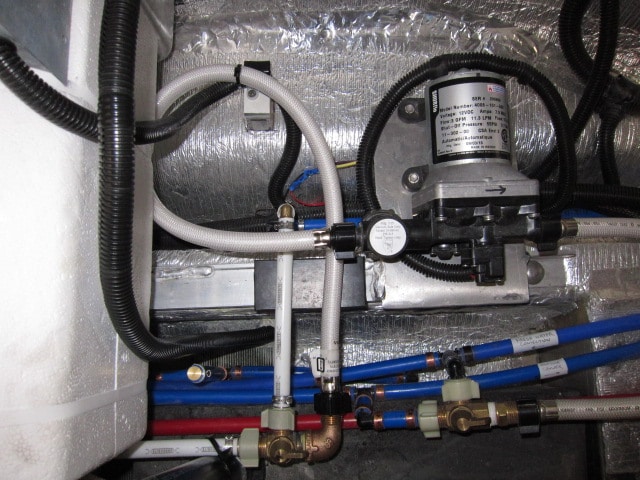
You can see the Easy Start without removing the A/C top cover. You will need a ladder. The Easy Start is that beige colored box behind the copper tubing. Closer view of the Easy Start through that rectangular opening: But yes, you need to put your eyes on everything, standard equipment as well as options.
 3 points
 -
Well, I promised some updates after we actually got to use the truck fridge. Overall, we're very happy after two weeks and some days with only solar and generator. It has taken some monitoring and getting used to. The first day, from warm to cold, took about 8 hours to cool. I'd have done better to put some ice blocks or cold material in. The extra run time cost an extra 20 amp hours of battery power. Or, of course, cool it at home before leaving, but, I wanted the warm startup test. Most days, the fridge used between 40 and 50 amp hours. When it runs, it uses 3.5 ah. Most often, it runs 12 to 13 minutes, with a 20 to 25 minutes rest. I found it ran better ( less run time) with a couple ice packs in the otherwise empty freezer. Parked in dense shade, the trailer was nice and cool, but we didn't generate more than 1 to 1.8 ah in power to compensate for the new fridge with our 200 watts of rooftop solar. The first week, we ran the Honda 1000 to make up. After that, we mostly used a portable 100 watt panel that we moved around in the spots of sun. For people who plug in most of the time, the change would not be noticed. For us, it's a new learning curve on solar management, as we don't usually plug in, and have no power on our NC camping property. In the sun, we'd be fine. Preference is to live in shade, so adding a portable panel and Port will work well for us. Overall, I really like the fridge. Pretty even temps all around. the fixed door shelves took s little getting used to. I removed the glass shelf above the produce drawer before we left home. A disaster waiting to happen. I was going to cut a plexi shelf, but I'm happy just moving one of the wire shelves down. This fridge had a flip up on the top rack to allow for tall items... But not really designed for a full gallon of milk. I can live with that. A quart or half gallon is plenty for a week or two, anyway. The freezer is small. It does make ice in a few hours. A couple trays, and a few bags of veggies would probably fill it, though. At camp, we left the original vents open, with screening behind them. Average daytime temp was a high of 86, night lows in the 60s. one (very welcome) night the low was in the 50s. I played a bit with the temp control and two thermometers. It didn't make a big difference in temp turning down the fridge from 7 to 6. Just cut the run time frequency. I really like the big drawer in the bottom of the fridge for produce, and water bottles. Organization is different than the old dometic, but better for me as far as access. Randy brought up s good point about the door swing. Our fridge, I think, only can swing right. Which is good for me. We cook outside 96 per cent of the time. Right swing is easier for loading groceries dumped by the door, accessing beverages during the day, and just as easy as the old left to take stuff out and stack on the small dinette table to prep for outdoor cooking. With the left swing, I had to move everything beyond the door for loading. Sherry2 points
-
Hi everyone, Judy and I enjoyed meeting many of you at the rally. Thanks for all the tips. We really enjoyed the decorating competition. We finally got our act together and placed our order the 15th of May for a September 20 delivery and we can't wait. Our plan is to enjoy the fall weather on the east coast and then head to Arizona for the winter. See you on the road, Ken1 point
-
When charging from the TV, I just hook up directly to the batteries with lumper cables. Two stage charging is not needed to simply bulk charge the batteries as this is not a "normal" charging method used all the time or to bring the batteries to full charge. Further, having batteries sitting around in a low state of charge is very damaging to them. This quick charge method is just a way to bulk them up for a big load or get me through until we leave. But, my Ram does charge in a two stage manner with a 14 volt bulk charge and a 13 volt maintenance charge. That is fine for the constant use of the on-board starting batteries, just not a needed feature for charging the trailer batteries. I would never leave the truck runing long enough to get the batteries to a full stat of charge when I can get to 90% of that in about 1/2 the time. Remember, this is not a method that I'm claiming is better than using the on-board charger, or to replace the onboard charger, or that it is always the best method for continuus battery maintenance. It is a method to add a lot of current to the batteries without using a generator. The advantages are: No generator to carry around, no fuel for that generator and a less annoying sound than a constant high speed genearator. As quiet as generator are, they are still annoying. They are annoying because they make a constant high speed sound when working hard and they are not really very quiet. Charging from the truck engine is essentially the same thing boats do all the time when out cruising. They use the main engine generator, not a Honda portable generator to charge the house batteries. Also, if you have an inverter, you can run power tools or the microwave from the batteries fora short time and don't need a 120 volt generator for those times. Our avatar is a picture of Sandy, our coyote. A fascinating story[attachment file=unnamed-4 2.jpg]
1 point
-
We're towing with the 2016 5.7L 4X4 Tundra double cab and it works well as a TV for the E2. The Tundra's operators manual requires a sway device when towing any trailer over 2000 pounds. The manual also requires a WDH when towing trailers 5000 pounds or more. We keep Ollie's weight under 5000 pounds, ready to camp weight of 4920 pounds, with empty water tanks. Our Ollie is not equipped with solar panels and only has two 12V AGM batteries. We transport gear in the TV keeping Ollie's weight low and Tundra's weight under 7100 GVW with Ollie connected. When Ollie is connected to the Tundra there is still more weight on the front axle compared to the rear axle. All weights verified by CAT scales. Many E2s here probably weigh in over 5000 or 6000 pounds at ready to camp weights. We use an electronic sway control without WDH. The Hayes Sway Control detected and applied trailer brakes in two sway event situations (that I'm aware of) when I was towing down a mountain too fast in both cases and the Sway Control applied trailer brakes half way through the curves, I had not detected the sway. It's an interesting sensation towing when the trailer brakes are automatically applied, but thankful I had the sway control installed.1 point
-
I have read that on delivery you should bring a list of the options you purchased for your Ollie and make sure they were installed. I can't believe you need to bring a ladder, take the cover off the A/C and make sure the factory installed your Easy Start. The other item friends paid for and found missing was the built in surge protector. You need to take off a screwed down panel and know what you are looking for. This is a bit disconcerting.1 point
-
HI Tom and Linda, actually our delivery date is the 19th as i'm told they don't do two deliveries in a day. It is very exciting for us as well. We closed on our house last week and have moved the remainder of our stuff into my moms house. The grand adventure begins. Our first excursion will be the mini Oliver rally in Jacksonville in October. After that we will be back to Atlanta to regroup and then head west for the winter. Right now we are in the process of getting things like a telescoping ladder and generator. We hope to do a lot of boondocking mixed in with some Thousand Trails stays as well. At least that is the plan at this point. We have camped all over the U.S. in the past 30 years using our Coleman popup and Hi-Lo travel trailer but we were always in vacation mode. Forcing ourselves to slow down will probably be the hardest adjustment of full timing. Good Luck, Ken and Judy1 point
-
You're gonna love the Schoodic Peninsula. The campground there is only a couple of years old and is really nice. The views of the ocean just down the road are magnificent. If you like steamed lobster be sure to drop by the Trenton Bridge Lobster Pound at 1237 Bar Harbor Rd, Trenton, ME. Drive up on Cadillac Mountain in Acadia National Park. At 1,530 feet (466 meters), it is the highest point along the North Atlantic seaboard and the first place to view the sunrise in the United States from October 7 through March 6.1 point
-
PEI is where the Gulf Stream comes back a shore. A cool place with warm water. After wading in the water of Acadia you will see how nice warm water is. There are at least 6 Oliver's in the state, plus visitors...be prepared to wave...
1 point
-
It’s a good looking truck, Steve. Hook up the Ollie and take it for a spin up the Trace to see how it does! Mike1 point
-
Probably best for all parties.1 point
-
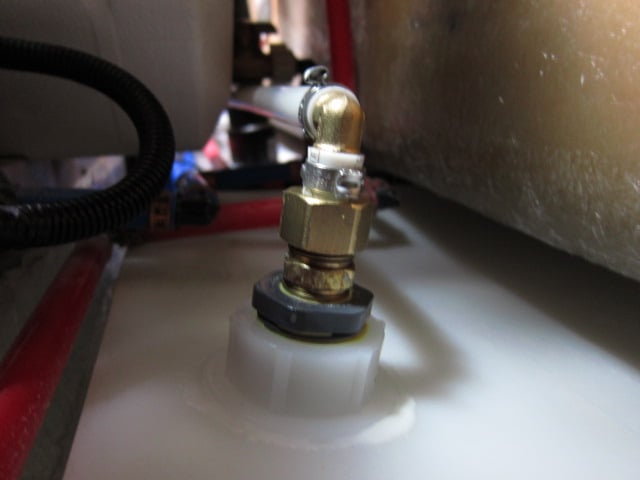
Well I may be kicking a dead horse here, but I finally got around to adding the siphon tube to my Ollie's FWT. Thanks to Raspy and Reed and all others for their input which was of great help to me. I modified Raspy's design just a bit by using a PEX suction tube instead of copper. Don't know if one is better than the other but they do have some subtle installation differences I thought I'd point out. The heart of the setup is the same, the 1/2" brass compression fitting that has been carefully drilled through with a 5/8" bit to remove the internal stop so the copper or pex tube can be pushed through the fitting. The important difference here with PEX is not to use the brass compression ring, but a nylon ring made for that purpose. Here's a pic of the siphon tube setup with all the fittings: Of course the part that gave me the greatest worry was spin welding the fitting on to the tank. I used the same HD fitting that Reed used and I bought 6 of them so I could practice on a piece of scrap plastic I got at a local tank factory (they gave me the scraps). I bought the fittings and the driver from here. They have all the fittings and drivers for that particular fitting that you need, and are very fairly priced. I oversized the fitting and also got the HD version for strength. I oversized because I wanted to screw the brass compression fitting into a bushing and not directly into the spin weld fitting as a hedge just in case! Did I need to? Maybe not, but I felt better doing it. The difficulty on my Elite is that it is crowded down there in between the hulls! I'm no stranger to routers, they are powerful, can impart tremendous torque, and things can go South in a hurry if you don't respect that. Reaching down in there with the router was dicey. My grip was tenuous at best, I needed an extra elbow! I could get a reasonable hold and turn it on, but had to change my grip for the critical turning off stage!! I did not want to change my grip with the router running and court disaster. So finally I put two short extension cords together and had my wife at the ready to pull them apart when I yelled out to her. We practiced a few times until we both felt good about it. Four seconds of terror later the job was done....perfect weld! For those used to using routers with wood and who know what can happen, I would say that spin-welding plastic fittings is pretty easy and forgiving. Timing is the most critical factor. I was glad though that I did a few test tries first, and at only .35 cents a fitting, it was cheap to do so. The rest was easy. Since using a PEX suction tube, I did not cap it but cut out 2 tabs on the bottom on my table saw to keep the tube 1/4" above the tank bottom. Everything else was just as Raspy and Reed did in their video. Here's the pic of the installed suction tube. It's actually straight, camera was tilted a bit. Here's a pic on the pump side: The pickup tube came out just next to the water heater where I strapped it to the drain pipe to the GWT. You can see the brass pulg in the old pickup tube next to the water heater. While down there, I added a brass elbow to the valve on the left for the flex line to the input side of the pump. Originally, there was none and the flex line was badly kinked having to make such a tight turn: So all is well now. Instead of loosing prime at 36% full. The pump just barely makes it to 6% full. That's a lot of water! Things are looking up! Dave
1 point


-
Recent Achievements
-
")


")


")


