Galway Girl
-
Posts
750 -
Joined
-
Last visited
-
Days Won
24
Everything posted by Galway Girl
-

Simple AGM to Lithium Conversion question(s)
Galway Girl replied to Danno and Donna's topic in Mechanical & Technical Tips
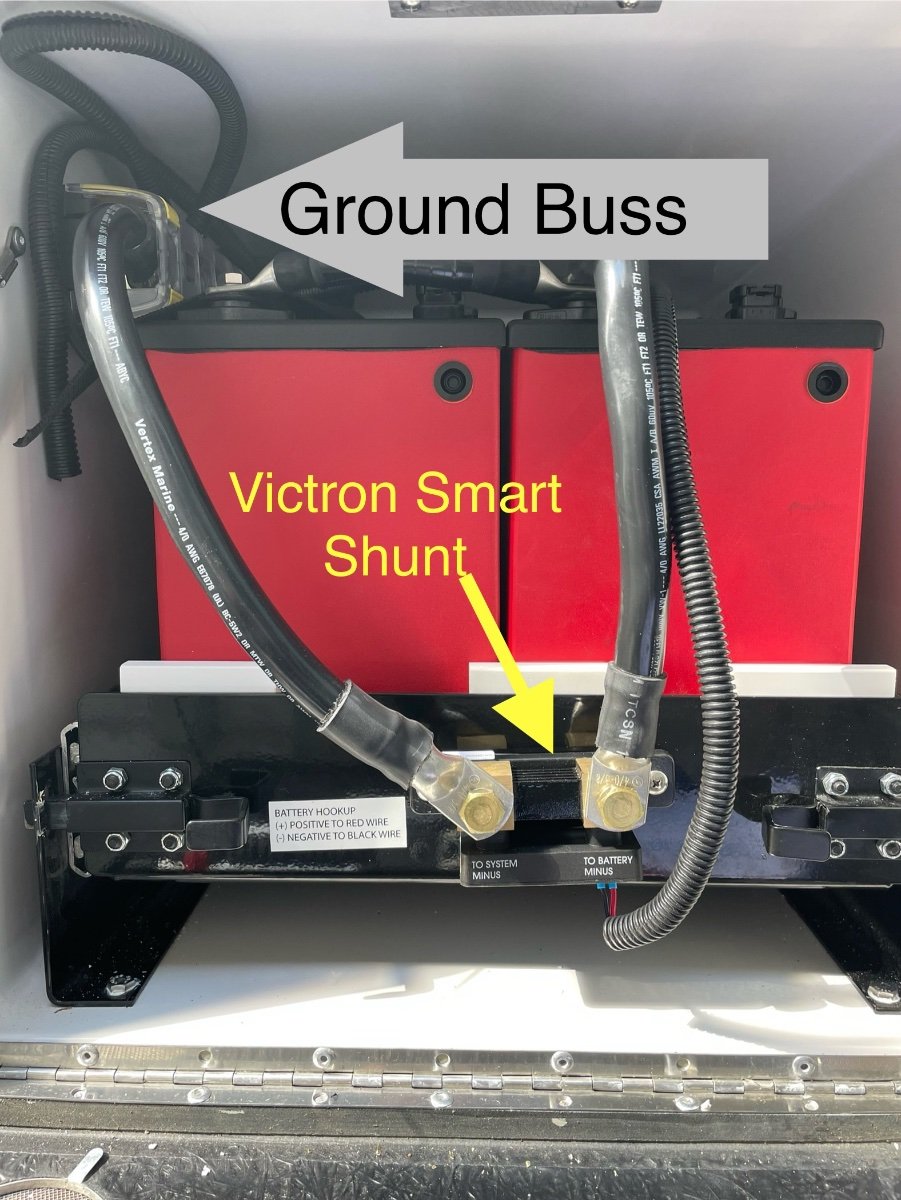
I was able to re-use 2 (+) cables that were on the batteries and those coming into the battery bay from the inside connections. I had to make 2 new ground cables for the battery as they were farther apart for the new batteries. I also added a common bus bar for all grounds as I installed a Victron smart shunt for measuring battery bank status.
-
Simple AGM to Lithium Conversion question(s)
Galway Girl replied to Danno and Donna's topic in Mechanical & Technical Tips
In this blog post I cover the many aspects of a Agm to lithium conversion including a discussion of the 7 pin wire disconnection and dc-dc converter installation. Hope it’s of some use. https://4-ever-hitched.com/ggs-blog/f/lithium-battery-upgrade Craig -
Heads up: It could be impossible for CGI to do the treatment at Ladybird Park for the 3 days adjacent to the eclipse (if at all). Just suggesting CGI check if Ladybird Park park policy allows services including cleaning limited at that time .
-
Friction Hinges - Lippert - Another quick mod.
Galway Girl replied to Ty J's topic in Ollie Modifications
Thanks for the tips. Did the mod today in < 30 minutes. I used a 5/32" bit instead of the 11/64" the instructions suggested as having a bit more metal for the self tappers to bite into was needed. Here's my blog post including details. https://4-ever-hitched.com/ggs-blog/f/adding-friction-door-hinges-for-wind-protection Craig -
Mike,
We're considering hopping over to CGI Detailing in April after our Oliver Service visit. When you had your's done, where was it applied? Do they have a shop?
I looked up the business and it just looks like a home. (No Shop).
What's been your experience after the detailing? Did it last? Approximate cost?
Thanks,
Craig Short
*hull 505-

AS I remember it - Mike and Carol had their Ollie done by CGI in the driveway of their home in Texas.
I had mine done just last year at CGI's place in TN. The place is slightly hard to find but it is just outside Murfreesboro, TN. They do have a "shop" and can totally enclose the Oliver if the weather demands it.
If you like donuts - then I recommend Donut Country in Murfreesboro. Its not hard to get to from CGI. If you get coffee and eat inside they will refill the coffee - free (do not get the paper cup - ask for the ceramic cup)
Tell the guys - Colin, Gavin and Denver - I said hello. Also, there are a bunch of "different" chickens running around the yard - some with feathered feet!
Bill
Craig -
I just "Googled" CGI and I think that I see what you are probably talking about. Perhaps they have moved the operation - but - my bet is that the Googled address is where Colin and Gavin are presently living versus where they detail and coat Olivers. Make sure that you get the GPS coordinates for where they want you to arrive for your appointment.
-

Craig, we had ours done in our driveway. The CGI team was on a Texas visit and did 5 or 6 trailers. They are very thorough and do a great job. They gave us a complimentary wash the day we arrived at the rally last year. The shine has held up well, we’re glad we did it since we were starting to oxidize a little. Mike
-
-
My data for your inclusion: One other piece of data that would be great in the set is the sticker payload.... in this case our F350 has a factory sticker Payload of 3440 Lbs.
-
We cover the 10 choice requirements in our blog here: https://4-ever-hitched.com/ggs-blog/f/how-did-we-choose-an-oliver-travel-trailer
-
Inexpensive Helpful Modifications
Galway Girl replied to Wandering Sagebrush's topic in Ollie Modifications
Just did a whole series of articles on mods/accessories here on our Hull 505 *Galway Girl* blog fyi. link: Galway Girls Blog 7
-
Truma Water Heat Fire in the Hole
Galway Girl replied to AlbertNTerri's topic in Mechanical & Technical Tips
Hull 505 - Reports back Our SN for the failed unit was Hull 505 - SN DLE 60C - 29289053.. Another SN reported is.... Hill 1125 - S/N DLE 60C - 32153014 There were other reports before and after hull 505. Maybe Truma needs to reveal and report all suspect unit S/N to NHTSA? -
Book Storage bins beneath twin bed “Wing”
Galway Girl replied to Mountainman198's topic in Ollie Modifications
Maybe this... We use one of these Hasko cup holders in our Bathroom for toothbrushes. They have a strong suction cup that sticks like crazy to the Ollie fiberglass. It can pivot a bit for adjustment on the curved wall. It comes with the cup but it can be removed and a typical store water bottle fits. It's called the HASKO accessories - Suction Cup Toothbrush Holder We feature it in our blog here along with other suction cup storage holders. https://4-ever-hitched.com/ggs-blog/f/our-top-6---storage-products
-
We have CPAP machines, so we sleep head to rear as our machines sit on the middle storage cubby. Our rear console also has AC , DC, and USB outlets on both sides so it works best for us to head rearward. CS
-
Welcome to the family. Maybe we'll see you in Texas in April during the Eclipse. We'll be at Lady Bird Johnson RV Park in Fredericksburg. Check out our BLOG below our signature for some sites we've traveled in our Oliver and news on the Eclipse. Craig & Rose Hull 505
-
Truma Water Heat Fire in the Hole
Galway Girl replied to AlbertNTerri's topic in Mechanical & Technical Tips
In our case Truma kept pointing at Oliver. But once they got my failed unit back they changed their tune. Final Update: Upon factory inspection by Truma of the failed unit. They reported back to Oliver that the issue was with some improperly torqued connections inside the water heater, caused by improperly calibrated production tools at Truma. So they have fully refunded the cost of my repair. I don't know if NHTSA is taking any action, but I'll report back the results I heard from Oliver and Truma. I suggest anyone with fire issues turn it in on the NHTSA website. -
Oliver Outfitters Guide 2025 Updates
Galway Girl replied to Galway Girl's topic in Ollie Modifications
Reflecting on 4 years of ownership, we posted a whole host of articles in the Galway Girl Blog Site today. We're trying to provide a place for new owners to find out about various gear for their Oliver. The most recent articles are here: Current Oliver Outfitters Guide Happy New Year to All Rose and Craig Hull505 - Galway Girl
-
I've made some changes to the publication of the Oliver Outfitters Guide in our Blog this week. The list we've maintained features the most popular camping equipment as purchased and used by Oliver Owners. When you click on the link inside our blog, you'll connect to a personal Oliver Outfitters idea list on Amazon. The purpose of this list is to keep track of the various great items useful for Oliver Owners. NOTE: The idea list is compensated but with no added fees to users. ( As of November 30, 2023, Amazon's Idea Hub has been retired. This means that Idea Lists can no longer be linked to web-pages for compensation.) Here's the link to our blog where we've captured the non-compensated but still useful idea lists. https://4-ever-hitched.com/blog-articles/f/oliver-outfitters-guide Happy New Year Craig Hull -505 Galway Girl
-
For Alaska we made reservations at key spot's first. 1) Denali National Park 2) Homer Alaska 3) Seward Municipal Campground 4) All of the BC Parks 5) Commercial Campgrounds in Whitehorse, Fairbanks.' Yukon Territorial Parks are all first come parks. (So plan for noon arrival to get the most choices.) When we booked Seward, we logged on the "first hour" of the first day they were available. By the time we finished booking our 4 nights, the number of sites had dropped to 10% available and that was in about 30 mins. Craig
-
FYI....Just updated our website with pictures to include all the fall stops for the Colorado/Utah and Arizona parks. If interested you can see them here: https://4-ever-hitched.com/fall-2023-%2F-mighty-5 Craig Hull 505 Galway Girl
-
- 2
-

-

-
Removed
-
A couple folks had asked about the stops we made for Alaska 2023. Here's an updated map with the list of stops spelled out on the map. We share the number of days we stayed at each stop in parenthesis each way (Outbound, Return) Red stops are the ones we made down the Casiiar HWY as our return route. We had a couple of Alaska Commercial RV parks we wouldn't suggest staying at: 1) Trapper Creek AK - Don't bother with the mudpit called Trapper Creek RV park, there are free sites or State parks all around that are much better. We were simply looking for a dump and that was the suggestion from RV apps. 2) Northern Nights in Glenallen AK....is now under new ownership...and it's chaos there. There are other State and National Parks near there which are much better. If you have specific questions DM me on the forum. Craig - Hull 505 - Galway Girl
-
We've finally been home a bit and I updated our website with pix of the Alaska Trip. If interested you can take a look here: https://4-ever-hitched.com/alaska-2023 Our route was North from Seattle up to Dawson and following the Alaska Highway all the way up to Tok, Delta Junction & Fairbanks. We then looped south to Denali, Talkeetna, Anchorage the Kenai Peninsula including Homer, then back up and across through Wrangell St. Elias to Tok AK, then the return following the Cassiar Highway down to Prince George. Fires in late August caused us to cut off from going further East of Prince George. s a result we returned home 2 weeks earlier than originally planned, but that was fine as we hit the road again in early Sept for our trip to Utah/Colorado and N. Rim. Hope you enjoy the pictures. Craig & Rose Hull 505 - Galway Girl
-
Leave Black Tank Drain Valve Open When Flushing!
Galway Girl replied to Rivernerd's topic in Mechanical & Technical Tips
I posted this inside our closet door.
-
partial route 2 days at Whitehorse -High Country RV park ( best town for a restock and laundry) 2nights at Condon Creek near Destruction Bay (FCFS arrive at noon if possible for best pick of site) This is a beautiful cg on the lake. Note: very rough road between destruction bay and Tok. 2Nights at Tok RV CG (pre reserve a 50’ site) 7 Nights at Chen’s River KOa 3 nights Denali NP ( Book asap)
-
Our extra solar panel setup is documented here: https://4-ever-hitched.com/ggs-blog/f/here-comes-the-sun
-
Need to add EMS, none installed on older hulls?
Galway Girl replied to jd1923's topic in Mechanical & Technical Tips
The EMS in our 2019 EIi is installed under the rear dinette seat on the wall facing the aisle. This pix is looking down under that seat. The readout is mounted in the attic on street side wall.