Ronbrink
-
Posts
1,189 -
Joined
-
Last visited
-
Days Won
38
Everything posted by Ronbrink
-
Thanks for your input, the Xantrex 2000W was the only upgrade option in 2020. I’ll keep your fuse upgrade in mind if ever a 3000W dominates my dreams. As for Mr. M, he comes around but I won’t let him stay long!
-
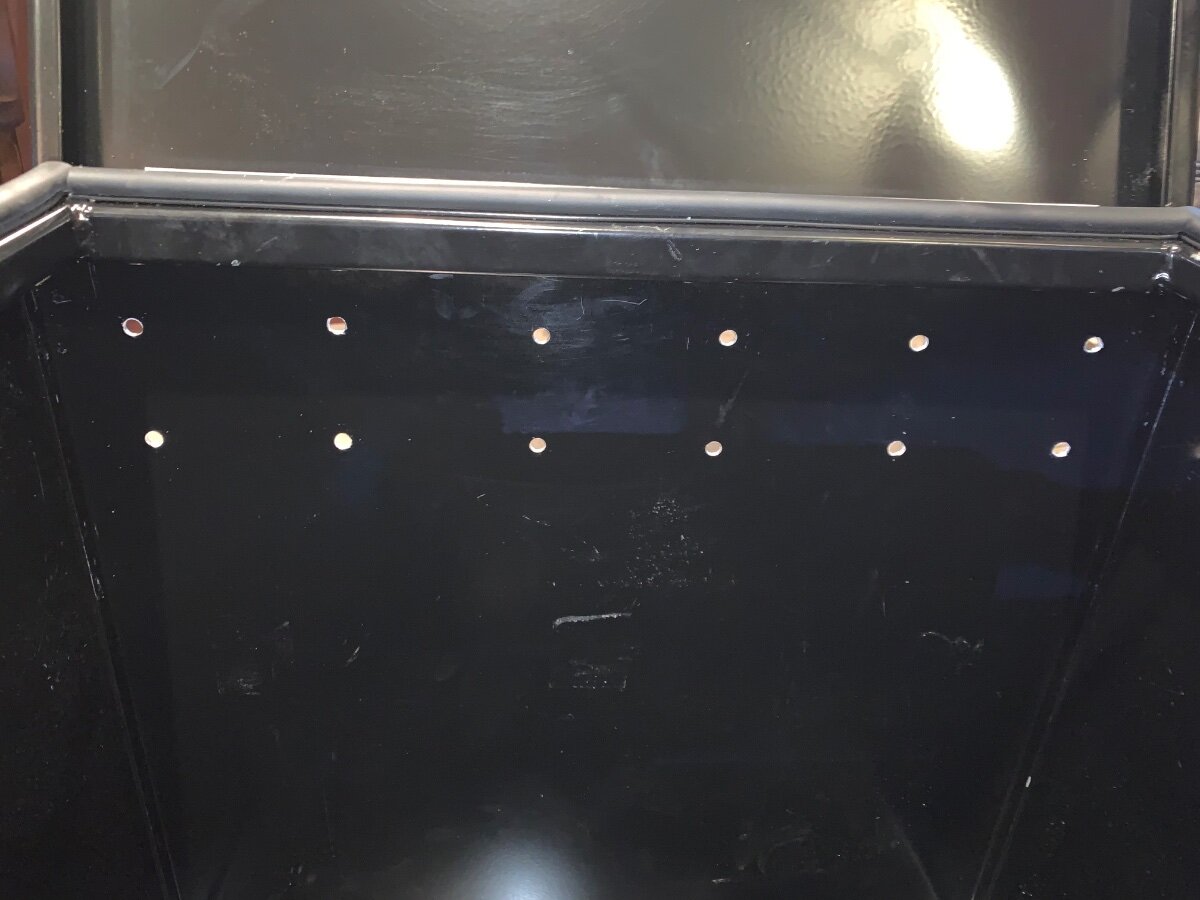
You are correct, the 200A breaker is used to turn off battery feed to the inverter and thus, all AC circuits. There is also a second 60A breaker that turns off all DC loads. Between the two, the battery bank is isolated. Also, when I upgraded to LFPs a 250A ANL fuse was installed in the battery bay on the positive lead from said bank (See pics). For major disconnect, I have removed the fuse from the bus. Finally, with mention of a 300A fuse, should the 250A be replaced for optimum protection?

-
My 2020 LEll did not come with a battery cutoff switch and thus, the stock 200A breaker leading to the Xantrex 2000 serves that purpose in my situation.
-
Please add: Make GMC Model Savana Van Series 2500 Year 2019 Drive 2WD Fuel Gas Engine 6.0L Vortec Rear End 3.42 Other HD Trailering Equip Trailer LEll Hull 579 Thanks!
-
Here’s some observations in using the Cielo Breez Max phone app, the phone’s Bluetooth must be turned on to pair the device and Wi-Fi is initially required to operate the A/C via the app. Once the A/C is powered up and set to run at a desired mode of operation and Wi-Fi is discontinued, the A\C will continue to run as set, but changes cannot be made. However, to make changes or when it comes time to turn off the A/C Wi-Fi is once again needed. I know this based on my experience a couple weeks ago, wherein I started the A/C using the phone app while at my house in order to run the Atmos via the inverter while in transit to the COW Barn for storage. Once stowed and ready to leave, I was unable to turn off the Atmos and found it necessary to use my wife’s cell hotspot in order to do so. Fast forward to yesterday, when I activated a recently acquired Starlink Mini and went back to the COW Barn to check on the Oliver and perform some tests. To no surprise, the SLM worked flawlessly, as well as the Cielo/Almos. It wasn’t a terribly hot day for Texas due to pending inclement weather, outside temp was 88°/relative humidity 77%; the Oliver registered 89°/72%. Yep, the dehumidifier was shutdown with a full reservoir and thus, the high humidity condition within! Not to worry, the SLM/Cielo phone app started and ran the Atmos for 45 minutes, at which time it powered off on Comfy Mode at the set temp of 75°/humidity was 45%. In approximately 20 minutes, the Atmos turned back on when the temp rose to 77°/humidity was 47%. It then ran 17 minutes before total shutdown again, humidity was 45%; no humidity spike whatsoever, YAHOO! Loving the Cielo Breez Max and the SLM is proving to be a worthy addition as well, as many of you already know. Hopefully other owners will try out the Cielo Breez Max on their respective A/Cs, and report on subsequent findings and experiences.
-
Not sure, but did notice in years past they started offering bundled packages (decor, electronics, solar/batteries, etc.) and thus, eliminated many of the individual options while increasing the overall costs.
-
The manual awning was standard on our 2020 OLEll; the Dometic power awning was the option, which I have no regrets getting.
-
The fuse taps are rated at 15 amps and came with 15A mini blade fuses. The additional loads required 10A fuses.
-
I suspect your AC is creating the high humidity and the Pro Breeze just couldn’t keep up with it, whereby the larger floor model is much more efficient and beneficial given your situation and weather conditions. Humidity spikes are inherent to the AC’s continuous fan ON when the compressor cycles OFF and thus, moisture evaporates from the coil fins and the water vapor is returned to the cabin as humidity.
-
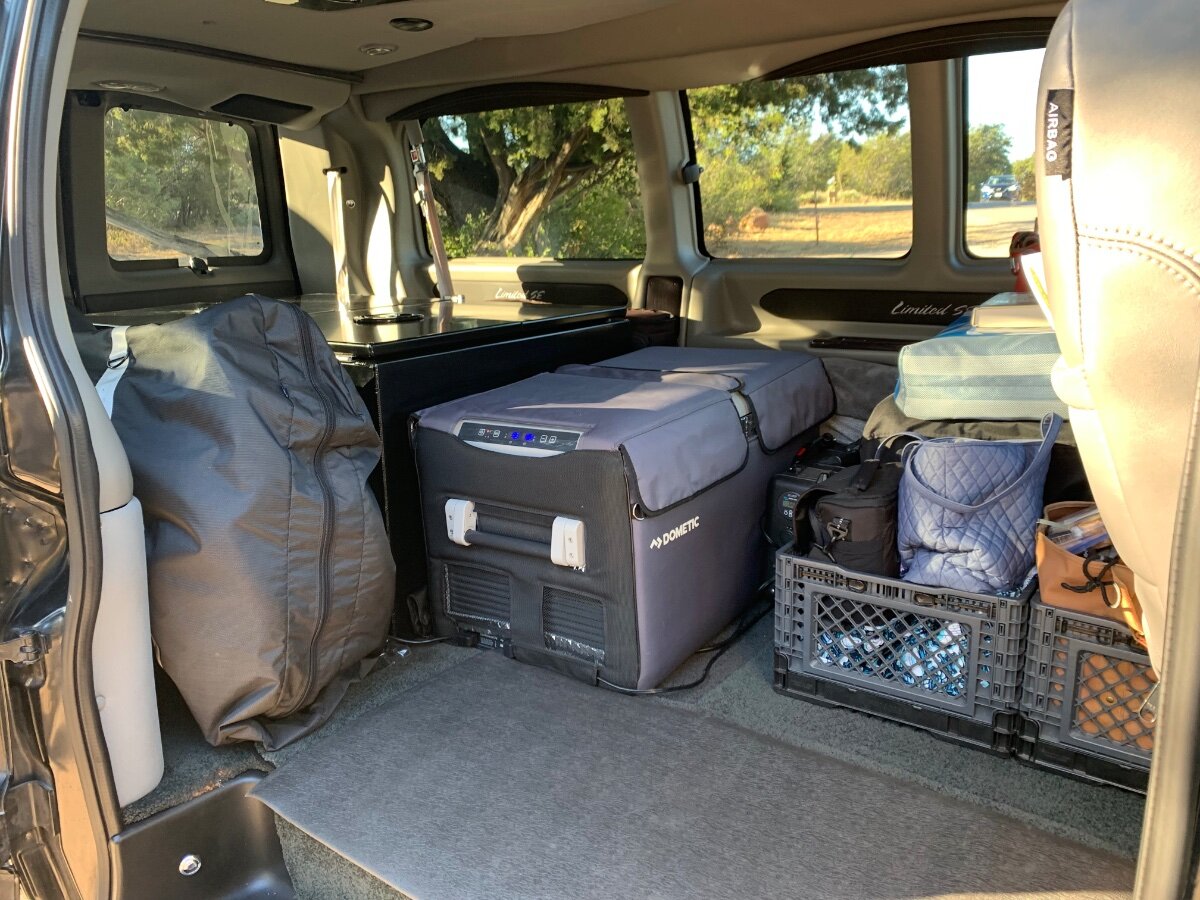
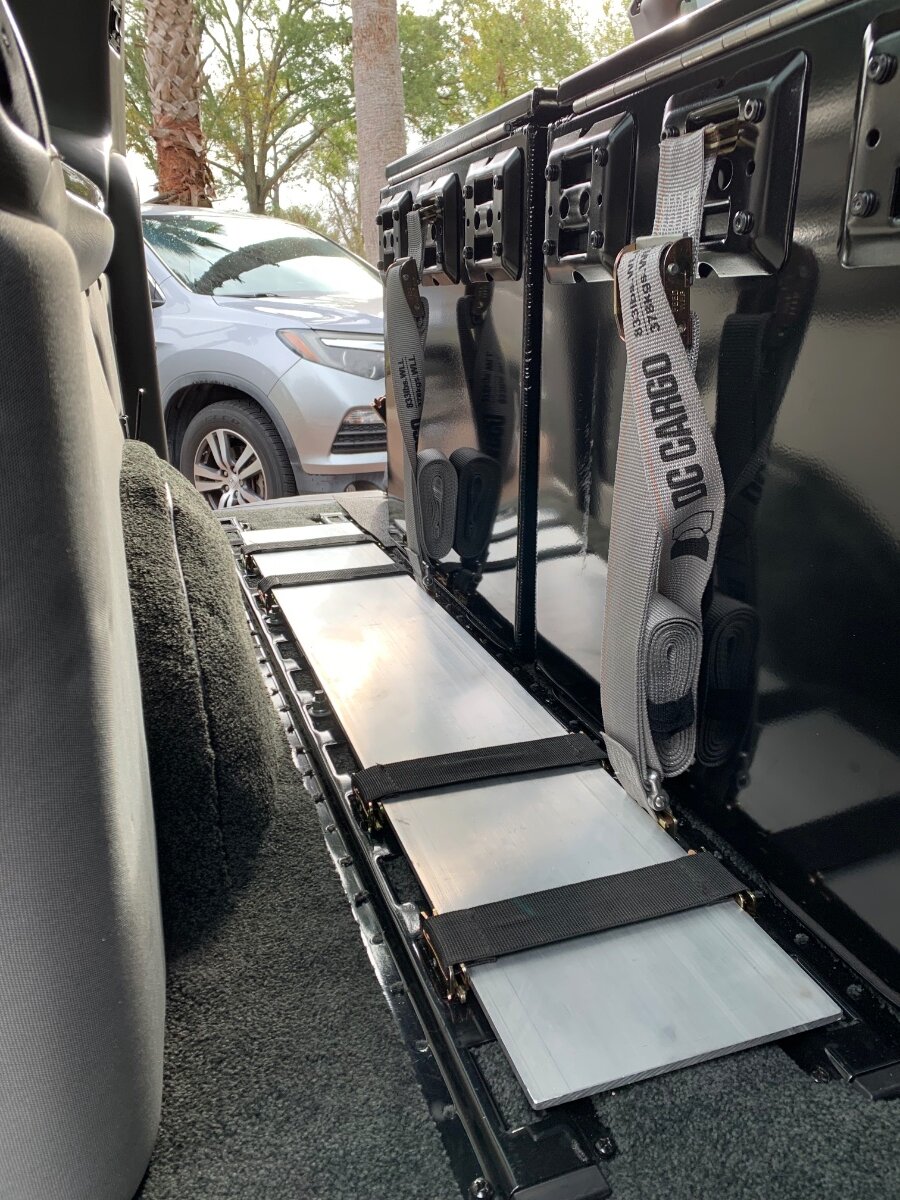
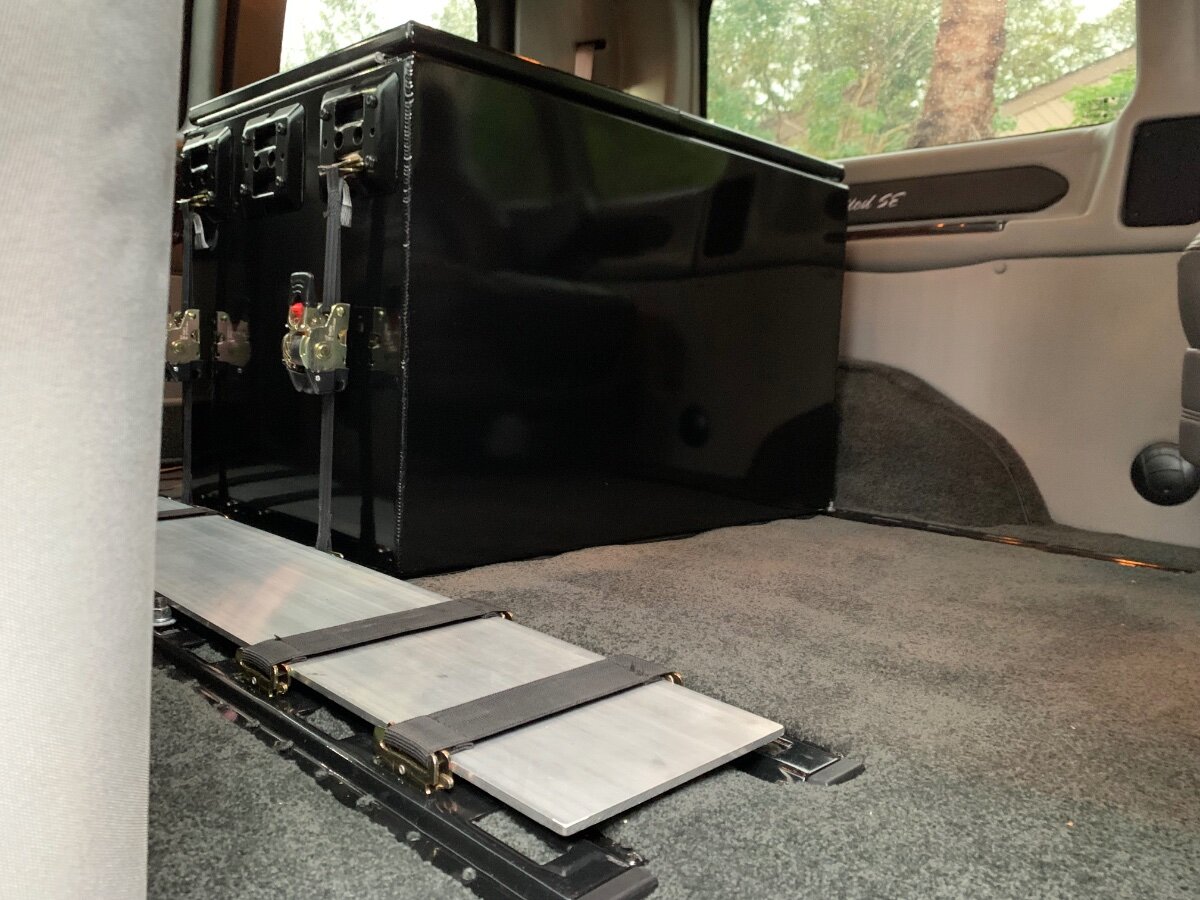
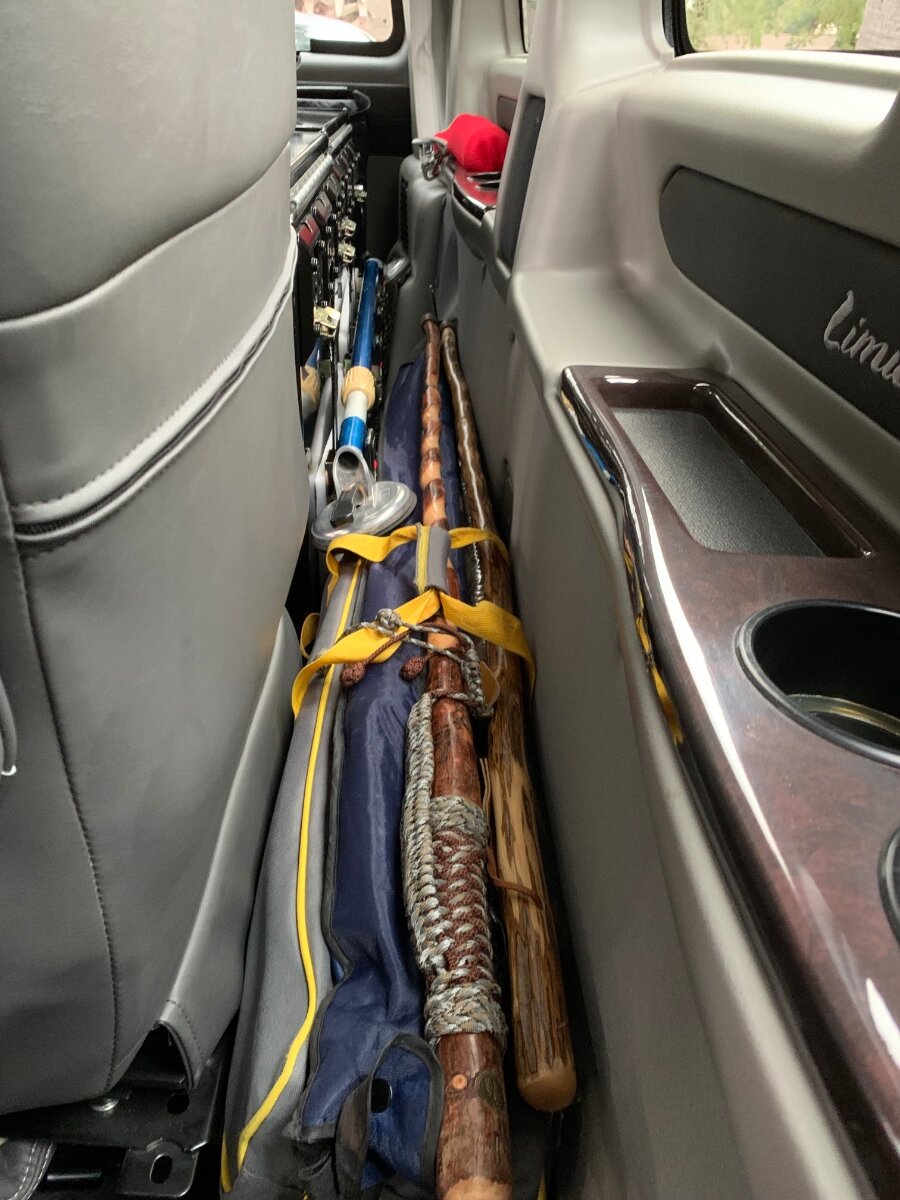
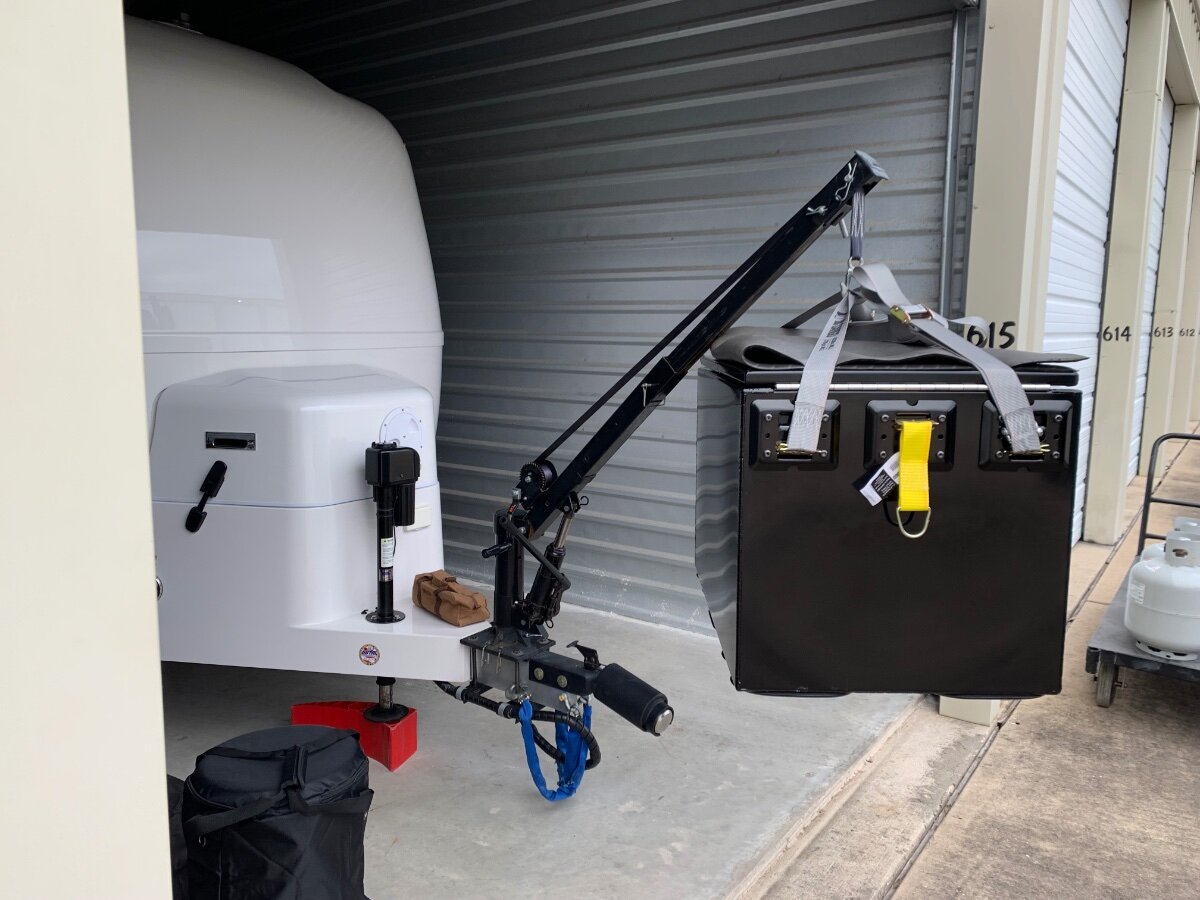
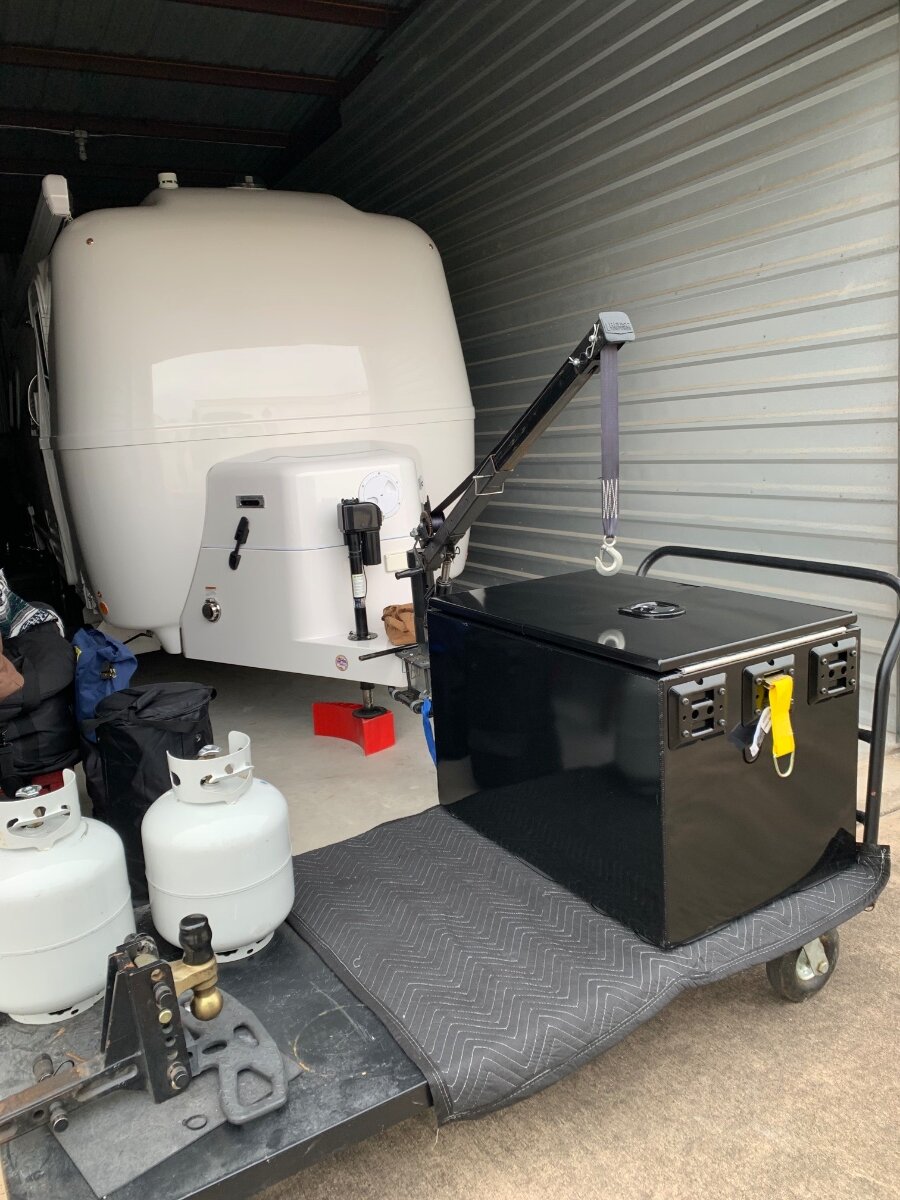
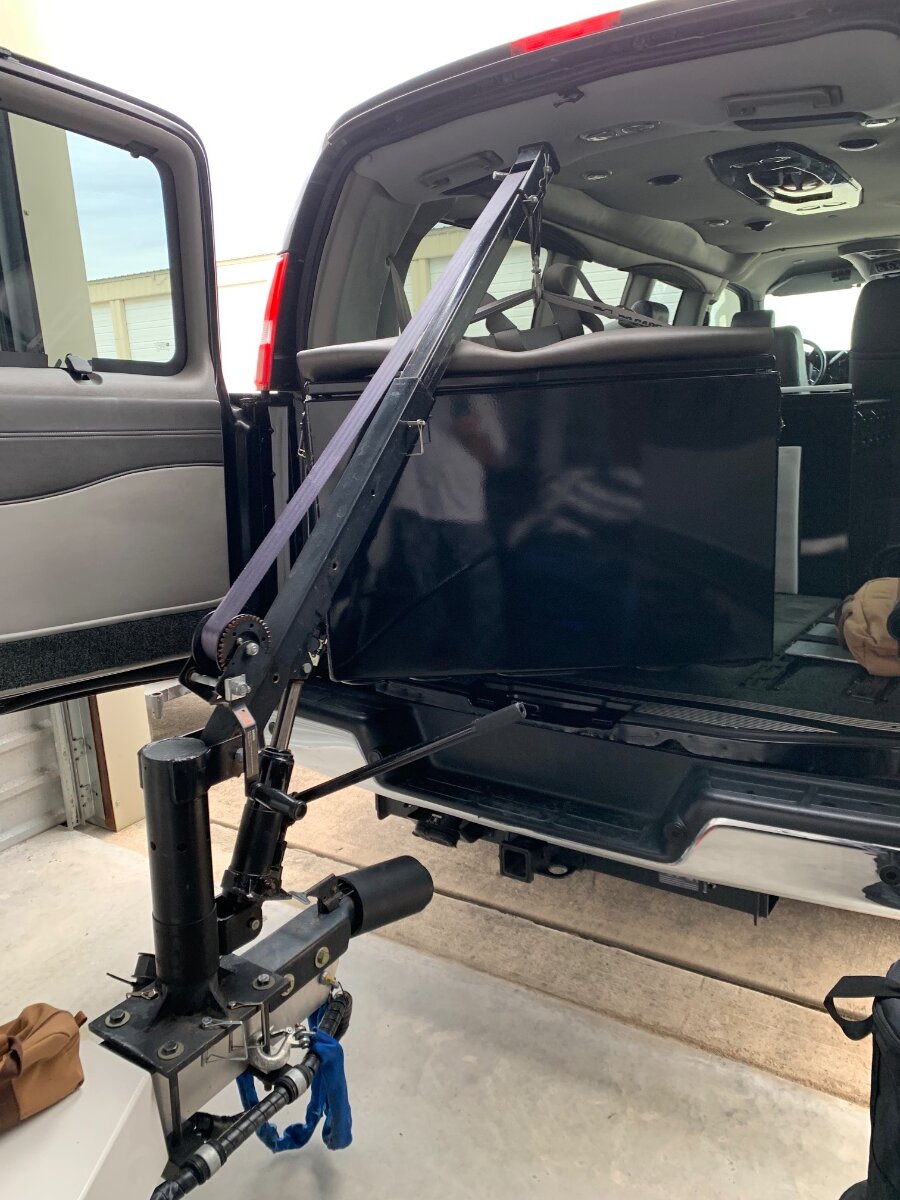
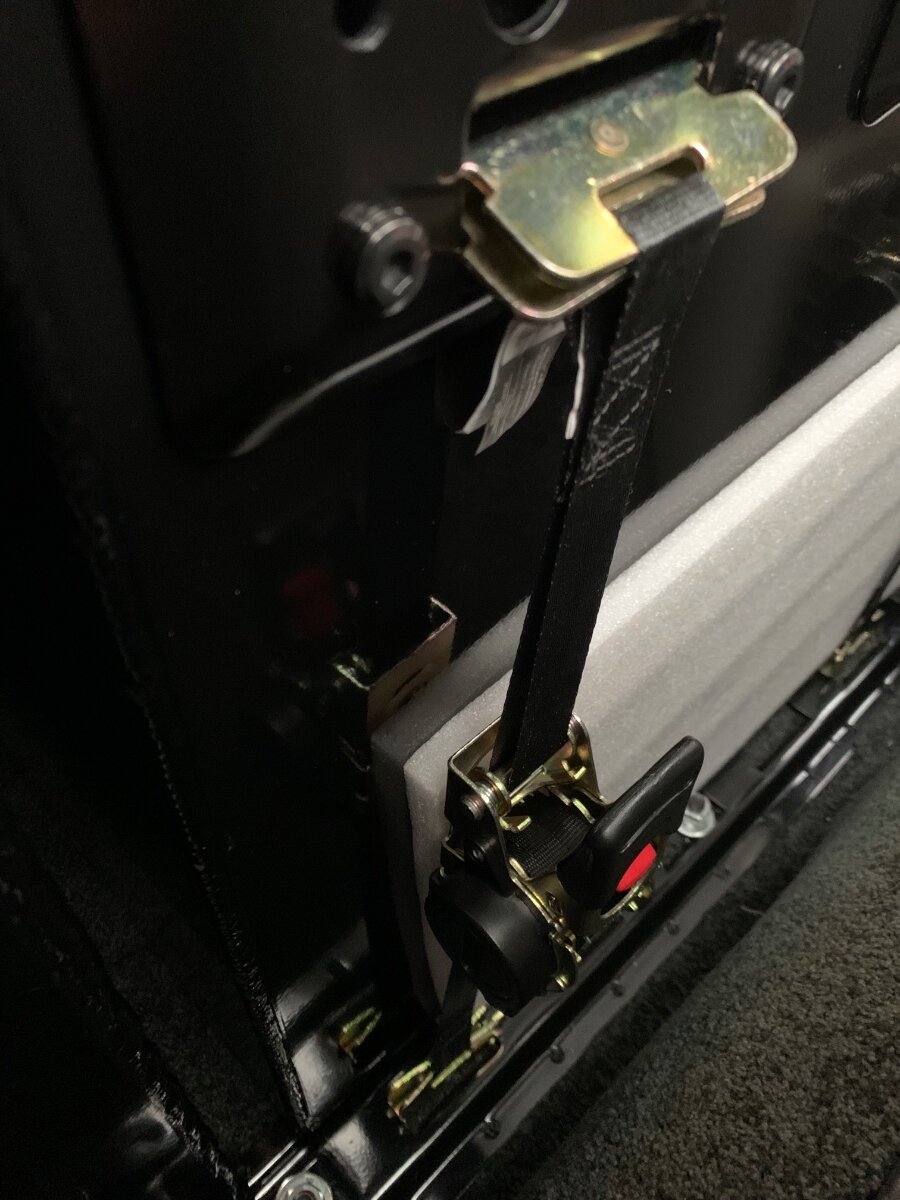
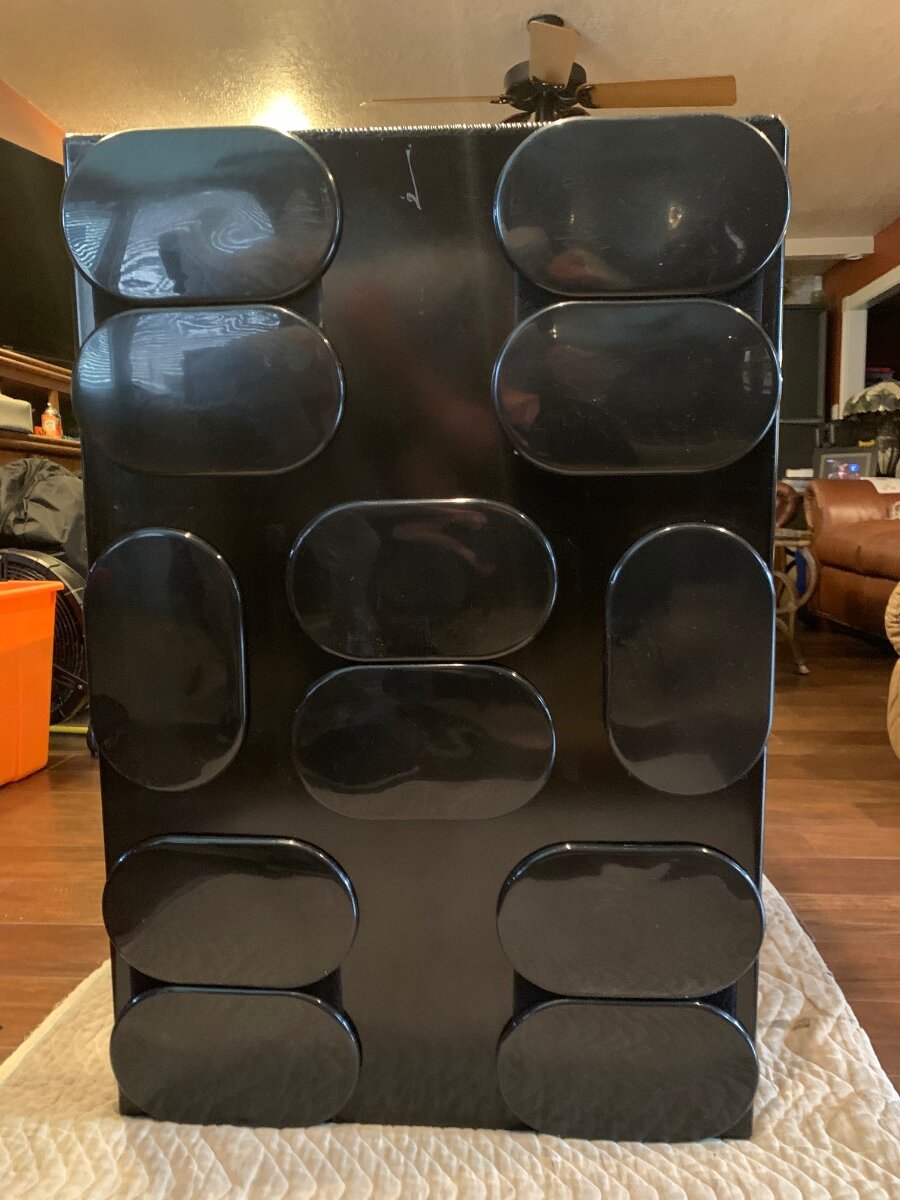
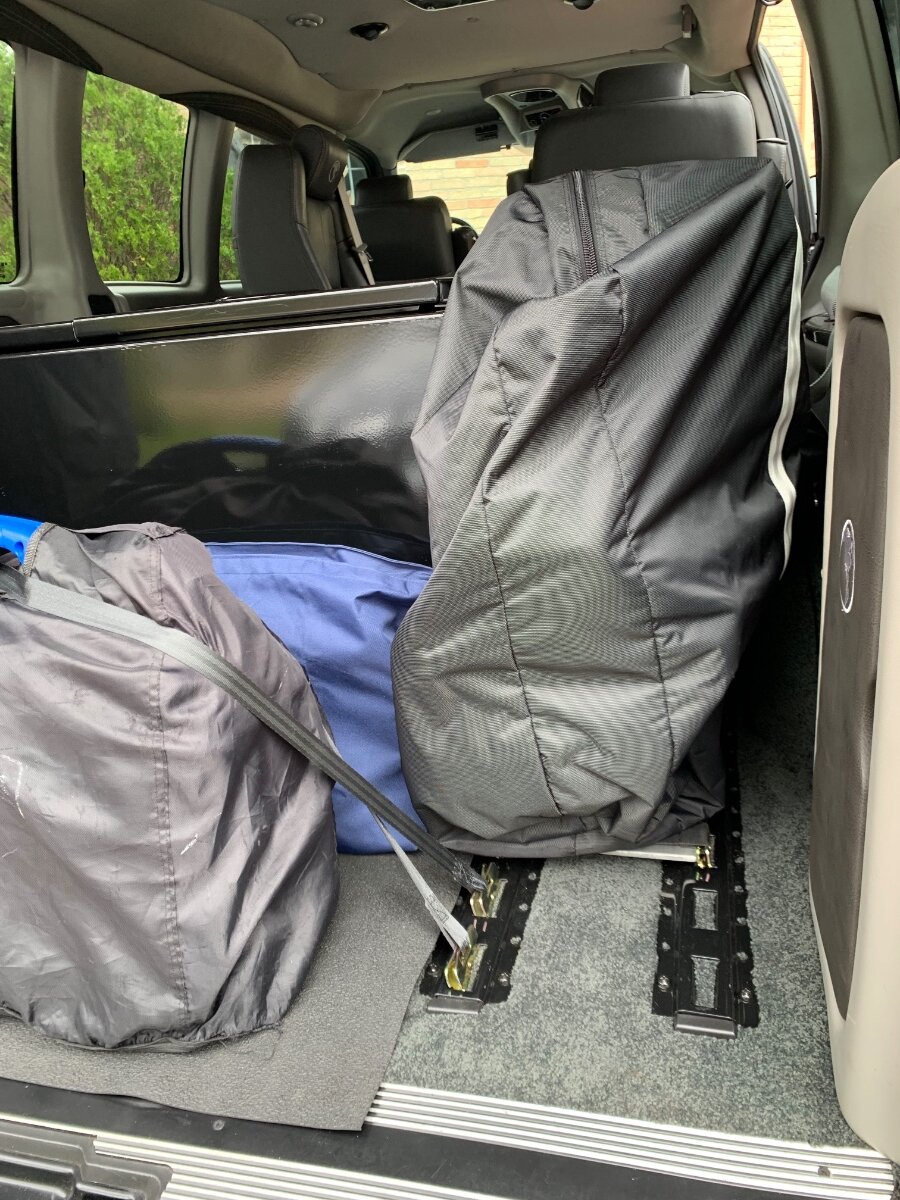
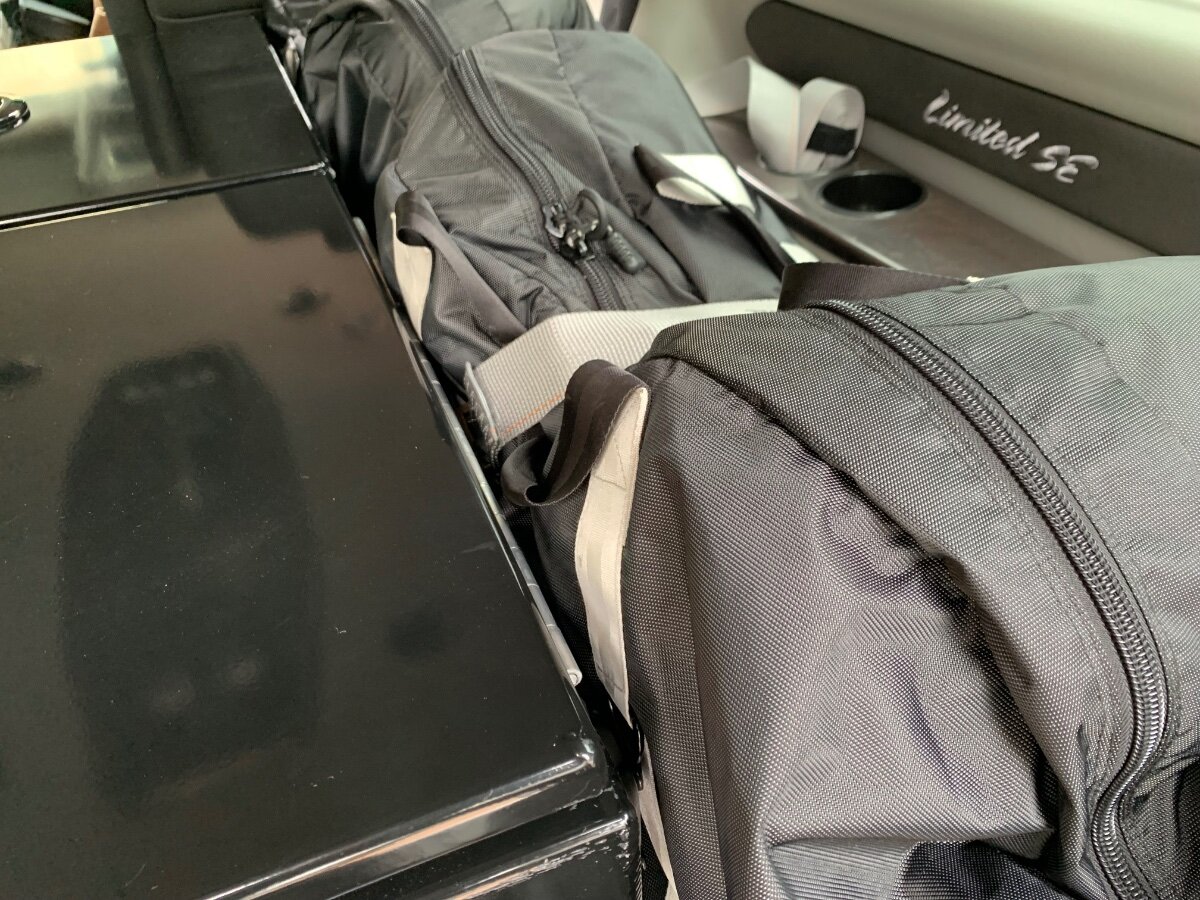
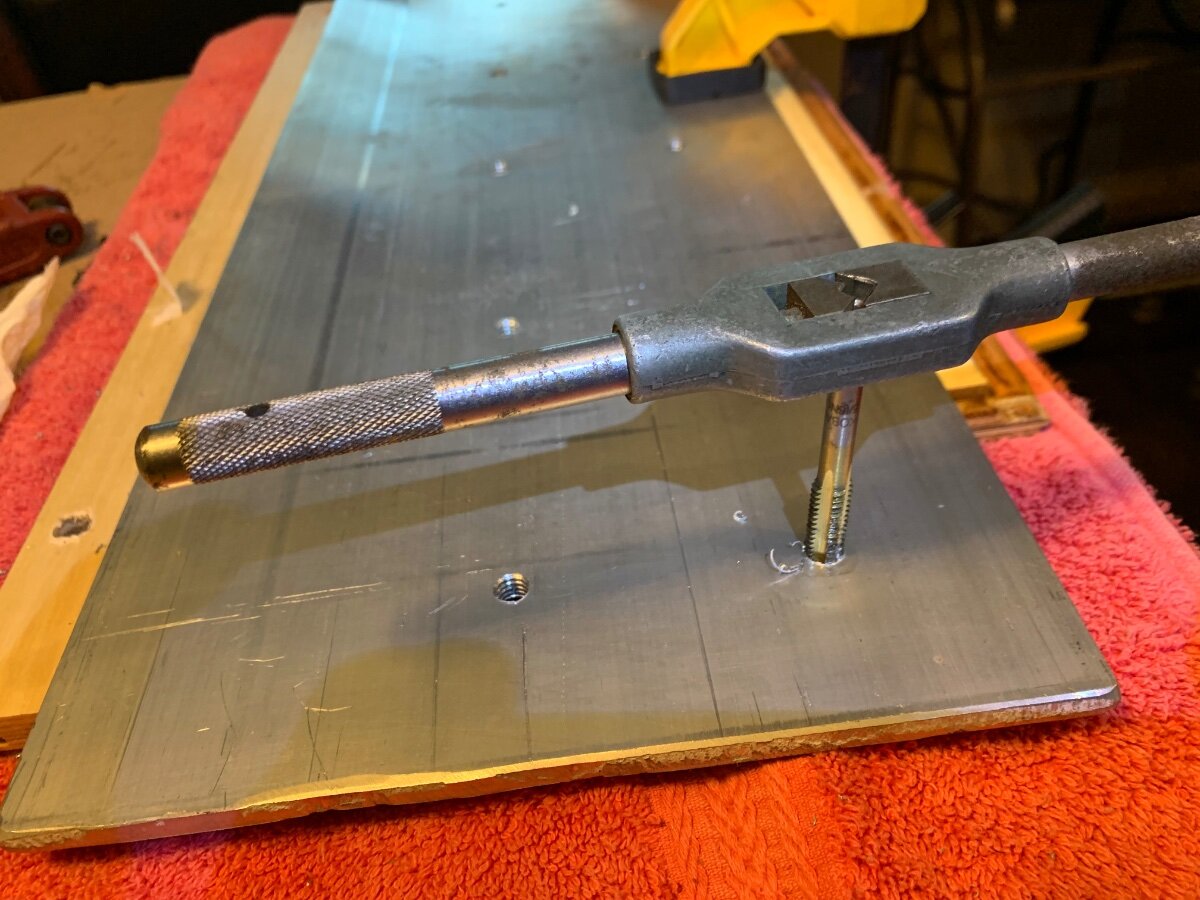
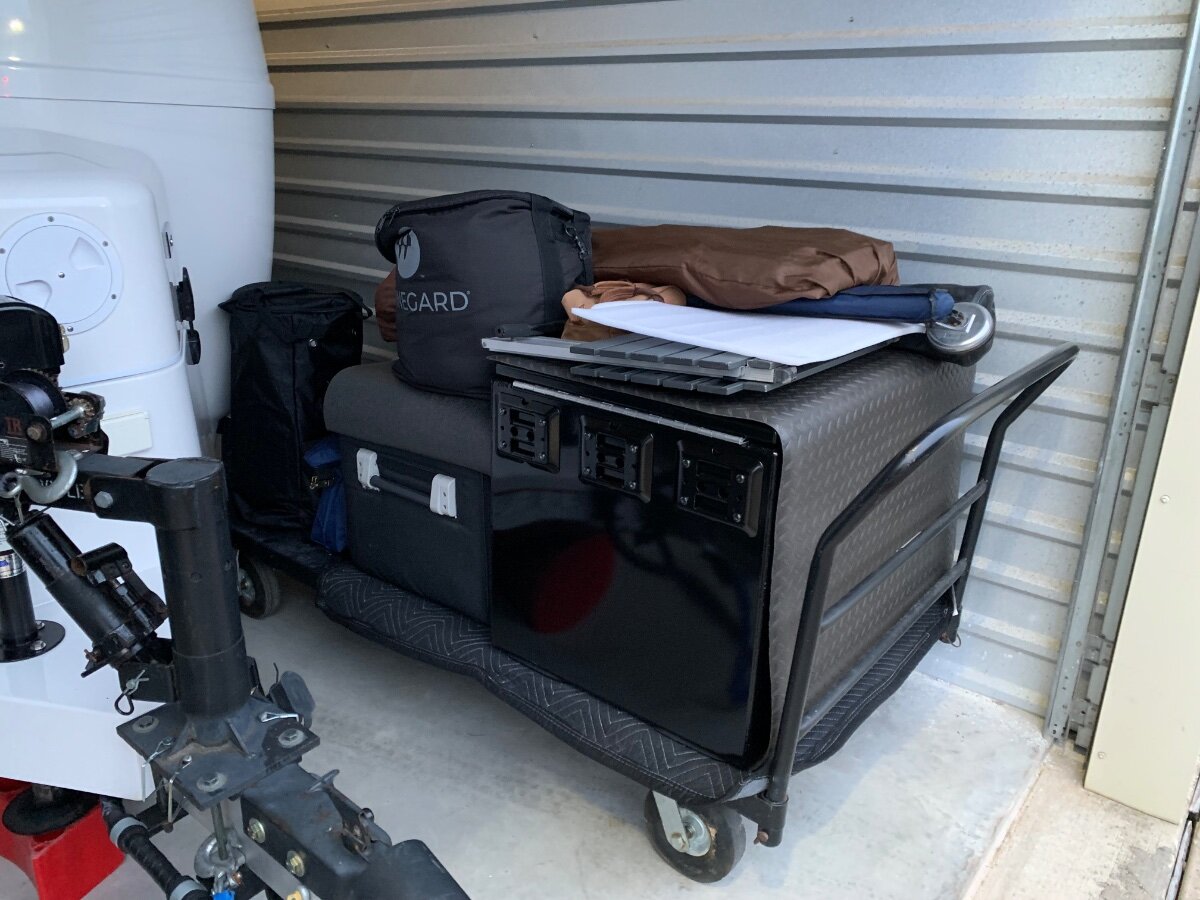
The following was copied from a former post and provided herein to better consolidate progressive modifications to the Savana in regards to the opening statement: “Ultimately, two storage boxes were acquired to safely stow much of the cargo; specifically, underbody tool boxes.” Cargo Securement Assurance/General Discussion Posted December 14, 2024 When towing with a truck, the majority of ‘stuff’ brought along on a camping trip or road adventure is conveniently stowed within the various holds of the Oliver and bed of the TV. However, even though my former crew cab Silverado 1500 had a storage box under the rear seat, it was mostly used to accommodate service tools and supplies for the truck and thus, found myself utilizing the rear floorboards and seat as additional cargo space when traveling. There’s peace of mind knowing cargo carried in the bed of a truck is adequately secured, not so much for that behind the front seats! All one needs is something going on from behind when something tragic is happening up front, no bueno! We’re required to wear seatbelts for good reason, proper securement of vehicle interior cargo should be of equal importance. I would be interested in learning how owners with trucks/SUVs safely carry their cargo within. My awareness of cargo securement was heightened recently with acquisition of a converted cargo work van as my TV; specifics are detailed in a forum post last October under ‘Towing an Oliver’ and titled ‘2019 GMC Savana 2500 Cargo Van’, if interested. Unlike service utility work vans that generally have a partition or cargo net, along with containment shelves and boxes, to secure cargo and ensure personal safety; conversion and passenger vans are more designed for ‘people’ cargo. In the aforementioned forum post, I addressed cargo containment, but cargo securement was still under consideration. Here is what I did to address the subject matter: Maiden voyage to Texas Oliver Rally, Inks Lake SP; cargo contained, but not secured! DC CARGO E-Track system components were obtained via online purchases from Tractor Supply. Each of the Buyers Products boxes were fitted with six of these brackets, three at the top of each end. A 1/4” x 8” aluminum backing plate was used to attach and strengthen these mounts. Backing plate cut to size, holes drilled and tapped for mounting bolts. Containment boxes prepped for backing plate and E-Track bracket installation. Super Sliders affixed to bottom of containment boxes for ease of handling on interior carpet. Three E-Tract rails fastened to deck to accommodate securement straps. Aluminum plate at floor level is runway for folded e-bikes. This box was slid rearward once back box was removed for storage at COW Barn. It primarily contains items typically kept in the TV with additional storage space, as needed, a trunk per se. Ratchet straps best used for non-towing vehicle use. Box securement once e-bikes are deployed. Wider Cam straps best used for e-bikes and subsequent box securement when traveling. Rear box is for camping ‘stuff’, forward as a trunk and more ‘stuff’. Driver’s side box securement using ratchet straps. View of e-bikes ready for ‘takeoff’ on runway! Cam strap securing e-bike. Ratchet straps for spare propane tank, generator and other needs. Items too long for the containment boxes are stowed behind at side panel. Oliver-mounted hoist used to transfer box at storage facility. TV moved forward to enable box positioning. Cam straps used for the lift. Containment box lowered onto platform cart. Liking the modular containment storage.
-

Installing Pioneer Inverter AC
Ronbrink replied to Treasure Coast Vault's topic in Ollie Modifications
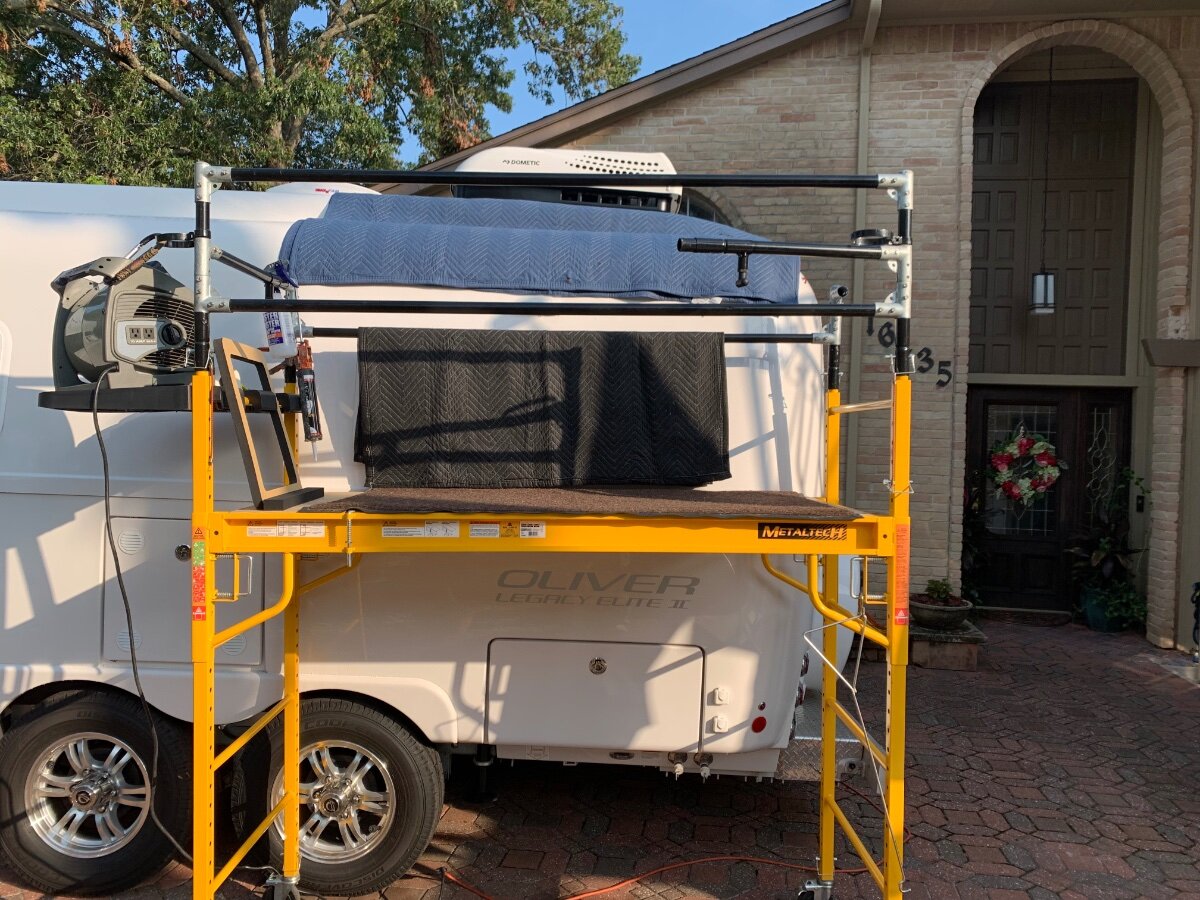
Removal made easy, used moving blankets to protect the gel coat. I detailed my a/c swap in Dreiha Atmos 4.4 Home Install/Ollie Modifications; follow your installation manual, the process should be very similar in general.
-
Gorilla compact 25’ hose for marine and RV use
Ronbrink replied to Patriot's topic in Mechanical & Technical Tips
Did you go Gorilla? -
Gorilla compact 25’ hose for marine and RV use
Ronbrink replied to Patriot's topic in Mechanical & Technical Tips
Invest indeed! I have the ELEY Garden QC sets, which happen to be on sale now. I like that they are full-flow, commercial-duty fittings. -
Gorilla compact 25’ hose for marine and RV use
Ronbrink replied to Patriot's topic in Mechanical & Technical Tips
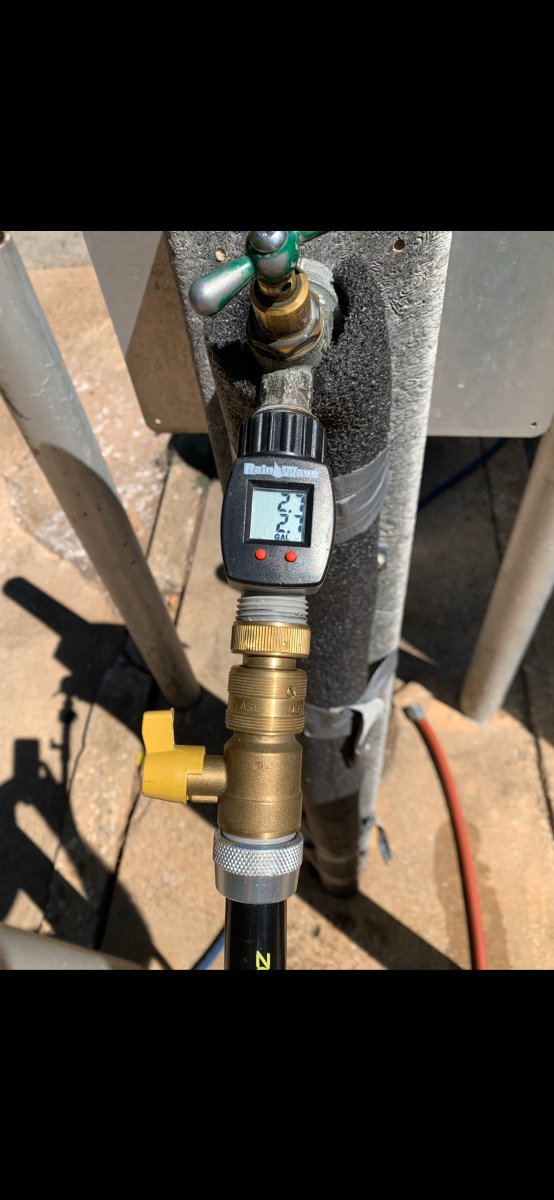
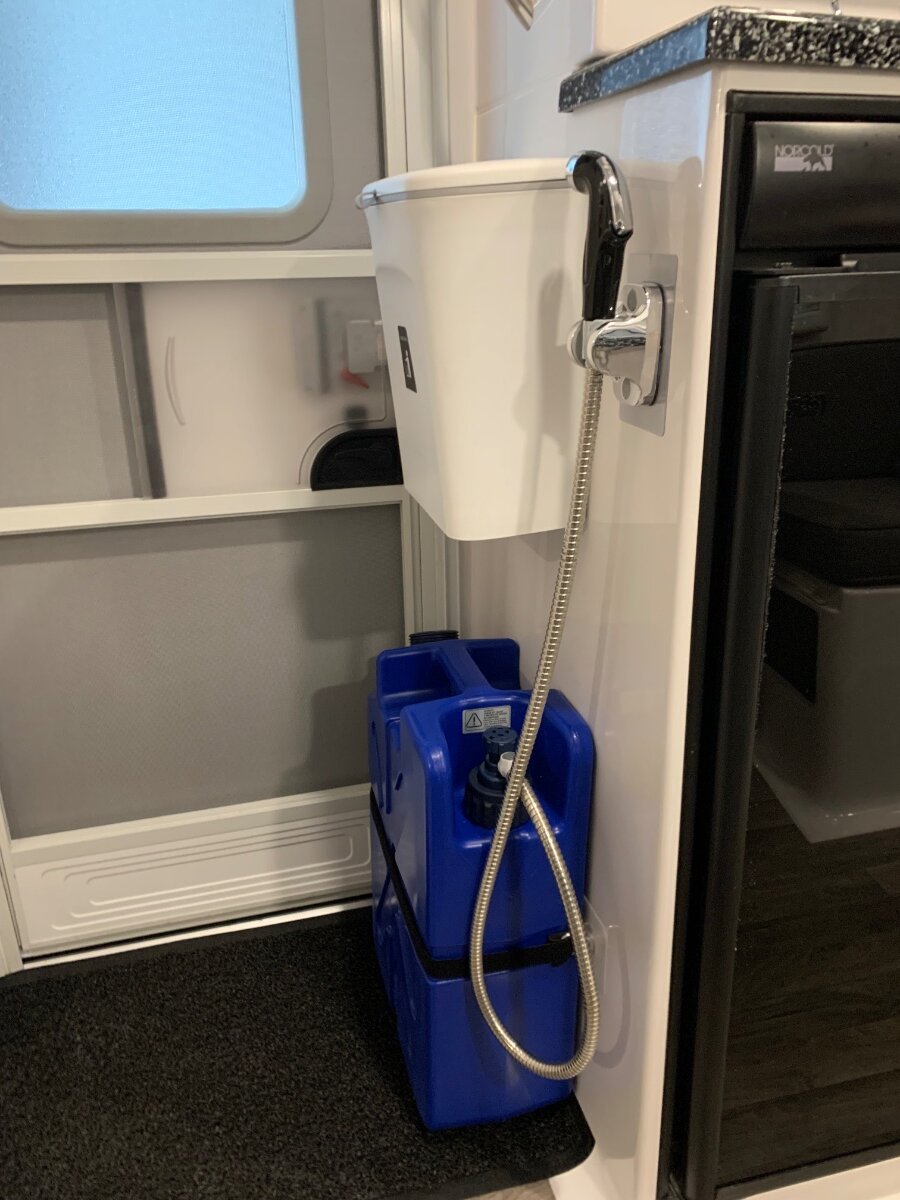
I have quick connect components on all of my hose ends so no need for tightening/loosening. I also use Teflon tape on all of the threaded connections. I have a 25’ zero-G fitted with a flow meter and stowed in the rear bumper compartment. It doesn’t take up much space and is easy to access. I generally flush the tank a couple of times following the initial dump. With the black tank valve closed, I meter the amount of flush water prior to release and leave the water flowing during the process for added spray action; the process is then repeated.
-
My solution, Lifesaver Jerrycan for drinking water and ice. It can easily be refilled from the freshwater tank during extended travels, but in a pinch designed to adequately filter the worst of waters (think survival situations).
-
The following has been found beneficial in ‘Setpoint’ selection in Comfy Mode, but may be applicable with use of Comfy Max Mode, as well; TBD. It is important to know that a setpoint one or two degrees below the upper range of temperature selected will have the fan run more than the compressor prior to power shutdown; whereas a setpoint of three or four degrees will have the fan and compressor turn off in sync, and the outside blower fan runs a half minute or so before total shutdown of the unit. Here’s a screenshot of the Custom Settings for my ‘Day’ Comfy temperature range. Although I have the Vertical Swing set to Auto, there are nine other positions to choose. Once the Atmos is running in a Comfy Mode, the Swing can be temporarily changed. I find this useful when sitting or lying in bed (head at rear) and don’t want the cold air oscillating downward onto me. Pos 1 can be selected to set the Swing to blow straight out. The Fan speed can also be changed, as well. These interim changes will revert back to the original settings next use.
-
I’m sharing my experience in hopes of helping other Oliver owners resolve the inherent humidity issue, regardless of the brand of a/c unit they may have. If found to work with a particular unit, perhaps others can share their experiences.
-
I posted the following comment this morning to address the same humidity issue expressed by a Truma Aventa owner (Truma AC blowing humid air?/Mechanical & Technical Tips). ‘In my post titled Drieha Atmos 4.4 Home Install/Ollie Modifications I recently provided comment on an easy remedy to the humidity issue with my unit, which may be applicable to the Truma Aventa, as well as other makes and models.’ Pertinent information provided therein may be of interest to Hougthon owners, as well.
-
In my post titled Drieha Atmos 4.4 Home Install/Ollie Modifications I recently provided comment on an easy remedy to the humidity issue with my unit, which may be applicable to the Truma Aventa, as well as other makes and models.
-
No vent assembly kit installed. I don’t keep the hose connected because it’s a tight fit when the bumper gate is closed; the bend in the hose is subject to rubbing on the gate, which could eventually cause a hole or tear. I was using the provided cam lock plug to seal the discharge pipe, but had some seepage when removed once; I then tapped a fitting into it to attach the clear silicone tube for previously described purposes. The plug fitted with a threaded hose connection can be bought, but I choose to convert mine. Since the hose is collapsed when stowed, once connected to the discharge pipe the terminal valve has to be cracked to enable air intake to facilitate extension. Stowing is not a problem, since it is disconnected from the discharge pipe and given a final clean water rinse before collapsing.
-
I got sea sick watching the DERUBIS video!
-
Back to last months swing rack builds with Phase 2 of that project; custom swing away racks for my two Wavian Jerry Cans and spare 30# propane tank. Had some supply delays, but now finding time seems to be an issue and thus, I will report as the builds progress. I completed fabrication of the primary driver side swing out carrier hinge and tack welds on the passenger side assemblies. Here’s a few pics:
-
And the Truma for that matter! EDIT: Dometic Penguin ll, as well!
-
Good idea! It also claims ‘The smart air conditioner controller is compatible with over 20,000 models of mini-splits, window, or portable units’. Maybe there will be some owners of SOB units willing to try the Cielo Breez Max and report their findings.
-
The Cielo has to be positioned for line-of-sight with the Atmos controls in the air distribution panel. And yes, an AC outlet or USB port is needed in close proximity; however it is equipped for hardwiring. When learning how to use the Cielo, I sat at the dinette and plugged into an AC outlet via the supplied 5V adapter; the supplied base stand for flat surface staging was also used. Being a wall-mount is best securement in a rolling earthquake, I first tried it on the forward bulkhead to the upper left of the wet bath door, but didn’t like the cord dangling down the wall and it seemed a bit less responsive due to the distance. I then placed it between the two curbside upper cabinets near the under cabinet USB ports above the cooktop, but the 90° orientation didn’t work as well and there would be concerns of rising heat if cooking. Finally I placed it as shown in the pic, whereby the cord runs in and out of the galley cabinet and plugs into said USB port. I used Velcro for the mount, and may eventually hardwire the Cielo through that upper cabinet and tap into the wiring within the access screw port for a cleaner installation. As positioned, the Cielo is in clear view from bed, and I like that the backlight is dimmable or can be turned off.