
jd1923
-
Posts
2,958 -
Joined
-
Last visited
-
Days Won
207
Everything posted by jd1923
-
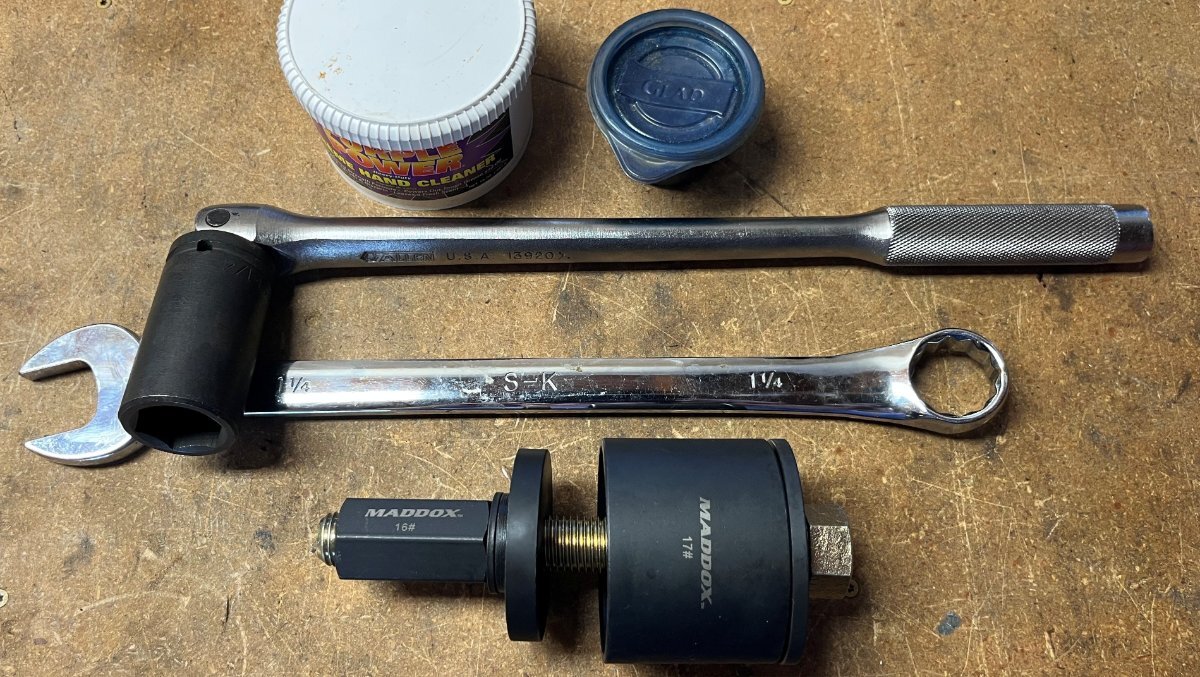
This 3/4" impact has an insane amount of torque, at "1900 ft-lbs of breakaway torque." and you would need the 3/4" to 1/2" reducer most of the time to turn nuts and bolts 1" or less which includes TT and TV lug-nuts. This 1/2" model would be better for everyday use. A little more expensive, but smaller, 1.5 lbs. lighter and breakaway torque spec'd at 1750 lb-ft. Still a beast! https://www.homedepot.com/p/DEWALT-20V-1-2-in-High-Torque-Impact-Wrench-Tool-Only-DCF961B/328393371 Or you could save $38 and go another 1.25 lbs. lighter and go with this very capable model with breakaway torque spec'd at 1400 lb-ft. https://www.homedepot.com/p/DEWALT-20V-MAX-Cordless-1-2-in-Impact-Wrench-Tool-Only-DCF900B/317991357 Either model would be preferred by most of us vs. the 3/4" beast! I have a 3/4" to 1/2" reducer for when I need sockets >1" like the 1 1/4" socket shown above required for the bearing press. The 3/4" breaker bar shown removes wheel lug-nuts easily or just put the weight of your foot on it to get it started! 🤣 However, not all 1/2" models have the required torque. Check the torque specs. I purchased one years ago, when they were not as strong as some today. It could pull lug-nuts off 12mm or 1/2" studs torqued to 120 lb-ft but it would not budge lug-nuts on a 2500 series truck with 14mm or 9/16" studs torqued to 140-150 lb-ft. I returned it after it failed to loosen a lug on my Dodge Ram. Ever since I've used my pneumatic 1/2" impact in the workshop and work to keep our vehicles well maintained so not to breakdown on the road, having hand tools for this rare case! I work on the TT and TV too much at home and thankfully we did over 50 days of travel in the last 3 months and all my tools stayed in the bottom of the TV toolbox! 😂
-
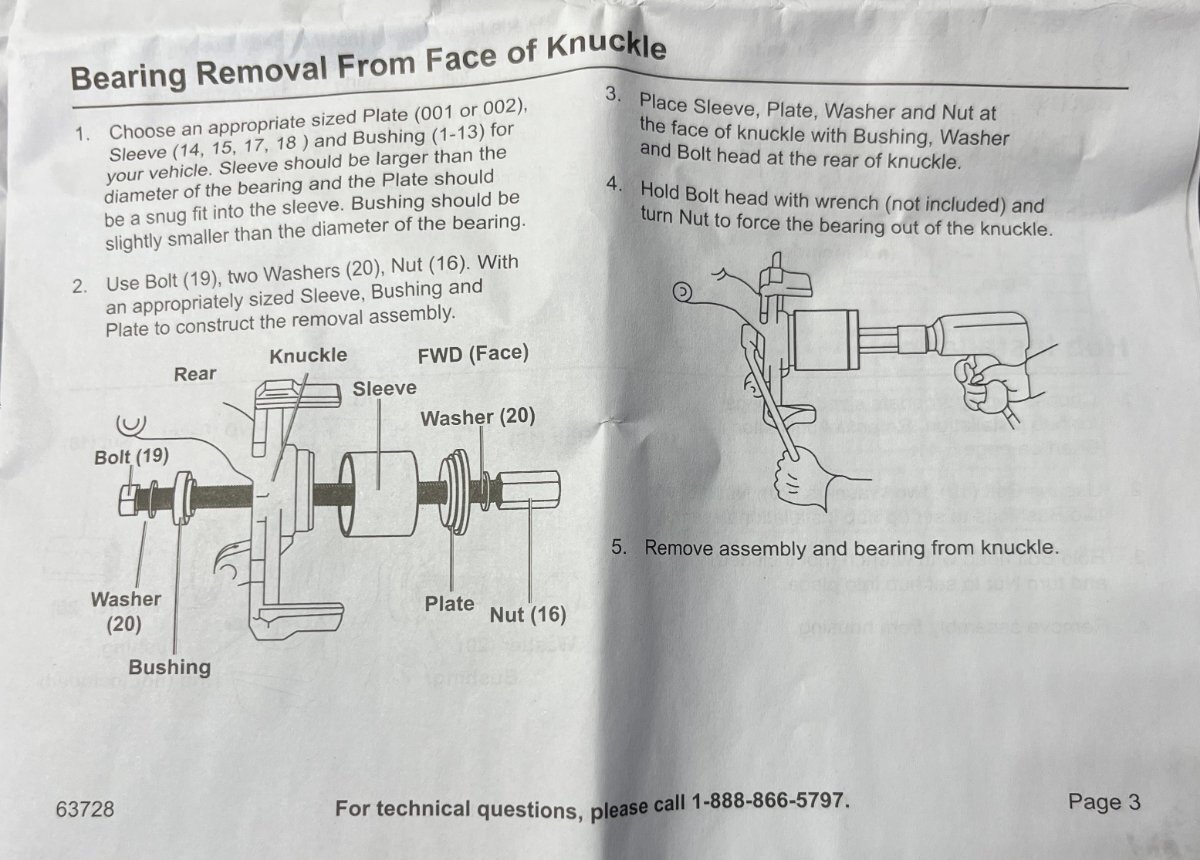
CRM, now I believe you are correct in your thinking. Please let the misses know I approve. Get the friggin' 3/4 impact! 🤣 (Do note the press instructions show using an impact)! Chris picked up the Maddox kit today (had to get it while my 15% coupon was running) and needed a shopping cart to carry it away! The HUGE box measures 17x15x4" and weighs near 20 LBS. No way I'm carrying this kit with me, but our dear friend @ScubaRx would likely store it right next to his battery-powered grease gun and another 800 LBS of tools onboard (love you Steve)! The first pic shows part of the installation instructions. In my professional opinion they show the 'bushing' in the wrong direction, TBD. Second pic shows the tools I would bring, given I have guessed the right bushing/sleeve sizes. The instructions also have an application guide which lists the 2001-2010 PT Cruiser! Holding the drum will not be an issue, but holding both sides of the press may be! the bolt is 7/8" DIA with heads of 1 1/4" on both sides. It would be great if you could torque down the wide nut and the bolt would stay, but you should have both sides held and the drum would not turn anyway. Sitting flat on the truck tailgate may not work, TBD. How many of you have the automotive tools I have in the toolbox (1 1/4" socket and 3/4" breaker bar and 1 1/4" wrench)? Not many, but this will be my toolkit, after testing of course that I have the complete and correct set of tools. Don't forget the grease and the Go-Jo hand soap that's always packed in our rig! 🤣

-
Minimize the use of Construction Glue, but OK as a repair when needed. Mounting a styrofoam sheet to a wall to hold it temporarily in place until I screw down the paneling to finish. This was the original purpose! Many over-use glue and sealants for lack of better solutions. The worse part is having to remove something you’ve glued down! 🤣
-

Driving with AC on for a short period
jd1923 replied to Wayne and Karen's topic in General Discussion
We started doing this on our last trip when it got to mid 90s up north unexpectedly for too many days. Great results! Please see my most recent post on our DC-DC Charger mod thread -- -
Yeah, that would do it, no crow bar required! I have the baby 3/8" version and at home use air and a 1/2" drive Ingersoll Rand impact. They have an 1/2" model which should be enough, but if you buy this beast, get something like this to fit your 1/2" sockets. 🤣 https://www.homedepot.com/p/K-Tool-International-3-4-in-Female-1-2-in-Male-Impact-Socket-Adapter-KTI34016/207024761
-
A long HD screw driver or crow bar between the hub and two lugs should hold it. Your spouse or travel partner holding the bar may help for the 3rd hand! Yes, we'll see! At least we are preparing ahead of time vs. broke-down-on-roadside! 🤣
-
I would think given the hub-drum off the axle is substantial in weight, it would be easy to hold not allowing it to rotate. I would sit the drum on a piece of rubber on my truck tailgate. The press requires a specific socket with 1/2" drive ratchet or breaker bar. I would use some grease to allow the press parts to turn more freely. It should not be too hard. The press is designed for hand-use and advertised "while keeping the steering knuckle and strut assembly intact on the vehicle." Should be easier with drum on a flat surface. Chris is going to Harbor Freight for me today since she will be in the same shopping center for something else and my 15% coupon expires tomorrow. I hope it's the right kit. The numbers look right, but if wrong I can return it later. When my axles get here, I will remove one drum and mount the tool to see how it works and which of the many pucks and spacers are needed for this job. I'll post pics. I'll just need to figure out where to order the correct spindle nuts, given the Timken parts on Rock Auto are correct.
-
FYI, I edited the above post adding info on the bearing tool, after @CRM and @Mike and Carol had read this.
-
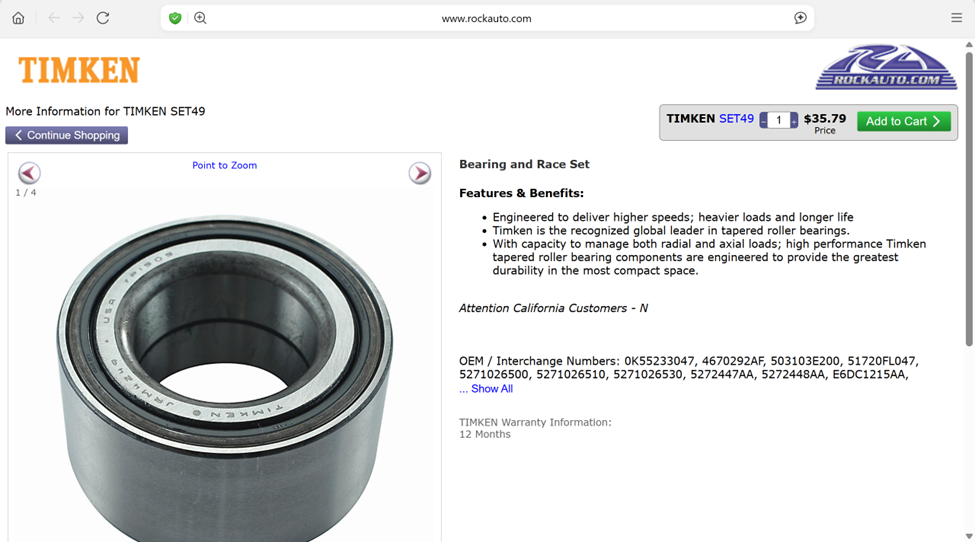
Thanks @srthomsen. I'll get a photo of the label off my new axles when they arrive for comparison. And thanks again Ken @mountainoliver. I really like the forum post that mentioned it is the front wheel bearing for the 2010 Chrysler PT Cruiser! Went straight to RockAuto.com and found this very reasonable Timken Bearing. Rock Auto for the PT Cruiser shows a different kind of non-locking spindle nut. They do list the larger snap-ring which along with the washer can be reused. I will verify when my axles come that this is the right part. The spec shows 1.654" ID which does convert to 42mm. Nice! Re the bearing press. This bearing has a 76mm OD. We'll need a kit that has a 75mm puck to pull and press this bearing. The Maddox kit that Ken showed from Harbor Freight has one at 2.96" which converts to 75mm. This kit will likely work well and Harbor Freight just sent me a "We miss you" email with 15% off! Two bearings and this bearing kit at $200 OTD plus the cost of a couple correct spindle nuts, now we're talking! 😂
-
Yes, stop and say Hi! Get hull #s, take pics… 🤣
-
Yes, there’s got to be better pricing for real Timken bearings and the hub-drum assembly! (I’ll get 2 extra bearing kits and the proper tool, no hubs for me.) For those of you who have service companies do your maintenance and repairs, just buy a couple bearing kits to have with you. I do not believe this style bearing will immediately freeze up. There will be warning signs, heat and noises, allowing you time to tow more slowly to a trailer repair shop. But if you don’t have the parts, you’ll be there waiting 2-3 days! Think about the etrailer price of $655. We just purchased whole axles for $1,001 each that include two hub-drum assemblies, two brake assemblies and all working (spare) parts! Who would buy a hub at this price? Maybe I should have ordered three axles!🤣 Alcan was going to price the bearing kit for me, now that I remember. I’ll have a couple items to talk to them about this week. Will keep you posted!
-
Good point, depending on the tool as Ken mentioned. I'll know soon enough when I receive shipment of our axles. I looked at a few pics online, like this one from eTrailer. It appears the Nev-R Lube hub and drum are integrated one part. Swapping this part would mean bring the shoe adjusters in for the new drum and you will have to go through break-in adjustments. Also not fun! I would prefer to carry a proper hand tool with correct spacers and two spare bearings kits vs. carrying two hole hub-drum assemblies. These would be pretty heavy and take a bit of space in the truck toolbox! It appears this is a $650 part, so with tax over $1,400 to carry two with you! The Timken bearing kits on eTrailer are $228 plus tax and include a new nut, washer and snap-rings, $500 OTD for two kits. Not certain these are the right components, but as close as I could find today. Again, I would verify when I have a drum off one of our new axles! Agreed with @CRM, don't trust a $38 Amazon Chinese knock-off! (And I could not find one on Summit.) https://www.etrailer.com/Trailer-Bearings-Races-Seals-Caps/Dexter/31-73-3.html https://www.etrailer.com/Trailer-Hubs-and-Drums/Dexter/8-388-80UC3.html
-
That's OTT for ya! I would think yours would look closer to mine since our 2016 was actually built fall of 2015 when you check the label dates on all components. But there is also some distance between #70 and #113.
-
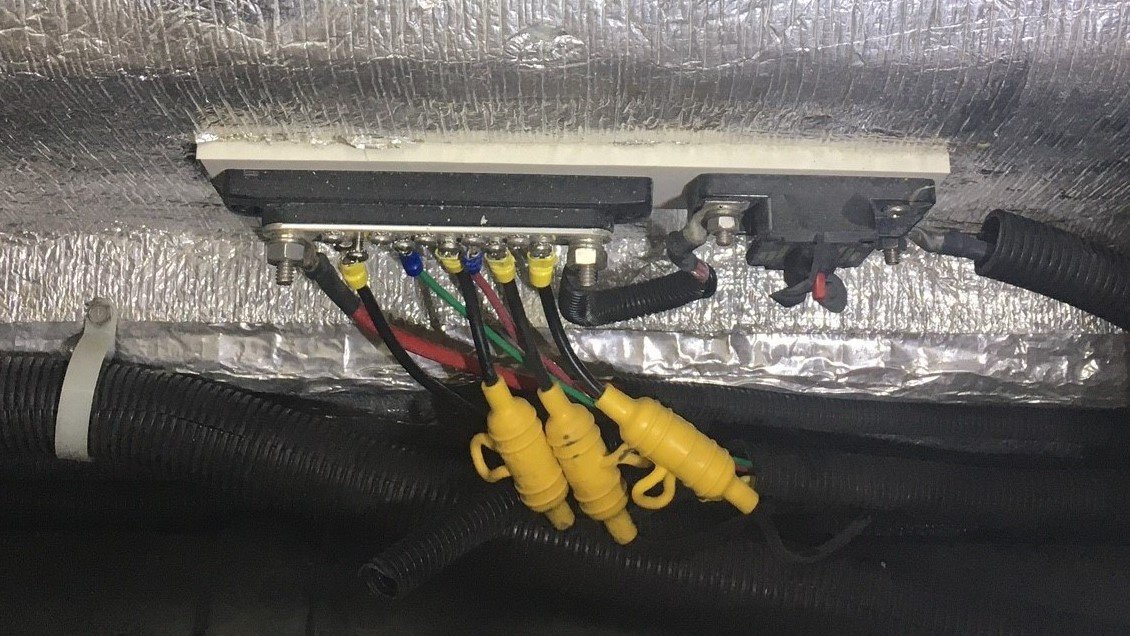
Actually they look a lot alike except yours only has the 3 stabilizer jack wires. Did you test for power at the 7-blade adapter? You got to get a yes/no answer to this before doing anything else. You have a fuse all the way to the right in your picture. It looks just like the one @Ray Kimsey pointed to as his Black Charge Wire. It could be yours too. You can see how your system a 2018 is somewhere between mine a 2016 and Ray's 2020. Our Oliver has none of those two-post fuses at all.
-
Why is it 5033#? I thought the standard D52 meant 5200 LBS. I'll have to see what my new axles state on the label when they arrive.
-
I plan to call Alcan this week to check status on our special order Dexter axles (the 50.00" length that only a few older hulls have). I'll be installing them myself and based on one failure I read about here, I plan to open all 4 wheel assemblies to make sure they were assembled correctly! I will look for markings/part #s on the Nev-R Lube bearings to see if they are marked Timken and hopefully find a part number. I will determine what kind of job it would be to change a bearing. They key to the correct bearing press/puller is to have the correct diameter spacers to match the bearing diameter. We should all have a couple of new bearings on hand! I also will compare increase in brake shoe surface area, going from 10" to 12" brakes. It will be well into August by the time I get this work started, let alone finished. I will write up a NEW and complete installation post with these particulars when I get finished. Now that this thread is about to be 28 pages! EDIT - Wow, my post just made this thread 28 pages! Thanks Ken, for being partner to our humiliation! (Lance too) 🤣
-
Yes, the wiring is VERY different from 2016 to 2020 and @dewdev's is a 2018, likely to be closer to our older hull, but who knows!
-
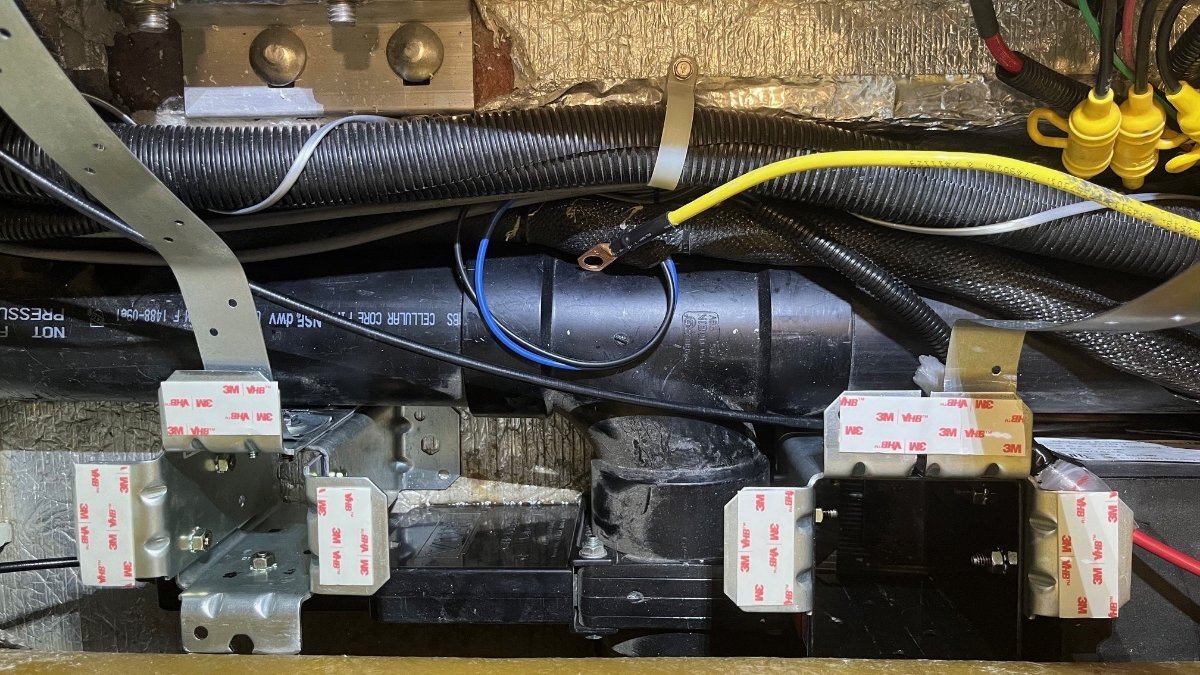
Should be. The trick is finding it since every old Oliver seems to be somewhat different. First thing I suggest is to text you test for voltage at your 7-blade connector to see that it is powered and which blade connects to the Black charge wire. Later after disconnecting the wire, you want to see that the same blade is no longer powered. This is the only true means to know you got the correct wire disconnected. Some have reported seeing the cable split under the bathroom vanity, so perhaps you can see where the black wire branches from there. I got lucky to find mine at the +bus under the streetside bed. Notice in the picture, the black wire at the left side of the bus where I have the screw loosened. I removed all the wiring to this bus, shortened the 3 fused + connections to the stabilizer jacks, added a more substantial + bus under the rear dinette seat for easy access. I was able to sort out all the wiring, no extra cables to the batteries, etc. In doing this, I've learned what almost every wire is for in the basement areas of Hull #113! 🤣
-
Good idea! My son has one of those. I don’t have too much experience but an oscillating tool should work well to square new corners and where a jigsaw would not fit.
-
Looks like you need 2" across the width of the unit at the bottom for intake airflow. Be careful in how much you chop the bottom platform so that you will allow for 2" of airflow. I always wondered why in some compressor fridges, like @mossemi's installation of the Nova Kool that existing vents are capped. I imagine these units must be front cool which means the heat of the unit comes into your living space out the top vent. Am I correct here? I like how this model allows for rear venting! We have the lower intake and upper exhaust vents for the old Dometic absorption fridge. These can be reused with this new model and I would keep the Beech Lane fans I installed for hot days when the entrance side is in the sun. From the drawings it appear that when using an upper rear vent it would not be needed. This allows @DunnYet more room above if needed for the installation but less room below given the 2" air supply requirement.
-
Love this sentiment, Chris too! That's why I did this extensive work. It keeps me from going under the beds unless I'm working a new mod! 🤣
-
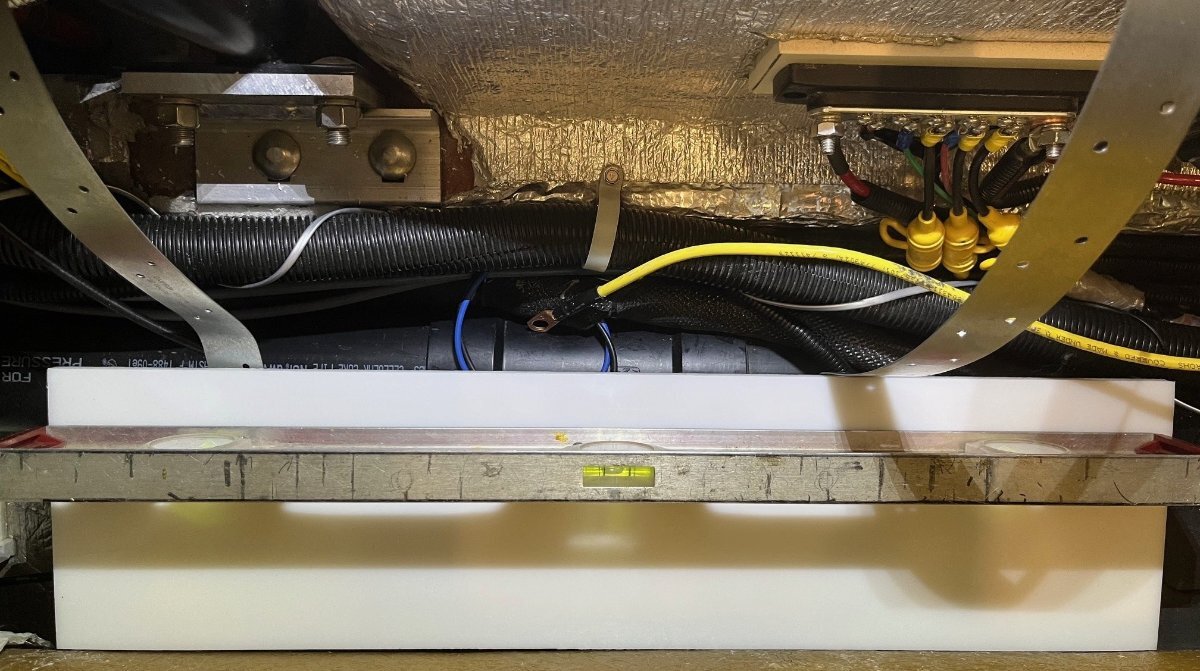
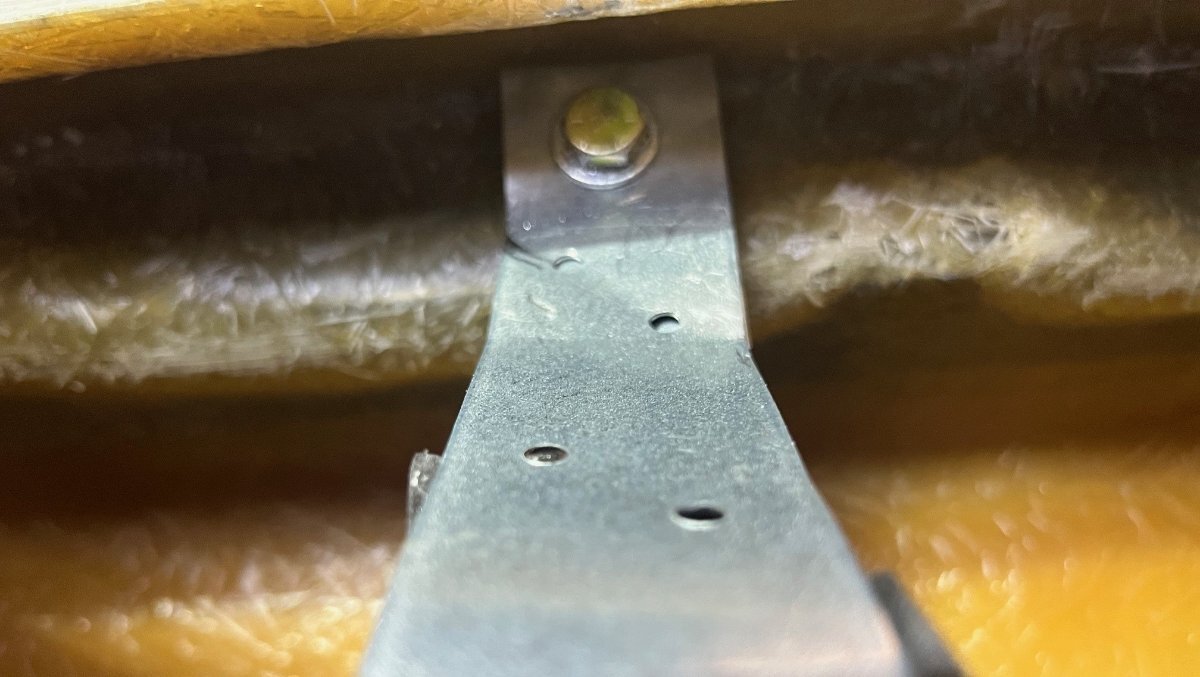
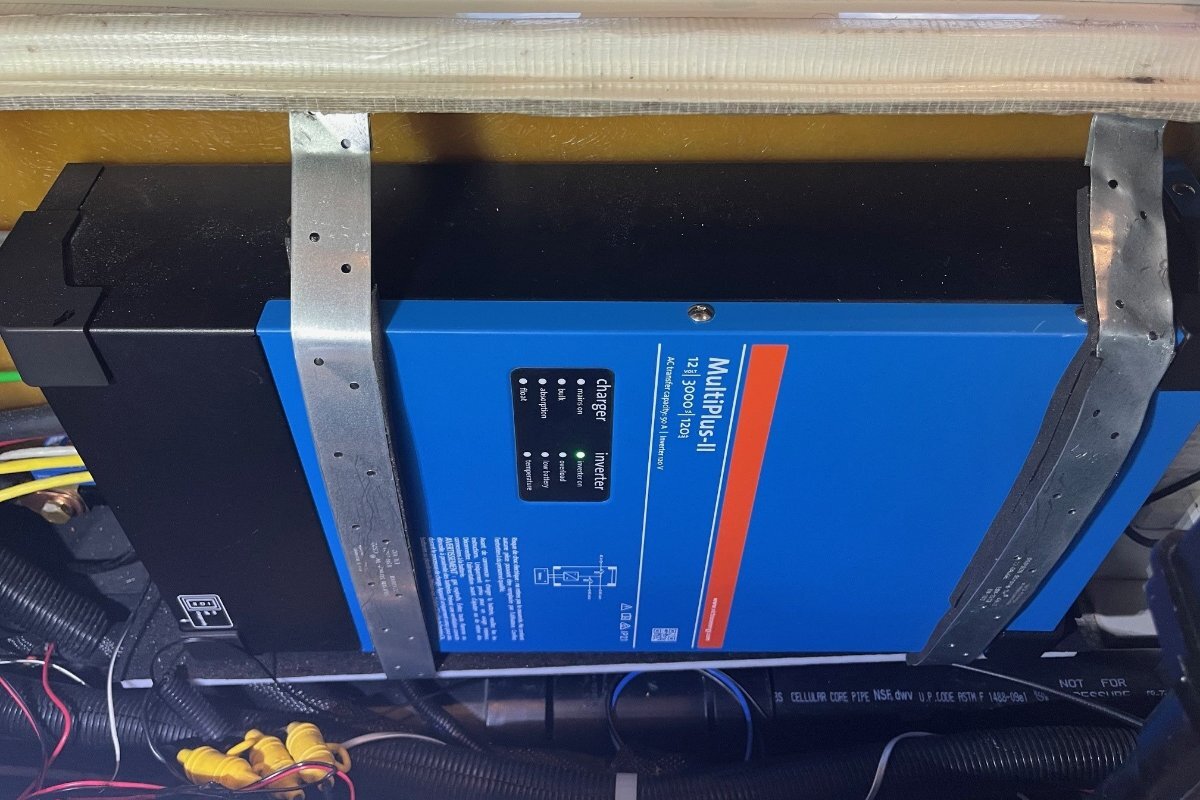
Question is Tom, would additional adhesive work, when it did not work the first time? (Can I say, what a lame glue job OTT! 🤣) When I installed our Victron inverter, I had seen installations on this forum using a vertical mounting board and adhesives which made me worry. That's a lot of weight to to be glued to a wall of a travel trailer! I decided to build a shelf sitting on the floor below and after the inverter was in place, I used anchors and strapping to hold it against the wall (see pics). You should see if you can move the inverter up and out of the way and see if building a floor-mounted shelf would work in your hull. Pull the battery ground or turn a shut-off switch before moving or removing your inverter. In the meantime if you must travel, stuff some insulation on both sides of the inverter to keep it from moving!
-
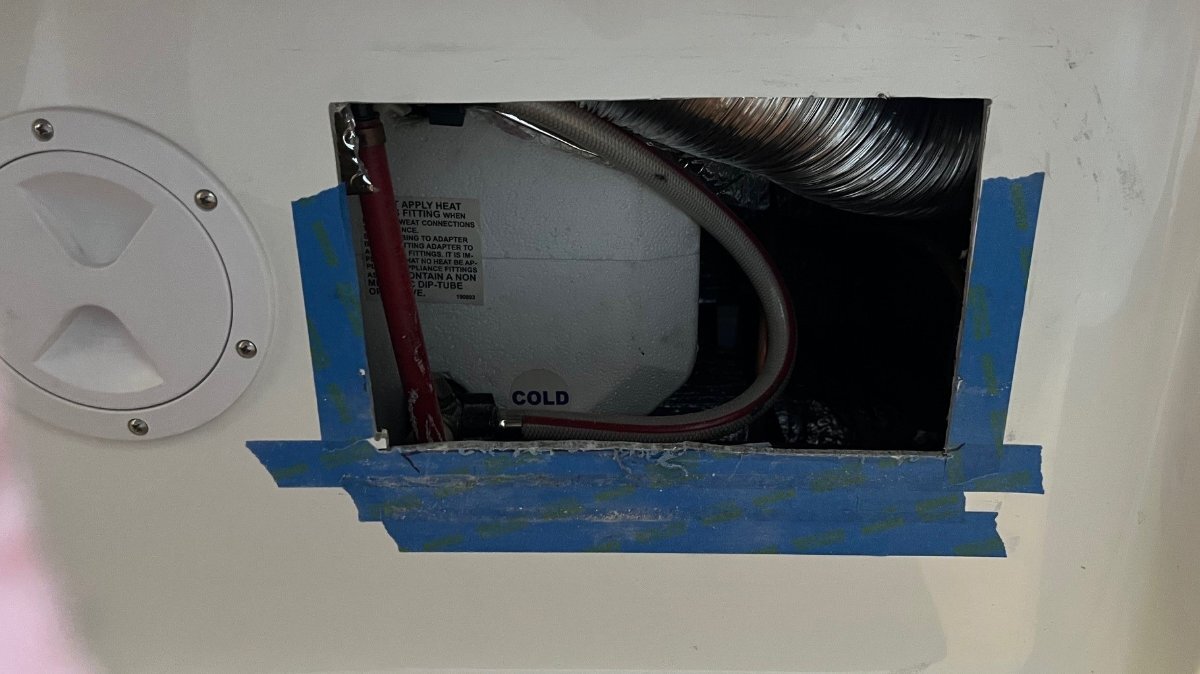
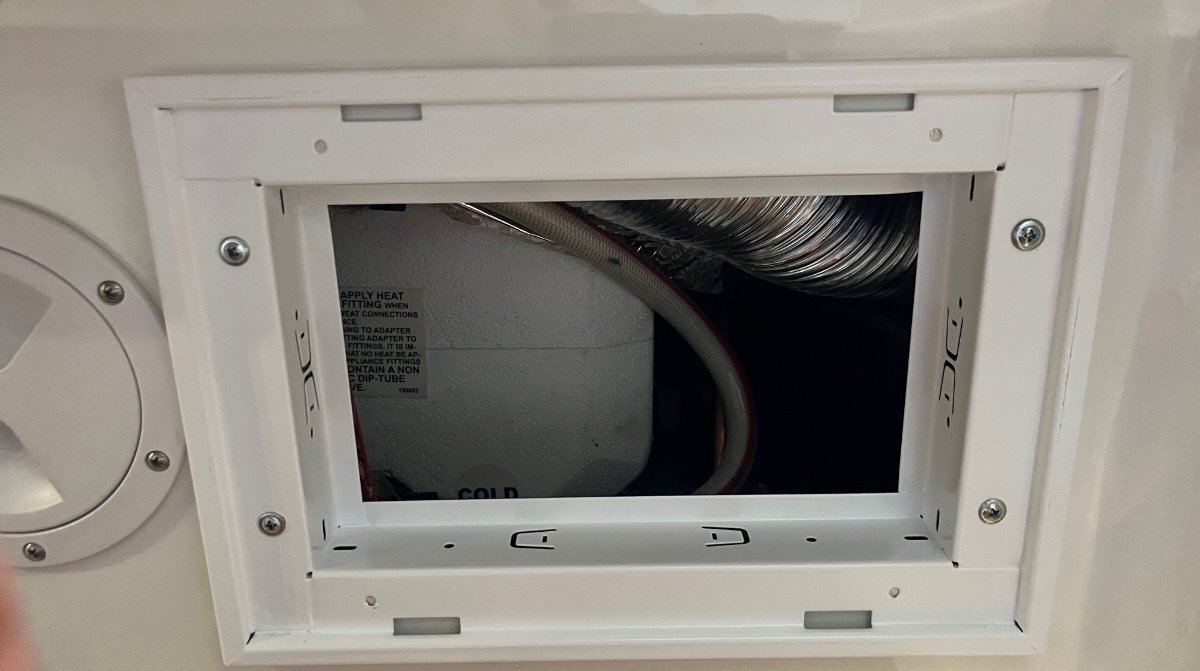
Cool project! What model fridge are you installing? In our Oliver, I replaced the vent under the bed with a filter housing. I had to make the opening a little wider in both directions and found the fiberglass cut easily with my DeWalt cordless jigsaw using a fine steel blade (see pics). Cutting the fiberglass should be easy as long as the base of a jigsaw can fit and sit level on the taped fiberglass. You may have to use a sawzall in the corners which is not as easy to control and cut in a clean straight line. Looks like there is ducting or something under the fridge base, so you may not get a full 3" there. I would work below first. Not much room up above either! You will likely need to "combine the two" approaches. Maybe make the base about 2" lower and cut 1" in the fiberglass above. Keep us posted!
-
This is not true. You can certainly double-up grounds. I would double up the lighter gauge yellow wires, 2 per screw-down which can give you many available spaces in the negative bus. I did this on ours after adding a new longer negative bus. I'm not familiar with your 12VDC fuse panel pictured. Our much older hull has 12VDC fuses and 120VAC breakers integrated in one combined panel. To see if this is grounded correctly, use the continuity setting on a multi-meter. Touch this negative bus with one probe and touch the main negative bus (with all the yellow wires) with the other probe. If you hear the alert sound for continuity then this bus is properly connected to the battery negative post and can be used for any negative 12V wire. If the unused bus is not grounded (connected to B- in a 12V system), you can ground it by running a 6 or 8 AWG wire to connect the two negative buses. I would not count on a frame ground in a trailer or RV electrical system. All 12V negative wiring must terminate at negative battery terminal. In an automotive system, the negative battery terminal is grounded to the steel frame. Positive +12V wires can be wired to positive buses connected to the battery + terminal. Negative -12V wires (some use the word "ground" but "negative" is correct) can be wired to positive buses connected to the battery - terminal.
-
Battery and Solar Disconnect Install Questions
jd1923 replied to Tony and Rhonda's topic in Ollie Modifications
I drilled one 4" hole and five 3" holes for closet/bathroom vents and to vent an oven that replaced our microwave. I just used a new high-quality standard hole saw, likely it was carbide steel, not diamond. I did not bother to tape using a hole-saw. It really doesn't help anything. I do tape when using a jigsaw since the base can cause surface marring. In some places the fiberglass is thin, like the 1/8" stated at the pantry. In some places it's double-layered and a plug about 3/4" could be removed. Use a low-speed and a clutch setting on your drill since large hole saws will catch when very slightly off angle. The clutch will save your wrist and the work surface since it will slip when catching vs. jumping. It's late July, so summer is here another 6 weeks and it's hot everywhere. Our weather has been a little cooler for a few days now, but I'm working a brake job this weekend regardless with my son on his '97 T100. We don't have the choice to wait for cooler weather! Two weeks ago, it was my truck and my garage was 105F in the afternoons, fortunately without your humidity. A floor fan helped, lot's of water and electrolytes! Working in the Oliver? NP, just turn on the A/C! I installed my new inverter/charger and moved all the wiring that was under the streetside bed to under the rear dinette seat during July 2024. It was 100+ in my garage and a cool 75F inside the Oliver! 🤣