Search the Community
Showing results for 'Generator box'.
-

Navigation in 2025; smart phone via car play, traditional GPS or other
jd1923 replied to routlaw's topic in Towing an Oliver
Yeah, I would do that too! But not what OTT installed years ago. The screen is bulky and low res, and not sitting on my dash. Do I remember correctly, powered by a cigarette lighter plug? Mine has been in a box since we got our Oliver 2 years ago. Except for our Victron inverter and multiple charger systems, total rewire of all things electrical, a bunch of sensors and apps, powered water and waste valves and a few other items, like our Samsung A/V system… Our Dodge and Oliver are mainly old-school! 🤣 -
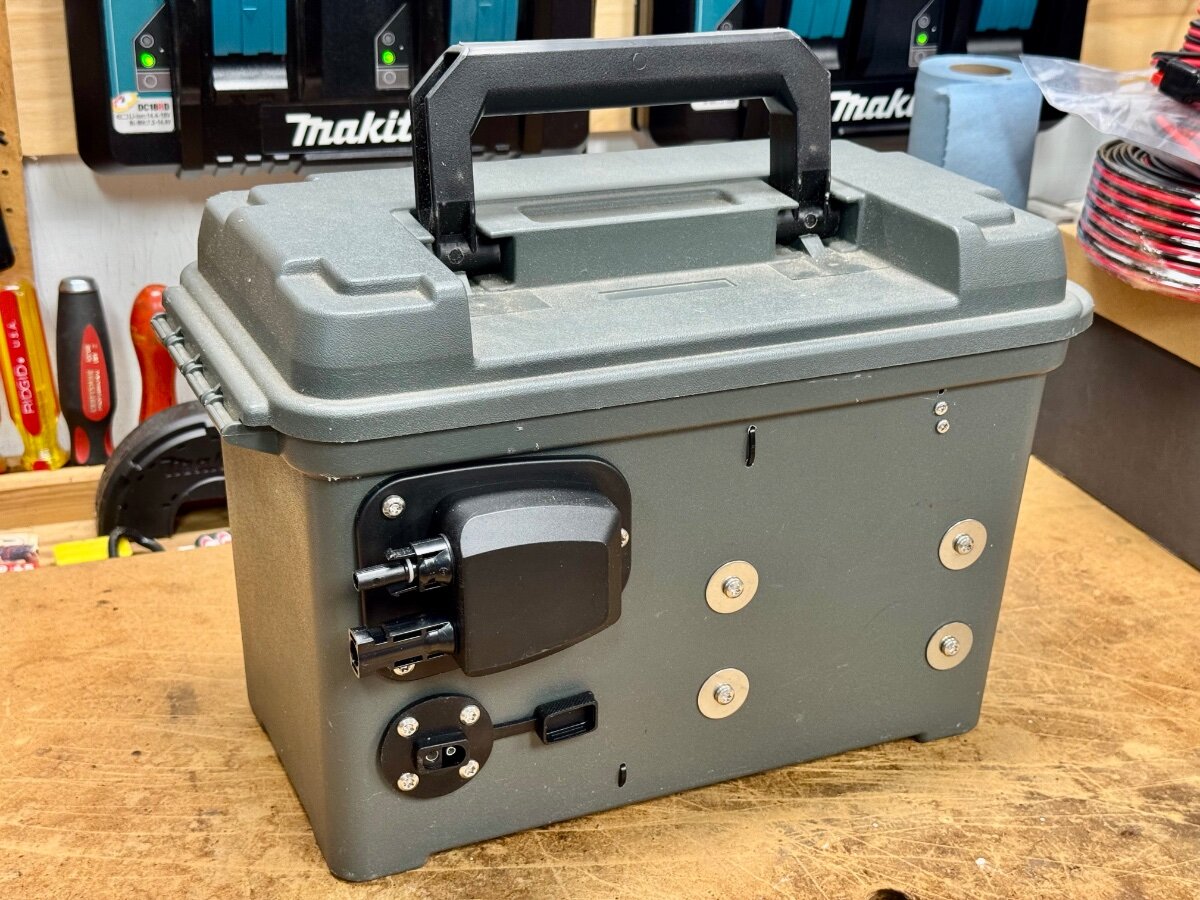
Prompted by similar posts on the Facebook groups and here on the Oliver forum, I finally assembled my portable solar kit. I’ve had a Bluetti 200W solar panel (which does not have an integrated charge controller) for several years to help keep the EB70 in my truck charged up. I added a second after we got the Oliver, as well as a Vicrton MPPT 100/20 charge controller. My original intention was to interrupt the line between the solar port and the battery. But I really didn’t want to do something that invasive. So instead, like many owners before me, I built a suitcase case to supplement my suitcase panels. A Cabela’s plastic ammo box works great to mount the charge controller, an SAE solar port, and an MC4 PV port. It also holds the 10 gauge SAE and 30’ 10 gauge MC4 cables, inline fuse, polarity reverser, and MC4 tools. All in a handy box. This will be handy next weekend, when we leave for a ten day trip to New York’s Adirondack area at Fish Creek Pond. There are camp sites all around the lake; every one a waterfront spot. But no hookups and lots of trees. So hopefully 800W of solar panels will keep us well charged.

-
- 5
-

-

-

Legacy Elite II with 3000w Inverter - Generator Setup
Rolind replied to EurekaJ's topic in Mechanical & Technical Tips
I think your process is great. I usually don’t turn off the main ac breaker prior to starting the generator, but maybe it is best to do so. Eco mode is also fine if you are not running the air conditioning. Lastly, if you should lose or misplace your neutral grounding plug, you can still use the generator to power the trailer if you switch the ems to bypass mode. I usually use the grounding plug but have misplaced mine on occasion. I also change the xantrex breaker rating to 15 amps. I remember that the xantrex will trip the overload on the generator if the batteries are significantly discharged and the breaker rating is set higher. We have the larger lithium bank, not sure if the smaller bank would also trip the overload. -

Northwest parks late summer, early fall
Mike and Carol replied to Dennis and Melissa's topic in General Discussion
We visited TRNP and Glacier NP (Two Medicine) in September (2019). Weather in ND was warm during the day and nice and cool at night. Lots of sun. At Glacier, weather was cool during the day and cooler at night. Very little sun, I had to run the generator at Glacier a couple times since there was not much solar activity going on. Two Medicine is a pretty dramatic site, mountains all around. Camping at TRNP, lots of blue skies. There were also lots of Bison wandering around the campground. At Two Medicine campground, GNP. No sun, cool damp weather. This park is a must see!! More Two Medicine…
-
I'm not much for out the window solutions in vehicles. Why not use the outdoor 110V outlet? We still have the included 50 ft wire and charger kit in the box. Over time and weather use of the long cord may become painful. It's nice to carry dish and battery and not worry about extending a cord and winding it up to leave. I just place the dish on an upside-down milk crate, always have a couple in the back of the truck. The battery solution can be expensive if purchasing outright, but we've had the DeWalt tools for years and I would not have had to buy more if one had not go bad last time out. Found an open-box 10 Ah 2-pack on eBay and these and a couple small ones will power up the Starlink and all the other tools we use. You also need the larger Ah for the leaf blower which cleans dirt-road dust of of the Oliver in seconds, clears debris from campsites and I use it every so often on outdoor rug. Nice to have! But I get it, the cable and 30V power adapter is in the kit, no additional expense, yes KISS! Best wishes, JD
-
 I see now in the pix that your trailer doesn't have solar on the roof. Sorry I forgot to look closely. Yes...you'll be good to go with new batteries that are being charged with 45A when plugged into shore power as a first step. Future: Rewiring for new Xantrex 3000 to run your A/C When you upgrade in the future to a Xantrex 3000 Inverter/Charger that you'll also likely be wanting to have some of the wiring swapped around to enable you to run the Air Conditioner off of the inverter and battery. In older units (Pre 2021) the Xantrex 2000W Inverter only unit, the AC inverter outputs are routed only to the Outlets of the trailer plus the Microwave outlet. The older units inverter is not wired to a breaker to feed the Air Conditioner circuit. In the day of AGM's it wasn't really a viable option to run AC off the inverter. Those wiring swaps will happen on installation of your new Inverter/Charger, and most changes happen on the back side of the PD4000 breaker box under the dinette. You'll also be needing to find a location for the new Xantrex 3000 display panel once the new Inv/Charger is in place. For future reference, here's a picture of the area under the street side bed where our Old Xantrex inverter was and the new Inverter/Charger was placed. It's the exact location of our hulls original Xantrex 2000 Inverter. We had to remove the old inverter and install a new carrier board for the new - larger size inverter. I could have gone with an Xantrex 3000 but did my design as a drop in replacement as opposed to a full upgrade for running the A/C off battery. Battery Box: You may or may not need to take out the battery tray. It depends on the height/size of the new batteries. In our upgrade we put in 2 - 315AH Lithionics and they fit in the tray with some spacers to take up extra space. Other folks that have upgraded to the larger form factor >400AH batteries have needed to remove the tray because the new batteries wouldn't fit the tray. Final Cable Cleanup: At the time that you do the upgrade of the Xantrex, you may want to consider cleaning up all the various wires that come into the battery box. This is what our 4 AGM cabling looked like at the factory. After cleaning up and adding buss bars you'll only have big battery connection cables left in the box. THIS is completely optional and not necessary but clearing out clutter makes troubleshooting on the road much easier. To clean up the mess of cables you would have all the grounds run to a single buss bar (under the street side bed) and then just one ground cable to the battery box. Likewise for the + 12V cables (red) that run out to the battery box. Good luck on your journey to Lithium. CS
-
Just a quick update on this project: Only four owners have requested assistance in getting one of these numbered plaques. We know that two of these were not in the original box that Oliver received from the supplier. One of these was removed by the previous owner to keep as a memento of the years that they had the Oliver. And, the last one is still being investigated. We are also in the process of investigating at least two different avenues of having these plaques produced at prices that are somewhat below what has already been quoted. Further details as we progress. Bill
-
We also have a Honda EU2200 in the bed of our F-150. When we need the generator, I remove it from the truck. It sets on the ground outside of our trailer or truck for "Just in Case" bad things that happen. Having it run in your TV or Tongue Box has several problems. One is that up front you have no line of sight to see a fire. At least if you put the generator on the ground and to the street side, if it cooks off, you have a chance of seeing the fire ball directly. Now I have never heard of a Honda generator "Self-Immolating"..... but if ours does, we will not be exiting the trailer about 4 feet from the fire. With it on the street side we at least could have an opportunity to see the fire ball and exit the trailer on the curb side. I would then grab the cord and disconnect it from the generator. Then use our awning crank as a hook to move the burning generator away from our Ollie. Or it could just sit in a box in the box at the front of Ollie and maybe the auto fire extinguishing system will overcome the leaking gasoline fire. Or if you run it in the TV bed, and it has a "problem", you would have a great excuse to buy a new TV. But then, what are the odds? Maybe something to really think about I suspect. 🙂 Safety John
-
Our older Ollies have absorption based refrigerator systems. They have an open flame burner that drives the refrigeration process. If the system has a combustion issue, it will generate CO. If you have critters flying into the cabin via the refer vents, your box is no longer sealed properly. That could for sure put you and others at risk. Seriously recommend you: Replace your CO/Propane Detector if there is any doubt about it's age or in our case with these type of refrigerators if the detector is over 4 years old. Reseal the combustion area from the cabin area. Most of us use Foil Tape. Buy 3M foil tape. GJ
-
The Ramcharger appears to be a series hybrid which means that the onboard gas generator provides electricity to the batteries to drive the wheels when the drive battery charge goes below the predetermined lower threshold and stops discharging. This feature is great when you deplete your battery and then the generator kicks on to provide electricity. From what I understand the generator can only provide a diminished, set amount of electric to run the drivetrain. This is all fine for driving on flat land at moderate speed and not towing. But what about when you are towing up a significant incline and the battery has gone below its lower limit and the electricity output from the onboard generator is not enough to meet the heavy power demands of towing uphill? It appears the Ram engineers have thought of this and included a “Tow” mode which reserves a preset amount of battery reserve to be engaged along with the generator output in high demand situations. Good thinking. This is very similar to the “Mountain”mode in my Chevrolet Volt (which reserves electric for climbing when using the onboard gas generator. But, what if someone forgets to engage towing mode and depletes their battery before starting to climb a long steep grade while towing? If the Ramcharger behaves like my Volt in similar conditions, you can quickly reach a point where energy demand outpaces the capability of the onboard gas generator, forcing the vehicle into reduced propulsion mode. I know with my volt the accelerator response and power is greatly diminished, placing the car into a sort of enhanced limp mode. Will the Ramcharger do the same? Will the reduced propulsion mode on the Ram be enough energy to tow a heavy trailer up a grade slowly or at all? Will the tow vehicle come to a stop leaving you stranded on incline? Who will be first to test this out and report back? my point above is stated perhaps more clearly in this article, however it is still not clear whether the enhanced battery reserve is available in standard drive mode or only when the driver manually engages tow mode before heading out with a fully charged battery. https://insideevs.com/news/751670/ramcharger-battery-size-usa-towing/
-
Hopefully, these will be available in the US one of these days, or the shipping from the UK is reasonable. These would come in really handy for cleaning up some of the sloppy wiring we've all found. https://quickfixjb.co.uk/
-
- 4
-
-
-
We like the looks of the SeaBiscuit strange box. Yeah, a little pricey, but tempting. First major trip out - I lugged the Honda 2200eu (I think) along with us in the truck bed. Never used it once. I was thinking of the SeaBiscuit locking box for the generator - but figured it probably wouldn’t be worth the investment based on that non-usage. Our OEM Oliver storage basket is only used for picking up firewood when entering a CG, bag of garbage heading to the dump station, or staging my blocks, chocks, Andersen WD wrench, and San-T-flush hose. I never traveled with anything in it. Though I know it will likely reap howls of disapproval, I had been thinking that a locking SeaBiscuit box here would be a great place to have a -running- generator. Properly modified with large vents and fan for cooling and combustion air AND a suitable system for moving exhaust away from the trailer. Yeah, that’s the part that will make the hair stand up on the back of your head. That said, every generator-equipped motor home I’ve ever seen just routes the exhaust to the edge of the vehicle. Wonder if there’s any history of CO deaths for those guys. (Like I said guys - I’m not doing this - just brainstorming!) Of course, best practice is keep your running generator FAR from your RV. Unfortunately, the Honda generators seem to have “Steal Me!” stenciled on the side, so unless I’m sitting outside watching it - I’d never even be using it.
-
We stopped using a generator after we sold our Class-C. As you know, we have the Victron Multiplus II 12/3000/120-50. The numbers translate to 12VDC output / 3000 KVA inverter capacity / 120A max charge output / 50A max AC input (shore power/generator). I've had our charge output on the MP2 set to 50A ever since we installed ours last summer, and in our case we do not have a reason for faster charging. Specs for the 300AH Epoch Essentials show "recommended charge current" at 50A. Max charge current is 200A, so they could certainly take every bit of the 120A, but why is 50A recommended? Perhaps the lower charge is better for the life of the batteries. With 600AH we can go for days, a week or more off grid, assuming no use of A/C. Given the SW skies cloud up for awhile (rarely except when caused by chem-trails🙁), we can eventually get low on SOC. Under 50% is rare, but I do remember one trip it got down to 20% and the red warning light was on the Victron Connect app! (I set this to 20%.) What we did that time, and would do again whenever needed, is merely to stay one night somewhere with electric hook-ups. Plug into shore power and the MP2 is giving a full 50A to the batteries. At 20% SOC, down 80% on 600AH is 480AH to charge. Let's round up to 500AH (worse-case scenario). To re-coop this would take 10 hours to charge at a 50AH rate. We are going to check-in late afternoon say about 4PM, and even if you're the type to leave before the sun rises (not us!), you're going to be connected for 12-14 hours minimum. SOC is back to 100% HOURS before we would leave and we're good for another week. I much prefer this to carrying a generator and extra fuel. You like to camp summers in the SE, God bless ya, get hook-ups because if you're running your generator all day you will get ugly looks from me and many others! Generators rules at campgrounds are generally no use after 10PM and boondocking in the SE is rare where you could be far enough away from neighbors to run a noisy generator and even worse, the awfully noisy Dometic Penguin II! 🤣
-

Installing Pioneer Inverter AC
Treasure Coast Vault replied to Treasure Coast Vault's topic in Ollie Modifications
Good morning Folks. I have a friend who has a car lift in his Mancave at Treasure Coast Vault and we are going to use that to lift the units on and off. I am giving him the Dometic for his Race Car Trailer for installing the unit. I ordered a 2 wire Honeywell battery powered thermostat for the Gas Heater so that I can give him the control box for the Dometic. I am thinking the drain will prolly be abandoned.
-

Dexter Self Adjusting Brake - Fail
Jason Foster replied to Galway Girl's topic in Mechanical & Technical Tips
You could put it into a lock box like this one: https://seabiscuitmetaldesigns.com/product/oliver-box/?srsltid=AfmBOop13ZLOJ_IbQjuF2xEgcZK9V2oEiPxau77chyi0BNgynA5L8kEH -

Oliver Screen Door
Tony and Rhonda replied to Tony and Rhonda's topic in Mechanical & Technical Tips
Thanks for the responses. I've looked under the street side bed/seat and didn't see the big red switch. Don't remember seeing the Blue Sky box either. I'll take a picture of the under seat area next time I'm at the camper but perhaps it wasn't installed. The screen door is almost worthless as is. It would stop the cicadas flying around now but small bugs would come right in. I had my Four Wheel Camper in British Columbia one time and the mosquitoes were so bad you couldn't stand outside. I killed all the ones that followed me in and 15 minutes later the camper was full again. This cycled a couple times before I discovered the bugs were coming into the camper through the frig. vent. When they're hungry, they'll find any opening and our screen door has lots of openings! Not sure what I can do but I'll work on it next time I have it at my house. Thanks, Tony -
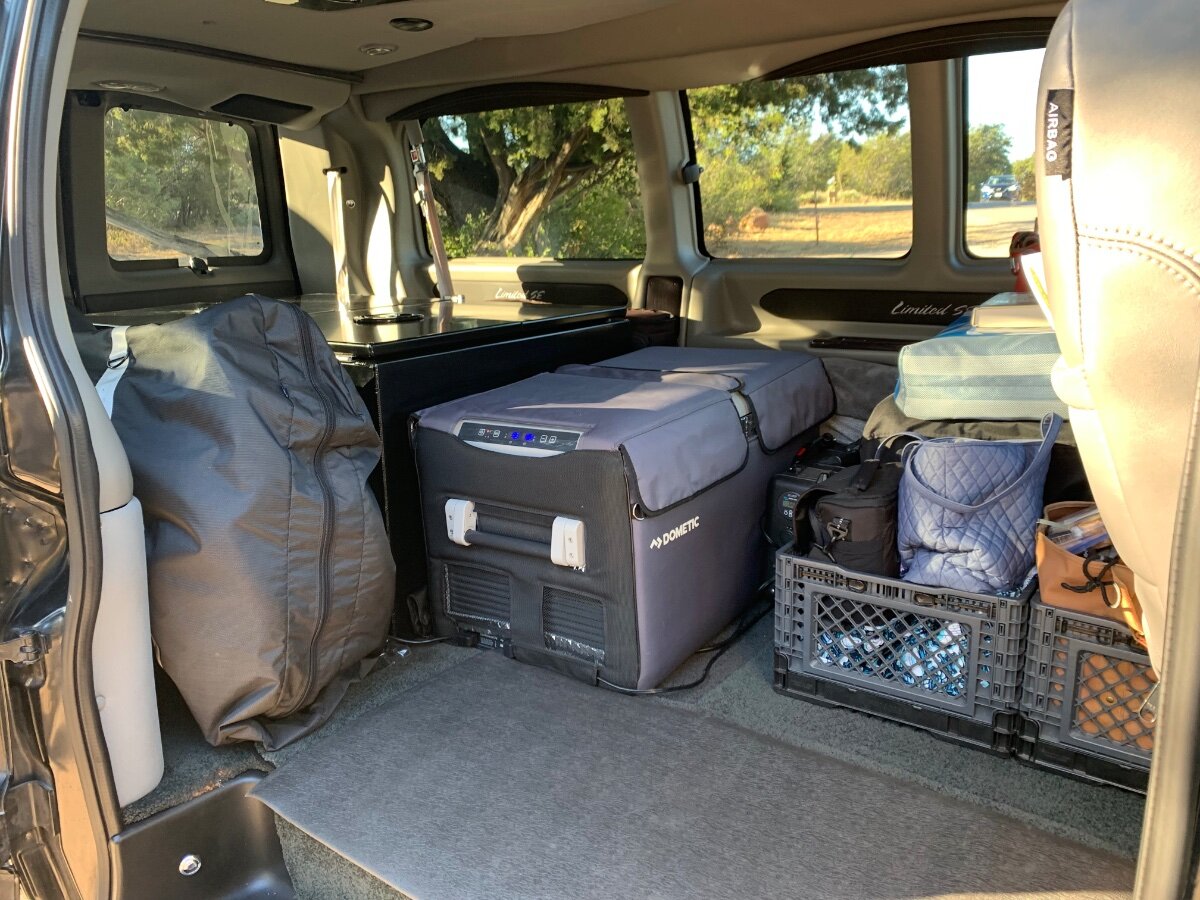
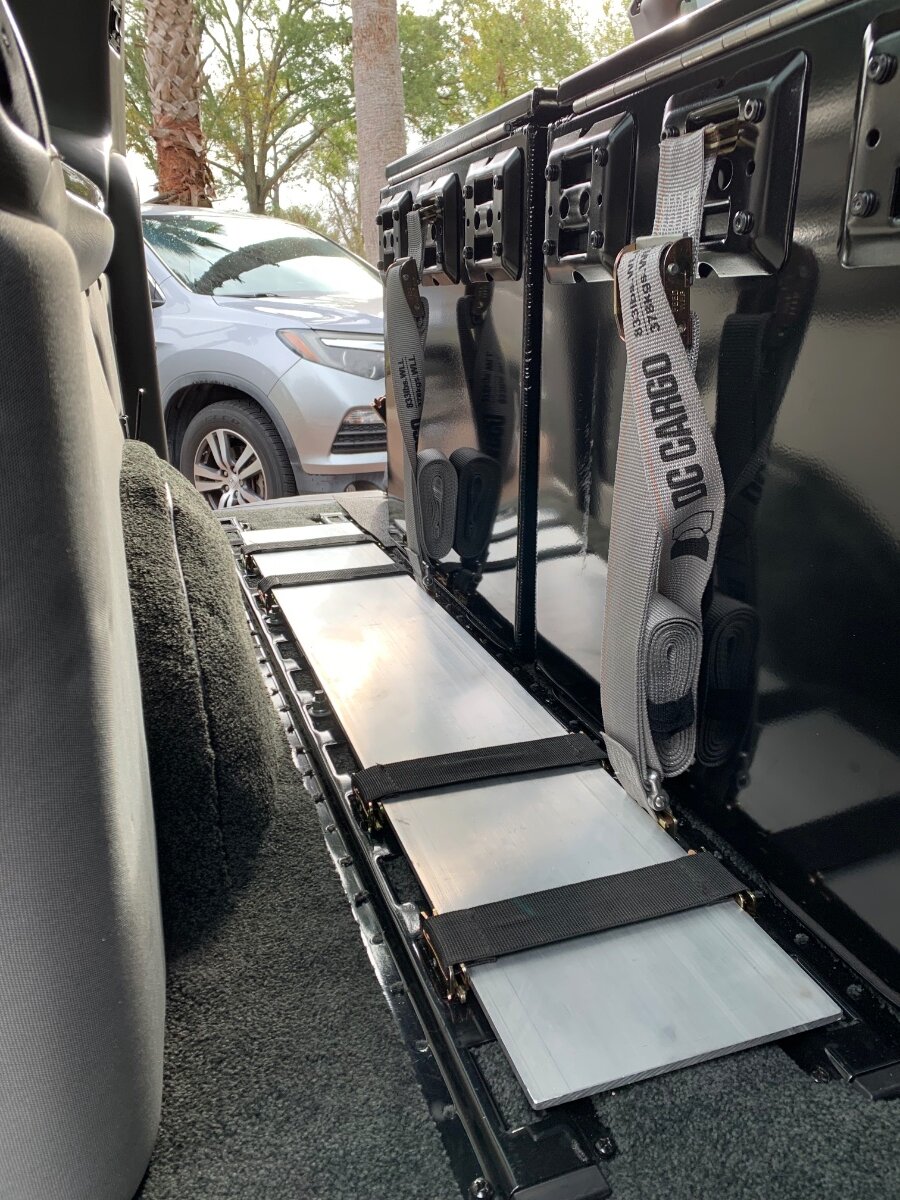
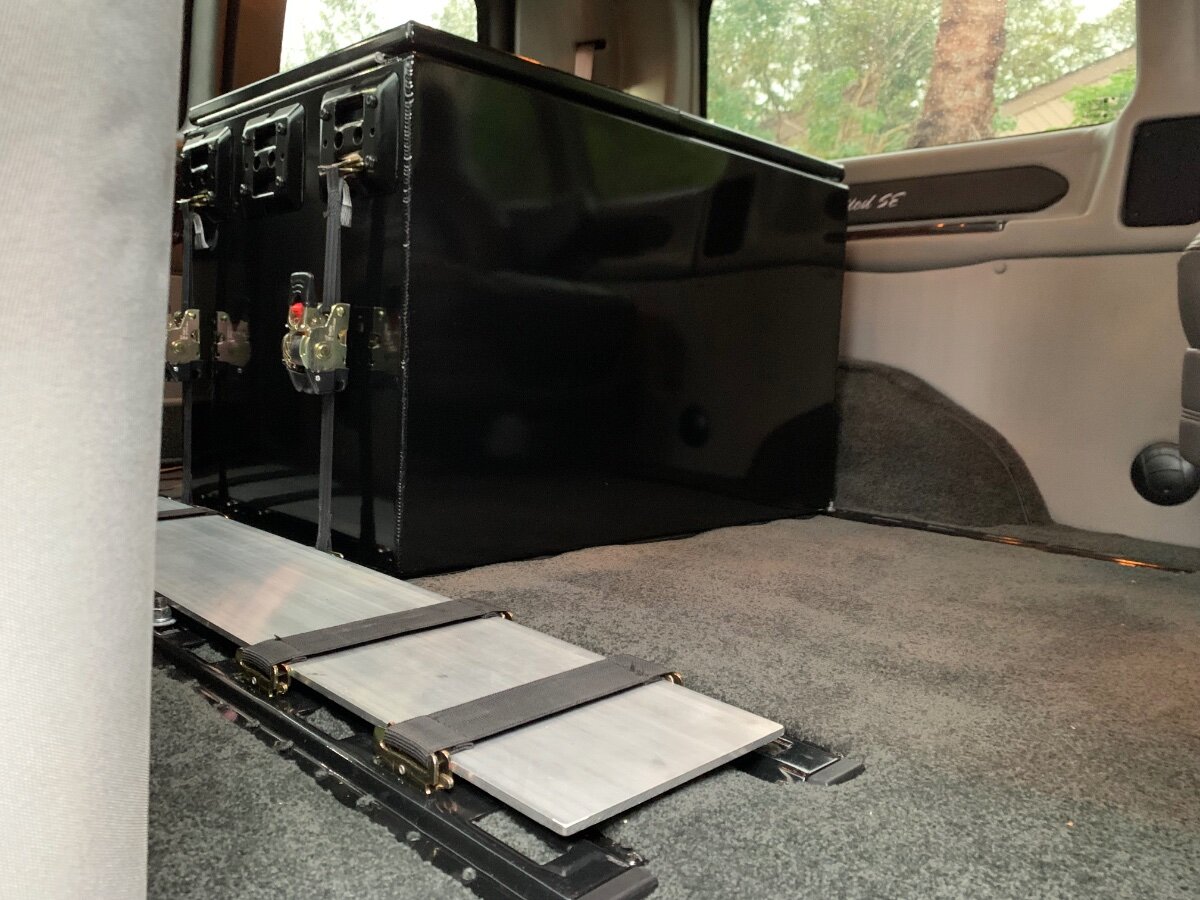
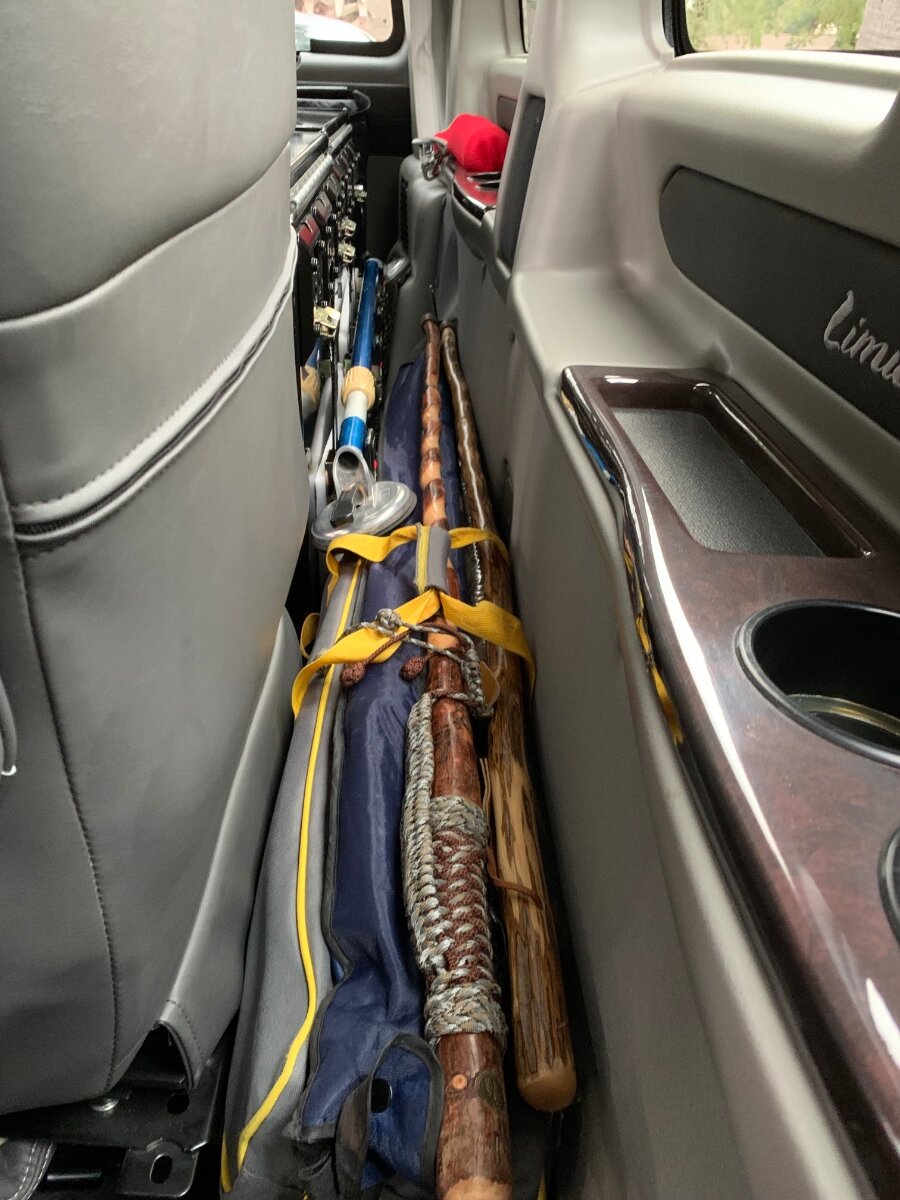
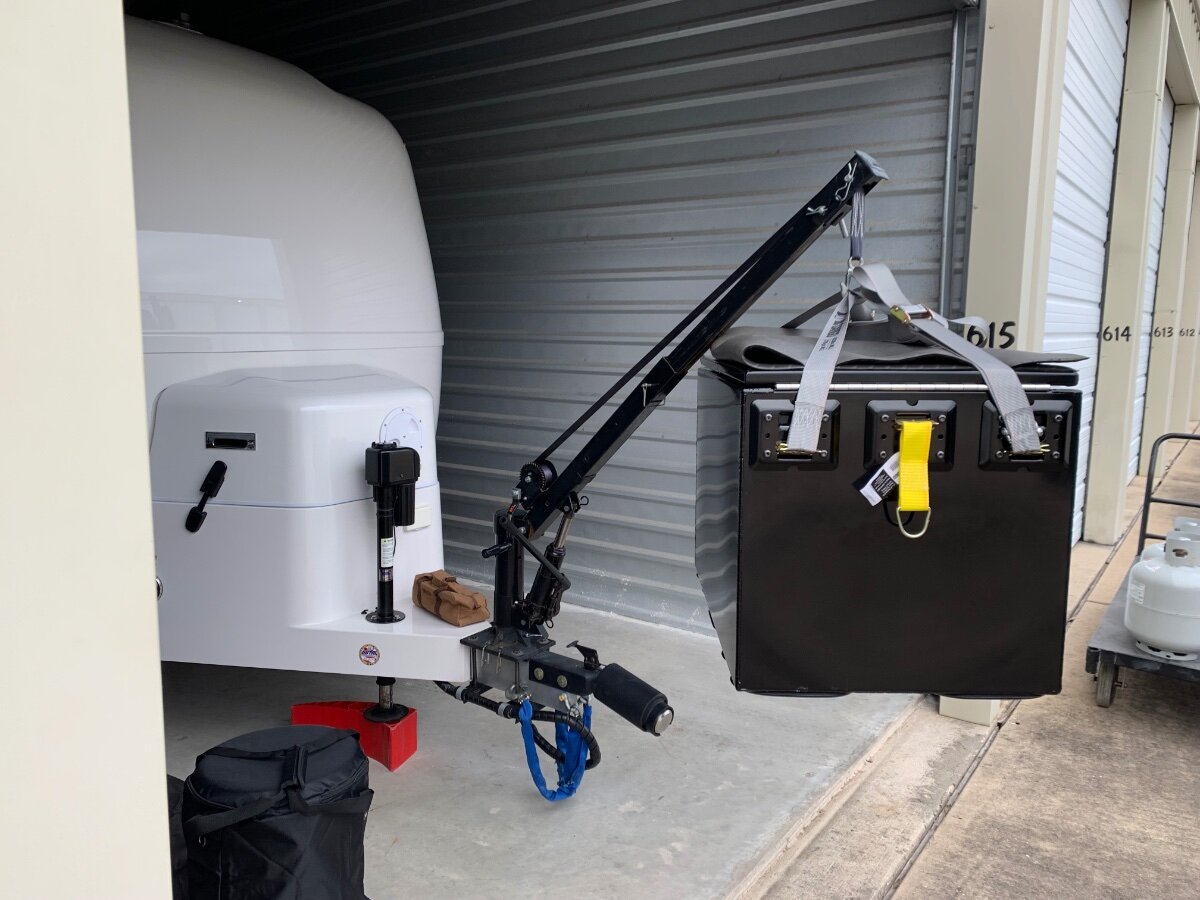
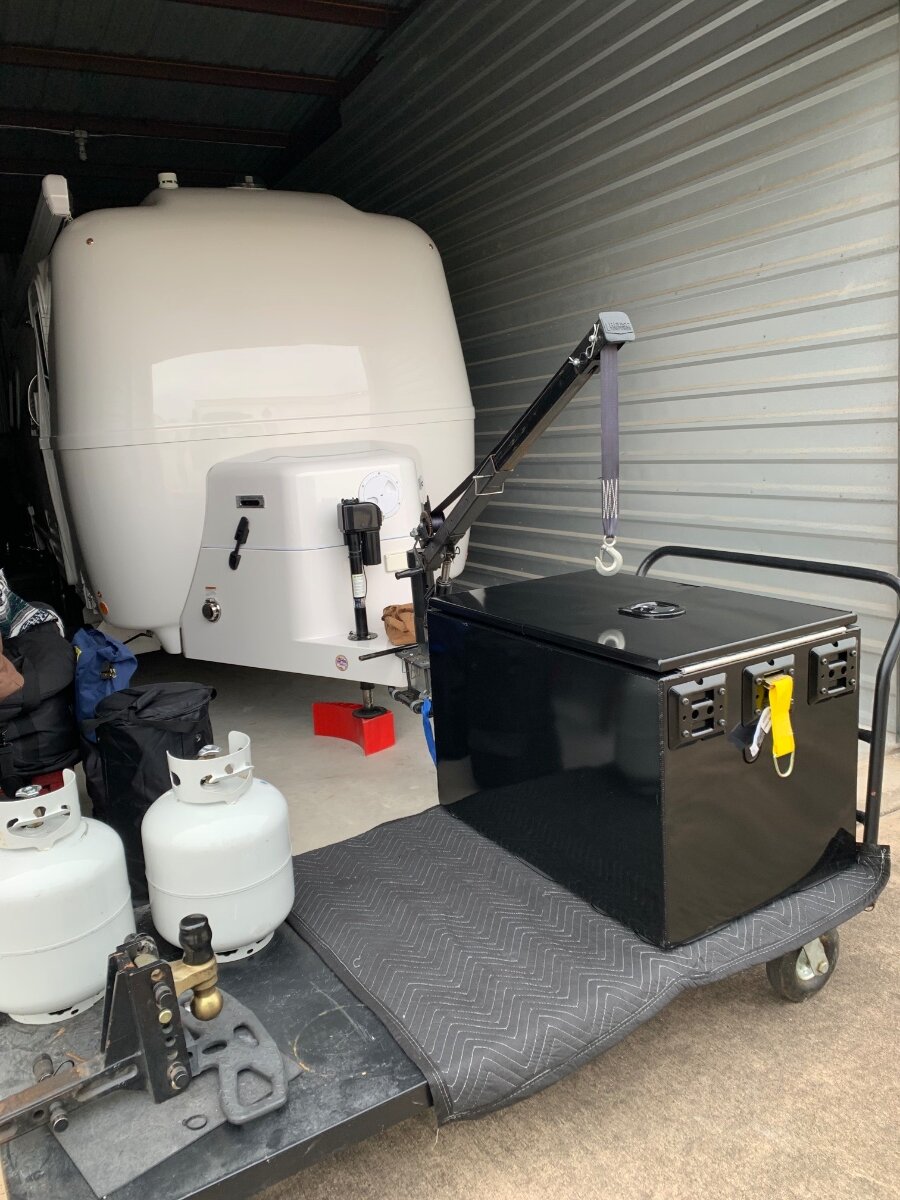
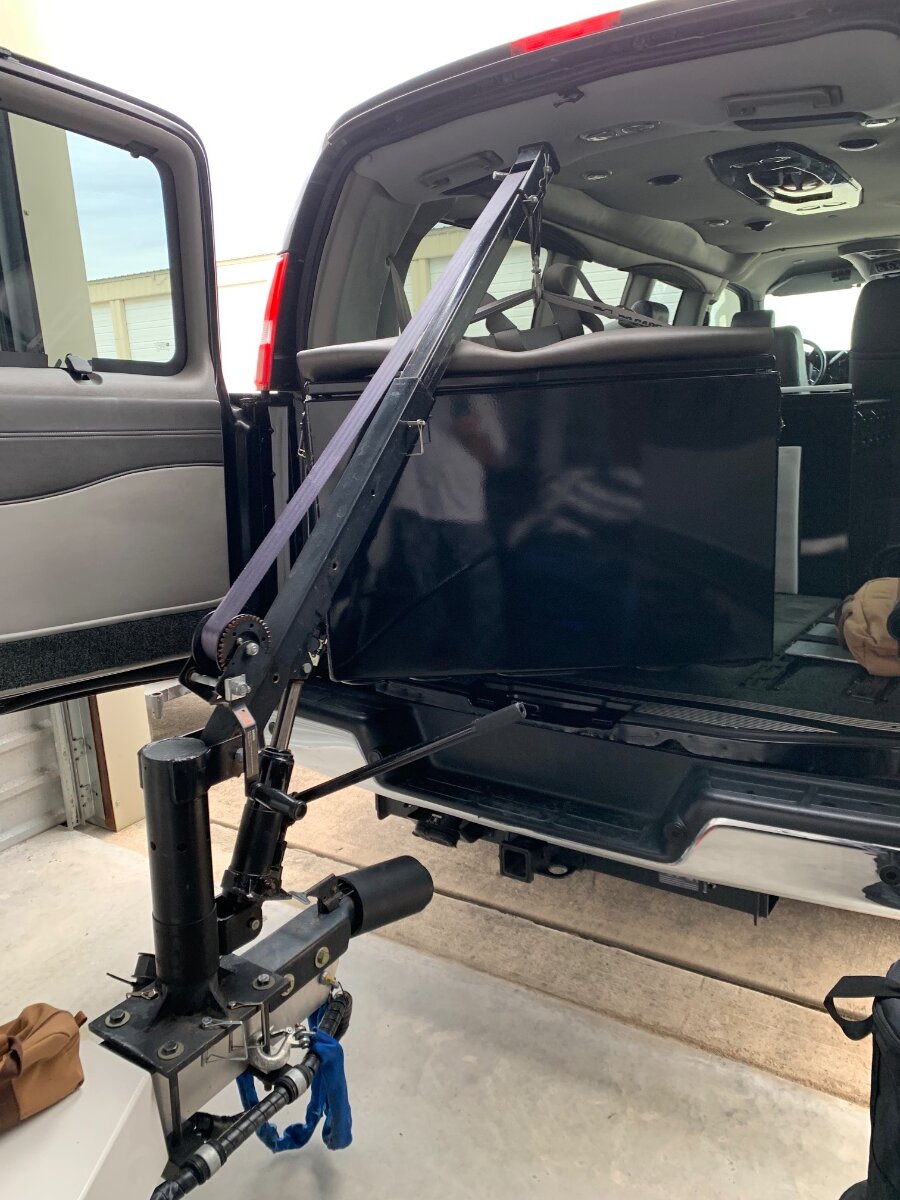
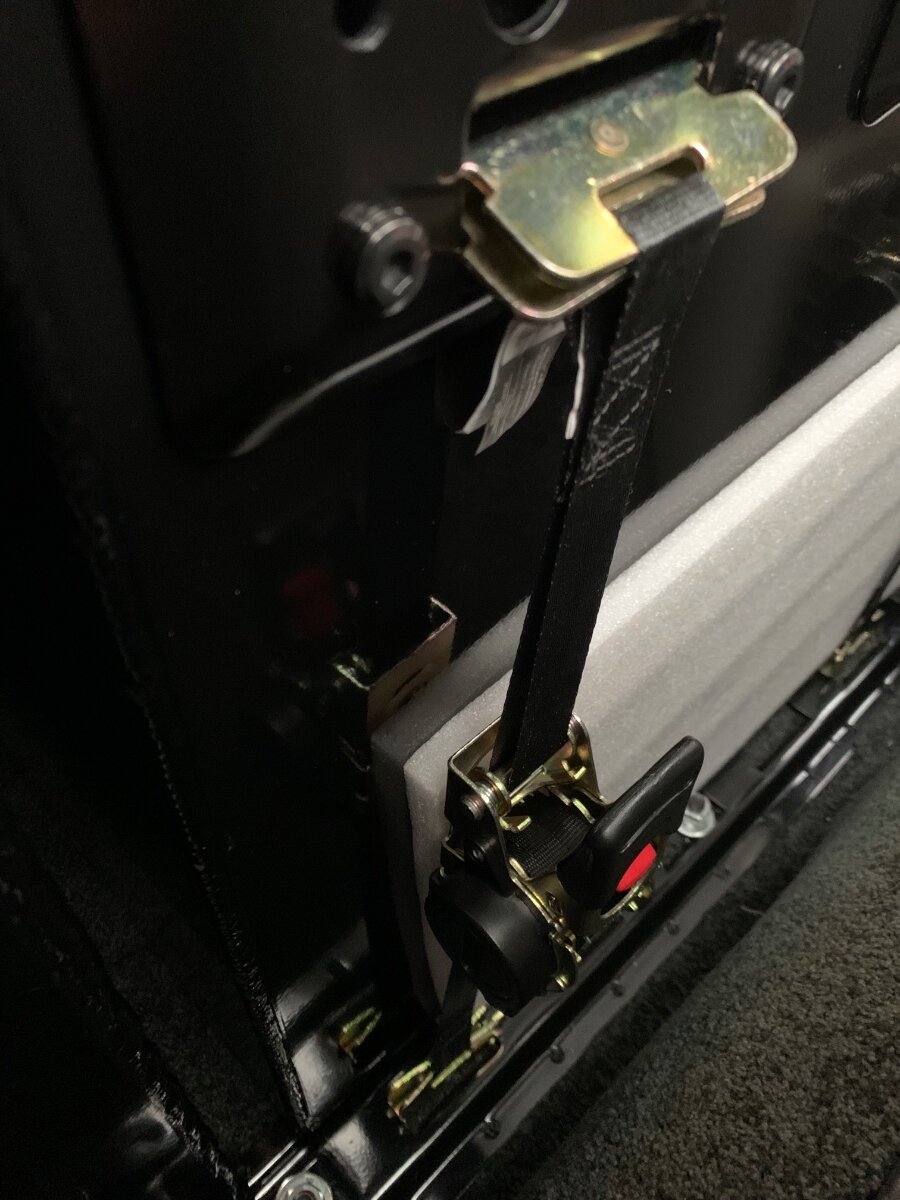
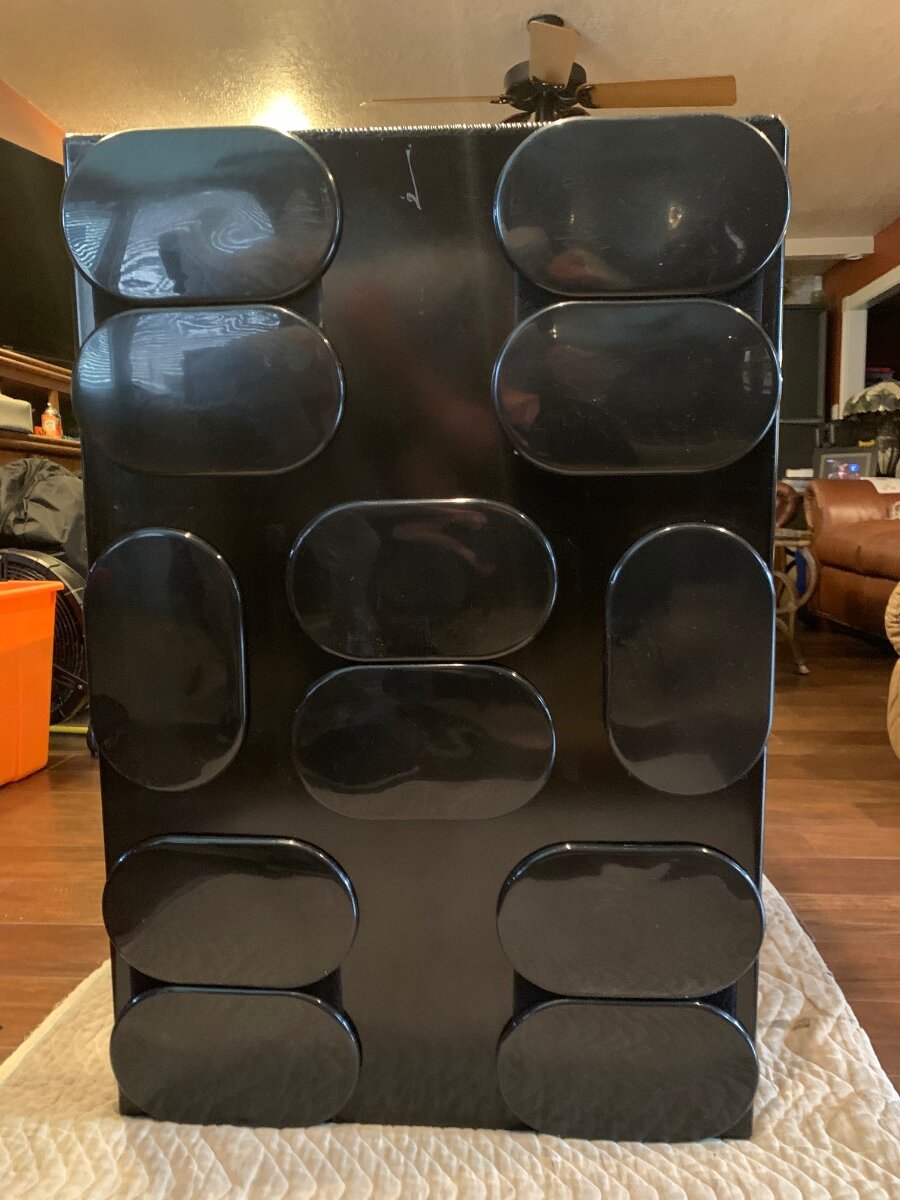
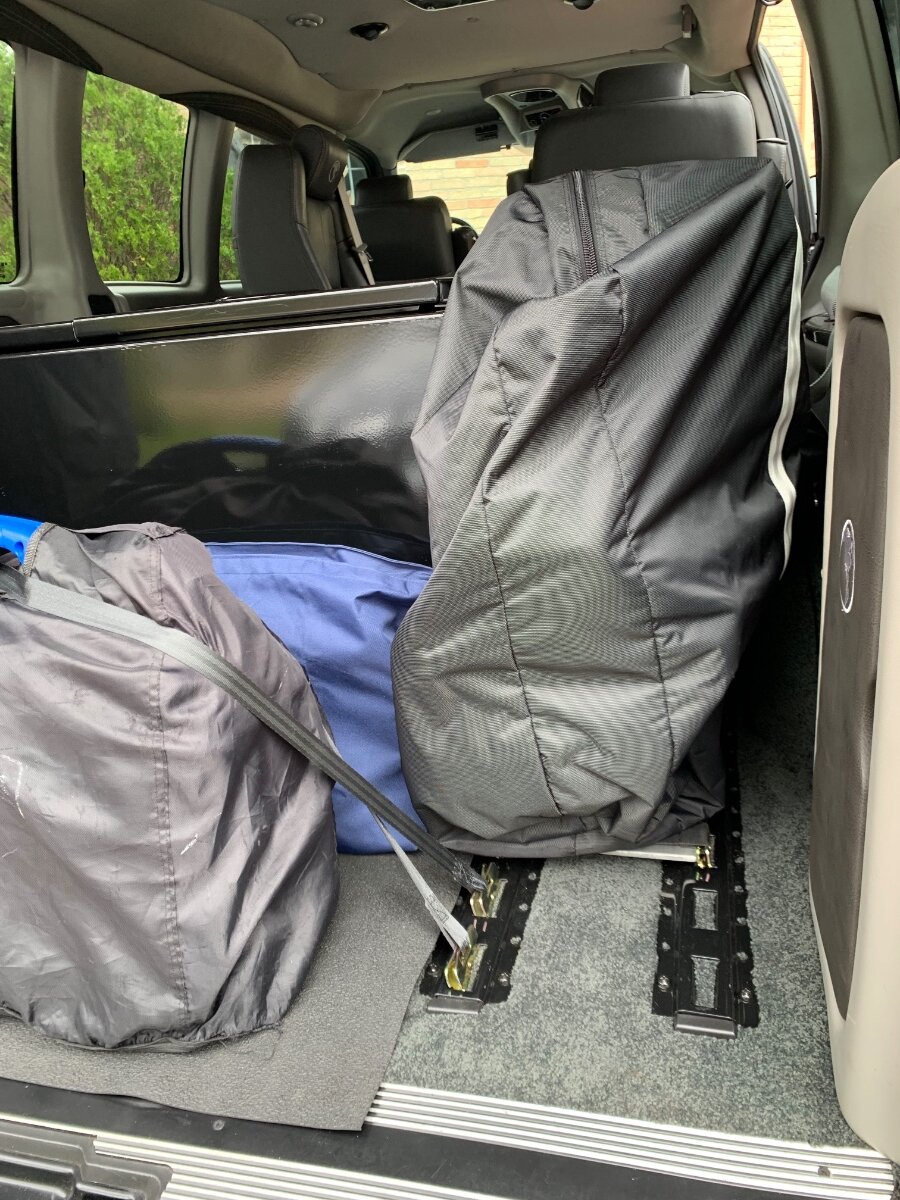
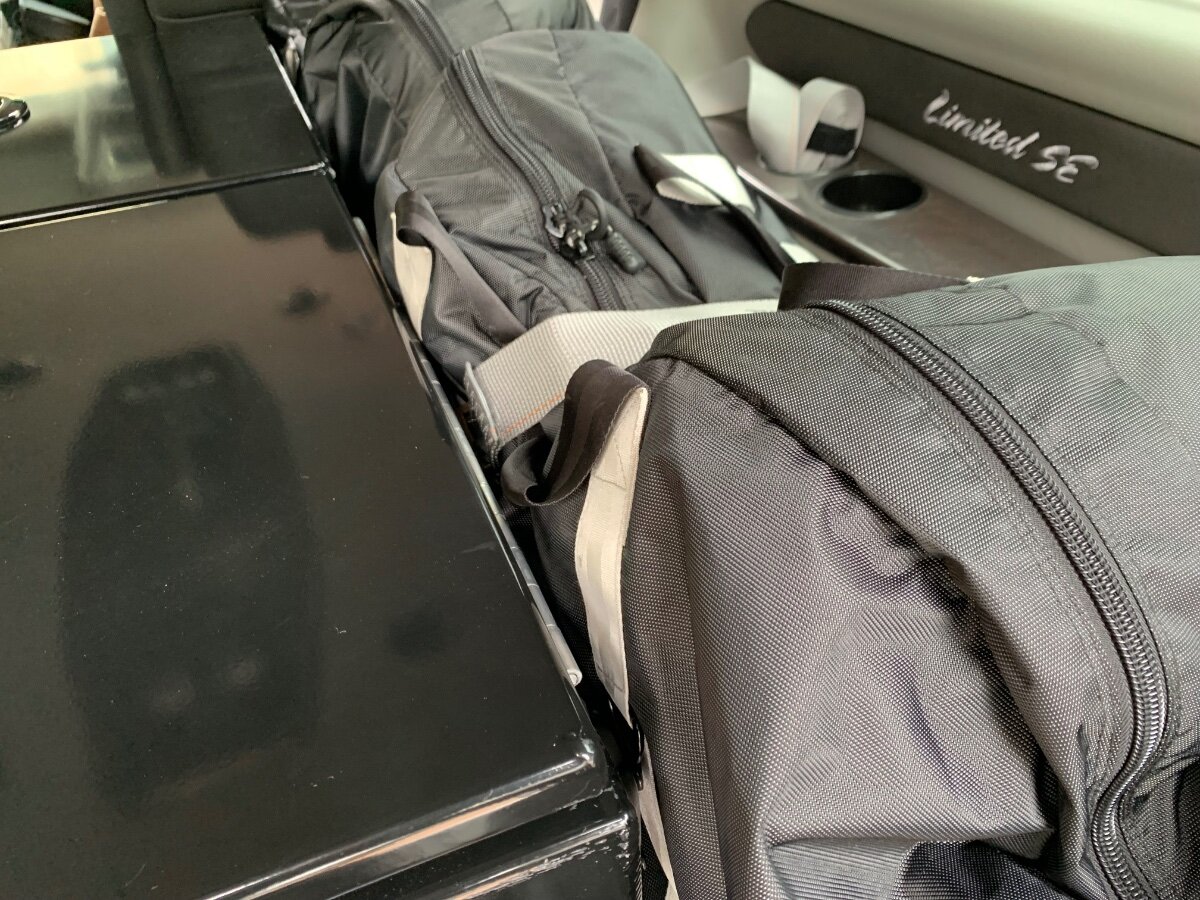
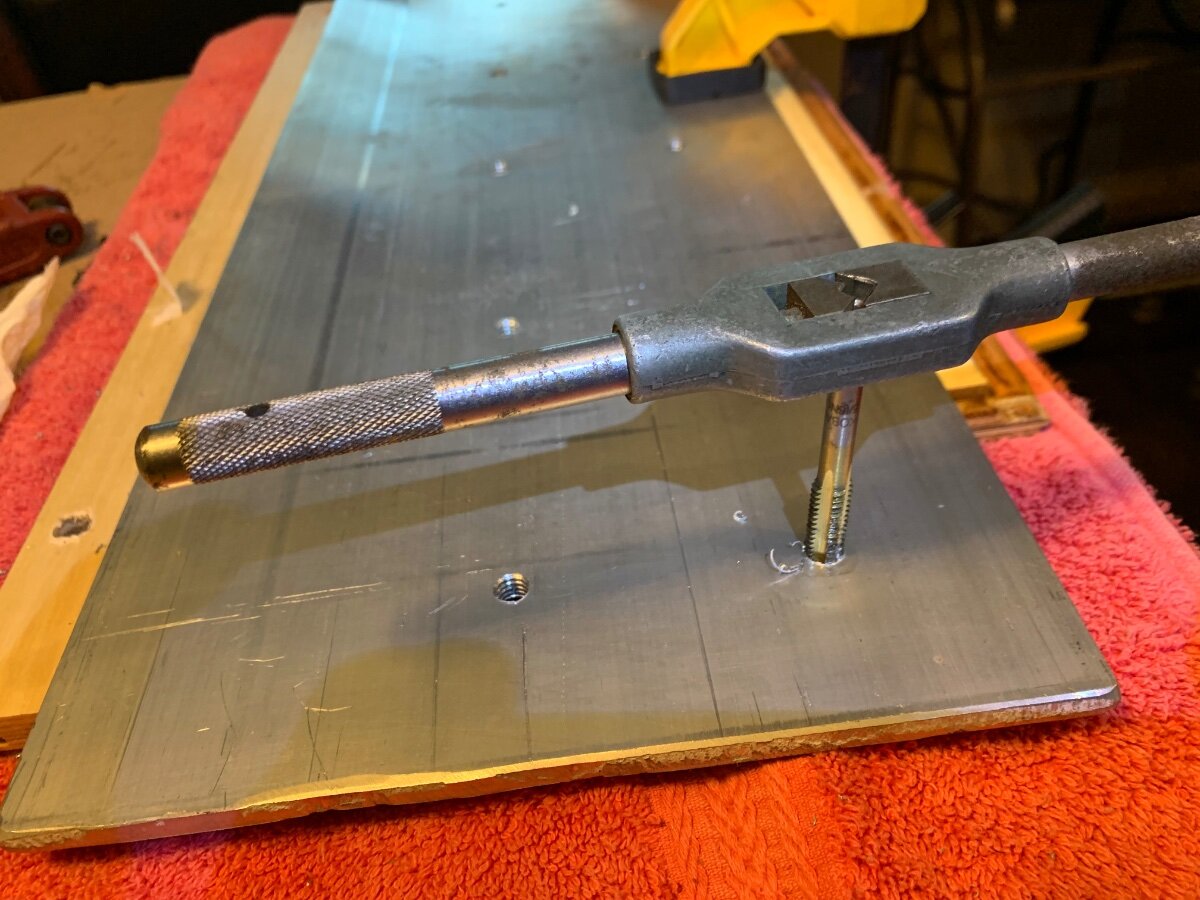
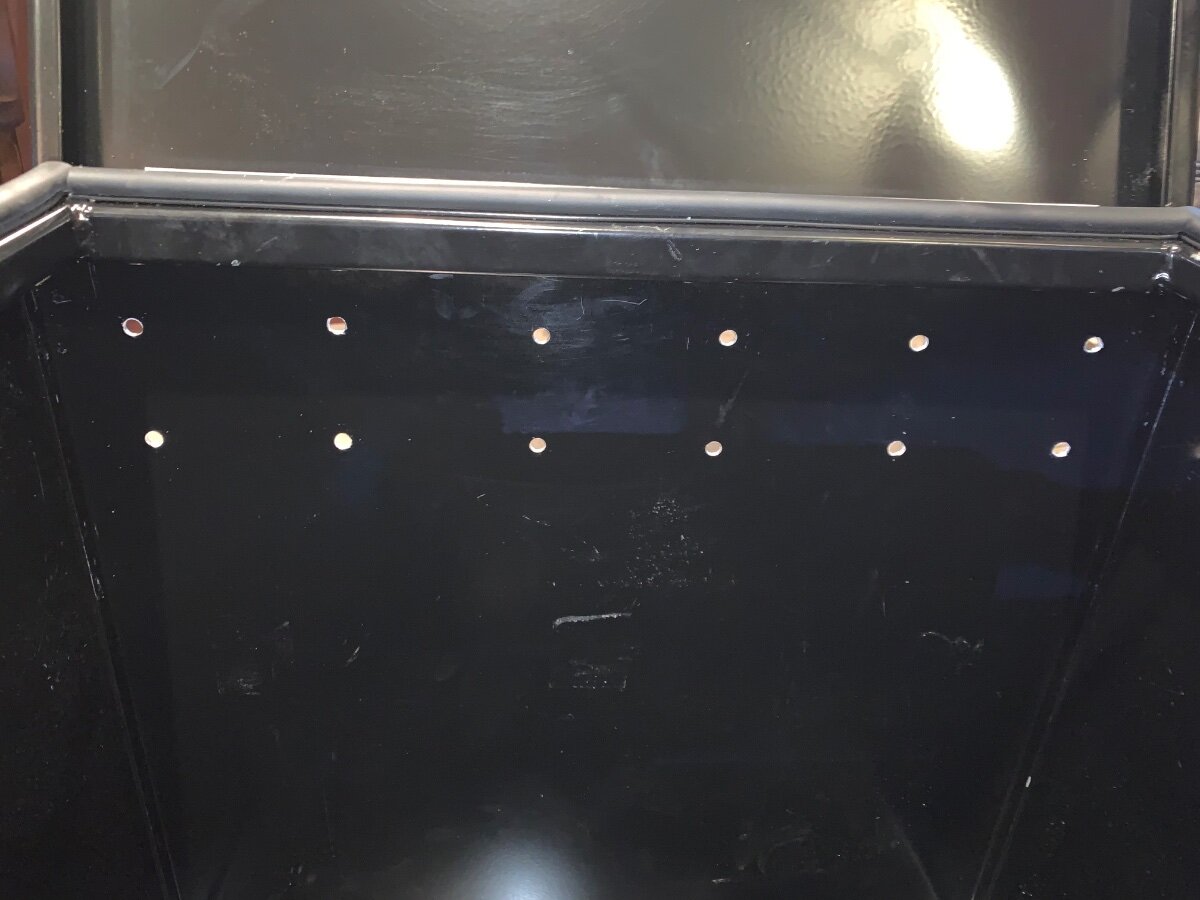
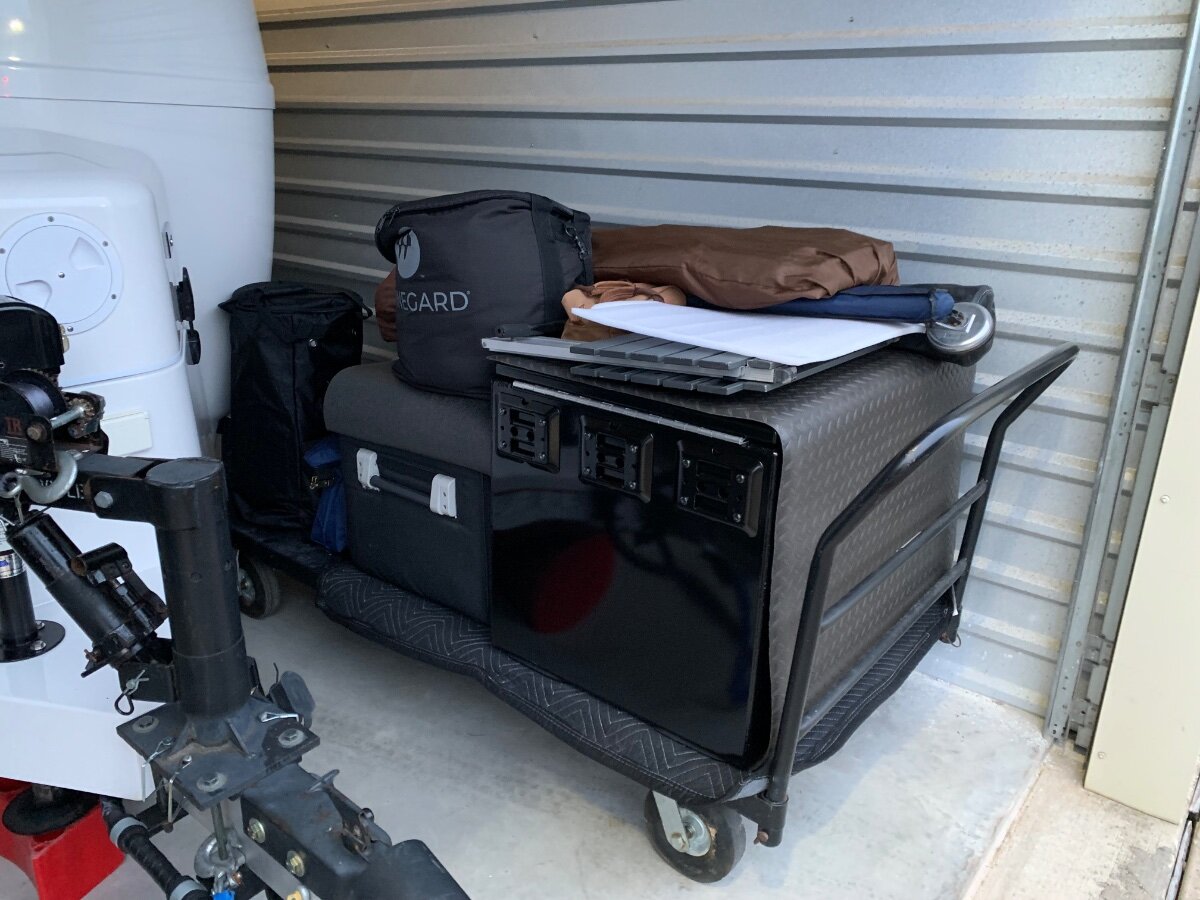
When towing with a truck, the majority of ‘stuff’ brought along on a camping trip or road adventure is conveniently stowed within the various holds of the Oliver and bed of the TV. However, even though my former crew cab Silverado 1500 had a storage box under the rear seat, it was mostly used to accommodate service tools and supplies for the truck and thus, found myself utilizing the rear floorboards and seat as additional cargo space when traveling. There’s peace of mind knowing cargo carried in the bed of a truck is adequately secured, not so much for that behind the front seats! All one needs is something going on from behind when something tragic is happening up front, no bueno! We’re required to wear seatbelts for good reason, proper securement of vehicle interior cargo should be of equal importance. I would be interested in learning how owners with trucks/SUVs safely carry their cargo within. My awareness of cargo securement was heightened recently with acquisition of a converted cargo work van as my TV; specifics are detailed in a forum post last October under ‘Towing an Oliver’ and titled ‘2019 GMC Savana 2500 Cargo Van’, if interested. Unlike service utility work vans that generally have a partition or cargo net, along with containment shelves and boxes, to secure cargo and ensure personal safety; conversion and passenger vans are more designed for ‘people’ cargo. In the aforementioned forum post, I addressed cargo containment, but cargo securement was still under consideration. Here is what I did to address the subject matter: Maiden voyage to Texas Oliver Rally, Inks Lake SP; cargo contained, but not secured! DC CARGO E-Track system components were obtained via online purchases from Tractor Supply. Each of the Buyers Products boxes were fitted with six of these brackets, three at the top of each end. A 1/4” x 8” aluminum backing plate was used to attach and strengthen these mounts. Backing plate cut to size, holes drilled and tapped for mounting bolts. Containment boxes prepped for backing plate and E-Track bracket installation. Super Sliders affixed to bottom of containment boxes for ease of handling on interior carpet. Three E-Tract rails fastened to deck to accommodate securement straps. Aluminum plate at floor level is runway for folded e-bikes. This box was slid rearward once back box was removed for storage at COW Barn. It primarily contains items typically kept in the TV with additional storage space, as needed, a trunk per se. Ratchet straps best used for non-towing vehicle use. Box securement once e-bikes are deployed. Wider Cam straps best used for e-bikes and subsequent box securement when traveling. Rear box is for camping ‘stuff’, forward as a truck and more ‘stuff’. Driver’s side box securement using ratchet straps. View of e-bikes ready for ‘takeoff’ on runway! Cam strap securing e-bike. Ratchet straps for spare propane tank, generator and other needs. Items too long for the containment boxes are stowed behind at side panel. Oliver-mounted hoist used to transfer box at storage facility. TV moved forward to enable box positioning. Cam straps used for the lift. Containment box lowered onto platform cart. Liking the modular containment storage.
-

Dexter Self Adjusting Brake - Fail
ADKCamper replied to Galway Girl's topic in Mechanical & Technical Tips
I would really like a disc brake upgrade as well... installed Kodiak discs on my boat trailer and it really worked out well. The problem is I can't find a "nice" place to mount the electric-over-hydraulic controller. Several folks with Elite-2's have mounted them in the propane enclosure, but there's not enough room in my Elite-1 propane enclosure. I mocked it up with a modified cardboard cereal box and it just won't fit in there without removing one of the two 20-lb tanks. I think I could mount it on top of the fiberglass in front of the front tongue jack, but its pretty exposed there, looks kinda funny, and screams "come mess with me" to passing by ne'er do wells LOL. I could put it in some sort of tongue box, but that would interfere with lowering the TV tail gate all the way. -

Made in USA leaf springs
Geronimo John replied to Mountainman198's topic in Mechanical & Technical Tips
Now that is a bad-boy machine I could really enjoy! I would likely go for the endure street legal 350 version. In a younger day, I had a 400 Penton KTM and Husky CR400. Both were way too pippy on the torque band, and more than I could handle even then as a young beast. The new 350 would have plenty of power for what I'm likely to get into. If I wait too long then likely a 250! 😞 And a big box on the rear. I see both of these efforts in the future! Thanks for sharing. GJ
-
Hi Guys! I need your help... I am about to attempt a DC to DC installation on my setup, a 2020 Jeep Gladiator Rubicon and my 2021 Oliver Elite 1 (Hull #924). I need your guidance on how you routed the charging cables through the hull and then pull them back to the charger and the battery box. I have looked carefully but have not found an "easy" way to get the wires through the hull of the trailer. I was going to run the cables down the middle of the trailer in the recessed part of the hull and then somehow get them to the Victron Orion charger and then into the battery box for connection. I was hoping someone with much more experience could suggest the best way to route the cables on the trailer side with minimal drilling required. Thanks in advance! Carl
-

Legacy Elite II with 3000w Inverter - Generator Setup
ScubaRx replied to EurekaJ's topic in Mechanical & Technical Tips
I agree with you. I never turn off the main 30 amp breaker prior to starting the generator. I can’t see any reason to do that as we don’t turn it off prior to plugging it into a power post. As far as misplacing or losing your bonding ground plug, I leave mine permanently in the generator. There’s no reason to remove it. If I were to remove mine, I wouldn’t be able to find it five minutes later much less on the next camping trip. -
We've been toting around the little Weber Q for years, long before we got our Oliver. I've gotten tired of this old grill, the folding side shelves, the rickety rolling stand. Recently, we became interested in the Napoleon PRO285-BK Grill. There are high-end models with built-in stands, but I thought they would be heavy and awkward to stow. It's a little bigger and heavier than the Q, but beats adding a second cooking device, like having a grill and a Brookstone (this has optional griddle inserts) and it offers indirect cooking, given the 2-burner design that cannot be had on a single-burner grill. List price is $329 plus tax (was $299 on Amazon last week, but not anymore). Then I found this company. I was a little skeptical at first, with their Chinese-like name (a Kansas Co, shipped from Hayes KS). And then when Trust Pilot and other online sources said good to OK things about them with a few years of history. I made the purchase last Sunday, they shipped Tuesday and we received it today in excellent condition, only a few scuffs on the box. You cannot beat this deal! Today the price is $228.65 but they do NOT charge shipping and NO sales tax! I paid $201.75 TOTAL last week, OMG. 🤣 Are you looking for a new grill? https://sansujyuku.com/product/napoleon-travelq-pro-285-sq-in-black-portable-liquid-propane-grill-pro285-bk/ We also purchased these extras. Leaving soon on a 5-week trip and can't wait to eat the food Chris cooks using our improved cooking equipment! https://www.amazon.com/dp/B00L6EMW0U/?th=1 https://www.amazon.com/dp/B077SLW6L4/?th=1
-
We just just spent a week at Bear Den CG just North of Spruce Pine, NC. ⭐️⭐️⭐️⭐️⭐️ with Hull# 634 which performed flawlessly. It was a well needed vacation post our blueberry harvest. We took time and spent a lot of time learning our Ollies systems- Love Love the Truma, long instant hot showers a win.I think it took like 6-8 seconds for us to have constant hot water at the kitchen sink and sink/shower. Microwave convection oven a must have for us. We were easily able to quickly cook/heat meals during a heavy storm one evening. Full hook ups allowed us to use our black and gray tanks seamlessly. The generator tray was extremely useful for a number of tasks. (We did not take our Honda generator this trip). Our AC kept us cool and cycled as it should. We did run the Dometic furnace on a cool 60 degree morning and it performed great. All in all a great safe week! A few photos....of our great State of North Carolina! 😊🇺🇸 Our Tundra CrewMax and it’s reliability delivered and performed outstanding. Check out Bear Den if your ever traveling the gorgeous elevations of the Blue Ridge Parkway. Happy Camping! Patriot
- 272 replies
-
- 14
-
-
-

Need a new Grill? A 2-burner Napoleon at an Amazing Price!
Steve and MA replied to jd1923's topic in General Discussion
Well, I put one of these grills in my shopping cart on the Sansujyuku webstore, but did not follow through due to the price fluctuations. Today I was contacted by another seller, GW Store, asking if I still wanted to order the grill. Sounded odd since I had never contacted GW before and didn't know who they were. They already had my shipping address and asked if I wanted to finish the order, at the regular retail price of $329. No thanks, I cancelled. JD, I know you're on the road. Did you save the box the grill was shipped in. It might be telling whether Sansujyuku shows as the sender, or someone else. A little research (below) reveals that Sansujyuku is likely to be a scammer. Though they do deliver to some customers, others have simply been cheated out of their money with no product delivered. You did receive your grill, but it could still be a scam. One of the tricks is for the scammer to set up fake ID credit card accounts, then they take your order and use their fake ID account to pay and have the product shipped to you from another vendor. The scammer gets your money. The actual product is effectively stolen; either the credit card company or the vendor that actually shipped the product takes the loss. I'm not saying that's the case with your purchase, but you know the old saying, if it sounds too good to be true.... https://www.trustpilot.com/review/sansujyuku.com -
New Epoch 300AH Essential Battery, all going well except…
ScubaRx replied to routlaw's topic in Mechanical & Technical Tips
Back when your trailer was built, they didn’t understand all the nuances of the solar system that I designed for them. The then “service manager” just couldn’t grasp the notion that all the negative wires had to go through the shunt first or the IPN Pro would not calculate the SOC properly. Most likely, the negatives from the solar controller and possibly the charger also, go directly to the negative terminal on the battery. There really should only be two wires coming out of the battery box. I moved everything else out of the box and onto some massive buss bars.