Leaderboard


Popular Content
Showing content with the highest reputation on 04/17/2018 in all areas
-
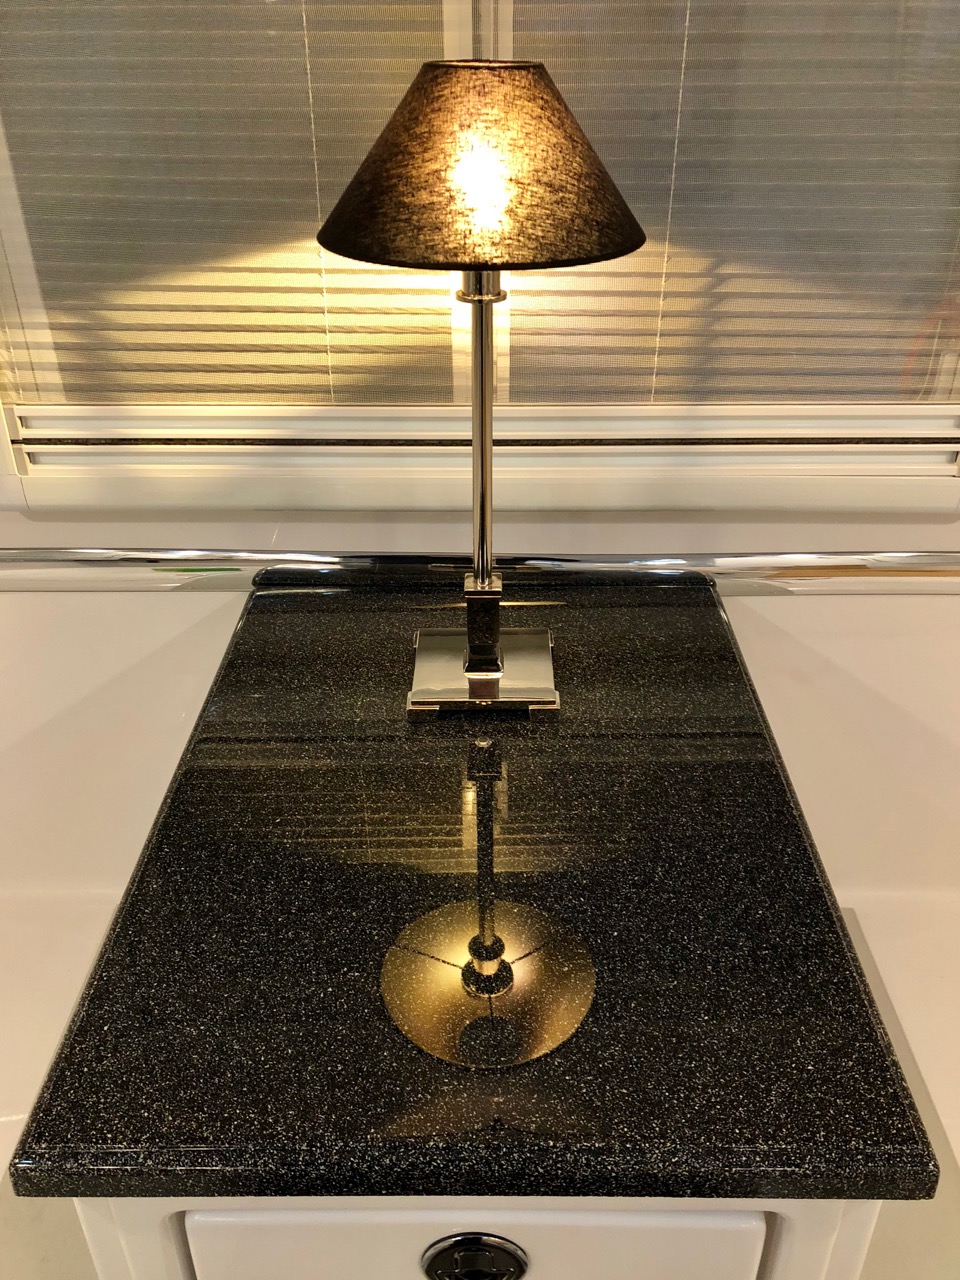
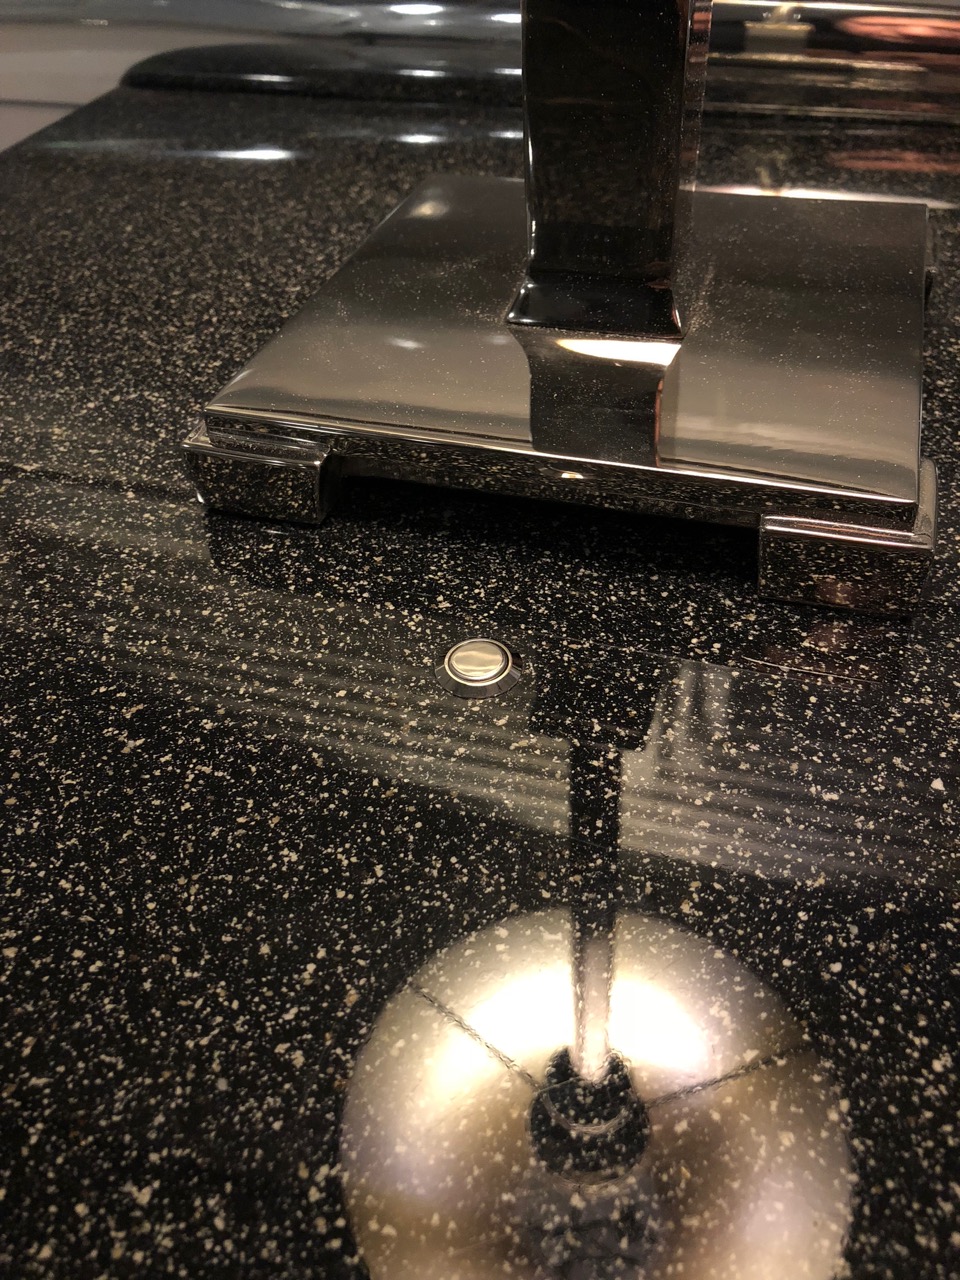
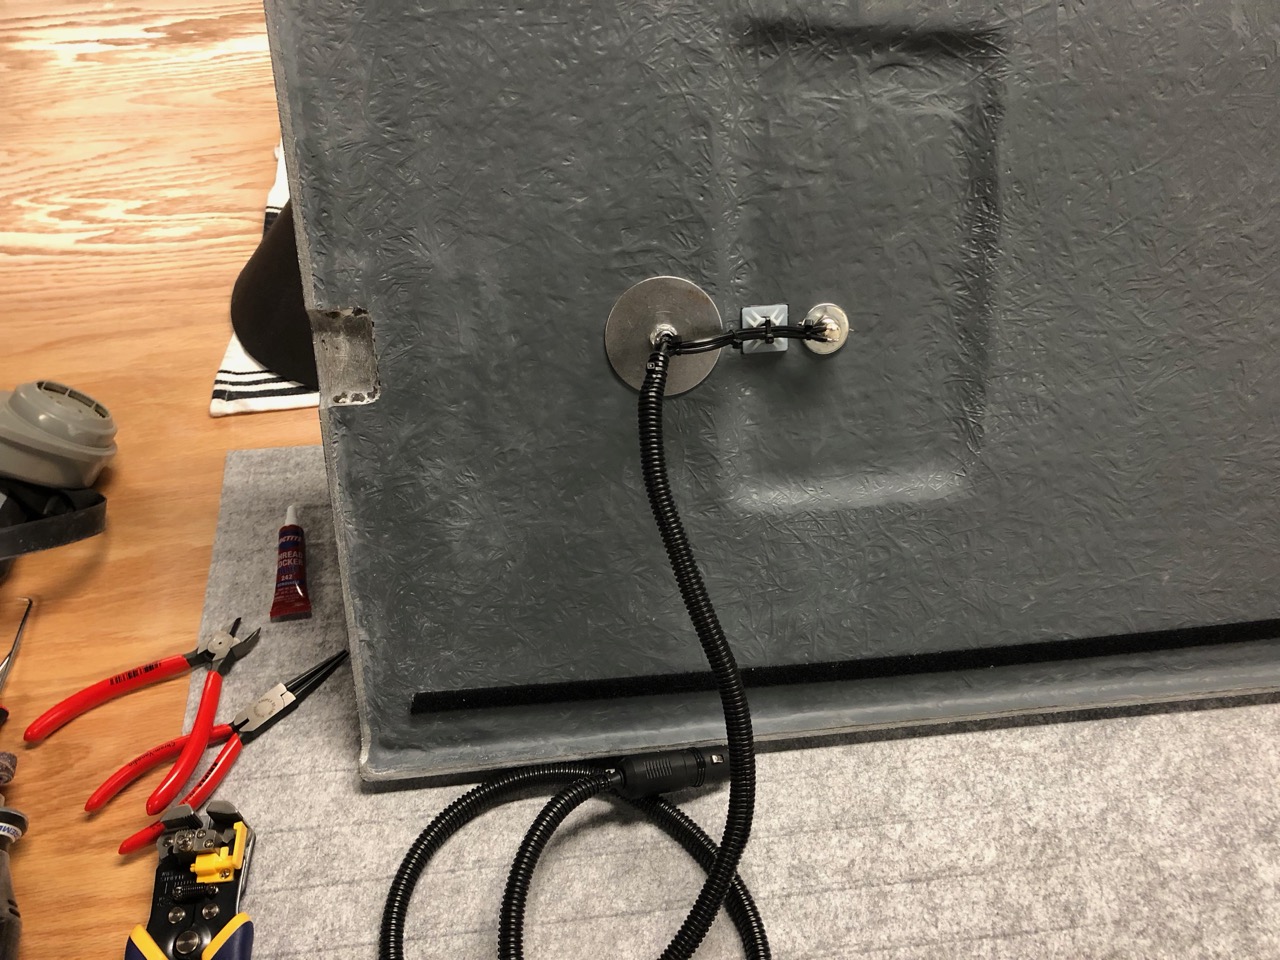
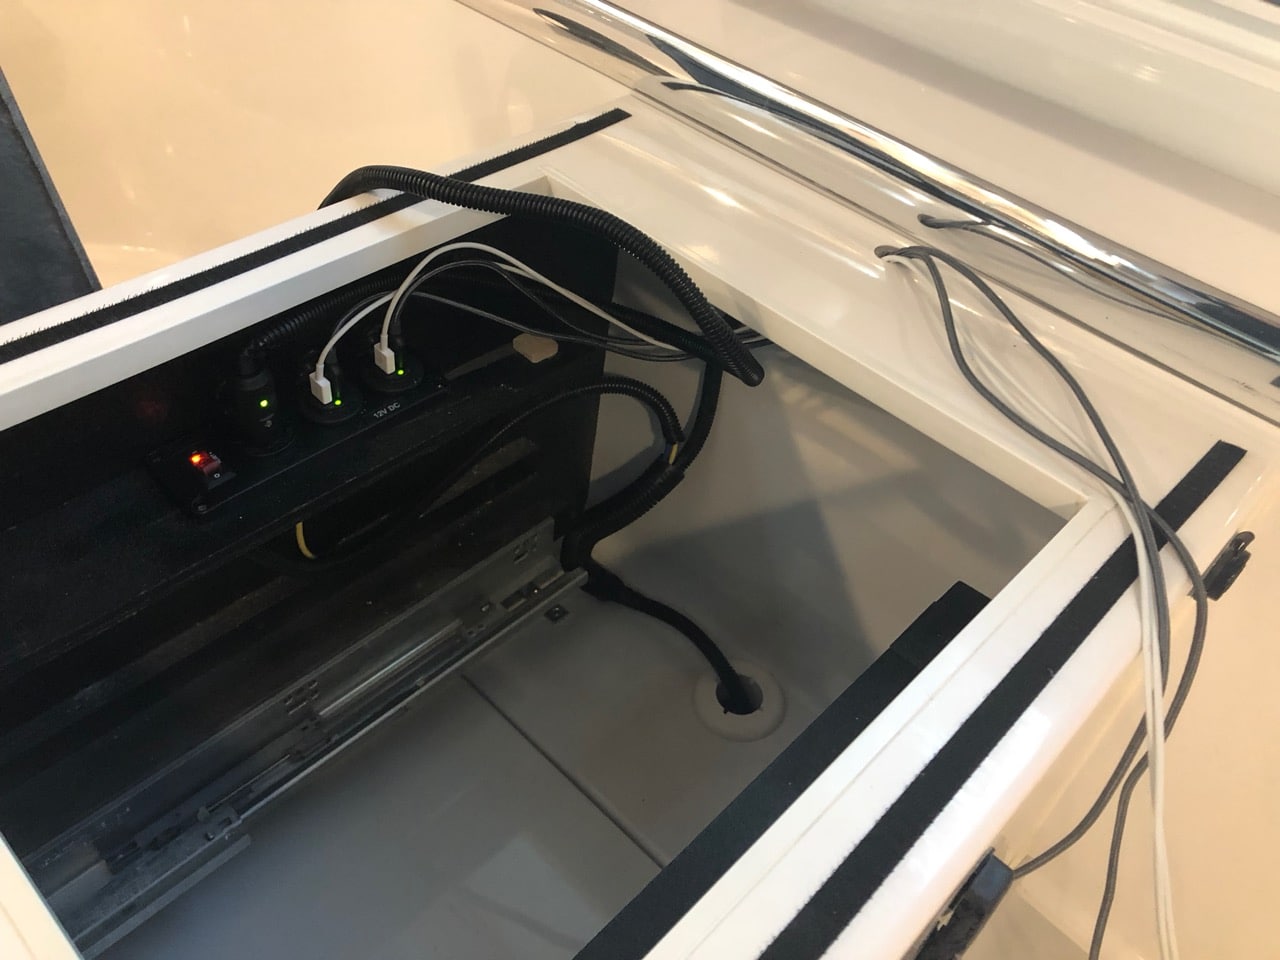
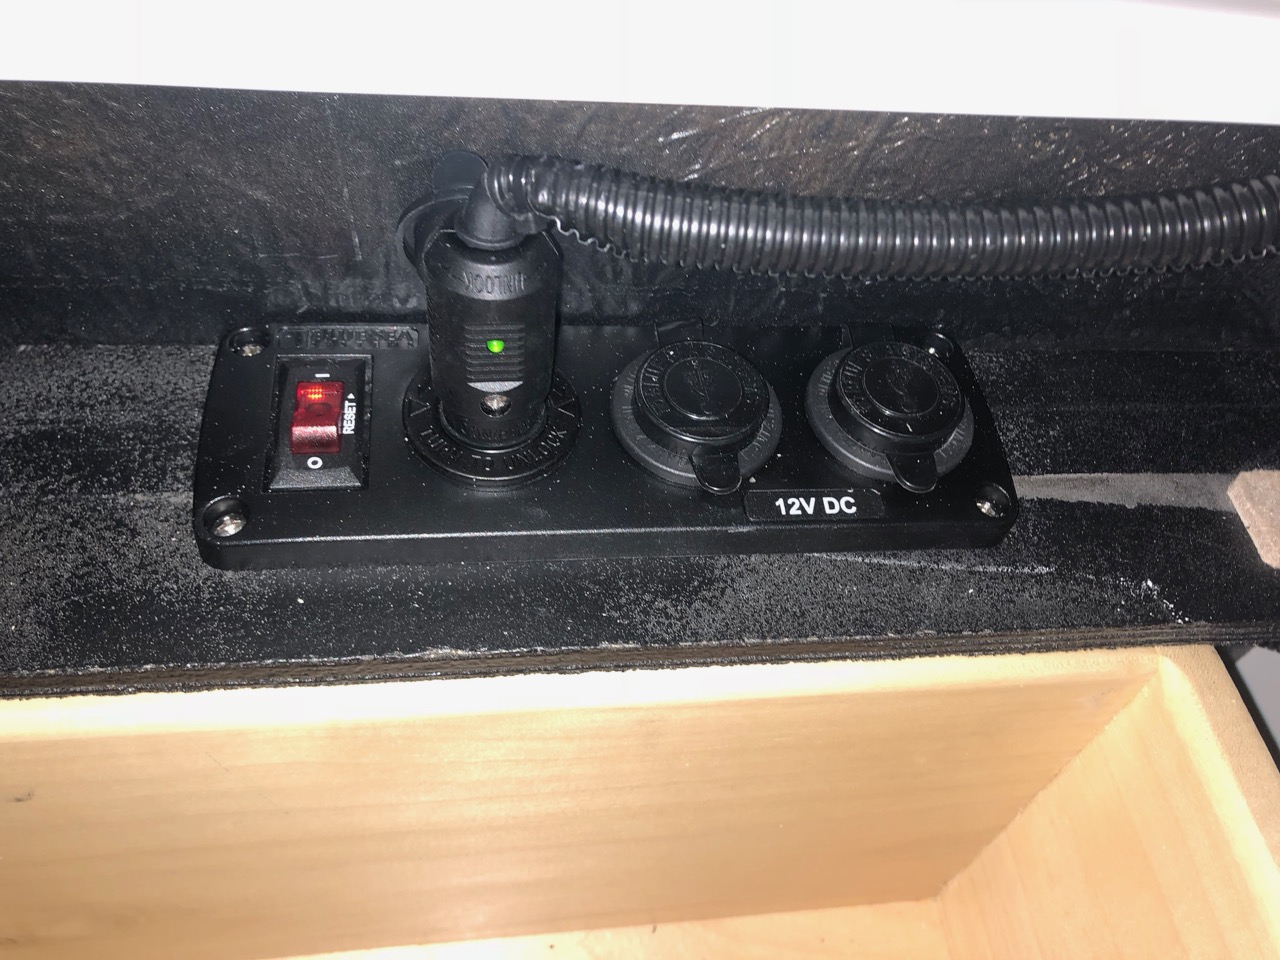
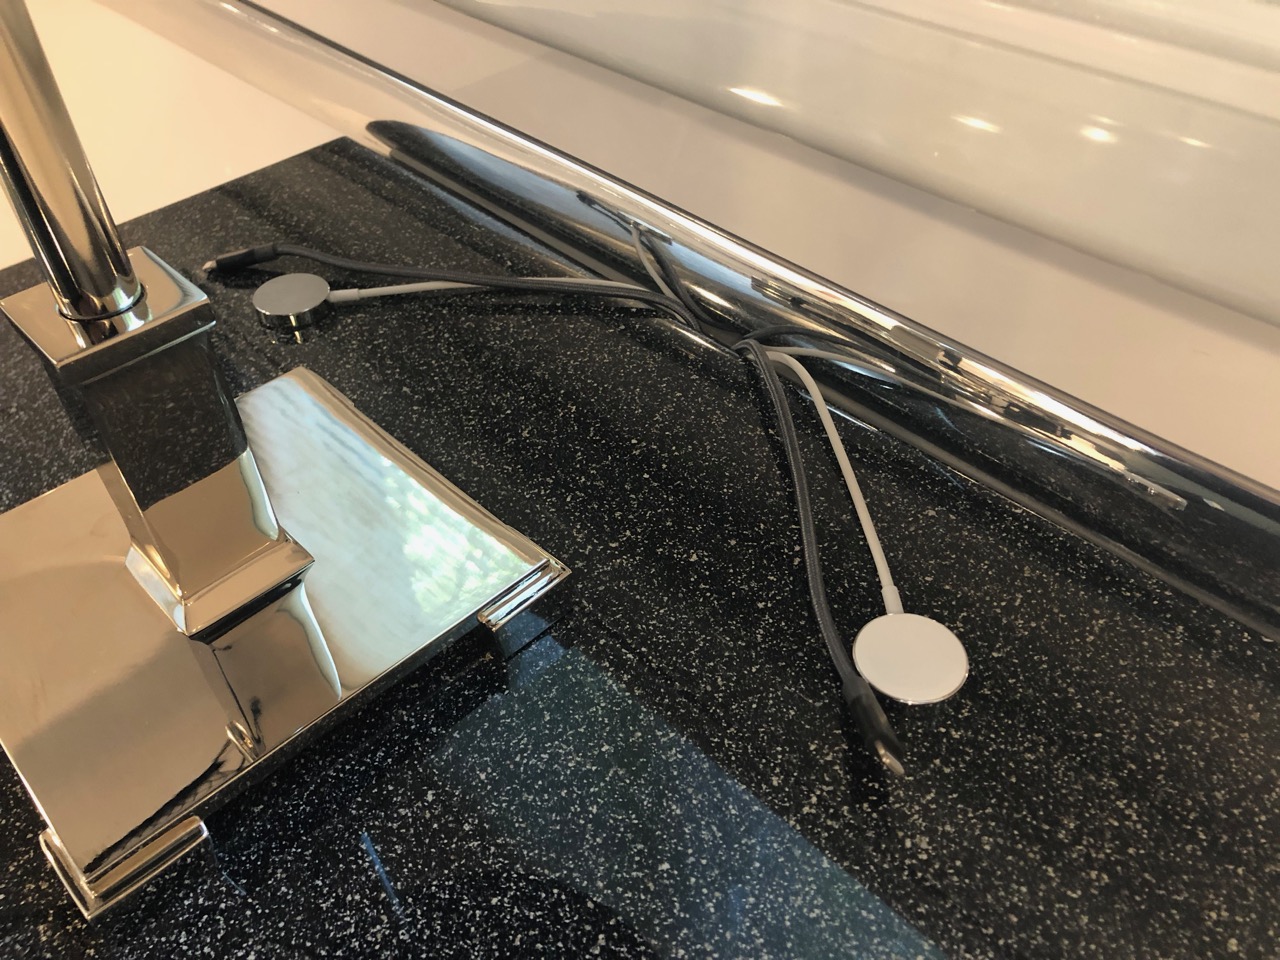
One thing we noticed the first few nights sleeping in the Ollie was that there's not a convenient light or light switch that can be reached from the bed. If you're on the curb side, you can sit up and flip a switch if you remember which one to flip but otherwise you have to get out of bed to turn on or off the lights. I loved the cool table lamp that @scubarx installed in the Outlaw Oliver, so I added a lamp to the list of to do's. My list of requirements for the lamp were: that it be 12 volt so that I didn't need to be plugged in or have the inverter on to use it; that it be securely mounted but easily removed; that all the wiring should be hidden and everything look completely built in; that the bulb have a nice warm temperature (I'm a believer in having only low temp lighting on for at least an hour before bed); that it have a switch that's easily accessible while lying in bed; and that the lamp itself should be high quality, able to withstand bumps and vibrations, and last the life of the trailer. So, with all that in mind, I first picked out the lamp. We went with the Petite Candlestick Lamp from Restoration Hardware. I would have preferred something a little bit more modern, but this one was the right size and has an Art Deco feel to it that I think goes fine with everything else we've done and with the trailer itself. It's way too tall as it comes, but dismantling it and cutting it down to a reasonable height for the trailer is pretty straightforward. I've gotten several lamps from Restoration Hardware, and they've all been super high quality and this one is no exception. They have a yearly or twice yearly half-off sale on lighting, so if you get one from them, be patient and wait because they're arguably overpriced at retail. Secondly, I found these bulbs on Amazon, which you can get in warm white or daylight, whichever you prefer. That's really all you need to convert a lamp to 12 volt these days, apart from swapping out the plug or direct wiring it to the trailer. I went with a lighter plug since I wanted to be able to remove the lamp. You can get those anywhere, but I highly recommend a locking marine style plug because the quality difference is substantial. Third, you'll need a socket for the plug if you go that route. I was fortunate in that I had asked Oliver to provide us with USB ports on the nightstand, so I already had 12 volt power run. If you don't, then you'll need to tap into the wiring behind the breaker panel on the right side of the attic and then run your wiring down to the basement and then up through the base of the nightstand. Shouldn't be too difficult but I can't say for sure since I didn't have to go that route. But I did need the socket, and while I was at it I wanted to add some USB ports inside the nightstand as well. (That's actually what I'd asked for, but Oliver placed the outlets on the side of the nightstand instead. Easily accessible, but otherwise you've got to deal with cords getting in the way of bedding and a little green light shining in your eyes.) So I ordered a combination outlet panel by Blue Sea off Amazon. It has a pair of dual USB sockets and a lighter outlet, and also has a switch and circuit breaker inside. It's a really nice panel. Finally, I decided that a little chrome push button mounted to the table top in front of the lamp would make for a great switch. This one was perfect. So, how to mount the lamp to the table. Steve and Tali had the genius idea of glueing magnets to the base of their lamp and to the underside of the table top. I experimented with that but just couldn't get it to work. Maybe the table tops are different or thicker, but I just got a really weak hold even with some super strong magnets. So instead, I decided to bolt through. Since I had the lamp apart anyway, I just swapped out the threaded rod holding it together with one that was a few inches longer than what I needed. (The way the original rod was made it couldn't be cut down.) When I put the lamp back together, I left the extra rod sitting out the base at the bottom. Then carefully drilled a ½" hole where I wanted the lamp, put the rod through the hole and screwed it in. I got the biggest washer I could find to distribute the load on the tabletop. Then I drilled another ½" hole just in front of the lamp and mounted the switch. The switch is just a tad mushy for my taste, but it's acceptable and I like the way it kind of disappears in all the reflections on the top. Underneath, wiring it up was a simple task and the only tricky part was that I had to solder the connections to the switch, and I've never developed good soldering skills. But it works. I added a few zip tie mounts with VHB tape to hold the wiring in place out of the way and keep it from vibrating too much. The switch connection is a bit exposed, so I think I might paint some plasti dip on the leads. Finally, I added the lighter plug, leaving plenty of slack in the cord, and covered the cord with wire wrap to protect it. In the nightstand, I removed one of the little shelves that hold the tray in place and mounted the outlet panel there. The panel is a bit too wide, but it's a good spot for it, so I cut a little notch on the bottom of the tray for it to fit back. I just unclipped the wiring from one of the USB outlets Oliver had installed and clipped it to the new panel. I'll probably run a jumper back to that outlet even though I doubt we'll ever use it now. I don't like the angle of the wire coming out of the plug, so I'll need to add another zip tie mount or something there, but I was down to the two I used on the top so I'll need to get some more. I then cut a scallop out of the back of the tray to run the wire, and any other cords we might have for charging stuff in the tray. You'll also notice in the pics that I drilled a hole in the back of the nightstand for USB cords to run, and ground out a little notch in the bottom of the top for the cords. I think I need to grind out a notch along the back as well, since right now I have to pull the top out a bit for the cords. And that's it. Pics...
 2 points
 -
Stan - Don't throw that "point" away! We can combine it with the "coin" that I got and get a milkbone for your pup. Bill2 points
-
So, as I await the build and delivery of our E-II, I am mulling over a few ideas for improvement. With our selection of Nature’s Head Composting Toilet the black water tank becomes superfluous. Has anyone thought about repurposing it into a secondary water storage. (It will be untarnished - new) Seems plausible, will have to look closer after I have my unit in hand. I enjoy the many Ollie owners on the forum who posses a similar "I can make that better" gene. Having built 3 conversion vans, I appreciate the engineering and build of the Oliver but that doesn't stop my tinkering mind. There is always something to be improved. Ha, perfection is always an elusive mistress.1 point
-
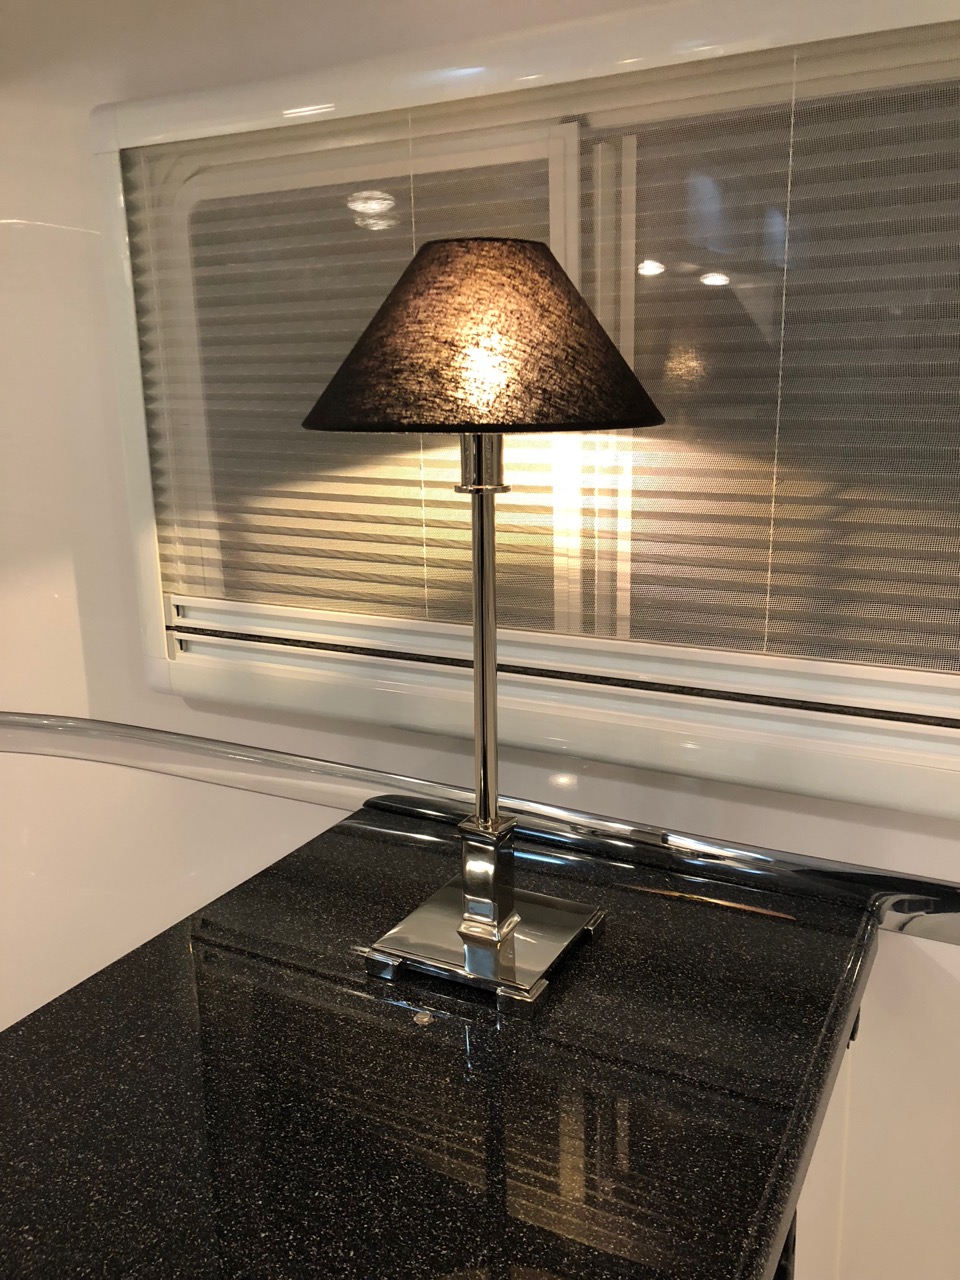
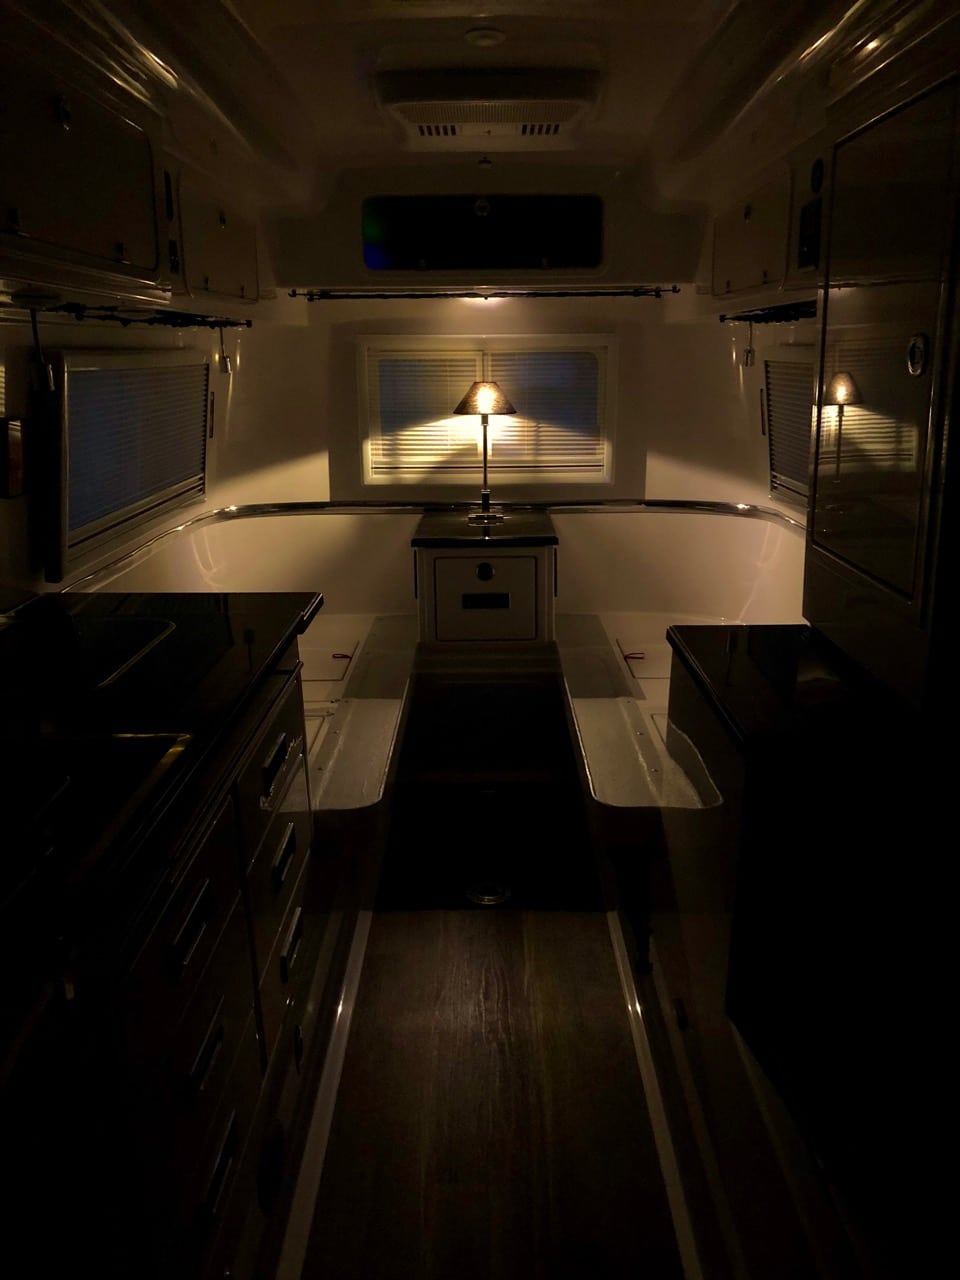
Here's a pic of just the lamp on. This makes it look slightly dimmer than it is, but it's definitely a low light level which is what we wanted. They're supposed to be 2W, but the battery monitor can barely detect them. In fact the amp draw went down 0.1 amps once when I turned on the lamp, so maybe they're magic bulbs.
1 point
-
Yep, I was talking about converting the black to fresh in that thread, but I have not got anywhere with it yet. The tank should be fine for potable water, I think it is ABs, and the only code issue is that waste and potable systems cannot be interconnected. Thus you won’t find a manufacturer who will do this during or after production.... it would be up to the owner. It should gravity feed the main tank since it sits several inches higher, so other than reconfiguring the venting system (you must disconnect and cap the existing big vent line at the tee under the bathroom sink) and adding a new vent/ overflow, there won’t be a lot to the conversion. Go ahead and do yours, post pics and a shopping list, and then I will do mine. The R&D is the tough part. BTW, since I fixed the pickup tube in my main fresh tank so that I can use almost all of the capacity, I am not nearly as worried as I was a year ago..... that mod is now standard at the factory, so you will already have full use of your fresh tank. John Davies Spokane WA1 point
-
I was already making a shopping list.1 point
-
I got one of those emails, and was concerned was not a legitimate email, so I talked to Heather and she said it was something new that was in the works. I had 1 (one) point, so now I guess I have none. Oh well. Stan1 point
-
My pump actually runs at a lower pressure than it's specs say too. No big deal assuming you don't want to firehose something and you don't have the tankless WH. It doesn't matter where you measure the static pressure in the system as long as it's downstream of the pump, but a long restrictive pigtail connector before the accumulator will make the pump stutter as it tries to shut off. You are adjusting the tank pressure in the right way. Matching the pump's actual pressure settings and allowing the accumulator to partially fill before the pump shuts off. There is no problem with the bladder and you are doing it correctly, but you will never get anywhere near two gallons out before the pump cycles. A 2 gallon tank will only yield a few cups before the switch differential is reached. It's not there to hold a lot of water, but to stabilize the pressure and reduce the number of cycles. If the bladder presssure was at zero, the tank would not work at all and if the pressure was above pump shutoff it, again, would not work at all. It should be set just below the cut-in pressure. This gives you a fairly large amount of water in the tank, for fewer cycles, and it allows for the expansion of the water caused by warming of the water heater. A good test is 1. install a 100 PSI pressure guage on the pressure side of the pump (a good plce for this is a T on the pump outlet or a T on the accumulator inlet). 2. get all air out of the water system by running the water until no air is present. 3. run the faucet to turn on the pump, shut off the faucet and allow the pump to reach full cut-off pressure with no water running. Don't run any more water. 3. then turn on the water heater and monitor the pressure on a guage. This will cause the pressure to rise. The more air volume in the tank, the less the rise. If you start a test about 40 PSI (the cut-out pressure), you should reach about 60 PSI or less as the water heater comes up to full temp. With no accumulator, the pressre will go up over 100 PSI and pop the relief valve. Overall, just find a happy medium tank pressure that allows minimal pump cycles and keeps the pressure as steady as possible while the water heater goes from cold to hot. This will be somewhere just below the cut-in pressure. All piping between the pump outlet and the accumulator should be short and relatively large in diameter. If not, the pump will stutter as it approaches the cut-off point.1 point
-
The manufacturer of the on-board jacks does NOT recommend using the jacks to lift the weight of the trailer even as a temporary use for changing a tire. New model trailers have an extended steel sub-frame assembly that provides ample room for a jack point either in front or behind the tire that needs to be changed. Older models may not have enough room on the steel sub-frame to use a lifting jack(scissor jack or bottle jack). If this is the case you will simply locate the main frame rail point closest to the tire that needs to be lifted and use a lift pad that will help to distribute the weight. Owner’s manuals may state different things as changes occur every year in the RV industry. There are several reasons why these changes might occur from year to year or even in the middle of a production cycle. Sometimes new industry standards/codes are introduced and changes have to occur to meet these new standards. Sometimes components are discontinued and replaced with a new model that may not work just like the previous model. Sometimes companies simply make a decision change within the company to market their product differently. These are just a few of the reasons that change happens and why your owner’s manuals may be different. Product information is provided by the manufacturer of the component and is available online in the Oliver University section. Oliver strives to provide accurate information to every customer. The product information on components not manufactured by Oliver is dependent on the manufacturer or supplier supplying us with the correct information and as such may not always be 100% accurate.1 point
-
I have been involved with Oliver Travel Trailers almost since day one. The fact that we have owned two of their fine trailers should indicate to everyone that I am very pro-Oliver. As well as the Oliver family, I have personally known virtually all the workers on the line during these past 10 years. I can attest that they are all fine, Christian, honest folks with the customer’s best interests at heart. I have placed this post in this thread since it seems that, once again, an old problem has reared its ugly head. That problem being the attacking or speaking disparagingly against Oliver’s employees. I want to make it very clear that from this point on there will be ZERO tolerance for negatively commenting on an employee’s performance or words within this forum. This is not the proper venue for venting toward an individual. Case in point is the recent comment alleged to have been made by Anita in the sales office. I have spoken with Anita concerning this matter. She is very upset about this accusation and vehemently denies ever having said those words. Further, it has been addressed with management. You may feel free to rant on about anything Oliver Trailer related but if you have a problem with an Oliver employee or if you perceive they have acted in a manner that you deem unprofessional, you are to address that matter directly with Scott Oliver.1 point
-
Yup, Anita told me the same thing and I laughed then because I'm proactive myself and fix the problems while either filming the fix or taking pictures when needed. Oliver is waiting for us to film our exterior light fixture fix and that will come next month hopefully. It needs to be done in hot weather above 73° This jack thread has been hashed out over and over and some of you guys make to much of a big deal out of the simple things. They are called JACKS for a reason. And Oliver has used these "Screw Jacks" since the beginning. Karen and I are embarking on a new future here in Arizona now, and we will be here in Stanton for atleast a year. We thought about buying a larger trailer since we live full time in our Olli and started looking again, but there are no other trailers that even come close in comparrison to the quality that we love in our Oliver's. No other quality trailers provide electric jacks all around. Use some common sense, use either the jacks or jacks and blocks when needed. You have the best trailer that money can buy, so deal with it and quit sweating the small stuff. Jacking up a tire is simple highschool learning and if you can't figure it out, go back and take the beginning drivers education class again... :) Reed1 point
-
Wishing you miles of smiles, and great adventures. Nice rig, and love your choices. Sherry1 point


-
Recent Achievements
-


")


")


")


