Leaderboard


Popular Content
Showing content with the highest reputation on 04/18/2018 in all areas
-
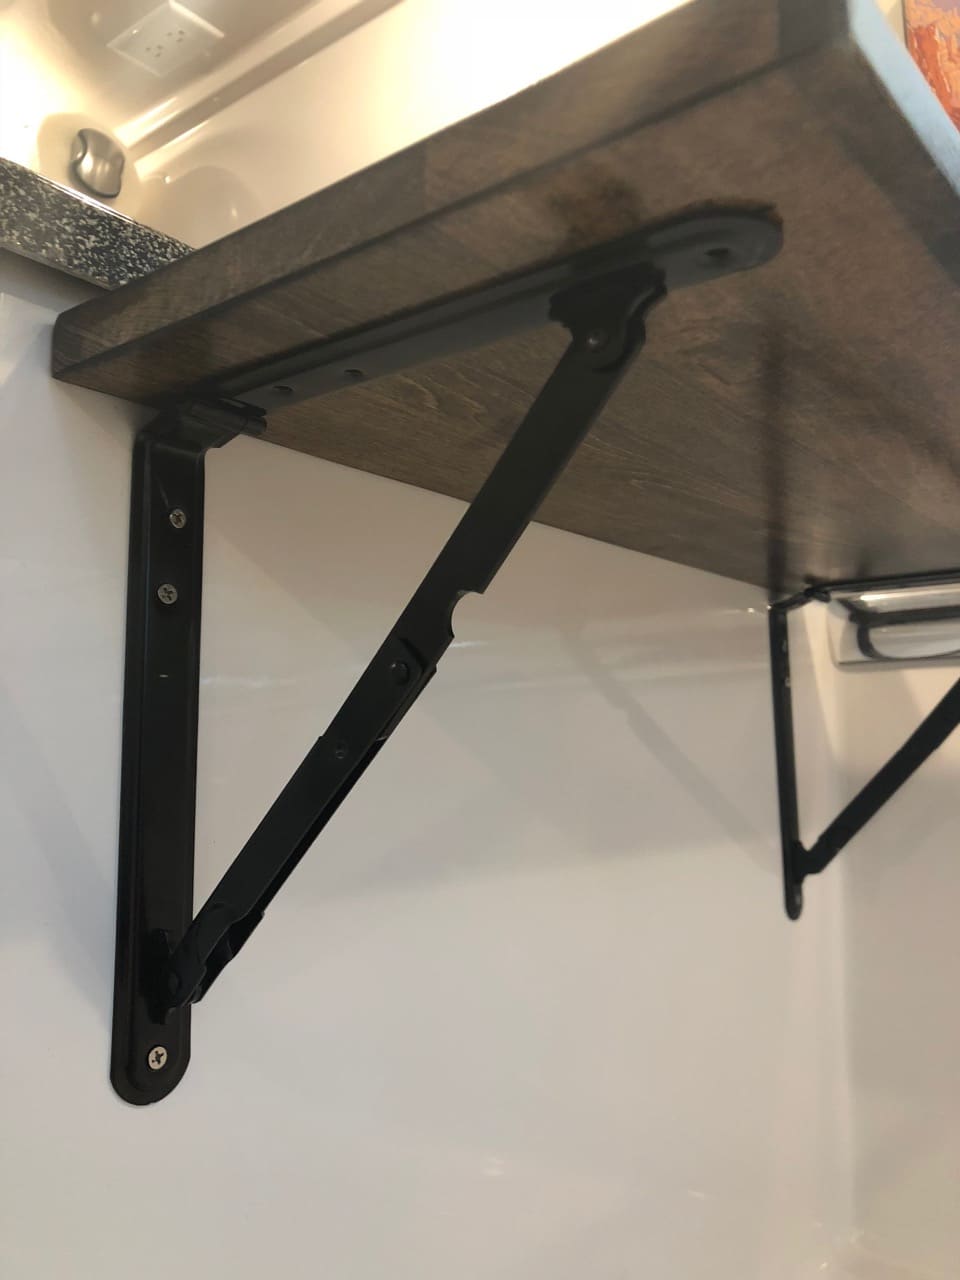
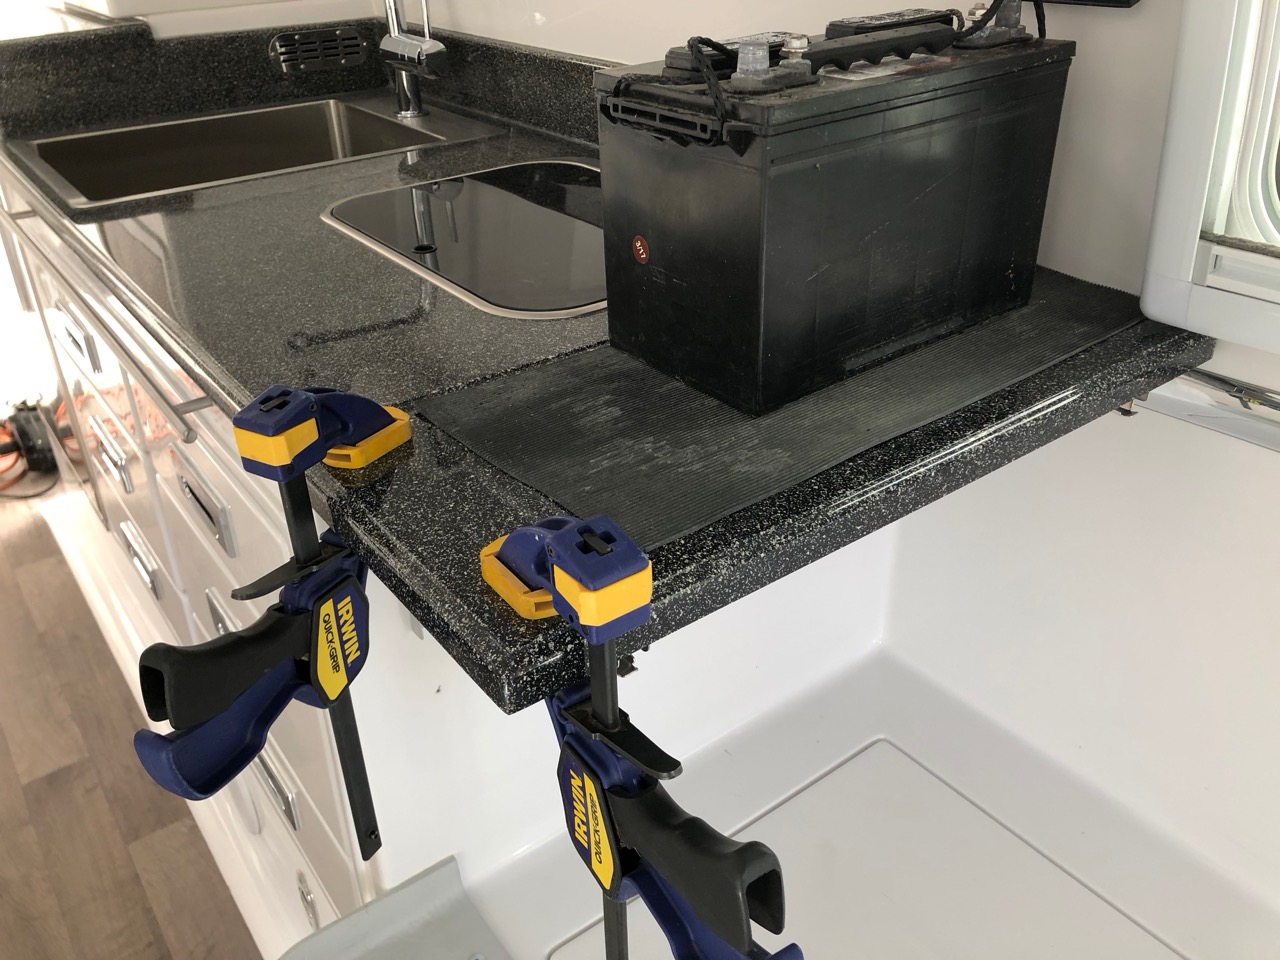
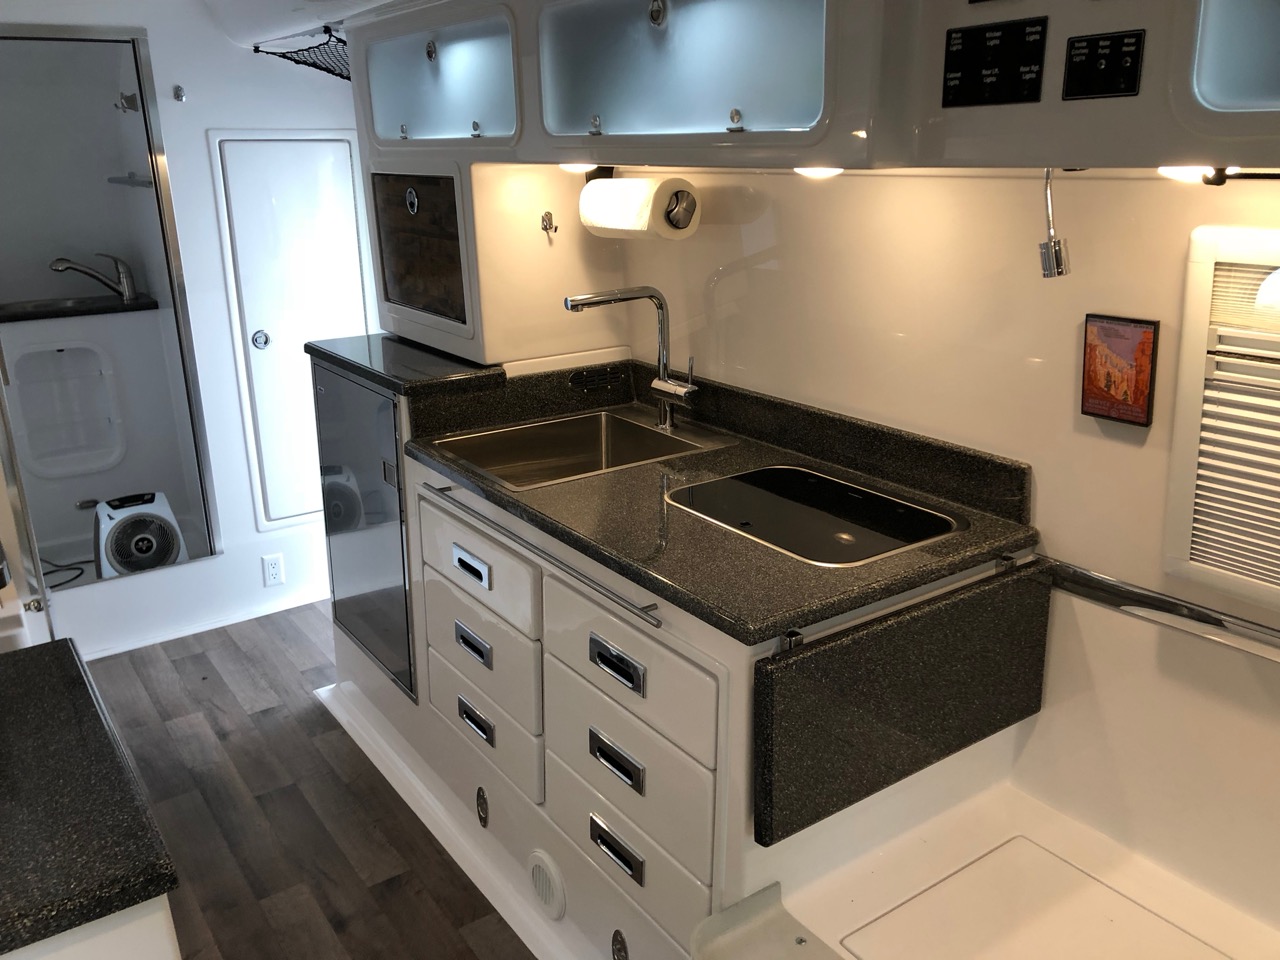
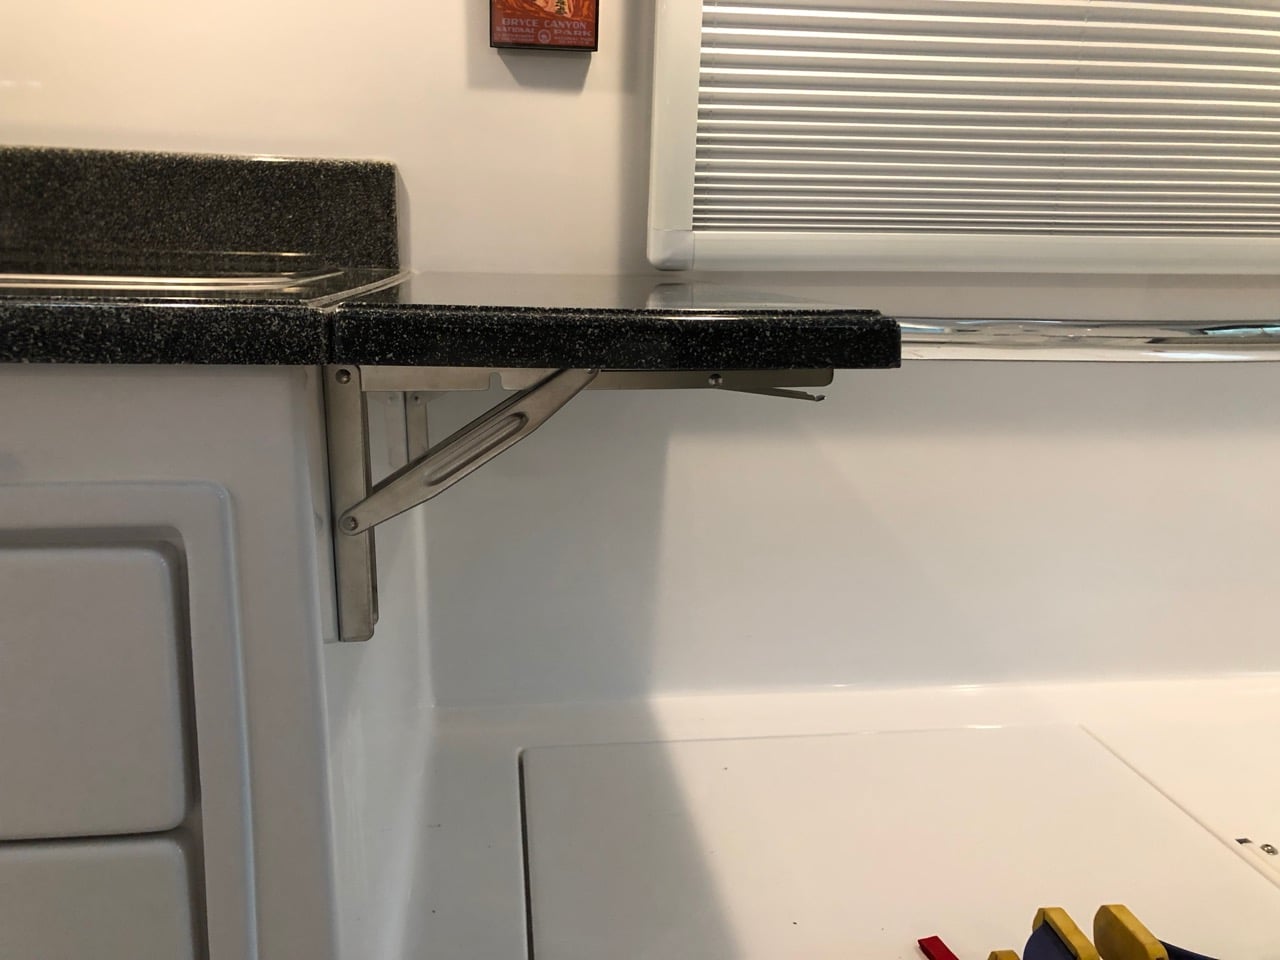
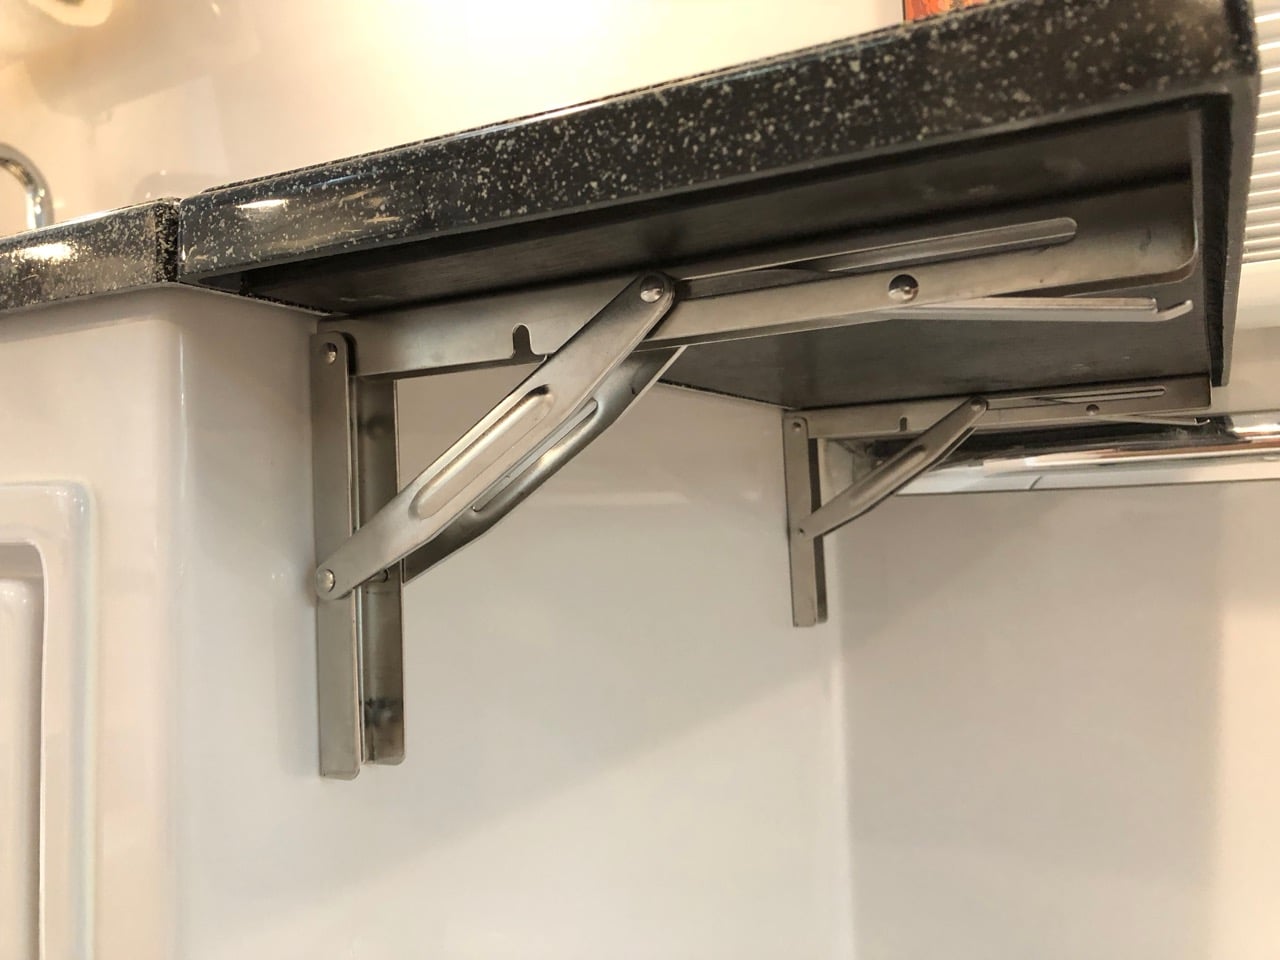
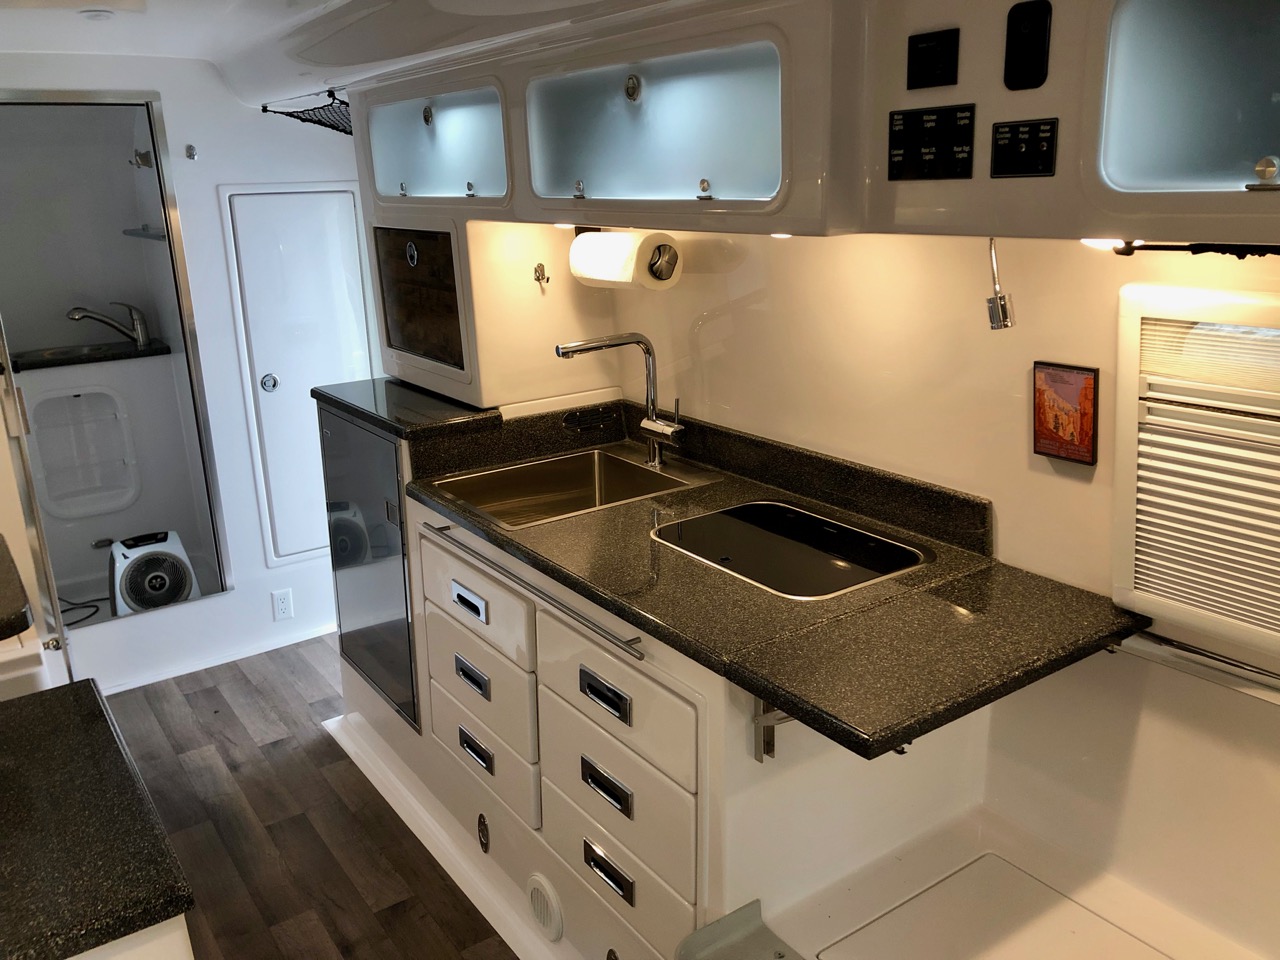
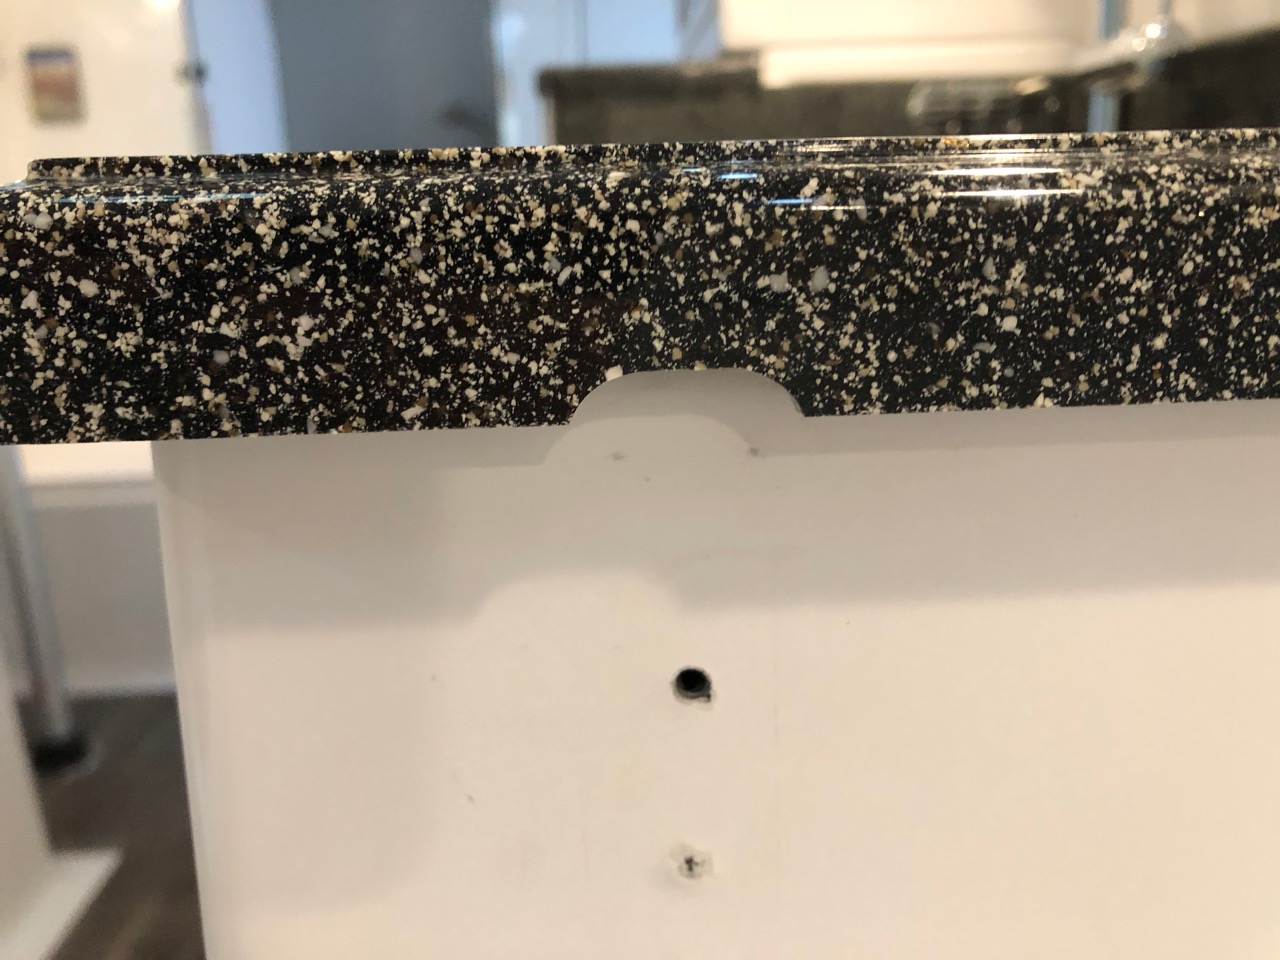
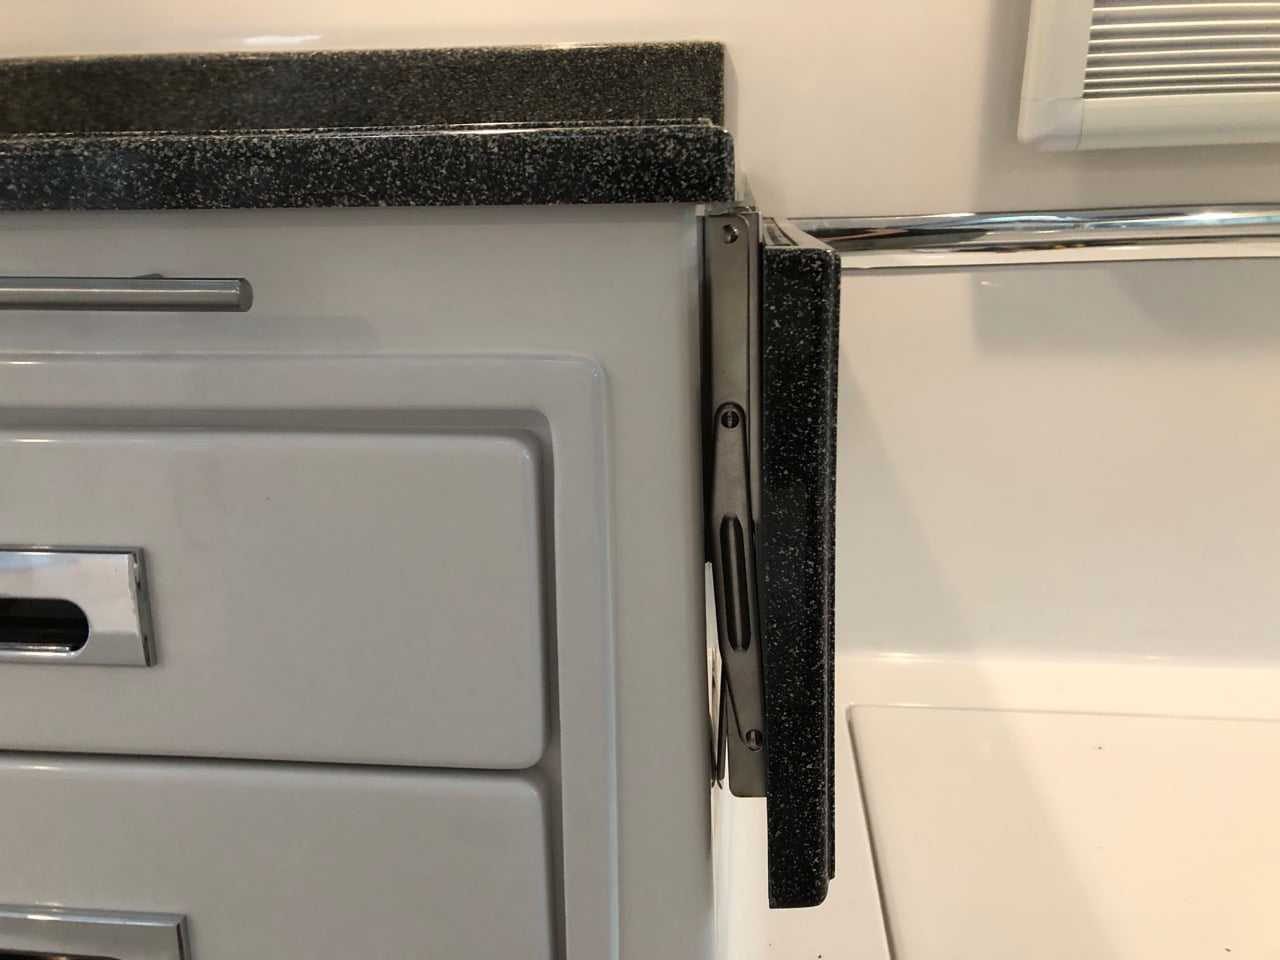
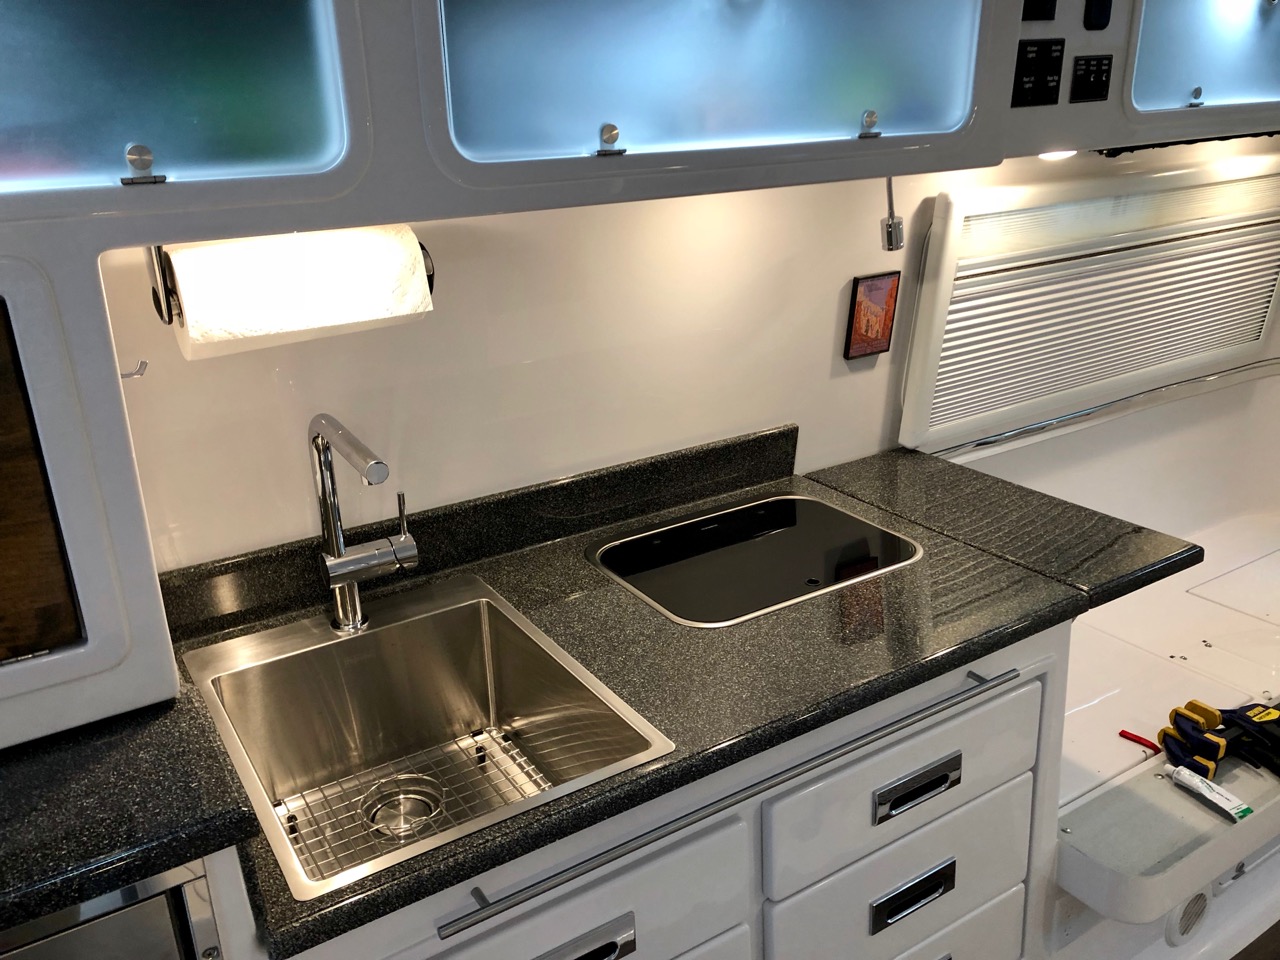
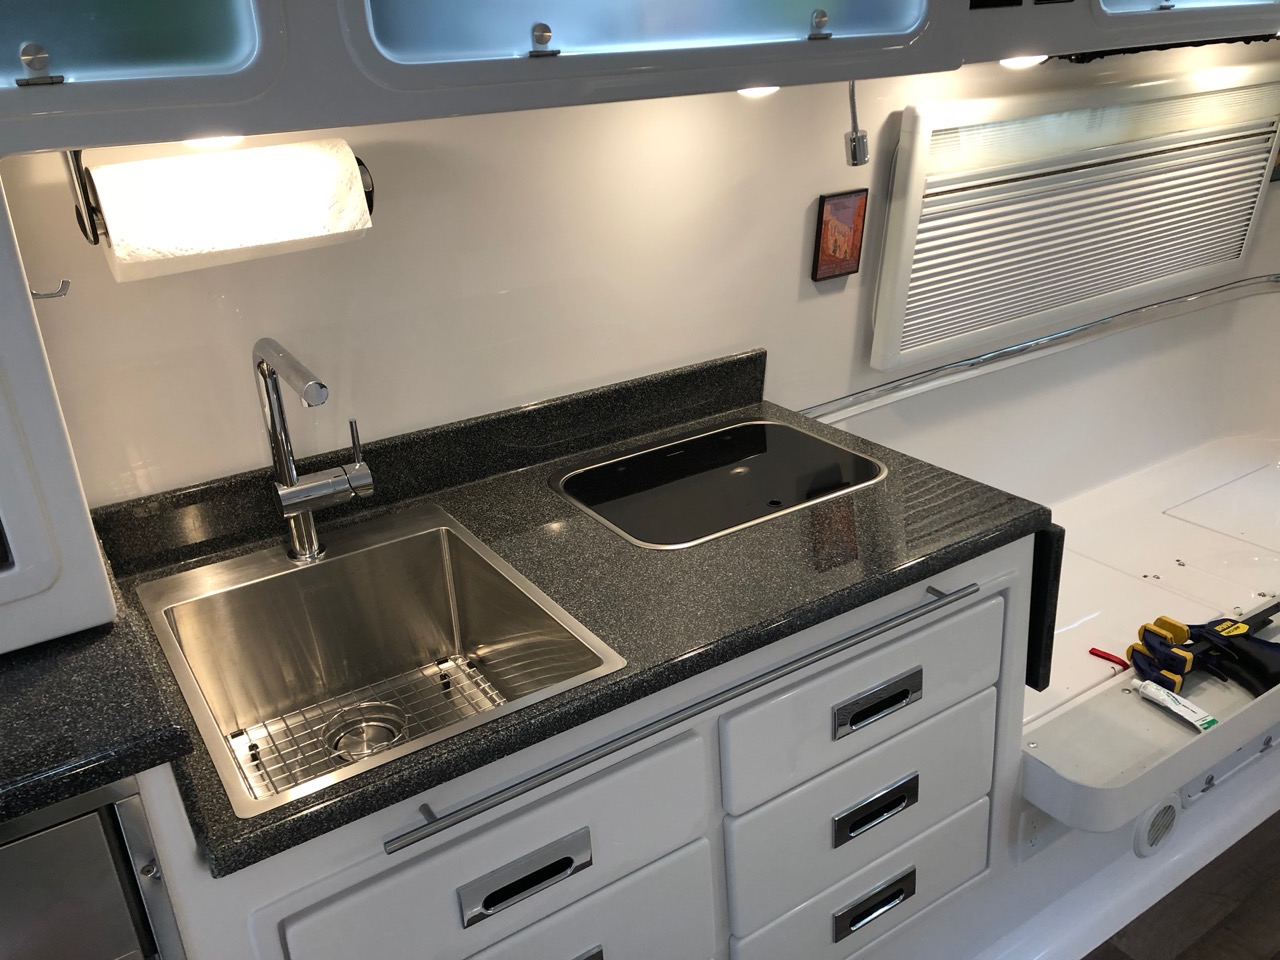
One of the things I asked Oliver to do for me was to install a 12" counter extension to the right of the cooktop that could be folded down when not in use. I figured we could use the extra counter space, plus I wanted a buffer between the cooktop and beds for splatter. This is what they came up with - This was perfectly fine and exactly what I was expecting, and we've really enjoyed using it. The only thing I didn't really like was that the hardware was finicky and just didn't work well. And the top ended up about 9" rather than 12", so it was a little small. And we had asked if they could make a piece of fiber granite to match, but they'd have to make a new mould for it so that wasn't going to happen. It also would have been nice if the extension were flush to the counter. So maybe a lot of problems. But we were happy with it nonetheless. But one day when I was running some wires through the pantry, I had removed the countertop beneath for access and just naturally set it down on top of the counter extension. Well, it fit perfectly; and thus, a new project was added to the list. I asked Oliver if they would sell me an extra top and picked it up when I got my trailer out of service a few weeks ago. I believe they charged $150 for it. Since I was redoing the top, I figured I'd search for better hardware as well. I found several options, but the ones that stood out were these from Amarine. They're super heavy duty and stainless steel. They work much better than what we had, and look nicer to boot. The only problem was that they were about a half inch too long for the countertop, so they'd have to be cut to size. But worth the trouble, so I ground the ends off a half inch. If you don't want to go through that trouble, my second choice was these, which are small enough to fit without modification. I cut a ½" piece of plywood that I could screw into to use as the base for the top. A ½" sheet will sit flush to the lip of the counter, which is what I wanted, but to make the countertop flush to the existing counter, it meant the hinges had to be high enough that I had to grind out a small notch for each hinge to clear. No big deal - btw, a Dremel with a small sanding cylinder works really well on the fiberglass, and leaves a smooth edge and no chipping whatsoever. Wear a mask. Here are the notches - The brackets are easy, just mark the holes, drill, and screw. I used ¾" #10 stainless on the bottom legs and ¼" #8's on the top. And 3M 4200 along each leg and on each screw going into the fiberglass to prevent it from backing out over time. Since none of the surfaces in the trailer are perfectly 90°, I needed to shim something to make the counter level. I considered grinding down the latch that holds the brackets at 90°, but that would have been difficult and if I ground off too much, I'd have to buy another bracket. Instead, I decided to shim between the plywood and fiber granite and then glue the top to the plywood with more 3M 4200, which I'm using so much that I've started referring to it around the house now as Snowball Glue. It's only about ⅛" max to shim - I used some stainless washers that I had lying about and just glued them down in each of the corners. I found that the top was a bit warped, so I had to weigh it down while the glue set - See, I knew lead acid batteries still had a use. I let it sit overnight and in the morning, I had what's in the photo above. Cool. BTW, if you want to do this and have mattresses, then you'll want to check their thickness to make sure the extension will clear when folded. Measure down 12" from the bottom lip of the counter. If your mattress is below that, you're good. If you have cushions, then no problem, but you'll need to move one of the back ones out of the way when raising or lowering the top. More pics -
 6 points
 -
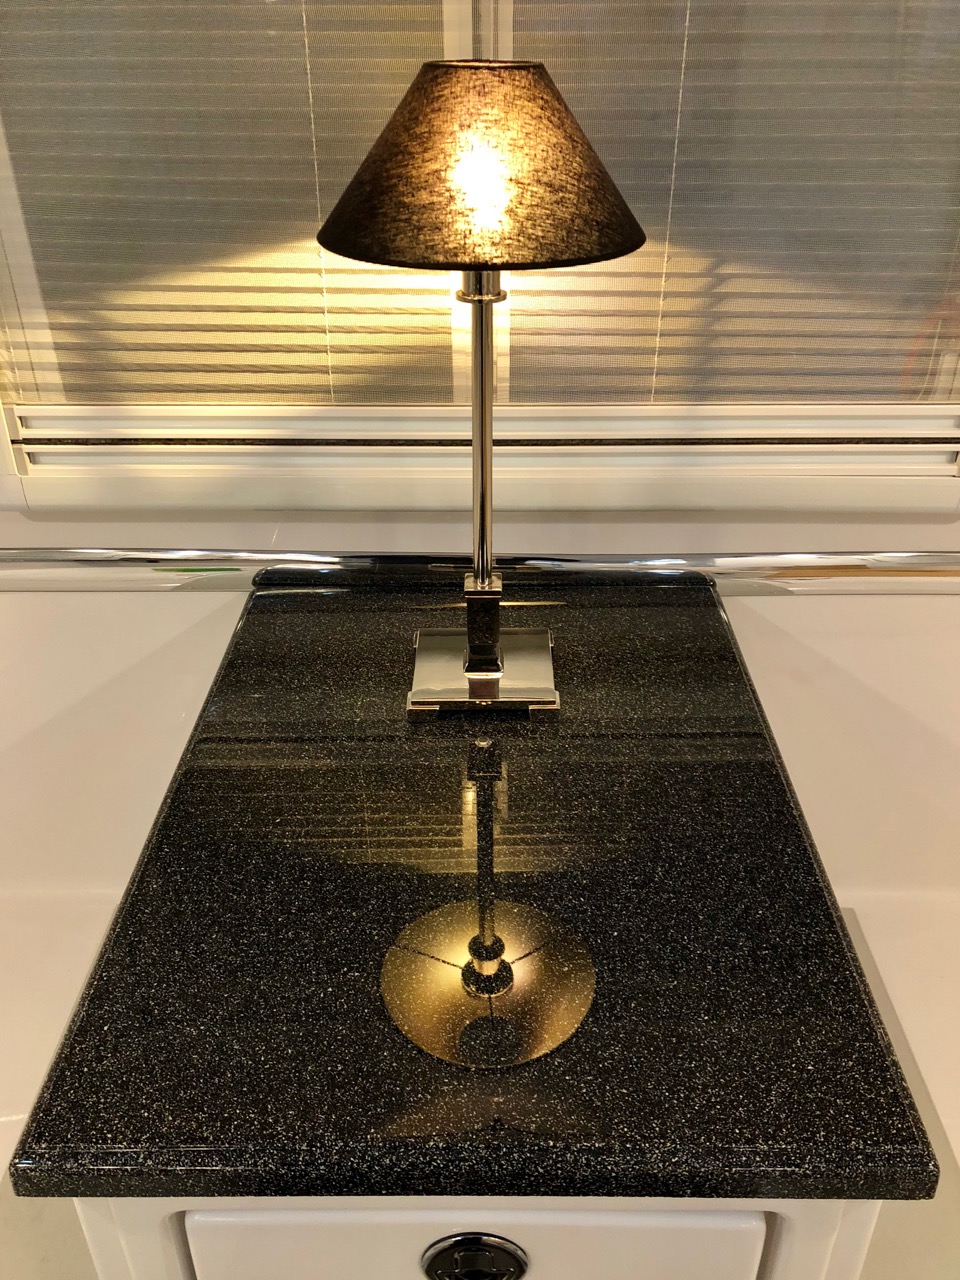
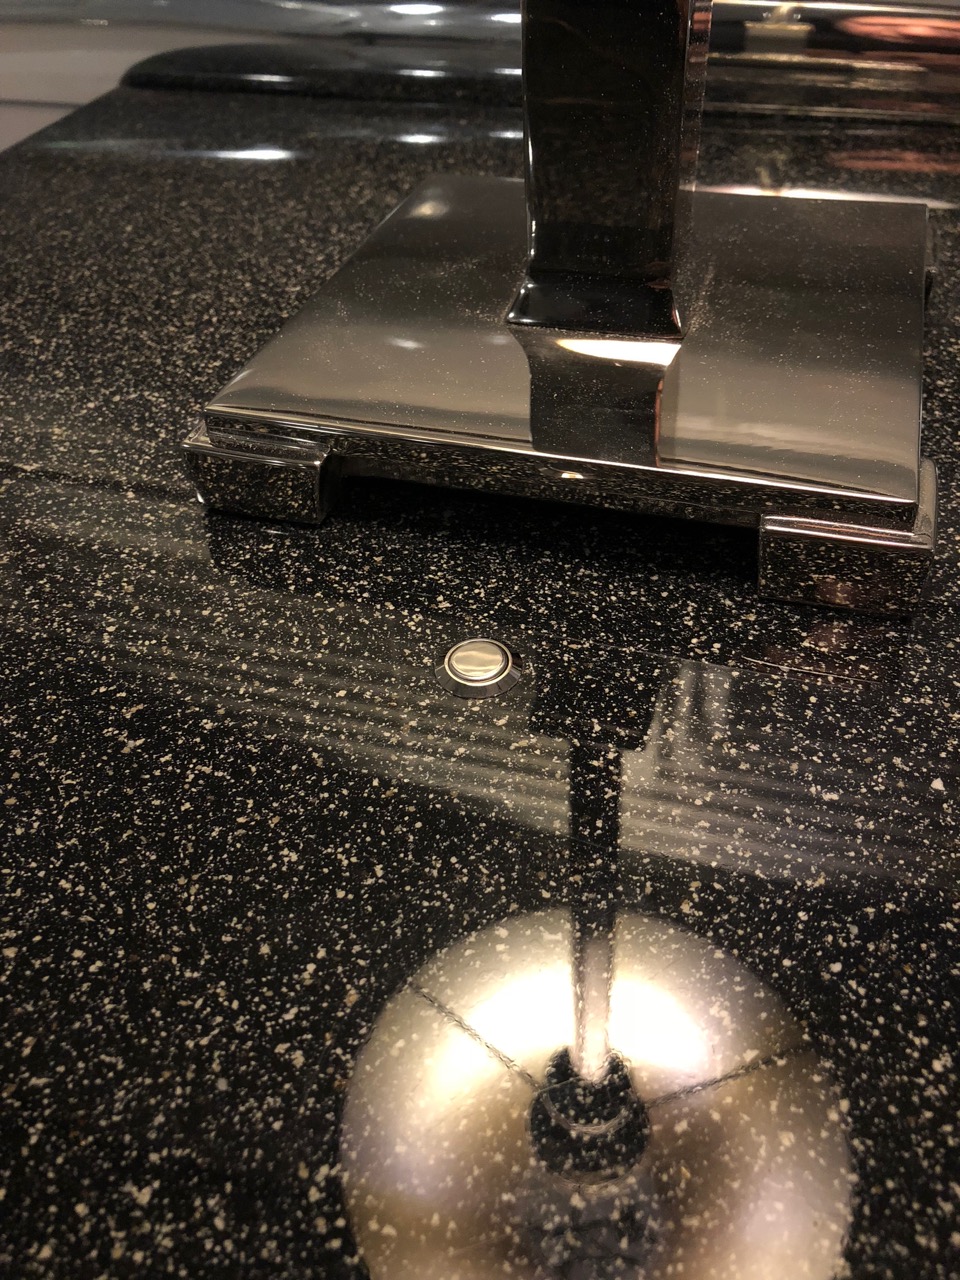
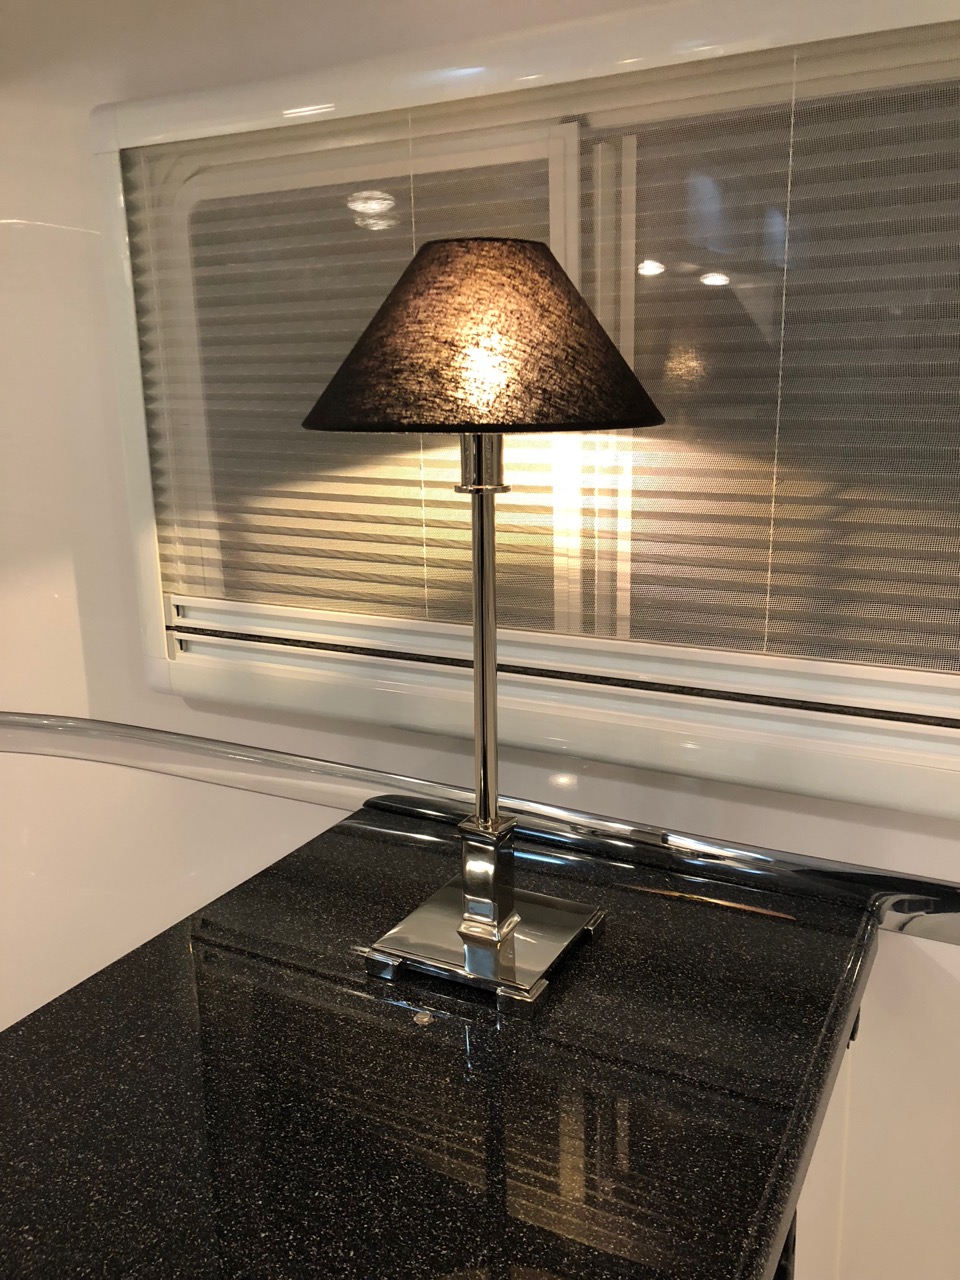
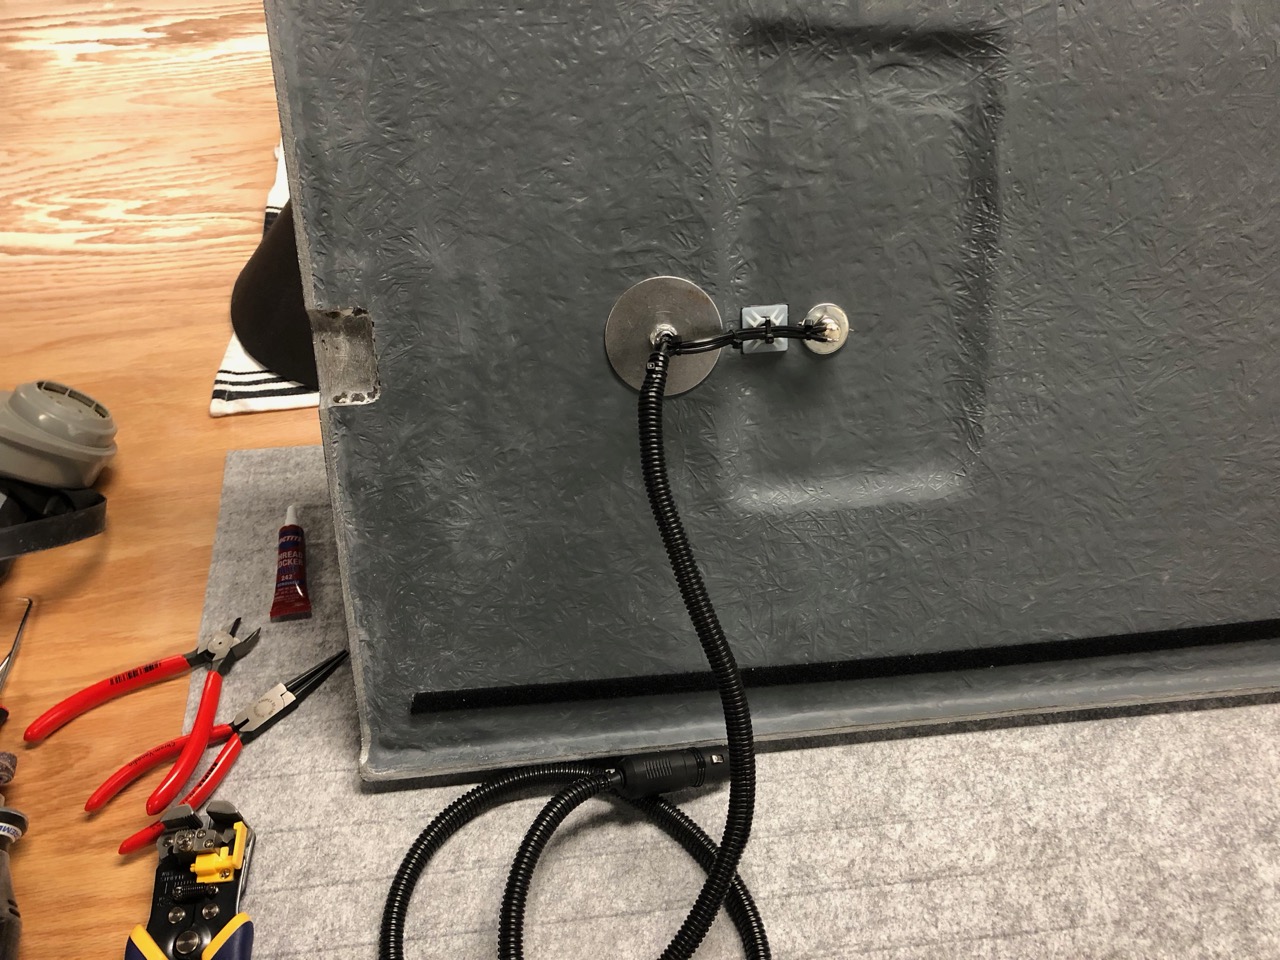
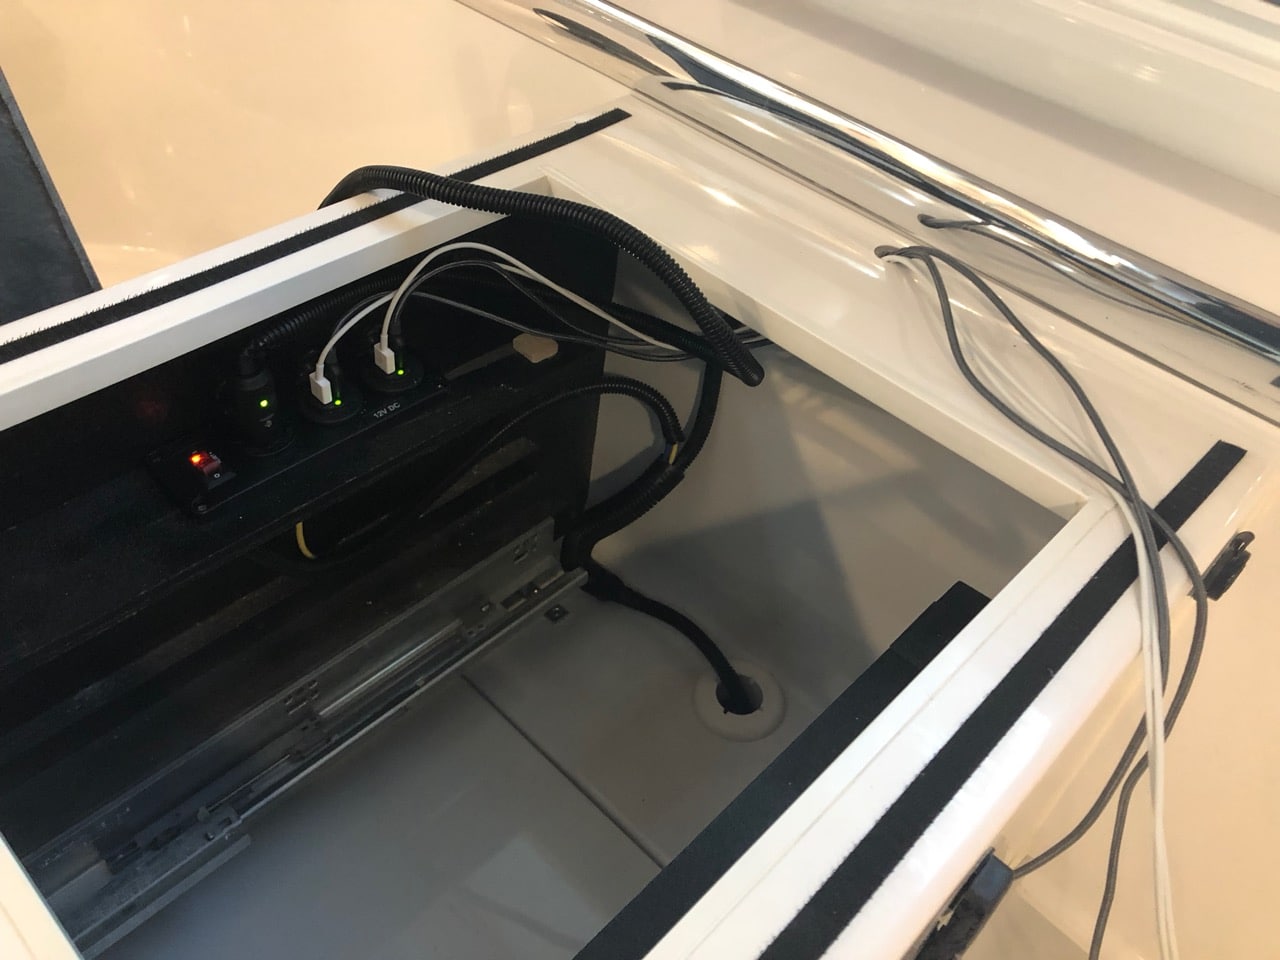
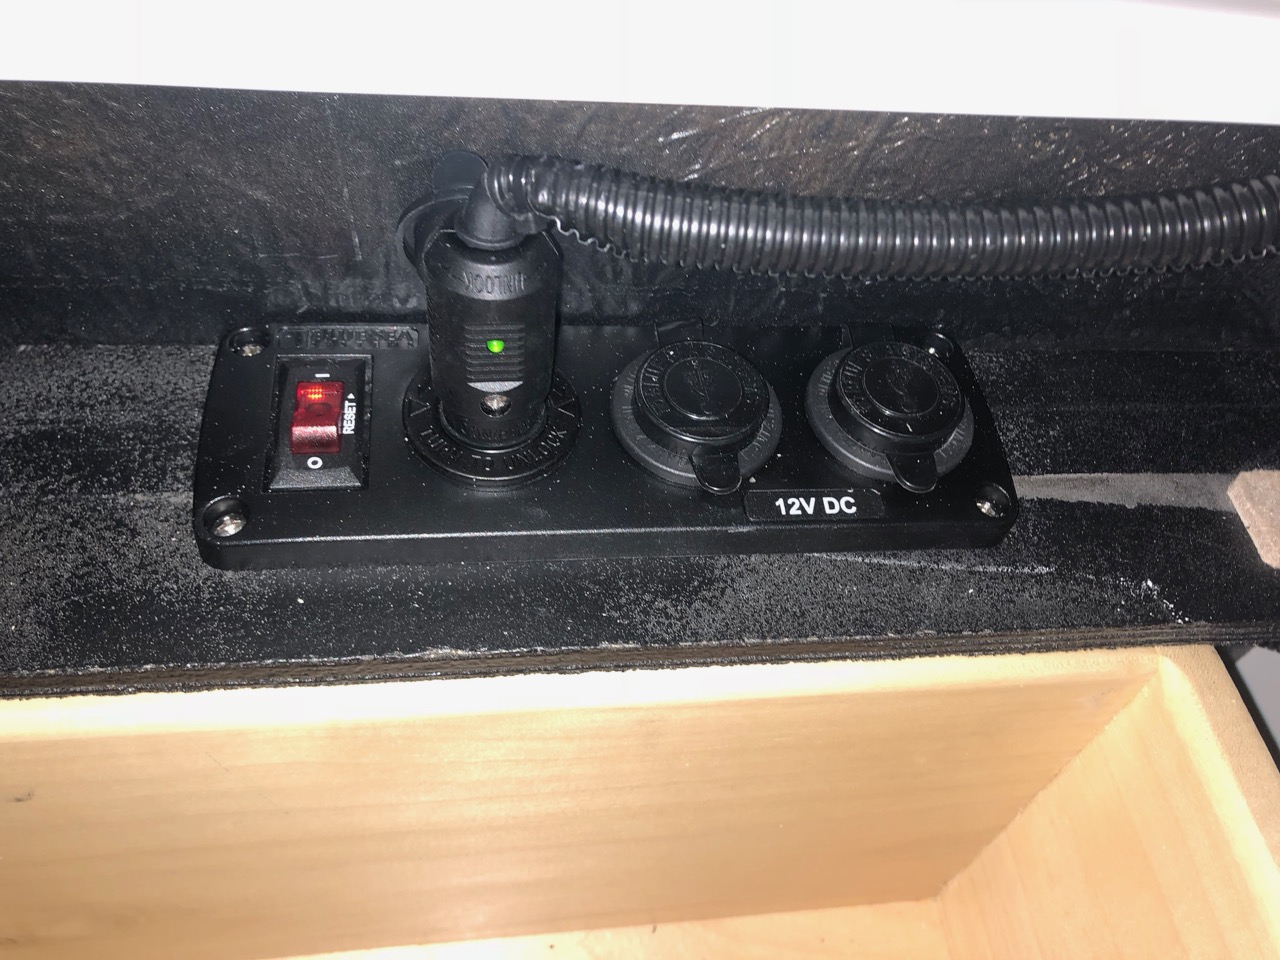
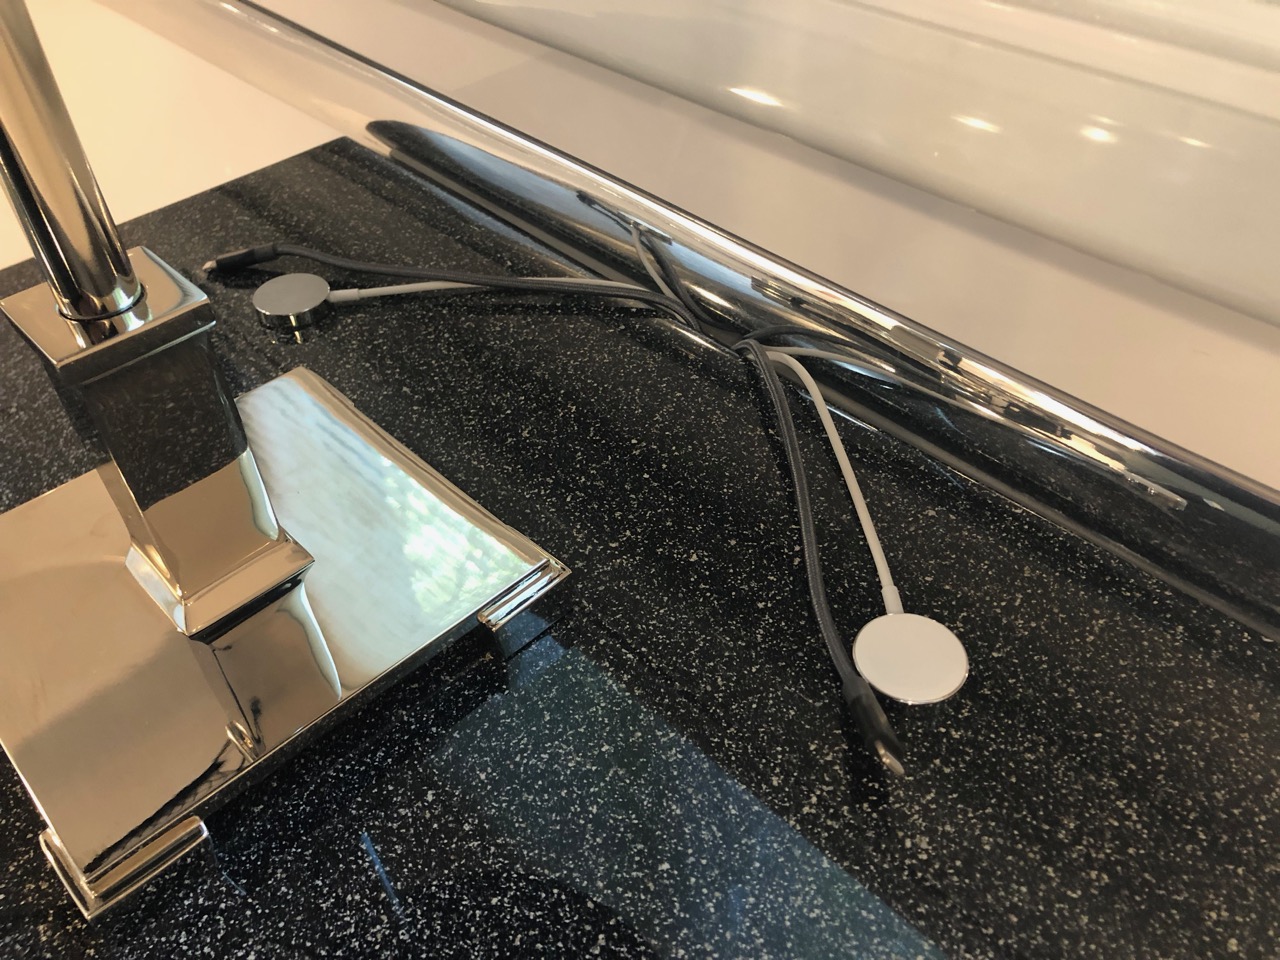
One thing we noticed the first few nights sleeping in the Ollie was that there's not a convenient light or light switch that can be reached from the bed. If you're on the curb side, you can sit up and flip a switch if you remember which one to flip but otherwise you have to get out of bed to turn on or off the lights. I loved the cool table lamp that @scubarx installed in the Outlaw Oliver, so I added a lamp to the list of to do's. My list of requirements for the lamp were: that it be 12 volt so that I didn't need to be plugged in or have the inverter on to use it; that it be securely mounted but easily removed; that all the wiring should be hidden and everything look completely built in; that the bulb have a nice warm temperature (I'm a believer in having only low temp lighting on for at least an hour before bed); that it have a switch that's easily accessible while lying in bed; and that the lamp itself should be high quality, able to withstand bumps and vibrations, and last the life of the trailer. So, with all that in mind, I first picked out the lamp. We went with the Petite Candlestick Lamp from Restoration Hardware. I would have preferred something a little bit more modern, but this one was the right size and has an Art Deco feel to it that I think goes fine with everything else we've done and with the trailer itself. It's way too tall as it comes, but dismantling it and cutting it down to a reasonable height for the trailer is pretty straightforward. I've gotten several lamps from Restoration Hardware, and they've all been super high quality and this one is no exception. They have a yearly or twice yearly half-off sale on lighting, so if you get one from them, be patient and wait because they're arguably overpriced at retail. Secondly, I found these bulbs on Amazon, which you can get in warm white or daylight, whichever you prefer. That's really all you need to convert a lamp to 12 volt these days, apart from swapping out the plug or direct wiring it to the trailer. I went with a lighter plug since I wanted to be able to remove the lamp. You can get those anywhere, but I highly recommend a locking marine style plug because the quality difference is substantial. Third, you'll need a socket for the plug if you go that route. I was fortunate in that I had asked Oliver to provide us with USB ports on the nightstand, so I already had 12 volt power run. If you don't, then you'll need to tap into the wiring behind the breaker panel on the right side of the attic and then run your wiring down to the basement and then up through the base of the nightstand. Shouldn't be too difficult but I can't say for sure since I didn't have to go that route. But I did need the socket, and while I was at it I wanted to add some USB ports inside the nightstand as well. (That's actually what I'd asked for, but Oliver placed the outlets on the side of the nightstand instead. Easily accessible, but otherwise you've got to deal with cords getting in the way of bedding and a little green light shining in your eyes.) So I ordered a combination outlet panel by Blue Sea off Amazon. It has a pair of dual USB sockets and a lighter outlet, and also has a switch and circuit breaker inside. It's a really nice panel. Finally, I decided that a little chrome push button mounted to the table top in front of the lamp would make for a great switch. This one was perfect. So, how to mount the lamp to the table. Steve and Tali had the genius idea of glueing magnets to the base of their lamp and to the underside of the table top. I experimented with that but just couldn't get it to work. Maybe the table tops are different or thicker, but I just got a really weak hold even with some super strong magnets. So instead, I decided to bolt through. Since I had the lamp apart anyway, I just swapped out the threaded rod holding it together with one that was a few inches longer than what I needed. (The way the original rod was made it couldn't be cut down.) When I put the lamp back together, I left the extra rod sitting out the base at the bottom. Then carefully drilled a ½" hole where I wanted the lamp, put the rod through the hole and screwed it in. I got the biggest washer I could find to distribute the load on the tabletop. Then I drilled another ½" hole just in front of the lamp and mounted the switch. The switch is just a tad mushy for my taste, but it's acceptable and I like the way it kind of disappears in all the reflections on the top. Underneath, wiring it up was a simple task and the only tricky part was that I had to solder the connections to the switch, and I've never developed good soldering skills. But it works. I added a few zip tie mounts with VHB tape to hold the wiring in place out of the way and keep it from vibrating too much. The switch connection is a bit exposed, so I think I might paint some plasti dip on the leads. Finally, I added the lighter plug, leaving plenty of slack in the cord, and covered the cord with wire wrap to protect it. In the nightstand, I removed one of the little shelves that hold the tray in place and mounted the outlet panel there. The panel is a bit too wide, but it's a good spot for it, so I cut a little notch on the bottom of the tray for it to fit back. I just unclipped the wiring from one of the USB outlets Oliver had installed and clipped it to the new panel. I'll probably run a jumper back to that outlet even though I doubt we'll ever use it now. I don't like the angle of the wire coming out of the plug, so I'll need to add another zip tie mount or something there, but I was down to the two I used on the top so I'll need to get some more. I then cut a scallop out of the back of the tray to run the wire, and any other cords we might have for charging stuff in the tray. You'll also notice in the pics that I drilled a hole in the back of the nightstand for USB cords to run, and ground out a little notch in the bottom of the top for the cords. I think I need to grind out a notch along the back as well, since right now I have to pull the top out a bit for the cords. And that's it. Pics...
4 points
-
Stan - Don't throw that "point" away! We can combine it with the "coin" that I got and get a milkbone for your pup. Bill2 points
-
I'm curious if you tall folks (e.g., 6'2" or 74" +/-) find the the "twin" beds comfortable, given the 75" (6'3") bed length. Do you end up sleeping slightly sideways? Does the rounded corner feel like a space constraint? I apologize if this has been asked and answered, but a search on this topic didn't result in an answer for twin beds... In advance, thanks for your insight. BTW, I've enjoyed lurking in this forum; I've been impressed by the number of thoughtful, engaged owners and the abundant, useful information. Fritz1 point
-
How much of a concentrated load could there be, they're only stabilize jacks1 point
-
So, I remeasured and it's actually 12" from the bottom lip of the counter. I've edited the post. On ours, that leaves about 6.5" for a mattress. Our current mattresses have pillow tops that put them over that, but the extension will still scoot past them. We're swapping out for cushions now that were doing the Lagun Table (next project). I'm having them made 5" thick so no problem for us, but I knew it would be for others. In the closed position, it takes up right at 2" of bed space. I suppose there's nothing stopping someone from putting the extension from Oliver on a table saw and cutting it down to whatever size worked. It would just leave a rough edge that you'd have to sand down and polish. A lot of work, but not impossible.1 point
-
Love this idea. We're getting the latex mattresses which are about 8" deep, plus an inch for the aire-flow mat, so I doubt this will fit for us. Once we get our trailer I'll have to see how squishable the mattress is...maybe I can make it fit.1 point
-
Overland, The execution is brilliant! Oliver should make this a standard option. We have the 10 inch mattresses. When the shelf is folded down, is there enough vertical room for a 10 inch mattress and the bedding? How much does the folded shelf stick out from the cabinet, and reduce the sleep space? (I am 6 feet tall.) [Edit] I see your post had an answer to one of my questions. BTW, if you want to do this and have mattresses, then you’ll want to check their thickness to make sure the extension will clear when folded. Measure down 13″ from the bottom lip of the counter. If your mattress is below that, you’re good. If you have cushions, then no problem, but you’ll need to move one of the back ones out of the way when raising or lowering the top.1 point
-
I wanted to touch on some emails a few of you may have received about "coins" or "points" after make a topic or replying to a topic. I have been working on some new functionality for the forums as some of you may have noticed when you received the emails. This was caused by a settings error in the backend and started running over the weekend when it was not meant to. It's been disabled and I'll update you when we have more information about what we're working on to share with you. You may disregard any emails you have received about "coins" or "points". Thank you,1 point
-
I suspect that a 44 magnum would work a bunch better.1 point
-
I did! But of course the lamp comes off with the velcroed top. I plan to use the lamp and top as a shield against the bear as my wife crawls through the window. I'm chivalrous like that.1 point
-
Nice installation. Pretty! I especially like your choice of power distbution box. Did you get the high output USB ports? I share Randy’s thoughts on blocking the emergency exit, the fixture being right next to that window and bolted down. I expect in a fire you would blow right through the lamp, smashing it flat, but you would probably end up with some extra scratches... would you care to share your thoughts and reasoning about this? Did you consider a large flat plate and industrial velcro? Do you find having the lamp on top hinders routine access to the inside compartment, or do you just no longer use it? Did you secure all those floppy wires? But I guess they all ride pretty well just lying in the wood tray when stowed. I greatly appreciate the good quality pics. I am still waiting to see more of the pointy part of your trailer..... Edit: I have a suggestion in regard to pics. It is really hard to get correctly exposed images due to the bright reflective finishes Oliver uses. It’s like being on a bright white sandy beach. When you edit your pics, use the Exposure or Brightness settings to lighten up the too-dark areas. It will tend to wash out the rest of the shot, but it will highlight the hard-to-see black parts. Like this: Forcing the flash ON may help to brighten a black box, but it introduces unwanted reflections. It can be challenging taking pics of Olivers... Thanks. John Davies Spokane WA
1 point
-
Wow! Very nice job. I paricularly like the light switch you installed in the nightstand top. Very clean lines. Love it!1 point
-
To be clear, you hard mounted that lamp in front of your emergency egress? On the other hand, it looks fantastic and incorporating that switch is great. You do really nice work and have a great eye for things.1 point
-
Please see link below: On-Board Jacks & Jack Points1 point
-
At 5’10” and sleepng feet to the rear, I find the length OK, the width is more bothersome since there is no room to just roll over. (The mattresses are not regular Twin sized, but Bunk sized - 30 inches.) You must lift your body and reposition.... At your height it would really be best to test one in person. If you buy a Two Bed trailer and find out you don’t sleep well, that would be very upsetting. A King would without a doubt give tons more room and sleeping comfort. Also you need to see if you can live with whacking your head in the head.... especially when using the toilet. I showed Mouse to a couple who really liked the design, but the severe lack of headroom was a 100% deal breaker for the husband who was 6’6”. The entry opening to the head is a low head knocker, as is the main entry, but at least the latter is well padded. The metal head door frame can be painful... Try before you buy! John Davies Spokane WA1 point
-
Fritz - I'm only 6' even so I'm perhaps not the person that can best answer your question based on length. I do have plenty of room at both the top and bottom. However, I can say that I originally started sleeping with my head towards the rear of the camper (at the rounded corner end) but changed to sleep in the other direction. I like to sleep with elbows out near my head. This caused me to bang one or the other elbow on either the nightstand or on the rounded corner. Once I flipped direction there have been no further issues. Bill1 point
-
I was already making a shopping list.1 point
-
I got one of those emails, and was concerned was not a legitimate email, so I talked to Heather and she said it was something new that was in the works. I had 1 (one) point, so now I guess I have none. Oh well. Stan1 point
-
You'd think that this would be the type of information in the "manual" that Oliver sends you home with...1 point


-
Recent Achievements
-


")


")


")


