Leaderboard


Popular Content
Showing content with the highest reputation on 02/23/2019 in all areas
-
I’m interested in this as well. I have Gaia GPS and Garmin for offroad stuff, but I’ve been looking for a simpler program to just plot routes for general vacation planning. I’m thinking about downloading Road Trip Planner to try - http://roadtripplanner.modesittsoftware.com . It’s Mac only, but if that works for you, it will export to GPS as well as Apple Maps and their own iPhone viewer. It’s from the same developer who makes the Ultimate Campgound maps that John Davies recently posted about. We usually use Apple Maps via Car Play in our truck and prefer it over Ford’s GPS even though it requires a cell signal. But it looks like Road Trip Planner might work offline as well.2 points
-
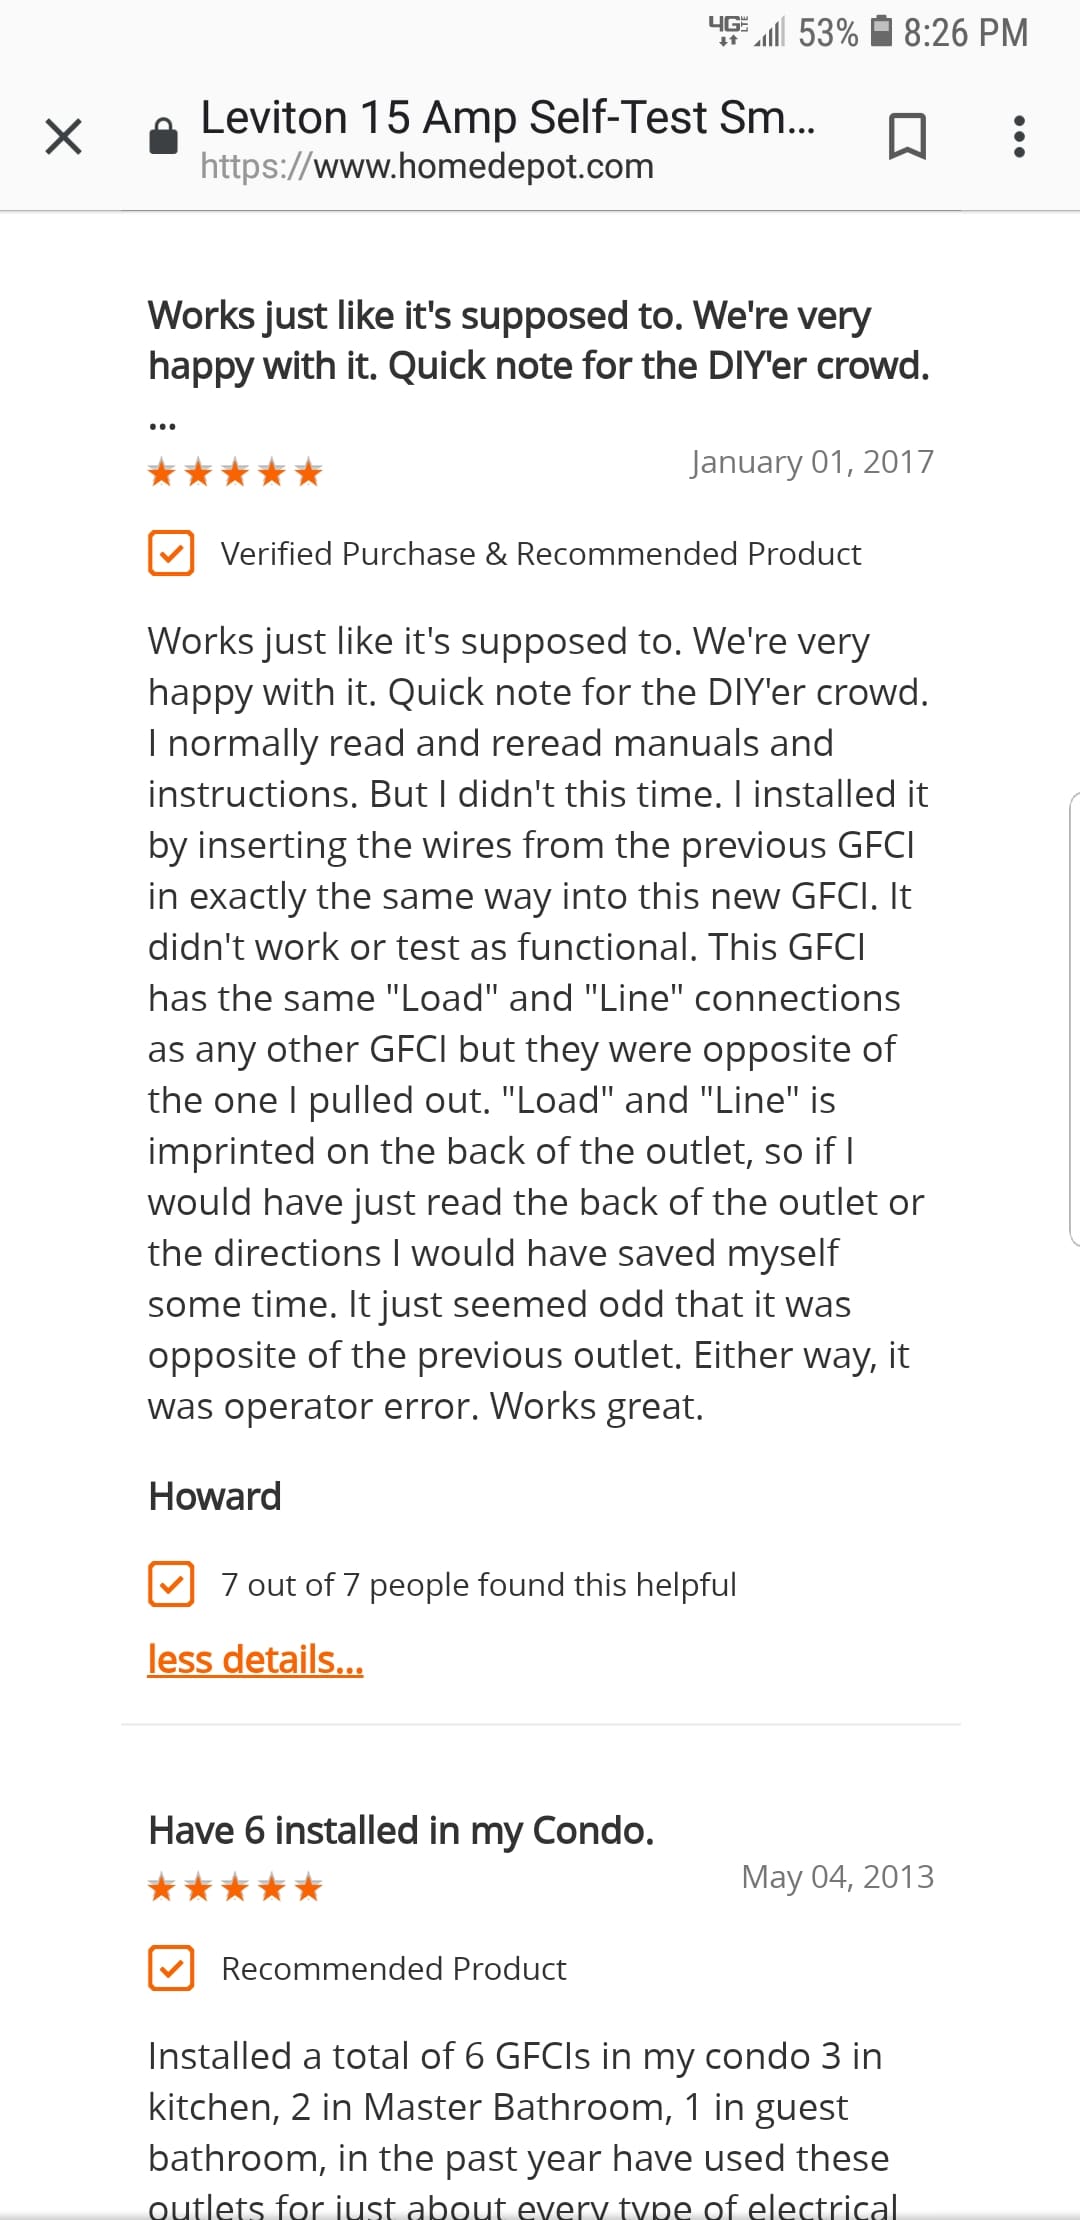
Sherry hit the ‘ole nail on the head (and probably should have hit my head with the hammer). The original outlet was faulty. The replacement (Leviton) was good. The replacer was faulty. Line and Load are arranged differently by these two manufacturers, as shown in the picture above. Note that the green ground terminals are arranged in the same relative position, which can lead to further confusion. Sherry, I would drink a toast in your honor but, as you know, they don’t allow alcohol at Ft DeSoto Park. Thank you to all who attempted to help through this thread.2 points
-
Hobo, I have mine parked on a concrete surface as well. I extend the trailers jacks (one at a time) to allow me to rotate each wheel 180 degrees. I do this about every 30 days to prevent flat spotting. Seems to work well. Those tires are crucial and I want to baby them. Good topic.2 points
-
There are numerous reviews to be found. http://rvlife.com/rv-trip-planning-apps/ I'm a wanderer, so Google Maps, Allstays and Harvest Hosts just to see what's up ahead whenever I get to somewhere I'm ready to stop.2 points
-
Hobo - You're looking at a fairly large "can of worms" with this question. See as many discussions here on the Forum regarding the use of the jacks/levelers as you can find and that should give you an idea of the various opinions on the subject of "lifting" the Oliver's frame. Other than simply leaving the Oliver on its wheels for long term storage, another method would be to use "tire supports" such as the Andersen levelers. Since these are curved they would not "flat spot" the tires as much as they would otherwise be if left on a plain flat floor. Bill2 points
-
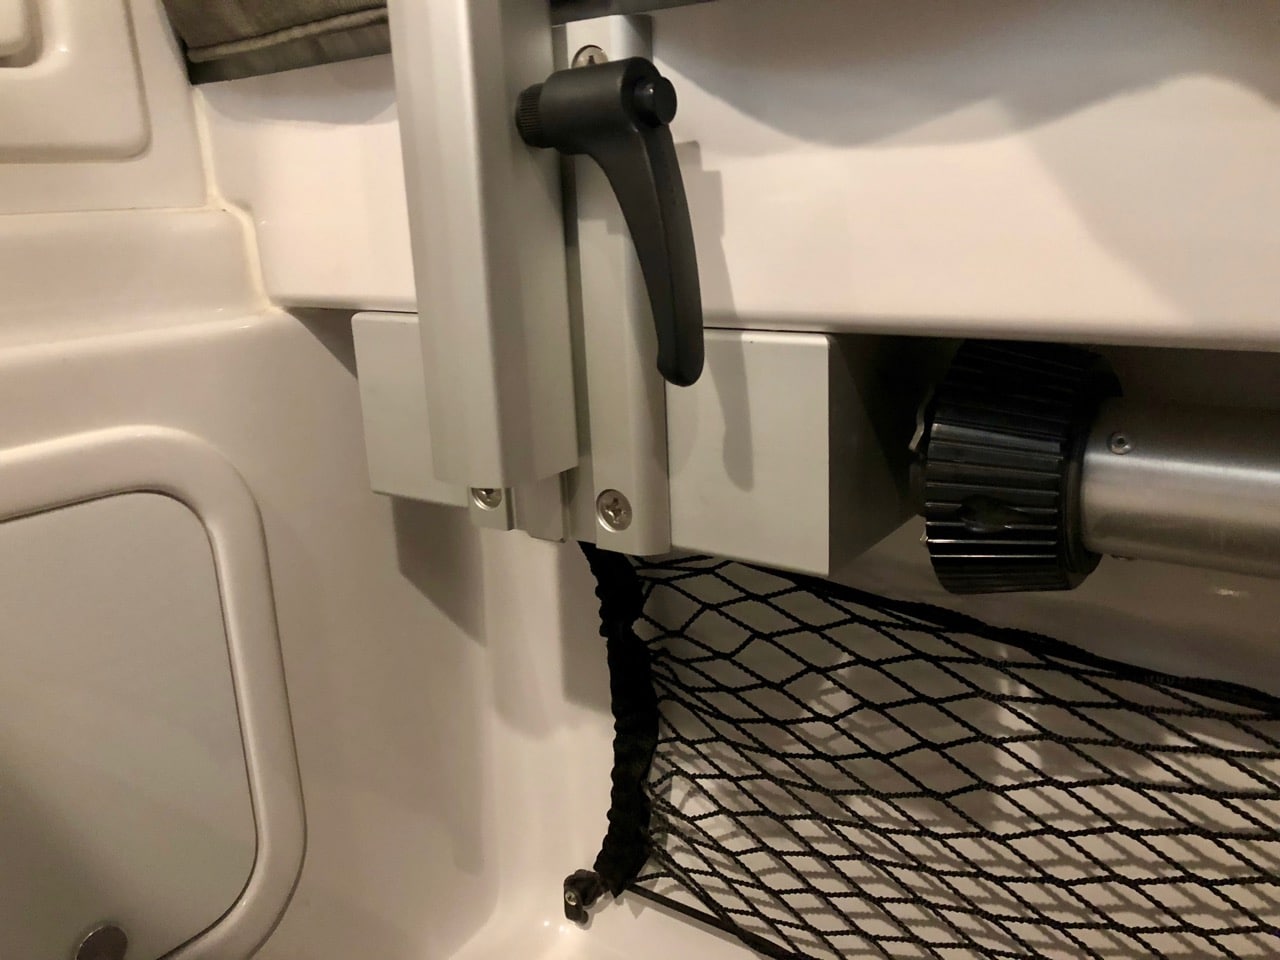
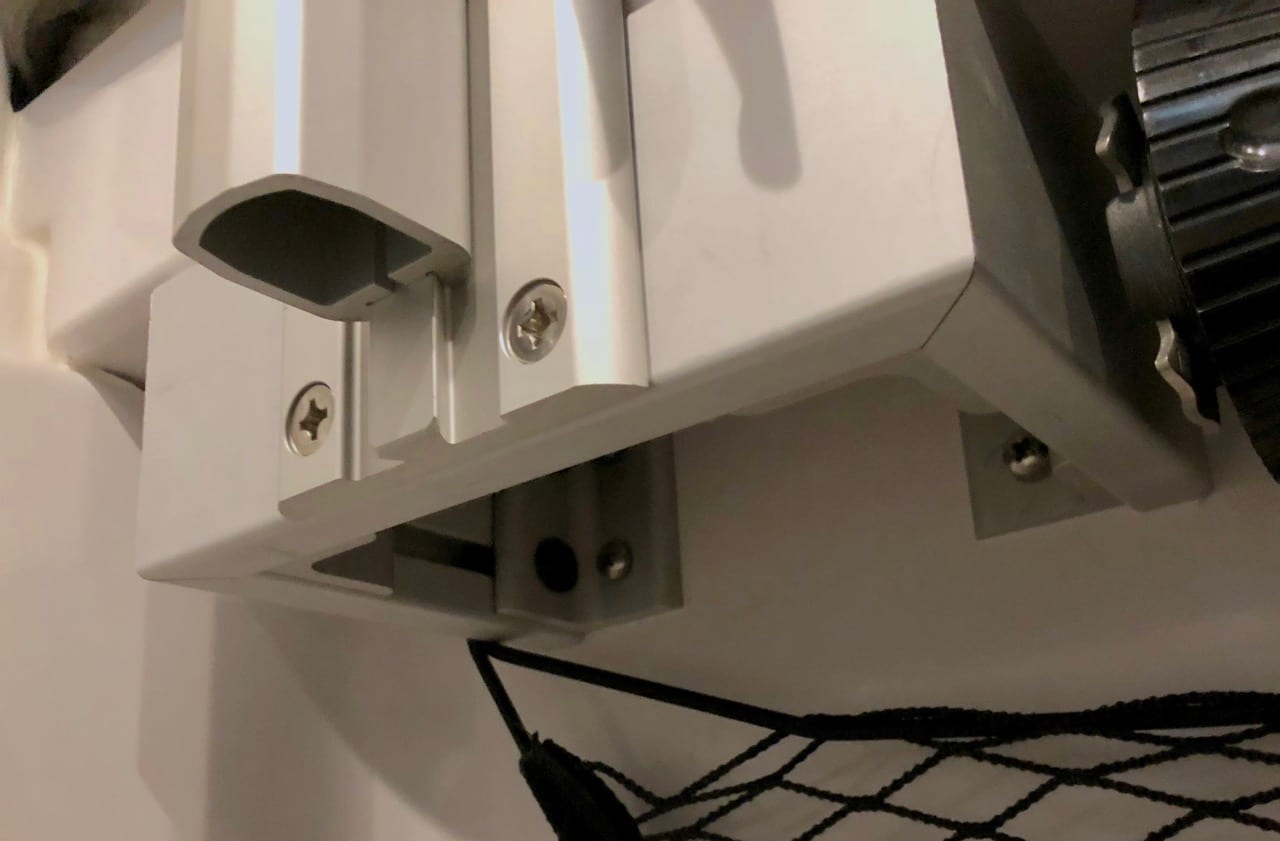
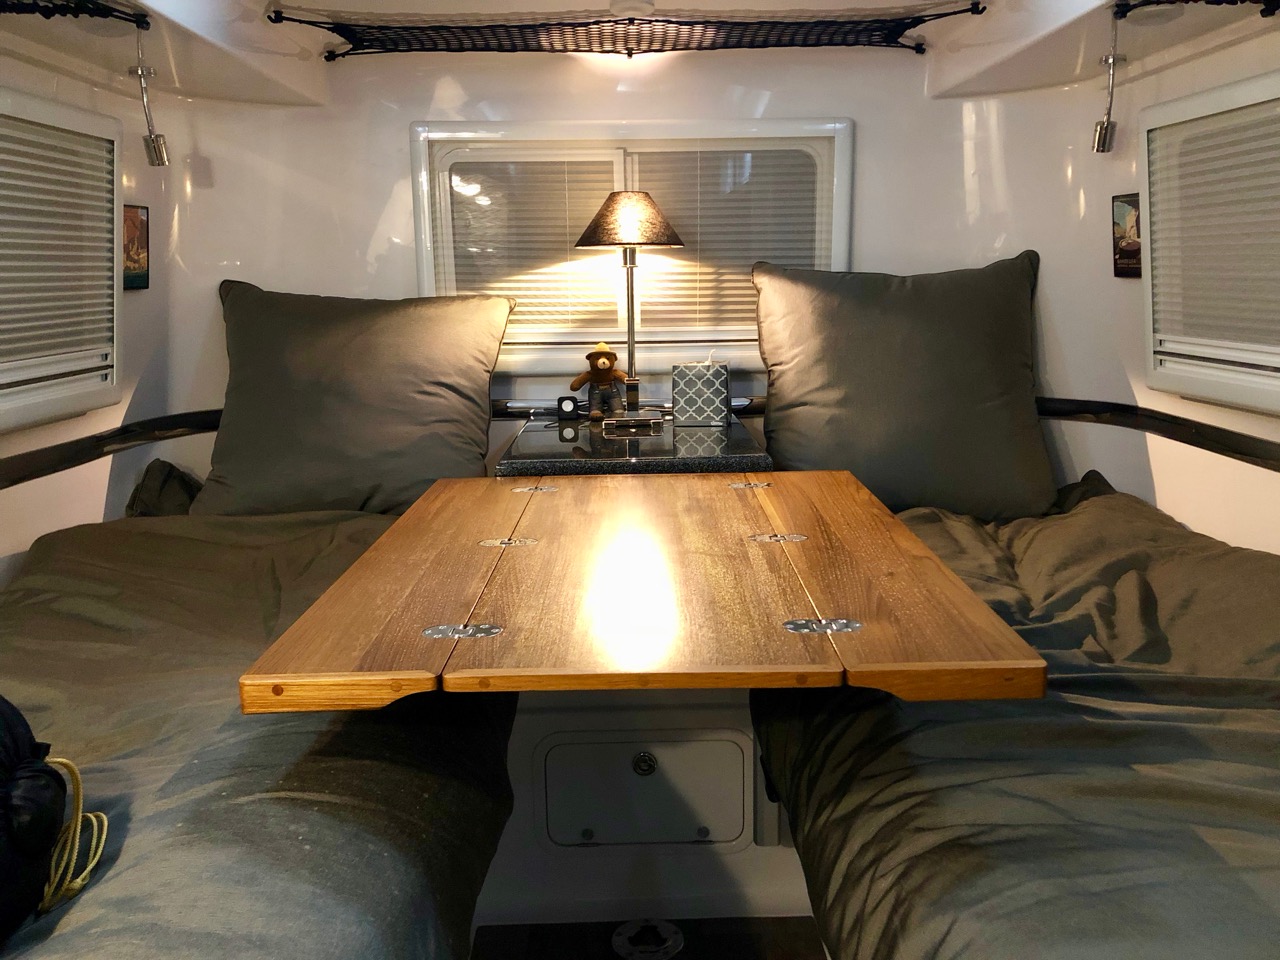
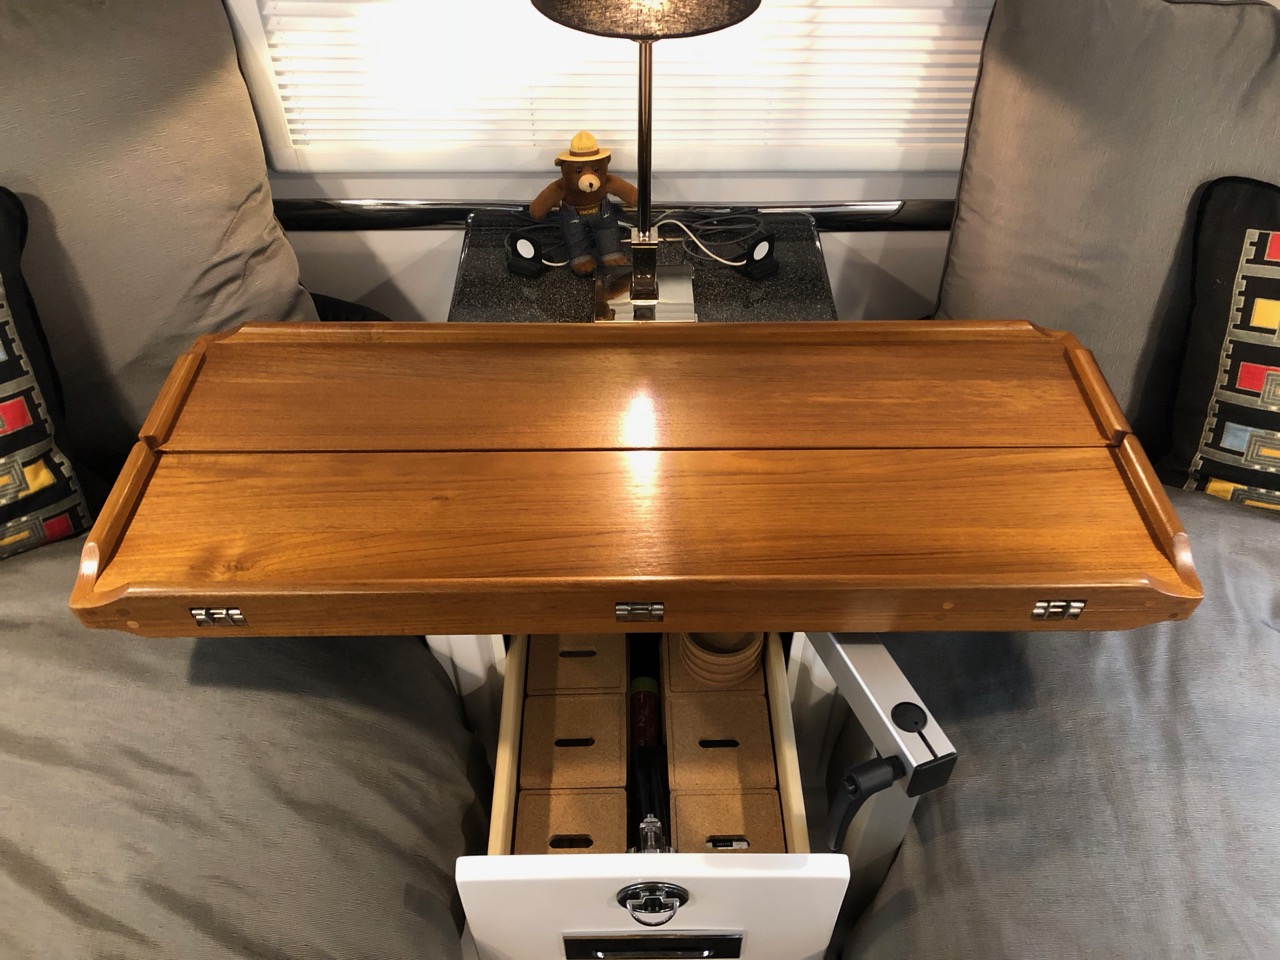
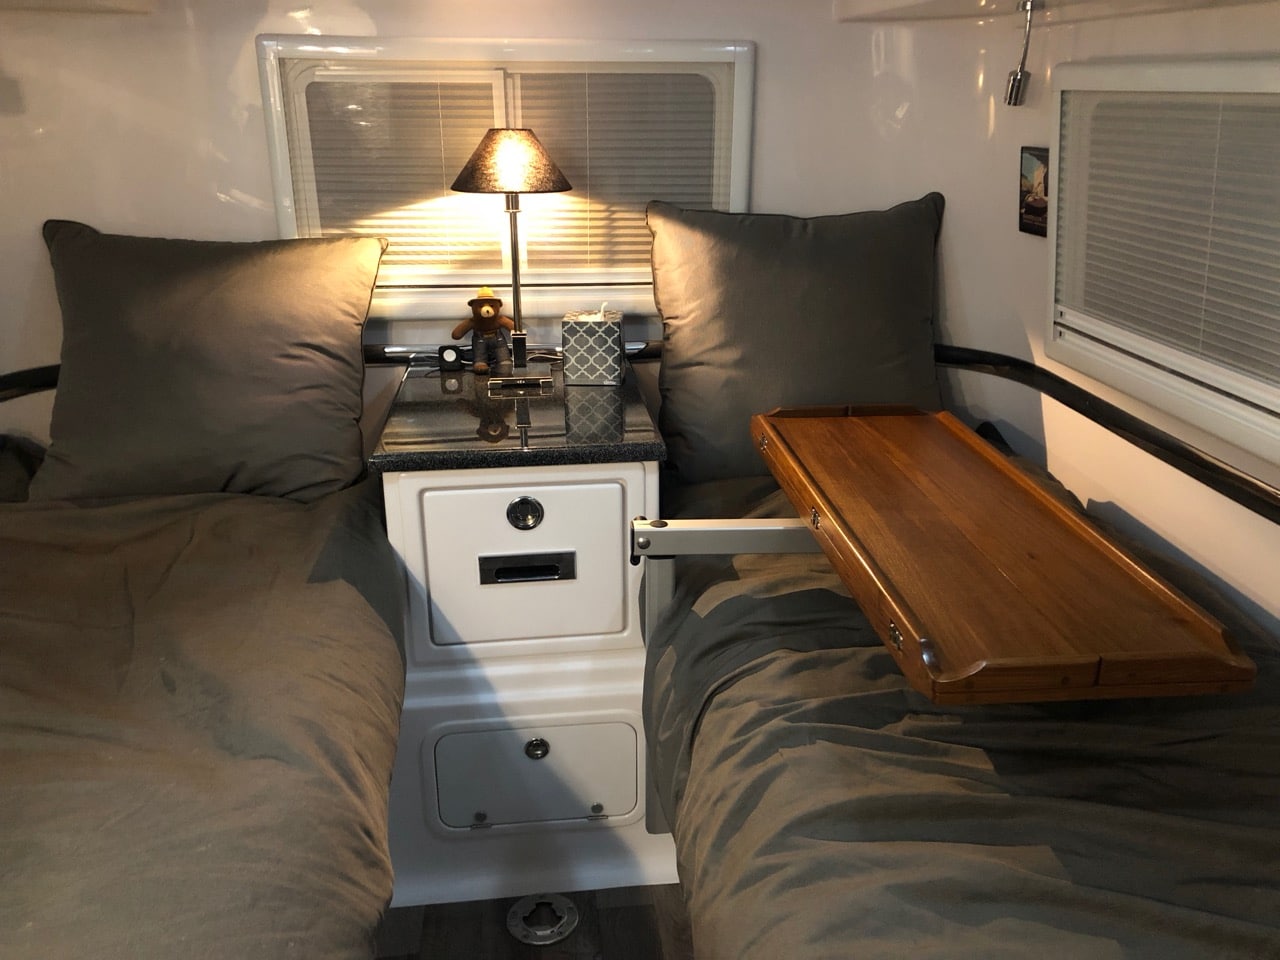
I think like a lot of Elite II buyers, we were torn between the twin beds vs the king. We chose the twin, but not so much for the size or comfort of the beds as it was the utility of nightstand and easy access to the overhead compartments. But we liked the idea of having a table and a large lounging area in the back, and so I set my mind on the idea of trying to have both. At first I designed a custom table for the back that would latch into the nightstand in the back with a pole in front, similar to how the dinette table works. I showed it to Oliver and they thought they'd give it a try, but as time went on and things got delayed or forgotten, I sort of gave up on that idea and asked if they would just sell me the standard table top and legs and I would figure it out. They did, and it was a big mistake since I could never figure it out. The table was just too heavy and bulky to put up and take down, and there was absolutely no place to store it. Plus the height with the standard legs was too short for the mattresses we had (another poor decision on my part). So on our first trip it was labeled the Albatross Table and it was just in the way the whole time. It didn't make another trip, just the two mounts screwed to the floor to remind me that not every problem has a solution. But the solution does exist in the Lagun table. I'd seen them before in the king bed model but I had sort of dismissed them as being too small to be of use. But that was before @rideadeuce started this topic about their upgraded table top. Their top was much larger, foldable, and just generally nicer looking than what I'd seen before; and so it clicked with me that with the Lagun mount, we could have a foldable table that could easily be stored or moved out of the way for access to the upper storage. Also the height could be whatever we wanted and unlike the table we had, could be quickly locked for travel. There were just two problems for us - the mount in it's normal location would block the nightstand drawer; and on top of that, we had opted for an access hatch to the basement right in that same spot where the Lagun is usually bolted to the hull. I needed a way to mount the table to the side somehow. So I made one of these - This contraption is made out of 15 Series extrusion from 80/20. I cut, mitered, and erector setted this little block and associated connectors to go beneath the bed overhang. The Lagun mounting plate (the vertical piece) bolts to the mount and then the whole thing gets bolted to the side wall under the bed in four places and to the bed overhang in four places. It looks complicated but if you have a miter saw and can play with Legos, you can build it. Here are some pics of the block in place so you can see how it mounts. The top two bolts on the Lagun plate bolt into the side of the bed extension, then there are two bolts on the block that secure vertically into the base of the extension, then another four bolts that go into the side wall of the base of the bed, opposite the basement. I marked and drilled for the two vertical holes first, then temporarily bolted it in place to mark all the other holes. You need to do this since not all of the surfaces are perpendicular to the trailer or one another. But the flat bottom of the bed extension runs parallel to the floor so if you use that as your starting point then the table top will end up parallel to the floor as well. The end result is extremely solid - The table top I chose is the 35" Nautic Sail top from Marine Teak. Look around on their site and you'll find a number of styles and sizes, any of which would be a great choice. (This is the same company as this one, btw, but they have more choices in table tops on their UK site.) I debated oiling it, but came to my senses and coated it in a couple layers of low gloss poly. Taking it apart to seal is no problem, but you do have to keep track of a number of shims that go under the hinges to make them flush to the wood. So here's the final result. I really like the versatility of the top. Use it folded, unfolded, bar height, table height, sideways, lengthways, stick it over the bed for travel or to get it out of the way, or...however. With the mounting plate where it is, we can raise the table hight enough to clear the nightstand and lower it enough that it sits on the bed locked in place for travel. As you can see, the drawer clears just fine. The table will work best once we have our cushions made to replace the mattresses, but we just did a quick weekend trip with it and it works well even as it is. And best of all, it fits in the closet -
 1 point
 -
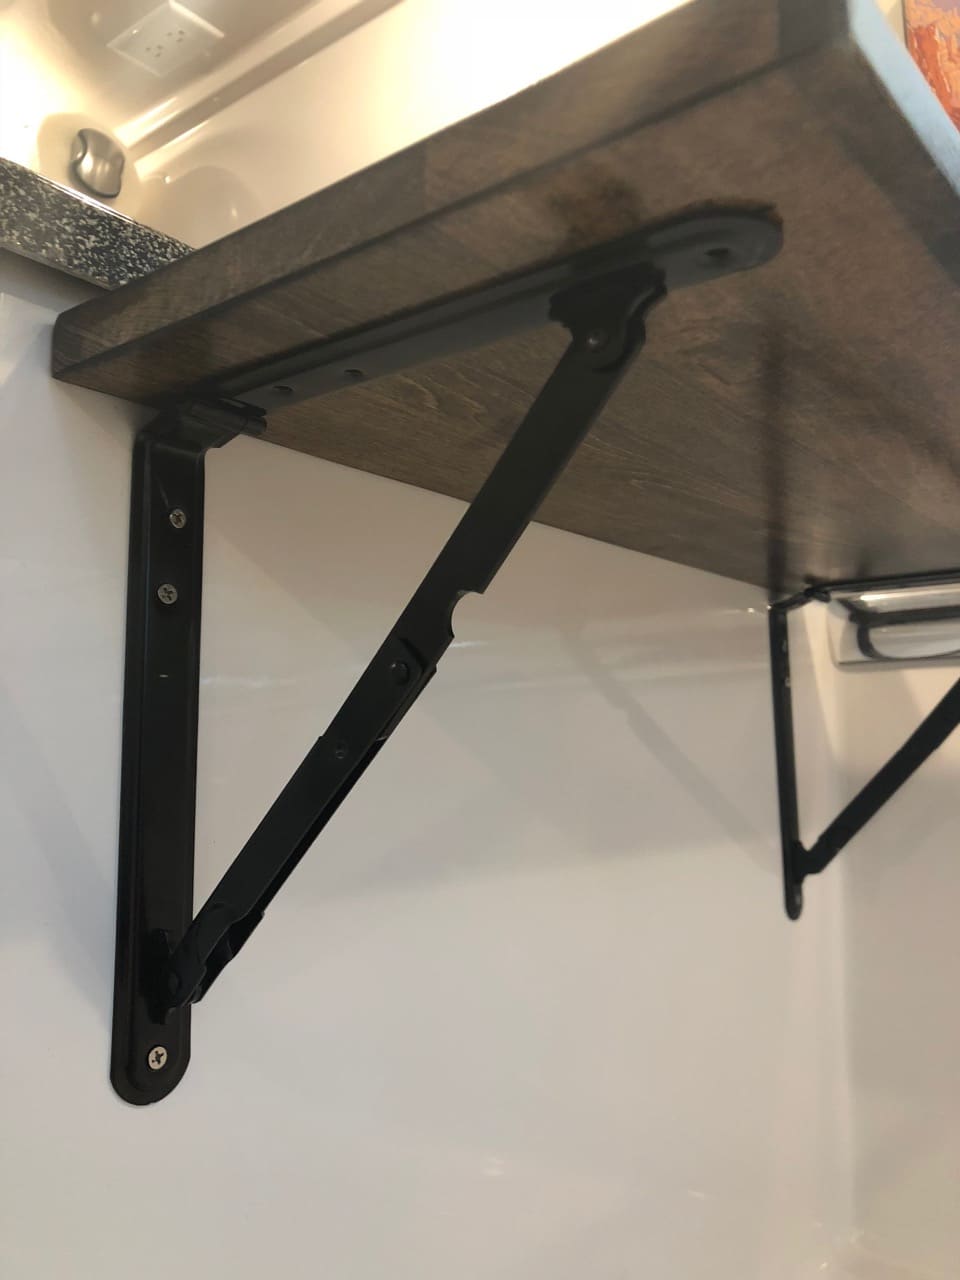
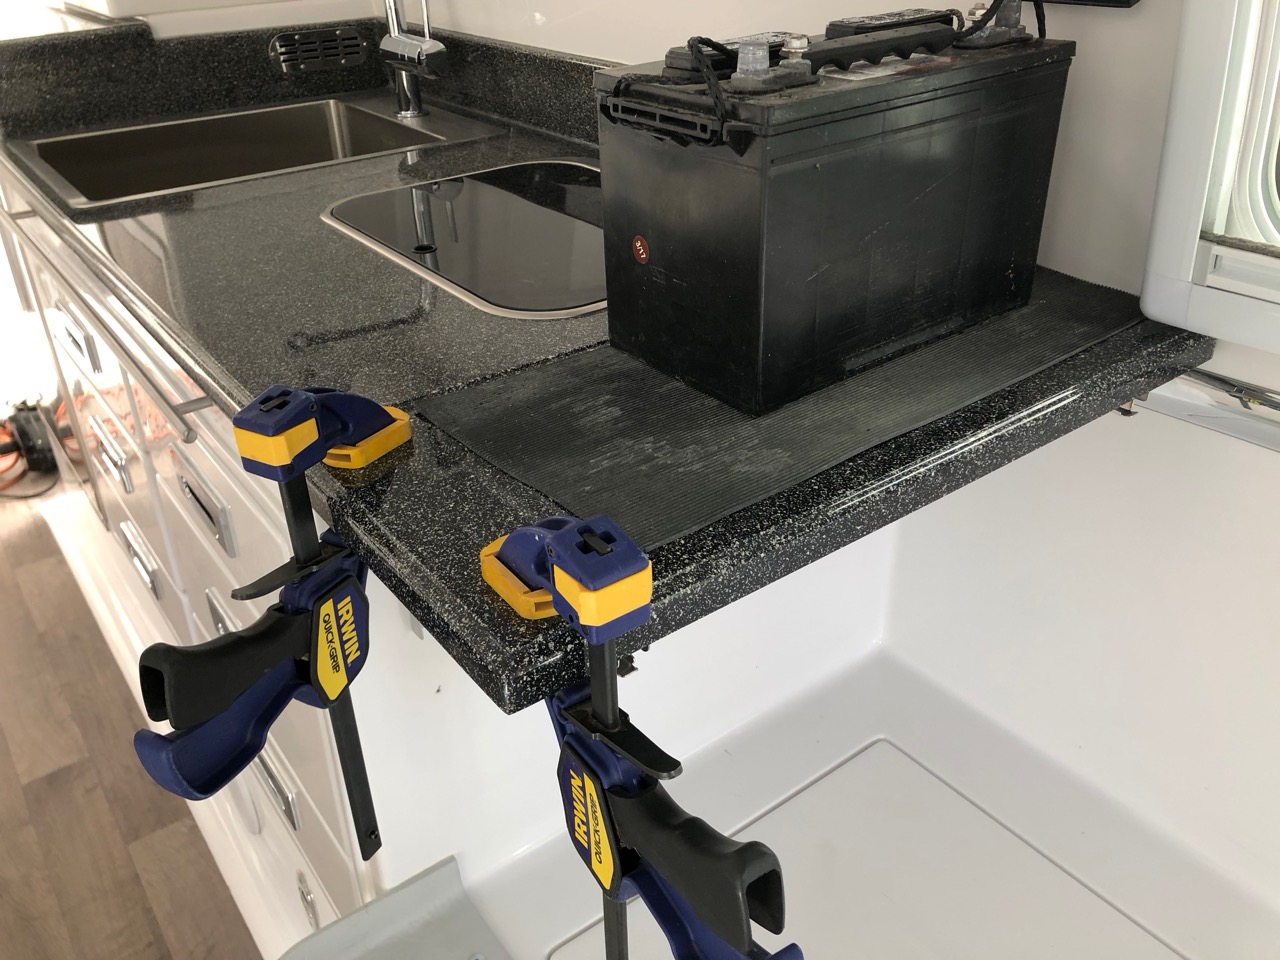
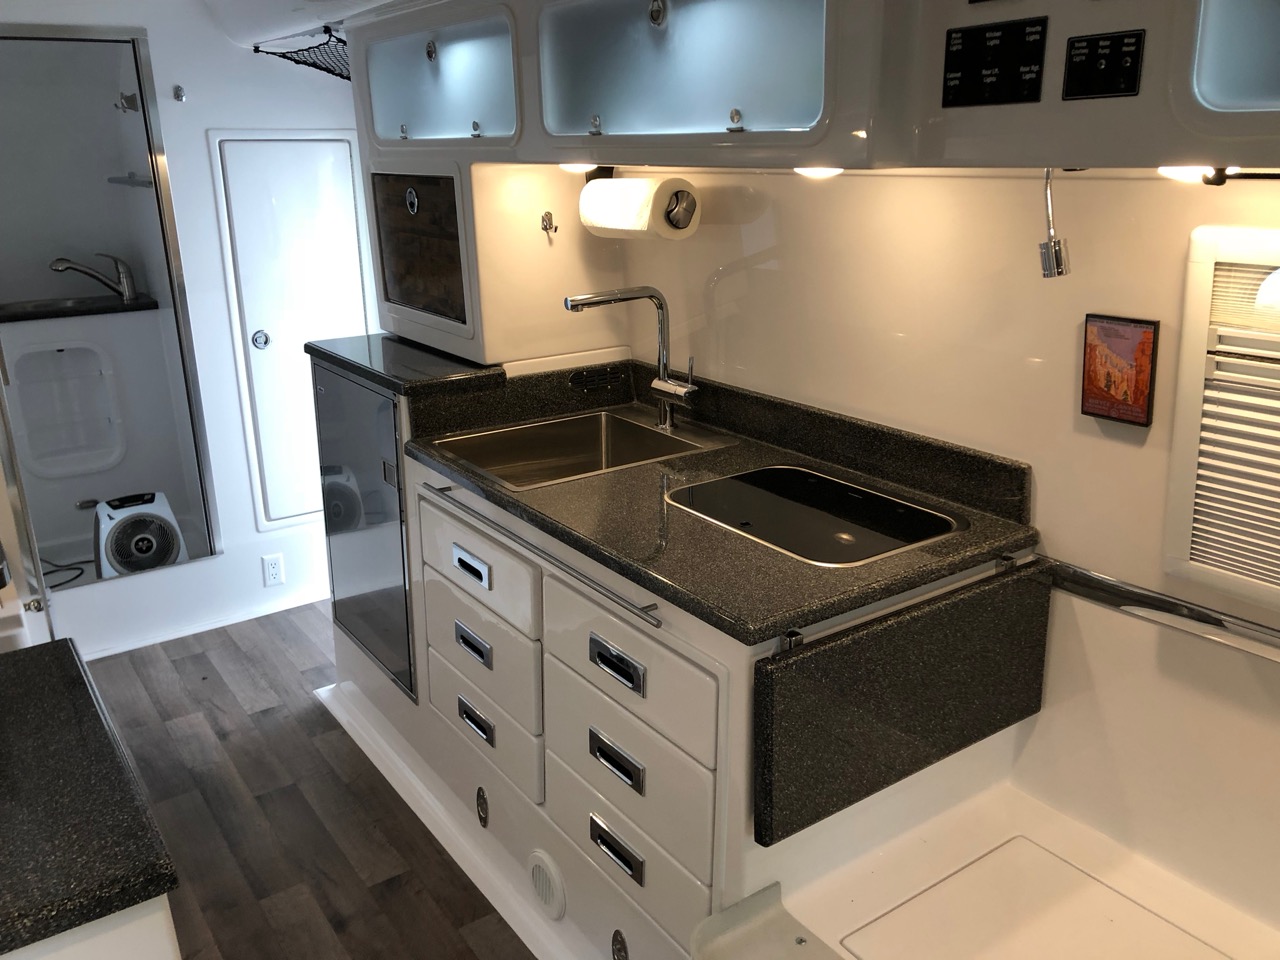
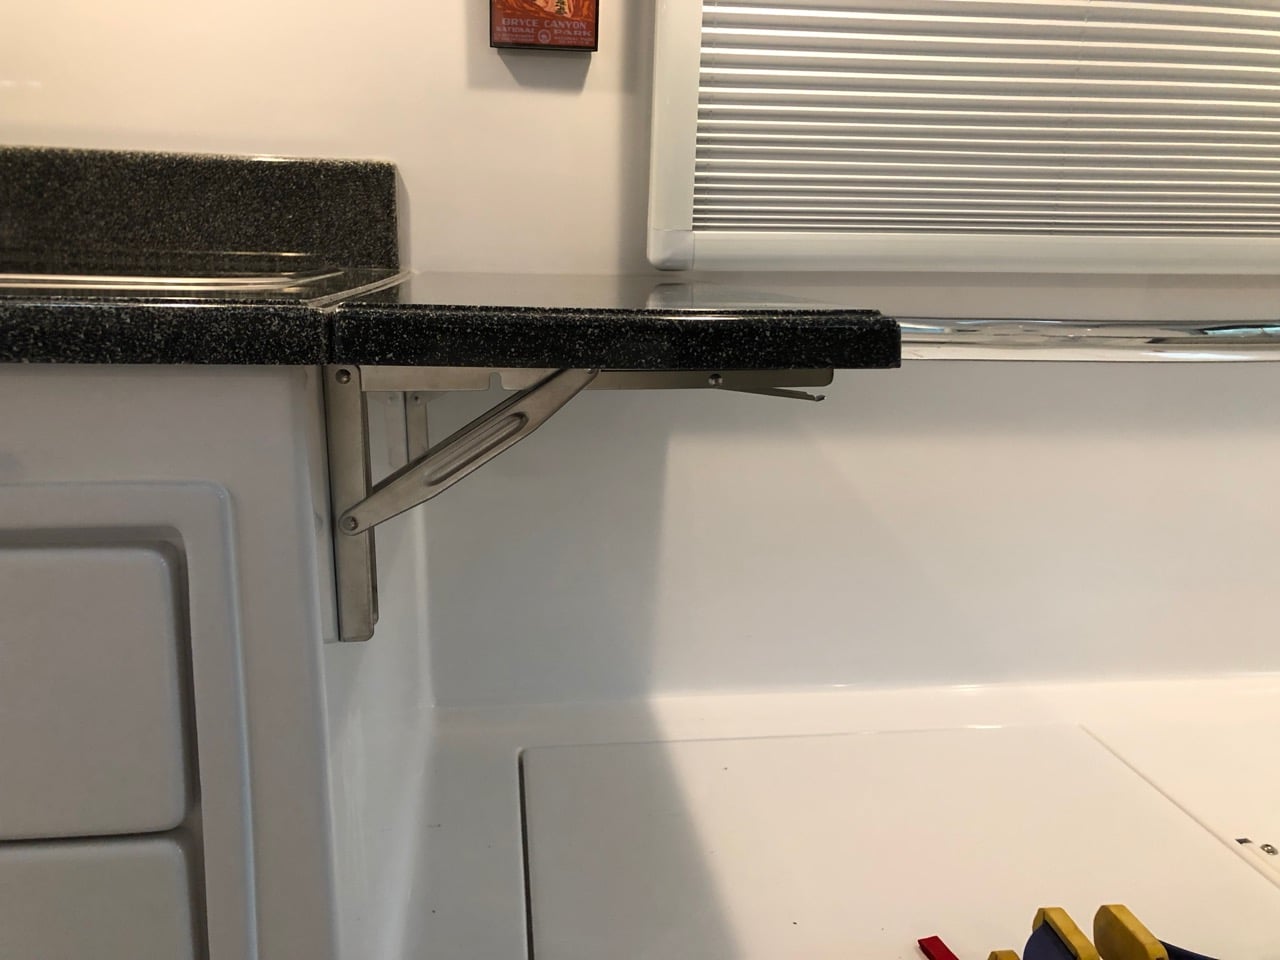
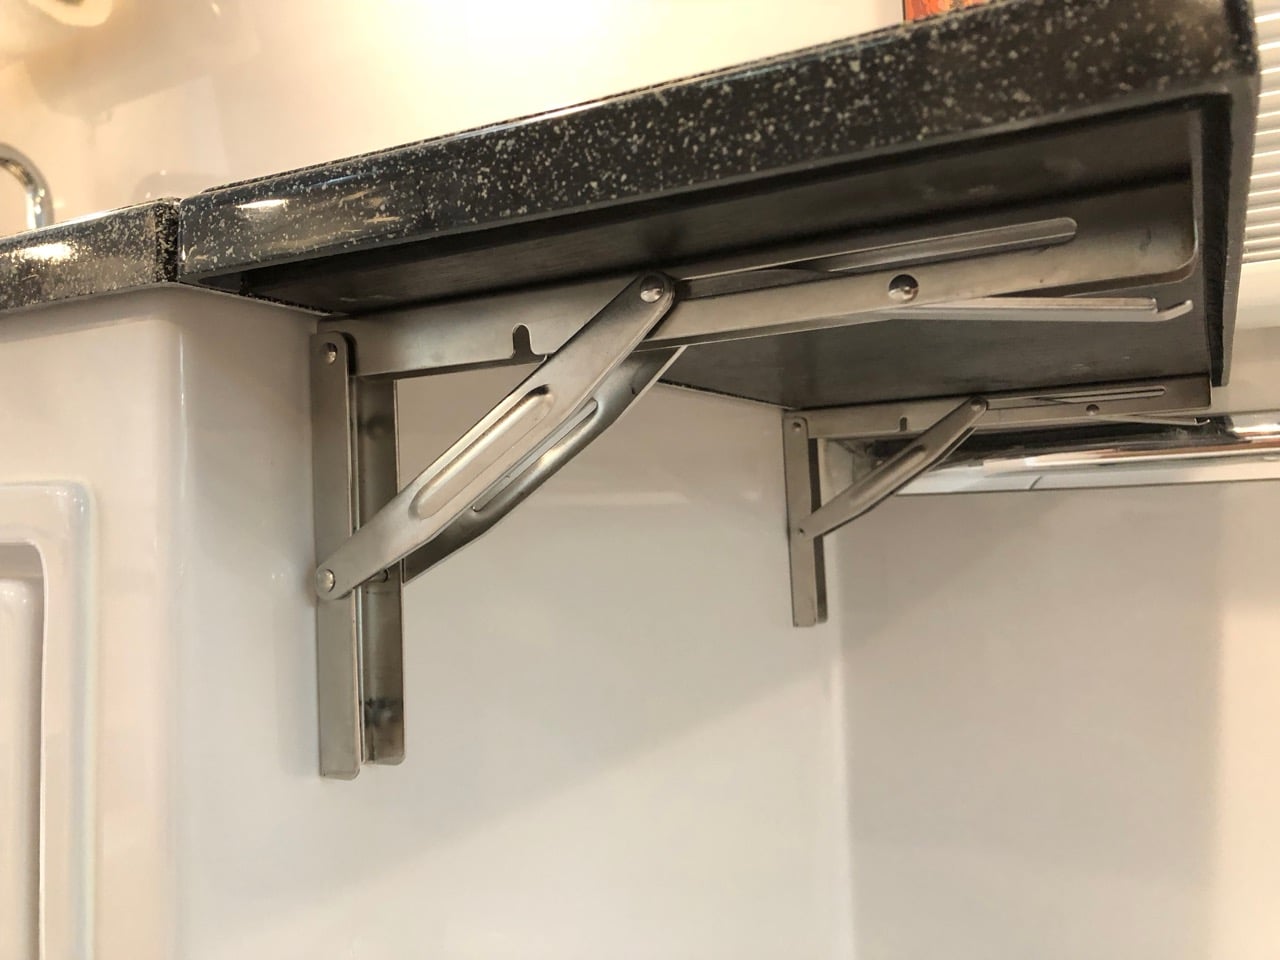
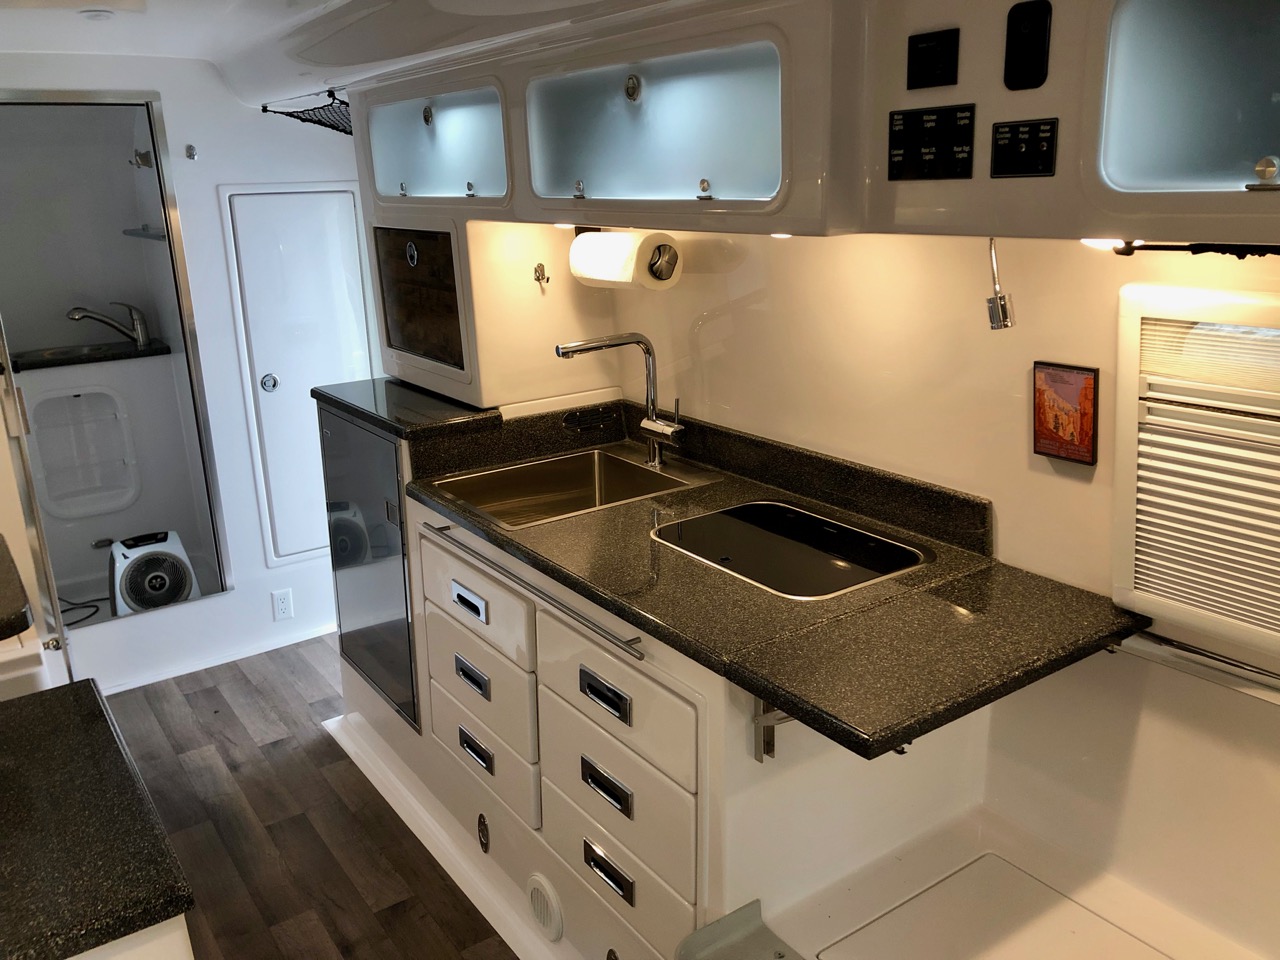
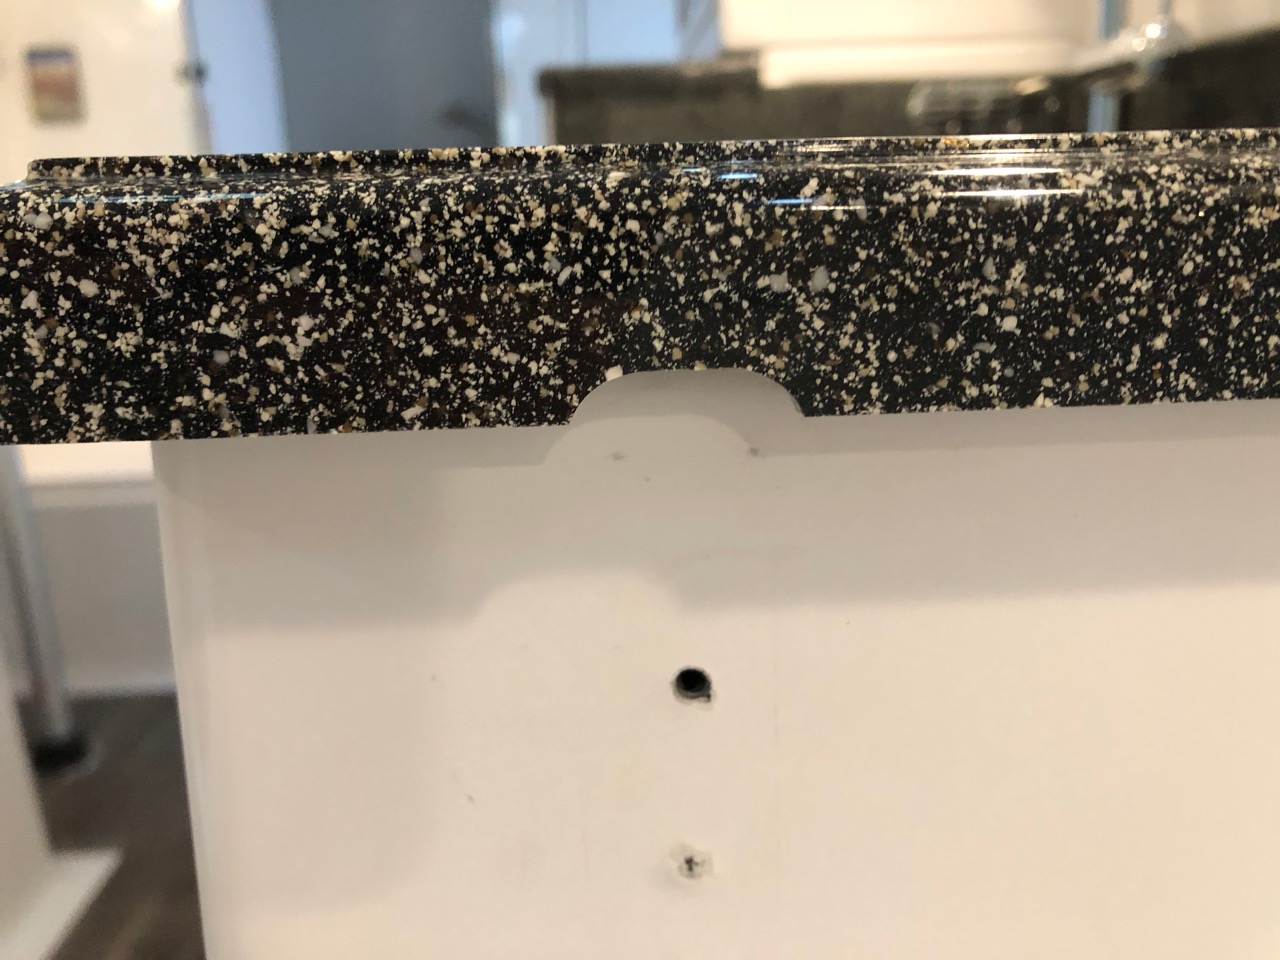
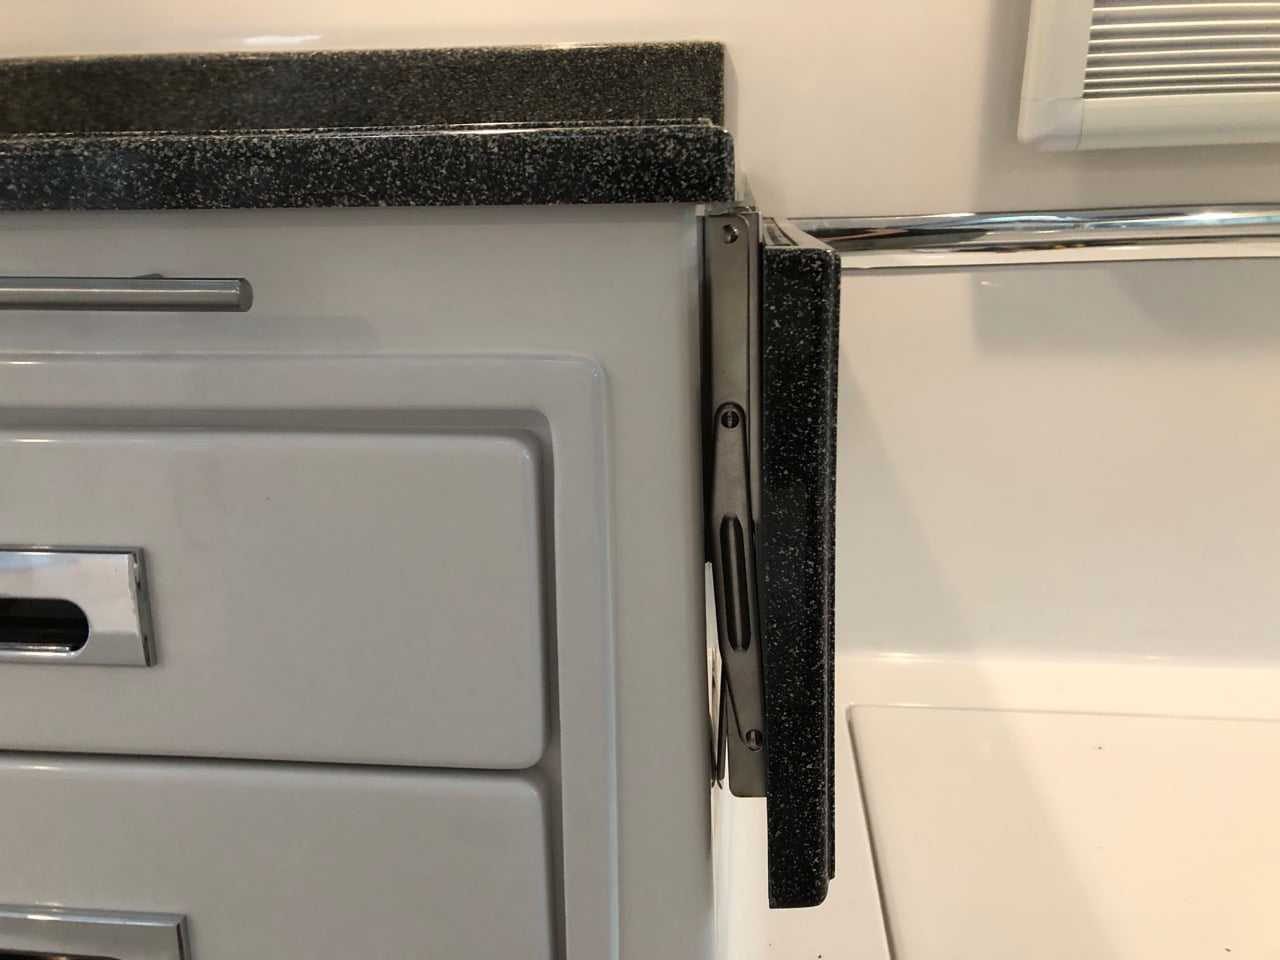
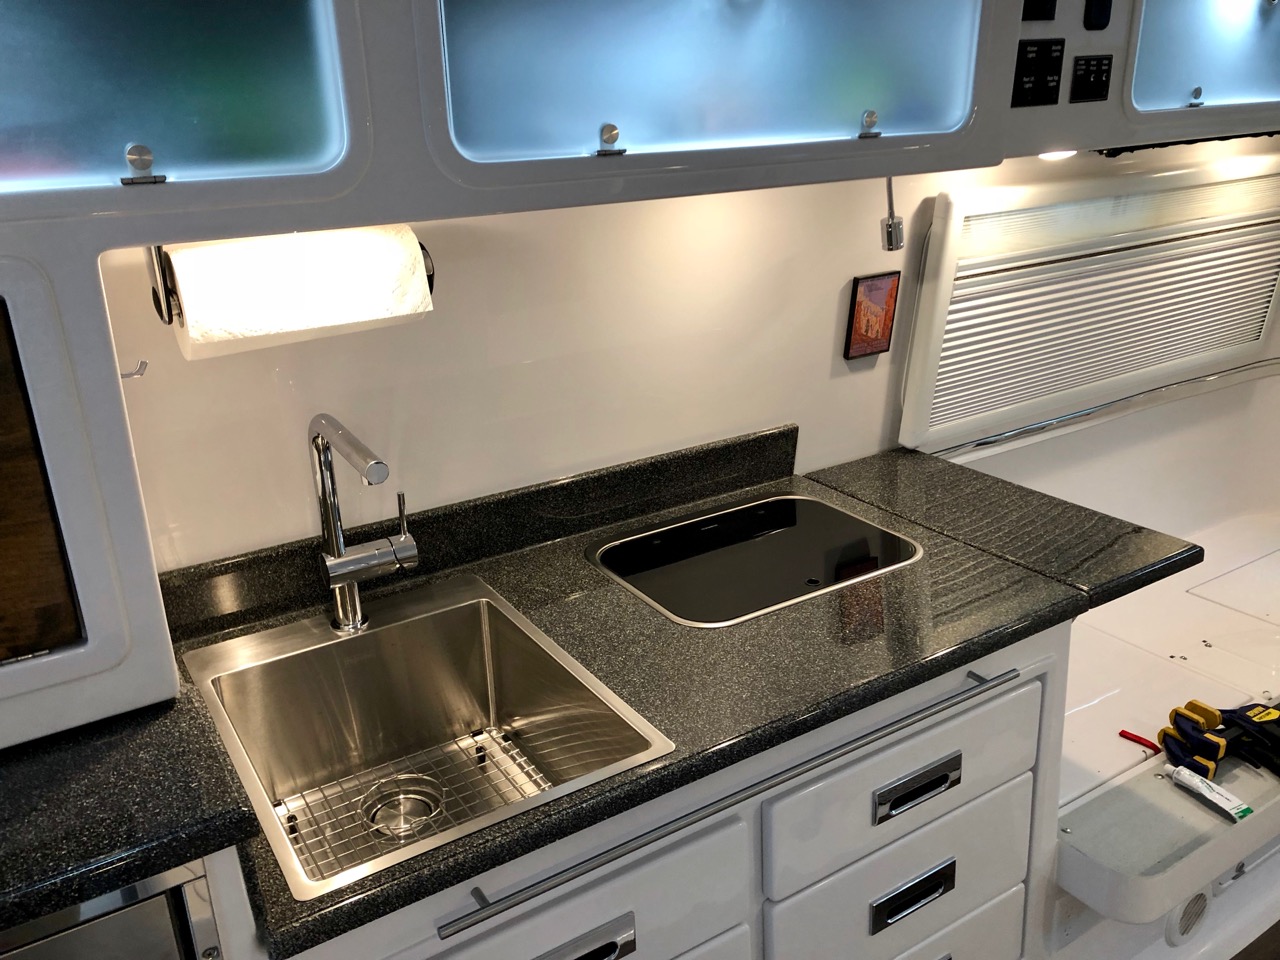
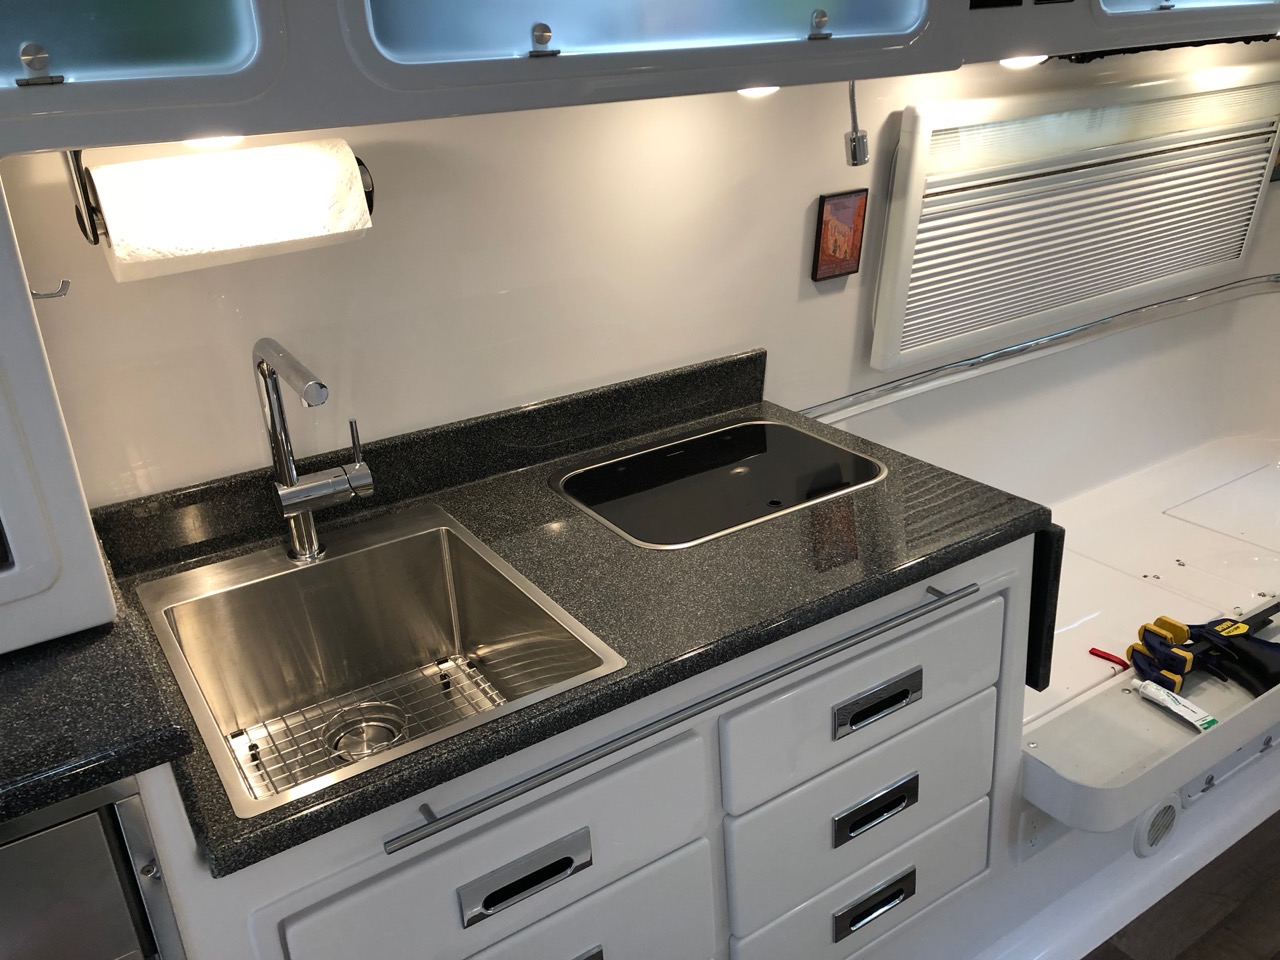
One of the things I asked Oliver to do for me was to install a 12" counter extension to the right of the cooktop that could be folded down when not in use. I figured we could use the extra counter space, plus I wanted a buffer between the cooktop and beds for splatter. This is what they came up with - This was perfectly fine and exactly what I was expecting, and we've really enjoyed using it. The only thing I didn't really like was that the hardware was finicky and just didn't work well. And the top ended up about 9" rather than 12", so it was a little small. And we had asked if they could make a piece of fiber granite to match, but they'd have to make a new mould for it so that wasn't going to happen. It also would have been nice if the extension were flush to the counter. So maybe a lot of problems. But we were happy with it nonetheless. But one day when I was running some wires through the pantry, I had removed the countertop beneath for access and just naturally set it down on top of the counter extension. Well, it fit perfectly; and thus, a new project was added to the list. I asked Oliver if they would sell me an extra top and picked it up when I got my trailer out of service a few weeks ago. I believe they charged $150 for it. Since I was redoing the top, I figured I'd search for better hardware as well. I found several options, but the ones that stood out were these from Amarine. They're super heavy duty and stainless steel. They work much better than what we had, and look nicer to boot. The only problem was that they were about a half inch too long for the countertop, so they'd have to be cut to size. But worth the trouble, so I ground the ends off a half inch. If you don't want to go through that trouble, my second choice was these, which are small enough to fit without modification. I cut a ½" piece of plywood that I could screw into to use as the base for the top. A ½" sheet will sit flush to the lip of the counter, which is what I wanted, but to make the countertop flush to the existing counter, it meant the hinges had to be high enough that I had to grind out a small notch for each hinge to clear. No big deal - btw, a Dremel with a small sanding cylinder works really well on the fiberglass, and leaves a smooth edge and no chipping whatsoever. Wear a mask. Here are the notches - The brackets are easy, just mark the holes, drill, and screw. I used ¾" #10 stainless on the bottom legs and ¼" #8's on the top. And 3M 4200 along each leg and on each screw going into the fiberglass to prevent it from backing out over time. Since none of the surfaces in the trailer are perfectly 90°, I needed to shim something to make the counter level. I considered grinding down the latch that holds the brackets at 90°, but that would have been difficult and if I ground off too much, I'd have to buy another bracket. Instead, I decided to shim between the plywood and fiber granite and then glue the top to the plywood with more 3M 4200, which I'm using so much that I've started referring to it around the house now as Snowball Glue. It's only about ⅛" max to shim - I used some stainless washers that I had lying about and just glued them down in each of the corners. I found that the top was a bit warped, so I had to weigh it down while the glue set - See, I knew lead acid batteries still had a use. I let it sit overnight and in the morning, I had what's in the photo above. Cool. BTW, if you want to do this and have mattresses, then you'll want to check their thickness to make sure the extension will clear when folded. Measure down 12" from the bottom lip of the counter. If your mattress is below that, you're good. If you have cushions, then no problem, but you'll need to move one of the back ones out of the way when raising or lowering the top. More pics -
1 point
-
Roadtrippers may be what you want for planning a driving route, as it gives you distances and estimated driving times. They have a web site, and if you create an account and create a trip on the computer, it will sync with their highly rated iPhone app. I don't know about your F-150 GPS, but the iPhone app will open up your trip for GPS navigation with Apple Maps or Google Maps. My reason for using Roadtrippers is that they can show you quirky stuff near your route, like weird museums, ghost towns, or waterfalls. We have used Roadtrippers to find interesting stops during the day, part way through our drive. Roadtrippers have a lot of trip guides already put together, which can be useful to browse for travel ideas. They seem to have partnered with KOA and with Airstream, as they have KOA-branded and Airstream-branded travel guides. If you sign up for an account, you will get a weekly email newsletter. For most web sites, such a newsletter immediately provokes me to hit the unsubscribe button. Instead, I have found the Roadtrippers newsletter interesting, and sometimes I have saved links to trips or destinations in my Ollie travel document. When Spike asked about Southern Utah travel, I posted the link I had saved to a Roadtrippers guide to Utah Highway 12. The service is free, and their business model appears to be to get you to book hotels and restaurants from their site or app. They now have a premium version, Roadrippers Plus, for $30 per year, which I have not investigated.1 point
-
We do the same thing except rotate 90 degrees every 30 days.1 point
-
Edit: So you have no issue on propane with the dinosaur board except controlling the temp? Does the dinosaur board have a lock out after 3 tries of ignition failure which it should? If so that's weird since it was replaced but sounds like a control board issue. If the "Check" light is coming on it sounds like a ignition problem. The fridge will try ignition 3 times before it sends that fault and turns on the check light. Then it is locked out and has to be reset by turning it off then back on. It just sounds like a propane issue to me since they replaced it. I know you said you have replaced the regulator. Which requlator did you replace it with? I have had lots of problems over the years with the model that was supplied on our trailer that looks like this. https://www.amazon.com/Fairview-Propane-Automatic-Changover-Regulator/dp/B06ZY5W3R7/ref=mp_s_a_1_14?ie=UTF8&qid=1550929872&sr=8-14&pi=AC_SX236_SY340_FMwebp_QL65&keywords=rv+regulator A few campers ago I started replacing them with this one and have not had a problem with them. https://www.amazon.com/MARSH-EXCEL-MEGR253-Change-Regulator/dp/B00KPR9Q30/ref=mp_s_a_1_5?ie=UTF8&qid=1550929872&sr=8-5&pi=AC_SX236_SY340_FMwebp_QL65&keywords=rv+regulator&dpPl=1&dpID=41R8vvkYz%2BL&ref=plSrch The only other thing I would try is to replace the thermocouple that senses the flame. I know it's new but it just sounds like you are losing the flame or not sensing the flame and causing a fault that way. I'm sure after all this time you have tried a differant propane tank and propane supplier.1 point
-
I looked up your new gfci. A couple reviews noted that the load and line are reversed from the original gfci the users were replacing. Could that possibly be your case? We don't have any of your particular type in our home or in the trailer. Also comments about removing the yellow tape from the load side. I'm not the engineer in our family, that's my husband. But, he's taught me to always look for the simplest solution first. And, look for what has changed. I'm sure you have checked the power at the pedestal? With a tester? You've probably already investigated all this, but maybe it will help someone else? Good luck. If all else fails, plug the Keurig in on the picnic table, enjoy your stay at beautiful desoto, and make an as appointment with camping world in port richey. They're much better, imo, than lazy days or most of the local shops in Hillsborough and pinellas, especially if they are on your route. Good luck. And keep us posted. Sherry
1 point
-
I agree with all the posts and thanks. I tend to go overboard on these and other items, always checking tire pressure and balance anything to make live on the road easier. Another key point on my purchase of the Ott was the wheel tire combo. You don't find this set up on travel trailers, most are all fitted with the China bombs. A/S. Yes a tire monitor system is on the buy list.1 point
-
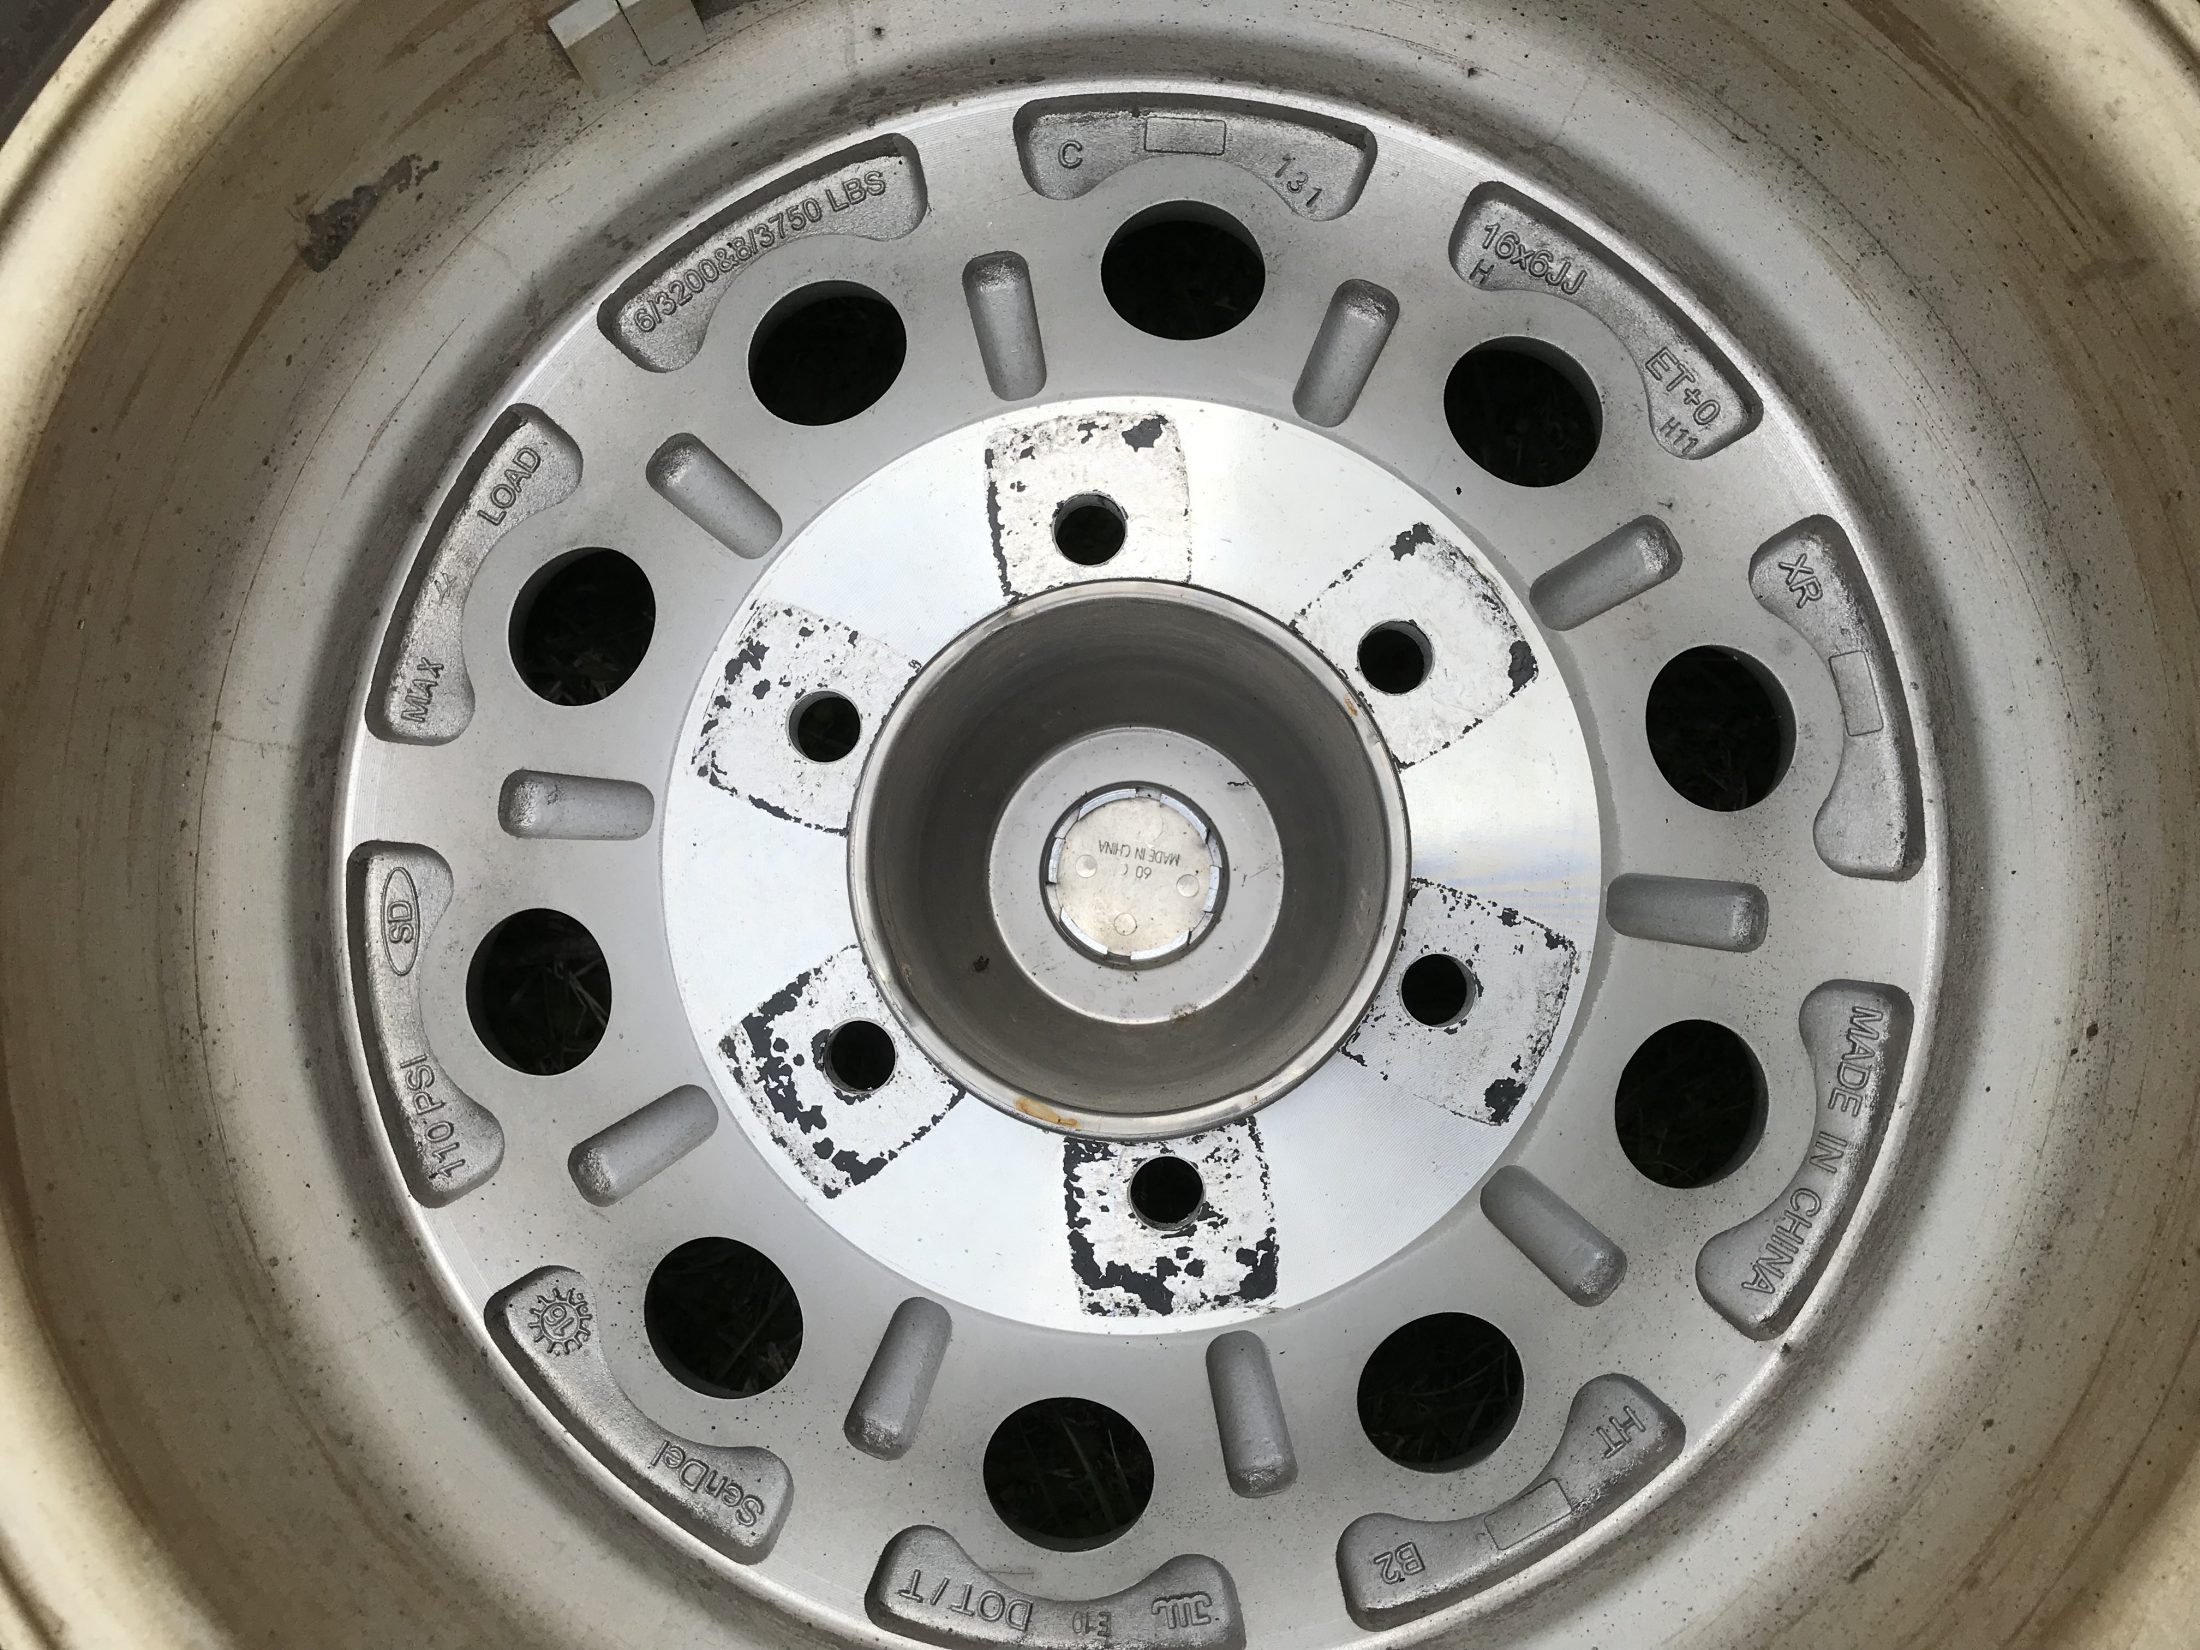
Took a photo of the information cast into the back of my hull number 208 LEII wheels. 110 psi is listed as a maximum. I run 60 psi in all four tires. I could be wrong but, I would think that it is harder on the bearings/tires when making a tight turn with really low inflation pressures.
1 point
-
I lost all of my 110v outlets when on shore power last year. I checked everything I knew to check. Finally I took it to my local RV repair guy who found a lose connection in the silver junction box next to my inverter. There were also a couple of other lose connections at the fuse box. Once he tightened everything the problem was solved. You might just systematically go through your wiring and ensure everything is tight. I’m sure my problem was from the vibrations of many miles on the road, if things are not tightened down it won’t take much for things to get lose. Mike1 point
-
The modifications they did for our camper were completed during the build if we requested them and they were approved before the trailer was too far down the production line. A few things the service department did because I requested them too late. I found that totally understandable. I am sorry to hear the answer is mostly “no” now. I too love your logo!1 point
-
Appreciate wheel maximum pressure information in this thread. We have Commercial TA tires on 5200 pound capacity axles, Hull #075. Could not find a load/pressure chart for BFG Commercial TA LT225/75R16 E tires yet, except for maximum load 2680 pounds each @ 80 PSI cold. Found a Michelin load/pressure chart for Michelin XPS Rib LT225/75R16 E. Maximum load 2680 pounds each @ 80 PSI cold. The following chart shows Michelin LT XPS Rib reduced pressure tire capacities. http://www.michelinrvtires.com/reference-materials/load-and-inflation-tables/#/1 point


-
Recent Achievements
-


")


")


")


